Explore Scientific WSH4003 Mode D'emploi

Explore Scientific WSH4003 Mode D'emploi

Avec capteurs multiples

Publicité

Les langues disponibles
  • FR

Les langues disponibles

  • FRANÇAIS, page 23

Liens rapides

WEATHER STATION WITH MULTIPLE SENSORS
STAZIONE METEO CON SENSORI MULTIPLI
WETTERSTATION MIT MEHREREN SENSOREN
STATION MÉTÉO AVEC CAPTEURS MULTIPLES
ESTACIÓN METEOROLÓGICA CON VARIOS SENSORES
WEERSTATION MET MEERDERE SENSOREN
Art.No.: WSH4003
EN INSTRUCTION MANUAL ............... 2
IT
ISTRUZIONI PER L'USO ................
DE BEDIENUNGSANLEITUNG ...........
FR
MODE D'EMPLOI
ES
MANUAL DE INSTRUCCIONES
NL MANUEEL INSTRUCTIE
........................
....
...............
9
16
23
30
37

Publicité

Table des Matières
loading

Sommaire des Matières pour Explore Scientific WSH4003

  • Page 1 STAZIONE METEO CON SENSORI MULTIPLI WETTERSTATION MIT MEHREREN SENSOREN STATION MÉTÉO AVEC CAPTEURS MULTIPLES ESTACIÓN METEOROLÓGICA CON VARIOS SENSORES WEERSTATION MET MEERDERE SENSOREN Art.No.: WSH4003 EN INSTRUCTION MANUAL ....2 ISTRUZIONI PER L’USO ....DE BEDIENUNGSANLEITUNG ... MODE D‘EMPLOI ......
  • Page 2: General Warnings

    ABOUT THIS INSTRUCTION • — Do not expose the device to high temperatures. Use only the MANUAL recommended batteries. Do not short-circuit These operating instructions are to be the device or batteries, or throw them into a fire. considered a component of the device. Excessive heat or improper handling could Please read the safety instructions and the trigger a short-circuit, a fire, or an explosion.
  • Page 3: Product Overview

    PRODUCT OVERVIEW 1.Press [ SNZ / LIGHT ] to activate the backlight or to activate the snooze function to delay the alarm for 5 minutes. 2.While in normal display mode, press [ UP ] to check max. and min. temperature. While displaying max.
  • Page 4: Lcd Display

    BUTTON DOWN MODE SNZ/LIGHT ALARM MODE Turn on Check max. and min. Enter into backlight temperature. Check time setting Toggle between Clear all memory alarm time Select PRESS SNOOZE outdoor sensor 。 F 。 C when display Turn Alarm when alarm channel 1-3 max.
  • Page 5: Getting Started

    GETTING STARTED 4. RCC receiving will automatically start from 1:00 – 5:00 every night. Auto receiving function will cease if it is successful. If it does not INSERT BATTERIES receive the RCC signal, it will receive in next 1.Remove the battery door from the back. day.
  • Page 6 ALARM SPECIFICATIONS SETTING/ADJUSTING ALARM TIME 1. Press [ ALARM ] to display the alarm time. MAIN UNIT: 2. Press and hold [ ALARM ] button to enter alarm setting mode. 3. The setting parameter will flash. Dimensions 4. Press [ UP ] or [ DOWN ] button to set the 141 x 21 x 124 mm (L x W x H) desired data.
  • Page 7 OUTDOOR SENSOR: NOTES ON CLEANING • Remove the batteries before cleaning. Dimensions: • Only use a dry cloth to clean the exterior of the 50 x 25 x 95 mm (L x W x H) device. To avoid damaging the electronics, do not use any cleaning fluid.
  • Page 8: Warranty & Service

    — at a local collection point or in the retail market. Disposal in domestic waste violates the Battery Directive. Batteries that contain toxins are marked with a sign and a chemical symbol. MANUAL DOWNLOAD: Cd ¹ Hg² Pb³ www.bresser.de/download/WSH4003 battery contains cadmium battery contains mercury battery contains lead...
  • Page 9: Avvertenze Generali

    INFORMAZIONI SUL MANUALE DI • RISCHIO DI INCENDIO/ESPLOSIONE — Non esporre il dispositivo a temperature elevate. ISTRUZIONI Utilizzare solo le batterie consigliate. Evitare Il presente manuale è parte integrante del che possano verificarsi corto-circuiti a carico prodotto. del dispositivo o delle batterie. Non gettare il Non azionare il dispositivo prima di aver letto dispositivo o le batterie nel fuoco.
  • Page 10: Descrizione Del Prodotto

    DESCRIZIONE DEL PRODOTTO 1.Premere [ SNZ / LIGHT ] per attivare la retroillum inazione o posticipare la sveglia di 5 minuti. 2.In modalità di visualizzazione normale, premere [ UP ] per controllare la temperatura massima e minima. Durante la visualizzazione dei valori massimo e minimo, tenerlo premuto [ UP ] per azzerare la memoria e ritornare in modalità...
  • Page 11: Display Lcd

    PULSANTE DOWN MODE SNZ/LIGHT ALARM MODALITÀ Controllo della temperatura massima e minima Attivazione della Azzeramento retroilluminazione Controllo Accesso alla Selezione del Selezione della memoria dell'orario modalità di canale (1-3) dell'unità di PREMERE durante la Posticipo della della sveglia del sensore impostazione misura visualizzazione...
  • Page 12: Operazioni Preliminari

    OPERAZIONI PRELIMINARI 3. Al termine del processo di sincronizzazione, l'indicatore RCC [ ] rimarrà acceso sul dis play, e la data e l'ora verranno impostate INSERIMENTO DELLE BATTERIE automaticamente. In caso contrario, tenere 1. Rimuovere il coperchio del vano batterie situato premuto il pulsante [ DOWN ] per riavviare la sul retro dell'unità.
  • Page 13: Temperatura E Umidità

    SPECIFICHE TECNICHE 3. Il parametro da impostare lampeggerà. 4. Premere il pulsante [ UP ] or [ DOWN ] per UNITÀ PRINCIPALE impostare il valore desiderato. 5. Sequenza dei parametri: Ora Minuto Esci 6. Premere il pulsante [ ALARM ] per confermare Dimensioni l'impostazione e uscire.
  • Page 14: Dichiarazione Di Conformità Ce It

    G m b H d i c h i a r a c h e i l t i p o d i apparecchiatura identificato con il Peso codice WSH4003 è conforme alla direttiva 45 g (batterie escluse) 2014/53/UE. Il testo integrale della dichiarazione di conformità...
  • Page 15: Smaltimento

    Le batterie in cui sono inclusi elementi tossici sono contraddistinte da un segno e un simbolo chimico. Cd 1 Hg 2 Pb 3 MANUAL DOWNLOAD: Batteria contenente cadmio www.bresser.de/download/WSH4003 Batteria contenente mercurio Batteria contenente piombo...
  • Page 16 ÜBER DIESER ANLEITUNG • BRAND-/EXPLOSIONSGEFAHR! —Setzen Sie das Gerät keinen hohen Temperaturen aus. Benutzen Diese Betriebsanleitung ist als Bestandteil Sie nur die empfohlenen Batterien. Gerät und des Gerätes zu betrachten. Bitte lesen Sie vor Batterien nicht kurzschließen oder ins Feuer werfen! der Nutzung des Geräts die Sicherheitshinweise und Durch übermäßige Hitze und unsachgemäße die Bedienungsanleitung aufmerksam durch.
  • Page 17: Produktübersicht

    PRODUKTÜBERSICHT 1.Drücken Sie [ SNZ / LIGHT ], um die Hintergrundbeleuchtung zu aktivieren oder die Schlummerfunktion zu aktivieren, um den Alarm um 5 Minuten zu verzögern. 2.Drücken Sie im normalen Anzeigemodus [ UP ], um die Höchst- und Mindesttemperatur zu überprüfen.
  • Page 18: Lcd-Bildschirm

    TASTE DOWN MODE SNZ/LIGHT ALARM MODUS Prüfen Sie die maximale und Hintergrund- minimale beleuchtung Temperatur Wechseln Sie In die Weckzeit prüfen einschalten Wählen Löschen Sie den Zeiteinstellung zwischen den drücken Alarm ein-/ gesamten Außensen- wechseln ausschalten SNOOOZE bei °C oder °F Speicher bei sorkanälen Standard-...
  • Page 19: Erste Schritte

    ERSTE SCHRITTE angezeigt und das Datum und die Uhrzeit werden automatisch eingestellt. Wenn das fehlschlägt, halten Sie die Taste [ DOWN ] BATTERIEN EINLEGEN gedrückt, um den RCC-Empfang erneut zu 1. Entfernen Sie die Batteriefachabdeckung von starten. der Rückseite. 4. Der RCC-Empfang beginnt jede Nacht 2.
  • Page 20 ALARM ANZEIGE DER MANUELLEN MESSUNGEN EINSTELLEN/ANPASSEN DER ALARMZEIT 1. Drücken Sie die Taste [ UP ], um die Höchst- und 1. Drücken Sie [ ALARM ], um die Weckzeit Mindesttemperatur anzuzeigen. anzuzeigen. 2. Reihenfolge der Anzeige: Aktuelle Werte > MAX 2.
  • Page 21: Eg-Konformitätserklärung

    EG-KONFORMITÄTSERKLÄRUNG Genauigkeit: +/- 5% (30%-80%), andere +/-8% Hiermit erklärt die Explore Scientific GmbH, dass der Gerätetyp mit der Artikelnummer: AUSSENSENSOR: WSH4003 der folgenden Richtlinie entspricht: 2014/53/EU. Der vollständige Text Abmessungen: der EG-Konformitätserklärung ist unter der 50 x 25 x 95 mm (L x B x H) folgenden Internetadresse verfügbar:...
  • Page 22: Entsorgung

    Sammelstelle oder im Einzelhandel. Die Entsorgung über den Hausmüll verstößt gegen die Batterie- Richtlinie. Batterien, die Giftstoffe enthalten, sind mit einem Zeichen und einem chemischen Symbol gekennzeichnet. MANUAL DOWNLOAD: www.bresser.de/download/WSH4003 Cd 1 Hg 2 Pb 3 Batterie enthält Cadmium Batterie enthält Quecksilber...
  • Page 23: Avertissements - Généralités

    • Risque d’incendie/explosion — N’exposez pas A PROPOS DE CE MODE D'EMPLOI l’appareil à des températures élevées. Utilisez Ce mode d’emploi fait partie intégrante de uniquement les piles recommandées. Ne l’appareil. Veuillez lire les consignes de courtcircuitez pas l’appareil ou les piles et ne les sécurité...
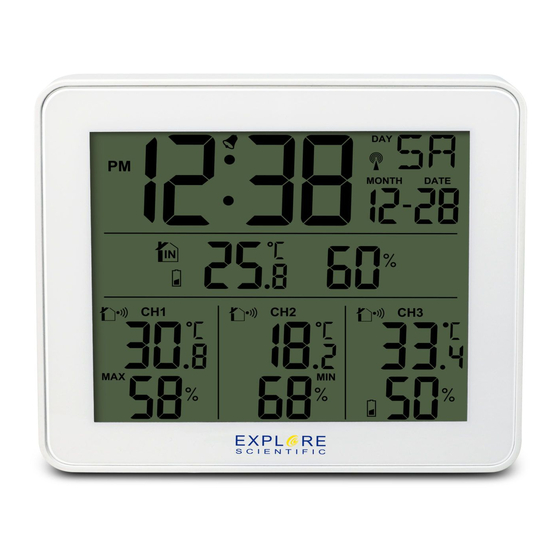
  • Page 24: Description Du Produit

    DESCRIPTION DU PRODUIT 1. Appuyez sur le bouton [ SNZ / LIGHT ] pour activer le rétroéclairage ou pour activer la fonction de répétition et retarder l’alarme de 5 minutes. 2. En mode d’affichage normal, appuyez sur le bouton [ UP ] pour vérifier la température max. et min.
  • Page 25: Écran Lcd

    BOUTON SNZ/LIGHT ALARM DOWN MODE MODE Vérifier la Activer le température Vérifier l’heure rétroéclairage max. et min. de l’alarme. Passer au Basculer Sélectionner Activer la entre les réglage APPUYER Effacer la °C ou °F Activer/ répétition de canaux 1-3 de l’heure mémoire lors de désactiver l’alarme...
  • Page 26: Pour Commencer

    POUR COMMENCER 3. Si le processus de réception du signal aboutit, l’icône complète du signal radio-piloté [ s’affiche à l’écran et la date et l’heure se règlent INSERTION DES PILES automatiquement. En cas d’échec, maintenez 1. Retirez le couvercle du compartiment des piles le bouton [ DOWN ] appuyé...
  • Page 27: Spécifications Unité Principale

    ALARME AFFICHAGE MANUEL DES DONNÉES 1. Appuyez sur le bouton [ UP ] pour afficher la CONFIGURATION/RÉGLAGE DE L’HEURE température max. et min. DE L’ALARME 2. Séquence d’affichage : Valeurs actuelles > 1. Appuyez sur le bouton [ ALARM ] pour afficher MAX (valeurs maximales) >...
  • Page 28: Capteur Extérieur

    Dimensions : déclare que le type d’appareil de numéro 50 x 25 x 95 mm (L x l x h) de pièce : WSH4003 satisfait à la Directive : 2014/53/UE. L’intégralité de la déclaration Poids : de conformité UE est disponible à l’adresse internet...
  • Page 29: Élimination

    Directive relative aux piles. Les piles qui contiennent des toxines sont marquées avec un signe et un symbole chimique. MANUAL DOWNLOAD: www.bresser.de/download/WSH4003 Cd 1 Hg 2 Pb 3 pile contenant du cadmium...
  • Page 30: Advertencias De Carácter General

    SOBRE ESTE MANUAL DE • Riesgo de incendio/explosión — No exponga e dispositivo a altas temperaturas. Utilice solamente INSTRUCCIONES las pilas recomendadas. No cortocircuite el Este manual de instrucciones debe dispositivo o las pilas, ni las arroje al fuego. El considerarse un componente del aparato.
  • Page 31: Vista General Del Producto

    VISTA GENERAL DEL PRODUCTO 1.Presione [ SNZ / LIGHT ] para activar la retroiluminación o para activar la función de repetición de alarma y que esta suene al cabo de 5 minutos. 2.En el modo de pantalla normal, presione [ UP ] para comprobar la temperatura máx.
  • Page 32: Pantalla Lcd

    BOTÓN DOWN SNZ/LIGHT ALARM MODE MODO Comprobar la temperatura Activar la máx. y mín retroiluminación. Para Comprobar la Entrar en el desplazarse hora de Seleccionar Borrar Activar la ajuste de PRESIONAR entre los alarma Activar grados toda la memoria REPECIÓN DE la hora canales 1-3 cuando aparecen...
  • Page 33: Primeros Pasos

    PRIMEROS PASOS 2. Una vez que el radiocontrol reciba la señal, si cambia la indicación de ajuste pertinente (como, año, mes, día, hora, minuto, etc.) el INSERCIÓN DE LAS PILAS símbolo de radiocontrol [ ] desaparecerá 1. Retire la cubierta del compartimento de las pilas automáticamente.
  • Page 34: Temperatura Y Humedad

    ALARMA INDICACIÓN DE MEDICIÓN MANUAL 1. Presione el botón [ UP ] para ver la indicación AJUSTE DE LA HORA DE ALARMA de temperatura máx. y mín. 1. Presione [ ALARM ] para ver la alarma en pantalla. 2. Orden de aparición en pantalla: Valores 2.
  • Page 35: Sensor Exterior

    DECLARACIÓN DE SENSOR EXTERIOR: CONFORMIDAD CE ES Dimensiones: Explore Scientific GmbH declara que el 50 x 25 x 95 mm (L. x An. x Al.) artículo con número: WSH4003 está en conformidad con la Directiva: 2014 Peso: /53/UE. El texto completo de la declaración de 45 g (sin pilas) conformidad de la UE está...
  • Page 36: Garantía Y Servicio

    Las llamadas des del extranjero están productos tóxicos están marcadas con un signo ligadas a costes suplementarios. y un símbolo químico. Cd 1 Hg 2 Pb 3 pila que contiene cadmio MANUAL DOWNLOAD: pila que contiene mercurio www.bresser.de/download/WSH4003 pila que contiene plomo...
  • Page 37: Algemene Waarschuwingen

    OVER DEZE • Demonteer het apparaat nooit. Neem in geval van een storing contact op met uw gespecialiseerde GEBRUIKSAANWIJZING detailhandelaar. De gespecialiseerde detailhandelaar Deze gebruiksaanwijzing moet worden neemt contact op met het servicecentrum en stuurt beschouwd als onderdeel van het apparaat. het apparaat indien nodig ter reparatie op.
  • Page 38: Overzicht Van Het Product

    OVERZICHT VAN HET PRODUCT 1. Druk op [ SNZ / LIGHT ] om de achtergrondverlichting te activeren of om de sluimerfunctie te activeren en het alarm gedurende 5 minuten uit te stellen. 2. In de normale weergavemodus drukt u [ UP ] om de max.
  • Page 39 KNOP DOWN MODE SNZ/LIGHT ALARM MODUS De max. en min. temperatuur Achtergrondverlichting controleren. inschakelen Tussen De alarmtijd Naar de buitensensor- Al het geheugen controleren. °C of °F SLUIMEREN tijdinstellingen DRUKKEN kanaal Alarm wissen tijdens de selecteren gaan wanneer het 1-3 schakelen. aan-/uitzetten weergave van de alarm afgaat...
  • Page 40: Aan De Slag

    AAN DE SLAG 3. Wanneer RCC is ontvangen, wordt het voltooide RCC-symbool [ ] in het scherm weergegeven en is de datum en tijd automatisch ingesteld. DE BATTERIJEN PLAATSEN Als dit niet lukt, drukt u op de [ DOWN ] knop en 1.
  • Page 41: Achtergrondverlichting

    ALARM HANDMATIGE METINGWEERGAVE 1. Druk op de [ UP ] knop om de max. en min. DE ALARMTIJD INSTELLEN OF AANPASSEN temperatuur weer te geven. 1. Druk op [ ALARM ] om de alarmtijd weer te geven. 2. Volgorde van de weergave: Huidige waarden > 2.
  • Page 42: Eg-Verklaring Van Overeenstemming

    OVEREENSTEMMING Afmetingen: Hierbij verklaart Folux GmbH dat het 50 x 25 x 95 mm (L x B x H) apparaattype met artikelnummer WSH4003: in Gewicht: overeenstemming is met Richtlijn: 2014/30/EU. De 45 g (zonder batterijen) volledige tekst van de EU-conformiteitsverklaring is beschikbaar...
  • Page 43: Service En Garantie

    Weggooien met het zullen hogere kosten met zich meebrengen. huishoudelijk afval schendt de batterijrichtlijn. Batterijen die giftige stoffen bevatten, zijn HANDLEIDING DOWNLOADEN: gemarkeerd met een teken en een chemisch www.bresser.de/download/WSH4003 symbool. Cd 1 Hg 2 Pb 3 batterij bevat cadmium...
  • Page 44 Folux GmbH Gutenbergstr. 2 · DE-46414 Rhede Germany www.bresser.de · service@bresser.de Explore Scientific LLC 1010 S. 48th Street, Springdale, AR 72762 www.explorescientific.com...

Table des Matières