Table des Matières
Publicité
Les langues disponibles
Les langues disponibles
Liens rapides
D11x
D11x
1
1
Page 2-18
Page 2-17
Installation Manual
Installation Manual
IP Video Door Station
IP Video Door Station
D11x Series
D11x Series
Seite 19-35
Seite 18-34
Installationsanleitung
Installationsanleitung
IP Video Türstation
IP Video Türstation
D11x Serie
D11x Serie
Page 36-52
Manuel d'installation
Interphone vidéo IP
Série D11x
VERSION . , MIN. HW .
VERSION . , MIN. HW .
Publicité
Table des Matières

Manuels Connexes pour DoorBird D1101V

Sommaire des Matières pour DoorBird D1101V
- Page 1 Page 2-17 Page 2-18 Installation Manual Installation Manual IP Video Door Station IP Video Door Station D11x Series D11x Series Seite 18-34 Seite 19-35 Installationsanleitung Installationsanleitung IP Video Türstation IP Video Türstation D11x Serie D11x Serie Page 36-52 Manuel d‘installation Interphone vidéo IP Série D11x D11x...
- Page 2 You can always find the most up-to-date version of the shocks. installation manual on www.doorbird.com/support To make things easier we use the term “device” for • Devices with 110-240 V connection: The device the product “IP Video Door Station D11x series”...
- Page 3 ̵ Places where the temperature is very low, such as inside a refrigerated area or in front of an air WARNING conditioner. shock could result. ̵ Places subject to steam or smoke (e.g. near • High voltage may be present internally. Do not heating or cooking surfaces).
- Page 4 (12‘‘) away from AC 100-240 V wiring. AC induced noise and/or device malfunction For information about the device warranty, see could result. www.doorbird.com/warranty • Install the device in an area that will be accessible for future inspections, repairs and maintenance.
- Page 5 COMPONENTS* 1x Main Electrical Unit 1x Back-housing with 1x Installation manual 1x Quickstart guide with call button(s) wall-mounting bracket with Digital Passport and front panel 1x Drilling template 1x Waterproof A4 laser 1x Power supply unit (mains adaptor) printer paper for labelling with four country-specific adaptors name plates 1x Screw connection...
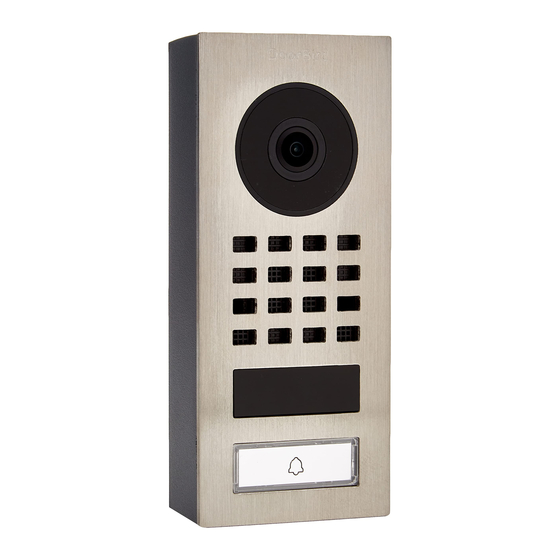
- Page 6 DEVICE WITH CALL BUTTONS Front Inside WIFI 1) Front panel 11) Diagnostic-LED 2) HDTV Video Lights up a few seconds after 3) Security screws connecting the device to power 4) Light Sensor 12) Main Electrical Unit For night-vision mode 13) Screw connection terminal 5) Bluetooth tranceiver 14) Gasket 6) Speaker...
- Page 7 Need help with the installation? Be sure to watch our installation videos which can be found the assembly location, i.e. the door chime, on http://www.doorbird.com/support electric door opener, power supply unit for the video door station etc. Each individual step of the installation is clearly documented in the videos.
- Page 8 When choosing the assembly location, consider the lighting conditions. Avoid direct sunlight, direct We offer additional wall-mounting kits for D1101V backlight and reflective surfaces. and D1102V Surface-Mount with a wedge corner wall-mount adapter (7.5° vertical down or up) and Do not expose the device to direct sunlight.
- Page 9 We have designed the front panel and safety screws in a way that they cannot be screwed through the front panel so that they do not fall off / get lost during installation. D1101V & D1102V D1101KH Turn the safety screws counter-clockwise until Turn the safety screws counter-clockwise until they are loose.
- Page 10 flush-mounted housing is sealed all around against moisture from the outside. NETWORK CONNECTION OPTIONS You can connect the device to the network by either using a WiFi 2.4 GHz connection (only for D1101V and D1102V) or a network cable. OPTION OPTION Network cable WiFI 2.4 GHz...
- Page 11 To power the device via a PoE-Switch (e.g. D-Link adapter, 2 insulated wires are required. The power DGS-1008P) or PoE-Injector (e.g. DoorBird Gigabit supply unit has a 300 cm (9.8 ft) long cable with PoE Injector A1091), use a CAT.5 cable or higher two insulated wires.
-
Page 12: Connecting The Device
OPTION Power supply using a DIN rail power supply unit Alternatively to the mains adapter, we offer DIN rail If you must power more than one device with power supplies in our online shop, which can be one power supply, we recommend to use a installed by a specialist. - Page 13 You can configure the default state of the relay (open/close) via the DoorBird App. These ports can be used to connect e.g. an electric door opener. The device does not supply power to the connected device.
- Page 14 ASSEMBLE THE DEVICE TO THE MOUNTNG HOUSING (BACKBOX) Assemble the front panel with the attached Main Eletrical Unit carefully using the screwdriver provided to the mounting housing. D1101V & D1102V D1101KH Turn the safety screws clockwise until they are firmly tightened.
-
Page 15: Downloading And Installing The App
If you use WiFi for connecting the device to your Internet Router, first go to the DoorBird App > ”WiFi The device features a well documented API for Setup“ and follow the instructions. third-party integration. For information, terms and conditions see www.doorbird.com/api... - Page 16 Stainless Steel Only high-quality stainless steel is used for all available DoorBird door stations. However, high-quality stainless steel can also rust, as approx. 70 % of stainless steel is made of iron. Rust resistance is only achieved by a protective layer (also called passive layer), which covers the iron like a skin.
- Page 17 (loose contact). If the problem still exists, please check if your PoE-Switch / PoE Injector supports the PoE Standard IEEE 802.3af Mode A, see also www.doorbird.com/poe If the device is to be supplied with power by a DIN-rail power supply, switch on the DIN-rail...
-
Page 18: Legal Notes
Internet or to the Bird Home Automation GmbH’s server. General remarks 1. DoorBird is a registered trademark of Bird Home Automation GmbH. Instructions for disposal Do not dispose of the device with regular domestic waste. Electronic 2. - Page 19 Bedienungsanleitung. hin, die die optimale Verwendung des Geräts unterstützen. Die stets aktuelle Version der Installationsanleitung finden Sie unter www.doorbird.com/de/support Zur Vereinfachung der Begriffe verwenden wir „Gerät“ Gefahrenhinweise für das Produkt „IP Video Türstation D11x“ sowie „mobiles Endgerät“ für ein Smartphone/Tablet.
- Page 20 muss von einem qualifizierten Elektriker durchgeführt werden. WARNUNG • Gerätemontage an Wand oder Decke: Plastikfolien/-tüten, Styroporteile etc. können Vermeiden Sie Installationsorte, an denen das für Kinder zu einem gefährlichen Spielzeug Gerät Erschütterungen oder Stößen ausgesetzt werden. ist. • Verlegen Sie Kabel stets so, dass diese keine •...
- Page 21 Sie die Drähte mehr als 30 cm (12‘‘) entfernt von 100-240 V Wechselstromver- Gewährleistung drahtung. Ansonsten können Wechselstrom- induzierte Geräusche und/oder Geräte- Informationen zur Gewährleistung des Geräts finden Störungen auftreten. Sie unter www.doorbird.com/de/warranty • Installieren Sie das Gerät in einem Bereich, der...
- Page 22 KOMPONENTEN* 1x Elektrische 1x Montagerückgehäuse mit 1x Installationsanleitung 1x Quickstartanleitung Haupteinheit mit Wandmontagehalterung mit Digital Passport Ruftaste(n) und Frontblende 1x Bohrschablone 1x Wasserfestes A4 Laser - 1x Steckernetzteil (110 - 240 V AC drucker-Papier für die auf 15 V DC) mit 4 Landesadaptern Beschriftung einer Namensschildtaste 1x Grüner Schraub-...
- Page 23 GERÄT MIT RUFTASTEN Vorderseite Innenseite W-LAN 1) Frontblende 11) Diagnose LED 2) HDTV Video Leuchtet nach ein paar Sekunden auf nachdem 3) Sicherheitsschrauben das Gerät mit dem Strom verbunden wurde 4) Lichtsensor 12) Elektrische Haupteinheit Für den Nachtsichtmodus 13) Schraubklemmenblock 5) Bluetooth-Transceiver 14) Dichtung 6) Lautsprecher...
- Page 24 Abstand der Person von 50 cm (19.68 in) zum Gerät mindestens 0,5 Mbit/s Uploadgeschwindigkeit verfügt. eine geringe Montagehöhe ausreicht. Daher ist das Sie können über die DoorBird App jederzeit auch einen Objektiv auch mechanisch nicht verstellbar. Geschwindigkeitstest durchführen. Das Nutzererleb- Die Kameralinse sollte sich auf einer Höhe von...
-
Page 25: Montage Des Rückgehäuses
Keil- (7.5° vertikal nach oben oder unten) und einem Eck-Winkel-Wandmontageadapter (45° horizontal, Das Produkt ist als Auf- und Unterputzvariante ver- links oder rechts montierbar) für D1101V und D1102V fügbar. Bei der Unterputzvariante ist die Frontblende separat erhältlich. etwas größer, damit das Loch in der Wand besser abgedeckt ist und das Rückgehäuse besteht statt aus... - Page 26 Montagerückgehäuse. Die Frontplatte und die Sicherheitsschrauben sind so konstruiert, dass sie nicht aus der Frontplatte herausgeschraubt werden können. Dadurch fallen sie bei der Montage nicht heraus/kommen abhanden. D1101V & D1102V D1101KH Drehen Sie die Sicherheitsschrauben gegen den Drehen Sie die Sicherheitsschrauben gegen den Uhrzeigersinn, bis sie sich lösen.
- Page 27 Außenseite der Wand aufliegt und der Rand des Unterputzgehäuses gegen Feuchtigkeit von außen rundum abgedichtet ist. OPTIONEN ZUR NETZWERKVERBINDUNG Sie können das Gerät entweder über eine WiFi 2,4 GHz-Verbindung (nur bei D1101V und D1102V) oder über ein Netzwerk kabel mit dem Netzwerk verbinden. OPTION OPTION Netzwerkkabel (empfohlen, WLAN 2.4 GHz (nur bei D1101Vund D1102V)
- Page 28 Zur Stromversorgung des Geräts per Steckernetzteil Zur Stromversorgung des Geräts per PoE-Switch (z.B. werden zwei isolierte Drähte benötigt. Das mitgelieferte D-Link DGS-1008P) oder PoE-Injektor (z.B. DoorBird Steckernetzteil verfügt über ein 300 cm langes Kabel Gigabit PoE Injektor A1091) verwenden Sie ein Cat.5 mit zwei isolierten Drähten.
-
Page 29: Gerät Anschliessen
Stromversorgung per PoE. Alternativ zum Steckernetzteil bieten wir Weitere Informationen über PoE finden Sie unter: in unserem Shop Hutschienennetzteile an, welche http://www.doorbird.com/de/poe durch einen Fachmann installiert werden können. Die Netzwerkanbindung erfolgt per Netzwerkkabel oder 1. Trennen Sie den vorgesehenen PoE-Switch WLAN. - Page 30 Verdrahtung eines elektrischen Türöffners generell den Einsatz eines abgesetzten Sicherheitsrelais, das im Hausinneren montiert wird (z.B. DoorBird E/A Tür Controller A1081). E1, E1 Digitaler Eingang (0 V, 0 A (NO)), für Türöffnertaster, max. 0 V DC/AC, 0 A.
- Page 31 Kurzschluss und zur Zerstörung des Geräts führen. MONTAGE DES GERÄTES AN DAS RÜCKGEHÄUSE Montieren Sie die Frontblende inklusive der elektrischen Haupteinheit vorsichtig mit Hilfe der mitgelieferten Schraubendreher am Montagegehäuse. Drehen Sie die Sicherheitsschrauben im Uhrzeigersinn bis sie fest- angezogen sind. D1101V & D1102V D1101KH...
- Page 32 DOWNLOAD UND INSTALLATION kann je nach Umgebungssituation variieren. DER APP BLUETOOTH TRANSCEIVER Laden Sie sich die App “DoorBird“ von Bird Home Automation aus dem Apple App Store bzw. Google Das Gerät verfügt über einen integrierten Bluetooth ® Play Store auf Ihr mobiles Endgerät. Die stets aktuelle Transceiver.
- Page 33 Nach jeder Reinigung mit klarem Wasser nebelfeucht Pflege und Reinigung nachwischen und trockenreiben, um die Bildung Alle DoorBird Frontblenden werden aus hochwertigen von Kalkspuren zu verhindern. Durch Nutzung von Materialien gefertigt und sind für eine lange entmineralisiertem Wasser lassen sich Kalkrückstände Lebensdauer ausgelegt.
-
Page 34: Rechtliche Hinweise
RECHTLICHE HINWEISE de/poe Allgemeines Wenn das Gerät über ein Hutschinennetzteil 1. DoorBird ist ein registriertes Warenzeichen der Bird Home Automation GmbH. versorgt werden soll, schalten Sie die das 2. Apple, das Apple Logo, Mac, Mac OS, Macintosh, iPad, Multi-Touch, Hutschinennetzteil jetzt ein. Wenn das iOS, iPhone und iPod touch sind Warenzeichen von Apple Inc. - Page 35 Gerät nicht im Hausmüll entsorgen! Elektronische Geräte sind entsprechend der Richtlinie über Elektro- und Elektronik Altgeräte zu entsorgen, z.B. über die örtlichen Sammelstellen für Elektronik- Altgeräte. Herausgeber Bird Home Automation GmbH Uhlandstraße 165 10719 Berlin Deutschland Web: www.doorbird.com Email: hello@doorbird.com...
- Page 36 • L’installation, le montage et les travaux Vous trouverez la toute dernière version du manuel d’entretien des appareils électriques doivent d’installation à l’adresse www.doorbird.com/support. être exclusivement réalisés par un spécialiste Pour simplifier les termes, nous utiliserons le mot agréé. En ne respectant pas cette consigne, «...
- Page 37 • Pour les appareils contenant du plastique ou du verre véritable, n’exercez pas de forte WARNING pression sur le verre. La rupture de celui-ci peut branchement. Des décharges électriques occasionner des blessures. peuvent en résulter. • Pour les appareils avec écran LCD, si l’écran •...
- Page 38 dommages matériels ou corporels suite à une endommagé. Manipulez-le avec prudence. manipulation inappropriée ou au non-respect • L‘appareil est hors service en cas de panne de des instructions de sécurité. Dans ce type courant. de cas, il n’existe aucun recours en garantie ! •...
- Page 39 Transport Garantie Vous trouverez les informations relatives à la garantie Utilisez l‘emballage d‘origine ou un emballage en consultant la page www.doorbird.com/warranty NOTICE équivalent pour éviter d‘endommager l‘appareil. COMPOSANTS* 1x Unité électrique 1x Boîtier arrière 1x Manuel d‘installation 1x Guide rapide avec...
-
Page 40: Appareil Avec Bouton D'appel
APPAREIL AVEC BOUTON D’APPEL Avant Intérieur WIFI 1) Face avant 10) LED de diagnostic 2) Vidéo HDTV S‘allume quelques secondes 3) Vis de sécurité après avoir branché l‘appareil 4) Capteur de luminosité 11) Unité électrique principale Pour le mode vision nocturne 12) Borne de raccordement à... -
Page 41: Appareil Avec Clavier
Regardez nos vidéos d‘installation qui se trouvent pas plus de deux ans, qu‘ils ont été fabriqués par un sur la page https://www.doorbird.com/support fabricant renommé et qu‘ils sont équipés du dernier firmware. -
Page 42: Couper Le Courant
Pour les D1101V et D1102V uniquement Nous proposons des kits de montage mural pour les COUPER LE COURANT modèles D1101V et D1102V avec montage en saillie : un adaptateur mural d‘angle vertical (7,5° vertical vers Coupez l‘alimentation de tous les fils menant le bas ou vers le haut) et un horizontal (45°... -
Page 43: Assemblage Du Boîtier De Montage
Nous avons conçu la face avant et les vis de sécurité de manière à ce qu‘elles ne puissent pas être vissés à travers la face avant afin qu‘elles ne tombent pas / ne se perdent pas pendant l‘installation. D1101V & D1102V D1101KH Tournez les vis de sécurité... -
Page 44: Montage
Vissez le support mural du boîtier de montage au mur. OPTIONS DE CONNEXION AU RÉSEAU Vous pouvez connecter l‘appareil au réseau en utilisant soit une connexion WiFi 2,4 GHz (uniquement pour D1101V et D1102V), soit un câble réseau. OPTION OPTION Câble de réseau WiFI 2.4 GHz... -
Page 45: Préparer L'alimentation Électrique
D-Link DGS-1008P) ou un injecteur PoE (p. ex. d‘alimentation comporte un câble de 300 cm (9.8 l‘injecteur PoE Gigabit DoorBird A1091), utilisez un ft) de long avec deux fils isolés. La connexion au câble CAT.5 ou supérieur conforme à la norme PoE réseau est ensuite établie par un câble réseau ou,... -
Page 46: Connexion De L'appareil
OPTION Alimentation électrique à l‘aide d‘un bloc d‘alimentation sur rail DIN un câble réseau ou par WiFi. Si vous devez alimenter plusieurs appareils Alternativement à l‘adaptateur secteur, nous avec une seule alimentation, nous proposons des alimentations sur rail DIN dans notre recommandons d‘utiliser un commutateur boutique en ligne, qui peuvent être installées par un PoE avec la norme PoE IEEE 802.3af Mode A... - Page 47 Relais de verrouilage bistable n° 1, max. 24 V DC/AC, 1 A. Dispositif de sécurité : Le relais conserve son état même en cas de perte de puissance. Vous pouvez configurer l‘état par défaut du relais (ouvert/fermé) via la APP DoorBird. Ces ports peuvent être utilisés pour connecter, p. ex., un ouvre-porte électrique. L‘appareil ne fournit pas de courant à...
-
Page 48: Port Pour Bouton D'appel
Montez avec précaution la face avant et l‘unité électrique principale dans le boîtier de montage en utilisant le tournevis fourni. D1101V & D1102V D1101KH Tournez les vis de sécurité dans le sens des aiguilles d‘une montre jusqu‘à ce qu‘elles soient bien serrées. -
Page 49: Émetteur-Récepteur Bluetooth
à jour. DoorBird > „Ajouter un appareil“ et cliquez sur l‘icône du code QR dans le champ „Nom d‘utilisateur“. Scannez le code QR de l‘utilisateur qui se trouve sur le „... -
Page 50: Changer La Plaque Nominative D'un Bouton D'appel
DOORBIRD CONNECT Acier inoxydable Nous n‘utilisons que de l‘acier inoxydable de haute qualité pour nos interphones vidéo DoorBird. L‘appareil peut être intégré dans de nombreux Cependant, l‘acier inoxydable de haute qualité systèmes tiers. Pour connaître les conditions peut également rouiller, car environ 70 % de l‘acier d‘utilisation et obtenir plus d‘informations, consultez la... -
Page 51: Dépannage
(mauvais contact). Si le problème persiste, veuillez vérifier si votre commutateur / injecteur PoE supporte la norme PoE IEEE 802.3af Mode A, voir aussi www.doorbird.com/ Si l‘appareil doit être alimenté par une alimentation sur rail DIN, allumez l‘alimentation sur rail DIN. Si l‘alimentation sur rail DIN était déjà... -
Page 52: Mentions Légales
Des modifications ou limitations importantes des fonctions Généralités existantes ne se produisent normalement que lorsque Bird Home 1. DoorBird est une marque déposée de Bird Home Automation Automation GmbH le juge nécessaire (par ex. en raison de la GmbH. - Page 54 Space for notes / Platz für Notizen...
- Page 56 www.doorbird.com...