Masquer les pouces Voir aussi pour D21 Série:

Publicité

Les langues disponibles

Les langues disponibles

Liens rapides

Installation Manual (Pages 2-28)
IP VIDEO DOOR STATION
D21x Series
Installationsanleitung (Seite 29-57)
IP VIDEO TÜRSTATION
D21x Serie
Manuel d´installation (Page 58-86)
INTERPHONE VIDÉO IP
D21x Série
Manual de Instalación (Página 88-114)
VIDEOPORTERO IP
D21x Series
VERSION 1.2, MIN. HW 1.10
1
1
1
1
1
1
1

Publicité

Table des Matières
loading

Sommaire des Matières pour DoorBird D21 Série

  • Page 1 Installation Manual (Pages 2-28) IP VIDEO DOOR STATION D21x Series Installationsanleitung (Seite 29-57) IP VIDEO TÜRSTATION D21x Serie Manuel d´installation (Page 58-86) INTERPHONE VIDÉO IP D21x Série Manual de Instalación (Página 88-114) VIDEOPORTERO IP D21x Series VERSION 1.2, MIN. HW 1.10...
  • Page 2 You can always find the most up-to-date version of the installation manual on www.doorbird.com/support To make things easier we use the term “device” for the product “IP Video Door Station” and “mobile device” for a smartphone or tablet.
  • Page 3 Notice: Indicates a situation which, if not avoided, could result NOT I C E in damage to property. Important: Indicates significant information which is essential for the product to function correctly. Note: Indicates useful information which helps in getting the most out of the product.
  • Page 4 WARNING ∙ For safety, approval and licensing reasons (CE/FCC/IC etc.), unauthorized change and/or modification of the device is not permitted. ∙ The device is not a toy; do not allow children to play with it. Do not leave packaging material lying around. Plastic films/bags, pieces of polystyrene, etc.
  • Page 5 ∙ Do not put any metal or flammable material into the device. Fire, electric shock, or device trouble could result. ∙ Existing wiring such as chime wiring, etc. may contain high voltage AC electricity. Damage to the device or electric shock could result. Wiring and installation must be done by a qualified eletrician.
  • Page 6 WARNING ∙ On devices with intercom, be sure to perform a call test with low audio volume on both intercom devices. A sudden call etc. may arrive causing for example damage to your ear. ∙ If the device does not operate properly, unplug the power supply. ∙...
  • Page 7 ∙ Keep the device more than 1 m (3.3') away from microwave, radio, TV, wireless router and any other wireless devices. ∙ On devices with intercom or built-in speaker or built-in microphone or signal transmission functions, keep the wires more than 30 cm (12'') away from AC 100-240 V wiring.
  • Page 8 When transporting the device, use the original packaging or NOT IC E equivalent to prevent damage to the device. Warranty Information For information about the device warranty, see www.doorbird.com/warranty DEVICE EXAMPLE WITH 1 CALL BUTTON Front 1) HDTV Video 2) Light Sensor...
  • Page 9 DEVICE EXAMPLE WITH 2 AND MORE CALL BUTTONS Front 1) HDTV Video 2) Light Sensor For night-vision mode 3) Security screws 4) Motion Sensor 5) Illuminated call buttons with nameplate The illumination is also acting as Diagnostic LED(s). 6) Night Vision LEDs 7) Microphone 8) Loudspeaker 9) RFID Reader...
  • Page 10 10) DoorBird Multi Tenant Module MTM18A DoorBird Multi Tenant Module MTM18A DEVICE EXAMPLE WITH DISPLAY MODULE AND KEYPAD MODULE Front 1) Night Vision LEDs 7) RFID Reader 2) HDTV Video 8) Motion Sensor 3) Microphone 9) Display Module 4) Light Sensor...
  • Page 11 Inside 1) Main Electrical Unit 2) Yellow cable for call button (unused) 3) Red cable for Module Port 1 Connected to the Keypad Module 4) Green cable for Module Port 2 Connected to the Display Module 5) Screw connection terminal 6) LAN/PoE jack 7) Nylon cord To secure the front panel during...
  • Page 12 Please ensure that the upload speed of your Internet connection is at least 0.5 Mbps. You can also carry out a speed test at any time via the DoorBird App. The user experience is only as good as your network speed, network stability and quality of your network components, such as your Internet Router and WiFi access points or WiFi repeaters.
  • Page 13 Should these requirements not be fulfilled, it may occur, for example that the performance of audio and video is poor or push notifications are delayed or do not arrive on your smartphone or tablet at all. High-speed Internet (via landline): DSL, cable or optical fibre Network: Ethernet, with DHCP STEP 1: SWITCHING OFF POWER Switch off the power to all wires leading to the assembly location, i.e.
  • Page 14 Router can have a maximum length of 80 meters/262 feet (IEEE 802.3). If you have only two wires available at the assembly location, you may use of the “DoorBird 2-Wire Ethernet PoE Converter A1071”, sold separately. It allows you to transfer network data (Ethernet) and power (PoE) with a simple two-wire cable over long distances.
  • Page 15 To power the device via a PoE-Switch (e.g. D-Link DGS-1008P) or PoE-Injector (e.g. DoorBird Gigabit PoE Injector A1091) in accordance with the PoE standard IEEE 802.3af Mode A, the four wires bearing the numbers 1, 2, 3 and 6 of a Cat.5 cable or better are to be used.
  • Page 16 STEP 7: CONNECTING THE DEVICE It is possible to connect the cables and wires to the device conveniently and safely via labelled connection ports. You can connect all necessary cables and wires to the device now. Please remove any cables and wires from the connection ports of the device that you do not need.
  • Page 17 REL1 REL2 BELL 15VDC LAN/POE Only related for devices with call button(s) with call b butt utton( 4 Pin 2 Pin Each Premium Soft-Touch call button is equipped with two jacks. PORT DESCRIPTION LAN/POE RJ45 jack to connect a standard Network cable Cat.5 or better, coming from the Internet Router/PoE-Switch/ PoE-Injector.
  • Page 18 1 Ampere. Security feature: The relay keeps its state even in the case of loss of power. You can configure the REL1 default state of the relay (open/close) via the DoorBird REL1 App. These ports can be used to connect e.g. an electric door opener.
  • Page 19 Use the yellow cable to connect the button to the IP Video Door Station. 2 PIN (BELL) We offer feature-rich IP door chimes (e.g. DoorBird A1061W), which can be securely connected via your BELL network (LAN / WIFI / WAN) to this device. Alternatively...
  • Page 20 The power supply for the door chime must be installed separately. Should you have any questions, please contact the manufacturer of your door chime. You can find compatible door chimes at www.doorbird.com/support Some door chimes operate with 110-240 V DC/V AC. Do not connect such door chimes to this relay contact.
  • Page 21 STEP 10: DOWNLOADING AND INSTALLING THE APP Download the “DoorBird” App by Bird Home Automation onto your mobile device from the Apple App Store or Google Play Store. You can always find the...
  • Page 22 App manual on www.doorbird.com/support Go to DoorBird App “Settings > Add device” and click on the QR code icon in the “User” field. Scan the user QR code found on the “Digital Passport” provided with the device.
  • Page 23 Engraving Service Engraving service for a modern and clean appearance: www.doorbird.com/engraving Please follow STEP 1 to switch off power. We recommend to use a thin slot screwdriver to remove the cover of the nameplate. We recommend to use white paper for the label which does not absorb moisture.
  • Page 24 MAINTENANCE FOR DOORBIRD PRODUCTS Cleaning and maintenance instructions All DoorBird door stations are made of high-quality materials and are designed for a durable lifetime. Since door stations are usually installed in unprotected outdoor areas, they are exposed to adverse weather conditions and aggressive substances, especially close to frequently used roads, in coastal and industrial areas.
  • Page 25 After the cleaning rinse with clear water and dry to prevent the formation of lime traces. Lime residues can be avoided by using demineralised water. Stainless steel PVD coated PVD coated, chrome-plated or gold-plated surfaces are recommended to be cleaned with a grease-dissolving detergent and clear water or with a clean and dust-free microfibre cloth.
  • Page 26: Technical Specifications

    1x Installation manual 16 keys, illuminated, configurable 1x Small parts via app, e.g. Warranty: • Individual PIN codes see www.doorbird.com/warranty • Individual events (e.g. switch a relay, push notification, SIP call [audio/ CURRENT SYSTEM REQUIREMENTS video], HTTP(s) notification) • Individual schedules...
  • Page 27 0 - 3 cm, depends on environment Ethernet: Antenna: RJ45 jack, PoE 802.3af Mode-A Internal MOTION SENSOR Compatible Transponder: RFID key fobs, sold separately, Type: see www.doorbird.com/buy Active Up to 100 tags manageable Detection angle: 110° Configuration: Via app, e.g. Range: • Tag (add, delete) 1 –...
  • Page 28: Legal Notes

    LEGAL NOTES General remarks If the device is a door-, indoor station or camera: 1. DoorBird is a registered trademark of Bird Home Automation GmbH. · In many countries video and voice signal may only be transmitted once a visitor has rung the 2.
  • Page 29 Wenn Sie das Gerät anderen Personen zur Nutzung überlassen, übergeben Sie auch diese Bedienungsanleitung. Die stets aktuelle Version der Installationsanleitung finden Sie unter www.doorbird.com/de/support Zur Vereinfachung der Begriffe verwenden wir „Gerät“ für das Produkt „IP Video Türstation“ sowie „mobiles Endgerät“ für ein Smartphone/Tablet.
  • Page 30 Vorsicht: Weist auf eine gefährliche Situation hin, welche, falls nicht verhindert, zu geringfügiger oder mäßiger Verletzung führen kann. Bitte beachten: Weist auf eine gefährliche Situation hin, NOT IC E welche, falls nicht verhindert, zu Sachschäden führen kann. Wichtig: Weist auf wichtige Informationen hin, die den richtigen Betrieb des Produkts gewährleisten.
  • Page 31 WARNUNG ∙ Öffnen Sie das Gerät nicht. In solchen Fällen erlischt jeder Gewähr- leistungsanspruch! Für Folgeschäden übernehmen wir keine Haftung! Das Gerät enthält keine durch den Anwender zu wartenden Teile. Im Fehlerfall lassen Sie das Gerät von einer autorisierten Fachkraft prüfen. ∙...
  • Page 32 ∙ Schließen Sie keinen Anschluss am Gerät an eine Netzstromleitung an. Feuer oder elektrische Stromschläge können die Folge sein. ∙ Stellen Sie sicher, dass das Netzkabel nicht beschädigt oder gequetscht ist. Wenn das Netzkabel gebrochen ist, kann es zu einem Brand oder elektrischen Stromschlag kommen.
  • Page 33 WARNUNG - Orte mit Staub, Öl, Chemikalien, Schwefelwasserstoff (heiße Quellen). - Orte, die extremer Feuchtigkeit und Luftfeuchtigkeit ausgesetzt sind, wie Bäder, Keller, Gewächshäuser, etc. - Orte, an denen die Temperatur extrem niedrig ist, wie z. B. in einem gekühlten Bereich oder vor einer Klimaanlage. - Orte, die Dampf oder Rauch ausgesetzt sind (z.B.
  • Page 34 ∙ Achten Sie darauf, dass das Gerät weder Stößen noch starkem Druck ausgesetzt ist. ∙ Installieren Sie das Gerät nicht an instabilen Halterungen, Oberflächen oder Wänden. Stellen Sie sicher, dass das Material stabil genug ist, um das Gewicht des Geräts zu tragen. ∙...
  • Page 35 Verantwortung liegen; Oder, wenn während der Übertragung ein Fehler oder fehlende Daten auftreten. Transport Bei Bedarf transportieren Sie das Gerät in der Originalverpackung NOTIC E oder einer entsprechenden Verpackung, so dass Schäden vermie- den werden. Gewährleistung Informationen zur Gewährleistung des Geräts finden Sie unter www.doorbird.com/de/warranty...
  • Page 36 GERÄT MIT EINER RUFTASTE Vorderseite 1) HDTV Video 2) Lichtsensor Für den Nachtsichtmodus 3) Sicherheitsschrauben 4) Bewegungssensor 5) Beleuchtete Ruftaste mit Namensschild Die Beleuchtung agiert auch gleichzeitig als Diagnose LED(s) 6) Nachtsicht LEDs 7) Mikrofon 8) Lautsprecher 9) RFID Leser Innen 1) Elektrische Haupteinheit 2) Gelbes Kabel für Ruftaste...
  • Page 37 GERÄT MIT 2 UND MEHR RUFTASTEN Vorderseite 1) HDTV Video 2) Lichtsensor Für den Nachtsichtmodus 3) Sicherheitsschrauben 4) Bewegungssensor 5) Beleuchtete Ruftasten mit Namensschild Die Beleuchtung agiert auch gleichzeitig als Diagnose LED(s) 6) Nachtsicht LEDs 7) Mikrofon 8) Lautsprecher 9) RFID Leser Innen 1) Elektrische Haupteinheit 2) Flauschpunkt 1...
  • Page 38 9) Flauschpunkt 2 Zur permanenten Befestigung des Mehrparteien Moduls 10) DoorBird Multi Tenant Module MTM18A DoorBird Multi Tenant Module MTM18A...
  • Page 39 GERÄT MIT DISPLAY MODUL UND KEYPAD MODUL Vorderseite 1) Nachtsicht LEDs 6) Lautsprecher 2) HDTV Video 7) RFID Leser 3) Mikrofon 8) Bewegungssensor 4) Lichtsensor 9) Display Modul Für den Nachtsichtmodus 10) Keypad Modul 5) Sicherheitsschrauben Die Beleuchtung agiert auch gleichzeitig als Diagnose LED(s) Innen 1) Elektrische Haupteinheit...
  • Page 40 GERÄT MIT INFO MODUL UND KEYPAD MODUL Vorderseite 1) Nachtsicht LEDs 7) RFID Leser 2) HDTV Video 8) Bewegungssensor 3) Mikrofon 9) Info Modul 4) Lichtsensor 10) Keypad Modul Für den Nachtsichtmodus Die Beleuchtung agiert auch gleichzeitig als Diagnose LED(s) 5) Sicherheitsschrauben 6) Lautsprecher Innen...
  • Page 41 Verwendungsart zugelassen sind. Netzwerkgeschwindigkeit und Netzwerkkomponenten Stellen Sie sicher, dass Ihre Internetverbindung über mindestens 0,5 Mbit/s Uploadgeschwindigkeit verfügt. Sie können über die DoorBird App jederzeit auch einen Geschwindigkeitstest durchführen. Das Nutzererlebnis ist nur so gut wie die Netzwerkgeschwindigkeit, Netzwerkstabilität und Qualität Ihrer Netzwerkkomponenten, wie z.B.
  • Page 42 (IEEE 802.3). Wenn Sie nur zwei Drähte am Montageort zur Verfügung haben, können Sie den „DoorBird 2-Draht Ethernet PoE Konverter A1071“ verwenden, der separat erhältlich ist. Er ermöglicht es Ihnen, Netz- werkdaten (Ethernet) und Strom (PoE) über eine einfache Zwei- drahtleitung über weite Strecken hinweg zu übertragen.
  • Page 43 SCHRITT 4: FRONTBLENDE ENTFERNEN Entfernen Sie die Frontblende mit der Haupteinheit vorsichtig mit dem mit- gelieferten Schraubendreher vom Montagerückgehäuse. 1.) Sicherheitsschrau ben 2.) Frontblende nach 3.) Frontblende zu 1 cm herausdrehen. unten ziehen. sich heranziehen. SCHRITT 5: MONTAGERÜCKGEHÄUSE MONTIEREN Montieren Sie das Montagerückgehäuse an der Wand. Sie finden detaillierte Zeichnungen und Abmessungen im Datenblatt des entsprechenden Geräts.
  • Page 44 Option 2: Stromversorgung per PoE Zur Stromversorgung des Geräts per PoE-Switch (z.B. D-Link DGS-1008P) oder PoE-Injektor (z.B. DoorBird Gigabit PoE Injektor A1091) nach PoE Stan- dard IEEE 802.3af Mode A werden die vier Drähte mit den Nummern 1, 2, 3 und 6 eines Cat.5 Netzwerkkabels oder besser benutzt.
  • Page 45 Behandeln Sie die Frontblende mit Vorsicht. Die Oberfläche der Frontblende könnte zerkratzt oder anderweitig beschädigt werden, wenn diese während der Installation unvorsichtig behandelt wird. Sie können die Nylonschnur ver- wenden, um die Frontblende temporär am Montagerückgehäuse zu befestigen, während Sie die Kabel und Drähte mit dem Gerät verbinden.
  • Page 46 Relais behält den Zustand auch bei Spannungsverlust. REL1 REL1 Sie können den Standardzustand des Relais (geöffnet/ geschlossen) über die DoorBird App konfigurieren. Diese Anschlüsse können verwendet werden, um z.B. einen elektrischen Türöffner anzuschließen. Das Gerät bietet keine Stromversorgung für einen elektrischen Türöffner.
  • Page 47 Türstation aufbricht und die Verdrahtung des Türöffners kurzschließt). Wir empfehlen daher für die Verdrahtung eines elektrischen Türöffners generell den Einsatz eines abgesetzten Sicherheitsrelais, das im Hausinneren montiert wird (z.B. DoorBird E/A Tür Controller A1081). BELL, BELL NOTI CE Reserviert – nicht verwenden! EXT, EXT Türöffnertaster, max.
  • Page 48 Verwenden Sie das gelbe Kabel um die Ruftaste mit der IP Video Türstation zu verbinden. 2 PIN (BELL) Wir bieten leistungsstarke IP Türgongs an (z. B. DoorBird A1061W), die über Ihr Netzwerk (LAN / WLAN / WAN) BELL sicher an dieses Gerät angeschlossen werden können.
  • Page 49 SCHRITT 8: FRONTBLENDE MONTIEREN Montieren Sie die Frontblende des Geräts an das Montagerückgehäuse. 1.) Frontblende in 2.) Frontblende nach 3.) Sicherheitsschrau- das Montagerück- oben schieben. ben einsetzen. gehäuse drücken. SCHRITT 9: INBETRIEBNAHME Schalten Sie den Strom der zum Montageort führenden Leitungen an. Wenn das Gerät per Steckernetzteil mit Strom versorgt werden soll, stecken Sie das Steckernetzteil des Geräts in eine Wandsteckdose.
  • Page 50 SCHRITT 10: DOWNLOAD UND INSTALLATION DER APP Laden Sie sich die App “DoorBird“ von Bird Home Automation aus dem Apple App Store bzw. Google Play Store auf Ihr mobiles Endgerät. Die stets aktuelle Version der App Bedienungsanleitung finden Sie unter www.doorbird.com/de/support...
  • Page 51 Das Gerät verfügt über eine gut dokumentierte API für die Integration in Anwendungen Dritter. Weitere Informationen finden Sie unter www.doorbird.com/de/api DOORBIRD CONNECT Das Gerät verfügt über viele Möglichkeiten, es in Drittanbieteranwendungen zu integrieren. Weitere Informationen finden Sie unter www.doorbird.com/de/connect BESCHRIFTUNG EINES NAMENSSCHILDS WECHSELN Nur relevant für Geräte mit einem oder mehr Ruftasten mit beleuch-...
  • Page 52 = 18. Ruftastenbuchse PFLEGE DER DOORBIRD-PRODUKTE Pflege und Reinigung DoorBird Türstationen werden aus hochwertigen Materialien gefertigt und sind für eine lange Lebensdauer ausgelegt. Da Türstationen meistens im ungeschützten Außenbereich montiert werden, sind sie widrigen Witterungsbe- dingungen und aggressiven Substanzen ausgesetzt, insbesondere an Straßen, in Küstennähe und in Industriegebieten.
  • Page 53 Pflege alle Reste und Rückstände von Reinigungs- oder Schmier- mitteln, um Flecken oder Verfärbungen zu vermeiden. Edelstahl Für DoorBird Türstationen werden ausschließlich hochwertige deutsche Edelstahle verwendet. Aber auch hochwertiger Edelstahl kann rosten, denn Edelstahl besteht zu ca. 70 % aus Eisen. Die Rostbeständigkeit wird lediglich durch eine Schutzschicht (auch Passivschicht genannt) erzeugt, die sich wie eine Haut über das Eisen legt.
  • Page 54 Lackierte Oberflächen Reinigen Sie Lackoberflächen und Beschriftungen mit einem mit milder Sei- fenlösung angefeuchteten, weichen, kratzfreiem Tuch (z. B. Brillenputztuch, Möbelpoliertuch o. ä.). Damit keine Flecken oder Verfärbungen entstehen, sollte das Pflegemittel rückstandslos abgewischt werden. Gehen Sie bei Beschriftungen besonders behutsam vor, um die Folie oder den Aufdruck nicht zu beschädigen.
  • Page 55: Technische Daten

    1x Installationsanleitung • Individuelle PIN Codes 1x Kleinteile • Individuelle Events (z.B. ein Relais schalten, Push Nachricht, SIP Anruf Garantie: [Audio/Video], HTTP(s) Notification) Siehe www.doorbird.com/de/warranty • Individuelle Zeitpläne SYSTEMANFORDERUNGEN Anschlüsse: • RJ45, für LAN/PoE Systemanforderungen: • Bi-stabiles selbsthaltendes Mobiles Endgerät: Neuestes iOS auf Schaltrelais #1, max.
  • Page 56 Intern Typ: Kompatible Transponder: Aktiv RFID Key fobs, separat erhältlich, Erfassungswinkel: siehe www.doorbird.com/de/buy 110° Es können bis zu 100 Tags verwaltet Reichweite: werden 1 – 10 m (3.3 – 32.9 ft), je nach Um- gebung, konfigurierbar in 1 m (3,3 ft) INTEGRIERTE FUNKMODULE Schritten.
  • Page 57: Rechtliche Hinweise

    RECHTLICHE HINWEISE die von Land zu Land variieren. Überprüfen Sie die Allgemeines Gesetze in Ihrer Region vor der Installation und 1. DoorBird ist ein registriertes Warenzeichen der Verwendung dieses Gerätes für Überwachungs- Bird Home Automation GmbH. zwecke. 2. Apple, das Apple Logo, Mac, Mac OS, Macintosh, Wenn es sich bei dem Gerät um eine Tür-,...
  • Page 58 également ce manuel. Vous trouverez la toute dernière version du manuel d’installation à l’adresse www.doorbird.com/fr/support Pour simplifier les termes, nous utiliserons le mot « appareil » pour parler du produit « portier vidéo IP » et le mot « appareil mobile » pour parler d’un smartphone ou d’une tablette.
  • Page 59 Prudence : indique une situation dangereuse qui, si rien n’est fait pour l’éviter, peut entraîner des lésions légères. Remarque : indique une situation dangereuse qui, si rien n’est NOT IC E fait pour l’éviter, peut entraîner des dommages matériels. Important : indique la présence d’informations importantes garantissant le fonctionnement correct du produit.
  • Page 60 MISE EN GARDE ∙ N’ouvrez pas l’appareil. Si vous le faites, votre garantie sera annulée ! L’appareil ne contient aucune pièce pouvant être entretenue par l’utilisateur. En cas d’erreurs, veuillez faire contrôler l’appareil par un spécialiste agréé. ∙ Pour des raisons de sécurité, d’homologation et de licences (CE/FCC /IC etc.), il est interdit de procéder à...
  • Page 61 ∙ Ne raccordez aucun terminal de l’appareil à une ligne d’alimentation. Il peut en résulter un incendie ou des décharges électriques. ∙ Assurez-vous que le câble d’alimentation ne soit ni endommagé, ni écrasé. Si le câble est rompu, il peut en résulter un incendie ou une décharge électrique.
  • Page 62 MISE EN GARDE dysfonctionnements au niveau de l’appareil : - emplacements exposés à la lumière directe du soleil ou à proximité d’appareils de chauffage dont la température varie. - emplacements exposés à la poussière, à l’huile, aux produits chimiques, à l’acide sulfurique (source chaude). - emplacements soumis à...
  • Page 63 Instructions de sécurité NOT IC E ∙ L‘appareil doit être utilisé conformément aux lois et règlements locaux. ∙ Stocker l‘appareil dans un endroit sec et aéré. ∙ Évitez d‘exposer l‘appareil à des chocs ou à une forte pression. ∙ N’installez pas l’appareil sur des supports, surfaces ou parois instables. Assurez-vous que le matériau utilisé...
  • Page 64 ∙ Installez l’appareil dans un endroit accessible en cas d’inspections, de réparations et d’entretiens à venir. ∙ Si l’appareil est utilisé à proximité d’un téléphone mobile, des perturbations peuvent s’ensuivre. ∙ En cas de chute, l’appareil peut être endommagé. Manipulez-le avec prudence.
  • Page 65: Appareil Avec 1 Bouton D'appel

    Au besoin, transportez l’appareil dans son emballage d’origine ou NOTIC E dans un emballage adapté, afin d’éviter tout dommage. Garantie Vous trouverez les informations relatives à la garantie en consultant la page www.doorbird.com/fr/warranty APPAREIL AVEC 1 BOUTON D’APPEL Face avant 1) Vidéo HDTV 2) Capteur de luminosité...
  • Page 66: Appareil Avec 2 Boutons D'appel Et Plus

    APPAREIL AVEC 2 BOUTONS D’APPEL ET PLUS Face avant 1) Vidéo HDTV 2) Capteur de luminosité Pour le mode vision nocturne 3) Vis de sécurité 4) Capteur de mouvement 5) Boutons d’appel éclairés avec plaque nominative L’éclairage agit en même temps comme LED de diagnostic 6) Plusieurs LED de vision nocturne 7) Microphone...
  • Page 67 9) Bande velcro 2 Pour la fixation permanente du module multi-résidentiel au boîtier de montage arrière 10) DoorBird Module multi-résidentiel MTM18A DoorBird Multi Tenant Module MTM18A...
  • Page 68: Appareil Avec Module Écran (Display) Et Module Clavier (Keypad)

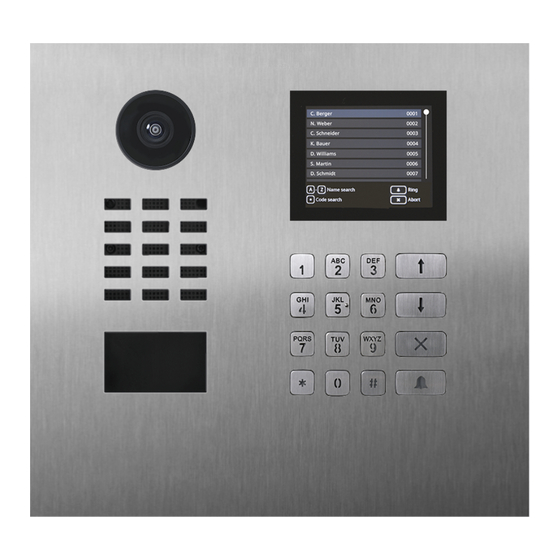
    APPAREIL AVEC MODULE ÉCRAN (DISPLAY) ET MODULE CLAVIER (KEYPAD) Face avant 1) Plusieurs LED de vision nocturne 6) Haut-parleur 2) Vidéo HDTV 7) Lecteur RFID 3) Microphone 8) Capteur de mouvement 4) Capteur de luminosité 9) Écran d’affichage (display) Pour le mode vision nocturne 10) Clavier (keypad) L’éclairage agit en même temps 5) Vis de sécurité...
  • Page 69: Appareil Avec Module Info Et Module Clavier (Keypad)

    APPAREIL AVEC MODULE INFO ET MODULE CLAVIER (KEYPAD) Face avant 1) Plusieurs LED de vision nocturne 6) Haut-parleur 2) Vidéo HDTV 7) Lecteur RFID 3) Microphone 8) Capteur de mouvement 4) Capteur de luminosité 9) Module info Pour le mode vision nocturne 10) Clavier (keypad) 5) Vis de sécurité...
  • Page 70: Étape 2: Démontage De La Sonnette Existante

    Assurez-vous que votre connexion Internet dispose bien d’une vitesse de chargement minimale de 0,5 Mbit/seconde. Vous pouvez procéder à tout moment à un test de vitesse grâce à l’application DoorBird. L’expérience utilisateur est à l’image de la vitesse de votre réseau, de la stabilité de votre réseau et de la qualité...
  • Page 71: Étape 3: Détermination De L'emplacement De Montage

    ÉTAPE 3: DÉTERMINATION DE L’EMPLACEMENT DE MONTAGE Grâce à sa lentille grand angle hémisphérique, si une personne se tient à une distance minimale de 50 cm de l’appareil, une hauteur de montage réduite de l’appareil est suffisante. La lentille de la caméra devrait être placée à une hauteur minimale de 125 cm.
  • Page 72: Étape 5 : Fixation Du Boîtier De Montage Arrière

    SCHRITT 4: ENLEVER LA FACE AVANT À l’aide du tournevis fourni, enlevez soigneusement la face avant (avec le module principal) du boîtier de montage arrière. 1.) Dévissez les vis de 2.) Tirez la face avant 3.) Tirez ensuite la face sécurité...
  • Page 73 2. Amenez le câble réseau à l’emplacement de montage de l’appareil. Vous trouverez de plus amples informations sur la PoE ici : http://www.doorbird.com/de/poe ÉTAPE 7 : BRANCHER L’APPAREIL Les câbles et fils sont raccordés très simplement à l‘appareil via des ports de raccordement étiquetés.
  • Page 74 Vous pouvez utiliser le fil en nylon pour fixer temporairement la face avant au boîtier de montage arrière, pendant que vous raccordez les câbles et fils à l’appareil. REL1 REL2 BELL 15VDC LAN/POE Uniquement pour les appareils avec bouton (s) poussoir (s). 4 Pin 2 Pin Chaque bouton poussoir...
  • Page 75 état même en cas de coupure de courant. Vous pouvez REL1 configurer l‘état par défaut du relais (ouverture/fermeture) REL1 via l‘application DoorBird. Ces relais peuvent être utilisés pour connecter p. ex. un ouvre-porte électrique. L‘appareil n‘alimente pas l‘appareil raccordé. L‘alimentation électrique de l‘ouvre-porte électrique doit être installée séparément.
  • Page 76 Par conséquent, nous recommandons généralement l‘utilisation d‘un relais de sécurité à distance monté à l‘intérieur (p. ex. DoorBird commande de porte E/S A1081) pour le câblage d‘un ouvre- porte électrique pour une installation plus sûre dans votre maison.
  • Page 77 Vous trouverez des carillons de porte dotés de nombreuses fonctionnalités intéressantes sur notre bou- BELL tique en ligne (p. ex. DoorBird Carillon IP A1061W). Ceux BELL – ci peuvent être branchés en toute sécurité via votre réseau (LAN / WIFI / WAN) à l’appareil. Vous pouvez également connecter un carillon de porte...
  • Page 78: Étape 8 : Fixation Du Panneau Avant

    ÉTAPE 8 : FIXATION DU PANNEAU AVANT Fixez la face avant de l’appareil au boîtier de montage arrière. 1.) Poussez la face 2.) Faites coulisser 3.) Insérez les vis de avant dans le boîtier la face avant vers sécurité. de montage arrière le haut ÉTAPE 9 : MISE EN MARCHE Remettez sous tension l‘alimentation électrique menant à...
  • Page 79 Dans l’application DoorBird, allez dans « Paramètres > Ajouter » et cliquez sur le symbole du code QR dans le champ « Nom d’utilisateur ». Scannez le code QR du passeport digital Fourni avec l’appareil.
  • Page 80: Modifier Le Libellé D'une Plaque Nominative

    L’appareil dispose d’une interface de programmation API bien documentée pour une intégration dans des applications tierces. Vous trouverez de plus amples informations à l’adresse www.doorbird.com/fr/api DOORBIRD CONNECT L’appareil dispose de nombreuses possibilités d’intégration dans des applications tierces. Vous trouverez de plus amples informations à l’adresse www.doorbird.com/fr/connect...
  • Page 81: Connecter Les Boutons D'appel Au Module Multi-Résidentiel

    ENTRETIEN DES PRODUITS DOORBIRD Entretien et nettoyage Les produits DoorBird sont fabriqués à partir de matériaux de haute qualité et sont conçus pour une longue durabilité. Comme les DoorBirds sont généralement installés dans des zones extérieures non protégées, ils sont exposés à...
  • Page 82 Acier inoxydable Nous utilisons uniquement de l‘acier inoxydable allemand de haute qualité pour les produits DoorBird. Cependant, l‘acier inoxydable de haute qualité peut également rouiller en surface, car environ 70% de l‘acier inoxydable est constitué de fer. La résistance à la rouille n‘est obtenue que par une couche protectrice (aussi appelée couche passive), qui recouvre le fer comme une peau.
  • Page 83: Données Techniques

    1x Petites éléments • Relais de commutation bistable autoportant #1, max. 1-24 V DC/V DA, Garantie : 1 Ampère, par exemple pour Siehe www.doorbird.com/fr/warranty ouvre-porte électrique • Relais de commutation bistable autoportant #2, max. 1-24 V DC/V DA, CONFIGURATION REQUISE 1 Ampère, par exemple pour...
  • Page 84 débit fixe haute vitesse à large bande, Portée : DSL, câble ou fibre, pas de socks ou 1 - 10 m (3,3 - 32,9 ft), selon de serveur proxy l’environnement, configurable par pas de 1 m (3,3 ft) Réseau : réseau Ethernet avec DHCP Quand un «...
  • Page 85 Transpondeur compatible : Badges RFID, disponibles séparément, voir www.doorbird.com/fr/buy Jusqu‘ à 100 badges peuvent être gérés MODULES SANS FIL INTÉGRÉS RFID : 125 KHz Capteur : 24 GHz, peut être désactivé ACCESSOIRES OPTIONNELS Disponibles séparément : Voir www.doorbird.com/fr/buy *: seulement sur certains modéls ou...
  • Page 86: Mentions Légales

    MENTIONS LÉGALES trouve sur le territoire de l’Union européenne. Le Généralités centre de données est exploité conformément 1. DoorBird marque déposée aux normes de sécurité les plus strictes. Bird Home Automation GmbH. 3. Les méthodes de surveillance vidéo, audio et 2.
  • Page 87 Space for notes / Platz für Notizen...
  • Page 88 Encontrará siempre la versión más actualizada del manual de instalación en www.doorbird.com/support Para hacer las cosas más fáciles usamos el término „dispositivo“ para el producto „Videoportero IP“ y „ dispositivo móvil „para un smartphone o tablet.
  • Page 89 Aviso: Indica una situación que, si no se evita, podría resultar NOT IC E en daños a la propiedad. Importante: Indica información importante y esencial para que el producto funcione correctamente. Nota: Indica información útil que ayuda a sacar el máximo provecho del producto.
  • Page 90 WARNING • El alto voltaje puede estar presente internamente. No abra el dispositivo, podría resultar en una descarga eléctrica. • El dispositivo no es a prueba de explosión. No lo instale ni utilice cerca de gases o materiales inflamables, podría producirse un incendio o una explosión.
  • Page 91 • No coloque nada en el dispositivo ni lo cubra con un paño, silicona, pegamento, recubrimiento, cubiertas separadas, etc., podría ocasionar un incendio o problemas con el dispositivo. • No instale el dispositivo en ninguna de las siguientes ubicaciones, podría ocasionar un incendio, una descarga eléctrica o problemas con el dispositivo.
  • Page 92 Instrucciones de seguridad NOT IC E ∙ El dispositivo debe utilizarse de acuerdo con las leyes y normativas locales. • Guarde el aparato en un lugar seco y ventilado. • Evite exponer el dispositivo a golpes o presiones elevadas. • No instale el dispositivo en soportes, superficies o paredes inestables. Asegúrese de que el material sea lo suficientemente fuerte como para soportar el peso del dispositivo.
  • Page 93 • Instale el dispositivo en un área accesible para futuras inspecciones, reparaciones y mantenimiento. • Si el dispositivo se usa cerca de un teléfono celular, es posible que funcione mal. • El dispositivo puede dañarse si se cae, manipular con cuidado. •...
  • Page 94 Información de garantía Para obtener información sobre la garantía del dispositivo, consulte www.doorbird.com/warranty EJEMPLO DE DISPOSITIVO CON 1 TECLA DE LLAMADA Frontal 1) Video HDTV 2) Sensor de luz para el modo de visión nocturna 3) Tornillos de seguridad 4) Sensor de movimiento 5) Botones de llamada iluminados con placa de identificación.
  • Page 95 EJEMPLO DE DISPOSITIVO CON 2 Y MÁS BOTONES DE LLAMADA Frontal 1) Video HDTV 2) Sensor de luz para el modo de visión nocturna 3) Tornillos de seguridad 4) Sensor de movimiento 5) Botones de llamada iluminados con placa de identificación. La iluminación también actúa como LEDs de diagnóstico.
  • Page 96 10) DoorBird Módulo Multi Familiar MTM18A DoorBird Multi Tenant Module MTM18A EJEMPLO DE DISPOSITIVO CON MÓDULO DE DISPLAY Y MÓDULO DE TECLADO Frontal 1) LEDs para visión nocturna 7) Lector RFID 2) Video HDTV 8) Sensor de movimiento 3) Micrófono 9) Módulo de Display...
  • Page 97 Por dentro 1) Unidad Eléctrica Principal 2) Cable amarillo para botón de llamada conectado a la tecla de llamada iluminada con placa de identificación 3) Cable rojo para el puerto del módulo 1 (no utilizado) 4) Cable verde para el puerto del módulo 2 (no utilizado) 5) Terminal de conexión para tornillo 6) Conector LAN/PoE...
  • Page 98 Asegúrese de que la velocidad de subida de su conexión a Internet sea de al menos 0,5 Mbps. También puede realizar una prueba de velocidad en cualquier momento a través de la aplicación DoorBird. La experiencia de usuario sólo es tan buena como la velocidad de red, la estabilidad de red y la calidad de los componentes de red, como el enrutador de Internet y los puntos de acceso WiFi o los repetidores WiFi.
  • Page 99 componentes de red no tengan más de dos años de antigüedad, hayan sido fabricados por un fabricante conocido y tengan instalado el firmware más reciente. Si no se cumplen estos requisitos, puede ocurrir, por ejemplo, que el rendimiento de audio y vídeo sea deficiente o que las notificaciones push se retrasen o no lleguen a su smartphone o tablet.
  • Page 100 802.3). Si sólo tiene dos cables disponibles en el lugar de montaje, puede utilizar el „DoorBird 2-Wire Ethernet PoE Converter A1071“, que se vende por separado. Permite transferir datos de red (Ethernet) y potencia (PoE) con un simple cable de dos hilos a grandes distancias.
  • Page 101 Para alimentar el videoportero a través de un conmutador PoE (p. ej., D-Link DGS-1008P) o un inyector PoE (p. ej. DoorBird Gigabit Injector-A1091) conforme a la norma PoE IEEE 802.3af Modo A, se deben utilizar los cuatro cables con los números 1, 2, 3 y 6 de un cable Cat.
  • Page 102 1. Desconecte el interruptor PoE o el inyector PoE de la red eléctrica. 2. Coloque el cable de red en el lugar de instalación del videoportero. PASO 7: CONEXIÓN DEL DISPOSITIVO Es posible conectar los cables y alambres al dispositivo de forma cómoda y segura a través de los puertos de conexión etiquetados.
  • Page 103 REL1 REL2 BELL 15VDC LAN/POE Sólo relacionado para dispositivos con botón(es) de llamada dispo sitivo ivos c botón( ón( ón( ón( llama amad 4 Pin 2 Pin Cada botón de llamada Soft-Touch Premium está equipado con dos conectores. PUERTO DESCRIPCIÓN LAN/POE Conector RJ45 para conectar un cable de red estándar Cat.
  • Page 104 Pue- REL1 de configurar el estado predeterminado del relé (abrir/ REL1 cerrar) a través de la aplicación DoorBird App. Estos puertos se pueden utilizar para conectar, por ejemplo, un abrepuertas eléctrico. El dispositivo no suministra alimentación eléctrica al dispositivo conectado.
  • Page 105 Por lo tanto, generalmente recomendamos el uso de un relé de seguridad remoto instalado en interiores (por ejemplo, el controlador de puerta DoorBird I/O DoorBird A1081) para el cableado de un abrepuertas eléctrico para una instalación más segura en su hogar.
  • Page 106 2 PIN (BELL) Ofrecemos campanas de puerta IP (p.ej. DoorBird A1061W), que pueden conectarse de forma segura a BELL través de su red (LAN / WIFI / WAN) a este dispositivo. BELL Alternativamente, puede conectar un timbre de puerta convencional utilizando este contacto de relé. Relé de conmutación, máx.
  • Page 107 PASO 8: MONTAJE DE LA PLACA FRONTAL Monte la placa frontal del aparato en la carcasa de montaje (caja trasera) del dispositivo. 1.) Introducir el panel 2.) Empuje el panel 3.) Inserte los tornillos frontal en la carcasa frontal hacia de seguridad.
  • Page 108 Apple App Store o Google Play Store. Siempre puede encontrar la versión más actualizada del manual de la aplicación en www.doorbird.com/ support, vaya a DoorBird App „Configuración > Añadir dispositivo“ y haga clic en el icono de código QR en el campo „Usuario“. Escanee el código QR de usuario que se encuentra en el „Pasaporte digital“...
  • Page 109 El dispositivo cuenta con una API bien documentada para la integración con terceros. Para más información, términos y condiciones, véase www.doorbird.com/ DOORBIRD INTEGRACIÓN El dispositivo cuenta con muchas opciones para integrarlo en aplicaciones de terceros. Para más información, términos y condiciones, véase www.doorbird.
  • Page 110 MANTENIMIENTO DE LOS PRODUCTOS DOORBIRD Instrucciones de limpieza y mantenimiento Todos los videoporteros DoorBird están fabricados con materiales de alta calidad y están diseñados para una duradera vida útil. Debido a que los videporteros se instalan generalmente en áreas al aire libre, están expuestos a condiciones climáticas adversas y a sustancias agresivas, especialmente cerca...
  • Page 111 Acero Inoxidable Para todos los videoporteros DoorBird sólo se utiliza acero inoxidable alemán de alta calidad. Sin embargo, el acero inoxidable de alta calidad también puede oxidarse, ya que aproximadamente el 70 % del acero inoxidable es de hierro. La resistencia al óxido sólo se consigue mediante una capa protectora (también llamada capa pasiva), que cubre el hierro como una piel.
  • Page 112: Especificaciones Técnicas

    Módulo del teclado*: 1 x Manual de instalación 16 teclas, iluminadas, configurables vía app, p. ej. Garantía: • Códigos PIN individuales Ver www.doorbird.com/es/warranty • Eventos individuales (por ejemplo cambiar un relé, notificación HTTP (s), REQUISITOS ACTUALES llamada SIP [audio/video], DEL SISTEMA notificación push)
  • Page 113 Interna Tipo: Activo Transpondedor compatibles: Llaveros RFID de venta por separado Ángulo de cobertura: en www.doorbird.com/es/buy 110° Hasta 100 etiquetas gestionables Alcance: 1 - 10 m (3,3 - 32,9 ft), según entorno, Configuration: configurable a partir de 1 m (3,3 pies).
  • Page 114 NOTAS LEGALES Observaciones generales de su región local antes de instalar y utilizar este 1. 1. DoorBird es una marca registrada de Bird dispositivo con fines de vigilancia.before installing Home Automation GmbH. and using this device for surveillance purposes. 2. Apple, the Apple logo, Mac, Mac OS, Macintosh, Si el dispositivo es una puerta, estación interior o...
  • Page 115 Space for notes / Platz für Notizen...
  • Page 116 FCC Caution This device complies with part 15 of the FCC Rules. Operation is subject to the following two conditions: (1) This device may not cause harmful interference, and (2) this device must accept any interference received, including interference that may cause undesired operation.
  • Page 117 www.doorbird.com...

Ce manuel est également adapté pour:

D21x série

Table des Matières