Sony DSX-A40UI Mode D'emploi
Table des Matières
Les langues disponibles
Les langues disponibles
Liens rapides
FM/AM
Digital Media
Player
Owner's Record
The model and serial numbers are located on the bottom of
the unit.
Record the serial number in the space provided below.
Refer to these numbers whenever you call upon your Sony
dealer regarding this product.
Model No. DSX-A40UI
Serial No.
To cancel the demonstration (DEMO) display, see page 12.
Pour annuler l'affichage de démonstration (DEMO),
reportez-vous à la page 12.
DSX-A40UI
4-468-988-21(1)
Operating Instructions
Mode d'emploi
GB
FR
Chapitres
Table des Matières
Dépannage

Manuels Connexes pour Sony DSX-A40UI


Sommaire des Matières pour Sony DSX-A40UI
- Page 20 Pour plus de sécurité, installez cet appareil dans le tableau de bord de votre véhicule. Pour de plus amples informations sur l’installation et les raccordements, reportez- vous au manuel d’installation et de raccordement fourni. Remarque sur la pile au lithium N’exposez pas la pile à...
- Page 21 Table des matières Guide des pièces et commandes ..4 Préparation Retrait de la façade ....6 Réglage de l’horloge .
-
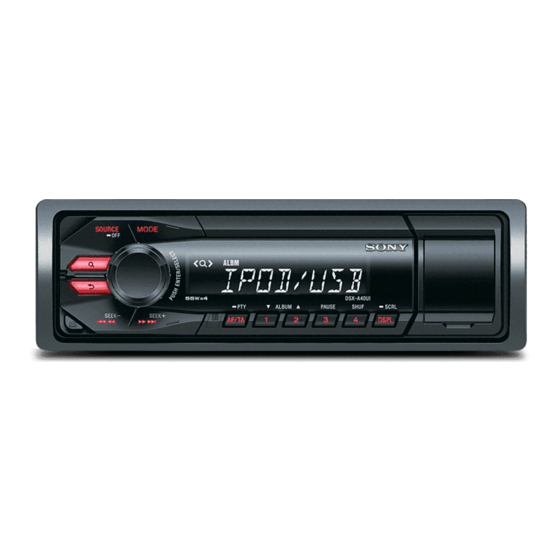
Page 22: Guide Des Pièces Et Commandes
Guide des pièces et commandes Appareil principal La touche numérique 2/ALBUM comporte un point tactile. Molette de réglage (navigation) (page 11) Permet d’accéder au mode de navigation Tournez pour régler le volume. pendant la lecture. ENTER Permet d’entrer l’élément sélectionné. ... - Page 23 SEEK +/– Télécommande RM-X211 Permet de syntoniser automatiquement des stations de radio. Appuyez sur la touche et maintenez-la enfoncée pour syntoniser des stations manuellement. / (précédente/suivante), / (retour/avance rapide) Récepteur de télécommande PTY (type d’émission) Permet de sélectionner PTY en mode RDS.
-
Page 24: Préparation
SOUND Permet d’ouvrir le menu de configuration Préparation sonore directement. -MENU Retrait de la façade Appuyez sur la touche et maintenez-la enfoncée pour ouvrir le menu de configuration générale. Vous pouvez retirer la façade de cet appareil pour le protéger du vol. ... -
Page 25: Réglage De L'horloge
Raccordez le iPod/périphérique Réglage de l’horloge USB à l’appareil. Pour raccorder un iPod/iPhone, utilisez le câble de raccordement USB pour iPod Appuyez sur la touche SELECT et (non fourni). maintenez-la enfoncée. Lors du raccordement d’un iPhone L’écran de configuration apparaît. Tournez la molette de réglage pour sélectionner [CLOCK-ADJ], puis appuyez dessus. -
Page 26: Écoute De La Radio
Appuyez sur SOURCE pour sélectionner [AUX]. Écoute de la radio Pour faire correspondre le niveau de Écoute de la radio volume de l’appareil raccordé à celui des autres sources Pour écouter la radio, appuyez sur SOURCE Démarrez la lecture sur l’appareil audio pour sélectionner [TUNER]. -
Page 27: Mémorisation Manuelle
Pour syntoniser des stations Appuyez sur PTY pendant la automatiquement réception FM. Appuyez sur SEEK +/–. Le balayage s’interrompt lorsque Tournez la molette de réglage l’appareil capte une station. Répétez jusqu’à ce que le type d’émission cette procédure jusqu’à ce que vous souhaité... -
Page 28: Lecture
Raccordez un iPod/périphérique USB au port USB (page 7). Lecture La lecture commence. Si un périphérique est déjà raccordé, Lecture d’un iPod/ appuyez sur SOURCE pour sélectionner [USB] afin de lancer la lecture. périphérique USB Réglez le volume sur cet appareil. Dans ce mode d’emploi, «... -
Page 29: Recherche Et Lecture Des Plages
Recherche d’une plage par nom Recherche et lecture des (Quick-BrowZer™) plages En cours de lecture USB, appuyez (navigation)* pour afficher la liste des catégories de recherche. Lecture répétée et lecture aléatoire Lorsque la liste de plages apparaît, appuyez plusieurs fois sur (retour) pour afficher la catégorie de recherche Lecture répétée :... -
Page 30: Recherche D'éléments Par Saut (Mode Saut)
Recherche d’éléments par saut Réglages (Mode Saut) Annulation du mode DEMO Appuyez sur (navigation). Appuyez sur SEEK +. Vous pouvez désactiver l’affichage de démonstration qui apparaît lorsque cet Tournez la molette de réglage pour appareil est éteint. sélectionner l’élément. Appuyez sur la touche SELECT et L’appareil effectue des sauts dans la liste maintenez-la enfoncée. -
Page 31: Configuration Générale
Appuyez sur la touche SELECT pour AUTO OFF accéder à la configuration sonore Permet d’éteindre automatiquement ou appuyez sur la touche SELECT et après un laps de temps souhaité lors de maintenez-la enfoncée pour l’arrêt de l’appareil : [NO], [30S] accéder à... -
Page 32: Configuration Sonore
Configuration sonore Informations complémentaires EQ3 PRST (présélection EQ3) Précautions Permet de sélectionner une courbe d’égaliseur parmi 7 courbes d’égaliseur ou Si votre véhicule est resté stationné en de désactiver la fonction : [XPLOD], plein soleil, laissez l’appareil refroidir avant [VOCAL], [EDGE], [CRUISE], [SPACE], de l’utiliser. -
Page 33: À Propos Du Ipod
À propos du iPod Entretien Vous pouvez raccorder cet appareil aux modèles d’iPod suivants. Mettez vos Remplacement de la pile au lithium de périphériques iPod à jour avec le logiciel le la télécommande plus récent avant toute utilisation. Lorsque la pile est faible, la portée de la Made for télécommande diminue. -
Page 34: Caractéristiques Techniques
N’exercez pas une pression trop forte, car Sensibilité : 26 μV vous pourriez endommager les connecteurs. Lecteur USB Interface : USB (haute vitesse) Courant maximal : 1 A Nombre maximal de données reconnaissables : Dossiers (albums) : 128 Fichiers (plages) par dossier : 512 Codecs correspondants : MP3 (.mp3) et WMA (.wma) Remarques... -
Page 35: Dépannage
Accessoires/appareils en option : Câble de raccordement USB pour iPod : Dépannage RC-100IP La liste de vérification suivante vous aidera à Il est possible que votre détaillant ne dispose remédier aux problèmes que vous pourriez pas de certains accessoires énoncés ci- rencontrer avec cet appareil. -
Page 36: Réception Radio
Les stations mémorisées sont effacées et Impossible de capter une station l’heure est remise à zéro. présélectionnée. Le fusible est grillé. Le signal capté est trop faible. Émission d’un bruit lorsque la position de la clé de contact est modifiée. ... - Page 37 2 secondes (l’affichage disparaît), puis appuyez de nouveau sur OFF. Si le lecture commence automatiquement. message d’erreur ne disparaît pas de Selon la structure du périphérique USB, l’affichage, contactez votre détaillant Sony cette opération peut prendre plus d’une le plus proche. minute. NO MUSIC STOP ...
- Page 40 Web suivant : http://esupport.sony.com http://www.sony.com/caraudio If you have any questions/problems regarding this product, try the following: Read Troubleshooting in these Operating Instructions. Please contact (U.S.A. only); 1-800-222-7669 Call http://www.SONY.com http://www.sony.net/ ©2013 Sony Corporation Printed in Thailand...