Publicité

Les langues disponibles
  • FR

Les langues disponibles

  • FRANÇAIS, page 17

Liens rapides

00054867
(RS100)
„RS100" Audio Extension Set
Audio-Erweiterungsset „RS100"
Quick Guide
Kurzanleitung
Notice d'utilisation
Beknopte bedieningsinstructies
Návod k použití
Návod na použitie
GB
D
F
NL
CZ
SK

Publicité

Table des Matières
loading

Sommaire des Matières pour Hama 00054867

  • Page 1 00054867 (RS100) „RS100” Audio Extension Set Audio-Erweiterungsset „RS100” Quick Guide Kurzanleitung Notice d’utilisation Beknopte bedieningsinstructies Návod k použití Návod na použitie...
  • Page 2 Speaker: 9.0 x 9.2 x 10.5 cm Weight/ Transmitter 0.15 kg, Receiver 0.16 kg, Speaker (2x) 0.6 kg Gewicht Further information (features, languages, and so on) are available on / Weitere Informationen (Features, Sprachen, etc.) finden Sie hier 00054867: www.hama.com/54867#downloads...
  • Page 3 Speakers Transmitter 11 12 13 14 15 16 17...
  • Page 4 Receiver Remote Control Display Rear...
  • Page 6: Remote Control

    G Operating instructions Controls and Displays A: Speakers C: Receiver Speaker Status LED Thread for attaching to the wall Mains lead bracket [Pairing] button Connection terminals of audio Connection terminals of audio cable (positive/negative pole) cable (positive/negative pole) (2x) B: Transmitter Remote Control Optical connection status LED [POWER] button...
  • Page 7 Thank you for choosing a Hama product. 3. Safety notes Take your time and read the following instructions and • The product is intended for private, non-commercial use information completely. Please keep these instructions in a only. safe place for future reference. If you sell the device, please •...
  • Page 8: Replacing The Battery

    AC power grid. Please note that a country- specific adapter may be necessary. • You can find a selection of compatible products at www. hama.com. Receiver Note • Only connect the product to a socket that has been approved for the device.
  • Page 9: Surround Mode

    5.2.1 Connecting the transmitter using an optical Right-hand corner signal cable • Take the speaker intended for the right-hand corner of the room and the audio cable coloured red and black. • Connect the red-sheathed audio cable to the positive Note pole (red connection) of the speaker and the positive •...
  • Page 10 5.5 Learning function 7. Warranty Disclaimer You have the option of using your original TV remote Hama GmbH & Co KG assumes no liability and provides no control to operate the product. warranty for damage resulting from improper installation/ This requires that your original TV remote control be mounting, improper use of the product or from failure to learned.
  • Page 11 D Bedienungsanleitung Bedienungselemente und Anzeigen A: Lautsprecher C: Receiver Lautsprecher Status-LED Gewinde zur Befestigung an Netzzuleitung der Wandhalterung [Pairing]-Taste Anschlussklemmen Anschlussklemmen Audiokabel Audiokabel (Plus-/Minuspol) (Plus-/Minuspol) (2x B: Transmitter Fernbedienung Status-LED optischer Anschluss [POWER]-Taste Status-LED AUX IN Quellenauswahl [POWER]-Taste Surround-Effekt (+/-) [SOURCE]-Taste Verzögerung (+/-) Volume -...
  • Page 12 Vielen Dank, dass Sie sich für ein Hama Produkt 3. Sicherheitshinweise entschieden haben! Nehmen Sie sich Zeit und lesen Sie • Das Produkt ist für den privaten, nicht-gewerblichen die folgenden Anweisungen und Hinweise zunächst Haushaltsgebrauch vorgesehen. ganz durch. Bewahren Sie diese Bedienungsanleitung •...
  • Page 13: Batterie Wechseln

    V geeignet und daher in nahezu allen Stromnetzen auf Wechselstrom-Basis einsetzbar. Beachten Sie, dass hierzu ein länderspezifischer Adapter notwendig sein kann. • Eine entsprechende Auswahl an Produkten finden Sie unter www.hama.com. Receiver Bedienungshinweise • Betreiben Sie das Produkt an einer dafür zugelassenen Steckdose.
  • Page 14 5.2 Herstellen der kabelgebundenen Verbindungen 5.2.3 Receiver Über die analogen und digitalen Audioeingänge können Verbinden Sie den Receiver mithilfe der zweiadrigen Sie Ihr Endgerät anschließen und dessen Audiosignal über Audiokabel mit den Lautsprechern. das Produkt wiedergeben. Hierfür haben Sie die Wahl Hinweis zwischen dem Anschluss über ein 3.5 mm Audiokabel (Klinkenkabel)/ Cinchkabel oder ein optisches Signalkabel.
  • Page 15 5.3 Erneute Verbindung von Transmitter und Gehen Sie wie folgt vor: Receiver (Pairing) Drücken und halten Sie gleichzeitig beide Lautstärke- Tasten (5) + (6) am Transmitter für ca. 3 Sekunden, Hinweis um den Lernmodus zu aktivieren. Die Status-LED optischer Anschluss (1) und Stauts-LED AUX IN (2) •...
  • Page 16: Konformitätserklärung

    Formen der Verwertung von Altgeräten/Batterien leisten Sie einen wichtigen Beitrag zum Schutz unserer Umwelt. 10. Konformitätserklärung Hiermit erklärt die Hama GmbH & Co KG, dass der Funkanlagentyp [00054867] der Richtlinie 2014/53/EU entspricht. Der vollständige Text der EU-Konformitätserklärung ist unter der folgenden Internetadresse verfügbar:...
  • Page 17: A: Haut-Parleurs

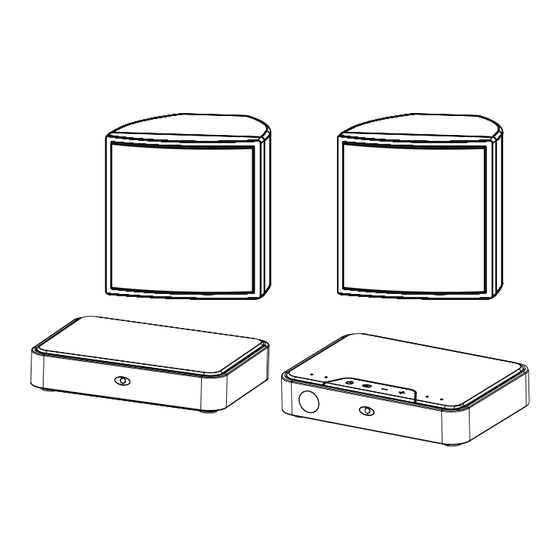
    F Notice d’utilisation Éléments de commande et d‘affichage A: Haut-parleurs C: Receiver Haut-parleur LED d’état Filetage de fixation au Câble d’alimentation support mural Touche [Pairing] Bornes de raccordement Bornes de raccordement câble audio (bornes positive/ câble audio (bornes positive/ négative) négative) (2x) B: Transmetteur Télécommande...
  • Page 18: Risque D'électrocution

    Nous vous remercions d’avoir choisi un produit Hama. 3. Consignes de sécurité Veuillez prendre le temps de lire l‘ensemble des remarques • Ce produit est destiné à une installation domestique non et consignes suivantes. Veuillez conserver ce mode commerciale. d‘emploi à portée de main afin de pouvoir le consulter en •...
  • Page 19: Mise En Service De La Télécommande

    électriques à courant alternatif. Veuillez toutefois noter qu‘un adaptateur sera éventuellement nécessaire dans certains pays. Receiver • L‘entreprise Hama propose une gamme de produits adaptés sur le site Internet www.hama.com. Remarque • Utilisez le produit uniquement branché à une prise 5.2 Câblage des composants...
  • Page 20: Raccordement De L'émetteur Par Câble Optique

    Coin droit Remarque • Munissez-vous du haut-parleur destiné au coin droit de la pièce et du câble audio rouge/noir. • Les connexions par câble optique sont moins • Branchez le câble audio à gaine rouge à la borne positive sensibles aux parasites électriques ou magnétiques (raccord rouge) du haut-parleur et à...
  • Page 21: Fonction D'apprentissage

    5.5 Fonction d’apprentissage 7. Exclusion de garantie Ce produit vous permet d’utiliser votre télécommande TV La société Hama GmbH & Co KG décline toute d’origine pour piloter votre nouveau kit. responsabilité en cas de dommages provoqués par une Vous devrez effectuer une programmation de votre installation, un montage ou une utilisation non conformes télécommande pour utiliser cette fonctionnalité.
  • Page 22 N Handleiding Bedieningselementen en weergaven/indicaties A: Luidspreker C: Receiver Luidspreker Statusledje Schroefdraad voor de Voedingskabel bevestiging aan de [Pairing]-toets wandhouder Aansluitklemmen audiokabel Aansluitklemmen audiokabel (plus-/minpool) (2x) (plus-/minpool) Afstandsbediening B: Transmitter [POWER]-toets Statusledje optische aansluiting Bronselectie Statusledje AUX IN Surround-effect (+/-) [POWER]-toets Vertraging (+/-) [SOURCE]-toets...
  • Page 23: Verklaring Van Waarschuwingssymbolen En Instructies

    Hartelijk dank dat u voor een product van Hama heeft 3. Veiligheidsinstructies gekozen! Neem de tijd en lees allereerst de onderstaande • Het product is bedoeld voor privé-, niet zakelijk aanwijzingen en instructies volledig door. Bewaar gebruik in huiselijke kring.
  • Page 24: Batterij Vervangen

    Let op: hiervoor kan een landspecifieke adapter nodig zijn. • Een desbetreffende keur aan producten vindt u op www. Receiver hama.com. Aanwijzing • Sluit het product alleen aan op een daarvoor geschikt en intact stopcontact. Het stopcontact moet altijd 5.2 Kabelgebonden verbindingen tot stand brengen...
  • Page 25 5.2.3 Ontvanger Aanwijzing Verbind de ontvanger met behulp van de 2-aderige audiokabel met de luidsprekers. • Verbindingen die met behulp van een optische signaalkabel tot stand worden gebracht, zijn Aanwijzing ongevoeliger voor elektrische of magnetische storingen dan verbindingen die met behulp van een •...
  • Page 26 7. Uitsluiting aansprakelijkheid • Indien de gewenste afstandsbediening over een Hama GmbH & Co KG is niet aansprakelijk voor en verleent andere standaard (bijv. Bluetooth) beschikt, dan is het geen garantie op schade die het gevolg is inleren niet mogelijk.
  • Page 27: Conformiteitsverklaring

    10. Conformiteitsverklaring Il fabbricante, Hama GmbH & Co KG, dichiara che il tipo di apparecchiatura radio [00054867] è conforme alla direttiva 2014/53/UE. Il testo completo della dichiarazione di conformità...
  • Page 28: Dálkový Ovladač

    C Uživatelská příručka Ovládací prvky A: Reproduktory C: Přijímač Reproduktor Signalizační LED dioda STATUS Závěs pro montáž na zeď Přívodní kabel Konektor pro připojení audio kabelu, +/- terminál Tlačítko párování Konektory pro připojení audio B: Vysílač kabelu, +/- terminál Signalizační LED dioda optického vstupu Dálkový...
  • Page 29 Děkujeme, že jste si vybrali výrobek Hama. 3. Bezpečnostní pokyny Přečtěte si, prosím, všechny následující pokyny a informace. • Výrobek je určen pro použití v soukromých Uchovejte tento text pro případné budoucí použití. Pokud domácnostech. výrobek prodáte, předejte tento text novému majiteli.
  • Page 30: Použití Dálkového Ovládání

    100 a 240V, což umožňuje jeho použití téměř kdekoliv na světě. V některých zemích bude možná nutno použít adaptér do zásuvky. Sound source Transmitter • Příslušenství naleznete na stránkách společnosti Hama. www.hama.com, případně www.hama.cz POZNÁMKA • Zařízení připojujte výhradně do kompatibilní zásuvky. Receiver •...
  • Page 31 5.2 Zapojení kabelů 5.2.3 Přijímač Pro propojení zařízení se zdrojem audio signálu můžete Propojte přijímač a reproduktory pomocí přiložené použít jak digitální, tak analogové spojení. Můžete použít dvojlinky. 3.5mm jack, RCA kabel, nebo optický kabel. POZNÁMKA POZNÁMKA • Reproduktor určený pro levý roh místnosti je označen •...
  • Page 32 • Dbejte na to, aby se do výrobku nedostala voda. Bluetooth, nelze použít. 7. Vyloučení záruky Hama GmbH & Co KG nepřebírá žádnou odpovědnost nebo záruku za škody vzniklé neodbornou instalací, montáží nebo neodborným použitím výrobku nebo nedodržováním návodu k použití a/nebo bezpečnostních pokynů.
  • Page 33 Recyklací a jinými způsoby zužitkování přispíváte k ochraně životního prostředí. 10. Prohlášení o shodě Tímto Hama GmbH & Co KG prohlašuje, že typ rádiového zařízení [00054850] je v souladu se směrnicí 2014/53/EU. Úplné znění EU prohlášení o shodě...
  • Page 34: Diaľkový Ovládač

    Q Návod na použitie Ovládacie a indikačné prvky A: Reproduktory C: Prijímač Reproduktor Signalizačná LED kontrolka STATUS Záves pre montáž na stenu Prívodný kábel Konektor pre pripojenie audio káblu, +/- terminál Tlačidlo párovanie Konektory pre pripojenie audio B: Vysielač káblu, +/- terminál Signalizačná...
  • Page 35 Ďakujeme, že ste sa rozhodli pre výrobok Hama. 3. Bezpečnostné upozornenia Prečítajte si všetky nasledujúce pokyny a informácie. • Tento výrobok je určený pre súkromné použitie v Uchovajte tento návod na použitie pre prípadné budúce domácnosti, nie je určený na komerčné použitie.
  • Page 36 100 a 240V, čo umožňuje jeho použitie takmer kdekoľvek na svete. V niektorých krajinách bude možno nutné použiť adaptér Sound source Transmitter do zásuvky. • Príslušenstvo nájdete na stránkach spoločnosti Hama. www.hama.com, poprípade www.hama.sk POZNÁMKA Receiver • Zariadenie pripájajte výhradne do kompatibilnej zásuvky.
  • Page 37 5.2 Zapojenie káblov 5.2.3 Prijímač Pre prepojenie zariadenia so zdrojom audio signálu môžete Prepojte prijímač a reproduktory pomocou priloženej použiť ako digitálne, tak aj analógové spojenie. Môžete dvojlinky. použiť 3.5mm jack, RCA kábel, alebo optický kábel. POZNÁMKA POZNÁMKA • •Reproduktor určený pre ľavý roh miestnosti je •...
  • Page 38: Údržba A Starostlivosť

    5.3 Prepojenie vysielača a prijímača – párovanie Postup učenia ovládačov: 1. Pre aktiváciu funkcie učenie, stlačte a podržte obe tlačidlá ovládania hlasitosti na vysielači (B-5 a B-6) POZNÁMKA zároveň, po dobu cca 3 sekúnd. LED kontrolky • Vysielač a prijímač sú z výroby už spárované. signalizácie optického vstupu (B-1) a AUX vstupu (B-2) začnú...
  • Page 39 životného prostredia. 10. Vyhlásenie o zhode Hama GmbH & Co KG týmto vyhlasuje, že rádiové zariadenie typu [00054850] je v súlade so smernicou 2014/53/EÚ. Úplné EÚ vyhlásenie o zhode je k dispozícii na tejto internetovej adrese: www.hama.com - >...
  • Page 40 Hama GmbH & Co KG 86652 Monheim / Germany www.hama.com All listed brands are trademarks of the corresponding companies. Errors and omissions excepted, and subject to technical changes. Our general terms of delivery and payment are applied.

Ce manuel est également adapté pour:

Rs100

Table des Matières