Table des Matières

Publicité

Les langues disponibles

Les langues disponibles

Liens rapides

Labor-Netzgerät
BEDIENUNGSANLEITUNG
Laboratory power supply
OPERATING INSTRUCTIONS
Appareil d'alimentation pour laboratoire
MODE D'EMPLOI
Labvoeding
GEBRUIKSAANWIJZING
Best.-Nr. / Item No. / N° de commande / Bestnr.:
1086555 DPPS-16-30, 1 – 16 V/DC, 0 – 30 A
1086556 DPPS-32-15, 1 – 32 V/DC, 0 – 15 A
1086558 DPPS-60-8, 1 – 60 V/DC, 0 – 8 A
1086559 DPPS-16-40, 1 – 16 V/DC, 0 – 40 A
1086560 DPPS-32-20, 1 – 32 V/DC, 0 – 20 A
1086561 DPPS-60-10, 1 – 60 V/DC, 0 – 10 A
1086562 DPPS-16-60, 1 – 16 V/DC, 0 – 60 A
1086563 DPPS-32-30, 1 – 32 V/DC, 0 – 30 A
1086564 DPPS-60-15, 1 – 60 V/DC, 0 – 15 A
Seite 3 – 38
Page 39 – 74
Page 75 – 110
Pagina 111 – 146
Version 01/16

Publicité

Table des Matières
loading

Sommaire des Matières pour VOLTCRAFT DPPS-60-8

  • Page 1 1086555 DPPS-16-30, 1 – 16 V/DC, 0 – 30 A 1086556 DPPS-32-15, 1 – 32 V/DC, 0 – 15 A 1086558 DPPS-60-8, 1 – 60 V/DC, 0 – 8 A 1086559 DPPS-16-40, 1 – 16 V/DC, 0 – 40 A 1086560 DPPS-32-20, 1 –...
  • Page 2 Diese Bedienungsanleitung gehört zu diesem Produkt. Sie enthält wichtige Hinweise zur Inbetriebnahme und Handhabung. Achten Sie hierauf, auch wenn Sie dieses Produkt an Dritte weitergeben. Heben Sie deshalb diese Bedienungsanleitung zum Nachlesen auf! Eine Auflistung der Inhalte finden Sie in dem Inhaltsverzeichnis mit Angabe der entsprechenden Seitenzahlen auf Seite 3.
  • Page 3: Table Des Matières

    INHALTSVERZEICHNIS 1. Einführung ..........................4 2. Bestimmungsgemäße Verwendung ..................5 3. Lieferumfang ..........................6 4. Zeichenerklärung ........................7 5. Sicherheitshinweise .......................8 a) Personen / Produkt ......................8 b) Sonstiges ........................10 6. Bedienelemente ........................10 7. Inbetriebnahme ........................12 a) Anschluss des Netzkabels ....................12 b) Aufstellen des Gerätes....................12 c) Allgemeine Informationen ....................12 8.
  • Page 4: Einführung

    1. EINFÜHRUNG Sehr geehrte Kundin, sehr geehrter Kunde, mit dem Kauf eines Voltcraft®-Produktes haben Sie eine sehr gute Entscheidung getroffen, für die wir Ihnen danken. Voltcraft® - Dieser Name steht auf dem Gebiet der Mess-, Lade- sowie Netztechnik für überdurchschnittliche Qualitätsprodukte, die sich durch fachliche Kompetenz, außergewöhnliche Leistungsfähigkeit und permanente Innovation auszeichnen.
  • Page 5: Bestimmungsgemäße Verwendung

    Ausgangsstrom (Insgesamt, MAIN + AUX) DPPS-16-30 1 – 16 V/DC 0 – 30 A DPPS-32-15 1 – 32 V/DC 0 – 15 A DPPS-60-8 1 – 60 V/DC 0 – 8 A DPPS-16-40 1 – 16 V/DC 0 – 40 A DPPS-32-20 1 –...
  • Page 6: Lieferumfang

    Mit der im Lieferumfang enthaltenen Software und dem USB-Anschluss kann die Stromversorgung zum Betrieb von zyklischen Arbeitsabläufen über einen PC gesteuert werden. Bis zu 20 programmierbare Spannungs- und Strom-Sets mit unterschiedlicher Zeitdauer können für den Betrieb programmiert werden. Die zyklischen Arbeitsabläufe können bis zu 999-mal wiederholt werden. Das Gerät ist überlast- und kurzschlussfest und beinhaltet eine Sicherheits-Temperaturabschaltung.
  • Page 7: Zeichenerklärung

    4. ZEICHENERKLÄRUNG Ein Ausrufungszeichen in einem Dreieck zeigt wichtige Anweisungen in dieser Anleitung, die unbedingt befolgt werden müssen. Ein Blitzsymbol im Dreieck warnt vor einem elektrischen Schlag oder der Beeinträchtigung der elektrischen Sicherheit des Geräts. Dieses Symbol zeigt Tipps und Informationen zur Bedienung. Nur zur Verwendung in trockenen Innenbereichen.
  • Page 8: Sicherheitshinweise

    5. SICHERHEITSHINWEISE Lesen Sie sich die Bedienungsanleitung aufmerksam durch und beachten Sie insbesondere die Sicherheitshinweise. Falls Sie die Sicherheitshinweise und die Angaben zur sachgemäßen Handhabung in dieser Bedienungsanleitung nicht befolgen, übernehmen wir für dadurch resultierende Personen-/Sachschäden keine Haftung. Außerdem erlischt in solchen Fällen die Gewährleistung/Garantie. a) Personen / Produkt •...
  • Page 9 • Beim Öffnen von Abdeckungen oder Entfernen von Teilen können spannungsführende Teile freigelegt werden.Trennen Sie deshalb vor einer Wartung oder Instandsetzung das Produkt von allen Spannungsquellen. Kondensatoren im Gerät können noch geladen sein, selbst wenn es von allen Spannungsquellen getrennt wurde. •...
  • Page 10: Sonstiges

    • Betreiben Sie das Produkt nicht an Orten oder in Räumen, die ungünstige Umgebungsbedingungen aufweisen. Dies kann zur Beschädigung der empfindlichen Elektronik im Inneren des Produkts führen und ist mit lebensbedrohenden Gefahren verbunden. Ungünstige Umgebungsbedingungen sind: - Hohe Luftfeuchtigkeit (> 80 % relativ, Kondensation) - Feuchtigkeit, Staub, brennbare Gase, Lösungsmitteldämpfe, Benzin - Hohe Umgebungstemperatur (>...
  • Page 11 1086555 / 1086556 / 1086558 1086559 / 1086560 / 1086561 / 1086562 / 1086563 / 1086564 1086555 / 1086556 / 1086558 1086559 / 1086560 / 1086561 1086563 / 1086564 1086562...
  • Page 12: Inbetriebnahme

    7. INBETRIEBNAHME Das Labornetzgerät ist kein Ladegerät. Verwenden Sie zum Laden von Akkus geeignete Ladegeräte mit entsprechender Ladeabschaltung. Bei längerem Betrieb mit Nennlast wird die Gehäuseoberfläche warm. Achtung! Mögliche Verbrennungsgefahr ! Achten Sie daher unbedingt auf eine ausreichende Belüftung des Netzgerätes und betreiben Sie es niemals teilweise oder ganz abgedeckt, um eventuelle Schäden zu vermeiden.
  • Page 13 Nach dem Einschalten erfolgt ein Systemcheck. In den beiden Anzeigen wird der Teststatus angezeigt. Die Anzeigereihenfolge ist wie folgt: Anzeige des aktuellen Softwarestandes. Segmenttest ob die Anzeige mit allen Einzel- segmenten funktioniert. Danach erfolgt der Test der LED-Anzeigen C.V., C.C. und REAR CONTROL. Systemtest der Schutzvorrichtungen beginnt.
  • Page 14: Normalbetrieb

    Das Netzgerät ermöglicht den Betrieb in 4 Modi. Diese Modi werden über den Wahlschalter MODE (8) an der Rückseite angewählt. Folgende Modi sind möglich: Normal Normalbetrieb. Die Einstellung von Spannung und Strom erfolgt an der Vorderseite. Preset Speicherplatzbetrieb. Im Gerät können drei Festspannungen eingespeichert und über diese Preset-Funktion direkt angewählt werden.
  • Page 15: Ausgangsspannung Einstellen

    Erfolgt innerhalb von 2 Sekunden keine Einstellung, schaltet die Anzeige wieder zur aktuellen Stromanzeige zurück. 5. Zum Einstellen der Strombegrenzung drehen Sie den Einstellregler nach links oder rechts. Nach dem Einschalten ist immer der Fein-Einstellbereich (0,1 A) aktiv. Dies wird durch eine leicht hellere Ziffer dargestellt.
  • Page 16: Anschluss Eines Verbrauchers

    c) Anschluss eines Verbrauchers Achten Sie beim Anschluss eines Verbrauchers darauf, dass dieser ausgeschaltet mit dem Netzgerät verbunden wird. Die max. Stromaufnahme des anzuschließenden Verbrauchers darf die Angaben in den technischen Daten nicht überschreiten. Bei der Reihenschaltung der Ausgänge mehrerer Netzgeräte können berührungsgefährliche Spannungen (>...
  • Page 17: Speicherplatzbetrieb „Preset" Und „Set

    Strom Spannung Strom DPPS-16-30 Maximum 13.8 V Maximum 15 V Maximum DPPS-32-15 Maximum 13.8 V Maximum 25 V Maximum DPPS-60-8 Maximum 13.8 V Maximum 55 V Maximum DPPS-16-40 Maximum 13.8 V Maximum 15 V Maximum DPPS-32-20 Maximum 13.8 V Maximum...
  • Page 18: Speicherplätze Selbst Belegen „Set

    1. Aktivieren Sie die Preset-Funktion über den rückseitigen Wahlschalter MODE (8). 2. Stellen Sie den Schalter in Position Preset. Die vorderseitige Kontrollanzeige REAR CONTROL (2) leuchtet. Die vorderen Einstellregler sind jetzt inaktiv. 3. Wählen rückseitigen Wahlschalter RECALL (9) den entsprechenden Speicherplatz P1, P2 oder P3.
  • Page 19: Fernsteuerbetrieb „Remote Ctrl

    10. FERNSTEUERBETRIEB „REMOTE CTRL“ Über den eingebauten Fernsteuerungsanschluss Remote Control (10) kann die Spannungs- und Stromeinstellung mit einer externen Spannungsquelle oder über einen externen, einstellbaren Widerstand (kurz „Poti“) erfolgen. Der Fernsteuerungsanschluss erfolgt am rückseitigen Fernsteuerungsanschluss Remote Control (10). Für den Anschluss liegt eine Remote- Anschlussbuchse bei.
  • Page 20: Steuerung Über Externe Spannungsquelle

    b) Steuerung über externe Spannungsquelle Das Netzgerät kann mit einer externen Spannungsquelle von 0 bis 5 V/DC über den gesamten Bereich für Spannung und Strom ferngesteuert werden. Zum Anschluss gehen Sie wie folgt vor: Verbinden Sie die Anschlussleitungen der Remote-Buchse wie abgebildet: Spannungseinstellung “V”...
  • Page 21: Steuerung Über Einen Regelbaren Widerstand (Poti)

    c) Steuerung über einen regelbaren Widerstand (Poti) Das Netzgerät kann mit einem externen Poti (5 kOhm) über den gesamten Bereich für Spannung und Strom ferngesteuert werden. Zum Anschluss gehen Sie wie folgt vor: Verbinden Sie die Anschlussleitungen der Remote-Buchse wie abgebildet: Spannungseinstellung “V”...
  • Page 22: Ausgang Fernsteuern (Ein/Aus)

    d) Ausgang fernsteuern (Ein/Aus) Der DC-Ausgang kann über einen Schaltkontakt ein- und ausgeschaltet werden. Zum Anschluss gehen Sie wie folgt vor: 1. Verbinden Sie die Anschlussleitungen der Remote-Buchse wie abgebildet. 2. Kontaktieren Sie Anschluss 4 und 5 zu einem potentialfreien Schaltkontakt. 3.
  • Page 23: Sense-Funktion (1086562)

    11. SENSE-FUNKTION (1086562) Die Sense (Sensor)-Funktion ist nur bei Bestell.-Nr. 1086562 verfügbar. Die Sense-Funktion ist eine automatische Spannungsregelung für den rückseitigen Hochstromausgang (MAIN OUTPUT) (7). Dazu werden zwei separate Messleitungen parallel zu den Anschlussleitungen angeschlossen. Auf diesen beiden Messleitungen wird der Spannungsabfall, welcher auf den Anschlussleitungen auftritt gemessen.
  • Page 24: Software Installieren

    12. SOFTWARE INSTALLIEREN Die Software ist mit den Windows Betriebssystemen XP, 2003, Vista, 7, 8 kompatibel. ® 1. Legen Sie die beiliegende Software-CD in das DVD-Laufwerk Ihres Computers ein. 2. Installieren Sie den Treiber (USB zu UART Bridge) für Ihr Betriebssystem im Ordner USB CP210x Drivers...
  • Page 25: Betriebselemente Der Software Und Grundbetrieb

    a) Betriebselemente der Software und Grundbetrieb A Funktionsregisterkarten Wechseln Sie die Funktionsansicht auf der rechten Seite zwischen: • Externes Zeitprogramm (External Timed Program) • Interner Voreinstellungsspeicher (Internal Preset Memory) • Datenaufzeichnung (Data Log) • Einstellungen (Setting) B Datenerfassungstabelle Das Datenerfassungsfeld für die externe Zeitprogrammfunktion. Die maximale Anzahl an Aktionen beträgt 20.
  • Page 26 F Tabellenbeschreibung Ein Textfeld, in dem eine Tabellenbeschreibung eingetragen werden kann. G Dateiverwaltung Datenerfassungstabelle/Einstellungen .csv Datei exportieren .csv-formatierte Datenerfassungstabelle/Einstellungen importieren Ansicht drucken H Einstellungen übernehmen Eingestellte Spannung und Strom übernehmen und übertragen. I Ausgang ein (On) / aus (Off) Stromversorgung aktivieren / deaktivieren. Bestätigen Sie die Einstellung mit der Eingabetaste (H).
  • Page 27: Interner Voreinstellungsspeicher

    b) Interner Voreinstellungsspeicher Über die Software können Sie den Voreinstellungsspeicher der Stromversorgung ablesen, einstellen und anwenden. • Die Voreinstellungswerte werden automatisch in die Software geladen; falls dies nicht erfolgt, klicken Sie die Schaltfläche Read From PS, um die Information zu laden. •...
  • Page 28: Datenaufzeichnung

    c) Datenaufzeichnung Sie können das Echtzeit- bzw. aufgezeichnete Spannungs-/Strom-/Leistungs-Diagramm dieser Funktion sehen. Mit den Bedienflächen der Dateiverwaltung (G) können Sie die Einstellungen importieren und exportieren oder ausdrucken. • Wechseln Sie zwischen dem aufgezeichneten Diagramm (Import) und dem Echtzeit-Diagramm (Now), indem Sie die entsprechende Option in der unteren linken Ecke des Bedienfeldes auswählen.
  • Page 29: Einstellungen

    d) Einstellungen Sprache (Language) Wählen Sie die gewünschte Programmsprache aus. COMM-Schnittstelle Der Anschluss zwischen dem PC und der (COM Port) Stromversorgung. Er wird automatisch während des Softwarestarts konfiguriert. Es wird nicht empfohlen, hier manuelle Änderungen vorzunehmen. DataLog Abtastdauer Das Zeitintervall zwischen zwei Abtast- (Data Log Sampling Time) vorgängen.
  • Page 30: Schutzeinrichtungen

    14. SCHUTZEINRICHTUNGEN Das Netzgerät hat verschiedene automatische Schutzeinrichtungen integriert, die das Netzgerät vor Beschädigungen schützen. Die aktivierten Schutzeinrichtungen werden mit Buchstabencodes im Display angezeigt und gleichzeitig wird der DC-Ausgang aus Sicherheitsgründen abgeschaltet. Ist eine Schutzeinrichtung aktiv, muss umgehendst der Verbraucher abgeschaltet und vom Netzgerät abgeklemmt werden.
  • Page 31: Überlastabschaltung

    c) Überlastabschaltung • Bei einer Überlastung am DC-Ausgang wird normalerweise die Strombegrenzung aktiv. Sollte dies einmal nicht der Fall sein, so wird eine zweite Schutzfunktion aktiv. • Schalten Sie umgehendst nach erscheinen dieser Warnmeldung das Netzgerät ab und kontrollieren die Anschlussdaten des Verbrauchers.
  • Page 32: Behebung Von Störungen

    16. BEHEBUNG VON STÖRUNGEN Mit dem Labor-Netzgerät haben Sie ein Produkt erworben, welches zuverlässig und betriebssicher ist. Dennoch kann es zu Problemen oder Störungen kommen. Hier möchten wir Ihnen beschreiben, wie Sie mögliche Störungen leicht selbst beheben können: Beachten Sie unbedingt die Sicherheitshinweise! Fehler Mögliche Ursache •...
  • Page 33: Entsorgunga

    Anzeige „OLP“ Überlastabschaltung: Siehe Kapitel „Schutzeinrichtungen“. Andere Reparaturen als zuvor beschrieben sind ausschließlich durch eine autorisierte Fachkraft durchzuführen. Sollten Sie Fragen zum Umgang des Gerätes haben, steht Ihnen unser Technischer Support zur Verfügung. 17. ENTSORGUNG Elektronische Geräte sind Wertstoffe und gehören nicht in den Hausmüll. Entsorgen Sie das Produkt am Ende seiner Lebensdauer gemäß...
  • Page 34: Technische Daten

    18. TECHNISCHE DATEN 1086555 1086556 1086558 (DPPS-16-30) (DPPS-32-15) (DPPS-60-8) Betriebsspannung: 200 – 240 V/AC, 50/60 Hz Max. Eingangsstrom (230 V/AC): 2,4 A 2,4 A 2,5 A Max. Ausgangsleistung: 480 W 480 W 480 W Ausgangsspannung: 1 – 16 V/DC 1 – 32 V/DC 1 –...
  • Page 35 1086559 1086560 1086561 (DPPS-16-40) (DPPS-32-20) (DPPS-60-10) Betriebsspannung: 200 – 240 V/AC, 50/60 Hz Max. Eingangsstrom (230 V/AC): 3,1 A 3,1 A 3.1 A Max. Ausgangsleistung: 640 W 640 W 600 W Ausgangsspannung: 1 – 16 V/DC 1 – 32 V 1 –...
  • Page 36 1086562 1086563 1086564 (DPPS-16-60) (DPPS-32-30) (DPPS-60-15) Betriebsspannung: 200 – 240 V/AC, 50/60 Hz Max. Eingangsstrom (230 V/AC): 4,7 A 4,5 A 4,5 A Max. Ausgangsleistung: 960 W 960 W 900 W Ausgangsspannung: 1 – 16 V/DC 1 – 32 V/DC 1 –...
  • Page 37: Zusätzliche Funktionen

    19. ZUSÄTZLICHE FUNKTIONEN Diese Ergänzung gilt nur für Geräte mit Firmware-Version 3.x. a) Manuelle Nullstellung des Geräts Jedes Mal, wenn Sie das Netzteil einschalten, wird es automatisch auf Null gestellt. Falls Sie das Gerät während des Betriebs auf Null zurückstellen müssen, es jedoch nicht erneut starten möchten, dann führen Sie die Nullstellung manuell durch.
  • Page 38: Rückstellung Der Speicherplätze (P1/P2/P3) Auf Werkseinstellung

    b) Rückstellung der Speicherplätze (P1/P2/P3) auf Werkseinstellung Das Netzteil ermöglicht die Speicherung von drei Spannungswerten (inklusive der Strom- Einstellungen) auf drei unterschiedlichen Speicherplätzen: P1, P2, und P3. Falls Sie die Speicherplätze auf die Werkseinstellungen zurücksetzen möchten, gehen Sie wie folgt vor. 1.
  • Page 39 CONTENTS 1. Introduction ..........................40 2. Intended Use ........................41 3. Delivery content ........................42 4. Symbol explanation ......................43 5. Safety instructions ........................44 a) Persons / Product ......................44 b) Miscellaneous .........................46 6. Operating elements ......................46 7. Start-up ..........................48 a) Connecting the power cable ...................48 b) Unit installation........................48 c) General informations.......................48 8.
  • Page 40: Introduction

    1. INTRODUCTION Dear Customer, In purchasing this Voltcraft® product, you have made a very good decision for which we would like to thank you. Voltcraft® - In the field of measuring, charging and network technology, this name stands for high-quality products which perform superbly and which are created by experts whose concern is continuous innovation.
  • Page 41: Intended Use

    (Total, MAIN + AUX) DPPS-16-30 1 – 16 V/DC 0 – 30 A DPPS-32-15 1 – 32 V/DC 0 – 15 A DPPS-60-8 1 – 60 V/DC 0 – 8 A DPPS-16-40 1 – 16 V/DC 0 – 40 A DPPS-32-20 1 –...
  • Page 42: Delivery Content

    With the software included and the USB connection, the power supply can be controlled by a personal computer for running cyclical operations. Up to 20 programmable sets of voltage and current at different time durations can be programmed into the operation and the cyclical operations can be repeated up to 999 times.
  • Page 43: Symbol Explanation

    4. SYMBOL EXPLANATION An exclamation mark in a triangle indicates important instructions in this operating manual which absolutely have to be observed. The triangle containing a lightning symbol warns of danger of an electric shock or of the impairment of the electrical safety of the device. The symbol can be found when you are to be given tips and information on operation.
  • Page 44: Safety Instructions

    5. SAFETY INSTRUCTIONS Read the operating instructions carefully and especially observe the safety information. If you do not follow the safety instructions and information on proper handling in this manual, we assume no liability for any resulting personal injury or damage to property.
  • Page 45 • Always lay the cables so that nobody can trip over or become entangled in them. This poses a risk of injury. • When working with power supplies or chargers, do not wear any metallic or conductive chains, bracelets, rings etc. Never connect the power supply or charger with humans or animals.
  • Page 46: Miscellaneous

    • The product should not be used immediately after it has been brought from an area of cold temperature to an area of warm temperature. Condensed water might destroy the product. Wait until the product adapts to the new ambient temperature before use. b) Miscellaneous •...
  • Page 47 1086555 / 1086556 / 1086558 1086559 / 1086560 / 1086561 / 1086562 / 1086563 / 1086564 1086555 / 1086556 / 1086558 1086559 / 1086560 / 1086561 1086563 / 1086564 1086562...
  • Page 48: Start-Up

    7. START-UP The laboratory power unit is not a charger. To charge batteries, use suitable chargers with a charging current cut-off. During a longer period of operation under nominal load, the surface of the housing will heat up. Attention! Risk of burns! Therefore, make sure that there is adequate ventilation of the power unit and never operate it partly or fully covered to avoid any damage.
  • Page 49 After the device switches on, a system check is performed. The test status is displayed on the two displays. The displays are in the following order: Display of the current software state. Segment test to determine if the display works with all its individual segments.
  • Page 50: Normal Operation

    The power unit enables operation in 4 modes. These modes are selected by the selection switch MODE (8) slider on the back. The following modes are possible: Normal Normal operation. Voltage and current are adjusted on the front. Preset Memory slot operation Three fixed voltages can be stored in the device and directly selected through this Preset function.
  • Page 51: Set Output Voltage

    Where no setting is made within 2 seconds, the display switches back to the current current display. 5. Turn the control to the left or right to set the current limitation. After switching on, the fine settings area (0.1 A) is always active. This is indicated by a slightly lighter digit. Press the rotary control slightly from the front.
  • Page 52 Max. 5 A shall be tapped at the terminals AUX. OUTPUT 5A MAX. (6). A PTC overcurrent protection protects those terminals against overloading and interrupts the current supply when triggered (>5 A). To reset the unit, immediately turn it off and let it cool down to room temperature before using it again. The terminals MAIN OUTPUT (screw sockets) (7) on the back are indicated for full nominal current.
  • Page 53: Memory Slot Operation "Preset" And "Set

    Current Voltage Current DPPS-16-30 Maximum 13.8 V Maximum 15 V Maximum DPPS-32-15 Maximum 13.8 V Maximum 25 V Maximum DPPS-60-8 Maximum 13.8 V Maximum 55 V Maximum DPPS-16-40 Maximum 13.8 V Maximum 15 V Maximum DPPS-32-20 Maximum 13.8 V Maximum...
  • Page 54: Assigning Memory Slots With "Set

    5. For deactivating the fixed voltage function, slide the selection switch MODE (8) back to the Normal position. The control indicator REAR CONTROL (2) goes out. The device switches back to normal power unit operation (always remove DC consumers before!). a) Assigning memory slots with “Set”...
  • Page 55: Remote Control Operation "Remote Ctrl

    10. REMOTE CONTROL OPERATION “REMOTE CTRL” Through the built-in remote control terminal Remote control (10), the voltage and current can be set through an external voltage source or an external adjustable resistance (short “poti”). The remote control is connected on the remote control terminal Remote control (10). There is a remote socket included for connection.
  • Page 56: Control Through External Voltage Source

    b) Control through external voltage source The power unit can be remote-controlled with an external voltage source from 0 to 5 V/DC throughout the range for voltage and current. Proceed as follows for connection: Connect the connecting cables of the remote sockets as illustrated: Voltage setting “V”...
  • Page 57: Control Through A Controllable Resistance (Poti)

    c) Control through a controllable resistance (poti) The power unit can be remote-controlled with an external poti (5 Kohm) throughout the range for voltage and current. Proceed as follows for connection: Connect the connecting cables of the remote sockets as illustrated. Voltage setting “V”...
  • Page 58: Remote-Control Output (On/Off)

    d) Remote-control output (on/off) The DC output can be turned on and off via the a switching contact. Proceed as follows for connection: 1. Connect the connecting cables of the remote sockets as illustrated. 2. Contact connections 4 and 5 with an isolated switching contact. 3.
  • Page 59: Sense Function (1086562)

    11. SENSE FUNCTION (1086562) The sense function is only available with Item No. 1086562. The sense function is an automatic voltage control for the rear high-current output (MAIN OUTPUT) (7). For this, two separate measuring cables are connected parallel to the connecting cables. The potential drop which occurs on the connecting cables is measured on these two measuring cables.
  • Page 60: Software Installation

    12. SOFTWARE INSTALLATION Software is compatible with Windows operating systems XP, 2003, Vista, 7 ,8 ® 1. Insert the supplied software CD into the DVD drive of your computer. 2. Located in directory USB CP210x Drivers... install the driver (USB to UART Bridge) suitable to your operating system.
  • Page 61: Operating Elements Of The Software And The Basic Operation

    a) Operating elements of the software and the basic operation A Function tabs Switch the function of the window on the right-hand side between: • External timed program (External Timed Program) • Internal preset memory (Internal Preset Memory) • Data log (Data Log) •...
  • Page 62 G File management Export table/settings as .csv file. Import .csv formatted table/settings Print current view H Transfer settings Transfer set voltage and current to power supply. Activate/deactivate power supply. Confirm input with button (H). I Ouput on/off The LED display displays “O P OFF”. J Current The field where you can program the current to the power supply.
  • Page 63: Internal Preset Memory

    b) Internal preset memory You can read, set and apply the preset memory of the power supply via the software. • The preset values are loaded into the software automatically, but if not, press the button Read From PS button to load the information. •...
  • Page 64: Data Log

    c) Data log You can see the real-time/recorded voltage-current-power chart in this function. With the buttons for file management (G) you can import, export or print the settings. • Switch between recorded diagram (Import) and the real-time diagram (Now) by selecting the corresponding option in the left bottom corner.
  • Page 65: Setting

    d) Setting Language Choose software language. COM Port The connection between the personal computer and the power supply. It is automatically configured during software launch and not recommended to be changed manually. Data Log Sampling Time The time interval between each sampling. Voltage Upper Limit (UVL) Setting Limit the voltage output from the software side.
  • Page 66: Protective Measures

    14. PROTECTIVE MEASURES The power unit has several integrated automatic protective measures that protect the power unit from damage. The activated protective measures are displayed with letter codes and the DC output is switched off for safety reasons at the same time. When a protective measures is active, the consumer must be switched off and disconnected from the power unit immediately.
  • Page 67: Overload Protection

    c) Overload protection • In case of overload at the DC output, the power limitation is usually switched on. If this is not the case, the second protective function becomes active. • Switch off the power unit at once when this warning message appears and check the connection data of the consumer.
  • Page 68: Troubleshooting

    16. TROUBLESHOOTING By purchasing the laboratory power unit, you have acquired a product that is reliable and operationally safe. Nevertheless, problems or errors may occur. For this reason we want to describe how to troubleshoot potential malfunctions: Always follow the safety instructions! Error Possible cause •...
  • Page 69: Disposal

    Display “OLP” Overload-protection: See chapter “Protective measures”. Repairs other than those described above may only be carried out by an authorised specialist. If you have any questions concerning the handling of the device, please do no hesitate to contact our Technical Support. 17.
  • Page 70: Technical Data

    18. TECHNICAL DATA 1086555 1086556 1086558 (DPPS-16-30) (DPPS-32-15) (DPPS-60-8) Operating voltage: 200 – 240 V/AC, 50/60 Hz Max. input current (230 V/AC): 2.4 A 2.4 A 2.5 A Maximum output power: 480 W 480 W 480 W Output voltage: 1 – 16 V/DC 1 –...
  • Page 71 1086559 1086560 1086561 (DPPS-16-40) (DPPS-32-20) (DPPS-60-10) Operating voltage: 200 – 240 V/AC, 50/60 Hz Max. input current (230 V/AC): 3.1 A 3.1 A 3.1 A Maximum output power: 640 W 640 W 600 W Output voltage: 1 – 16 V/DC 1 –...
  • Page 72 1086562 1086563 1086564 (DPPS-16-60) (DPPS-32-30) (DPPS-60-15) Operating voltage: 200 – 240 V/AC, 50/60 Hz Max. input current (230 V/AC): 4,7 A 4,5 A 4,5 A Maximum output power: 960 W 960 W 900 W Output voltage: 1 – 16 V/DC 1 –...
  • Page 73: Added Functions

    19. ADDED FUNCTIONS The supplement is only valid for devices running firmware version 3.x. a) Zeroing the unit manually The power supply is auto-zeroed every time you turn it on. In case you need to zero the unit during operation and do not want to restart it, zero it manually. 1.
  • Page 74: Resetting Output Presets (P1/P2/P3) To Factory Default Values

    b) Resetting output presets (P1/P2/P3) to factory default values The power supply allows for presetting three voltage values (including current settings) by means of three memory slots: P1, P2, and P3. In case you want to reset the memory slots to the factory default values during operation, do the following.
  • Page 75 SOMMAIRE 1. Introduction ..........................76 2. Utilisation prevue ........................77 3. Contenu de l’emballage .......................78 4. Explication des symboles .....................79 5. Consignes de sécurité ......................80 a) Personnes / Produit ......................80 b) Divers ..........................82 6. Éléments de fonctionnement ....................82 7. Mise en service ........................84 a) Raccordement du câble réseau ..................84 b) Installation de l’appareil ....................84 c) Généralités........................84...
  • Page 76: Introduction

    Voltcraft® - Ce nom est en effet garant d’une qualité au dessus de la moyenne dans les domaines de la mesure, de la recharge ainsi que des appareils de réseau, tous se distinguant par leur compétence technique, leur fiabilité, leur longévité...
  • Page 77: Utilisation Prevue

    (totale, MAIN + AUX) DPPS-16-30 1 – 16 V/CC 0 – 30 A DPPS-32-15 1 – 32 V/CC 0 – 15 A DPPS-60-8 1 – 60 V/CC 0 – 8 A DPPS-16-40 1 – 16 V/CC 0 – 40 A DPPS-32-20 1 –...
  • Page 78: Contenu De L'emballage

    Avec le logiciel fourni et la connexion USB, l’alimentation peut être contrôlée par un PC pour exécuter des opérations cycliques. Plus de 20 jeux de tension et de courant de différentes durées peuvent être programmés dans l’opération et les opérations cycliques peuvent être répétées jusqu’à 999 fois. L’appareil est protégé...
  • Page 79: Explication Des Symboles

    4. EXPLICATION DES SYMBOLES Dans ce mode d’emploi, le symbole avec un point d’exclamation dans un triangle signale des consignes importantes, qui doivent être absolument respectées. Le symbole de l’éclair dans un triangle met en garde contre tout risque de décharge électrique ou toute compromission de la sécurité...
  • Page 80: Consignes De Sécurité

    5. CONSIGNES DE SÉCURITÉ Lisez le mode d’emploi avec attention en étant particulièrement attentif aux consignes de sécurité. En cas de non-respect des consignes de sécurité et des informations données dans le présent mode d’emploi pour une utilisation correcte de l’appareil, nous déclinons toute responsabilité en cas de dommage personnel ou matériel consécutif.
  • Page 81 • Dans des locaux commerciaux, veuillez vous tenir aux consignes de prévention d’accidents des associations professionnelles d’installations et de systèmes électriques. • Lors de l’ouverture des couvercles ou de l’enlèvement de pièces, des éléments conducteurs d’électricité peuvent être dégagés. Pour cette raison, débranchez le produit de toutes les sources d’énergie avant un entretien ou une mise en état.
  • Page 82: Divers

    • Ne placez aucun appareil ayant des champs électromagnétiques puissants tels que des transformateurs, des moteurs, des téléphones sans fil, des appareils de radio etc. à proximité du produit, car il pourrait interférer avec le produit. • N’utilisez pas le produit dans des endroits ou des locaux présentant des conditions défavorables.
  • Page 83 1086555 / 1086556 / 1086558 1086559 / 1086560 / 1086561 / 1086562 / 1086563 / 1086564 1086555 / 1086556 / 1086558 1086559 / 1086560 / 1086561 1086563 / 1086564 1086562...
  • Page 84: Mise En Service

    7. MISE EN SERVICE L’alimentation de laboratoire n’est pas un chargeur d’accumulateurs. Afin de recharger des accumulateurs, utilisez un chargeur adéquat muni d’un dispositif d’interruption de charge approprié. La surface du boîtier chauffe en cas de fonctionnement prolongé à une charge nominale.
  • Page 85 Après la mise en service, un contrôle du système est effectué. L’état du contrôle est affiché sur les deux affichages. L’ordre d’affichage est le suivant : Affichage de la version logicielle actuelle. Test de segment pour vérifier le fonctionnement de l’affichage avec chaque segment.
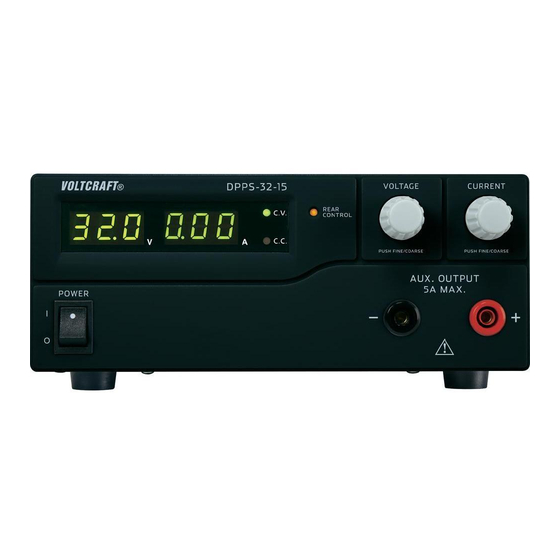
  • Page 86: Fonctionnement Normal

    L’alimentation permet un fonctionnement en 4 modes. Ces modes sont sélectionnés par un bouton poussoir à l’arrière «MODE» (8). Les modes suivants sont possibles : Normal Fonctionnement normal. Le réglage de la tension et du courant est effectué à l’avant. Preset Fonctionnement emplacement de mémoire.
  • Page 87: Régler La Tension De Sortie

    Si aucun réglage n’est effectué dans les 2 secondes, l’affichage indique à nouveau l’affichage du courant actuel. 5. Tournez le régulateur vers la gauche ou la droite pour régler la limitation de courant. Après l’allumage, la plage de réglage précis (0,1 A) est toujours active. Elle est représentée par un chiffre légèrement plus clair.
  • Page 88: Fonctionnement Emplacement De Mémoire «Preset» Et «Set

    L’alimentation dispose de deux sorties. Ces sorties ont toujours la même tension de sortie. Leur différence réside dans la charge admissible de courant. Aux bornes AUX. OUTPUT 5A MAX. (6) on ne peut tirer qu’un courant maximal de 5 A. Un dispositif de protection contre les surintensités par PTC protège ces bornes contre toute surcharge et interrompt l’alimentation électrique lorsqu’il se déclenche (>...
  • Page 89 Courant Tension Courant DPPS-16-30 Maximum 13,8 V Maximum 15 V Maximum DPPS-32-15 Maximum 13,8 V Maximum 25 V Maximum DPPS-60-8 Maximum 13,8 V Maximum 55 V Maximum DPPS-16-40 Maximum 13,8 V Maximum 15 V Maximum DPPS-32-20 Maximum 13,8 V Maximum...
  • Page 90: Les Emplacements De Mémoire Occupent «Set

    a) Les emplacements de mémoire occupent «Set» Tous les trois emplacements de mémoire peuvent être occupés avec des valeurs de tension de sortie et de limitation de courant propres à l’utilisateurs. Veillez à ce qu’aucun consommateur ne soit raccordé. 1. Activez la fonction «Set» à l’aide du bouton poussoir arrière «MODE» (8). Placez l’interrupteur sur la position «Set».
  • Page 91: Fonctionnement À Distance «Remote Ctrl

    10. FONCTIONNEMENT À DISTANCE «REMOTE CTRL» La tension avec une source externe peut se régler par le biais de la prise de télécommande intégrée «Remote Control» (10) ou d´une résistance réglable de façon externe (à savoir le potentiomètre). Le raccordement de la commande à distance est effectué sur la prise «Remote Control» (10). Une prise à...
  • Page 92: Commande Via Une Source De Tension Externe

    b) Commande via une source de tension externe L’alimentation peut être commandée à distance avec une source de tension externe de 0 à 5 V/CC sur toute la plage de tension et de courant. Procéder comme suit pour le raccordement: Reliez les câbles de raccordement du connecteur à...
  • Page 93: Commande Via Une Résistance Réglable (Potentiomètre)

    c) Commande via une résistance réglable (potentiomètre) L’alimentation peut être commandée à distance avec un potentiomètre externe (5 kOhm) sur toute la plage de tension et de courant. Procéder comme suit pour le raccordement: Reliez les câbles de raccordement du connecteur à distance comme illustré : Réglage de la tension «V»...
  • Page 94: Sortie Commande À Distance (Marche/Arrêt)

    d) Sortie commande à distance (marche/arrêt) La sortie CC peut être activée et désactivée par un contact de sécurité. Procéder comme suit pour le raccordement: 1. Reliez les câbles de raccordement du connecteur à distance comme illustré. 2. Contactez les raccordements 4 et 5 avec un contact de sécurité sans potentiel. 3.
  • Page 95: Fonction De Détection (1086562)

    11. FONCTION DE DÉTECTION (1086562) La fonction de détection n’est disponible uniquement sur le modèle No. 1086562. La fonction de détection est un contrôle automatique de tension pour la sortie à courant élevé arrière (MAIN OUTPUT) (7). Pour cela, deux câbles de mesure séparés sont connectés en parallèle aux câbles de connexion.
  • Page 96: Installation Du Logiciel

    12. INSTALLATION DU LOGICIEL Le logiciel est compatible avec les systèmes d’exploitation Windows ®, XP, 2003, Vista, 7, 8 1. Insérez le CD du logiciel fourni dans le lecteur de DVD de votre ordinateur. 2. Installer le pilote (USB à UART Bridge) adapté à votre système d’exploitation, qui se trouve dans le répertoire USB CP210x Drivers.
  • Page 97: Utilisation Du Logiciel D'exploitation Et Fonctionnement De Base

    a) Utilisation du logiciel d‘exploitation et fonctionnement de base A Onglets de fonction Changer de fonction avec les volets situés sur le côté droit: • Programme horaire externe (External Timed Program) • Mémoire de interne préréglée (Internal Preset Memory) • Journal de données (Data Log) •...
  • Page 98 G Gestionnaire des fichiers Exporter tableau / paramètres en tant que fichier csv. Importer tableau / paramètres à partir d’un fichier csv. Imprimer écran H Paramètres de transfert Transférer la tension et le courant paramétrés vers l’alimentation. I Sortie marche / arrêt Activer / désactiver l’alimentation.
  • Page 99: Mémoire Interne Préréglée

    b) Mémoire interne préréglée Vous pouvez lire, arrêter et appliquer la mémoire préréglée de l’alimentation via le logiciel. • Les valeurs prédéfinies sont chargées dans le logiciel automatiquement, mais dans le cas contraire, appuyez sur le bouton Read from PS pour charger les informations. •...
  • Page 100: Journal De Données

    c) Journal de données Avec cette fonction vous pouvez visualiser le tableau tension-courant-puissance en temps réel/ enregistré. Vous pouvez importer, exporter ou imprimer les paramètres avec les boutons de gestion de fichiers (G). • Basculer entre diagramme enregistré (Import) et le schéma en temps réel (Now) en sélectionnant l‘option correspondante dans le coin inférieur gauche.
  • Page 101: Configuration

    d) Configuration Langue (Language) Choisir la langue Port COMM (COM Port) Connexion entre l’ordinateur et l’alimentation. Il est configuré automatiquement lors du lancement du logiciel. Il n’est pas recommandé de le modifier manuellement. Temps d’échantillonnage du DataLog Intervalle temps entre chaque (Data Log Sampling Time) échantillonnage.
  • Page 102: Dispositifs De Protection

    14. DISPOSITIFS DE PROTECTION L’alimentation intègre plusieurs dispositifs de protection automatiques la protégeant contre les dommages. Les dispositifs de protection activés sont affichés avec des codes de lettres sur l’écran et la sortie CC est simultanément désactivée, pour des raisons de sécurité. Lorsqu’un dispositif de protection est activé, le consommateur doit être immédiatement éteint et débranché...
  • Page 103: Mise Hors Tension En Cas De Surcharge

    c) Mise hors tension en cas de surcharge • En cas de surcharge sur la sortie CC, la limitation de courant est normalement activée. Si ce n’est exceptionnellement pas le cas, une deuxième fonction de protection est activée.. • Eteignez l’alimentation dès l’apparition de ce signal d’alarme et vérifiez les données de raccordement du consommateur.
  • Page 104: Dépannage

    16. DÉPANNAGE Avec cette alimentation de laboratoire, vous avez acquis un produit d’une grande sécurité de fonctionnement. Il est toutefois possible que des problèmes ou des pannes surviennent. A ce niveau, nous souhaitons vous décrire comment vous dépanner le cas échéant : Respecter impérativement les consignes de sécurité...
  • Page 105: Élimination Des Déchets

    Mise hors circuit en cas de surtension Voir chapitre «Dispositifs de protection» Mise hors circuit en cas de surtempérature Voir chapitre «Dispositifs de protection» Mise hors circuit causée par une surcharge Voir chapitre «Dispositifs de protection» Les réparations autres que celles décrites précédemment doivent être exécutées uniquement par un technicien agréé.
  • Page 106: Caractéristiques Techniques

    18. CARACTÉRISTIQUES TECHNIQUES 1086555 1086556 1086558 (DPPS-16-30) (DPPS-32-15) (DPPS-60-8) Tension de service : 200 – 240 V/AC, 50/60 Hz Courant d’entrée max. (230 V/AC): 2,4 A 2,4 A 2,5 A Puissance de sortie max.: 480 W 480 W 480 W Tension de sortie : 1 –...
  • Page 107 1086559 1086560 1086561 (DPPS-16-40) (DPPS-32-20) (DPPS-60-10) Tension de service : 200 – 240 V/AC, 50/60 Hz Courant d’entrée max. (230 V/AC): 3,1 A 3,1 A 3,1 A Puissance de sortie max.: 640 W 640 W 600 W Tension de sortie : 1 –...
  • Page 108 1086562 1086563 1086564 (DPPS-16-60) (DPPS-32-30) (DPPS-60-15) Tension de service : 200 – 240 V/AC, 50/60 Hz Courant d’entrée max. (230 V/AC): 4,7 A 4,5 A 4,5 A Puissance de sortie max.: 960 W 960 W 900 W Tension de sortie : 1 –...
  • Page 109: Fonctions Supplémentaires

    19. FONCTIONS SUPPLÉMENTAIRES Ce supplément est seulement valide pour les appareils ayant la version 3.x du micrologiciel. a) Remettre l’unité à zéro manuellement Le bloc d’alimentation se remet automatiquement à zéro à chaque fois que vous l’allumez. Si vous avez besoin de remettre l’unité à zéro durant le fonctionnement et que vous ne souhaitez pas éteindre l’appareil, mettez-le donc à...
  • Page 110: Réinitialiser Les Préréglages De Sortie (P1/P2/P3) Aux Valeurs Par Défaut

    b) Réinitialiser les préréglages de sortie (P1/P2/P3) aux valeurs par défaut Le bloc d’alimentation permet de prérégler trois valeurs de tension (y compris les configurations du courant) au moyen des trois fentes d’espace mémoire : P1, P2, et P3. Si vous souhaitez, lors du fonctionnement, remettre à...
  • Page 111 INHOUD 1. Inleiding ..........................112 2. Bedoeld gebruik .........................113 3. Leveringsomvang .......................114 4. Tleg van symbolen ......................115 5. Veiligheidsvoorschriften .....................116 a) Personen / Product .......................116 b) Diversen ........................118 6. Bedieningselementen ......................118 7. Ingebruikname ........................120 a) Aansluiting van het netsnoer..................120 b) Opstellen van het toestel ....................120 c) Algemeen ........................120 8.
  • Page 112: Inleiding

    1. INLEIDING Geachte klant, Wij danken u hartelijk voor het aanschaffen van een Voltcraft®-product. Hiermee heeft u een uitstekend apparaat in huis gehaald. Voltcraft® - deze naam staat op het gebied van meettechniek, laadtechniek en voedingsspanning voor onovertroffen kwaliteitsproducten die worden gekenmerkt door gespecialiseerde vakkundigheid, buitengewone prestaties en permanente innovaties.
  • Page 113: Bedoeld Gebruik

    (totale, MAIN + AUX) DPPS-16-30 1 – 16 V/DC 0 – 30 A DPPS-32-15 1 – 32 V/DC 0 – 15 A DPPS-60-8 1 – 60 V/DC 0 – 8 A DPPS-16-40 1 – 16 V/DC 0 – 40 A DPPS-32-20 1 –...
  • Page 114: Leveringsomvang

    Met de meegeleverde software en de USB-aansluiting kan de voeding beheerd worden door een pc voor het uitvoeren van cyclische operaties. Maximaal 20 programmeerbare sets met spanning en stroom en met verschillende tijdsduren kunnen geprogrammeerd worden en de cyclische handelingen kunnen maximaal 999 maal herhaald worden.
  • Page 115: Tleg Van Symbolen

    4. TLEG VAN SYMBOLEN Een uitroepteken in een driehoek betekent belangrijke instructies in deze handleiding die absoluut moeten worden opgevolgd. Een bliksemschicht in een driehoek waarschuwt voor een elektrische schok of een veiligheidsbeperking van elektrische onderdelen in het apparaat. Dit symbool kan worden gevonden bij tips of informatie over het gebruik. Alleen voor toepassing in droge binnenruimtes.
  • Page 116: Veiligheidsvoorschriften

    5. VEILIGHEIDSVOORSCHRIFTEN Lees de gebruiksaanwijzing zorgvuldig door en let vooral op de veiligheidsinstructies. Indien de veiligheidsinstructies en de aanwijzingen voor een juiste bediening in deze gebruiksaanwijzing niet worden opgevolgd, kunnen wij niet aansprakelijk worden gesteld voor de daardoor ontstane schade aan apparatuur of persoonlijk letsel.
  • Page 117 • Onderdelen onder spanning kunnen blootgelegd worden wanneer het deksel wordt geopend of bij het verwijderen van onderdelen. U moet daarom het product van alle stroomvoorzieningen ontkoppelen voordat onderhoud of reparaties uitgevoerd mogen worden. Condensatoren in het apparaat kunnen nog steeds een elektrische spanning bevatten, zelfs wanneer het apparaat van alle stroombronnen is ontkoppeld.
  • Page 118: Diversen

    • Gebruik de oplader niet op plaatsen of in ruimten met ongunstige omstandigheden. Dit kan de gevoelige elektronica in de oplader beschadigen en kan mogelijk levensbedreigende situaties veroorzaken. Ongunstige omstandigheden zijn: - hoge luchtvochtigheid (> 80 % relatieve, condensatie) - vochtigheid stof, ontvlambare gassen, oplosdampen, benzine - hoge omgevingstemperaturen (>...
  • Page 119 1086555 / 1086556 / 1086558 1086559 / 1086560 / 1086561 / 1086562 / 1086563 / 1086564 1086555 / 1086556 / 1086558 1086559 / 1086560 / 1086561 1086563 / 1086564 1086562...
  • Page 120: Ingebruikname

    7. INGEBRUIKNAME De voeding is geen lader. Gebruik voor het laden van accu’s geschikte laders met een geschikte laaduitschakeling. Bij langdurig gebruik met nominale last wordt het oppervlak van de behuizing warm. Let op! Mogelijk gevaar op verbranden! Zorg daarom altijd voor voldoende ventilatie rondom de voeding en gebruik deze nooit geheel of gedeeltelijk afgedekt om eventuele schade te voorkomen.
  • Page 121 Na het inschakelen vindt er een systeemcontrole plaats. In de beide schermen (2 en 3) wordt de teststatus weergegeven. De volgorde van de meldingen is als volgt: Weergave van de actuele softwarestand. Segmenttest of de weergave met alle individuele segmenten functioneert. Daarna volgt de test van de LED-indicatoren “C.V.”, “C.C.”...
  • Page 122: Normaal Gebruik

    De voeding laat het gebruik in 4 modi toe. Deze modi worden via een schuifschakelaar aan de achterkant “MODE ” (8) geselecteerd. De volgende modi zijn mogelijk: Normal Normaal gebruik De instelling van spanning en stroom gebeurt aan de voorkant. Preset Gebruik van opslagplaats.
  • Page 123: Uitgangsspanning Instellen

    Indien binnen 2 seconden geen keuze is gemaakt, schakelt het display terug naar het huidige stroom display. 5. Om de stroombegrenzing in te stellen, draait u de instelregelaar naar links of rechts. Na het inschakelen is het fijn-instelbereik (0,1 A) altijd actief. Dit wordt door een licht helderder getal weergegeven.
  • Page 124 Max. 5 A mag worden afgenomen van de AUX aansluitingen AUX. OUTPUT 5A MAX. (6). Een PTC-overstroombeveiliging beschermt deze aansluitingen tegen overbelasting en onderbreekt de stroomtoevoer wanneer geactiveerd (>5 A). Om het toestel terug te zetten, schakel het onmiddellijk uit en laat tot kamertemperatuur afkoelen voordat u het opnieuw gebruikt.
  • Page 125: Gebruik Van Opslagplaats "Preset" En "Set

    Stroom Spanning Stroom DPPS-16-30 Maximum 13.8 V Maximum 15 V Maximum DPPS-32-15 Maximum 13.8 V Maximum 25 V Maximum DPPS-60-8 Maximum 13.8 V Maximum 55 V Maximum DPPS-16-40 Maximum 13.8 V Maximum 15 V Maximum DPPS-32-20 Maximum 13.8 V Maximum...
  • Page 126: Opslagplaats Zelf Toewijzen "Set

    5. Voor het uitschakelen van de vaste spanning functie, schuift u de keuzeschakelaar MODE (8) terug naar de Normal positie. De controlelamp REAR CONTROL (2) gaat uit. Het wordt bij normaal gebruik van de voeding omgeschakeld (DC-verbruiker altijd op voorhand verwijderen!) a) Opslagplaats zelf toewijzen “Set”...
  • Page 127: Remote Control Operation "Remote Ctrl

    10. REMOTE CONTROL OPERATION “REMOTE CTRL” Via de ingebouwde “Remote Control”-aansluiting van de afstandsbediening (10) kan de spanningsen stroominstelling met een externe spanningsbron of door een externe, instelbare weerstand (kort “poti”) gebeuren. De aansluiting van de afstandsbediening gebeurt met de “Remote Control”- inbouwstekker (10) aan de achterkant.
  • Page 128: Sturing Via Externe Spanningsbron

    b) Sturing via externe spanningsbron De voeding kan met een externe spanningsbron van 0 tot 5V/DC over het gehele bereik voor spanning en stroom op afstand worden bediend. Voor het vervangen gaat u als volgt te werk: Verbind de aansluitleidingen van de Remote-bus zoals afgebeeld: Spanningsinstelling “V”...
  • Page 129: Sturing Via Een Regelbare Weerstand (Poti)

    c) Sturing via een regelbare weerstand (Poti) De voeding kan met een externe Poti (5 Kohm) over het gehele bereik voor spanning en stroom op afstand worden bediend. Voor het vervangen gaat u als volgt te werk: Verbind de aansluitleidingen van de Remote-bus zoals afgebeeld: Spanningsinstelling “V”...
  • Page 130: Uitgang Op Afstand Bedienen (Aan/Uit)

    d) Uitgang op afstand bedienen (aan/uit) De DC-uitgang kan via een schakelcontact in- en uit worden geschakeld. Voor het vervangen gaat u als volgt te werk: 1. Verbind de aansluitleidingen van de Remote-bus zoals afgebeeld. 2. Contacteer aansluitingen 4 en 5 met een potentiaalvrij schakelcontact. 3.
  • Page 131: Sensor Functie (1086562)

    11. SENSOR FUNCTIE (1086562) De sensor functie is alleen beschikbaar met Item Nr. 1086562. De sensor functie is een automatische regeling van de spanning voor de achterste hoge stroomuitgang (MAIN OUTPUT) (7). Hiervoor worden twee afzonderlijke meetkabels parallel aan de aansluitkabels aangesloten.
  • Page 132: Software Installatie

    12. SOFTWARE INSTALLATIE Software is compatible met Windows® besturingssystemen XP, 2003, Vista, 7 ,8 1. Voer de meegeleverde software CD in de DVD drive van uw computer. 2. Instaleer de driver (USB naar UART Bridge), in directory USB CP210x Drivers..., die geschikt is voor uw besturingssysteem.
  • Page 133: Bedieningselementen Van De Software En De Basisbediening

    a) Bedieningselementen van de software en de basisbediening A Functie tabs Schakel de functie van het venster aan de rechterzijde tussen: • Externe tijdprogramma (External Timed Program) • Interne voorinstelling geheugen (Internal Preset Memory) • Data log (Data Log) • Instelling (Setting) B Data invoer tabel Het data invoerveld voor de externe tijdprogramma functie.
  • Page 134 G Bestandsbeheer Exporteer tabel/instellingen als .csv file. Importeer .csv geformatteerde tabel/instellingen Print huidige scherm H Overdracht instellingen Ingestelde spanning en stroom naar de voeding toevoer overdragen. I Uitgang aan/uit Activeer/deactiveer voeding toevoer. Invoer bevestigen met de (H) knop. Het LED-display toont "O P UIT". J Stroom Het veld waar u de stroom naar de voeding toevoer kunt programmeren.
  • Page 135: Intern Vooringesteld Geheugen

    b) Intern vooringesteld geheugen Met de software kunt u het vooraf ingestelde geheugen van de voeding lezen, instellen en toepassen. • De waarden worden automatisch in de software geladen; als dat niet het geval is, kunt u de informatie laden met een druk op de knop Read From PS. •...
  • Page 136: Logboek

    c) Logboek U kunt het real-time/geregistreerde spaning/stroom-diagram van deze functie bekijken. Met de knoppen voor bestandsbeheer (G) kunt u de instellingen importeren, exporteren of afdrukken. • Schakel tussen opgenomen schema (Import) en het real-time schema (Now) door het selecteren van de overeenkomstige optie in de hoek linksonder. •...
  • Page 137: Instellen

    d) Instellen Taal (Language) Gekozen software taal. COMM-poort (COM Port) De verbinding tussen de pc en de voeding. Deze wordt automatisch ingesteld bij het starten van de software en het wordt afgeraden om dit handmatig te wijzigen. DataLog monstertijd Het tijdinterval tussen elke bemonstering. (Data Log Sampling Time) Bovengrens spanning (UVL) instelling Beperk de afgegeven spanning vanuit de...
  • Page 138: Beschermingsvoorzieningen

    14. BESCHERMINGSVOORZIENINGEN Er werden op de voeding verschillende automatische beschermvoorzieningen geïntegreerd die de voeding tegen beschadigingen beschermen. De geactiveerde beschermvoorzieningen worden met lettercodes op het display weergegeven en gelijktijdig wordt de DC-uitgang uit veiligheidsoverwegingen uitgeschakeld. Als een beschermvoorziening actief is, moet de verbruiker onmiddellijk worden uitgeschakeld en van de voeding worden afgeklemd.
  • Page 139: Uitschakeling Bij Overbelasting

    c) Uitschakeling bij overbelasting • Bij overbelasting aan de DC-uitgang wordt normaal gezien de stroombegrenzing actief. Indien dit het geval niet is, wordt een tweede beschermfunctie actief. • Schakel onmiddellijk verschijnen deze waarschuwingsmelding de voeding uit en controleer de aansluitgegevens van de verbruiker. Verwijder de verbruiker van de DC-uitgang van de leiding.
  • Page 140: Verhelpen Van Storingen

    16. VERHELPEN VAN STORINGEN U heeft met deze laboratoriumvoeding een product aangeschaft dat betrouwbaar en veilig is in het gebruik. Toch kunnen zich problemen of storingen voordoen. Hieronder vindt u enkele manieren om eventuele storingen te verhelpen: Neem altijd de veiligheidsinstructies in acht! Fout Mogelijke oorzaak De voeding kan zich niet...
  • Page 141: Verwijdering

    “OtP” display Uitschakeling bij overtemperatuur: Zie het hoofdstuk “Beschermvoorzieningen”. “OLP” display Uitschakelen bij overbelasting: Zie het hoofdstuk “Beschermvoorzieningen” Andere reparaties dan hierboven beschreven, mogen uitsluitend door een erkende vakman worden uitgevoerd. Als u vragen heeft omtrent het gebruik van het product, kunt u contact opnemen met onze technische helpdesk onder het volgende telefoonnummer.
  • Page 142: Technische Gegevens

    18. TECHNISCHE GEGEVENS 1086555 1086556 1086558 (DPPS-16-30) (DPPS-32-15) (DPPS-60-8) Bedrijfsspanning: 200 – 240 V/AC, 50/60 Hz Max. ingangsstroom (230 V/AC): 2.4 A 2.4 A 2.5 A Max. uitgangsvermogen: 480 W 480 W 480 W Uitgangsspanning: 1 – 16 V/DC 1 – 32 V/DC 1 –...
  • Page 143 1086559 1086560 1086561 (DPPS-16-40) (DPPS-32-20) (DPPS-60-10) Bedrijfsspanning: 200 – 240 V/AC, 50/60 Hz Max. ingangsstroom (230 V/AC): 3.1 A 3.1 A 3.1 A Max. uitgangsvermogen: 640 W 640 W 600 W Uitgangsspanning: 1 – 16 V/DC 1 – 32 V 1 –...
  • Page 144 1086562 1086563 1086564 (DPPS-16-60) (DPPS-32-30) (DPPS-60-15) Bedrijfsspanning: 200 – 240 V/AC, 50/60 Hz Max. ingangsstroom (230 V/AC): 4,7 A 4,5 A 4,5 A Max. uitgangsvermogen: 960 W 960 W 900 W Uitgangsspanning: 1 – 16 V/DC 1 – 32 V/DC 1 –...
  • Page 145: Toegevoegde Functies

    19. TOEGEVOEGDE FUNCTIES De aanvulling is alleen geldig voor apparaten die werken met firmware versie 3.x. a) Het toestel handmatig op nul zetten De voeding wordt automatisch bij elke inschakeling op nul gezet. In geval u het toestel tijdens de werking op nul dient te zetten en u wilt het toestel niet opnieuw opstarten, zet het toestel handmatig op nul.
  • Page 146: De Uitvoer-Voorinstellingen (P1/P2/P3) Op De Fabriekswaarden Terugzetten

    b) De uitvoer-voorinstellingen (P1/P2/P3) op de fabriekswaarden terugzetten De voeding stelt het voorinstellen van drie spanningswaarden (waaronder stroominstellingen) toe door middel van drie geheugenplaatsen: P1, P2, en P3. In geval u de geheugenplaatsen tijdens de werking naar de fabriekswaarden wilt terugzetten, voer het volgende uit: 1.
  • Page 148: Legal Notice

    Impressum Dies ist eine Publikation der Conrad Electronic SE, Klaus-Conrad-Str. 1, D-92240 Hirschau (www.conrad.com). Alle Rechte einschließlich Übersetzung vorbehalten. Reproduktionen jeder Art, z. B. Fotokopie, Mikroverfilmung, oder die Erfassung in elektronischen Datenverarbeitungsanlagen, bedürfen der schriftlichen Genehmigung des Herausgebers. Nachdruck, auch auszugsweise, verboten.

Table des Matières