Table des Matières
Publicité
Les langues disponibles
Les langues disponibles
Liens rapides
Glasstron
Operating Instructions
Mode d'emploi
WARNING
YOUR FAILURE TO FOLLOW THESE OPERATING INSTRUCTIONS MAY RESULT IN EYE
FATIGUE, EYE DAMAGE, OR OTHER INJURY.
CAREFULLY READ THIS INSTRUCTION MANUAL AND BECOME FAMILIAR WITH ALL
SAFETY INSTRUCTIONS FOR THIS PRODUCT.
THIS PRODUCT SHOULD NOT BE USED BY CHILDREN AGE 15 OR YOUNGER.
IF YOU HAVE BEEN DIAGNOSED WITH EYE DISEASE OR EYE INJURY, CONSULT YOUR
DOCTOR BEFORE USE AND DO NOT USE WITHOUT YOUR DOCTOR'S APPROVAL.
AVERTISSEMENT
LE NON-RESPECT DES PRESENTES INSTRUCTIONS D'UTILISATION IMPLIQUE DES
RISQUES DE FATIGUE, DE BLESSURE OU AUTRES AUX YEUX.
LISEZ ATTENTIVEMENT LE PRESENT MODE D'EMPLOI ET FAMILIARISEZ-VOUS AVEC
TOUTES LES INSTRUCTIONS DE SECURITE AFFERENTES.
CET APPAREIL NE PEUT ETRE UTILISE PAR DES ENFANTS AGES DE 15 ANS OU MOINS.
SI VOUS SOUFFREZ DE MALADIES OU D'AFFECTIONS OCULAIRES, CONSULTEZ
VOTRE MEDECIN AVANT D'UTILISER CET APPAREIL ET NE L'UTILISEZ PAS SANS
L'AUTORISATION DE VOTRE MEDECIN.
PLM-S700
© 1998 by Sony Corporation
3-862-917-11 (1)
™
US
FR
Publicité
Chapitres
Table des Matières
Dépannage

Manuels Connexes pour Sony Glasstron PLM-S700


Sommaire des Matières pour Sony Glasstron PLM-S700
- Page 1 CET APPAREIL NE PEUT ETRE UTILISE PAR DES ENFANTS AGES DE 15 ANS OU MOINS. SI VOUS SOUFFREZ DE MALADIES OU D’AFFECTIONS OCULAIRES, CONSULTEZ VOTRE MEDECIN AVANT D’UTILISER CET APPAREIL ET NE L’UTILISEZ PAS SANS L’AUTORISATION DE VOTRE MEDECIN. ™ PLM-S700 © 1998 by Sony Corporation...
-
Page 2: Declaration Of Conformity
Trade Name: SONY Model No.: PLM-S700 CAUTION Responsible Party: Sony Electronics Inc. To prevent electric shock, match wide blade Address: 1 Sony Drive, Park Ridge, of plug to wide slot, fully insert. NJ07656 USA Telephone No.:... - Page 3 In some areas the disposal of lithium ion batteries in household or business trash may be prohibited. For the Sony Service Center nearest you call 1-800-222-SONY (United States only) For the Sony Factory Service Center nearest you call 416-499-SONY (Canada only) Caution: Do not handle damaged or leaking lithium ion batteries.
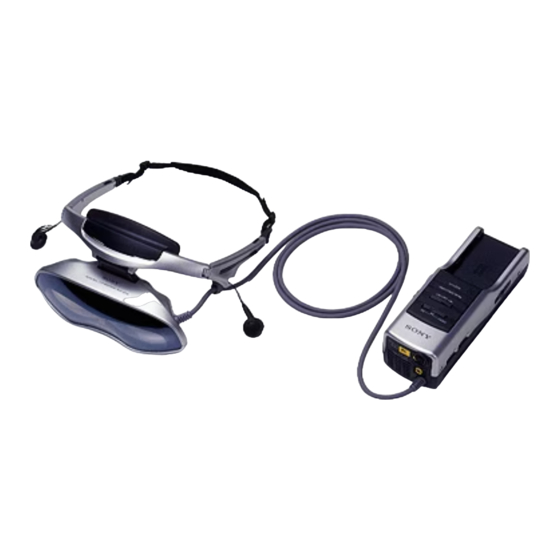
- Page 4 Glasstron is a brand-new concept in visual display Congratulations on your purchase of a Sony Note on the LCD (Liquid Crystal Glasstron Personal Viewer. The Glasstron, Display) using current technology in small, The LCD screen is made with high- lightweight visual displays, provides a precision technology.
-
Page 5: Table Des Matières
Table of Contents SAFETY INSTRUCTIONS ..................6 About the Glasstron ....................11 Getting Started Checking the supplied accessories ............... 13 Locating the parts and controls ................14 Connecting the Glasstron Connecting the PC .................... 15 Connecting the video equipment ..............18 Connecting the power source ................ -
Page 6: Safety Instructions
SAFETY INSTRUCTIONS THE SONY GLASSTRON PERSONAL VIEWER SHOULD BE USED IN STRICT ACCORDANCE WITH ALL INSTRUCTIONS TO PREVENT EYE OR OTHER INJURY, LOSS OF VISUAL FUNCTIONS, PROPERTY DAMAGE, OR DEATH. USE RESTRICTIONS Warning: No Use by Children Age 15 or Younger. - Page 7 Health Concerns Warning: Eye Fatigue/Eye Damage/Loss of Visual Functions. Misuse or overuse of this product may result in eye fatigue, eye damage, or loss of visual functions. Stop using if you feel tired or experience headaches or discomfort. Warning: No Use by Children Age 15 or Younger. This product is designed for adult use.
- Page 8 SAFETY INSTRUCTIONS (continued) Health Concerns Caution: Motion Sickness from External Motion. Do not use this product while subject to external motion –– for example, as a passenger in a car. Use of this product under these conditions may cause motion sickness.
- Page 9 Instructions for Safe Fit Warning: Proper Fit. Each time this product is used adjustment screens will appear, requiring the viewer to properly fit the product. Proper fit means that an asterisk ( * ) will appear in each corner of the display. Failure to properly fit the product each time may result in eye fatigue, eye damage, or loss of visual functions and may result in accident or injury.
- Page 10 SAFETY INSTRUCTIONS (continued) Warnings for Electronic Products Caution: Electric Shock. Failure to observe all operating and maintenance instructions may cause damage to your product and may result in property damage or injury or death from electric shock, fire, or other cause. Caution: Do Not Disassemble.
-
Page 11: About The Glasstron
(left and right) LCDs. Power supply box You can supply power using the supplied AC power adapter or the optional Sony rechargeable battery pack. When using with the Glasstron, connect your video equipment or PC to the connector on the power supply box. - Page 12 About the Glasstron (continued) Features • A powerful, big screen experience comparable to watching a 30-inch screen from approximately 4 feet (1.2 m) away (SVGA mode). • You can connect the Glasstron, which is equipped with 1.55 million dot LCD, to your PC to see the screen of the PC in the SVGA or VGA screen mode.
-
Page 13: Checking The Supplied Accessories
Checking the supplied accessories Check that the following accessories are supplied with your Glasstron. If any item is not supplied, contact your Sony dealer or local authorized Sony service facility. • Display unit/power supply box (1) • Audio/video cable (special miniplug ˜... -
Page 14: Locating The Parts And Controls
Locating the parts and controls Refer to the pages indicated in parentheses ( ) for details. Display unit Strap release button (21) POWER SAVING SENSOR (inner side) (36, 38) Earphone slide button (22) Stereo earphone (22) Power supply box PUSH DISPLAY jog dial (23, 37) MENU button (37) SCREEN switch (34) RGB connector... -
Page 15: Connecting The Glasstron
Connecting the Glasstron When connecting the Glasstron to other equipment, use the supplied cables. Note If you use the commercially available cables, and the performance is reduced, check the performance using the supplied cables. Connecting the PC Be sure to turn off your PC before connecting the power supply box. Notes •... - Page 16 Connecting the Glasstron (continued) Connecting a Macintosh Powerbook Depending on the model, you may need to use a commercially available adapter to connect the RGB signal cable (supplied) as shown below. When you connect the Glasstron to your Powerbook, set the PC-VIDEO switch on the power supply box to “PC.” to monitor to RGB port of...
- Page 17 Connecting a Macintosh (desktop models) Depending on the model, you may need to use the supplied Macintosh adapter to connect the RGB signal cable (supplied) as shown below. When you connect the Glasstron to your Macintosh, set the PC-VIDEO switch on the power supply box to “PC.” to monitor port to RGB signal cable of Macintosh...
-
Page 18: Connecting The Video Equipment
Connecting the Glasstron (continued) Connecting the video equipment Connect a VCR, laser disc player, DVD player, or camcorder to the power supply box using one of the audio/video cables (supplied) as shown below. When you connect the Glasstron to the video equipment, set the PC-VIDEO switch on the power supply box to “VIDEO.”... - Page 19 If your video equipment has an S-video jack Connect the Glasstron to the video equipment using the supplied S-video cable and the audio/ video cable to enjoy the highest quality pictures. In this case, you do not need to connect the video (yellow) plug.
-
Page 20: Connecting The Power Source
(phono jacks) of your video equipment, connect the Glasstron to both the carried to the Glasstron depending on the video source. In this case, contact your Sony right and left audio output jacks. If you dealer or local authorized Sony service connect the Glasstron to just one audio facility. -
Page 21: Wearing The Glasstron
Wearing the Glasstron WARNING • Failure to properly fit the product (see “Proper Fit,” page 9) each time may result in eye fatigue, eye damage, or loss of visual functions and may result in accident or injury. • This product should not be used by children age 15 or younger. The eyes of children are still developing and may be adversely affected by use of this product, and it may cause eye fatigue, eye damage, or loss of visual functions. - Page 22 Wearing the Glasstron (continued) Adjust the angle of the display unit. While holding the front pad against Front pad your forehead, adjust the angle of the display unit using the two hinges. Move the display unit close to your eyes at a slight downward angle.
-
Page 23: Turning On The Glasstron
Turning on the Glasstron After you complete all of the connections and put on the Glasstron properly, turn on both the Glasstron and the connected equipment, and follow the procedures below. 1 Checking the display unit position n This page 2 Checking the screen position alignment n Page 25 3 Setting a password n Page 28 If you do not want to use a password, you have to set the Glasstron to operate without... - Page 24 Turning on the Glasstron (continued) Read the next WARNING and press the jog dial. WARNING THIS PRODUCT SHOULD NOT BE USED BY CHILDREN AGE 15 OR YOUNGER. SEE THE USER’S MANUAL FOR DETAILS. PUSH DISPLAY CHECK Adjust the display unit so that you can see an asterisk (*) in each of the four corners as shown below.
-
Page 25: Checking The Screen Position Alignment
Read the next WARNING, then go to “Checking the screen position alignment.” WARNING TO PREVENT EYE DAMAGE, DO NOT USE THIS PRODUCT IF THE VERTICAL LINES DO NOT CROSS THE HORIZONTAL LINE ON THE NEXT SCREEN. SEE THE USER’S MANUAL FOR DETAILS. - Page 26 If you cannot see a proper arrangement of these lines even after resting your eyes for a few hours, the Glasstron may not be operating correctly. Contact your Sony dealer or local authorized Sony service facility.
- Page 27 Read the WARNING and press the jog dial. WARNING MISUSE OR OVERUSE OF THE PRODUCT MAY RESULT IN EYE FATIGUE OR EYE DAMAGE. STOP USING IF YOU FEEL TIRED OR EXPERIENCE HEADACHES OR DISCOMFORT. SEE THE USER’S MANUAL FOR DETAILS. CHECK PUSH DISPLAY The password “YES or NO”...
-
Page 28: Setting The Password
Setting the password WARNING This product should not be used by children age 15 or younger. The eyes of children are still developing and may be adversely affected by use of this product. To prevent such use, this product has been equipped with a safety password protection system. Please use a secure password if children age 15 or younger may have access to this product. -
Page 29: Changing The Password
Verify a password using the jog dial. If the password is correct, select YES by turning the jog dial. If not, select NO. Then press the jog dial. IS YOUR PASSWORD CORRECT? If you select NO, return to step 1. If you select YES, go to step 4 in “Using the Glasstron”... -
Page 30: Using The Glasstron
Using the Glasstron You need to set a password the first time you use the Glasstron or after you reset the Glasstron. Set the password following the procedure in “Setting the password” (pages 28 and 29). Before you start… Be sure to follow the procedures in “Connecting the Glasstron” (pages 15 to 20) and “Wearing the Glasstron”... - Page 31 Follow the instructions on the screen. 1 Warning message n Follow steps 3 through 7 in “Checking the display unit position” (pages 23 through 25). • After carefully reading the warnings and checking the display unit position, press the jog dial. 2 Screen alignment n Follow steps 1 through 3 in “Checking the screen position alignment”...
-
Page 32: Checking The Display Indication
Using the Glasstron (continued) Adjust the brightness by turning the BRIGHT control. BRIGHT BRIGHTNESS darker ˜ brighter Adjust the sound volume by turning the VOL control. When you set AVLS in the menu to on, you cannot turn up the volume beyond the defined limit (see page 38). -
Page 33: Screen Warnings Against Overuse Of The Glasstron
Screen warnings against After about 6 hours of use overuse of the Glasstron WARNING YOU HAVE WATCHED FOR To prevent eye fatigue or eye damage, after OVER 6 HOURS. TO PREVENT EYE FATIGUE you use the Glasstron for a fixed length of OR EYE DAMAGE, GLASSTRON time, the following caution appears on the WILL AUTOMATICALLY SHUT... -
Page 34: Viewing The Surrounding Environment
Viewing the surrounding environment While you are wearing the Glasstron, you can view the surrounding environment through the screen in two ways: Viewing the surrounding Viewing the surrounding environment by adjusting the environment in the area transparency of the entire around the picture only screen (See-through mode) (Screen mode) -
Page 35: Adjusting The Sound And Picture Signal Compatibility
Adjusting the sound and picture Signal compatibility The signal specifications that this unit supports are as follows: PC mode (RGB signal) Display mode Screen resolution Horizontal Vertical (dot × line) frequency (kHz) frequency (Hz) Macintosh 640 × 480 13” color 35.0 832 ×... -
Page 36: Adjusting The Sound/Picture
Adjusting the sound and picture (continued) Adjusting the sound/picture You can adjust the following items using the menu display. The menu is displayed only in English. PC mode (RGB signal) Video mode (video signal) AVLS (Auto Volume Limiter System): Keeps the maximum volume down to protect your ear. You cannot turn up the volume beyond the defined limit even if you try to turn the VOL control. - Page 37 Press MENU. PC mode The menu display appears on the screen. MENU EXIT AVLS : MEGA BASS : POWER SAVE : V CENT H CENT TRACKING SYNC PRESET EXEC MENU EXIT MENU VIDEO mode MENU EXIT AVLS : MEGA BASS : POWER SAVE : CONTRAST COLOR...
-
Page 38: Power Save
Adjusting the sound and picture (continued) AVLS (Auto Volume Limiter POWER SAVE System) Turn the jog dial to set to Turn the jog dial to set to ON, then press the jog dial. ON, then press the jog dial. POWER SAVE : AVLS : EXEC EXEC... -
Page 39: Adjusting The Rgb Signal
Adjusting the RGB signal It is recommended to adjust the picture after installing the information file included in the supplied Windows 95/Windows 98 PC Glasstron Information disk, or the screen adjustment disk for Macintosh. For details on how to install the information file, refer to the instruction manual “Windows 95/Windows 98 PC Glasstron Information Disk/screen adjustment disk for Macintosh”. -
Page 40: Adjusting The Video Signal
Adjusting the sound and picture (continued) Adjusting the video signal Resetting the adjustment to the CONTRAST factory preset level Turn the jog dial to adjust AVLS, MEGA BASS, POWER SAVE settings the contrast, then press the are not reset to the factory preset level. jog dial. -
Page 41: Using The Optional Battery Pack
• If the POWER/POWER SAVING lamp flashes while using the battery pack, charge the battery pack. • If the CHARGE lamp flashes, the power supply box or battery pack is malfunctioning. Contact your Sony dealer or local authorized Sony service facility. • Use the supplied AC power adapter only when charging a battery pack. - Page 42 • The battery life listed above is for PC mode. When you use the Glasstron in video mode, the battery life is reduced to 80% of the PC mode. “InfoLITHIUM” is a trademark of Sony Corporation. Checking the remaining battery life When no indication or caution appears on the screen, press the jog dial.
-
Page 43: Precautions
If you find • Always turn the product off when you do the screens misaligned, have the product repaired at your Sony dealer or local not use it. Unplug the product from the wall outlet if authorized Sony service facility. - Page 44 • Do not disassemble or remodel the product. It may cause fire or electric shock. Have the product checked and repaired at your Sony dealer or local authorized Sony service facility. • Do not attempt to service the product yourself since opening the cabinet may...
-
Page 45: Error Messages
Error messages The following error messages may appear to indicate the status of the Glasstron or input signal. OUT OF SCAN RANGE The input signal does not match the supported specification. Change the screen resolution on your PC. For details of the signal compatibility, see “Signal compatibility”... -
Page 46: Troubleshooting
Troubleshooting If you have any questions or problems not listed below, contact your Sony dealer or local authorized Sony service facility. Symptom Cause Remedy The picture does not Connections are incorrect. Connect the equipment correctly appear. (pages 15 to 20). - Page 47 Symptom Cause Remedy The battery pack is not The battery pack is not installed Install the battery pack properly charged. properly. (page 41). The battery pack is completely dead. Replace the battery pack with a new one (page 41). The supplied AC power adapter is Use the supplied AC-PLM3 AC not used.
-
Page 48: Specifications
Specifications Power supply AC power adapter: AC-PLM3 – 100-240 V AC, 50/60 Hz, 16 W SYNC (Horizontal) Output voltage 8.4 V, 1.6 A SYNC (Vertical) Battery pack: NP-F550/NP-F750/ NP-F950 (not supplied) – Power consumption 10 W (approx., PC mode) PC AUDIO input: Stereo minijack 12 W (approx., VIDEO mode) VIDEO mode Operating temperature... -
Page 49: Index
Index I, J, K, L, T, U AC power adapter 20 Instructions for safe fit 9 Tracking 39 Accessories supplied 13, 48 M, N, O Adjusting Mega bass 36, 38 Vertical position 39 brightness 32 color 40 P, Q W, X, Y, Z hue 40 Password 28 WARNING messages 23-... -
Page 50: Pour Les Utilisateurs Au Canada
Pour connaître le point de ramassage le plus proche de chez vous, composez le 416-499- Ce symbole est destiné à SONY (Canada uniquement) avertir l’utilisateur de la présence à l’intérieur du Avertissement: Ne pas utiliser des batteries boîtier de cet appareil d’une... - Page 51 Si vous ne parvenez pas à introduire complètement la fiche dans la prise, consultez votre revendeur Sony. • Vous pouvez utiliser votre Glasstron dans n’importe quel pays offrant une tension d’alimentation comprise entre 100 et 240 V CA, 50/60 Hz.
- Page 52 Nous vous remercions d’avoir fait AVERTISSEMENT l’acquisition d’une visionneuse individuelle CET APPAREIL NE PEUT ETRE UTILISE Glasstron Sony. Le Glasstron, qui fait appel PAR DES ENFANTS AGES DE 15 ANS OU aux technologies modernes de systèmes MOINS. d’affichage miniaturisés légers, assure une LES YEUX DES ENFANTS SONT expérience télévisuelle comparable au...
- Page 53 Table des matières INSTRUCTIONS DE SECURITE ................6 A propos de la visionneuse Glasstron ..............11 Préparation Vérification des accessoires fournis ..............13 Localisation des composants et des commandes ..........14 Raccordement du Glasstron Raccordement de l’ordinateur ................ 15 Raccordement d’un appareil vidéo ..............18 Raccordement de la source d’alimentation ...........
-
Page 54: Instructions De Securite
INSTRUCTIONS DE SECURITE LA VISIONNEUSE INDIVIDUELLE GLASSTRON SONY DOIT ETRE UTILISEE EN STRICTE CONFORMITE AVEC TOUTES LES INSTRUCTIONS AFFERENTES AFIN D’EVITER LES BLESSURES AUX YEUX ET AUTRES, LA PERTE DE FONCTIONS VISUELLES, LES DOMMAGES AUX BIENS ET D’ECARTER LES DANGERS DE MORT. -
Page 55: Problèmes De Santé
INFORMATIONS DE SECURITE COMPLEMENTAIRES. A. Problèmes de santé - Voir pages 7 à 8. B. Instructions d’ajustage - Voir page 9. C. Avertissements relatifs aux appareils électroniques - Voir page 10. Problèmes de santé Avertissement: Fatigue oculaire, affections oculaires, perte de fonctions visuelles. -
Page 56: Instructions De Securite (Suite)
INSTRUCTIONS DE SECURITE (suite) Problèmes de santé Attention: Mal des transports résultant du visionnage. Certains utilisateurs ressentent des symptômes de mal des transports, des maux de tête ou des nausées en visionnant des films ou des enregistrements vidéo, et plus particulièrement s’ils comportent des scènes d’action intense et très animées. -
Page 57: Instructions D'ajustage
Instructions d’ajustage Avertissement: Ajustez correctement la visionneuse. Chaque fois que cet appareil est utilisé, les écrans de réglage s’affichent pour inviter l’utilisateur à ajuster correctement l’appareil. La visionneuse est correctement ajustée lorsqu’un astérisque ( * ) apparaît dans chaque coin de l’affichage. -
Page 58: Avertissements Relatifs Aux Appareils Électroniques
INSTRUCTIONS DE SECURITE (suite) Avertissements relatifs aux appareils électroniques Attention: Electrocution. La non-observation de toutes les instructions d’utilisation et d’entretien peut endommager votre visionneuse et entraîner des dommages aux biens ou encore des blessures, voire la mort, à la suite d’une électrocution, d’un incendie ou d’une autre cause. -
Page 59: A Propos De La Visionneuse Glasstron
écrans LCD (gauche et droit). Bloc d’alimentation Vous pouvez assurer l’alimentation à l’aide de l’adaptateur secteur ou de la batterie rechargeable Sony en option. Lors de l’utilisation du Glasstron, raccordez votre équipement vidéo ou ordinateur au connecteur du bloc d’alimentation. -
Page 60: Caractéristiques
A propos de la visionneuse Glasstron (suite) Caractéristiques • Une expérience télévisuelle grandiose comparable au visionnage sur un écran de 30 pouces à une distance d’approximativement 1,2 m (4 pieds) (mode d’écran SVGA). • Le Glasstron, étant équipé d’un écran LCD de 1,55 millions de points, peut être raccordé... -
Page 61: Vérification Des Accessoires Fournis
Vérification des accessoires fournis Assurez-vous que les accessoires suivants sont fournis avec le Glasstron. S’il manque l’un de ces accessoires, veuillez consulter votre revendeur Sony ou un centre de service après-vente Sony agréé. • Unité d’affichage/Bloc d’alimentation (1) • Câble audio/vidéo (minifiche spéciale ˜... -
Page 62: Localisation Des Composants Et Des Commandes
Localisation des composants et des commandes Pour plus de détails, reportez-vous aux pages indiquées entre parenthèses ( ). Unité d’affichage Bouton de dégagement de la sangle (21) POWER SAVING SENSOR (intérieur) (36, 38) Bouton coulissant des écouteurs (22) Ecouteurs stéréo (22) Bloc d’alimentation Molette de sélection PUSH DISPLAY (23, 37) -
Page 63: Raccordement Du Glasstron
Raccordement du Glasstron Pour raccorder le Glasstron à un autre appareil, utilisez les câbles fournis. Remarque Si vous utilisez des câbles disponibles dans le commerce et si vous observez une réduction des performances, contrôlez les performances au moyen des câbles fournis. Raccordement de l’ordinateur Veillez à... - Page 64 Raccordement du Glasstron (suite) Raccordement à un Powerbook Macintosh En fonction du modèle, il se peut que vous ayez besoin d’un adaptateur disponible dans le commerce pour raccorder le câble de signal RVB (fourni) comme illustré ci-dessous. Lorsque vous raccordez le Glasstron à votre Powerbook, mettez le commutateur PC-VIDEO du bloc d’alimentation sur “PC”.
-
Page 65: Raccordement À Un Macintosh (Modèles De Bureau)
Raccordement à un Macintosh (modèles de bureau) En fonction du modèle, il se peut que vous deviez utiliser l’adaptateur Macintosh fourni afin de raccorder le câble de signal RVB (fourni) comme illustré ci-dessous. Lorsque vous raccordez le Glasstron à votre Macintosh, mettez le connecteur PC-VIDEO du bloc d’alimentation sur “PC”. vers le port moniteur vers le câble de signal RVB du Macintosh... -
Page 66: Raccordement Du Glasstron (Suite)
Raccordement du Glasstron (suite) Raccordement d’un appareil vidéo Raccordez un magnétoscope, un lecteur de disque laser, un lecteur DVD ou un caméscope au bloc d’alimentation à l’aide d’un des câbles audio/vidéo (fournis) comme illustré ci-dessous. Lorsque vous raccordez le Glasstron à l’appareil vidéo, mettez le commutateur PC-VIDEO du bloc d’alimentation sur “VIDEO”. -
Page 67: Si Votre Équipement Vidéo Dispose D'une Prise S-Vidéo
Si votre équipement vidéo dispose d’une prise S-Vidéo Raccordez le Glasstron à l’appareil vidéo à l’aide du câble S-Vidéo fourni et du câble audio/ vidéo pour bénéficier d’images de haute qualité. Dans ce cas, vous ne devez pas raccorder la fiche vidéo (jaune). -
Page 68: Raccordement De La Source D'alimentation
Si vous suivant la source vidéo. En pareil cas, raccordez le Glasstron à une seule prise de consultez votre revendeur Sony ou un centre sortie audio, vous n’entendrez le son que par de service après-vente Sony agréé. -
Page 69: Port Du Glasstron
Port du Glasstron AVERTISSEMENT • Si vous n’ajustez pas correctement la visionneuse (voir “Ajustez correctement la visionneuse” à la page 9) à chaque utilisation, vous risquez de souffrir de fatigues ou de troubles oculaires ou encore de perdre certaines fonctions visuelles ce qui peut entraîner un accident ou des blessures. -
Page 70: Fixation Des Pare-Soleil
Port du Glasstron (suite) Ajustez l’angle de l’unité d’affichage. Tout en maintenant le coussinet frontal contre le front, ajustez l’angle de l’unité Coussinet frontal d’affichage à l’aide des deux charnières. Rapprochez l’unité d’affichage de vos yeux et inclinez-la légèrement vers le bas. -
Page 71: Mise Sous Tension Du Glasstron
Mise sous tension du Glasstron Lorsque vous avez terminé tous les raccordements et correctement chaussé le Glasstron, mettez- le sous tension et appliquez les procédures suivantes. 1 Vérification de la position de l’unité d’affichage n Cette page 2 Vérification de l’alignement de l’écran n Page 25 3 Saisie du mot de passe n Page 28 Si vous ne souhaitez pas utiliser de mot de passe, configurez le Glasstron pour qu’il fonctionne sans mot de passe dans la section “Saisie du mot de passe”. -
Page 72: Mise Sous Tension Du Glasstron (Suite)
Mise sous tension du Glasstron (suite) Lisez l’AVERTISSEMENT suivant et appuyez ensuite sur la molette de sélection. AVERTISSEMENT CET APPAREIL NE PEUT ETRE UTILISE PAR DES ENFANTS AGES DE 15 ANS OU MOINS. POUR PLUS DE DETAILS, VOIR LE MODE D’ EMPLOI. CONTROLER PUSH DISPLAY Ajustez l’unité... -
Page 73: Vérification De L'alignement De L'écran
Lisez l’AVERTISSEMENT suivant et passez ensuite à la section de “Vérification de l’alignement de l’écran”. AVERTISSEMENT POUR EVITER TOUT RISQUE POUR LES YEUX, NE PAS UTILISER SI LES TRAITS VERTICAUX NE COUPENT PAS LA LIGNE HORIZONTALE. POUR PLUS DE DETAILES, VOIR LE MODE D’... - Page 74 Si vous ne voyez toujours pas une combinaison correcte de ces lignes même après vous être reposé la vue pendant quelques heures, c’est probablement parce que le Glasstron ne fonctionne pas correctement. Consultez votre revendeur Sony ou un centre de service après-vente Sony agréé.
- Page 75 Lisez l’AVERTISSEMENT et appuyez sur la molette de sélection. AVERTISSEMENT TOUTE UTILISATION NON CONFORME IMPLIQUE DES RISQUES POUR LES YEUX. CESSEZ EN CAS DE FATIGUE MIGRAINE OU MALAISE. CONTROLER PUSH DISPLAY L’écran de sélection “OUI ou NON” du mot de VOULEZ-VOUS PROGRAMMER passe apparaît.
-
Page 76: Saisie Du Mot De Passe
Saisie du mot de passe AVERTISSEMENT Cet appareil ne peut être utilisé par des enfants âgés de 15 ans ou moins. Les yeux des enfants sont toujours en phase de développement et peuvent être gravement affectés par l’utilisation de cet appareil. Pour empêcher toute utilisation par des enfants âgés de 15 ans ou moins, cet appareil est équipé... -
Page 77: Modification Du Mot De Passe
Vérifiez le mot de passe à l’aide de la molette de sélection. Si le mot de passe est correct, sélectionnez “OUI” en tournant la VOTRE MOT DE PASSE molette de sélection. Sinon, sélectionnez EST-IL CORRECT ? “NON”. Appuyez ensuite sur la molette de sélection. -
Page 78: Utilisation Du Glasstron
Utilisation du Glasstron Vous devez saisir un mot de passe la première fois que vous utilisez le Glasstron ou après que vous avez réinitialisé le Glasstron. Introduisez le mot de passe en appliquant la procédure de “Saisie d’un mot de passe” (pages 28 et 29). Avant de commencer... - Page 79 Suivez les instructions à l’écran. 1 Message d’avertissement n Exécutez les étapes 3 à 7 de “Vérification de la position de l’unité d’affichage” (pages 23 à 25). • Lorsque vous avez lu attentivement les avertissements et vérifié la position de l’unité...
-
Page 80: Utilisation Du Glasstron (Suite)
Utilisation du Glasstron (suite) Ajustez la luminosité en tournant la commande BRIGHT. BRIGHT BRIGHTNESS plus foncé ˜ plus clair Réglez le volume du son en tournant la commande VOL. Si vous réglez AVLS sur ON dans le MENU, vous ne pouvez pas augmenter le volume au-delà... -
Page 81: Avertissements Contre Une Utilisation Excessive Du Glasstron
Avertissements contre Remarque Si vous n’appuyez pas sur la molette de une utilisation excessive sélection lorsque ces mises en garde du Glasstron apparaissent à l’écran, le Glasstron se met automatiquement hors tension dans les deux cas. Pour éviter la fatigue et les troubles oculaires à... -
Page 82: Visualisation De L'entourage
Visualisation de l’entourage Lorsque vous portez le Glasstron sur les yeux, vous pouvez visualiser l’entourage à travers l’écran de deux manières: Visualisation de l’entourage Visualisation de l’entourage en réglant la transparence de dans la zone entourant l’écran tout entier (mode l’image uniquement (mode transparence) écran) -
Page 83: Réglage Du Son Et De L'image Compatibilité De Signaux
Réglage du son et de l’image Compatibilité de signaux Les spécifications de signal supportées par l’appareil sont les suivantes: Mode PC (signal RVB) Mode d’affichage Résolution d’écran Fréquence Fréquence (point × ligne) horizontale (kHz) verticale (Hz) Macintosh 640 × 480 13”... -
Page 84: Réglage Du Son/Image
Réglage du son et de l’image (suite) Réglage du son/image Vous pouvez régler les options suivantes à l’aide de l’affichage du menu. Le menu ne s’affiche qu’en anglais. Mode PC (signal RVB) Mode vidéo (signal vidéo) AVLS (système automatique de limitation du volume): Réduit le volume maximum afin de protéger vos oreilles. - Page 85 Appuyez sur MENU. L’écran de menu apparaît. Mode PC MENU EXIT AVLS : MEGA BASS : POWER SAVE : V CENT H CENT TRACKING SYNC PRESET EXEC MENU EXIT MENU Mode VIDEO MENU EXIT AVLS : MEGA BASS : POWER SAVE : CONTRAST COLOR RESET...
- Page 86 Réglage du son et de l’image (suite) AVLS (système de limitation POWER SAVE automatique du volume) Tournez la molette de Tournez la molette de sélection pour l’activer, puis sélection “ON” et appuyez appuyez sur la molette de ensuite sur la molette de sélection.
-
Page 87: Réglage Du Signal Rvb
Réglage du signal RVB Il est recommandé d’ajuster l’image après avoir installé le fichier d’information inclus sur la disquette d’information Windows 95/Windows 98 PC Glasstron, ou la disquette de réglage de l’écran pour Macintosh. Pour plus de détails sur l’installation du fichier d’information, reportez- vous au mode d’emploi “Windows 95/Windows 98 PC Glasstron Information Disk/screen adjustment disk for Macintosh”. -
Page 88: Réglage Du Signal Vidéo
Réglage du son et de l’image (suite) Réglage du signal vidéo Réinitialisation des réglages aux valeurs par CONTRAST Tournez la molette de défaut sélection pour régler le Les réglages AVLS, MEGA BASS, POWER contraste, puis appuyez sur SAVE ne sont pas ramenés aux réglages la molette de sélection. -
Page 89: Utilisation De La Batterie En Option
• Si le témoin CHARGE se met à clignoter, c’est que le bloc d’alimentation ou la batterie présente un dysfonctionnement. Consultez votre revendeur Sony ou un centre de service après-vente Sony agréé. • Utilisez l’adaptateur secteur uniquement lorsque vous rechargez la batterie. -
Page 90: Utilisation De La Batterie En Option (Suite)
• L’autonomie reprise dans la liste ci-dessus concerne le mode PC. Lorsque vous utilisez le Glasstron en mode vidéo, l’autonomie de la batterie est réduite à 80% du mode PC. ”InfoLITHIUM” est une marque de commerce de Sony Corporation. Vérification de l’autonomie résiduelle de la batterie Si aucune indication ni avertissement n’apparaît sur l’écran,... -
Page 91: Précautions
• Mettez toujours l’appareil hors tension les écrans sont désalignés, faites réparer lorsque vous ne l’utilisez pas. l’appareil par votre revendeur Sony ou Débranchez l’appareil de la prise murale si dans un centre de service après-vente vous prévoyez de ne pas l’utiliser pendant Sony agréé. -
Page 92: Remarque Sur Le Transport
• Ne démontez pas et ne transformez pas l’appareil. Vous risquez sinon de provoquer un incendie ou une électrocution. Faites vérifier et réparer l’appareil par votre revendeur Sony ou un centre de service après-vente Sony agréé. Câbles • Ne tentez pas d’effectuer vous-même l’entretien de cet appareil parce que... -
Page 93: Messages D'erreur
Messages d’erreur Les messages d’erreur suivants apparaissent pour indiquer l’état du Glasstron ou du signal d’entrée. OUT OF SCAN RANGE Le signal d’entrée ne correspond pas aux spécifications supportées. Changez la résolution de l’écran de votre ordinateur. Pour plus de détails sur la compatibilité des signaux, reportez-vous à... -
Page 94: Dépannage
Dépannage Si vous avez des questions ou des problèmes qui ne figurent pas dans cette liste, consultez votre revendeur Sony ou un centre de service après-vente Sony agréé. Symptôme Cause Remède L’image n’apparaît pas. Les connexions ne sont pas bien Raccordez l’équipement... - Page 95 Symptôme Cause Remède La batterie se décharge La batterie rechargeable n’est pas Chargez complètement la batterie rapidement. suffisamment chargée. rechargeable ou utilisez-en une La batterie rechargeable est neuve (page 41). complètement morte. La batterie n’est pas La batterie rechargeable n’est pas Installez convenablement la batterie chargée.
-
Page 96: Spécifications
Spécifications Alimentation SYNC (Horizontale) Adaptateur secteur: AC-PLM3 SYNC (Verticale) 100-240 V CA, 50/60 Hz, 16 W – Tension de sortie 8,4 V, 1,6 A Batterie: NP-F550/NP-F750/NP-F950 Entrée PC AUDIO: Miniprise stéréo (non fournie) Consommation électrique Mode VIDEO 10 W (approx., mode PC) Entrée AUDIO/VIDEO: 12 W (approx., mode VIDEO) Miniprise spéciale... -
Page 97: Index
Index M, N, O Accessoires fournis 13, 48 Mega bass 36, 38 Sangle arrière 22 Adaptateur secteur 20 Synchronisation du Mode d’écran 34 Alignement 39 Mot de passe 28 signal 39 Alignement de l’écran 26 S-Vidéo 19 Messages d’avertissement Autonomie résiduelle de la AVERTISSEMENT 23-25, batterie 42 T, U... - Page 100 Printed in Japan Sony Corporation...