Publicité
Les langues disponibles
Les langues disponibles
Liens rapides
®
PROPLUS
2000KL
STRETCHER / IN-BED PATIENT WEIGHING SCALE
BALANZA CAMILLA PARA PESAJE DE PACIENTES
BALANCE CIVIÈRE POUR PESÉE DE PATIENTS
USER INSTRUCTIONS
INSTRUCCIÓNES DE USO
MODE D'EMPLOI
Patents 7550682B2 and D508655 (US)
Patent 0149984/1-8 and Patent Pending (EU)
Patents ZL200480031711X and 200430004551.2 (PRC)
© Pelstar LLC 2009
Rev. 200912028
Publicité
Chapitres
Dépannage

Manuels Connexes pour Health O Meter PROPLUS 2000KL


Sommaire des Matières pour Health O Meter PROPLUS 2000KL
- Page 1 ® PROPLUS 2000KL STRETCHER / IN-BED PATIENT WEIGHING SCALE BALANZA CAMILLA PARA PESAJE DE PACIENTES BALANCE CIVIÈRE POUR PESÉE DE PATIENTS USER INSTRUCTIONS INSTRUCCIÓNES DE USO MODE D'EMPLOI Patents 7550682B2 and D508655 (US) Patent 0149984/1-8 and Patent Pending (EU) Patents ZL200480031711X and 200430004551.2 (PRC) ©...
-
Page 2: Table Des Matières
Thank you for your purchase of this Health o meter® Professional product. Please read this manual carefully and keep it for easy reference or training. Gracias por su compra de éste producto Health o meter® Profesional. Lea éstas instrucciónes con cuidado, y mantenga el manual disponible para futuras consultas y también para su uso a la hora de orientar o formar al nuevo personal que la utilizará. -
Page 3: Caution And Warning
• If the scale becomes damaged, it should not be operated until properly serviced. All repairs should only be performed by authorized Health o meter® Professional service personnel. • This scale is designed for static weighing of patients only. No scale should be used for patient transfer. - Page 4 SPECIFICATIONS GENERAL The Health o meter Professional ProPlus Stretcher Scale Model 2000KL uses highly ® ® sophisticated microprocessor technology. This scale is designed to provide accurate, reliable and repeatable weight measurements and features that make the weighing process simple, fast and convenient.
-
Page 5: Quick Start Instructions
QUICK START INSTRUCTIONS Pre-weighing the Stretcher (Setting Stretcher Tare) There are two ways to pre-weigh the stretcher using the TARE function. One is automatic (PUSH BUTTON TARE) and the other is manual (KEYBOARD or KEYPAD TARE) tare. AUTOMATIC (PUSH BUTTON TARE) 1. -
Page 6: Calculating Bmi
QUICK START INSTRUCTIONS (CONTINUED) Taking a Weight Measurement 1. The scale will calculate the patient’s weight. Depending on the movement of the patient on the scale, it may take several seconds for the scale to lock onto the weight. Once a weight has been displayed, while the patient is still on the stretcher, we recommend performing a second weighing by pressing the REWEIGH button. -
Page 7: Assembly Instructions
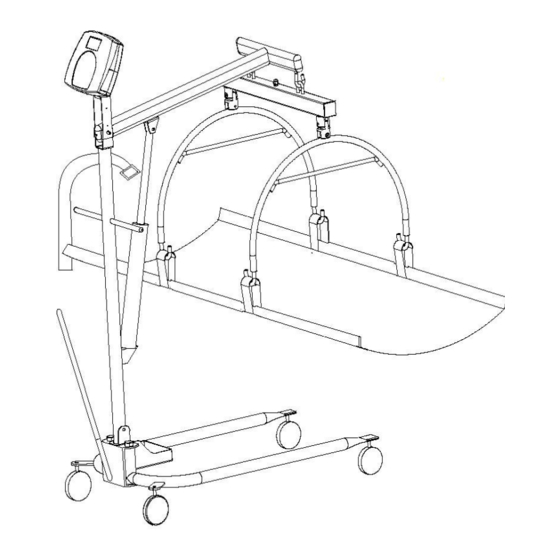
Carefully inspect all cartons for shipping damage before unpacking. If damage is found, contact your shipper or Health o meter® Professional representative immediately. Claims must be filed with the shipper as soon as possible after receipt of the damaged package. - Page 8 ASSEMBLY INSTRUCTIONS (CONTINUED) Assembling the Patient Lifter 1. Place the Stretcher Storage Tray on the Lifter Base, as shown below, before attaching the Lifter Mast. Figure 2 Remove black plastic protective caps from Lifter Mast. Insert the bottom of the Lifter Mast and Hydraulic Pump assembly into the mast sleeve (through the Stretcher Tray Holder) on the Lifter Base.
- Page 9 ASSEMBLY INSTRUCTIONS (CONTINUED) Attach the Display and Scale to the Patient Lifter: Figure 3 - 8 -...
- Page 10 ASSEMBLY INSTRUCTIONS (CONTINUED) 4. Referring to Figure 3 on page 8, connect the Lifter Boom (A) and the Display Support (B) to the Lifter Mast (C) using the NC⅜-20x2 ½” hexagon bolt and large self lock nut (D). Be sure to insert the NC3/8-20x2 ½”...
- Page 11 ASSEMBLY INSTRUCTIONS (CONTINUED) Display Assembly: 10. Position the Display Assembly close to the Display Support. Connect the load cell cable connector to the load cell port on the rear of the Display Assembly and insert and secure the cable into the center channel in the display. See Figure 4, for an illustration. Note: Do not attach the power cord at this point—wait until step 13.
- Page 12 ASSEMBLY INSTRUCTIONS (CONTINUED) 15. Hang the Load Cell Beam Assembly on the two hooks at the end of the Lifter Boom, using the loops on top of the Load Cell Beam Assembly (see Figure 5, above, for an illustration). 16. Connect the end of the Load Cell Beam Cable coming out of the center of the Load Cell Beam Assembly to its port on the side of the Lifter Boom.
- Page 13 2. Place batteries in the battery holder (see “Replacing Batteries” information in Figure 6, below). 3. Plug the scale’s AC adapter into the power source. 4. Press the ON/OFF button to turn the scale on. The display will show “Health o meter ProPlus” and then “000 ”.
-
Page 14: Maintenance
SET UP (CONTINUED) Unplug the scale. Remove the battery cover from the display assembly (A)--see Figure 6 on page 12. Disconnect battery holder cable connector from the scale-battery connector (B). Carefully remove the battery holder by sliding it out of the display assembly (C). ®... -
Page 15: Troubleshooting
TROUBLESHOOTING Refer to the following instructions to check and correct any failure before contacting qualified service personnel. SYMPTOM POSSIBLE CAUSE CORRECTIVE ACTION Scale does not turn on Dead Battery Replace batteries Faulty electrical outlet Use a different outlet Bad power supply Replace adapter Questionable weight or External object... -
Page 16: Exploded View Of Scale
EXPLODED VIEW OF 2000KL SCALE VISTA DETALLADA DE LA BÁSCULA 2000KL ÉCLATÉ DE LA BALANCE 2000KL - 15 -... - Page 17 2000KL PARTS LIST FOR MAINTENANCE Key No. Part No. Description Qty. B1109403-0 DISPLAY ASSEMBLY DISPLAY SUPPORT LOAD CELL CABLE HEXAGON HEAD SCREW NC 3/8-20 x 2-1/2 HEXAGON HEAD SCREW NC 3/8-20 x 1-3/4 LIFTER BOOM ASSEMBLY ELIPTICAL PIPE COVER LOAD CELL BEAM CABLE LOAD CELL WIRE CLIP LOAD CELL BEAM ASSEMBLY SQUARE PIPE COVER...
-
Page 18: Warranty
What does the Warranty Cover? Health o meter® ProPlus® scales are warranted from date of purchase against defects of materials or in workmanship for a period of three (3) years. If product fails to function properly, return the product, freight prepaid and properly packed to Pelstar, LLC (see “To Get Warranty Service”, below, for instructions). -
Page 19: Índice De Materias
2000KL Gracias por su compra de éste producto Health o meter® Profesional. Lea éstas instrucciónes con cuidado, y mantenga el manual disponible para futuras consultas y también para su uso a la hora de orientar o formar al nuevo personal que la utilizará. -
Page 20: Advertencias Y Precauciones
ADVERTENCIAS Y PRECAUCIONES Para evitar lesiones y proteger su báscula contra posibles averías, siga atentamente las siguientes instrucciones. • Para garantizar el correcto funcionamiento de su báscula con camilla ProPlus®, debe leer atentamente este manual de instrucciones antes de utilizarla. Mantenga este manual disponible para futuras consultas y también para su uso a la hora de orientar o formar nuevo personal que la vaya a utilizar. -
Page 21: Especificaciones
ESPECIFICACIONES GENERAL La báscula con camilla ProPlus® de Health o meter Professional ProPlus Modelo 2000KL ® ® utiliza tecnología de microprocesadores muy sofisticados. Esta báscula se ha diseñado para proporcionar mediciones de pesos exactas, confiables y repetibles, y características que hacen que el proceso de pesaje sea simple, rápido y práctico. -
Page 22: Instrucciónes Básicas
INSTRUCCIONES BÁSICAS Pesaje previo de la camilla (cómo establecer la tara de la camilla) Existen dos maneras de llevar a cabo el pesaje previo de una camilla utilizando la función TARE. Una es automática (CONFIGURACIÓN DE TARA MEDIANTE UN BOTÓN) y la otra es manual (CONFIGURACIÓN DE TARA MEDIANTE EL TECLADO). - Page 23 INSTRUCCIONES BÁSICAS (CONTINUACIÓN) Cómo realizar la medición del peso 1. La báscula calculará el peso del paciente. En función del movimiento del paciente sobre la báscula, es posible que se necesiten varios segundos para poder determinar el peso exacto. Cuando se haya mostrado el peso, y mientras el paciente se encuentre en la camilla, le recomendamos que realice un segundo pesaje por apretar el botón “REWEIGH”.
-
Page 24: Instrucciónes De Montaje
Si se detectan daños, póngase en contacto con su empresa de transporte o representante de Health o meter® Professional inmediatamente. Debe presentar las reclamaciones pertinentes a la empresa de transporte lo antes posible tras la recepción del paquete dañado. - Page 25 INSTRUCCIÓNES DE MONTAJE (CONTINUACIÓN) Cómo montar el elevador del paciente Coloque la bandeja de almacenamiento de la camilla en la base elevadora, tal y como se muestra a continuación, antes de colocar el mástil elevador. Figura 2 Retire las tapas protectoras, que son negras y de plástico, del mástil elevador. Insérte el extremo inferior del mástil elevador y la unidad de bombeo hidráulico en el manguito de unión del mástil (a través del soporte de la bandeja de la camilla) en la base elevadora.
- Page 26 INSTRUCCIÓNES DE MONTAJE (CONTINUACIÓN) Conexión de la Pantalla y la Báscula al Elevador del Paciente: Figura 3 - 25 -...
- Page 27 INSTRUCCIÓNES DE MONTAJE (CONTINUACIÓN) Consúlte la Figura 3 de la página antes y conecte el brazo elevador (A) y el soporte de la pantalla (B) al mástil elevador (C) utilizando el perno de cabeza hexagonal NC de ⅜-20x2 ½” y la tuerca de seguridad grande (D). Asegúrese de insertar el tornillo de cabeza hexagonal NC de 3/8-20x2 ½”...
- Page 28 INSTRUCCIÓNES DE MONTAJE (CONTINUACIÓN) Unidad de Visualización: 10. Colóque la unidad de visualización cerca del soporte de la pantalla. Conecte el conector del cable de celda de carga en el orificio de celda de carga en la parte trasera de la unidad de visualización e inserte y fije el cable en el canal central de la pantalla.
- Page 29 INSTRUCCIÓNES DE MONTAJE (CONTINUACIÓN) 15. Cúelgue la unidad de viga de celda de carga en los dos enganches del extremo del brazo elevador con los colgadores que se encuentran en la parte superior de la unidad de viga de celda de carga (consulte la Figura 5, arriba, como ilustración).
-
Page 30: Configuración / Pilas
Pilas" en la Figura 6, a continuación). Conecte el adaptador de CA de la báscula a la fuente de alimentación. Apréte el botón “ON/OFF” para encender la báscula. La pantalla mostrará “Health o meter ProPlus” y, a continuación, ”000 ”. -
Page 31: Mantenimiento
CONFIGURACIÓN (CONTINUACIÓN) Desconecte la báscula. Retire la tapa de las pilas (A) de la unidad de visualización; consulte la Figura 6 de la página previa. Desconecte el conector del cable del compartimiento para pilas del conector de las pilas (B). Retire cuidadosamente el compartimiento para pilas por deslizarlo del conjunto de la pantalla (C). -
Page 32: Resolución De Problemas
RESOLUCIÓN DE PROBLEMAS Consulte las siguientes instrucciones para verificar y solucionar cualquier fallo antes de ponerse en contacto con el personal de mantenimiento. SÍNTOMA CAUSA POSIBLE MEDIDA CORRECTIVA La balanza no Pilas sin carga Sustituya las pilas enciende Toma de eléctrica Utilice otra toma de corriente defectuosa Sustituya el adaptador... -
Page 33: Lista De Piezas Para Mantenimiento
LISTA DE PIEZAS DE LA 2000KL PARA MANTENIMIENTO N.º de la N.º de figura * pieza Descripción Cantidad B1109403-0 UNIDAD DE VISUALIZACIÓN SOPORTE DE LA PANTALLA CABLE DE CELDA DE CARGA TORNILLO DE CABEZA HEXAGONAL NC 3/8-20 x 2-1/2 TORNILLO DE CABEZA HEXAGONAL NC 3/8-20 x 1-3/4 UNIDAD DE BRAZO ELEVADOR TAPA ELÍPTICA DE TUBERÍA CABLE DE VIGA DE CELDA DE CARGA... -
Page 34: Garantía
¿Qué cubre la garantía? Ésta balanza Health o meter® Profesional está garantizada a partir de la fecha de compra por defectos de fabricación y mano de obra por un período de 3 (tres) años. Si el producto no funciona de forma adecuada, devuélvalo a Pelstar, LLC en un embalaje apropiado y con el flete prepagado (vea "Para obtener el servicio... - Page 36 2000KL Merci d’avoir acheté ce produit Health o meter® Professionnelle. Veuillez lire attentivement ce manuel et le garder à portée de main pour pouvoir le consulter à tout moment. TABLE DES MATIÈRES ENGLISH..........................1 ESPAÑOL ...........................18 FRANÇAIS ..........................34 MISES EN GARDE ET AVERTISSEMENT .................35 SPÉCIFICATIONS D' CETTE BALANCE ................36...
-
Page 37: Mises En Garde Et Avertissement
• Si la balance est endommagée, elle ne doit pas être utilisée tant qu’elle n’a pas subi une réparation appropriée. Toutes les réparations doivent être réalisées par le personnel de maintenance agréé de Health o meter® Professionnelle. • Cette balance est conçue uniquement pour la pesée statique de patients. Aucune balance ne doit être utilisée pour déplacer des patients. - Page 38 SPÉCIFICATIONS GÉNÉRALITÉS ® La Balance-Civière Health o meter Professionnelle ProPlus Modèle 2000KL utilise une technologie de ® microprocesseur hautement sophistiquée. Cette balance est conçue pour apporter des mesures et caractéristiques de poids précises, fiables et reproductibles qui rendent le processus de pesée simple, rapide et pratique.
-
Page 39: Instructions De Démarrage Rapide
INSTRUCTIONS DE DÉMARRAGE RAPIDE Pré-peser la civière (régler le tarage de la civière) Il existe deux méthodes pour pré-peser la civière en utilisant la fonction TARE. L’une est automatique (APPUYER SUR LA TOUCHE TARE) et l’autre est manuelle (CLAVIER ou CLAVIER NUMÉRIQUE). AUTOMATIQUE (APPUYER SUR LA TOUCHE TARE) 1. -
Page 40: Instructions De Démarrage Rapide (Suite)
INSTRUCTIONS DE DÉMARRAGE RAPIDE (SUITE) Effectuer une pesée 1. La balance va calculer le poids du patient. Selon la mobilité du patient sur la balance, cela peut prendre plusieurs secondes avant que la balance ne verrouille le poids. Une fois qu’un poids a été affiché, alors que le patient est toujours sur la civière, nous recommandons de procéder à... -
Page 41: Instructions De Montage
INSTRUCTIONS DE MONTAGE Avant montage La Balance-Civière Modèle 2000KL ProPlus® est livrée démontée dans trois (3) cartons séparés. Vérifiez attentivement l’absence de dommages sur tous les cartons avant de les déballer. En cas de dommage constaté, contactez immédiatement votre expéditeur ou le représentant de Health o meter®... - Page 42 INSTRUCTIONS DE MONTAGE (SUITE) Assembler l’élévateur de patients 3. Placez le Plateau de Pose de Civière sur la Base de l’Élévateur, comme illustré ci-dessous, avant d’attacher le mât de l’élévateur. Figure 2 Enlevez les capuchons de protection en plastique du Mât de l’Élévateur. Insérez le dessous du Mât de l’Élévateur et l’ensemble Pompe Hydraulique dans le manchon du mât (par le Support de Pose de Civière) sur la Base de l’Élévateur.
- Page 43 INSTRUCTIONS DE MONTAGE (SUITE) Fixer l’écran et la balance sur l’élévateur de patients: Figure 3 - 41-...
- Page 44 INSTRUCTIONS DE MONTAGE (SUITE) 4. En vous référant à la Figure 3 de la page 42, reliez la Flèche de l’Élévateur (A) et le Support d’Écran (B) au Mât de l’Élévateur (C) en utilisant un boulon à tête hexagonale NC⅜-20x2 ,5 po et un grand écrou autobloquant (D).
- Page 45 INSTRUCTIONS DE MONTAGE (SUITE) Figure 4 - Ensemble écran 10. Placez l’Ensemble Écran près du Support d’Écran. Reliez le connecteur de câble de cellule de charge au port de cellule de charge sur l’arrière de l’Ensemble Écran et insérez et sécurisez le câble dans le canal central de l’écran.
- Page 46 INSTRUCTIONS DE MONTAGE (SUITE) Figure 5 15. Accrochez l’Ensemble Poutre de Cellule de Charge sur les deux crochets à l’extrémité de la Flèche de l’Élévateur en utilisant les crochets de suspension en haut de l’Ensemble Poutre de Cellule de Charge (cf. Figure 5, ci-dessus, pour une illustration). 16.
-
Page 47: Consignes D'installation / Piles
3. Branchez l’adaptateur de courant alternatif dans le bloc d’alimentation. 4. Appuyez sur la touche ON/OFF pour allumer la balance. L’écran affiche « Health o meter ProPlus » et ensuite « 000Lb00oz ». Note: Pour régler le retro-éclairage et/ou le contraste, veuillez consulter le Manuel d’utilisation du Module d’Affichage ProPlus®. -
Page 48: Maintenance
CONSIGNES D'INSTALLATION (SUITE) Débranchez la balance. Enlevez le couvercle des piles de l’ensemble écran (A) – cf. figure 6 sur la page 46. Débranchez le connecteur de câble de support de piles du connecteur de piles de la balance (B). Enlevez le support de piles avec précaution en le glissant hors de l’ensemble écran (C). -
Page 49: Dépannage
DÉPANNAGE Reportez-vous aux instructions suivantes pour vérifier et corriger toute panne avant de contacter le personnel de maintenance. SYMPTÔME CAUSE POSSIBLE ACTION CORRECTIVE Pile usagée Remplacez les piles La balance ne s’allume Prise de courant défectueuse Utilisez une autre prise Mauvaise alimentation électrique Remplacez l’adaptateur Poids douteux ou la... -
Page 50: Nomenclature Pour Maintenance
NOMENCLATURE POUR MAINTENANCE 2000KL Code N° * Article Description Qté B1109403-0 ENSEMBLE ÉCRAN SUPPORT ÉCRAN CÂBLE DE CELLULE DE CHARGE VIS A TÊTE HEXAGONALE NC 0,375-20 x 2,5 VIS A TÊTE HEXAGONALE NC 0,375-20 x 1,75 ENSEMBLE FLÈCHE ÉLÉVATEUR PROTECTION TUBE ELLIPTIQUE CÂBLE DE POUTRE DE CELLULE DE CHARGE CLIP FIL CELLULE DE CHARGE ENSEMBLE POUTRE CELLULE DE CHARGE... -
Page 51: Garantie
MERCI D'ENREGISTRER LA BALANCE AFIN DE LA GARANTIR SUR LE: http://www.homscales.com/customers/registration.aspx Les produits Health o meter® Professionnelle sont la propriété de Pelstar LLC, laquelle également les fabrique et les conçoit. Health o meter® est une marque déposée de Sunbeam Products Inc., utilisée sous licence.