EMS Piezon Master 700 Mode D'emploi
Masquer les pouces
Voir aussi pour Piezon Master 700:
- Mode d'emploi (88 pages) ,
- Mode d'emploi (104 pages)
Table des Matières
Liens rapides
OPERATION INSTRUCTIONS
MODE D'EMPLOI
BEDIENUNGSANLEITUNG
INSTRUCCIONES DE EMPLEO
ISTRUZIONI PER L'USO
BRUKSANVISNING
12
13
14
11
10
9
8
7
6
5
4
3
2
Fold out the cover pages to view technical drawings
1
Technische Zeichnungen auf der Innenseite der Deckblätter
Abra las tapas del manual para ver las ilustraciones
Spiegare le copertine per visualizzare i disegni tecnici
Vik upp omslaget för att se tekniska ritningar
TECHNICAL MODIFICATIONS
MODIFICATIONS TECHNIQUES
EMS reserves the right to modify the technique,
accessories, operating instructions or contents
-
ments.
MODIFICACIONES TÉCNICAS
MODIFICHE TECNICHE
los accesorios, las instrucciones de empleo o el
tecnica, agli accessori, alle istruzioni operative o
al contenuto del set in seguito a miglioramenti
26
25
24
23
Op
tio
n
15
33
16
17
18
19
32
20
21
22
27
28
29
30
31
TECHNISCHE ÄNDERUNGEN
EMS behält sich vor, im Zusammenhang mit
technischen oder wissenschaftlichen Weiterent-
wicklungen Änderungen an der Technik, dem
Zubehör, der Bedienungsanleitung sowie am
Inhalt der Originalverpackung vorzunehmen.
TEKNISKA ÄNDRINGAR
EMS förbehåller sig rätten att ändra teknik,
tillbehör, bruksanvisning eller innehåll i satsen
på grund av tekniska eller vetenskapliga förbätt-
ringar.
Table des Matières
Dépannage

Manuels Connexes pour EMS Piezon Master 700


Sommaire des Matières pour EMS Piezon Master 700
- Page 1 Vik upp omslaget för att se tekniska ritningar TECHNICAL MODIFICATIONS MODIFICATIONS TECHNIQUES TECHNISCHE ÄNDERUNGEN EMS reserves the right to modify the technique, EMS behält sich vor, im Zusammenhang mit accessories, operating instructions or contents technischen oder wissenschaftlichen Weiterent- wicklungen Änderungen an der Technik, dem ments.
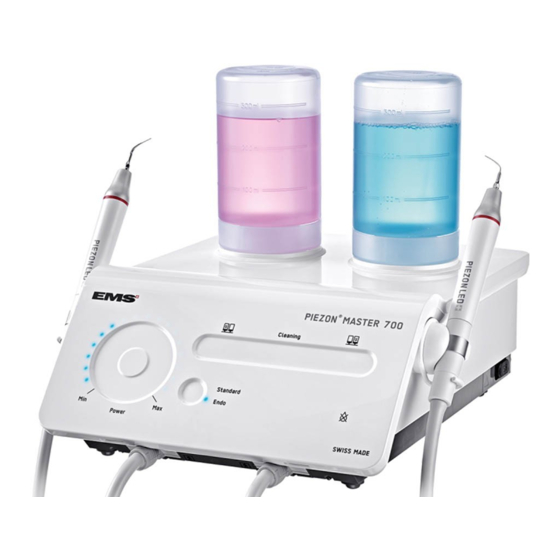
- Page 2 Kontrolllampe Support Voyant lumineux de fonctionnement Halter Potence EMS supplies this unit with various accessories. The EMS fourn EMS bietet Geräte in unterschiedlichen Ausstattungs- "Packing list" shows exactly what your unit includes. varianten an. Für die genaue Ausstattung Ihres Geräts avec votre appareil.
- Page 3 Option...
- Page 4 Tel. +39 02 3453 8111 Fax +49 89 42 71 61 60 Fax +39 02 3453 2778 e-mail: info@ems-ch.de e-mail: dental@ems-italia.it SPAIN EMS Electro Medical Systems España SL EMS Corporation Bernardino Obregón 14 bis 11886 Greenville Avenue #120 E-28012 Madrid Dallas, TX 75243, USA Tlf.
- Page 5 Anslutning för högra handstyckets slang Conector para el cable del mango derecho (opzionale) Anslutning för ytterligare en EMS-enhet Conector para conectar un segundo aparato de EMS Connettore per il cavo del manipolo di destra Anslutning för fotpedal Conector para el pedal Anslutning för vänstra handstyckets slang...
- Page 6 DEAR CUSTOMERS, CHERS CLIENTS, LIEBE KUNDEN, Thank you for buying a new EMS product. It meets Wir gratulieren Ihnen zum Kauf Ihres neuen EMS-Produkts. Es erfüllt höchste Ansprüche an the highest quality and safety standards. Qualität und Sicherheit. Indications Applications...
- Page 7 BÄSTA KUND, Le agradecemos que haya adquirido un nuevo Grazie di aver acquistato un nuovo prodotto EMS Tack för att du har köpt en EMS-produkt. Den producto de EMS. Éste satisface las exigencias uppfyller högt ställda kvalitets- och säker- más altas de calidad y seguridad.
-
Page 8: A Propos De Ce Manuel
Systembestandteile sind in den jeweiligen Bedie- of the components before using this product. Do not hesitate to contact your local EMS dealer for des Geräts sind die Bedienungsanleitungen, die further information. im Lieferumfang der einzelnen Systembestand- teile enthalten waren, zu lesen. -
Page 9: Presentación Del Manual
EMS-återförsäljare om du vill ha mer de los componentes. No dude en ponerse en con ciascun componente. Per ulteriori informa- information. contacto con su distribuidor local de EMS si desea zioni rivolgersi al rivenditore locale EMS. Denna produkt kräver särskilda försiktig- información adicional. - Page 10 To prevent possible patient or user injury or Zur Vermeidung von Personenschäden oder damage to the Piezon Master 700, please note ou dommages au Piezon Master 700, merci de Sachschäden am Piezon Master 700 beachten the corresponding directives: tenir compte des directives suivantes:...
- Page 11 Para evitar posibles lesiones en el paciente o Per impedire possibili lesioni al paziente o all'uti- För att förhindra patientskador eller skador på usuario, o daños al Piezon Master 700, nótense lizzatore o danni al Piezon Master 700 attenersi Piezon Master 700 ska följande varningar obser-...
-
Page 12: Table Des Matières
..4 Handstückschläuche und Halterungen..4 Connecting to the mains power ....6 ....6 Anschließen an das Stromnetz ....6 Connecting to another EMS unit (option)..8 Anschließen an ein anderes EMS-Gerät (option)............8 (optional)............8 Preparing for treatment........10 ....... - Page 13 Slangar och hållare till handstycke ....5 ......7 Connessione all'alimentazione di rete ..7 Ansluta nätströmmen ........7 Conexión a otro aparato de EMS (opción)... 9 Ansluta ytterligare en EMS-enhet (tillval) ..9 (opzionale)............ 9 Preparación para el tratamiento ....11 Förberedelser inför behandling......
- Page 14 Entsorgen des Produkts ........ 70 Warranty............70 Garantie ............70 Garantie ............70 Accessories............ 70 Accessoires............ 70 Zubehör............70 EMS Service ..........72 Service EMS ..........72 EMS-Service..........72 Symbols ............74 Symboles ............74 Symbole ............74 Technical data..........82 ......
- Page 15 Garantía ............71 Garanzia............71 Garanti ............71 Accesorios ............. 71 Accessori ............71 Tillbehör ............71 ........ 73 Servizio assistenza EMS ....... 73 EMS-service ..........73 Símbolos ............75 Simboli ............75 Symboler ............75 ..........83 Dati tecnici............84 Tekniska data ..........
-
Page 16: Installation
INSTALLATION INSTALLATION INSTALLATION Foot pedal Pédale de commande Fußschalter... -
Page 17: Instalación
INSTALACIÓN INSTALLAZIONE INSTALLATION Pedal Pedaliera Fotpedal... -
Page 18: Handpiece Cords And Supports
Handpiece cords and supports Cordons et supports de pièces à main Handstückschläuche und Halterungen Check that the cords are fully dry before connecting Stellen Sie sicher, dass die Schläuche vollständig to the unit. trocken sind, bevor Sie sie an das Gerät an- schließen. -
Page 19: Cables Y Soportes De Los Mangos
Cables y soportes de los mangos Cavi e supporti del manipolo Slangar och hållare till handstycke Controllare che i cavi siano asciutti prima di Kontrollera att slangarna är helt torra innan du antes de conectarlos al aparato. ansluter dem till enheten. Appoggiare il supporto del manipolo magnetico Placera den magnetiska handstyckehållaren på... -
Page 20: Connecting To The Mains Power
Connecting to the mains power Connexion au réseau électrique Anschließen an das Stromnetz 100-240 VAC 50-60Hz Always check that the unit is installed in Toujours s Das Gerät muss sicher und stabil aufgestellt a safe and stable position. An eventual fall may werden. -
Page 21: Conexión A La Red Eléctrica
Conexión a la red eléctrica Connessione all'alimentazione di rete Ansluta nätströmmen Compruebe siempre Controllare sempre che Se till att enheten installeras på en säker instalado en un lugar seguro y estable. Si se in una posizione sicura e stabile. Una eventuale och stadig plats. -
Page 22: Connecting To Another Ems Unit (Option)
Anschließen an ein anderes EMS-Gerät (option) (option) (optional) The Piezon Master 700 can be connected to Der Piezon Master 700 kann an ein anderes another compatible EMS device, so both devices kompatibles EMS-Gerät angeschlossen werden, can be operated using a single foot pedal. An sodass beide Geräte mit einem Fußschalter... -
Page 23: Conexión A Otro Aparato De Ems (Opción)
Ansluta ytterligare en EMS-enhet (opción) (opzionale) (tillval) El Piezon Master 700 se puede conectar a otro Il Piezon Master 700 può essere collegato ad un Piezon Master 700 kan anslutas till en annan dispositivo EMS compatible, de modo que puedan altro dispositivo EMS compatibile di modo che kompatibel EMS-enhet, så... -
Page 24: Preparing For Treatment
PREPARING FOR TREATMENT PRÉPARATION POUR VORBEREITEN FÜR LE TRAITEMENT DIE BEHANDLUNG Installing the bottles Mise en place des bouteilles Aufsetzen der Flaschen Always check the condition of the bottle cap Toujours Kontrollieren Sie vor jedem Aufsetzen der Flasche den O-Ring im Flaschendeckel. O-ring before installing the bottle. -
Page 25: Preparación Para El Tratamiento
PREPARACIÓN PARA PREPARAZIONE PER FÖRBEREDELSER INFÖR EL TRATAMIENTO IL TRATTAMENTO BEHANDLING Instalación de los botes Compruebe siempre el estado de la junta Prima dell'installazione del flacone, Kontrollera alltid att flasklockets O-ring tórica de la tapa del bote antes de instalarlo. controllare sempre la condizione dell'anello di är hel innan flaskan installeras. -
Page 26: Solutions Compatible With The Circuit
Desinfektionslösungen zum Reinigen des Geräts EMS Ultra Clean (H EMS Ultra Clean (H Hydrogen peroxide (H Peroxide d'hydrogène (H EMS Ultra Clean ( H Sterilox (hypochlorous acid) Sterilox (acide hypochlorique) Wasserstoffperoxid ( H Sterilox (unterchlorige Säure) Incompatible mixing Mélanges incompatibles Vermischen nicht kompatibler Lösungen... -
Page 27: Soluciones Compatibles Con El Circuito
/... Soluzioni disinfettanti per il lavaggio del Soluciones desinfectantes para lavar circuito Desinfektionslösningar för tvätt av slingan el circuito EMS Ultra Clean (H EMS Ultra Clean (H Perossido di idrogeno (H EMS Ultra Clean (H Väteperoxid (H Sterilox (acido ipocloroso) -
Page 28: Connecting The Handpieces
Connecting the handpieces Connexion des pièces à main Aufstecken der Handstücke Blow dry the connections to remove Trocknen Sie die einzelnen Komponenten eventual presence of liquid to ensure a proper mit einem Fön, um eine einwandfreie elektronische electrical contact. Never blow compressed air in Verbindung zu gewährleisten. -
Page 29: Conexión De Los Mangos
Conexión de los mangos Connessione dei manipoli Ansluta handstyckena Seque con aire las conexiones para Asciugare con aria le connessioni per Torka anslutningarna med en blåstork för eliminar la posible existencia de líquido y garan- eliminare eventuali liquidi presenti e garantire un att avlägsna eventuell vätska och säkerställa korrekt elektrisk kontakt. -
Page 30: Attaching The Instruments
Use only the CombiTorque to tighten the Utiliser uniquement la CombiTorque pour Für die Befestigung des EMS-Instruments EMS instrument on the handpiece to the correct am Handstück mit dem korrekten Drehmoment torque. Once the instrument is screwed all the darf nur der CombiTorque verwendet werden. -
Page 31: Acoplamiento De Los Instrumentos
Use solamente el CombiTorque para ajustar con il valore corretto di coppia utilizzare esclusiva- fast EMS-instrumentet på handstycket till rätt el instrumento de EMS en el mango al par de mente il CombiTorque. Una volta che lo strumento vridmoment. När instrumentet har skruvats in è... -
Page 32: Operating The Unit
OPERATING THE UNIT UTILISATION DE L’APPAREIL BEDIENEN DES GERÄTS Switching On Mise sous tension Einschalten When the unit is turned on, the control lamps Beim Einschalten des Geräts leuchten die Kontroll- light up and then the unit returns to its previous lampen auf und das Gerät wird auf die vorherge- After 15 min. -
Page 33: Slå På Enheten
UTILIZACIÓN DEL APARATO USO DELL'UNITÀ ANVÄNDA ENHETEN Encendido Accensione Slå på enheten Al encender el aparato, los pilotos indicadores När enheten slås på tänds kontrollampan och guración previa. cui si trovava prima dello spegnimento. Efter 15 minuters inaktivitet går enheten Tras 15 min. -
Page 34: Working Mode Selection
Working mode selection Sélection du mode de travail Auswählen des Betriebsmodus The unit includes two modes to optimize the ultra- Das Gerät verfügt über zwei Modi zur Optimierung sound power range depending on the application. la plage de puissance des ultrasons en fonction der Ultraschallleistung je nach Anwendung. -
Page 35: Selección Del Modo De Funcionamiento
Selección del modo de funcionamiento Selezione della modalità di funzionamento Välja driftsläge El aparato incluye dos modos para optimizar el Enheten har två driftslägen för att optimera ultra- intervalo de la potencia de los ultrasonidos depen- la gamma di potenza ad ultrasuoni in base all'ap- ljudseffekten efter användningsområdet. - Page 36 Handpiece used Available power Working mode Power settings according to the instuments Puissance disponible Mode de travail Leistungseinstellung je nach Instrument Verwendetes Handstück Verfügbare Leistung Arbeitsmodus Mango utilizado Potencia disponible Modo de trabajo Ajustes de potencia según los instrumentos Manipolo utilizzato Impostazioni della potenza secondo gli strumenti Potenza disponibile lavorazione...
-
Page 37: Power Handpiece On Compatible Piezon Devices (Option)
Power handpiece on compatible Pièce à main Power sur appareils Power-Handstück für kompatible Piezon devices (option) Piezon compatibles (option) Piezon-Geräte (optional) The Piezon Power handpiece (option) used on Das Piezon-Power-Handstück (optional) gewähr- a compatible Piezon device delivers a maximum leistet bei Verwendung mit einem kompatiblen Piezon-Gerät eine maximale Leistungssteigerung compared with a Piezon Universal handpiece, to zum Handstück Piezon Universal). -
Page 38: Dry Work" Mode Selection
"Dry Work" mode selection Sélection du mode de travail à sec Auswahl des Modus "Dry Work" "Dry Work" Press the foot pedal on the corresponding symbol Betätigen Sie den Fußschalter (Symbol für "Dry to activate the "Dry work" mode. pour activer le mode "Dry work". Work"-Modus). -
Page 39: Selección Del Modo "Dry Work
Selección del modo "Dry Work" Selezione della modalità "Dry Work" Välja "Dry Work"-läget Pise el pedal sobre el símbolo correspondiente Premere la pedaliera sul simbolo corrispondente Tryck på "Dry Work"-symbolen på fotpedalen för para activar el modo de "Dry work". att aktivera Dry Work-läget. -
Page 40: Multifunction Foot Pedal
Multifunction foot pedal Pédale multifonctions Multifunktionsfußschalter... -
Page 41: Multifonction Pedal
Multifonction pedal Pedale multifunzione Multifonction pedal Standard mode Irrigazione + Irrigation + lumière Flüssigkeit + Licht Irrigación + luz Spolning + belysning Irrigation + light illuminazione Ultraljud + spolning Ultrasons + irrigation Ultraschall + Ultrasuoni + irriga- Ultrasounds + Ultrasonidos + + belysning irrigation + light + lumière... -
Page 42: Piezon Handpiece Led
Piezon handpiece LED Pièce à main Piezon LED Piezon-Handstück-LED The Piezon handpiece LED lights up Das Piezon-LED-Handstück leuchtet auf, when the foot pedal is activated. The light stays sobald der Fußschalter aktiviert wird. Nach dem on for about 20 seconds after the foot pedal is Loslassen des Fußschalters leuchtet die LED released. -
Page 43: El Mango Piezon Led
El mango Piezon LED El manipolo Piezon LED Piezon-handstyckets LED 20 seconds El mango Piezon LED se ilumina cuando Il manipolo Piezon LED si illumina quando si Piezon-handstyckets LED tänds när fotpe- se activa el pedal. Esta luz permanece encendida attiva la pedaliera. -
Page 44: Selecting The Irrigation Supply
Selecting the irrigation supply Sélection de la source d'irrigation Auswahl der Flüssigkeitszufuhr Constantly check the presence of liquid in Überprüfen Sie während der Behandlung the bottles during treatment. liquide dans les bouteilles pendant le traitement. laufend, ob sich noch ausreichend Flüssigkeit in... -
Page 45: Selección De La Fuente De Irrigación
Selección de la fuente de irrigación Selezione della fonte di irrigazione Välja spolningskälla Compruebe constantemente que haya Controllare costantemente la presenza di líquido en los botes durante el tratamiento. -
Page 46: Setting The Ultrasound Power
Setting the ultrasound power Réglage de la puissance des ultrasons Einstellen der Ultraschallleistung The settings can be obtained either by sliding or Die gewünschte Einstellung kann entweder stufenlos oder direkt durch Antippen des Drehre- soit en plaçant le doigt sur la zone sensible. Placer glers bei der gewünschten Einstellung vorge- nommen werden (zur Beschleunigung des a quick setting alternative. -
Page 47: Ajuste De La Potencia De Los Ultrasonidos
Ajuste de la potencia Impostazione della potenza Ställa in ultraljudseffekten de los ultrasonidos degli ultrasuoni El ajuste se puede realizar deslizando el dedo o È possibile effettuare le impostazioni facendo Du kommer till inställningarna genom att dra scorrere o mettendo il dito sulla zona sensibile. del dedo directamente en el lugar deseado es una Una rapida alternativa di impostazione è... -
Page 48: Réglage Du Débit D'irrigation
Réglage du débit d'irrigation Beachten Sie für die optimale Einstellung der Flüssigkeitsmenge die Bedienungsanlei- each instrument are indicated in the operating tungen der einzelnen Piezon-Systeme. instructions of the Piezon systems systèmes Piezon. -
Page 49: Ajuste Del Flujo De Irrigación
di irrigazione Le impostazioni ottimali per la portata del Information om optimala inställningar av instrumento se indica en las instrucciones de empleo de los sistemas Piezon. nelle istruzioni operative dei sistemi Piezon. systemens bruksanvisningar. -
Page 50: External Peristaltic Pump Kit (Option)
EXTERNAL PERISTALTIC PUMP KIT DE POMPE PÉRISTALTIQUE SET FÜR EXTERNE KIT (OPTION) EXTERNE (OPTION) PERISTALTIKPUMPE (OPTIONAL) Installation of the sterile line Installation de la ligne stérile Installation der sterilen Leitung For further details on the installation of Pour plus de d Weitere Angaben zur Installation der externen the external peristaltic pump, please refer to the Peristaltikpumpe erhalten Sie in der Bedienungsan-... -
Page 51: Kit De Bomba Peristáltica Externa (Opción)
KIT DE BOMBA PERISTÁLTICA KIT DELLA POMPA PERISTAL- EXTERN PERISTALTISK PUMP EXTERNA (OPCIÓN) TICA ESTERNA (OPZIONALE) (TILLVAL) Instalación de la línea estéril Installazione della linea sterile Installera den sterila ledningen Para más detalles sobre la instalación de la Per ulteriori dettagli sull'installazione della Ytterligare information om installation av bomba peristáltica externa, consulte las instruc- pompa peristaltica esterna, consultare le istruzioni... -
Page 52: Operating
CE. Verwenden Sie ausschließlich den von Use only the single-use sterile hose EMS zur Verfügung gestellten, sterilen Einweg- delivered by EMS to avoid damaging the external schlauch, um eine Beschädigung der externen peristaltic pump. Peristaltikpumpe zu vermeiden. A roller clamp is installed on the sterile line Der sterile Schlauch verfügt über eine... -
Page 53: Utilización
Usare esclusivamente il tubo sterile mono- Använd endast sterila engångsslangar från uso suministrado por EMS para no dañar la bomba uso fornito da EMS per evitare danni alla pompa EMS för att undvika skador på den externa peris- peristáltica externa. -
Page 54: Removing The Sterile Line
Removing the sterile line Retrait de la ligne stérile Entfernen der sterilen Leitung... -
Page 55: Rimozione Della Linea Sterile
Desinstalación de la línea estéril Rimozione della linea sterile Ta bort den sterila ledningen... -
Page 56: Cleaning The Pump
Cleaning the pump Nettoyage de la pompe Reinigen der Pumpe To guarantee the correct operation of the Pour garantir le bon fonctionnement de la Um eine korrekte Funktion der Pumpe zu pump, clean the drive roller of the pump regularly gewährleisten, muss das Antriebsrad der Pumpe with an alcohol-based, commercially available, regelmäßig mit einem handelsüblichen, farblosen... -
Page 57: Limpieza De La Bomba
Limpieza de la bomba Pulizia della pompa Rengöra pumpen Para garantizar el correcto funcionamiento Per garantire il corretto funzionamento della För att säkerställa att pumpen fungerar de la bomba, limpie su cilindro de accionamiento pompa, pulire regolarmente il rullo della pompa korrekt ska pumpens drivspole rengöras med ett periódicamente con un desinfectante incoloro con un disinfettante a base alcolica, incolore,... -
Page 58: End Of The Treatment
END OF THE TREATMENT FIN DU TRAITEMENT ENDE DER BEHANDLUNG Instruments disassembly and cleaning Démontage et nettoyage des instruments Auseinandernehmen und reinigen der Instrumente Clean the instrument with running water Spülen Sie das Instrument vor der Desin- before disinfection. Please conform to the recommendations of Beachten Sie die Empfehlungen des Veuillez vous conformer aux recommanda- the "Reprocessing Instructions"... -
Page 59: Fin Del Tratamiento
FIN DEL TRATAMIENTO FINE DEL TRATTAMENTO AVSLUTA BEHANDLINGEN Desmontaje y limpieza Smontaggio e pulizia degli strumenti Demontera och rengöra instrument de los instrumentos Limpie los instrumentos con agua corriente Pulire lo strumento con acqua corrente Rengör instrumentet under rinnande prima della disinfezione. antes de desinfectarlos. -
Page 60: Cleaning And Disinfecting The Circuit
Cleaning and disinfecting the circuit Nettoyage et désinfection du circuit des Kreislaufs "Cleaning" mode Mode "Cleaning" "Cleaning"-Modus Eine tägliche Spülung und Desinfektion des It is recommended to proceed daily to the Flüssigkeitskreislaufs des Geräts wird empfohlen. washing and the disinfecting of the liquid circuit of the unit. -
Page 61: Limpieza Y Desinfección Del Circuito
Limpieza y desinfección del circuito Pulizia e disinfezione del circuito Modo "Cleaning" Modalità "Cleaning" Rengöringsläge Se recomienda lavar y desinfectar a diario Si consiglia di procedere giornalmente al Vi rekommenderar att du tvättar och desin- el circuito de líquido del aparato. lavaggio e alla disinfezione del circuito dei liquidi El modo "Cleaning"... - Page 62 Lift the connector(s) and put it (them) above Heben Sie das Anschlussstück (bzw. die An- a sink, gramme. Trois "bips" et le clignotement de schlussstücke) an und halten Sie es (sie) über Press the foot pedal to start the program. ein Waschbecken.
- Page 63 Levante el o los conectores y póngalo(s) Tryck på fotpedalen för att starta program- encima de un fregadero. Sollevare il connettore e collocarlo sul la- met. Tre pip och en blinkande kontrollampa Pise el pedal para que empiece el progra- vandino.
- Page 64 Illustration of a "Cleaning" mode cycle Illustration d'un cycle du mode "Cleaning" Abbildungen zum Reinigungszyklus...
- Page 65 Ilustración de un ciclo del modo "Cleaning" Illustrazione di un ciclo in modalità Illustration av en cykel i "Cleaning"-läget "Cleaning"...
-
Page 66: Removing The Bottle
Removing the bottle Retrait de la bouteille Abnehmen der Flasche At the end of each treatment a purge is Nach jeder Behandlung muss der Kreislauf necessary to remove the liquid inside the cords. gespült werden, um die Flüssigkeit aus den Before a prolonged stop of the unit, it is important Schläuchen zu entfernen. -
Page 67: Retirada Del Bote
Retirada del bote I slutet av varje behandling måste slangarna uno spurgo per eliminare i liquidi all'interno dei el líquido del interior de los cables. Antes de una tömmas på all vätska. Innan enheten står oanvänd parada prolongada del aparato, es importante en längre tid är det viktigt att man utför en total importante condurre una completa pulizia e disin- realizar una limpieza y desinfección completa del... -
Page 68: Cleaning, Disinfecting And Sterilizing
CLEANING, DISINFECTING NETTOYAGE, DÉSINFECTION REINIGEN, DESINFIZIEREN AND STERILIZING ET STÉRILISATION UND STERILISIEREN Please conform to the recommendations of Veuillez vous conformer aux recommanda- Beachten Sie die Empfehlungen des Handbuchs "Reprocessing Instructions", das im the Reprocessing Instructions manual delivered tions contenues dans le manuel "Reprocessing Lieferumfang Ihres Produkts enthalten ist, zur with your product regarding procedure of cleaning, Reinigung, Desinfektion, Sterilisation und Verpa-... -
Page 69: Limpieza, Desinfección Y Esterilización
LIMPIEZA, DESINFECCIÓN PULIZIA, DISINFEZIONE RENGÖRING, DESINFEKTION Y ESTERILIZACIÓN E STERILIZZAZIONE OCH STERILISERING Siga las recomendaciones del manual Attenersi alle raccomandazioni del manuale Följ rekommendationerna i handboken "Reprocessing Instructions" suministrado con "Reprocessing Instructions" in dotazione al ”Reprocessing Instructions” som medföljer su producto con respecto al procedimiento de prodotto sulle procedure di pulizia, disinfezione, produkten vad gäller procedurer för rengöring, limpieza, desinfección, esterilización y envasado... -
Page 70: Cleaning The Accessories
Cleaning the accessories Nettoyage des accessoires Reinigen des Zubehörs 135°C 135°C The bottles can be washed in a dishwasher Die Flaschen können in einer Spülmaschine and disinfected at up to 95 °C in a washer disin- gereinigt und in einem Thermodesinfektor bei fector. -
Page 71: Limpieza De Los Accesorios
Limpieza de los accesorios Pulizia degli accessori Rengöra tillbehör 135°C 135°C Los botes se pueden lavar en un lavavajillas Flaskorna kan tvättas i diskmaskin och y desinfectarse a un máximo de 95 °C en una lavadora desinfectante. disinfettatrice. Los botes no se pueden esterilizar. Flaskorna kan inte steriliseras. -
Page 72: Maintenance
Bitte beachten Sie hierzu die Anweisungen, with the maintenance set. die mit dem Wartungssatz geliefert werden. Always use EMS original parts. Using non Utiliser exclusivement des pièces originales Verwenden Sie nur Originalteile von EMS. original instruments may damage the unit, and EMS. -
Page 73: Mantenimiento
Se anvisningarna som medföljer under- el equipo de mantenimiento. manutenzione. hållssatsen. Use siempre piezas originales de EMS. Si Usare sempre parti di ricambio originali Använd alltid originaldelar från EMS. se utilizan instrumentos que no sean originales EMS. L'utilizzo di strumentazione non originale Om instrument som inte är originalinstrument... -
Page 74: Replacing The Fuses
Replacing the fuses Remplacement des fusibles Austauschen der Sicherungen Replace exclusively with the type of fuse Remplacer uniquement par le type de Die Sicherungen dürfen nur gegen Siche- indicated on the back of the unit. rungen des auf der Geräterückseite angegebenen Typs ausgetauscht werden. -
Page 75: Sustitución De Los Fusibles
Sustitución de los fusibles Sostituzione dei fusibili Byta säkringar Sustitúyalos exclusivamente por el tipo de Sostituire esclusivamente con il tipo di Använd endast den typ av säkringar som fusible que se indica en la trasera del aparato. anges på enhetens baksida. -
Page 76: Replacing The Pump Of The Unit
Replacing the pump of the unit Remplacement de la pompe de l'appareil Austauschen der Pumpe des Geräts The pump of the unit is a wear part. It is recom- Die Pumpe des Geräts ist ein Verschleißteil. Es mended to replace it every 18 months. wird empfohlen, sie alle 18 Monate auszutau- mois. -
Page 77: Sustitución De La Bomba Del Aparato
Sustitución de la bomba del aparato Sostituzione della pompa dell'unità Byta ut enhetens pump La bomba del aparato es una pieza de desgaste. Enhetens pump är en förbrukningsartikel. Den bör Se recomienda sustituirla cada 18 meses. usura. Si consiglia di sostituirla ogni 18 mesi. bytas var 18:e månad. -
Page 78: Safety Precautions
SAFETY PRECAUTIONS REMARQUES CONCERNANT SICHERHEITSHINWEISE LA SÉCURITÉ EMS and the distributor of this product accept no EMS et le distributeur de ce produit ne peuvent EMS und der Vertreiber des Produkts haften liability for direct or consequential injury or damage nicht für direkte und Folgeschäden, die durch... -
Page 79: Precauciones Sobre Seguridad
PRECAUCIONES SOBRE PRECAUZIONI DI SICUREZZA SÄKERHETSFÖRESKRIFTER SEGURIDAD EMS y el distribuidor de este producto no aceptan L'EMS e il distributore di questo prodotto non EMS och produktens distributör påtar sig inget ninguna responsabilidad por daños o lesiones ansvar för direkta skador eller följdskador som... - Page 80 Behandlung auf Schäden. Beschädigtes Zubehör sories or a damaged unit must not be used and oder ein beschädigtes Gerät dürfen nicht mehr must be replaced. Use original EMS spare parts verwendet und müssen ersetzt werden. Verwenden and accessories only. Sie ausschließlich Original-EMS-Ersatzteile und -Zubehör.
- Page 81 EMS. Fare riparare questo prodotto esclusiva- centra reparera produkten. Repare este producto exclusivamente en mente in un centro di assistenza EMS appro- Denna produkt har testats med avseende un centro de reparación autorizado de EMS. vato. på säkerhet mot elektriska stötar och brandrisk.
-
Page 82: Storing The Product
STORING THE PRODUCT ENTREPOSAGE DU PRODUIT AUFBEWAHREN DES GERÄTS Keep the original packaging until the product Bewahren Sie die Originalverpackung bis is to be disposed of permanently. It can be used zur endgültigen Entsorgung Ihres Produkts auf. for shipping or storing at any time. pour le rangement ou le transport. -
Page 83: Almacenamiento Del Producto
ALMACENAMIENTO STOCCAGGIO DEL PRODOTTO FÖRVARA PRODUKTEN DEL PRODUCTO Guarde el embalaje original hasta que vaya Conservare l'imballo originale fino allo Behåll originalförpackningen tills produkten a desechar el producto de forma permanente. kasseras permanent. Den kan återanvändas för Puede servir para su transporte o almacenamiento utilizzato per la spedizione o per lo stoccaggio. -
Page 84: Product Disposal
Abfall aus elektrischen und elektronischen belonging to customers located in the European Geräten im Besitz von Kunden in der Europäi- Union may be shipped to EMS for recycling in schen Union können gemäß der WEEE-Richtlinie accordance to the WEEE regulations. The costs of für die Wiederverwertung an EMS zurückgegeben... -
Page 85: Eliminación Del Producto
(WEEE – Waste Electrical and Electronic Equipment) som tillhör kunder inom L'apparecchiatura elettronica ed elettrica fuori EU kan skickas till EMS för återvinning i enlighet nicos (RAEE) que pertenezcan a clientes que se uso appartenente a clienti residenti nella UE med WEEE-direktivet. -
Page 86: Ems Service
Zubehörteile gemäß der Bedienungsanleitung operating instructions before dispatching them. When sending the product directly to the approved Bei Direktversand des Produkts an das von EMS EMS repair center, please include the name of autorisierte Reparaturzentrum geben Sie bitte den Namen Ihres Händlers an. Dies erleichtert le traitement. -
Page 87: Servicio Técnico De Ems
En el caso de reparaciones no autorizadas o daños In caso di riparazioni non autorizzate o di danni EMS påtar sig inget som helst ansvar vid oaukto- debidos a la no adherencia a las instrucciones de derivanti dalla mancata osservanza delle istruzioni riserade reparationer eller skador som beror att empleo, EMS no aceptará... -
Page 88: Symbols
SYMBOLS SYMBOLES SYMBOLE Logo du fabricant Herstellerlogo Caution! Read the operation instructions Achtung! Siehe Bedienungsanleitung Year of manufacture Herstellungsjahr Applied part, type BF Anwendungsteil Typ BF Degree of protection against water permeability Schutzgrad gegen Wasserdurchlässigkeit CE marking: refers to directive 93/42 EEC, including EN 60601-1 and EN 60601-1-2 CE-Kennzeichen: Bezieht sich auf die Richtlinie 93/42 EWG, einschließlich EN 60601-1 und EN 60601-1-2 Disposal of old electrical &... -
Page 89: Símbolos
SÍMBOLOS SIMBOLI SYMBOLER Logo del fabricante Logo del produttore. Tillverkarens logotyp ¡Precaución! Lea las instrucciones de empleo Attenzione! Leggere le istruzioni operative Varning! Läs bruksanvisningen Año de fabricación Anno di fabbricazione Tillverkningsår Componente aplicado de tipo BF Parte applicata, tipo BF Patientansluten del, typ BF Grado de protección frente a la penetración de agua Grado di protezione contro penetrazione di acqua... - Page 90 Power switch "ON" Hauptschalter „EIN“ Power switch "OFF" Hauptschalter „AUS“ Input Eingang Output Sortie Ausgang Fuse Fusible Sicherung conformance with US standards conforme US konform mit US-Normen Foot pedal connection Anschluss Fußschalter "Irrigation" mode – irrigation without ultrasounds Mode "Irrigation" – irrigation sans ultrasons "Irrigations"-Modus –...
- Page 91 Interruptor de alimentación encendido (ON) Interruttore di accensione På-knapp Interruptor de alimentación apagado (OFF) Interruttore di spegnimento Av-knapp Entrada Ingresso Ingång Salida Uscita Utgång Fusible Fusibile Säkring conformes con las estadounidenses standard statunitensi. CSA-märkning med koden "C" för produkter som överensstämmer med kanadensisk standard och "US" för produkter som överensstämmer med USA-standard Conexión pedal Connessione pedaliera...
- Page 92 "Dry Work" mode – ultrasounds without irrigation Mode "Dry Work" – Ultrasons sans irrigation "Dry Work"-Modus – Ultraschall ohne Spülung "Standard" mode Standard Mode "Standard" "Standard"-Modus "Endo" mode Endo Mode "Endo" "Endo"-Modus Power setting Power Einstellen der Ultraschallleistung "Cleaning" mode Cleaning Mode "Cleaning"...
- Page 93 Modo de "Dry Work" – ultrasonidos sin irrigación "Dry Work"-läge – ultraljud utan spolning Modo "Standard" Standard "Standard"-läge Modo "Endo" Endo" Endo "Endo"-läge Ajuste de la potencia Impostazione della potenza Power Effektinställning Modo "Cleaning" Cleaning "Cleaning"-läge (rengöringsläge) Ajuste máximo Impostazione massima Maxinställning Ajuste mínimo Impostazione minima...
- Page 94 Liquide fourni par la bouteille de gauche Flüssigkeitszufuhr aus linker Flasche Liquid supplied from right bottle Liquide fourni par la bouteille de droite Flüssigkeitszufuhr aus rechter Flasche Connection for a second EMS unit Connexion pour un second appareil EMS Anschluss für zweites EMS-Gerät Pump Pompe...
- Page 95 Líquido suministrado por el bote izquierdo Líquido suministrado por el bote derecho Conexión para un segundo aparato de EMS Anslutning för ytterligare en EMS-enhet Bomba Pompa Pump Número de serie Numero di serie Serienummer Bomba peristáltica externa Pompa peristaltica esterna...
-
Page 96: Technical Data
TECHNICAL DATA CARACTÉRISTIQUES TECHNIQUES DESCRIPTION DESCRIPTION Manufacturer EMS ELECTRO MEDICAL SYSTEMS SA, Fabricant EMS ELECTRO MEDICAL SYSTEMS SA, CH-1260 Nyon, Switzerland CH-1260 Nyon, Suisse Model Piezon ® Master 700 Modèle Piezon ® Master 700 - Class I - Classe I... -
Page 97: Technische Daten
TECHNISCHE DATEN DATOS TÉCNICOS BESCHREIBUNG DESCRIPCIÓN Hersteller EMS ELECTRO MEDICAL SYSTEMS SA, Fabricante EMS ELECTRO MEDICAL SYSTEMS SA, CH-1260 Nyon, Schweiz CH-1260 Nyon, Suiza Modell Piezon ® Master 700 Modelo Piezon ® Master 700 - Klasse I - Clase I... -
Page 98: Dati Tecnici
DATI TECNICI TEKNISKA DATA DESCRIZIONE BESKRIVNING Produttore EMS ELECTRO MEDICAL SYSTEMS SA, Tillverkare EMS ELECTRO MEDICAL SYSTEMS SA, CH-1260 Nyon, Svizzera CH-1260 Nyon, Schweiz Modello Piezon ® Master 700 Modell Piezon ® Master 700 - Classe I - Klass I... -
Page 100: Troubleshooting
Activate the "Cleaning" mode, disconnect the handpiece from the handpiece cord and check that liquid exits the cord; if it is the case, the handpiece is plugged, send the handpiece to an approved EMS repair center Unscrew the pump cover and check that the peristaltic pump functions... - Page 101 Check that the sterile line adapter is connected and that the control lamp of the external pump turns on when the handpiece is lifted from its support Check that the handpiece cord is connected to the unit Send the unit to an approved EMS repair center...
-
Page 102: Dépannage
DÉPANNAGE Dysfonctionnement Solution pas lors de la mise en marche de Contrôler la mise en place de la bouteille Pas de vibrations ultrasoniques ou Contrôler le joint O-ring du bouchon de la bouteille Remplacer la bouteille... - Page 103 Remplacer le guide lumière...
-
Page 104: Fehlerbehebung
Trocknen Sie die Anschlussstücke des Handstückschlauchs und des Handstücks Überprüfen Sie die Verbindung zum Fußschalter Prüfen Sie die Einstellungen und den Arbeitsmodus Halterung genommen wird. Wenn dies nicht der Fall ist, senden Sie das Handstück an ein von EMS autorisiertes Reparaturzentrum Ersetzen Sie den Handstückschlauch und/oder das Handstück Überprüfen Sie, ob bei der Verwendung eines von zwei Handstücken das andere Handstück korrekt in der... - Page 105 Überprüfen Sie die korrekte Position der externen Pumpe Überprüfen Sie den Anschluss des Adapters der sterilen Leitung und ob die Kontrolllampe der externen Leitung Überprüfen Sie den Anschluss des Handstückschlauchs an das Gerät Senden Sie das Gerät an ein von EMS autorisiertes Reparaturzentrum...
-
Page 106: Solución De Problemas
Compruebe las conexiones entre el aparato, el cable del mango y el mango Compruebe la conexión del pedal así, el mango estará atascado; envíe el mango a un centro de reparación autorizado de EMS Desenrosque la tapa de la bomba y compruebe que la bomba peristáltica funciona Envíe el aparato a un centro de reparación autorizado de EMS... - Page 107 Sustituya la guía de luz Pruebe con otro mango se encienda al levantar el mango de su soporte Envíe el aparato a un centro de reparación autorizado de EMS...
-
Page 108: Individuazione E Risoluzione Dei Problemi
Quando la pedaliera è attivata non vi Controllare la connessione della pedaliera cavo; in tal caso il manipolo è intasato. Inviare il manipolo ad un centro assistenza EMS approvato Svitare il coperchio della pompa e controllare che la pompa peristaltica funzioni... - Page 109 Sostituire la guida della luce Testare con un altro manipolo manipolo Controllare che la pompa esterna si posizionata correttamente Controllare che l'adattatore della linea sterile sia connesso e che la luce di controllo della pompa esterna si linea sterile accenda quando il manipolo viene sollevato dal suo supporto...
-
Page 110: Felsökning
Kontrollera fotpedalens anslutning. Aktivera rengöringsläget, ta bort handstycket från slangen och kontrollera att det kommer ut vätska ur slangen. Om det gör det är handstycket igensatt. Skicka handstycket till ett godkänt EMS-reparationscenter. Skruva bort pumpskyddet och kontrollera att pumpen fungerar. - Page 111 Kontrollera att den externa pumpen är korrekt placerad. Kontrollera att den sterila ledningen adapter är ansluten och att den externa pumpens kontrollampa tänds när ledningen handstycket tas ur hållaren. Kontrollera att handstyckets slang är ansluten till enheten. Skicka enheten till ett godkänt EMS-reparationscenter.