Table des Matières

Publicité

Les langues disponibles
  • FR

Les langues disponibles

  • FRANÇAIS, page 25

Liens rapides

Bedienungsanleitung
User Manual
Mode d'emploi
Manual de instrucciones
Istruzioni per l'uso
Gebruiksaanwijzing
PRO-STAR
Fleischwolf
Meat grinder
Hachoir à viande
Picadora de carne
Tritacarne
Gehaktmolen

Publicité

Table des Matières
loading

Sommaire des Matières pour Landig PRO-STAR

  • Page 1 Bedienungsanleitung User Manual Mode d'emploi Manual de instrucciones Istruzioni per l’uso Gebruiksaanwijzing PRO-STAR Fleischwolf Meat grinder Hachoir à viande Picadora de carne Tritacarne Gehaktmolen...
  • Page 2 Modell - Model - Modèle - Modelo - Modello - Model Picadora de carne Tritacarne Gehaktmolen Pro-Star Typnummer - Type number - Numéro de type - N.º Z66130 de tipo - Numero tipo - Typenummer Abmessungen (L x B x H) - Dimensions (L x W x H) -...
  • Page 4 Urheberrecht Auteursrecht Dit document is auteursrechtelijk be- Dieses Dokument ist urheberrechtlich schermd. Iedere vermenigvuldiging resp. geschützt. Jede Vervielfältigung bzw. iedere herdruk, ook gedeeltelijk, alsmede jeder Nachdruck, auch auszugsweise, de weergave van de afbeeldingen, ook in sowie die Wiedergabe der Abbildungen, gewijzigde vorm, is uitsluitend met schrif- auch im veränderten Zustand, ist nur mit telijke toestemming van de fabrikant toe-...
  • Page 5: Table Des Matières

    Kinder dürfen nicht mit dem Gerät ► Inhalt spielen. Sicherheitshinweise . . . . . . . . . . . . . . . 1 Lagern Sie das Gerät und die Zu- ►...
  • Page 6 Eine Reparatur des Gerätes wäh- ► Tragen, heben oder bewegen Sie ► rend der Gewährleistungs- bzw. das Gerät niemals am Netzkabel. Garantiezeit darf nur von einem Erstickungsgefahr durch Verpa- vom Hersteller autorisierten Kun- ckungsmaterialien! dendienst vorgenommen werden, Stellen Sie sicher, dass keine ►...
  • Page 7: Bestimmungsgemäße Verwendung

    aufweichen können. Legen Sie gege- ► Betätigen Sie den Rückwärtstaster benenfalls eine Unterlage unter die (7) nur max. 10 Sekunden (siehe Stellfüße des Gerätes. Kapitel Blockierungen beseitigen (S. 6), da sonst der Motor be- Bestimmungsgemäße schädigt werden könnte. Verwendung ► Betätigen Sie den Rückwärtstaster Dieses Gerät ist zur Zerkleinerung von erst nach vollständigem Stillstand...
  • Page 8: Inbetriebnahme

    ► Stellen Sie sicher, dass das Gerät VORSICHT an ein vorschriftsmäßig installiertes Wird verwendet für eine möglicherweise Schutzleitersystem angeschlossen gefährliche Situation, die zu leichten werden kann. Der Betrieb an einer Verletzungen oder zu Sachschäden Steckdose ohne Schutzleiter ist ver- führen kann. boten.
  • Page 9: Gerätebeschreibung

    Former Gerätebeschreibung Wurstfüllscheibe Spritzgebäckaufsatz (Abbildungen siehe linke Ausklappseite) Schieber Stopfer mit Deckel Kleine Lochscheibe (Ø 3 mm) Einfülltrichter Mittlere Lochscheibe (Ø 4,5 mm) Aufnahme für Vorsatz Große Lochscheibe (Ø 8 mm) Entriegelungsknopf für Vorsatz Feststellring Motorblock Kreuzmesser Ein-/Ausschalter Schnecke Rückwärtstaster Vorsatz Betriebskontrollleuchte Antriebsritzel...
  • Page 10 4. Stecken Sie die gewünschte Loch- 4. Stecken Sie das Wurstfüllrohr (9) scheibe (15, 16 oder 17) auf die durch den Feststellring (18). Schnecke. Die Kerbe der Lochscheibe 5. Schrauben Sie den Feststellring (18) muss dabei über der Führungsnase auf den Vorsatz. des Vorsatzes liegen.
  • Page 11: Gerät Demontieren

    4. Stecken Sie den Spritzgebäckaufsatz 4. Halten Sie den Entriegelungsknopf (4) (13) ohne den Schieber (14) auf die gedrückt. Lochscheibe. 5. Drehen Sie den Vorsatz im Uhrzei- 5. Schrauben Sie den Feststellring (18) gersinn und ziehen Sie ihn von der auf den Vorsatz.
  • Page 12 ● 2 Esslöffel Pinienkerne Fleischhülle für Kebbe ● 1 gehackte Zwiebel ● Verwenden Sie für ca . 20 Stück die fol- etwas Olivenöl genden Zutaten: ● Salz ● ● 250 g Bulgurweizen Pfeffer ● ● 500 g mageres Rind-, Hammel- oder Frittierfett Kalbfleisch So gehen Sie vor:...
  • Page 13: Reinigung Und Pflege

    Gewährleistung/Garantie So gehen Sie vor: 1. Ziehen Sie den Netzstecker aus der Neben der gesetzlichen Gewährleis- Steckdose. tungspflicht übernimmt Landig bei einigen 2. Wischen Sie den Motorblock (5) mit Produkten zusätzlich eine erweiterte Her- einem leicht feuchten Tuch ab. stellergarantie.
  • Page 14: Konformitätserklärung

    Verwendung von fremden Teilen bzw. Ersatzteilen, ■ Verwendung von ungeeigneten Ergän- zungs- oder Zubehörteilen. Konformitätserklärung Hiermit erklärt die Firma Landig, dass sich dieses Gerät in Übereinstimmung mit den grundlegenden Anforderungen und den übrigen einschlägigen Bestimmungen der Richtlinien 2014/35/ EU, 2014/30/EU, 2009/125/EG und...
  • Page 15 Store the appliance and the acces- ► Contents sory parts out of the reach of chil- dren under 8 years of age. Safety . . . . . . . . . . . . . . . . . . . . . . . . . . 11 Getting started .
  • Page 16: Overload Protection

    Only operate the appliance when DANGER ► the attachment body is mounted Hazard due to electrical current! and locked in place. Do not use the appliance if the ► Risk of injury due to sharp blades! mains cord or plug are damaged. Do not touch the blades of the ►...
  • Page 17: Designated Use

    ATTENTION Symbols used ► As soon as the appliance is plugged DANGER back in, it starts to grind. Press the ON/ OFF switch to stop it from operating. This is used for a hazard which is an im- mediate threat leading to severe bodily Safe operation site injury or to death.
  • Page 18: Power Connection

    3. Keep the original packaging for the Before first use duration of the appliance’s warranty or guarantee period so that the ap- 1. Clean the appliance and the acces- pliance can be packaged properly for sories, including parts in the pusher, shipping in the event of a warranty as described in the chapter Cleaning claim.
  • Page 19: Preparations

    Controls Function Catch (4) Releases the attachment body for dismantling. On/off switch (6) Switches the appliance on or off. Reverses the direction of the motor. If the attachment body cannot be separated from the Reversing button (7) housing after operation, press the reversing button for 2-3 seconds to loosen stuck foods.
  • Page 20 Making sausage (Figure B) Making spritz biscuits (Figure D) Proceed as follows: Proceed as follows: 1. Unplug the mains plug from the 1. Unplug the mains plug from the socket. socket. 2. Place the screw (20) into the attach- 2. Place the screw (20) into the attach- ment body (21).
  • Page 21: Disassembling The Appliance

    4. Clean the appliance and the accesso- twist the sausage and the continue filling evenly. ries used as described in the section Cleaning and care (page 18). Tips: Disassembling the appliance 1. The sausages taste best if they are grilled right away. Proceed as follows: 2.
  • Page 22: Cleaning And Care

    2. Allow the meat shells to freeze slightly Spritz biscuits to make filling easier. Use the following ingredients: Classic Kebbe filling ● 200 g butter Use the following ingredients for a ● 200 g sugar quantity of about 20: ● 1 package vanilla sugar ●...
  • Page 23: Storage

    4. Thoroughly dry all parts after cleaning In addition to the statutory warranty obliga- and before placing them back into the tion, Landig also offers an extended manu- appliance. facturer’s guarantee on certain products. In the case of commercial or equivalent...
  • Page 24: Limitation Of Liability

    ■ use of unsuitable add-ons or acces- sories. Declaration of Conformity Landig hereby declares that this appli- ance complies with the fundamental re- quirements and other relevant provisions of 2014/35/EU, 2014/30/EU, 2009/125/EC and 2011/65/EU directives.
  • Page 25: Sécurité

    Ne pas laisser les enfants jouer ► Table des matières avec l’appareil. Sécurité . . . . . . . . . . . . . . . . . . . . . . . . 21 Rangez l’appareil et ses accessoi- ►...
  • Page 26 Les réparations de l’appareil pen- ► Ne portez et ne levez jamais ► dant la période de garantie légale l‘appareil à l‘aide du câble élec- ou de garantie contractuelle doi- trique. vent obligatoirement être réalisées Risque d‘étouffement avec les em- par un service après-vente auto- ballages ! risé...
  • Page 27: Protection De Surcharge

    saucisson, kebbé et petits fours à utiliser Protection de surcharge à domicile ou autre, à l’exclusion de toute Le moteur est protégé des surcharges par utilisation commerciale telle que un disjoncteur thermique. Il s'éteint – les cuisines du personnel dans les automatiquement en cas de surcharge.
  • Page 28: Mise En Service

    interdit d’utiliser l’appareil sur une prise ATTENTION électrique sans conducteur de terre. En Est utilisé pour une situation susceptible cas de doute, faites vérifier votre ins- d’entraîner des dommages matériels. tallation domestique par un électricien. ► Suivre les instructions données ici Le fabricant décline toute responsabilité...
  • Page 29: Description De L'appareil

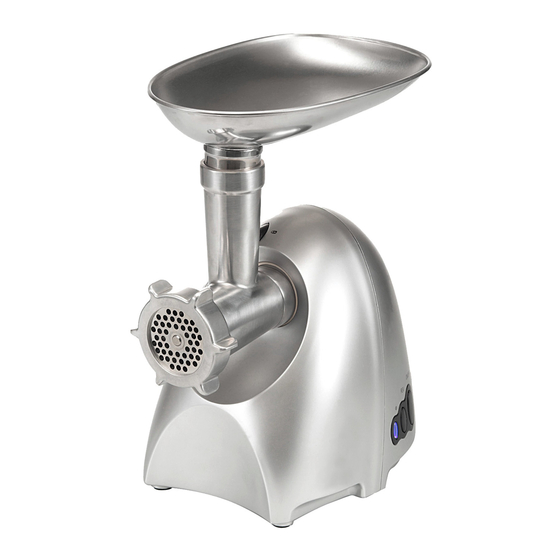
    Forme Description de l'appareil Disque de remplissage des saucisses Adaptateur à biscuits (Images sur le rabat gauche) Glissière Poussoir avec couvercle Grille à petits trous (Ø 3 mm) Trémie Grille à trous moyens (Ø 4,5 mm) Logement pour adaptateur Grille à grands trous (Ø 8 mm) Tête de déverrouillage pour adaptateur Bague de serrage Bloc moteur...
  • Page 30: Eliminer Les Blocages

    4. Mettez en place la grille choisie (15, 4. Introduisez le tuyau de remplissage 16 ou 17) sur la vis. L’encoche de la des saucisses (9) dans la bague de grille doit être située sur l’ergot de gui- serrage (18). dage de l’adaptateur.
  • Page 31: Après Utilisation

    4. Introduisez l’adaptateur à biscuits (13) 6. Dévissez la bague de serrage (18). sans la glissière (14) sur la grille. 7. Retirez toutes les pièces de l’adapta- 5. Vissez la bague de serrage (18) sur teur. l’adaptateur. Suggestions de recettes 6.
  • Page 32: Kebbé Classique

    ● 2 oeufs sortis du frigo La procédure est la suivante : ● 1 oignon finement haché 1. Hachez trois fois de suite la viande ● dans le hachoir à viande. ● poivre 2. Faites revenir les oignons dans l’huile La procédure est la suivante : d’olive, ajoutez les pignons de pin et faites-les dorer.
  • Page 33: Nettoyage Et Entretien

    La procédure est la suivante : Responsabilité/Garantie 1. Débranchez la fiche secteur de la prise électrique. Landig offre pour certains produits une ga- 2. Essuyez l’unité moteur (5) à l’aide rantie constructeur supplémentaire venant d’un chiffon légèrement humecté. en complément de l’obligation de responsa- 3.
  • Page 34: Limitations De Responsabilité

    ■ utilisation de pièces complémentaires ou d’accessoires inappropriés. Déclaration de conformité Par la présente, la société Landig déclare que cet appareil est conforme aux exigen- ces fondamentales et aux autres disposi- tions applicables des directives 2014/35/ UE, 2014/30/UE, 2009/125/CE et...
  • Page 35: Seguridad

    Está prohibido que los niños jue- ► Indice guen con el aparato. Seguridad . . . . . . . . . . . . . . . . . . . . . . . 31 Guarde el aparato y sus acceso- ►...
  • Page 36 La reparación del aparato durante ► Peligro de asfixia con los materiales el periodo de saneamiento por vi- del embalaje! cios o de garantía queda reserva- Asegúrese de que ningún niño jue- ► da exclusivamente al servicio pos- gue con el material del embalaje. venta autorizado por el fabricante ya que en caso contrario se pier- ADVERTENCIA...
  • Page 37: Protección Contra Sobrecarga

    Protección contra sobrecarga elaboración de embutidos, “kebbe” y pas- tas extrusionadas en el hogar o similares, El motor cuenta con un interruptor de pero no para uso industrial, como por protección térmica contra la sobrecarga ejemplo: para desconectarse automáticamente en –...
  • Page 38: Puesta En Funcionamiento

    tor. Encargue en caso de dudas a un ATENCIÓN electricista que compruebe la instala- Se utiliza para una situación que puede ción doméstica. El fabricante no asume generar un daño material. ningún tipo de responsabilidad por ► Síganse las instrucciones aquí expu- daños debidos a la falta de conductor estas para evitar el peligro.
  • Page 39: Descripción Del Aparato

    Boquilla Descripción del aparato Moldeador Disco para embutir (Véanse las ilustraciones en la página Pieza para pastas extrusionadas desplegable izquierda) Corredera Llenador con tapa Disco de agujeros pequeños (Ø 3 mm) Embudo de relleno Alojamiento para el cuerpo del aparato Disco de agujeros medianos (Ø...
  • Page 40 4. Encaje el disco perforado deseado 4. Introduzca el tubo para embutir (9) (15, 16 o 17) en el tornillo sin fin. La por el anillo de apriete (18). muesca del disco perforado tiene 5. Enrosque el anillo de apriete (18) en que quedar sobre el talón de guía del el cuerpo del aparato.
  • Page 41: Desmontar El Aparato

    3. Encaje el disco de agujeros grandes Desmontar el aparato (17) en el tornillo sin fin. La muesca del disco perforado tiene que quedar Proceda de la siguiente manera: sobre el talón de guía del cuerpo del 1. Desconecte el aparato. aparato.
  • Page 42 4. Eche la masa para el embutido en el Recomendaciones: embudo de relleno y vaya llenado la 1. En lugar de bulgur de trigo también tripa poco a poco. Aproximadamente puede utilizar harina (aproximada- a los 20 cm girar el embutido y seguir mente 200-250 g).
  • Page 43: Limpieza Y Conservación

    Recomendaciones: Limpieza y conservación 1. Con ello saben bien, por ejemplo, en- saladas, salsas y pan plano. PELIGRO Pastas extrusionadas Peligro por corriente eléctrica! ► No introduzca jamás el aparato ni Utilice los siguientes ingredientes: el enchufe en el agua ni en otros ●...
  • Page 44: Almacenamiento

    Declaración de conformidad mal dentro de la Unión Europea. Deseche el aparato entregándolo en los Mediante la presente, Landig declara que puntos de recogida municipales. este aparato cumple con los requisitos básicos y las demás disposiciones re- Saneamiento por vicios / Garantía...
  • Page 45: Istruzioni Di Sicurezza

    Non è consentito che i bambini ► Indice giochino con l’apparecchio. Istruzioni di sicurezza . . . . . . . . . . . . . 41 Conservare l’apparecchio e gli ac- ►...
  • Page 46 Una riparazione dell’apparecchio ► Non trasportare, sollevare o ► durante il periodo di validità della spostare mai l’apparecchio per garanzia deve avvenire esclusi- mezzo del cavo di alimentazione. vamente da parte di un centro di Pericolo di soffocamento dovuto ai assistenza clienti autorizzato dal materiali d’imballaggio! produttore, poiché...
  • Page 47: Protezione Contro Il Sovraccarico

    ► Le superfici dei mobili potrebbero con- ► Azionare il pulsante d’inversione tenere componenti che danneggiano rotazione (7) per solo 10 secondi al i piedini in gomma dell’apparecchio; massimo (vedi Eliminazione bloc- appoggiare eventualmente una base caggi (pag. 46) per evitare danni di appoggio sotto i piedini dell’appa- al motore di azionamento.
  • Page 48: Messa In Servizio

    ► Assicurarsi che l’apparecchio possa CAUTELA essere collegato a un sistema di mes- Viene impiegato per una situazione sa a terra installato a norma. È vietato potenzialmente pericolosa che potrebbe far funzionare l’apparecchio su una provocare lievi ferite o danni materiali. presa senza conduttore di terra.
  • Page 49: Descrizione Apparecchio

    Inserto per kibbeh Descrizione apparecchio Disco per insaccare salsicce Accessorio per biscotti (per le figure aprire la pagina piegata si- Inserto scorrevole nistra) 15 Trafila a fori piccoli (Ø 3 mm) Pestello con coperchio 16 Trafila a fori medi (Ø 4,5 mm) Tramoggia 17 Trafila a fori grandi (Ø...
  • Page 50 4. Inserire la trafila desiderata (15, 16 5. Avvitare la ghiera filettata (18) sulla o 17) sull’elica. L’intaglio della trafila parte frontale. deve trovarsi sulla sporgenza di guida 6. Inserire la parte frontale premontata della parte frontale. sull’attacco (3). 5. Avvitare la ghiera filettata (18) sulla 7.
  • Page 51: Smontaggio Dell'apparecchio

    5. Avvitare la ghiera filettata (18) sulla Proposte di ricette parte frontale. 6. Inserire l’inserto scorrevole sull’acces- Salsicce alla griglia sorio per biscotti. Impiegare i seguenti ingredienti per circa 7. Inserire la parte frontale premontata 20 pezzi: sull’attacco (3). ● 1,5 kg di carne di maiale 8.
  • Page 52 Procedere come di seguito descritto 2. Soffriggere le cipolle nell’olio di oliva. Aggiungere i pinoli e dorarli. 1. Con gli ingredienti viene realizzato un impasto morbido. 3. Aggiungere la carne, insaporire con sale e pepe e cuocere fino a quando 2.
  • Page 53: Pulizia E Manutenzione

    Procedere come di seguito descritto Garanzia/garanzia estesa 1. Estrarre la spina dalla presa. 2. Pulire con un panno leggermente umi- Oltre alla garanzia obbligatoria Landig ac- do il blocco motore (5). corda per alcuni prodotti addizionalmente 3. Pulire i componenti e gli accessori in una garanzia del produttore estesa.
  • Page 54: Dichiarazione Di Conformità

    ■ impiego di componenti o accessori non adatti. Dichiarazione di conformità Con la presente la ditta Landig dichiara che il presente apparecchio è conforme ai requisiti fondamentali e alle altre disposi- zioni rilevanti delle direttive 2014/35/UE, 2014/30/UE, 2009/125/CE e 2011/65/UE.
  • Page 55 Bewaar het apparaat en de acces- ► Inhoud soires buiten bereik van kinderen jonger dan 8 jaar. Veiligheid . . . . . . . . . . . . . . . . . . . . . . . 51 In bedrijfname .
  • Page 56 Een reparatie van het apparaat ► Verstikkingsgevaar door verpak- tijdens de waarborg- resp. garan- kingsmaterialen! tieperiode mag alleen door een Zorg er voor dat er geen kinde- ► door de fabrikant geautoriseerde ren met het verpakkingsmateriaal klantendienst uitgevoerd worden. spelen. Anders vervalt bij beschadigingen en de daaruit volgende storingen WAARSCHUWING...
  • Page 57: Beveiliging Tegen Overbelasting

    Bestemmingsconform gebruik Beveiliging tegen overbelasting De motor wordt met een thermische over- Dit apparaat is enkel bestemd voor het verkleinen van levensmiddelen en de be- belastingsbeveiliging beschermd tegen overbelasting. Bij overbelasting schakelt reiding van worst, kebbe en spritsgebak de motor automatisch uit. Ga in dat geval voor thuisgebruik of gelijkaardige, niet professionele sectoren, zoals bijvoorbeeld: als volgt te werk:...
  • Page 58: In Bedrijfname

    ► Controleer of het apparaat kan worden VOORZICHTIG aangesloten op een correct geïnstal- Wordt gebruikt voor een mogelijk ge- leerd stopcontact met beschermgelei- vaarlijke situatie, die kan leiden tot lichte der. Het gebruik op een stopcontact verwondingen. zonder beschermgeleider is niet ►...
  • Page 59: Beschrijving Apparaat

    Kneder Beschrijving apparaat Worst vulplaat Opzet spritsen (afbeeldingen zie linker uitklappagina) Schuiver Stamper met deksel Kleine gaten-schijf (Ø 3 mm) Vultrechter Middelgrote gaten-schijf (Ø 4,5 mm) Opening voor het voorzetstuk Grote gaten-schijf (Ø 8 mm) Ontgrendelknop voorzetstuk Klemring Motorblok Kruismes Aan/uit-schakelaar Transportschroef Achteruit schakelaar...
  • Page 60: Blokkeringen Verhelpen

    5. Schroef de klemring (18) op het voor- 7. Draai het voorzetstuk in tegenuur- zetstuk. werkwijzerzin, tot het hoorbaar vast- klikt (afb. E1). 6. Steek het voorgemonteerde voorzet- stuk in de opening (3). 8. Steek de beide vultrechters (2) op het voorzetstuk.
  • Page 61: Apparaat Demonteren

    8. Draai het voorzetstuk in tegenuur- Receptsuggesties werkwijzerzin, tot het hoorbaar vast- klikt (afb. E1). Braadworst 9. Steek de beide vultrechters (2) op het voorzetstuk. Gebruik voor ca . 20 stuks de volgende ingrediënten: Na het gebruik ● 1,5 kg varkensvlees Ga als volgt tewerk: ●...
  • Page 62 Ga als volgt tewerk: 3. Het vlees toevoegen, kruiden met pe- per en zout en zo lang aanbraden, tot 1. Maak met de ingrediënten een smeuig het vlees een knapperige kleur krijgt. deeg. 4. Breng nu het gehakt in de vleesom- 2.
  • Page 63: Reiniging En Onderhoud

    Waarborg/Garantie 1. Haal de stekker uit het stopcontact. Naast de wettelijke garantieverplichting 2. Veeg het motorblok (5) met een licht neemt Landig bij enkele producten een vochtige doek af. uitgebreide fabrieksgarantie op zich. 3. Reinig de opzetstukken en de ac-...
  • Page 64: Conformiteitsverklaring

    ■ gebruik van ongeschikte uitbreidings- of accessoire-inderdelen. Conformiteitsverklaring Bij deze verklaart Landig dat dit apparaat aan de principiële eisen en de overige van toepassing zijnde bepalingen van de richtlijnen 2014/35/EU, 2014/30/EU, 2009/125/EG en 2011/65/EU voldoet.
  • Page 65 Ersatzteile und Zubehör - Spare parts and accessories - Pièces de rechange et accessoires - Piezas de repuesto y accesorios - Pezzi di ricambio ed accessori - Reserveonderdelen en accessoires Ersatzteile und Zubehör erhalten Sie über unsere Homepage oder auf Anfrage bei unserem Kundenservice.
  • Page 68 Kundenservice: Customer service: Bureaux de service après-vente: Centros de atención al cliente: Klantenservice: Сервисная служба: Landig + Lava GmbH & Co. KG Valentinstraße 35-1 88348 Bad Saulgau Germany © 2016 by Landig Technische Änderungen vorbehalten. Druckfehler vorbehalten. Subject to technical modifications.

Ce manuel est également adapté pour:

Z66130

Table des Matières