
Manuels Connexes pour Eaton ModularEasy 9PX 5000i HotSwap


Sommaire des Matières pour Eaton ModularEasy 9PX 5000i HotSwap
- Page 1 ИБП Eaton 9PX 5000i HotSwap (9PX5KiBP) - Eaton 9PX ModularEasy - Пользовательский мануал по Постоянная ссылка на страницу: https://eaton-power.ru/catalog/eaton-9px/eaton-9px-5000i-hotswap/...
- Page 2 English - Français 9PXMEZ6Ki 9PXMEZ11Ki Deutsch - Español Installation Русский and user manual...
- Page 4 ModularEasy 9PXMEZ6Ki 9PXMEZ11Ki Installation and user manual Copyright © 2014 EATON All rights reserved. Service and support: Call your local service representative 614-09354-01_EN...
- Page 5 SAFETY INSTRUCTIONS SAVE THESE INSTRUCTIONS. This manual contains important instructions that should be followed during installation and maintenance of the ModularEasy and UPS. The ModularEasy models that are covered in this manual are intended for installation in an environment within 0 to 40°C, free of conductive contaminant. These limits are designed to provide reasonable protection against harmful interference when the equipment is operated in a commercial environment.
- Page 6 • The admissible storage temperature range is -15ºC to +60ºC. Special precautions • The ModularEasy is designed to work with approved EATON UPS (contact your Eaton reseller for more information). • All repairs and service should be performed by AUTHORIZED SERVICE PERSONNEL ONLY.
- Page 7 Contents 1. Introduction ..................5 1.1 Environmental protection ....................5 2. Presentation ..................6 2.1 Standard installation ......................6 2.2 Description / Panels ......................7 2.3 Firmware upgrade ......................8 2.4 Parallel UPS screen ......................8 2.5 Parallel setting ........................8 3. Installation ..................9 3.1 Inspecting the equipment ....................9 3.2 Unpacking the ModularEasy ....................9 3.3 Checking the accessory kit ....................9 3.4 Tower installation ......................
- Page 8 Before installing your ModularEasy with your UPS, please read first the safety instructions. Then follow the indications in this manual, which completes the UPS Installation and User Manual. To discover the entire range of EATON products, we invite you to visit our web site at www.eaton.com/powerquality or contact your EATON representative. 1.1 Environmental protection EATON has implemented an environmental-protection policy.
- Page 9 2. Presentation The Eaton® ModularEasy is an essential part of your Parallel system. It allows the connection of 2 UPS together, moreover, it possible to service or even replace the UPS without affecting the connected loads. You can safely eliminate the effects of UPS maintenance and guard the integrity of your equipment.
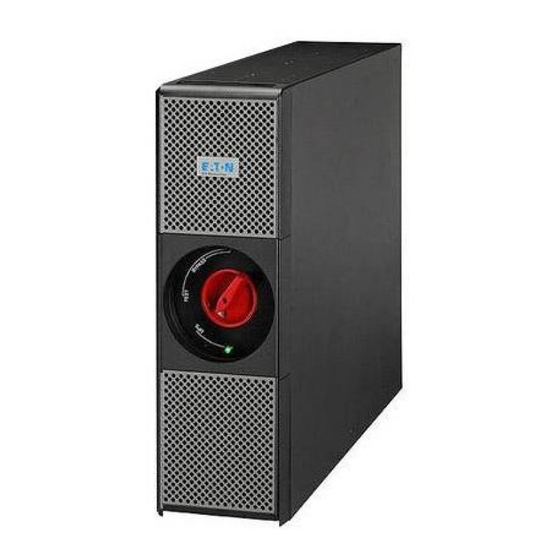
- Page 10 2. Presentation 2.2 Description / Panels The ModularEasy has a manual Bypass rotary switch with three positions: UPS: the load is supplied by the UPS. Test: the load is supplied directly by the AC power source, the two UPS are still supplied but their outputs are disconnected from the load.
- Page 11 Check that UPS firmware version is parallel compatible: Screen menu Identification UPS/NMC firmware. If “// Ready” doesn’t appear just next to the UPS firmware number, that means the UPS cannot be connected in parallel. Contact your Eaton reseller to download the latest firmware. 2.4 Parallel UPS screen Press button of any one of the two UPS to start the parallel system. The Power display is the UPS power and not the load power.
- Page 12 3. Installation 3.1 Inspecting the equipment If any equipment has been damaged during shipment, keep the shipping cartons and packing materials for the carrier or place of purchase and file a claim for shipping damage. If you discover damage after acceptance, file a claim for concealed damage. To file a claim for shipping damage or concealed damage: 1. File with the carrier within 15 days of receipt of the equipment; 2. Send a copy of the damage claim within 15 days to your service representative. 3.2 Unpacking the ModularEasy Unpack the equipment and remove all the packing materials and shipping carton.
- Page 13 3. Installation 3.4 Tower installation 3.5 Rack installation with non-included optional Rail Kit: 9RK Page 10 614-09354-01_EN...
- Page 14 3. Installation 3.6 Example of rack 19" setup with optional EBM 9PX EBM 240V 9PXMEZ11Ki 9PXMEZ6Ki 3.7 Example of battery integration system with non-included optional Trollet Frame: BINTSYS Page 11 614-09354-01_EN...
- Page 15 3. Installation 3.8 Installation requirements Recommended protective devices and cable cross-sections 3.8.1 9PXMEZ6Ki use with 9PX6000 or 9PX5000 UPS • Recommended protective devices D curve, 63A for Parallel Operation D curve, 32A for Redundancy Only 2 poles circuit breaker • Recommended cable cross-sections: Terminal Wire Terminal wire...
- Page 16 3. Installation 3.8 Installation requirements Recommended protective devices and cable cross-sections 3.8.3 9PXMEZ11Ki use with 9PX8000 or 9PX11000 UPS • Separate input source recommended protective devices For Parallel Operation D curve, 125A if use with 9PX11000 UPS D curve, 100A if use with 9PX8000 UPS For Redundancy Only D curve, 63A if use with 9PX11000 UPS D curve, 50A if use with 9PX8000 UPS...
- Page 17 4. Power cables connection This type of connection must be carried out by qualified electrical personnel. Before carrying out any connection, check that the upstream protection device (Normal AC source) is open "O" (Off). Before proceeding to connect the ModularEasy to the UPS, make sure the UPS has been properly shut down (refer to the UPS user manual).
- Page 18 4. Power cables connection 10. Connect the I/O cord Set connector to the ModularEasy, and secure it by fixing the two locking screws 11. Connect the two UPS together with the 9PX parallel cable and lock it. Use of specific parallel cable is mandatory for first start up and optimal use. Page 15 614-09354-01_EN...
- Page 19 4. Power cables connection 4.2 9PXMEZ11Ki - with common Normal and Bypass AC source 1. Connect the 4 integrated power cables to UPS1 and UPS2 I/O terminal blocks, following color coding on the cables and on UPS I/O cover (blue for UPS Input / red for UPS Output) – do not remove the UPS Input Bypass AC jumper inside the UPS I/O cover - refer to the UPS user manual to check the UPS terminal blocks connection.
- Page 20 4. Power cables connection 4. Insert the Normal AC source cable through the cable gland. 5. Connect the wires to the Normal AC source (Input) terminal blocks (do not remove the Input Bypass AC jumper and the UPS Input Bypass jumper inside the UPS I/O cover refer to the UPS User Manual) 6.
- Page 21 4. Power cables connection 4.3 9PXMEZ11Ki - with separate Normal and Bypass AC source 1. Slide the ModularEasy Bypass input cover after removing the screw. 2. Punch the two Bypass Input knockouts of the ModularEasy Bypass Input cover and insert the two small provided cable glands inside.
- Page 22 4. Power cables connection 10. Remove the Input Bypass AC jumper 11. Punch the Bypass AC Source knockout of the ModularEasy I/O cover and insert the bigger provided cable gland inside. 12. Insert the Normal AC source cable through the cable gland. 13.
- Page 23 The two UPS are connected together with the parallel cable, PN: 744-A2675 b) The UPS firmware version is parallel compatible : Screen menu Identification UPS/NMC firmware. If "// Ready" doesn’t appear just next to the UPS firmware number, contact your Eaton reseller to download the latest firmware. 8. Choose the mode "Redundancy Only" or "Parallel Operation" by the Screen menu Settings In/Out settings Redundancy mode.
- Page 24 The UPS firmware version is parallel compatible : Screen menu Identification UPS/NMC firmware. If "// Ready" doesn’t appear just next to the UPS firmware number, contact your Eaton reseller to download the latest firmware. 5. Check that the "UPS mode" green light of the ModularEasy is on, indicating that the UPS output power is available on the ModularEasy Important: do not continue to next step if the "UPS mode"...
- Page 25 5. Operations 5.3 UPS replacement with ModularEasy 5.3.1 Faulty UPS Removing: 1. Put the UPS in "internal Bypass mode" (refer to the UPS user manual) 2. Check that the UPS is on Bypass mode by checking the UPS display panel (refer to the UPS user manual) 3.
- Page 26 Screen menu Identification UPS/NMC firmware. If "// Ready" doesn’t appear just next to the UPS firmware number, contact your Eaton reseller to download the latest firmware. 7. Press the "ON" button of any one of the 2 UPS to start the parallel system. 8. Put the UPS in "internal Bypass mode" (refer to the UPS User Manual) 9.
- Page 27 6. Troubleshooting Condition Possible cause Action One UPS displays: One of the "UPS output" switches is off Switch on the "UPS output" switch on Load unbalance on the back of the ModularEasy the ModularEasy Firmware download is One of the two UPS is in Online or Select Standby or Bypass mode not possible Battery mode...
- Page 28 ModularEasy 9PXMEZ6Ki 9PXMEZ11Ki Manuel d'installation et d'utilisation Copyright © 2014 EATON Tous droits réservés. SAV et assistance : Contacter votre représentant SAV local 614-09354-01_FR...
- Page 29 INSTRUCTIONS DE SÉCURITÉ ENREGISTREZ CES INSTRUCTIONS. Ce manuel contient des instructions importantes qui doivent être suivies pendant l'installation et la maintenance du ModularEasy et de l'ASI. Les modèles de ModularEasy faisant l'objet de ce manuel sont conçus pour être installés dans un environnement compris entre 0 et 40 °C exempt de contaminants conducteurs.
- Page 30 • Si le système doit être stocké avant l'installation, l'emplacement de stockage doit être sec. • La plage de température admissible de stockage est comprise entre -15 ºC et +60 ºC. Précautions particulières • Le ModularEasy est conçu pour fonctionner avec des ASI EATON approuvées (contactez votre revendeur Eaton pour plus d'informations). • Toute réparation et tout SAV doivent être effectués UNIQUEMENT PAR DU PERSONNEL SAV AGRÉÉ.
- Page 31 Table des matières 1. Introduction ..................5 1.1 Protection de l'environnement ...................5 2. Présentation ..................6 2.1 Installation standard ......................6 2.2 Description / Panneaux ......................7 2.3 Mise à niveau du logiciel embarqué ..................8 2.4 Écran des ASI en parallèle ....................8 2.5 Réglage du fonctionnement en parallèle ................8 3.
- Page 32 Respectez toutes les réglementations locales dans la mise au rebut des matériaux d'emballage. Fin de vie EATON traitera les produits au terme de leur vie utile conformément aux réglementations locales. EATON collabore avec les sociétés chargées de la collecte et de l'élimination de ses produits au terme de leur vie utile. Produit Le produit est composé...
- Page 33 2. Présentation Le ModularEasy d'Eaton® est un élément essentiel de votre système parallèle. Il permet de connecter ensemble 2 ASI, mais également d'intervenir sur les ASI ou même de les remplacer sans affecter les charges connectées. Les inconvénients liés à la maintenance des ASI peuvent ainsi être éliminés et l'intégrité de votre équipement conservée.
- Page 34 2. Présentation 2.2 Description / Panneaux Le ModularEasy est doté d'un commutateur rotatif manuel à trois positions : UPS : la charge est alimentée par l'ASI. Test : la charge est alimentée directement par la source d'alimentation AC, les deux ASI sont toujours alimentées mais leurs sorties sont déconnectées de la charge. Bypass : la charge est alimentée directement par la source d'alimentation AC, les deux ASI sont déconnectées de la source d'alimentation AC.
- Page 35 Identification Logiciel embarqué. Si "// Ready" ne s'affiche pas en face du numéro de la Version Onduleur, celle-ci ne peut pas être connectée en parallèle. Contactez votre revendeur Eaton pour télécharger la dernière version du logiciel embarqué. 2.4 Écran des ASI en parallèle Appuyez sur le bouton de l'une des deux ASI pour lancer le système parallèle.
- Page 36 3. Installation 3.1 Inspection de l'équipement Si une partie de l'équipement a été endommagée pendant l'expédition, conservez le carton d'expédition et les matériaux d'emballage à l'intention du transporteur ou du lieu d'achat et déposez une réclamation pour dégâts de livraison. Si vous découvrez un dégât après avoir accepté les colis, déposez une réclamation pour avarie non apparente.
- Page 37 3. Installation 3.4 Position tour 3.5 Position rack avec le kit de rails non inclus : 9RK Page 10 614-09354-01_FR...
- Page 38 3. Installation 3.6 Exemple de configuration en 19 pouces avec EBM 9PX EBM 240V en option 9PXMEZ11Ki 9PXMEZ6Ki 3.7 Exemple de système intégrant la batterie avec le châssis Trollet Frame en option non inclus BINTSYS Page 11 614-09354-01_FR...
- Page 39 3. Installation 3.8 Conditions requises pour l'installation Dispositifs de protection et sections de câbles recommandés 3.8.1 9PXMEZ6Ki à utiliser avec les ASI 9PX6000 ou 9PX5000 • Dispositifs de protection recommandés Courbe D, 63 A pour un mode parallèle Courbe D, 32 A pour la redondance seule Disjoncteur bipolaire • Sections de câbles recommandées : Position sur Fonction Section du Section minimale Disjoncteur le bornier...
- Page 40 3. Installation 3.8 Conditions requises pour l'installation Dispositifs de protection et sections de câbles recommandés 3.8.3 9PXMEZ11Ki à utiliser avec les ASI 9PX8000 ou 9PX11000 • Dispositifs de protection recommandés pour la source d'entrée commune Pour un mode parallèle courbe D, 125 A pour ASI 9PX11000 courbe D, 100 A pour ASI 9PX8000 Pour la redondance seule courbe D, 63 A pour ASI 9PX11000...
- Page 41 4. Branchement des câbles d'alimentation Ce type de branchement doit être effectué par un électricien qualifié. Avant d'effectuer tout branchement, vérifiez que le dispositif de protection en amont (Normal AC source) est ouvert "O" (Off). Avant de passer au branchement du ModularEasy sur l'ASI, vérifiez que celle-ci a été correctement arrêtée (reportez-vous au manuel d'utilisation de l'ASI).
- Page 42 4. Branchement des câbles d'alimentation 10. Branchez le connecteur du jeu de cordons d'entrée/sortie sur le ModularEasy et fixez-le avec les vis de fixation. 11. Reliez les deux ASI avec le câble parallèle 9PX et bloquez ce dernier. L'utilisation d'un câble parallèle spécifique est obligatoire pour le premier démarrage et pour une utilisation optimale.
- Page 43 4. Branchement des câbles d'alimentation 4.2 9PXMEZ11Ki - avec Normal AC source et Bypass AC source communes 1. Branchez les 4 câbles d'alimentation intégrés sur les bornes d'entrée/sortie des ASI UPS1 et UPS2, en respectant le code de couleur des câbles et du cache d'entrée/sortie de l'ASI (bleu pour UPS Input, rouge pour UPS Output) –...
- Page 44 4. Branchement des câbles d'alimentation 4. Introduisez le câble Normal AC source dans le presse-étoupe. 5. B ranchez les fils sur les bornes Normal AC source (Input) (ne retirez pas le cavalier Input Bypass AC ni le cavalier UPS Input Bypass à l'intérieur du cache d'entrée/sortie de l'ASI reportez-vous au manuel d'utilisation de l'ASI. 6. Introduisez le câble Output dans le presse-étoupe. 7.
- Page 45 4. Branchement des câbles d'alimentation 4.3 9PXMEZ11Ki - avec Normal AC source et Bypass AC source séparées 1. Faites glisser le cache Bypass Input du ModularEasy après en avoir retiré la vis. 2. Retirez les deux entrées défonçables "Bypass Input" de ce cache et introduisez les deux petits presse- étoupe fournis à...
- Page 46 4. Branchement des câbles d'alimentation 10. Retirez le cavalier Input Bypass AC 11. Faites sauter l'entrée défonçable Bypass AC Source du cache d'entrée/sortie du ModularEasy et insérez le plus grand presse-étoupe fourni à l'intérieur. 12. Introduisez le câble Normal AC source dans le presse-étoupe. 13. Branchez les fils sur les bornes Normal AC source (Input).
- Page 47 L a version du logiciel embarqué de l'ASI est compatible avec le mode parallèle : Menu Identification Logiciel embarqué. Si "// Ready" ne s'affiche pas en face du numéro de la Version Onduleur, contactez votre revendeur Eaton pour télécharger la dernière version du logiciel embarqué. 8. Choisissez le mode "Redondance seule" ou "Mode parallèle" dans le Menu Réglages Régl. entrée/sortie Mode redondance. • "Mode parallèle" est le mode par défaut. "Mode parallèle" désactive l'alarme sonore lorsque la puissance de la charge est supérieure à...
- Page 48 Régl. entrée/sortie Mode redondance. Si "// Ready" ne s'affiche pas en face du numéro de la Version Onduleur, contactez votre revendeur Eaton pour télécharger la dernière version du logiciel embarqué. 5. V érifiez que le voyant vert "UPS mode" du ModularEasy est allumé, indiquant que l'alimentation de sortie de l'ASI est disponible sur le ModularEasy. Important : ne passez pas à l'étape suivante si le voyant vert "UPS mode" du ModularEasy reste éteint (la charge ne sera pas alimentée).
- Page 49 5. Utilisation 5.3 Remplacement d'une ASI avec ModularEasy 5.3.1 Retrait de l'ASI défectueuse : 1. Mettez l'ASI en "mode Bypass interne" (reportez-vous au manuel d'utilisation de l'ASI). 2. V érifiez sur l'écran de l'ASI que celle-ci est en mode Bypass (reportez-vous au manuel d'utilisation de l'ASI). 3. Placez l'interrupteur Bypass manuel du ModularEasy sur la position "Bypass". Le voyant rouge "Bypass mode"...
- Page 50 Logiciel embarqué. Si "// Ready" ne s'affiche pas en face du numéro de la Version Onduleur, contactez votre revendeur Eaton pour télécharger la dernière version du logiciel embarqué. 7. Appuyez sur le bouton ON de l'une des 2 ASI pour lancer le système parallèle. 8. Mettez l'ASI en "mode Bypass interne" (reportez-vous au manuel d'utilisation de l'ASI).
- Page 51 6. Dépannage Condition Cause Action Une ASI affiche : Load L'un des interrupteurs "UPS Placez l'interrupteur "UPS output" unbalance (déséquilibre de la output" est en position Off à en position On sur le ModularEasy charge) l'arrière du ModularEasy Il est impossible de télécharger L'une des deux ASI est en mode Sélectionnez le mode Standby ou le logiciel embarqué...
- Page 52 ModularEasy 9PXMEZ6Ki 9PXMEZ11Ki Installations- und Bedienungsanleitung Copyright © 2014 EATON Alle Rechte vorbehalten. Service und Support: Wenden Sie sich telefonisch an Ihren örtlichen Servicepartner 614-09354-01_DE...
- Page 53 SICHERHEITSANWEISUNGEN BEWAHREN SIE DIESE ANLEITUNG AUF. Diese Anleitung enthält wichtige Hinweise, die während der Installation und Wartung des ModularEasy beachtet werden müssen. Die in dieser Anleitung beschriebenen ModularEasy sind für eine Installation in Umgebungen mit Temperaturen von 0 - 40 °C und frei von leitenden Kontaminationen vorgesehen. Diese Grenzwerte wurden entwickelt, um im Rahmen des Vernünftigen einen Schutz gegen schädliche Interferenzen zu gewährleisten, wenn das Gerät in einer gewerblichen Umgebung eingesetzt wird.
- Page 54 • Der zulässige Bereich für die Lagertemperatur beträgt -15 ºC bis +60 ºC. Besondere Vorsichtsmaßnahmen • Das ModularEasy wurde für den Einsatz in Verbindung mit freigegebenen EATON-USV entwickelt (nähere Informationen erhalten Sie von Ihrem EATON-Händler) • Reparatur- und Wartungsarbeiten dürfen NUR VON AUTORISIERTEN WARTUNGSTECHNIKERN durchgeführt werden.
- Page 55 Inhalt 1. Einführung ..................5 1.1 Umweltschutz ........................5 2. Übersicht ................... 6 2.1 Standardinstallation ......................6 2.2 Beschreibung / Anschlusspaneele ..................7 2.3 Firmware-Upgrade ......................8 2.4 Bildschirm für parallele USV ....................8 2.5 Parallele Einstellung ......................8 3. Installation ..................9 3.1 Überprüfung des Geräts ....................9 3.2 Entpacken des ModularEasy .....................9 3.3 Überprüfung des Zubehörs ....................9 3.4 Installation am Tower .......................
- Page 56 1. Einführung Danke, dass Sie sich dafür entschieden haben, Ihre elektrischen Geräte mit einem EATON-Produkt zu schützen. Die ModularEasy-Baureihe wurde mit größter Sorgfalt entwickelt. Wir empfehlen, dass Sie sich die Zeit nehmen, dieses Handbuch gründlich zu lesen, um die vielen Möglichkeiten Ihres ModularEasy optimal zu nutzen.
- Page 57 2. Übersicht Das Eaton® ModularEasy ist ein wichtiger Bestandteil ihres Parallel-Systems. Es ermöglicht die Koppelung zweier USV und sogar die Wartung einer USV ohne Auswirkungen auf die angeschlossenen Lasten. Alle Auswirkungen der USV-Wartung werden aufgefangen und Ihre Geräte werden nicht beeinträchtigt.
- Page 58 2. Übersicht 2.2 Beschreibung / Anschlusspaneele Das ModularEasy verfügt über einen manuellen Bypass-Drehschalter mit drei Stellungen: UPV: die Last wird von der USV versorgt. Test: die Last wird direkt vom Netzeingang versorgt, die beiden USV werden weiter versorgt, aber ihre Outputs sind von der Last getrennt. Bypass: Die Last wird direkt vom Netzeingang versorgt, die beiden USV sind vom Netzeingang getrennt.
- Page 59 Wenn neben der USV-Firmware-Nummer nicht "// Ready” angezeigt wird, kann die USV nicht parallel angeschlossen werden. Wenden Sie sich bitte an Ihren EATON-Händler, um die neueste Version der Firmware zu erhalten. 2.4 Bildschirm für parallele USV Drücken Sie die Taste einer der beiden USV, um das Parallel-System zu starten.
- Page 60 3. Installation 3.1 Überprüfung des Geräts Wenn das Gerät oder ein Teil davon beim Versand beschädigt wurde, sollten Sie den Versandkarton und die Verpackungsmaterialien für den Spediteur oder die Verkaufsstelle aufbewahren und einen Versandschaden anmelden. Wenn Sie nach der Annahme einen Schaden feststellen, sollten Sie Schadensersatz wegen versteckter Mängel fordern.
- Page 61 3. Installation 3.4 Installation am Tower 3.5 Rack-Einbau mit dem optionalen Schienensatz (nicht im Lieferumfang): 9RK Seite 10 614-09354-01_DE...
- Page 62 3. Installation 3.6 Beispiel einer 19"-Rack-Konfiguration mit optionalem 9PX EBM 240V 9PXMEZ11Ki 9PXMEZ6Ki 3.7 Beispiel für die Integration eines Batteriesystems mit dem optionalen Trollet Frame (nicht im Lieferumfang): BINTSYS Seite 11 614-09354-01_DE...
- Page 63 3. Installation 3.8 Installationsanforderungen Empfohlene Schutzvorrichtungen und Kabelquerschnitte 3.8.1 9PXMEZ6Ki in Verbindung mit USV 9PX6000 oder 9PX5000 • Empfohlene Schutzvorrichtungen Kennlinie D, 63A, Parallel Betrieb Kennlinie D, 32A, Nur Redundanz 2-poliger Trennschalter • Empfohlene Kabelquerschnitte: Klemmen- Leiter- Querschnitt Mindestbemessung Trennschalter position funktion Klemmenanschlussdrähte...
- Page 64 3. Installation 3.8 Installationsanforderungen Empfohlene Schutzvorrichtungen und Kabelquerschnitte 3.8.3 9PXMEZ11Ki in Verbindung mit USV 9PX8000 oder 9PX11000 • Empfohlene Schutzvorrichtungen für getrennte Inputs Parallel Betrieb Kennlinie D, 125 A in Verbindung mit USV 9PX11000 Kennlinie D, 100 A, in Verbindung mit USV 9PX8000 Nur Redundanz Kennlinie D, 63A, in Verbindung mit USV 9PX11000 Kennlinie D, 50 A, in Verbindung mit USV 9PX8000...
- Page 65 4. Anschluss der Stromkabel Diese Anschlussarbeiten dürfen nur von einem qualifizierten Elektriker durchgeführt werden. Vor jeglichen Anschlussarbeiten muss sichergestellt werden, dass die vorgelagerte Schutzvorrichtung (Normal AC Source) offen "O" ist (Aus). Vergewissern Sie sich, bevor Sie das ModularEasy an die USV anschließen, dass diese ordnungsgemäß abgeschaltet ist (siehe Benutzerhandbuch der USV).
- Page 66 4. Anschluss der Stromkabel 10. Schließen Sie den Stecker des I/O-Kabels am ModularEasy an und sichern Sie es mit den beiden Fixierschrauben. 11. Verbinden Sie die beiden USV mit dem parallelen 9PX-Kabel und sichern Sie es. Für die Erstinbetriebnahme und eine optimale Funktion ist die Verwendung des speziellen parallelen Kabels zwingend erforderlich.
- Page 67 4. Anschluss der Stromkabel 4.2 9PXMEZ11Ki - mit gemeinsamer Normal und Bypass AC Source 1. Schließen Sie die 4 integrierten Stromkabel an den I/O-Klemmleisten von USV1 und USV2 an. Beachten Sie die Farbcodierung an den Kabeln und der I/O-Abdeckung der USV (blau für UPS Input / rot UPS Output) –...
- Page 68 4. Anschluss der Stromkabel 4. Führen Sie das Kabel der Normal AC Source durch die Kabelverschraubung ein. 5. Schließen Sie die Drähte an den Klemmen für die Normal AC Source (Input) an (entfernen Sie nicht den Input Bypass AC Jumper und den USV Input Bypass Jumper auf der Innenseite der I/O Abdeckung der USV, siehe das Benutzerhandbuch der USV).
- Page 69 4. Anschluss der Stromkabel 4.3 9PXMEZ11Ki - mit getrennter Normal und Bypass AC Source 1. Entfernen Sie die Schraube an der Bypass-Input Abdeckung des ModularEasy und ziehen Sie sie ab. 2. Stanzen Sie die zwei Bypass Input-Ausbruchstellen an der Bypass-Abdeckung des ModularEasy aus und setzen Sie die zwei mitgelieferten kleinen Kabelverschraubungen ein.
- Page 70 4. Anschluss der Stromkabel 10. Entfernen Sie den Input Bypass AC Jumper 11. Stanzen Sie die Bypass AC Source-Ausbruchstelle der I/O-Abdeckung des ModularEasy heraus und setzen Sie die mitgelieferte Kabelverschraubung ein. 12. Führen Sie das Kabel der Normal AC Source durch die Kabelverschraubung ein. 13.
- Page 71 Menü Identifikation USV/NMC Firmware. Wenn direkt neben der USV-Firmwarenummer nicht "// Ready" angezeigt wird, müssen Sie sich an Ihren EATON-Händler wenden, um die aktuelle Firmwareversion herunterzuladen. 8. Wählen Sie den Modus "Nur Redundanz" oder "Parallel Betrieb" im Menü Einstellungen Regelung Eing./Ausg Redundanz modus.
- Page 72 USV/NMC Firmware. Wenn direkt neben der USV-Firmwarenummer nicht "// Ready" angezeigt wird, müssen Sie sich an Ihren EATON-Händler wenden, um die aktuelle Firmwareversion herunterzuladen. 5. Prüfen Sie, ob die grüne Leuchte "USV-Modus" am ModularEasy leuchtet und damit anzeigt, dass die USV-Stromversorgung am ModularEasy-Output verfügbar ist.
- Page 73 5. Betrieb 5.3 Austausch einer USV mit ModularEasy 5.3.1 Entfernen eine defekten USV: 1. Versetzen Sie die USV in den "internen Bypass-Modus" (siehe das Benutzerhandbuch der USV) 2. P rüfen Sie am USV-Display, ob sich die USV im Bypass-Modus befindet (siehe das Benutzerhandbuch der USV). 3. Setzen Sie den manuellen Bypass-Schalter am ModularEasy auf die Stellung "Bypass": Die rote Leuchte "Bypass-Modus"...
- Page 74 USV/NMC Firmware. Wenn direkt neben der USV-Firmwarenummer nicht "// Ready" angezeigt wird, müssen Sie sich an Ihren EATON-Händler wenden, um die aktuelle Firmwareversion herunterzuladen. 7. Drücken Sie die Taste "ON" einer der beiden USV, um das Parallel-System zu starten. 8. Versetzen Sie die USV in den "internen Bypass-Modus" (siehe das Benutzerhandbuch der USV) 9.
- Page 75 6. Troubleshooting Problem Mögliche Ursache Maßnahme An einer USV wird angezeigt: Load Einer der "USV Output"- Schalten Sie den "USV unbalance (Lastungleichgewicht) Schalter auf der Rückseite des Output"-Schalter am ModularEasy steht auf AUS. ModularEasy ein. Die Firmware kann nicht Eine der beiden USV ist Online Wählen Sie den Standby- oder heruntergeladen werden.
- Page 76 ModularEasy 9PXMEZ6Ki 9PXMEZ11Ki Manual de instalación y del usuario Copyright © 2014 EATON Todos los derechos reservados. Servicio y asistencia: Llame a su representante de servicio local 614-09354-01_ES...
- Page 77 INSTRUCCIONES SOBRE SEGURIDAD GUARDE ESTAS INSTRUCCIONES. Este manual contiene instrucciones importantes que son necesarias para la instalación y el mantenimiento del ModularEasy y el SAI. Los modelos ModularEasy descritos en este manual se deben instalar en un entorno entre 0 y 40 °C sin contaminantes conductivos. Estos límites se han previsto para ofrecer una protección razonable contra interferencias cuando el equipo se utiliza en entornos comerciales.
- Page 78 • El intervalo admisible de temperatura de almacenamiento está entre -15 °C y +60 °C. Precauciones especiales • El ModularEasy está diseñado para trabajar con un SAI homologado por EATON (póngase en contacto con su distribuidor de Eaton si necesita más información) • SOLO EL PERSONAL DE SERVICIO AUTORIZADO puede realizar reparaciones y mantenimiento.
- Page 79 Contenido 1. Introducción ..................5 1.1 Protección ambiental ......................5 2. Presentación ..................6 2.1 Instalación estándar ......................6 2.2 Descripción/paneles ......................7 2.3 Actualización del firmware ....................8 2.4 Pantalla de SAI en paralelo ....................8 2.5 Configuración en paralelo ....................8 3. Instalación ..................9 3.1 Inspección del equipo ......................9 3.2 Desembalaje del ModularEasy ..................9 3.3 Comprobación del kit de accesorios ..................9...
- Page 80 Siga la normativa local para el desecho de los materiales del embalaje. Final de la vida útil EATON procesará los productos una vez finalizada su vida útil de acuerdo con la normativa local. EATON colabora con empresas que se ocupan de la recogida y eliminación de nuestros productos al final de su periodo de uso.
- Page 81 2. Presentación El ModularEasy de Eaton® es una parte fundamental de su sistema paralelo, ya que permite la conexión de dos SAI juntos. Además, se puede realizar el mantenimiento del SAI, o incluso sustituirlo, sin que las cargas conectadas se vean afectadas.
- Page 82 2. Presentación 2.2 Descripción/paneles El ModularEasy dispone de un interruptor giratorio de Bypass manual con tres posiciones: UPS (SAI): La carga recibe alimentación del SAI. Test (Prueba): La carga recibe alimentación directamente de la fuente de alimentación de CA, los dos SAI siguen recibiendo alimentación, pero sus salidas se desconectan de la carga.
- Page 83 Compruebe que la versión de firmware del SAI sea compatible con el sistema en paralelo: Menú Identificación SAI/NMC firmware. Si no aparece "// Ready" justo al lado del número de firmware del SAI, significa que el SAI no se puede conectar en paralelo. Póngase en contacto con su distribuidor de Eaton para descargar el firmware más reciente. 2.4 Pantalla de SAI en paralelo Pulse el botón de cualquiera de los dos SAI para iniciar el sistema en paralelo.
- Page 84 3. Instalación 3.1 Inspección del equipo Si un equipo ha recibido daños durante el transporte, guarde los cartones y materiales del embalaje del transportista o del lugar de compra, y presente una reclamación por daños de transporte. Si descubre los daños después de la aceptación, presente una reclamación por daños ocultos. Para presentar una reclamación por daños de transporte o por daños ocultos: 1.
- Page 85 3. Instalación 3.4 Instalación de torre 3.5 Posición de rack con kit de raíl opcional no incluido: 9RK Página 10 614-09354-01_ES...
- Page 86 3. Instalación 3.6 Ejemplo de configuración de 19" de rack con EBM 9PX EBM 240 V opcional 9PXMEZ11Ki 9PXMEZ6Ki 3.7 Ejemplo de sistema de integración de batería con Trollet Frame opcional no incluido: BINTSYS Página 11 614-09354-01_ES...
- Page 87 3. Instalación 3.8 Requisitos de instalación Secciones de cables y dispositivos de protección recomendados 3.8.1 9PXMEZ6Ki, de uso con el SAI 9PX6000 o 9PX5000 • Dispositivos de protección recomendados Curva D, 63 A para Operación Paralelo Curva D, 32 A para Sólo redundancia Disyuntor de dos polos • Secciones de cable recomendadas Posición del...
- Page 88 3. Instalación 3.8 Requisitos de instalación Dispositivos de protección y secciones de cable recomendados 3.8.3 9PXMEZ11Ki, de uso con SAI 9PX8000 o 9PX11000 • Dispositivos de protección recomendados de fuente de input separada Para Operación Paralelo Curva D, 125 A si se usa con SAI 9PX11000 Curva D, 100 A si se usa con SAI 9PX8000 Para Sólo redundancia Curva D, 63 A si se usa con SAI 9PX11000...
- Page 89 4. Conexión de los cables de alimentación Este tipo de conexiones debe ser realizado por electricistas cualificados. Antes de realizar cualquier conexión, compruebe que el dispositivo de protección de entrada de Normal AC source esté abierto ("O", Off). Antes de proceder a conectar el ModularEasy al SAI, asegúrese de que el SAI esté correctamente apagado (consulte el manual del usuario del SAI).
- Page 90 4. Conexión de los cables de alimentación 10. Inserte el conector del conjunto de cables de E/S en el ModularEasy y fíjelo con los dos tornillos de bloqueo 11. Conecte los dos SAI juntos con el cable paralelo 9PX y fíjelo. La utilización de este cable paralelo específico es obligatoria para la primera puesta en marcha y para un uso óptimo.
- Page 91 4. Conexión de los cables de alimentación 4.2 9PXMEZ11Ki - con Normal AC source y Bypass AC source comunes 1. Conecte los cuatro cables de alimentación integrados a los bloques de terminales de E/S del SAI1 y el SAI2 siguiendo el código de colores de los cables y de la tapa de E/S del SAI (azul para input del SAI/rojo para output del SAI).
- Page 92 4. Conexión de los cables de alimentación 4. Inserte el cable de Normal AC source a través del pasacables. 5. Conecte los cables a los bloques de terminales (Input) de Normal AC source (no quite el puente de Input Bypass AC ni el puente de input Bypass de SAI que está...
- Page 93 4. Conexión de los cables de alimentación 4.3 9PXMEZ11Ki - con Normal AC source y Bypass AC source separadas 1. Deslice la tapa de input de Bypass del ModularEasy después de quitar el tornillo. 2. Perfore las dos piezas preparadas para ello de Bypass Input de la tapa de input de Bypass del ModularEasy e introduzca los dos pequeños racores para cables suministrados.
- Page 94 4. Conexión de los cables de alimentación 10. Retire el puente de Input Bypass AC 11. Perfore la pieza preparada para ello de Bypass AC source de la tapa de E/S del ModularEasy introduzca el racor para cables grande suministrado. 12.
- Page 95 La versión de firmware del SAI es compatible con el sistema en paralelo: Menú Identificación SAI/NMC firmware. Si la palabra "// Ready" no aparece justo al lado del número de firmware del SAI, póngase en contacto con su distribuidor de Eaton para descargar el firmware más reciente. 8. Seleccione el modo "Sólo Redundancia" o "Operación Paralelo" mediante el Menú Ajustes Ajustes Entr./Sal. Modo redundancia.
- Page 96 Identificación SAI/NMC firmware. Si la palabra "// Ready" no aparece justo al lado del número de firmware del SAI, póngase en contacto con su distribuidor de Eaton para descargar el firmware más reciente. 5. Compruebe que la luz verde del "modo SAI" del ModularEasy esté iluminada, indicando que la alimentación de output del SAI está disponible en el ModularEasy Importante: No continúe con el paso siguiente si la luz verde del "modo SAI" del ModularEasy está...
- Page 97 5. Funcionamiento 5.3 Sustitución del SAI con el ModularEasy 5.3.1 Retirada de un SAI defectuoso: 1. Coloque el SAI en “modo Bypass interno”; consulte el manual del usuario del SAI. 2. Compruebe que el SAI esté en modo Bypass consultando el panel de visualización del SAI (consulte el manual del usuario del SAI) 3.
- Page 98 SAI/NMC firmware. Si la palabra "// Ready" no aparece justo al lado del número de firmware del SAI, póngase en contacto con su distribuidor de Eaton para descargar el firmware más reciente. 7. Pulse el botón "ON" de cualquiera de los dos SAI para iniciar el sistema en paralelo. 8. Coloque el SAI en "modo Bypass interno"; consulte el manual del usuario del SAI.
- Page 99 6. Resolución de problemas Problema Posible causa Acción En un SAI aparece: Uno de los interruptores "output del Encienda el interruptor "output del SAI" "Load unbalance" SAI" está apagado en la parte trasera del ModularEasy del ModularEasy No se puede Uno de los dos SAI está...
- Page 100 ModularEasy 9PXMEZ6Ki 9PXMEZ11Ki Инструкции по установке и руководство пользователя Copyright © 2014 EATON Все права защищены. Обслуживание и поддержка: Обращайтесь к своему местному представителю по обслуживанию 614-09354-01_RU...
- Page 101 ПРАВИЛА ТЕХНИКИ БЕЗОПАСНОСТИ СОХРАНИТЕ ЭТИ ИНСТРУКЦИИ. Это руководство содержит важные инструкции, которые должны соблюдаться при установке и техническом обслуживании ModularEasy и ИБП. Рассмотренные в этом руководстве модели ModularEasy предназначены для установки в свободной от электропроводных загрязнителей среде с температурой от 0 до 40 °C. Эти...
- Page 102 Допустимый диапазон температуры хранения: от −15 ºC до +60 ºC. Особые меры предосторожности • Модули ModularEasy предназначены для работы с ИБП, аттестованными компанией EATON (обратитесь к своему реселлеру Eaton для получения дополнительной информации). • ТОЛЬКО КВАЛИФИЦИРОВАННЫЙ ПЕРСОНАЛ СЕРВИСНОЙ СЛУЖБЫ может производить все...
- Page 103 Содержание 1. Введение ..................5 1.1 Охрана окружающей среды ..........................5 2. Презентация..................6 2.1 Стандартное исполнение ..........................6 2.2 Описание / Панели ............................7 2.3 Обновление программно-аппаратного обеспечения ..................8 2.4 Экран параллельных ИБП ..........................8 2.5 Параллельная настройка ..........................8 3.
- Page 104 Соблюдайте все местные нормы и правила утилизации упаковочных материалов. По окончанию срока службы EATON переработает продукт в конце его срока службы в соответствии с местными правилами. EATON сотрудничает с компаниями, отвечающими за сбор и утилизацию наших продуктов по окончанию их...
- Page 105 2. Презентация ModularEasy компании Eaton® – неотъемлемая часть системы Parallel. Он допускает общее подключение 2 ИБП. Кроме того, он позволяет обслуживать и даже заменять ИБП без воздействия на подключенные нагрузки. Можно безопасно устранить последствия технического обслуживания ИБП и не прерывать работу...
- Page 106 2. Презентация 2.2 Описание / Панели ModularEasy имеет ручной поворотный переключатель Байпас (Bypass) с двумя положениями: UPS (ИБП): нагрузка предоставляется ИБП. Test (Тест): нагрузка предоставляется напрямую источником переменного тока, два ИБП остаются в наборе, но их выходы отключены от нагрузки. Bypass (Байпас): нагрузка...
- Page 107 Версия ПО UPS/NMC. Если рядом с номером программно-аппаратного обеспечения ИБП нет надписи "// Ready", ИБП нельзя подключить в режиме параллельной работы. Свяжитесь со своим реселлером Eaton для загрузки последней версии программно-аппаратного обеспечения. 2.4 Экран параллельных ИБП Для запуска параллельной системы...
- Page 108 3. Установка 3.1 Осмотр оборудования Если какое-либо оборудование было повреждено при транспортировке, то сохраните транспортную тару и упаковочные материалы для перевозчика или продавца и предъявите претензию о повреждении при транспортировке. Если вы обнаружите повреждение после приемки, то подайте иск о скрытом повреждении. Чтобы...
- Page 109 3. Установка 3.4 Вертикальное исполнение 3.5 Исполнение для установки в стойку без дополнительного комплекта направляющих: 9RK Страница 10 614-09354-01_RU...
- Page 110 3. Установка 3.6 Пример настройки 19-дюймовой стойки с дополнительным EBM 9PX EBM 240V 9PXMEZ11Ki 9PXMEZ6Ki 3.7 Пример комплексной батарейной системы без дополнительного Trollet Frame: BINTSYS Страница 11 614-09354-01_RU...
- Page 111 3. Установка 3.8 Требования к установке Рекомендуемые защитные устройства и сечения кабелей 3.8.1 Использование 9PXMEZ6Ki с ИБП 9PX6000 или 9PX5000 • Рекомендуемые защитные устройства Кривая D, 63 A для Парал работа Кривая D, 32 A для Только резервир 2-полюсный выключатель •...
- Page 112 3. Установка 3.8 Требования к установке Рекомендуемые защитные устройства и сечения кабелей 3.8.3 Использование 9PXMEZ11Ki с ИБП 9PX8000 или 9PX11000 • Рекомендуемые защитные устройства раздельного входящего источника Для Парал работа Кривая D, 125 A при использовании с ИБП 9PX11000 Кривая D, 100 A при использовании с ИБП 9PX8000 Для...
- Page 113 4. Подключение силовых кабелей Этот тип соединения должен выполняться квалифицированным электротехническим персоналом. Перед подключением удостоверьтесь, что вышестоящее защитное устройство (Normal AC source) открыто (положение "O" – Off). Перед тем, как продолжить подключение ModularEasy к ИБП, убедитесь, что ИБП был правильно выключен...
- Page 114 4. Подключение силовых кабелей 10. Подключите разъем набора кабеля входа-выхода к ModularEasy и закрепите его двумя крепежными винтами 11. Соедините два ИБП с помощью кабеля параллельной работы 9PX и зафиксируйте кабель. При первом запуске и для оптимального использования необходимо применить определенный кабель параллельной работы. Страница...
- Page 115 4. Подключение силовых кабелей 4.2 9PXMEZ11Ki – с общим Normal AC source и Bypass AC source 1. Подключите 4 соединенных силовых кабеля к клеммным колодкам входа-выхода ИБП1 и ИБП2 согласно цветовой кодировке кабелей и крышки блока входа-выхода ИБП (синий цвет для входа ИБП, красный...
- Page 116 4. Подключение силовых кабелей 4. Пропустите кабель Normal AC source через кабельный ввод. 5. Подключите провода к входным (Input) клеммным колодкам Normal AC source. Не удаляйте перемычку переменного тока на байпасном входе ИБП и перемычку на байпасном входе ИБП, расположенную под крышкой...
- Page 117 4. Подключение силовых кабелей 4.3 9PXMEZ11Ki – с раздельным Normal AC source и Bypass AC source 1. Удалите винт и сдвиньте крышку блока байпасного входа ModularEasy. 2. Удалите две заглушки выбивных отверстий на крышке блока байпасного входа ModularEasy и вставьте в...
- Page 118 4. Подключение силовых кабелей 10. Удалите перемычку переменного тока байпасного входа 11. Удалите заглушку отверстия Bypass AC source на крышке блока входа-выхода ModularEasy и вставьте в него более крупный предоставленный кабельный ввод. 12. Пропустите кабель Normal AC source через кабельный ввод. 13.
- Page 119 Меню Идентификация Версия ПО UPS/NMC. Если рядом с номером программно-аппаратного обеспечения ИБП нет надписи "// Ready", свяжитесь со своим реселлером Eaton для загрузки последней версии прошивки. 8. Выберите режим "Только резервир" или "Парал работа" в пункте Меню Настройки Настр вход/выход...
- Page 120 Версия ПО UPS/NMC. Если рядом с номером программно-аппаратного обеспечения ИБП нет надписи "// Ready", свяжитесь со своим реселлером Eaton для загрузки последней версии прошивки. 5. Убедитесь, что на ModularEasy загорелся зеленый индикатор "UPS mode" (Режим ИБП). Это значит, что для ModularEasy поступает питание с выхода ИБП.
- Page 121 5. Эксплуатация 5.3 Замена ИБП с применением ModularEasy 5.3.1 Изъятие отказавшего ИБП: 1. Переключите ИБП в "Internal Bypass mode" (режим внутреннего байпаса см. Руководство пользователя ИБП). 2. Убедитесь, что ИБП находится в режиме "Bypass" (Байпас). Для этого проверьте дисплей ИБП (см. руководство...
- Page 122 Версия ПО UPS/NMC. Если рядом с номером программно-аппаратного обеспечения ИБП нет надписи "// Ready", свяжитесь со своим реселлером Eaton для загрузки последней версии прошивки. 7. Для запуска параллельной системы нажмите кнопку "ON" (Вкл.) на любом из 2 ИБП. 8. Переключите ИБП в "режим внутреннего байпаса" (см. Руководство пользователя ИБП) 9.
- Page 123 6. Устранение неисправностей Состояние Возможная причина Действие На дисплее одного Один из переключателей "UPS output Переведите переключатель "UPS output" ИБП: Load unbalance (Выход ИБП) на задней стенке ModularEasy в положение "Вкл." (Несимметрия нагрузки) ModularEasy находится в выключенном положении Firmware download Один...
- Page 125 EATON 9PX_ModularEasy 614-09354-01...