Télécharger Imprimer la page
Velleman DVM1100 Notice D'emploi

Velleman DVM1100 Notice D'emploi

Multimètre à instauration de gamme automatique

Publicité

Les langues disponibles
  • FR

Les langues disponibles

  • FRANÇAIS, page 22

Liens rapides

DVM1100
AUTORANGING MULTIMETER
MULTIMETER MET AUTOMATISCHE BEREIKINSTELLING
MULTIMÈTRE À INSTAURATION DE GAMME AUTOMATIQUE
MULTÍMETRO CON AJUSTE AUTOMÁTICO DEL RANGO
MULTIMETER MIT AUTOMATISCHER BEREICHSEINSTELLUNG
MIERNIK Z AYTOMATYCZNYM WYBOREM ZAKRESÓW
USER MANUAL
GEBRUIKERSHANDLEIDING
NOTICE D'EMPLOI
MANUAL DEL USUARIO
BEDIENUNGSANLEITUNG
INSTRUKCJA OBSŁUGI

Publicité

loading

Sommaire des Matières pour Velleman DVM1100

  • Page 1 DVM1100 AUTORANGING MULTIMETER MULTIMETER MET AUTOMATISCHE BEREIKINSTELLING MULTIMÈTRE À INSTAURATION DE GAMME AUTOMATIQUE MULTÍMETRO CON AJUSTE AUTOMÁTICO DEL RANGO MULTIMETER MIT AUTOMATISCHER BEREICHSEINSTELLUNG MIERNIK Z AYTOMATYCZNYM WYBOREM ZAKRESÓW USER MANUAL GEBRUIKERSHANDLEIDING NOTICE D’EMPLOI MANUAL DEL USUARIO BEDIENUNGSANLEITUNG INSTRUKCJA OBSŁUGI...
  • Page 3 If in doubt, contact your local waste disposal authorities. Thank you for choosing Velleman! Your DVM1100 should include: 1 x multimeter, 1 x K-type thermocouple, 2 x test leads, 2 x capacitor test leads and this manual. Please read the manual thoroughly before bringing this device into service.
  • Page 4 The meter is in continuity check mode. The meter is in data hold mode. The meter is in relative measurement mode. % °C °F kM Hz Measurement units. num FAV Overrange. 0L 0L 0L 0L DVM1100 - 4 - VELLEMAN...
  • Page 5 Hold SELECT pressed to disable the battery saver function. • Relative Measurement Mode The meter will display the relative measurement in all functions except for the frequency measurement. 1. Select a function and touch the test leads to the circuit to be measured. DVM1100 - 5 - VELLEMAN...
  • Page 6 On the 40M range, the meter may need a few seconds to stabilize the reading. This is normal for high resistance measuring. When the input is not connected, i.e. at open circuit, OL will be displayed for the overrange condition. DVM1100 - 6 - VELLEMAN...
  • Page 7 • The meter may take a few seconds to stabilize the reading. This is normal for high-capacitance measuring. • To improve the accuracy of measurements less than 50nF, subtract the residual capacitance of the meter and leads. • Below 500pF, the accuracy of measurements is unspecified. DVM1100 - 7 - VELLEMAN...
  • Page 8 6. Turn on the power of the measured circuit and read the display. Be sure to note the measurement units at the right side of the display (µA, mA or A). When only the figure “OL” is displayed, it indicates over range situation and a higher range has to be selected. DVM1100 - 8 - VELLEMAN...
  • Page 9 0°C~40°C or 32°F~122°F (< 80% RH, < 10°C) Storage Temperature -10°C~60°C or 14°F~140°F (< 70% RH, battery removed) Temperature Coefficient 0.1x / C° (< 18°C or > 28°C) Max. Voltage between Terminals and Earth 1000VAC RMS or 1000VDC DVM1100 - 9 - VELLEMAN...
  • Page 10 Normal mode rejection ratio: DC voltage: > 45dB @ 50 or 60Hz Frequency Function Range Resolution Accuracy 50.00Hz 0.01Hz 500.0Hz 0.1Hz Frequency Hz ± 0.1% + 3 digits 5.000Hz 0.001kHz (10Hz~100kHz) 50kHz 0.01kHz 100kHz 0.1kHz Overload Protection: 1,000VDC or 1,000VAC RMS DVM1100 - 10 - VELLEMAN...
  • Page 11 Range Resolution Accuracy < 10nF: ± 5.0% - 50 digits 50nF 10pF ± 3.0% + 10 digits 500nF 100pF Capacitance 5µF ± 3.0% + 5 digits 50µF 10nF 100µF 100nF Overload Protection: 1,000VDC or 1,000VDC DVM1100 - 11 - VELLEMAN...
  • Page 12 Hebt u vragen, contacteer dan de plaatselijke autoriteiten inzake verwijdering. Dank u voor uw aankoop! Uw DVM1100 wordt geleverd met: 1 x multimeter, 1 x thermokoppel type K, 2 x meetsnoeren, 2 x meetsnoeren voor capaciteitsmetingen en deze handleiding. Lees deze handleiding grondig voor u het toestel in gebruik neemt.
  • Page 13 • Het REL-symbool wordt weergegeven in de REL-modus. Ga voorzichtig te werk vanwege de gevaarlijke spanning. • Gebruik de meter niet wanneer de behuizing volledig (of gedeeltelijk) is verwijderd. 3. Omschrijving a. Multimeter 1. lcd-scherm 2. toetsenpaneel 3. draaischakelaar 4. bussen 5. batterijvak DVM1100 - 13 - VELLEMAN...
  • Page 14 Druk om de relatieve meetmodus binnen te treden of te verlaten. Druk om de frequentie te meten. Druk opnieuw om de cyclische verhouding te Hz/DUTY V~, A, mA, µA meten. Druk opnieuw om te verlaten. DVM1100 - 14 - VELLEMAN...
  • Page 15 Om elektroshocks en/of beschadiging te vermijden, breng nooit meer dan 1000VDC of 1000VAC rms aan tussen de COM-bus en de aarding. Het bereik van de DC-spanning bedraagt 400.0mV, 4.000V, 40.00V, 400.0V and 1000V; het AC 400.0mV-bereik bestaat enkel in de automatische bereikinstelling. DVM1100 - 15 - VELLEMAN...
  • Page 16 5. De meter geeft de benaderende doorlaatstroom van de diode weer. Keert u de aansluiting om, dan verschijnt enkel “1”. In een circuit zou een goede diode een doorlaatvoorspanning moeten produceren van 0.5V tot 0.8V. Een tegenvoorspanning kan variëren naargelang de weerstand tussen de meetsondes. DVM1100 - 16 - VELLEMAN...
  • Page 17 7. Verbind de meetsnoeren in parallel met het circuit. Raak de geleiders niet aan. 8. Druk opnieuw op Hz/DUTY om naar de normale modus terug te keren. 9. Lees de weergegeven waarde. OPMERKING: Gebruik een afgeschermde kabel voor het meten van kleine signalen in een luidruchtige omgeving. DVM1100 - 17 - VELLEMAN...
  • Page 18 Maak het toestel geregeld schoon met een vochtige, niet pluizende doek. Gebruik geen alcohol of solvent. Maak de bussen schoon: • Schakel de meter uit en ontkoppel de meetsnoeren. • Verwijder het vuil in de bussen. • Dompel een wattenstaafje in een glijmiddel en maak de bussen schoon. DVM1100 - 18 - VELLEMAN...
  • Page 19 (“OL”) Aanduiding zwakke batterij ja ( ) Polariteitsinstelling “-“automatische aanduiding Data Hold Achtergrondverlichting witte leds Automatische uitschakeling Voeding 9V-batterij Afmetingen 180 x 85 x 45mm Gewicht ± 360g (met batterij) Accessoires handleiding, meetsnoeren, temperatuursonde, 9V-batterij DVM1100 - 19 - VELLEMAN...
  • Page 20 ± 1.5% + 3 digits Bescherming tegen overbelasting: 1000VDC of 1000VAC rms Diode Functie Bereik Resolutie Nauwkeurigheid Diodetest 0.001V 1.0% uncertainty DC doorlaatstroom: ± 1mA DC sperspanning: ± 1.5V Bescherming tegen overbelasting: 1000VDC of 1000VAC rms DVM1100 - 20 - VELLEMAN...
  • Page 21 Max. ingangsstroom: 400mA DC of 400mA AC rms voor µA- en mA-bereiken; 10A DC of 10A AC rms voor A-bereik Voor metingen > 5A, max. 4 minuten ON, 10 minuten OFF; boven 10A niet gespecificeerd Gebruik dit toestel enkel met originele accessoires. Velleman nv is niet aansprakelijk voor schade of kwetsuren bij (verkeerd) gebruik van dit toestel.
  • Page 22 
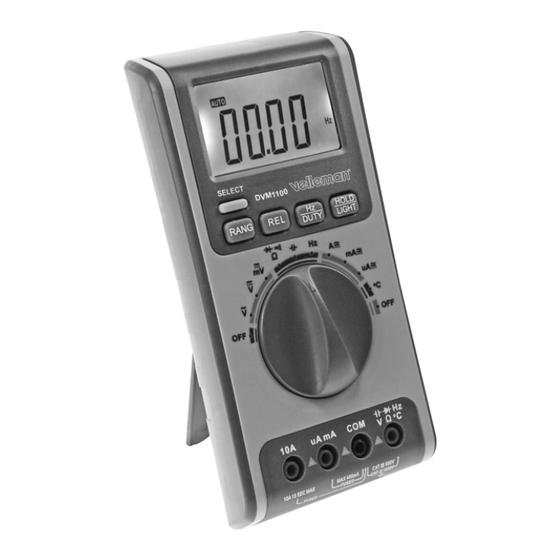
En cas de questions, contacter les autorités locales pour élimination. Nous vous remercions de votre achat ! Votre DVM1100 est livré avec : 1 x multimètre, 1 x thermocouple type K, 2 x cordon de mesure, 2 x cordon de mesure pour mesurage de capacité et cette notice. Lire la présente notice attentivement avant la mise en service de l’appareil.
  • Page 23 Indication de résultat de mesurage négatif Indication de tension ou courant CA. Indication de tension ou de courant CC. Mode d’instauration de gamme automatique. Mode de test de diode. Mode de test de continuité. Mode fonction « data-hold ». DVM1100 - 23 - VELLEMAN...
  • Page 24 REMARQUE : Le multimètre quitte le mode lors d’une sélection manuelle de gamme en mode « data hold ». 2. Maintenir enfoncé la touche RANG pour quitter le mode d’instauration de gamme manuelle et pour accéder au mode d’instauration de gamme automatique. DVM1100 - 24 - VELLEMAN...
  • Page 25 Afin d’obtenir plus de précision lors d’un mesurage d’une petite résistance, court-circuiter les fils de mesure avant et noter la valeur des sondes. Déduire cette valeur de la résistance des fils de mesure. DVM1100 - 25 - VELLEMAN...
  • Page 26 3. Brancher les fils de mesure au condensateur à mesurer et lire la valeur indiquée sur l’écran LCD. Quelques tuyaux pour mesurer la capacité : • Le multimètre stabilise les données affichées qu’après quelques secondes, ce qui est normal pour des mesurages de fortes capacités. DVM1100 - 26 - VELLEMAN...
  • Page 27 5. Interrompre la voie du circuit à mesurer. Raccorder le fil de mesure noir à la partie négative du circuit interrompu ; raccorder le fil de mesure rouge à la partie positive du circuit interrompu (un raccordement inversé résultera en un affichage négatif sans pour autant endommager le multimètre). DVM1100 - 27 - VELLEMAN...
  • Page 28 Précision spécifiée un an après calibrage à une température de service entre 18°C ~ 28°C avec un taux d’humidité relative de 0% ~ 75%. Précision notée comme ± (% de l’affichage + nombre de digits secondaires). DVM1100 - 28 -...
  • Page 29 NMRR : tension CC : > 45dB @ 50 ou 60Hz Fréquence Fonction Gamme Résolution Précision 50.00Hz 0.01Hz 500.0Hz 0.1Hz Fréquence Hz ± 0.1% + 3 digits 5.000Hz 0.001kHz (10Hz~100kHz) 50kHz 0.01kHz 100kHz 0.1kHz Protection surcharge : 1000VCC ou 1000VCA RMS DVM1100 - 29 - VELLEMAN...
  • Page 30 < 10nF : ± 5.0% - 50 digits 50nF 10pF ± 3.0% + 10 digits 500nF 100pF Capacité 5µF ± 3.0% + 5 digits 50µF 10nF 100µF 100nF Protection surcharge : 1000VCC ou 1000VCA RMS DVM1100 - 30 - VELLEMAN...
  • Page 31 Si tiene dudas, contacte con las autoridades locales para residuos. ¡Gracias por haber comprado el DVM1100! Incluye: 1 x multímetro, 1 x sonda tipo « K », 2 x puntas de prueba, 2 x puntas de prueba para medir la capacidad y este manual del usuario. Lea atentamente las instrucciones del manual antes de usar el aparato.
  • Page 32 • El icono REL se visualiza en el modo REL. Sea cuidadoso a causa de la presencia de tensión peligrosa. • No utilice el multímetro sin la caja. 3. Descripción a. Multímetro 1. pantalla LCD 2. teclas 3. selector giratorio 4. bornes 5. compartimento de pilas DVM1100 - 32 - VELLEMAN...
  • Page 33 Pulse para entrar en o salirse del modo de medición relativa. Pulse para medir la frecuencia. Vuelva a pulsar para entrar en el modo del ciclo Hz/DUTY V~, A, mA, µA de trabajo. Vuelva a pulsar para salirse. DVM1100 - 33 - VELLEMAN...
  • Page 34 1000VCA RMS entre el borne « COM » y la masa. Los rangos de la tensión DC incluyen 400.0mV, 4.000V, 40.00V, 400.0V y 1000V; el rango CA 400.0mV sólo está disponible en el modo de ajuste del rango manual. DVM1100 - 34 - VELLEMAN...
  • Page 35 5. El multímetro visualiza la tensión directa aproximativa del diodo. Un diodo en buen estado produce una tensión directa de 0.5V a 0.8V. No obstante, la lectura de la polarización inversa varía según la resistencia de las otras vías entre las puntas de prueba. DVM1100 - 35 - VELLEMAN...
  • Page 36 7. Conecte las puntas de prueba en paralelo al circuito. No toque los conductores eléctricos. 8. Pulse Hz/DUTY para entrar en el modo de medición del ciclo de trabajo. Vuelva a pulsar para volver al modo de medición de frecuencia. 9. El valor medido aparece en la pantalla. DVM1100 - 36 - VELLEMAN...
  • Page 37 Limpie los bornes: • Desactive el multímetro y quite las puntas de prueba. • Saque la suciedad de los bornes. • Sumerja un bastoncillo de algodón en un producto para la limpieza y limpie los bornes. DVM1100 - 37 - VELLEMAN...
  • Page 38 LEDs blancos Autoapagado sí Alimentación pila de 9V Dimensiones 180 x 85 x 45mm Peso ± 360g (con pila) Accesorios este manual del usuario, puntas de prueba, sonda tipo « K », pila de 9V DVM1100 - 38 - VELLEMAN...
  • Page 39 ± 1.5% lectura + 3 dígitos Protección de sobrecarga: 1000VCC o 1000VCA RMS Diodos Función Rango Resolución Precisión Prueba de diodos 0.001V 1.0% Tensión CC directa: ± 1mA Tensión CC inversa: ± 1.5V Protección de sobrecarga: 1000VCC o 1000VCA RMS DVM1100 - 39 - VELLEMAN...
  • Page 40 Para mediciones > 5A, mediciones de máx. 4 minutos, 10 minutos OFF: Más de 10A no especificado Utilice este aparato sólo con los accesorios originales. Velleman SA no será responsable de daños ni lesiones causados por un uso (indebido) de este aparato.
  • Page 41 Falls Zweifel bestehen, wenden Sie sich für Entsorgungsrichtlinien an Ihre örtliche Behörde. Wir bedanken uns für den Kauf des DVM1100! Lieferumfang: 1 x Multimeter, 1 x K-Typ-Thermofühler, 2 x Messleitungen, 2 x Messleitungen für Kapazitätsmessungen und diese Bedienungsanleitung. Lesen Sie diese Bedienungsanleitung vor Inbetriebnahme sorgfältig durch.
  • Page 42 Das Multimeter befindet sich im Diodentest-Modus. Das Multimeter befindet sich im Durchgangsprüfungsmodus. Das Multimeter befindet sich im Data-Hold-Modus. Das Multimeter befindet sich im Relativwert-Messmodus. % °C °F kM Hz Messeinheiten. num FAV Bereichsüberschreitung. 0L 0L 0L 0L DVM1100 - 42 - VELLEMAN...
  • Page 43 Schalten Sie das Multimeter ein. Das Multimeter schaltet nach etwa 30 Minuten automatisch ab. Halten Sie HOLD/LIGHT gedrückt oder drehen Sie den Drehschalter, um das Multimeter einzuschalten. Halten Sie SELECT gedrückt, um diese Funktion zu deaktivieren. DVM1100 - 43 - VELLEMAN...
  • Page 44 Widerstand der Messspitzen und ziehen Sie diese vom Widerstand der Messleitungen ab. Die Funktion verursacht genügend Spannung zur Silikonendiode oder zu den Transistorverbindungen, die eine Leitfähigkeit verursacht. Um dies zu vermeiden, verwenden Sie am besten nicht den 40M -Bereich für schaltungsinterne Widerstandsmessungen. Im 40M - DVM1100 - 44 - VELLEMAN...
  • Page 45 2. Verbinden Sie die schwarze Messleitung mit der COM-Buchse und die rote Messleitung mit der -Buchse. Sie können die Kapazität mit dem speziellen Mehrzweckstecker messen. 3. Verbinden Sie die Messleitungen mit dem Kondensator, den Sie messen möchten, und lesen Sie den Messwert vom LCD-Display ab. DVM1100 - 45 - VELLEMAN...
  • Page 46 Verwenden Sie die geeigneten Buchsen, Funktion und Bereich für alle Messungen. Stellen Sie eine Messleitung nie parallel mit einem Stromkreis oder einer Komponente wenn die Messleitungen sich in der Buchsen befinden. Der DC-Bereich des Multimeters beträgt 400.0µA, 40.00µA, 400.0mA, 4.000A und 10.00A. DVM1100 - 46 - VELLEMAN...
  • Page 47 Display erscheint. Trennen Sie alle Messleitungen und/oder Anschlüsse vom Stromkreis. • Stellen Sie den Drehschalter auf OFF. • Trennen Sie alle Messleitungen und/oder Anschlüsse von den Buchsen. • Öffnen Sie das Batteriefach mit einem geeigneten Schraubendreher. DVM1100 - 47 - VELLEMAN...
  • Page 48 Eingangsimpedanz (nominal): > 10M < 100pF; AC-Spannung: > 5M < 100pF CMRR: DC-Spannung: > 100dB @ DC; 50 oder 60Hz; AC-Spannung: > 60dB @ DC, 50 oder 60Hz NMRR: DC-Spannung: > 45dB @ 50 oder 60Hz DVM1100 - 48 - VELLEMAN...
  • Page 49 Funktion Bereich Auflösung Genauigkeit < 10nF: ± 5.0% - 50 Digits 50nF 10pF ± 3.0% + 10 Digits 500nF 100pF Kapazität 5µF ± 3.0% + 5 Digits 50µF 10nF 100µF 100nF Überlastungsschutz: 1000VDC oder 1000VDC DVM1100 - 49 - VELLEMAN...
  • Page 50 Jeśli masz wątpliwości skontaktuj się z firmą zajmującą się utylizacją odpadów. Dziękujemy za wybór produktu firmy Velleman! Twój DVM1100 zawiera: 1 x miernik, 1 x sonda temperatury typu - K, 2 x przewody testowe, 2 x przewody testowe do pomiaru kondensatorów i instrukcję obsługi Prosimy o dokładne...
  • Page 51 • Symbol REL wyświetla się jeśli pracujesz w trybie REL. UwaŜaj na bardzo wysokie napięcie zagraŜające Ŝyciu. • Nie dokonuj pomiarów jeśli obudowa lub jej część jest otwarta. 3. Opis a. Miernik 1. wyświetlacz LCD 2. klawiatura 3. przełącznik obrotowy 4. złącza 5. bateria DVM1100 - 51 - VELLEMAN...
  • Page 52 Funkcja zapamiętywania danych zatrzymuje aktualny wynik pomiaru na wyświetlaczu. Miernik wchodzi w tryb zakresu manualnego kiedy włączasz tę funkcję. Ta funkcja moŜe być anulowana poprzez zmianę trybu pomiaru lub naciśnięcie przycisku RANG lub ponowne naciśnięcie przycisku HOLD/LIGHT . DVM1100 - 52 - VELLEMAN...
  • Page 53 3. Podłącz czarny I czerwony przewód testowy do złącza COM i V terminals respectively. 4. Podłącz przewody testowe do obwodu, który chcesz mierzyć. 5. Przeczytaj wartość na wyświetlaczu. Polaryzacja czerwonego przewodu testowego będzie wskazana podczas pomiaru DC. DVM1100 - 53 - VELLEMAN...
  • Page 54 0.5V do 0.8V. JednakŜe wartość polaryzacji odwrotnej moŜe zaleŜeć od rezystancji pomiędzy ścieŜkami , a punktem umieszczenia przewodów testowych. • Test ciągłości Aby uniknąć elektrowstrząsów i/lub odłącz zasilanie obwodu I rozładuj wysoko napięciowe kondensatory zanim dokonasz pomiaru testu ciągłości . DVM1100 - 54 - VELLEMAN...
  • Page 55 7. Jeśli pracujesz w stanie pomiaru częstotliwości , naciśnij przycisk Hz/DUTY aby wejść stan cyklu roboczego. Wciśnij ponownie aby powrócić do pomiaru częstotliwości. 8. Odczytaj wyświetloną wartość. Uwaga : W otoczeniu szumu korzystaj ze specjalnego przewodu ekranowanego do mierzenia małych sygnałów. DVM1100 - 55 - VELLEMAN...
  • Page 56 Nie dokonuj naprawy lub serwisu miernika jeśli nie jesteś specjalistą w tym zakresie I nie posiadasz specjalnego urządzenia do kalibracji , testowania i informacji serwisowej. a. Ogólna konserwacja Aby uniknąć elektrowstrząsów i/lub uszkodzenia urządzenia nigdy nie uŜywaj wody wewnątrz obudowy miernika. Wyjmij przewody testowe zanim otworzysz obudowę. DVM1100 - 56 - VELLEMAN...
  • Page 57 Wyśwetlacz cyfry, LCD z automatycznym wskaźnikiem funkcji i symboli ¾ Wskaźnik przekroczenia zakresu tak (“OL”) Wskaźnik rozładowania baterii tak ( ) Wskaźnik polaryzacji wyświetla się automatycznie “-“ Zapamiętywanie danych Podświetlenie biała dioda LED Automatyczne wyłączenie DVM1100 - 57 - VELLEMAN...
  • Page 58 Rezystancja, oporność Funkcja Zakres Rozdzielczość Dokładność 400.0 ± 0.5% + 3 cyfry 4.000k 40.00k Rezystancja ± 0.5% + 2 cyfry 400.0k 4.000k 40.00M ± 1.5% + 3 cyfry Zabezpieczenie przeciw przeciąŜeniowe: 1,000VDC lub 1,000VAC RMS DVM1100 - 58 - VELLEMAN...
  • Page 59 1µA 40mA 0.01mA Prąd AC mA~ ± 1.8% + 5 cyfry 1, 2 400mA 0.1mA AC A~ Prąd ± 3.0% + 8 cyfry 1, 2 10mA Zakres częstotliwości: 40Hz~200Hz Reakcja: średnia kalibracji RMS fali sinusoidalnej. DVM1100 - 59 - VELLEMAN...
  • Page 60 UŜywaj tylko oryginalnych akcesorii. Velleman nv nie ponosi odpowiedzialności za uszkodzenie urządzenia lub zranienie spowodowane złym korzystaniem z urządzenia. Jeśli chcesz uzyskać więcej informacji o tym produkcie wejdź na stronę : www.velleman.eu. Informacje zawarte w instrukcji obsługi mogą ulec zmianie bez wcześniejszego powiadomienia.