Table des Matières

Publicité

Les langues disponibles

Les langues disponibles

Liens rapides

User Instruction Manual
To avoid injury, read user manual prior to use.
Manuel de l'utilisateur
Afin d'éviter tout accident, veuillez lire
attentivement la notice avant utilisation.
Manual de Instrucciones
Para evitar posibles daños, lea
previamente el manual de usuario.
Benutzerhandbuch
Um Verletzungen zu vermeiden, lesen Sie bitte die
Gebrauchsanweisung vor der ersten Benutzung.
Hoyer
Advance
®
Hoyer
Advance
®
Hoyer
Advance
®
Hoyer
Advance
®

Publicité

Table des Matières
loading

Sommaire des Matières pour Joerns Hoyer Advance

  • Page 1 User Instruction Manual Hoyer Advance ® To avoid injury, read user manual prior to use. Manuel de l’utilisateur Hoyer Advance ® Afin d’éviter tout accident, veuillez lire attentivement la notice avant utilisation. Manual de Instrucciones Hoyer Advance ® Para evitar posibles daños, lea previamente el manual de usuario.
  • Page 2: Table Des Matières

    English Advance Contents 1. Hoyer Advance Patient Lift ..................... 3 2. Introduction: The Hoyer Advance Patient Lift ..............4 3. Assembly and Commissioning Instructions ..............5 4. Disassembly ........................7 5. Safety Precautions ......................10 6. Control Box & Handset ....................12 7.
  • Page 3: Hoyer Advance Patient Lift

    Hoyer ® English Advance 1. The Hoyer Advance Patient Lift Hoyer Advance lift (ready for use) Boom Leg Restraining Cord Battery/ Control Pack Push Handle Cradle/Spreader Bar Electric Actuator Spreader Bar Retaining Cradle Push Pad Mast Tightening Knob Base Casting...
  • Page 4: Introduction: The Hoyer Advance Patient Lift

    The Hoyer Advance patient lift incorporates a 6-point spreader bar and is designed to be used in conjunction with the Hoyer range of slings. The examples of slings suitable for use with this device are listed as follows: •...
  • Page 5: Assembly And Commissioning Instructions

    • BATTERY CHARGING LEAD (ELECTRIC ONLY) • HYDRAULIC UNIT (HYDRAULIC ONLY) SAFETY NOTE: The Hoyer Advance is heavy and will need to be lifted with care. You may need assistance to lift the Hoyer Advance from the carton. Assembly Instructions 1.
  • Page 6 Check the leg locking knob is fully engaged. If the leg locking knob will not fully engage and operating the foot pedal does not adjust the legs, DO NOT use the lift and contact your authorised Joerns Healthcare service provider for examination and repair.
  • Page 7: Disassembly

    Hoyer ® English Advance 6. Release the spreader bar from the retaining cradle. The lift is now ready for operation. 4. Disassembly 1. Lower the mast to the lowest possible position, then insert spreader bar into retaining cradle. 2. Release leg-locking device (pulling it away from the cast base), close legs tightly together.
  • Page 8 Hoyer ® English Advance 3. Loosen the mast locking device sufficiently to allow the mast to be lifted upwards. Lift the mast fully until the upper stop is reached. Carefully fold the mast towards the legs. Use the push handle to assist this action. CAUTION When commencing folding of the mast, if resistance is felt, DO NOT force the mast;...
  • Page 9 Hoyer ® English Advance 5. Pull the restraining strap sharply upwards and extend over the wheels. (This will keep the legs, mast and boom neatly together during transit and storage). NOTE: Care should be exercised when folding/unfolding an Advance as there is a possible danger of pinching the fingers etc.
  • Page 10: Safety Precautions

    Hoyer ® English Advance 5. Safety Precautions Please read and follow the safety precautions listed below. The operation and use of Hoyer patient lifts is simple and straightforward. Following these few basic safety precautions will make lifting operations easy and trouble free. READ AND UNDERSTAND THE USER INSTRUCTION MANUAL BEFORE USING YOUR “ADVANCE”...
  • Page 11 Hoyer ® English Advance • DO NOT charge an electric lift in a bathroom or shower room. • DO NOT lift a patient unless you are trained and competent to do so. • YOUR lift is for patient lifting. DO NOT use it, or allow it to be used, for any other purpose. •...
  • Page 12: Control Box & Handset

    Hoyer ® English Advance 6. Control Box & Handset Detachable Battery Pack Raise & Lower Emergency Stop Button Buttons Emergency Raise & Lower Redundant Controls Handset Actuator Handset Actuator Connection Information Connection Screen Socket Socket Handset Connection Plug...
  • Page 13: Operating Instructions

    7. Operating Instructions 1. Leg adjustment The legs on the Hoyer Advance are adjustable for width. The legs can be opened to enable access around armchairs or wheelchairs. For transferring and negotiating doorways and passages, the lift legs should be securely locked in the closed position.
  • Page 14 NOTE: For detailed fitting instructions, please refer to the user guide supplied with each sling. WARNING Joerns Healthcare recommends slings are checked regularly and before use for fraying or damage. DO NOT use slings that are worn or damaged. WARNING HOYER RECOMMENDS THE USE OF GENUINE HOYER PARTS.
  • Page 15: Charging Instructions

    Hoyer ® English Advance Charging Instructions The batteries are located in the power pack and are charged through a socket at the base of the control box. 1. Insert the power supply plug into the charge point at the base of the control box. The plug is inserted with a straight push.
  • Page 16: Maintenance Schedule

    MAINTENANCE, INSPECTION AND TEST Joerns Healthcare recommends a thorough inspection and test of the Hoyer Advance lift and lifting accessories; slings, etc. are carried out on a regular basis. Inspection frequency varies depending on locality, so you must check with your dealer or local government agency as appropriate regarding how often an inspection is required.
  • Page 17: Lubrication

    Hoyer ® English Advance *THESE CHECKS SHOULD INCLUDE: ü = Required X = Recommended * 6 months in North America 1. SPREADER BAR: Check the spreader bar for freedom of rotation and swing. Check for wear on the central pivot. Check for firm attachment to ü...
  • Page 18: Technical Specifications

    Hoyer ® English Advance 9. Technical Specifications Specification Electric Hydraulic Safe Working Load ........341 lbs..155Kgs ....... 341 lbs ..155Kgs Maximum Overall Length ......51 inches ..1300mm ....49.2 inches ..1250mm Minimum Overall Length ......49 inches ..1250mm ....47.2 inches ..1200mm Maximum Overall Height ......73 inches ..
  • Page 19: Electrical Specifications

    Hoyer ® English Advance ELECTRICAL SPECIFICATIONS: BATTERIES............24 volt Rechargeable sealed lead acid type BATTERY CAPACITY ..........3.2 Ampere hours CHARGER RATED INPUT ........100 - 240 V AC/ 50/60 Hz CHARGER RATED OUTPUT ........ 29.5 VDC, Max. 19 W ELECTRIC SHOCK PROTECTION CHARGER ..............
  • Page 20 Hoyer ® English Advance KEY SYMBOLS: The following symbols are used on the charger, control unit and battery: Type B equipment, as per EN 60601-1 Class 2 equipment The disposal of the charging and control unit should not be mixed with general household waste.
  • Page 21: Warranty

    Joerns Healthcare’s obligation under this warranty is limited to supplying replacement parts, servicing or replacing, at its option, any product which is found by Joerns Healthcare to be defective. Warranty replacement parts are covered by the terms of this warranty until the product’s original warranty period expires.
  • Page 22 3. Instructions de montage et de mise en service ..............25 4. Démontage ........................27 5. Consignes de sécurité ....................30 6. Boîtier de commande et commande manuelle ...............32 7. Instructions de fonctionnement ..................33 8. Périodicité d’entretien de l’appareil Hoyer Advance ............36 9. Spécifications techniques ....................38 10. Garantie ...........................41...
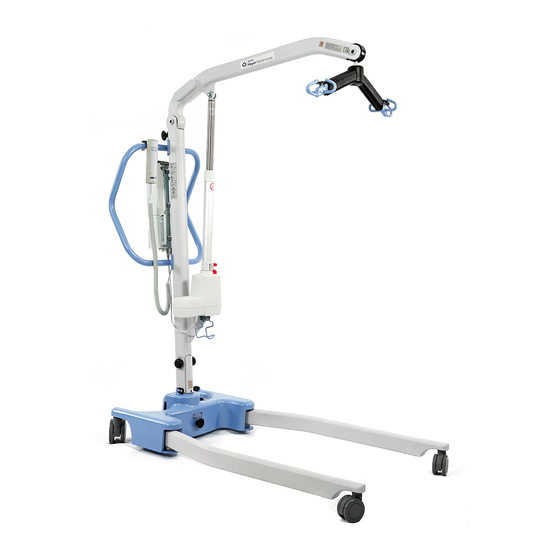
  • Page 23: Le Lève-Personne Hoyer Advance

    / commandes Poignée de manœuvre Berceau / barre d’écartement Actionneur électrique Berceau de retenue de la barre Bouton-poussoir d’écartement Bouton de serrage du mât Base moulée Partie extrudée du pied Roulette à frein Lève-personne Hoyer Advance (en position de rangement)
  • Page 24: Introduction: Le Lève-Personne Hoyer Advance

    L’usage prévu de cet appareil de levage consiste à lever et à transférer en toute sécurité un patient depuis un point à un autre (par ex. depuis un lit vers un fauteuil roulant). Joerns Healthcare recommande de toujours procéder à une évaluation des risques avant d’entreprendre le transfert d’un patient, et de limiter le transfert à...
  • Page 25: Instructions De Montage Et De Mise En Service

    • CHARGEUR DE BATTERIES AU PLOMB (MODÈLE ÉLECTRIQUE UNIQUEMENT) • UNE UNITÉ HYDRAULIQUE (MODÈLE HYDRAULIQUE UNIQUEMENT) REMARQUE CONCERNANT LA SÉCURITÉ: L’appareil Hoyer Advance est lourd et devra être soulevé avec précaution. Il est possible que vous soyez obligé(e) de vous faire aider pour soulever l’appareil Hoyer Advance et le sortir de la boîte.
  • Page 26 N’UTILISEZ PAS le lève-personne et contactez votre revendeur Joerns Healthcare agréé afin de le faire inspecter, voire réparer.
  • Page 27: Démontage

    Hoyer ® Francais Advance 6. Libérez le fléau de son support de retenue. Le lève-personne est maintenant prêt à l’emploi. 4. Démontage 1. Amenez le mât à la position la plus basse, puis insérez la barre d’écartement dans le berceau de retenue.
  • Page 28 Hoyer ® Francais Advance 3. Desserrez suffisamment le dispositif de blocage du mât afin de pouvoir lever le mât. Levez le mât entièrement jusqu’à ce qu’il atteigne la butée d’arrêt. Pliez délicatement le mât en direction des pieds. Aidez-vous de la poignée pour faciliter cette action. ATTENTION Si, lorsque vous pliez le mât, vous sentez une résistance, NE FORCEZ PAS, relevez le mât jusqu’à...
  • Page 29 Hoyer ® Francais Advance 5. D’un coup sec, tirez la sangle de retenue vers le haut et étendez-la au-dessus des roues. (Cela empêche les pieds, le mât et la flèche de se séparer durant le transport et l’entreposage). REMARQUE: Prenez des précautions pour plier et déplier un appareil Advance, car vous risquez de vous pincer les doigts, etc.
  • Page 30: Consignes De Sécurité

    Hoyer ® Francais Advance 5. Consignes de sécurité Veuillez lire et suivre les consignes de sécurité ci-dessous. Le fonctionnement et l’utilisation des lève-personnes Hoyer sont simples et clairs. Si vous suivez ces quelques consignes de sécurité fondamentales, vous serez en mesure d’utiliser ce lève-personne facilement et sans problèmes. AVANT D’UTILISER VOTRE LÈVE-PERSONNE «...
  • Page 31 Hoyer ® Francais Advance • N’ESSAYEZ PAS, si les roulettes ne peuvent pas surmonter un obstacle au sol, de pousser / tirer un lève-personne chargé. . • NE FORCEZ JAMAIS une commande de fonctionnement / de sécurité. Toutes les commandes sont faciles à utiliser et ne nécessitent pas une force excessive. •...
  • Page 32: Boîtier De Commande Et Commande Manuelle

    Hoyer ® Francais Advance 6. Boîtier de commande et commande manuelle Batterie détachable Boutons Bouton d’arrêt d’urgence d’élévation et d’abaissement Boutons de secours d’élévation et d’abaissement d’urgence Commande manuelle Vérin Écran d'information Prise de Prise de raccordement de raccordement la commande manuelle du vérin Fiche de raccordement de la commande manuelle...
  • Page 33: Instructions De Fonctionnement

    7. Instructions de fonctionnement 1. Réglage des pieds Sur l’appareil Hoyer Advance, la largeur des pieds est réglable. Ils peuvent être ouverts pour faciliter l’accès autour des fauteuils ou des chaises roulantes. Lors des transferts et pour permettre le passage du lève-personne par des embrasures de porte, les pieds doivent être ramenés en position fermée.
  • Page 34 REMARQUE : Pour toute instruction détaillée sur la mise en place, reportez-vous au guide d’utilisation fourni avec chaque courroie. AVERTISSEMENT Joerns Healthcare vous conseille de vérifier, régulièrement et avant toute utilisation, que vos courroies ne sont ni effilochées, ni endommagées. N’utilisez JAMAIS une courroie usagée ou endommagée.
  • Page 35: Instructions De Charge

    Hoyer ® Francais Advance Instructions de charge Les batteries sont situées dans le bloc d’alimentation et elles sont rechargées au moyen d’une prise qui se trouve à la base du boîtier de commande. 1. Insérez la fiche d’alimentation dans le point du chargeur à la base du boîtier de commande. Pour l’insérer, poussez la fiche en ligne droite.
  • Page 36: Périodicité D'entretien De L'appareil Hoyer Advance

    ENTRETIEN, INSPECTION ET ESSAIS Joerns Healthcare recommande d’effectuer régulièrement une inspection et des essais poussés du lève-personne Hoyer Advance et des accessoires, courroies, etc. La fréquence des inspections varie selon l'endroit. Veuillez vous renseigner auprès de votre revendeur et / ou d’un organisme gouvernemental local sur la périodicité...
  • Page 37 Hoyer ® Francais Advance *CES VÉRIFICATIONS DOIVENT PORTER SUR: ü = Nécessaire X = Recommandé * 6 mois en Amérique de Nord 1. BARRE D’ÉCARTEMENT : Vérifiez que la barre d’écartement tourne et pivote librement. Vérifiez l’absence d’usure sur le pivot central. Assurez-vous ü ü ü...
  • Page 38: Spécifications Techniques

    Hoyer ® Francais Advance 9. Spécifications Techniques Spécification Électrique Hydraulique Charge maximale d’utilisation ......341 livres ..155Kgs ....342 livres ..155Kgs Longueur maximale hors tout ......51 pouces ..1300mm .... 49,2 pouces ..1250mm Longueur minimale hors tout ......49 pouces ..1250mm .... 47,2 pouces ..1200mm Hauteur maximale hors tout ......
  • Page 39: Spécifications Électriques

    Hoyer ® Francais Advance SPÉCIFICATIONS ÉLECTRIQUES : BATTERIES............24 volts, type plomb-acide, scellées rechargeables CAPACITÉ DES BATTERIES ........3,2 A/h VALEURS NOMINALES D’ENTRÉE DU CHARGEUR ..100 - 240 V CA/ 50/60 Hz VALEURS NOMINALES DE SORTIE DU CHARGEUR ...29,5 V CC, à Max. 19 W PROTECTION CONTRE LES DÉCHARGES ÉLECTRIQUES CHARGEUR ..............CLASSE II (EN 60601-1) LÈVE-PERSONNE ............SOURCE D’ALIMENTATION INTERNE...
  • Page 40: Principaux Symboles

    Hoyer ® Francais Advance PRINCIPAUX SYMBOLES : Vous trouverez les symboles suivants sur le chargeur, l’unité de commande et la batterie : Equipement de type B, conformément à EN 60601-1 Equipement de Classe 2 Ne pas jeter le chargeur et l’unité de commande avec les déchets ménagers. Ne pas jeter la batterie avec les déchets ménagers.
  • Page 41: Garantie

    90 jours à compter de la date de livraison. En vertu de cette garantie, l'obligation de Joerns Healthcare se limite à la fourniture des pièces de rechange, à la réparation ou au remplacement, à son entière discrétion, de tout produit déterminé...
  • Page 42 ® Deutsch Advance Inhalt 1. Hoyer Advance Patientenlifter ..................43 2. Einführung: Hoyer Advance Patientenlifter ..............44 3. Montage und Inbetriebnahme ..................45 4. Demontage ......................... 47 5. Sicherheitshinweise ....................50 6. Steuerkasten und Handbedienung ................52 7. Bedienungshinweise ....................53 8.
  • Page 43: Hoyer Advance Patientenlifter

    Hoyer ® Deutsch Advance 1. Hoyer Advance Patientenlifter Hoyer Advance Lifter (betriebsbereit) Ausleger Ausleger-Halteriemen Akkusatz/ Steuerungseinheit Schiebehandgriff Halter/Spreizbügel Elektrischer Stellmotor Spreizbügelhalter Schiebepedal Mastfeststellknopf Fahrgestellbasis Fahrgestellspitze Feststellbare Laufrolle Hoyer Advance Lifter (zusammengeklappt)
  • Page 44: Einführung: Hoyer Advance Patientenlifter

    Patienten sowohl für den Patienten als auch für die Pflegeperson zu unterstützen und zu fördern. Zum Falten ist kein Werkzeug erforderlich und er kann damit auch in beengten Platzverhältnissen einfach eingelagert werden. Der Hoyer Advance kann auch in zwei Teile zerlegt werden, um den Transport in Fahrzeugen mit einem geeigneten Kofferraum zu ermöglichen.
  • Page 45: Montage Und Inbetriebnahme

    • HYDRAULIKEINHEIT (NUR HYDRAULIK-AUSFÜHRUNG) SICHERHEITSHINWEIS: Der Hoyer Advance ist schwer und muss vorsichtig gehoben werden. Holen Sie sich Hilfe, um den Hoyer Advance aus dem Karton zu heben. Montageanweisungen 1. Nehmen Sie alle Teile aus dem Karton heraus, legen Sie sie auf den Boden und achten Sie darauf, dass die Oberfläche des Geräts nicht beschädigt wird.
  • Page 46 Sie den Patientenlifter NICHT. Überprüfen Sie, dass die Fahrgestellsicherung ganz hineingedrückt ist. Wenn die Fahrgestellsicherung nicht ganz hineingedrückt werden kann und das Fahrgestell durch die Betätigung des Fußpedals NICHT verstellt wird, wenden Sie sich an Ihren autorisierten Joerns Healthcare Fachhändler für eine Überprüfung und Reparatur.
  • Page 47: Demontage

    Hoyer ® Deutsch Advance 6. Lösen Sie den Spreizbügel von der Halterung. Der Patientenlifter ist jetzt betriebsbereit. 4. Demontage 1. Senken Sie den Mast in die niedrigste Position, und setzen Sie dann den Spreizbügel in den Spreizbügelhalter. 2. Lösen Sie die Fahrgestellsicherung (aus der Fahrgestellbasis ziehen) und führen Sie die Fahrgestellträger eng zusammen.
  • Page 48 Hoyer ® Deutsch Advance 3. Lösen Sie den Mastfeststellknopf so weit, dass der Mast nach oben angehoben werden kann. Heben Sie den Mast ganz an, d.h., bis der obere Anschlag erreicht ist. Falten Sie den Mast vor- sichtig zum Fahrgestell hin. Verwenden Sie dazu den Schiebegriff. HINWEIS Wenn Sie beim Falten des Masts einen Widerstand feststellen, wenden Sie KEINE Gewalt an.
  • Page 49 Hoyer ® Deutsch Advance 5. Ziehen Sie den Halteriemen steil nach oben, und legen Sie ihn über die Laufrollen. (Mit dem Riemen werden Fahrgestell, Mast und Ausleger für Transport und Lagerung arretiert). HINWEIS: Das Zerlegen bzw. Aufstellen des Advance ist mit Vorsicht auszuführen, da die Gefahr besteht, dass Finger oder andere Körperteile beteiligter Personen gequetscht werden.
  • Page 50: Sicherheitshinweise

    Hoyer ® Deutsch Advance 5. Sicherheitshinweise Lesen und befolgen Sie die nachfolgend aufgeführten Sicherheitshinweise. Betrieb und Funktionsweise des Hoyer Patientenlifters sind einfach und direkt. Wenn Sie diese grundlegenden Sicherheitsvorkehrungen beachten, ist der Hebebetrieb leicht und problemlos. DER “ADVANCE” LIFTER DARF NUR VON PERSONEN VERWENDET WERDEN, DIE DIESES BENUTZERHANDBUCH GELESEN UND VERSTANDEN HABEN.
  • Page 51 Hoyer ® Deutsch Advance • Schieben/ziehen Sie den beladenen Lifter NICHT über Hindernisse am Boden, die von den Laufrollen nicht überfahren werden können. • Betätigen Sie die Bedienungs-/Sicherheitselemente NIEMALS mit Gewalt. Alle Elemente sind leichtgängig und ohne Gewalt zu betätigen. •...
  • Page 52: Steuerkasten Und Handbedienung

    Hoyer ® Deutsch Advance 6. Steuerkasten und Handbedienung Abnehmbare Akkueinheit Not-Aus-Taste Tasten zum Anheben und Absenken Redundante Bedienelemente zum Anheben und Absenken Handbedienung Verstellmotor LCD-Info-Anzeige Anschlussbuchse Anschlussstecker für Handbedienung für Verstellmotor Anschlussstecker für Handbedienung...
  • Page 53: Bedienungshinweise

    7. Bedienungshinweise 1. Einstellen der Fahrgestellbreite Die Breite des Fahrgestells am Hoyer Advance ist einstellbar. Die Fahrgestellträger können gespreizt werden, um Sessel oder Rollstühle zu umschließen. Zum Transfer und zum Schieben durch Türen und Durchgänge muss das Fahrgestell immer in der geschlossenen Stellung verriegelt sein.
  • Page 54 HINWEIS: Für detaillierte Anleitungen zur Befestigung siehe die Bedienungsanleitung für die Gurte. WARNUNG Joerns Healthcare empfiehlt, die Gurte regelmäßig und vor dem Gebrauch auf Ausfransen oder andere Schäden zu prüfen. Verwenden Sie KEINE Gurte, die abgenutzt oder beschädigt sind. WARNUNG HOYER EMPFIEHLT DIE VERWENDUNG VON HOYER-ORIGINALTEILEN.
  • Page 55: Aufladen Der Akkueinheit

    Hoyer ® Deutsch Advance Aufladen der Akkueinheit Die Akkus befinden sich in der Akkueinheit und werden über die Ladebuchse auf der Unterseite der Steuereinheit aufgeladen. 1. Stecken Sie den Stecker des Ladekabels in die Ladebuchse auf der Unterseite der Steuereinheit. Der Stecker wird geradlinig eingesteckt. Der Stecker darf NICHT in der Buchse verdreht werden.
  • Page 56: Wartungsplan

    Prüfungen aufgeführt. Eine Liste der Ersatzteile erhalten Sie auf Anfrage. TÄGLICHE PRÜFLISTE Joerns Healthcare empfiehlt dringend, dass der Lifter täglich vor der Benutzung auf folgende Punkte überprüft wird: - VERGEWISSERN SIE SICH, dass sich der Lifter frei auf den Laufrollen bewegen kann.
  • Page 57 Hoyer ® Deutsch Advance *DIESE PRÜFUNGEN SOLLTEN UMFASSEN: ü = Erforderlich X = Empfohlen * 6 Monate in Nordamerika 1. SPREIZBÜGEL: Vergewissern Sie sich, dass der Spreizbügel frei dreh- und schwenkbar ist. Prüfen Sie den zentralen Stift auf Verschleiß. Prüfen Sie, ü ü ü...
  • Page 58: Technische Daten

    Hoyer ® Deutsch Advance 9. Technische Daten Spezifikation Elektrisch Hydraulisch Zulässige Belastung...........341 lbs..155Kgs ....342 lbs ..155Kgs Maximale Gesamtlänge ........51 inches ..1300mm ..... 49.2 inches ..1250mm Minimale Gesamtlänge ........49 inches ..1250mm ..... 47.2 inches ..1200mm Maximale Gesamthöhe ........73 inches ..1860mm ..... 72.6 inches ..1845mm Minimale Gesamthöhe .........53.5 inches ..1360mm .....
  • Page 59 Hoyer ® Deutsch Advance ANGABEN ZUR ELEKTRIK: AKKUS ..............24 V, aufladbar, geschlossene Blei/Säure-Akkus AKKUKAPAZITÄT ..........3,2 Ah EINGANGSSPANNUNG DES LADEGERÄTS (NENNWERT) ...230VAC 50/60Hz AUSGANGSSPANNUNG DES LADEGERÄTS (NENNWERT) ..27,4/29,0 VDC@0,8A SCHUTZ GEGEN STROMSCHLAG LADEGERÄT ............KLASSE II PATIENTENLIFTER ..........INTERNE STROMQUELLE STOSSFESTIGKEIT LADEGERÄT ............
  • Page 60: Wichtige Symbole

    Hoyer ® Deutsch Advance WICHTIGE SYMBOLE: Die folgenden Symbole werden am Ladegerät, am Steuerkasten und am Akku verwendet: Medizinisches elektrisches Gerät, Typ B, gemäß EN 60601-1 Geräte der Klasse 2 Das Ladegerät und der Steuerkasten dürfen nicht als Hausmüll entsorgt werden Die Akkus dürfen nicht als Hausmüll entsorgt werden.
  • Page 61: Prüfung

    Für diese Teile wie etwa die DC-Batterien und Lenkräder gilt die zweijährige Garantiefrist nicht, es gilt eine Garantiefrist von 90 Tagen nach dem Lieferdatum. Joerns Healthcare ist im Rahmen dieser Garantie nur verpflichtet, nach seinem Ermessen für alle Produkte, die von Joerns Healthcare als defekt befunden wurden, Ersatzteile zu liefern, Wartungsarbeiten durchzuführen oder dieses zu ersetzen.
  • Page 62 Hoyer ® Español Advance Índice 1. Elevador para pacientes Hoyer Advance ............... 63 2. Introducción ........................64 3. Instrucciones de montaje y encargo ................65 4. Desmontaje ........................67 5. Precauciones de seguridad .................... 70 6. Caja de control y control de mano .................. 72 7.
  • Page 63: Elevador Para Pacientes Hoyer Advance

    Hoyer ® Español Advance 1. Elevador para pacientes Hoyer Advance Elevador Hoyer Advance (preparado para su uso) Cordón para limitación Larguero de movimiento de las patas Batería / Conjunto de control Asa de empuje Soporte / Barra de extensión Actuador eléctrico Soporte de retención de...
  • Page 64: Introducción

    El sistema de elevación Hoyer Advance se adapta a pacientes en posición SENTADA, SENTADA y RECOSTADA Y RECOSTADA. El sistema Hoyer Advance es un dispositivo de apoyo diseñado para promover la manipulación y transferencia seguras del paciente, tanto para el individuo que está siendo transportado como para la persona a cargo.
  • Page 65: Instrucciones De Montaje Y Encargo

    • TERMINAL DE CARGA DE BATERÍA (SÓLO ELÉCTRICO) • UNIDAD HIDRÁULICA (SÓLO HIDRÁULICA) NOTA DE SEGURIDAD: El Hoyer Advance es pesado y habrá que tener cuidado al levantarlo. Puede que necesite ayuda para levantar el Hoyer Advance de la caja.
  • Page 66 Si el pomo de bloqueo de las patas no encaja completamente y el funcionamiento del pedal no ajusta las piernas, NO uti- lice el elevador y póngase en contacto con su proveedor de servicios sanitarios autorizado de Joerns Healthcare para que lo examine y repare.
  • Page 67: Desmontaje

    Hoyer ® Español Advance 6. Suelte la barra separadora del soporte de sujeción. El elevador ya está listo para funcionar. 4. Desmontaje 1. Haga descender el mástil hasta la posición más baja posible, y después inserte la barra de extensión en el soporte de retención. 2.
  • Page 68 Hoyer ® Español Advance 3. Afloje el dispositivo de bloqueo del mástil lo suficiente como para permitir la elevación del mástil. Levante el mástil completamente hasta alcanzar el tope superior. Pliegue el mástil con cuidado hacia las piernas. Utilice el asa de empuje para ayudarse a realizar a esta acción. PRECAUCIÓN Al comenzar a plegar el mástil, si siente resistencia, NO lo fuerce;...
  • Page 69 Hoyer ® Español Advance 5. Tire de la correa de retención hacia arriba y extiéndala sobre las ruedas. (Esto mantendrá las patas, el mástil y el larguero juntos durante el transporte y almacenamiento). NOTA: Tenga cuidado al plegar/desplegar el Advance, ya que hay peligro de que queden atrapados los dedos, etc.
  • Page 70: Precauciones De Seguridad

    Hoyer ® Español Advance 5. Precauciones de seguridad Por favor, lea y siga las precauciones de seguridad que figuran más abajo. El funcionamiento y uso del elevador para pacientes Hoyer es sencillo y fácil de comprender. Siguiendo estas precauciones básicas de seguridad, las operaciones de elevación serán fáciles y estarán libres de problemas.
  • Page 71 Hoyer ® Español Advance • NO empuje el elevador sobre terreno irregular o accidentado, especialmente cuando esté cargado. • NO intente empujar/tirar de un elevador cargado sobre una obstrucción en el suelo, que las ruedas no sean capaces de salvar. •...
  • Page 72: Caja De Control Y Control De Mano

    Hoyer ® Español Advance 6. Caja de control y control de mano Caja de baterías desmontable Botón de parada Botones para de emergencia subir y bajar Controles redundantes de elevación y descenso de emergencia Control de mano Actuador Pantalla LCD de Toma de información conexión del...
  • Page 73: Instrucciones De Funcionamiento

    7. Instrucciones de funcionamiento 1. Ajuste de las patas Las patas del Hoyer Advance son ajustables en cuanto a su anchura. Las patas pueden abrirse para permitir el acceso alrededor de sillas o de sillas de ruedas. Para transferir y negociar puertas y pasajes, las patas del elevador deben estar bien bloqueadas en la posición cerrada.
  • Page 74 NOTA: Para obtener instrucciones de colocación más detalladas, consulte la guía del usuario proporcionada con cada eslinga. ADVERTENCIA Joerns Healthcare recomienda comprobar las eslingas regularmente y, en especial, antes del uso por si están deshilachadas o dañadas. NO utilice eslingas que estén desgastadas o dañadas. ADVERTENCIA HOYER RECOMIENDA UTILIZAR PRODUCTOS AUTÉNTICOS HOYER.
  • Page 75 Hoyer ® Español Advance Instrucciones de Carga de Baterías Las baterías están situadas en el conjunto de alimentación eléctrica y se cargan mediante un enchufe en la base del cuadro de control. 1. Inserte el enchufe de la fuente de suministro en el punto de carga en la base del cuadro de control.
  • Page 76: Plan De Mantenimiento

    Todas las verificaciones y pruebas deben llevarse a cabo según las recomendaciones y procedimientos explicados en el presente manual. Joerns Healthcare recomienda que el mantenimiento, inspección y comprobación certificada las lleve a cabo un agente o proveedor de mantenimiento autorizado.
  • Page 77 Hoyer ® Español Advance *ESTAS COMPROBACIONES DEBEN INCLUIR: ü = Estipulado X = Recomendado * 6 meses en América del Norte 1. BARRA DE EXTENSIÓN: Compruebe la barra de extensión para verificar si tiene libertad de rotación y giro. Compruebe si hay desgaste en el pivote ü...
  • Page 78: Especificaciones Técnicas

    Hoyer ® Español Advance 9. Especificaciones técnicas del Hoyer Advance Especificación Eléctrico Hidráulico Carga de trabajo segura ........341 lbs ..155Kgs ....342 lbs ..155Kgs Longitud total máxima ...........51 pulg ..1300mm ....49,2 pulg ..1250mm Longitud total mínima ..........49 pulg ..1250mm ....47,2 pulg ..1200mm Altura total máxima ..........73 pulg ..
  • Page 79: Condiciones Ambientales

    Hoyer ® Español Advance SPECIFICACIONES ELÉCTRICAS: BATERÍAS ............. Selladas y recargables de plomo-ácido de 24 voltios CAPACIDAD DE BATERÍAS:......3,2 Ah ENTRADA MEDIDA DEL CARGADOR ..230 V CA 50/60 Hz SALIDA MEDIDA DEL CARGADOR ..... 27,4/ 29,0 V CC a 0,8 A PROTECCIÓN CONTRA DESCARGA ELÉCTRICA CARGADOR ..........
  • Page 80: Explicación De Los Símbolos

    Hoyer ® Español Advance EXPLICACIÓN DE LOS SÍMBOLOS: Los signos enunciados a continuación se utilizan en el cargador, la unidad de control y la batería: Equipo de tipo B, según EN 60601-1 Equipo de clase El cargador y la unidad de control no deben desecharse junto con los residuos domésticos La batería no debe desecharse junto con los residuos domésticos.
  • Page 81: Garantía

    Si Joerns Healthcare así lo solicitara, las piezas deberán ser entregadas o devueltas con fines de verificación, y los costes correrán por cuenta del cliente. Cualquier crédito será emitido solamente después de realizada la verificación.
  • Page 84 Joerns Healthcare Inc. 2100 Design Road, Suite 100 Arlington, TX 76014 USA (T) 800-826-0270 • (F) 800-457-8827 www.joerns.com • email: info@joerns.com © 2020, Joerns Healthcare • 294000.10060 Rev D • DCO20-2404...

Table des Matières