
Manuels Connexes pour Kaba c-lever


Sommaire des Matières pour Kaba c-lever
- Page 1 All manuals and user guides at all-guides.com BEYOND SECURITY Kaba c-lever Kurzanleitung Quick Guide Notice succincte Istruzioni brevi DE/EN/FR/IT Doc.-No.: k2evo704xy-2013-09...
- Page 2 ENGLAND www.kaba.co.uk www.kaba.fr www.kaba.it This documentation may not be reproduced in any way nor further used in other ways without written permission of Kaba AG. Kaba® and Kaba elolegic® are registered trademarks of Kaba AG. Copyright by Kaba AG 2013...
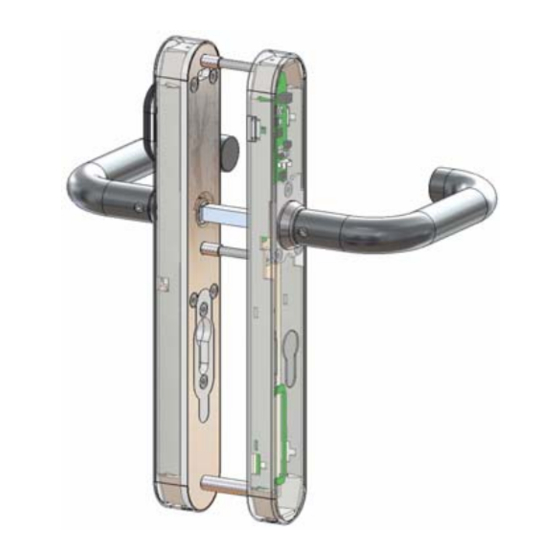
- Page 3 Befestigungsschrauben M5 x 50 mm (2 Stück) Batterieschutzfolie Batterieprint Batterien Type AA Lithium (2 Stück im Gerät) M6 Befestigungsschraube für Drücker (aussen) M6 Befestigungsschraube für Drücker (innen) M3 Befestigungsschraube für Innenschild Schloss (nicht enthalten) Antennenkabel Schliesszylinder (nicht enthalten) Richtungsgeber Buchse für Kupplungseinheit Zentrierhülse Kaba c-lever k2evo704xy-2013-09...
- Page 4 Befestigungslöcher markieren. HINWEIS: Bei einigen Drücker- formen ist der Drückerdorn (5) an die Türstärke anzupassen! Schloss entfernen und die bereits ange- zeichneten Befestigungslöcher bohren. Nach dem Bohren die Späne entfernen und das Schloss (14) wieder montieren. k2evo704xy-2013-09 Kaba c-lever...
- Page 5 Kupplungseinheit (3) stecken, danach Drückerdorn von oben mit Gewindestift (4) befestigen. Kupplungs- einheit (3) mit Stecker (18) verbinden und in den Beschlag stecken. Anschließend die Zentrierhülse (19) auf die untere Gewindehülse stecken! ACHTUNG! Auf das Kabel achten! Kaba c-lever k2evo704xy-2013-09...
- Page 6 Befestigungsbohrung durch die Tür füh- ren und das Außenschild (1) auf die Tür aufstecken. Um die Kupplungseinheit (3) zu entlasten, muss nach dem Aufste- cken des Außenschildes (1) am Drück- erdorn (5) in Pfeilrichtung angezogen werden. HINWEIS: Antennenkabel (15) nicht quetschen! k2evo704xy-2013-09 Kaba c-lever...
- Page 7 All manuals and user guides at all-guides.com Installation Kurzanleitung Innenbeschlag (6) des Kaba c-levers auf Drückerdorn (5) und Zylinder (16) aufste- cken und mit beiden Befestigungschrau- ben (7) mit dem Außenschild (1) fest- schrauben. Anzugsdrehmoment: 2,5 ±0,5 Nm Kabel (15) in den dafür vorgesehenen Ste- cker auf dem Innenteil (6) anstecken.
- Page 8 All manuals and user guides at all-guides.com Kurzanleitung Installation Bei der c-lever Variante mit Breitschild (55mm), wird zur besseren Abstützung des Innenschildes (2), zwischen dem Innenbe- schlag (6) und dem Innenschild (2) eine Distanzscheibe beigelegt. Innenschild (2) aufstecken und von unten CLICK mit M3 Schraube (13) befestigen.
- Page 9 Programmierbuchse anstecken. Berechtigtes User-Medium vor die Antenne halten und den Knopf am Batte- rienotgerät für ca. 1 Sekunde drücken. Danach kann die Tür geöffnet werden. ACHTUNG! Der Drücker bleibt so lange eingekuppelt, bis die Batte- rien gewechselt werden! Kaba c-lever k2evo704xy-2013-09...
- Page 10 Batteries Type AA Lithium (2 pcs. inside device) M6 fixing screw for handle (outside) M6 fixing screw for handle (inside) M3 fixing screw for inside shield Mortise lock (not included) Antenna cord Locking cylinder (not included) Direction indicator Socket for coupling unite Centering sleeve k2evo704xy-2013-09 Kaba c-lever...
- Page 11 NOTE: For some lever handle types the spindle (5) must be adapted to the door thickness! Remove the lock case and drill both marked fixing holes. After drilling clean the mortise for the lock and reinstall the mortise lock (14). Kaba c-lever k2evo704xy-2013-09...
- Page 12 (4) from above. Connect the cord of the coupling unit to the plug (18) and place it into the outside shield (1). After- wards put the centering sleeve (19) on the lower thread sleeve. ATTENTION! Take care of the cord! k2evo704xy-2013-09 Kaba c-lever...
- Page 13 (1) it is mandatory to pull the spindle (5) in the direction of the arrow, to relieve pres- sure from the coupling unit (3). NOTE: Take care of the antenna cord (15)! Kaba c-lever k2evo704xy-2013-09...
- Page 14 NOTE: Pay attention to the correct position of the batteries. Pull the contact protection film out. Slide the battery protection foil between the batteries. NOTE: Only use lithium batteries on doors in an outside environ- ment. k2evo704xy-2013-09 Kaba c-lever...
- Page 15 All manuals and user guides at all-guides.com Installation Quick Guide For a better support of the inside shield (2), the c-lever option with the wide shield (55 mm) has a distance sleeve bet- ween the inside shield (2) and the inside plate (6).
- Page 16 NOTE: Standoff of the locking cylinder on the outside and inside must be at least 18.5 mm. The use of c-lever (tested according to DIN 18273 - door furniture for fire - smoke protection doors, No.: DO 20.31) is permit-...
- Page 17 Vis de fixation de la poignée extérieure M6 (l‘extérieur) Vis de fixation de la poignée intérieure M6 (intérieu) Vis de fixation du couvercle intérieur M3 Serrure mécanique (non inclue) Câble de l’antenne Cylindre de fermeture (non inclue) Sélecteur de direction Connecteur pour accouplement Entretoise Kaba c-lever k2evo704xy-2013-09...
- Page 18 NOTE: Pour certains types de poi- gnées, le carré (5) doit être adapté à l’épaisseur de porte! Enlevez le bloc de serrure et percez les deux trous de fixation précédemment marqués. Après le perçage, nettoyez la mortaise et encastrez la serrure (14). k2evo704xy-2013-09 Kaba c-lever...
- Page 19 (3) avec la vis de blo- cage (4) sur le dessus. Branchez le câble du module d’accouplement sur son con- necteur (18). Mettez ensuite l’entretoise (19) en place sur le guide fileté inférieure. ATTENTION! Faites attention au câble ! Kaba c-lever k2evo704xy-2013-09...
- Page 20 (1). Après la mise en place de la garniture extérieure (1), il est obliga- toire de tirer l’axe (5) dans la direction de la flèche, afin d’eviter une pression sur l’accouplement (3). NOTE: Faites attention au câble d’antenne (15)! k2evo704xy-2013-09 Kaba c-lever...
- Page 21 équipement! NOTE: !Respecter la polarité des piles! Retirer le film de protection. Placer le film de protection des piles entre les deux piles. NOTE: pour des portes extérieures, n'utiliser que des piles au lithium! Kaba c-lever k2evo704xy-2013-09...
- Page 22 All manuals and user guides at all-guides.com Notice succincte Installation Pour un meilleur maintien de la garniture intérieure (2) sur la c-lever version large (55 mm), une entretoise sépare la garni- ture intérieure (2) de la plaque béquille intérieure (6).
- Page 23 NOTE: Il faut une saillie du cylindre sur le côté extérieur et intérieur d’au moins 18,5 mm! L’utilisation de la c-lever (testée suivant la norme DIN 18273 - garniture de porte ignifuge - porte pare-fumée, N° DO 20.31) est autorisée avec l’utilisation des produits...
- Page 24 Vite di fissaggio M6 per maniglia (all'esterno) Vite di fissaggio M6 per maniglia (all'interno) Vite di fissaggio M3 per placca interna Serratura (non accluso) Cavo dell’antenna Cilindro di chiusura (non accluso) Indicatore di direzione Alloggiamento per ingegno Camicia di centraggio k2evo704xy-2013-09 Kaba c-lever...
- Page 25 NOTE: Per alcuni tipe di maniglia l’ingegno (5) deve essere adattato allo spessore della porta! Rimuovere la serratura ed eseguire i fori di fissaggio sui punti già contrassegnati. Dopo la foratura rimuovere i trucioli e rimontare la serratura (14). Kaba c-lever k2evo704xy-2013-09...
- Page 26 Collegare il cavo motore dell’ingegno alla presa e posi- zionarle nella placca esterna (1). Posizio- nare quindi la camicia di centraggio (19) sul manicotto filettato più basso. ATTENTION! Prestare attenzione al cavo. k2evo704xy-2013-09 Kaba c-lever...
- Page 27 (1) sulla porta. Dopo avere messo piastra esterna (1) è obbligatorio tiratre il perno (5) nella direzione della freccia, per diminuire la pressione sull’unità di ingegno (3). NOTE: Non schiacciare il cavo dell’antenna (15)! Kaba c-lever k2evo704xy-2013-09...
- Page 28 NOTA: Prestare attenzione alla polarità delle batterie. Estrarre la lamina di protezione del contatto. Inserire la lamina di protezione tra le batterie. NOTA: Per le porte da esterno utilizzare solo batterie al litio. k2evo704xy-2013-09 Kaba c-lever...
- Page 29 All manuals and user guides at all-guides.com Installazione Istruzioni brevi Per un migliore supporto della placca interna (2), le c-lever fornite con la placca da 55 mm, hanno un distanziale tra la pias- tra interna e la placca. Inserire la placca interna (2) e fissarla dal CLICK basso con la vite M3 (13).
- Page 30 NOTE: La sporgenza del cilindro fuori e dentro dev’essere di almeno 18,5 mm! L’utilizzo della c-lever (testata in ottempe- ranza alla norma DIN 18273 - accessori per porte tagliafuoco, No.: DO 20.31) è per- messo con l’utilizzo dei seguenti articoli certificati secondo la normativa EN179 (componenti per porte d’emergenza):...