
Manuels Connexes pour Liemke MERLIN–13


Sommaire des Matières pour Liemke MERLIN–13
- Page 1 MERLIN –13 BEDIENUNGSANLEITUNG OPERATING MANUAL MANUAL DE INSTRUCCIONES MODE D’EMPLOI INSTRUKCJA OBSŁUGI...
- Page 2 Mit unserem Serviceversprechen, Ihnen im Falle einer Einsendung innerhalb von zehn Werktagen Ihre Optik wieder zu retournieren, sowie einer Garantie auf unsere Produkte von bis zu drei Jahren bedan- ken wir uns für Ihr Vertrauen und wünschen ein kräftiges Waidmannsheil! Ihr LIEMKE-Team!
-
Page 3: Table Des Matières
INHALT 01. TECHNISCHE DATEN � � � � � � Seite 04 02. LIEFERUMFANG � � � � � � � � Seite 05 03. KOMPONENTEN � � � � � � � � Seite 05 04. AKKUINSTALLATION � � � � � � � Seite 06 05. -
Page 4: Technische Daten
01. TECHNISCHE DATEN MODEL MERLIN –13 Microbolometer Auflösung (Pixel) 256 ×192 Pixelgröße (μm) NEDT (mk) ≤ 50 Bildwiederholrate (Hz) Technische Daten des Objektivs Objektivlinse (mm) Sehfeld (Grad) 13.5 ×10.1 Vergrößerung (x) 1× Detektionsreichweite (m) | (Zielgröße: 1.7m x 0.5m, P(n)=99%) Display 0.39“... -
Page 5: Lieferumfang
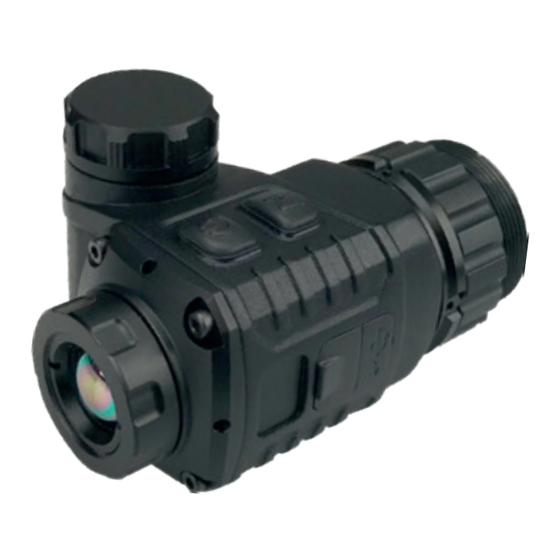
02. LIEFERUMFANG – Merlin-13 – Gewindeadapter M30x1 – M52x0,75 – Batterie CR123 – Bedienungsanleitung 03. KOMPONENTEN 01. Objektivlinse 02. EIN / AUS Taste (P) 03. USB-C Schnittstelle 04. Menütaste (M) 05. Akkufach 06. Okular-Konterring 07. Okularschnittstelle – MERLIN –13 · Bedienungsanleitung 11 / 2020... -
Page 6: Akkuinstallation
04. AKKUINSTALLATION > Entfernen Sie den Akkufachdeckel, indem Sie ihn im Gegenuhrzeigersinn drehen. > Fügen Sie einen CR123-Akku mit dem Pluspol nach Innen zeigend ein. > Führen Sie den Akkufachdeckel auf das Akkugehäuse und schrauben Sie Deckel im Uhrzei- gersinn ein. TIPPS! >... -
Page 7: Montage Des Merlin-13 Auf
05. MONTAGE DES MERLIN-13 AUF EINEM ZIELFERNROHR Bevor Sie das MERLIN-13 auf dem Zielfernrohr installieren, sollten folgende vorbereitende Maß nahmen durchgeführt werden: > Wählen Sie einen zum Objektivtubus des Zielfernrohrs passenden Klemmadapter aus. > Bereiten Sie einen Gewindeadaptereinsatz (8) vor, der auf die Gewindeschnittstelle des Okulars des MERLIN-13 und den Klemmadapter passt. - Page 8 Installation > Installieren Sie den Gewindeadaptereinsatz (8) am MERLIN-13, indem sie ihn im Uhrzeigersinn aufschrauben. > Drehen Sie den Okular-Konterring (6) im Gegenuhrzeigersinn, um den Adaptereinsatz (8) zu blockieren. > Installieren Sie den Gewindeeinsatz (8) vollständig im Klemmadapter (9). > Installieren Sie den Klemmadapter (9) mit dem MERLIN-13 auf dem Objektivtubus (10) Ihres Zielfernrohrs.
-
Page 9: Menü / Symbole In Der Statusleiste
06. MENÜ / SYMBOLE IN DER STATUSLEISTE White-Hot Black-Hot Red-Hot Farbe Display-Helligkeit Manuelle Kalibrierung Automatische Kalibrierung USB-Modus Akkuanzeige 07. BETRIEBSFUNKTIONEN 7.1 EIN- / AUS-Schalter > Die P-Taste (2) drücken und gedrückt halten, um das Gerät einzuschalten. Warten Sie drei Sekun- den, um in die Home-Benutzeroberfläche zu gelangen. -
Page 10: Standby-Modus
7.2 Standby-Modus > Drücken und die P-Taste (2) gedrückt halten, bis der Countdown erscheint, die innerhalb von 3 Sek. loslassen, um den Standby-Modus des Countdown auszulösen. > Drücken Sie die P-Taste (2) erneut, um den Stand- by-Modus zu verlassen. 7.3 Statusbalken Auf der Home-Benutzeroberfläche finden Sie System informationshinweise am unteren Bildschirm- rand, die folgende Information enthalten: Palette,... - Page 11 > Beim Umschalten auf die waagrechte Bewe- gungsrichtung, die P-Taste (2) drücken, um nach links zu fahren und die M-Taste (4) drücken, um nach rechts zu fahren. Die Bewegungsmethode ist dabei die gleich, wie die senkrecht auf der Y-Achse verlaufende. >...
- Page 12 7.6 Schnellwahlmenü In der Home-Benutzeroberfläche kurz die M-Taste (4) drücken, um ins Schnellwahlmenü zu gelangen. Im Schnellwahlmenü sind folgende Optionen verfügbar: Palette - Bildschirmhelligkeit - Kalibrierung - Verlassen. > Palette: Die P-Taste (2) kurz drücken, um zwischen White-Hot - Black-Hot - Red-Hot - und Falschfarbe zu wählen.
-
Page 13: Sicherheitshinweise
08. SICHERHEITS- HINWEISE > Schauen Sie niemals direkt in strah- lende Lichtquellen (z. B. Sonnenlicht). > Vermeiden Sie jeden Kontakt der Ob- jektivlinse mit spitzen Gegenständen. > Benutzen Sie einen standardmäßigen Akku. Leere Akkus niemals Im Haus- müll entsorgen oder ins Feuer werfen. >... -
Page 14: Instandhaltung
09. INSTANDHALTUNG Instandhaltungsarbeiten sollten mindestens zweimal im Jahr durchgeführt werden und beinhalten folgen- de Arbeiten. > Wischen Sie die äußeren Oberflächen mit einem Baumwolllappen ab, um Metall- und Kunststoff- teile staub- und schmutzfrei zu halten. Dafür kann Silikonfett verwendet werden. >... - Page 15 NOTIZEN – MERLIN –13 · Bedienungsanleitung 11 / 2020...
- Page 16 With our service promise to return your optic within ten working days if you send it in, as well as a warranty on our products of up to three years, we thank you for your trust and wish you a good hunting season! Your LIEMKE team!
- Page 17 CONTENT 01. SPECIFICATIONS � � � � � � � Page 04 02. SCOPE OF DELIVERY � � � � � Page 05 03. COMPONENTS � � � � � � � Page 05 04. BATTERY INSTALLATION � � � � � Page 06 05.
-
Page 18: Specifications
01. SPECIFICATIONS MODEL MERLIN –13 Microbolometer Resolution (pixels) 256 ×192 Pixel size (μm) NEDT (mk) ≤ 50 Frame refresh rate (Hz) Optical Specifications Objective Lens (mm) Field of view (degree) 13.5 ×10.1 Magnification (x) 1× Detection range (m) | (Target size: 1.7m x 0.5m, P(n)=99%) Display Type... -
Page 19: Scope Of Delivery
02. SCOPE OF DELIVERY – Merlin-13 – Thread adapter M30x1 – M52x0,75 – Battery CR123 – Operating Manual 03. COMPONENTS 01. Objective Lens 02. Power (P) Button 03. USB-C Interface 04. Menu (M) Button 05. Battery Compartment 06. Eyepiece Locking Ring 07. -
Page 20: Battery Installation
04. BATTERY INSTALLATION > Remove the battery cap by unscrewing it counter clockwise. > Insert a CR123 with positive pole inwards. > Place battery cap onto the battery compartment and screw clockwise until tight. TIPS! > Avoid removing the o-ring seal. >... - Page 21 05. MOUNTING THE MERLIN-13 ON A RIFLESCOPE Before installing the MERLIN-13 onto your Riflescope, the following preparations should be made: > Select a clip-on adapter matching the outside diameter of the objective tube of your riflescope. > If necessary, use a thread adapter that matches the thread interface on the MERLIN-13 and that of the clip-on adapter.
- Page 22 Installation > Install the threaded adapter insert (8) to the MERLIN-13 by rotating clockwise along the thread. > Rotate the eyepiece locking ring (6) counter- clockwise to lock the adapter insert (8). > Install the threaded insert (8) fully into the clip-on adapter (9).
-
Page 23: Menu / Status Bar Icons
06. MENU / STATUS BAR ICONS White hot Black hot Red hot Color Display lightness Manual Calibration Automatic Calibration USB mode Battery Indicator 07. OPERATIONS 7.1 Switch On / Off > Press and hold the P button (2) to turn on the device. -
Page 24: Standby Mode
7.2 Standby Mode > Press and hold P button (2) until the countdown appears, release the button within 3s countdown to active the standby mode. > Short press P button (2) again to exit standby mode. 7.3 Status Bar In the home interface, there are system information hints at the bottom of the screen including: Palette, Screen Brightness, Calibration mode, Battery status etc. - Page 25 > Press P button (2) and M button (4) simultaneously to switch the movement directions. > While switched to horizontal movement, press P button (2) to move towards left and M button (4) to move towards right. Movement method is same as vertical on Y-axis.
-
Page 26: Shortcut Menu
7.6 Shortcut Menu In the home interface, short press the M button (4) to enter shortcut menu. Options in Shortcut menu are as follows: Palette - Screen Brightness – Calibration – Exit. > Palette: press P button (2) briefly to switch between White Hot - Black Hot - Red Hot - Pseudo Colour. -
Page 27: Maintenance
Disposal of waste electrical equipment and batteries Do not dispose of waste electrical equipment and batteries in the household waste. Please hand them in to your local recycling centre. Remove used batteries before disposing of the equipment and hand in the batteries to a shop or collection point. - Page 28 Con la promesa de nuestro servicio técnico de devolverle su óptica en diez días laborables en caso de que nos la remita, así como una garantía de hasta tres años sobre nuestros productos, agradece- mos su confianza y le deseamos una buena caza. El equipo de LIEMKE...
- Page 29 ÍNDICE 01. DATOS TÉCNICOS � � � � � � Página 04 02. VOLUMEN DE SUMINISTRO � � � Página 05 03. COMPONENTES � � � � � � � Página 05 04. INSTALACIÓN DE LA BATERÍA � � � Página 06 05.
-
Page 30: Datos Técnicos
01. DATOS TÉCNICOS MODELO MERLIN –13 Microbolómetro Resolución (píxeles) 256 ×192 Tamaño de píxel (μm) NEDT (mk) ≤ 50 Velocidad de actualización de la imagen (Hz) Datos técnicos del objetivo Lente del objetivo (mm) Campo de visión (grados) 13.5 ×10.1 Aumento (x) 1×... -
Page 31: Volumen De Suministro
02. VOLUMEN DE SUMINISTRO – Merlin-13 – Adaptador de rosca M30x1 – M52x0,75 – Batería CR123 – Manual de instrucciones 03. COMPONENTES 01. Lente del objetivo 02. Botón de ENCENDIDO/APAGADO (P) 03. Puerto USB-C 04. Botón de menú (M) 05. Compartimento de la batería 06. -
Page 32: Instalación De La Batería
04. INSTALACIÓN DE LA BATERÍA > Retire la tapa del compartimento de la batería girándola en sentido antihorario. > Introduzca una batería CR123 con el polo positivo orientado hacia el interior. > Coloque la tapa del compartimento de la batería sobre la carcasa de la batería y enrosque la tapa en sentido horario. -
Page 33: Montaje De Merlin-13 Sobre
05. MONTAJE DE MERLIN-13 SOBRE UNA MIRA TELESCÓPICA Antes de instalar su MERLIN-13 sobre la mira telescó- pica, debe realizar los siguientes preparativos: > Seleccione un adaptador de abrazadera ade- cuado al tubo de objetivo de la mira telescópica. > Prepare un adaptador de rosca (8), adecuado para la conexión de rosca del ocular del MER- LIN-13 el adaptador de abrazadera. - Page 34 Instalación > Instale el adaptador de rosca (8) en su MERLIN-13 enroscándolo en sentido horario. > Gire el aro de contorno del ocular (6) en sentido antihorario para bloquear la pieza adaptadora (8). > Instale la pieza roscada (8) por completo en el adaptador de abrazadera (9).
-
Page 35: Menú / Iconos En
06. MENÚ / ICONOS DE LA BARRA DE ESTADO Blanco-caliente Negro-caliente Rojo-caliente Color Brillo de la pantalla Calibración manual Calibración automática Modo USB Indicador de batería 07. FUNCIONES DE SERVICIO 7.1 Interruptor de ENCENDIDO/APAGADO > Pulsar el botón P (2) y mantenerlo pulsado para encender el aparato. -
Page 36: Modo De Espera
7.2 Modo de espera > Pulsar y mantener pulsado el botón P (2) hasta que aparezca la cuenta atrás y soltarlo en los 3 segundos siguientes para activar el modo de espera de la cuenta atrás. > Pulse el botón P (2) de nuevo para salir del modo en espera. - Page 37 > Pulsar simultáneamente el botón P (2) y el botón M (4), para modificar las direcciones de despla- zamiento. > Al cambiar al movimiento horizontal, pulsar el botón P (2) para desplazarse a la izquierda y el botón M (4) para desplazarse a la derecha. El método de desplazamiento es el mismo que para recorrer el eje Y en sentido vertical.
- Page 38 7.6 Menú de selección rápida En la interfaz del usuario de inicio, pulsar breve- mente el botón M (4) para acceder al menú de selección rápida. En el menú de selección rápida, dispone de las siguientes opciones: Paleta - Brillo de la pantalla - Calibración - Salir.
-
Page 39: Instrucciones De Seguridad
08. INSTRUCCIONES DE SEGURIDAD > Nunca mire directamente a fuentes de luz radiada (p. ej., al sol). > Evite cualquier contacto de la lente del objetivo con objetos punzantes. > Use una batería estándar. Nunca tire las baterías agotadas a la basura doméstica ni al fuego. -
Page 40: Mantenimiento
09. MANTENIMIENTO Los trabajos de conservación se deben realizar dos veces al año, como mínimo, incluyendo las siguien- tes operaciones. > Limpie las superficies exteriores con un paño de algodón para mantener las piezas metálicas y de plástico libres de polvo y suciedad. Para ello se puede usar grasa de silicona. - Page 41 NOTAS – MERLIN –13 · Manual de instrucciones 11 / 2020...
-
Page 42: Fascination Technologie D'imagerie Thermique
Avec notre engagement du service après-vente de vous retourner vos optiques en cas d’expédition dans les dix jours ouvrables, ainsi qu'une garantie sur nos produits allant jusqu'à trois ans, nous vous remercions de votre confiance et vous souhaitons une bonne saison de chasse ! Votre équipe LIEMKE ! - Page 43 SOMMAIRE 01. CARACTÉRISTIQUES TECHNIQUES � Page 04 02. CONTENU DE LA LIVRAISON � � � Page 05 03. COMPOSANTS � � � � � � � Page 05 04. INSTALLATION DE LA PILE � � � � Page 06 05. MONTAGE DU MERLIN-13 SUR UNE LUNETTE DE VISÉE �...
-
Page 44: Caractéristiques Techniques
01. CARACTÉRISTIQUES TECHNIQUES MODÈLE MERLIN –13 Microbolomètre Résolution (pixels) 256 ×192 Taille des pixels (μm) NEDT (mk) ≤ 50 Taux de rafraîchissement (Hz) Caractéristiques techniques de l'objectif Lentille d’objectif (mm) Champ de vision (degré) 13.5 ×10.1 Grossissement (x) 1× Portée de détection (m) | (variable de consigne : 1,7m x 0,5m, P(n)=99%) Ecran... -
Page 45: Contenu De La Livraison
02. CONTENU DE LA LIVRAISON – Merlin-13 – Adaptateur de filetage M30x1 – M52x0,75 – Pile CR123 – Mode d'emploi 03. COMPOSANTS 01. Lentille d’objectif 02. Touche MARCHE / ARRÊT (P) 03. Interface USB-C 04. Bouton de menu (M) 05. Compartiment des piles 06. -
Page 46: Installation De La Pile
04. INSTALLATION DE LA PILE > Retirer le couvercle du compartiment de la pile en le tournant dans le sens inverse des aiguilles d'une montre. > Insérer une pile CR123 avec la borne positive tournée vers l'intérieur. > Introduire le couvercle du compartiment de la pile sur le boîtier de la pile et visser le couvercle dans le sens des aiguilles d'une montre. -
Page 47: Montage Du Merlin-13 Sur Une Lunette De Visée
05. MONTAGE DU MERLIN-13 SUR UNE LUNETTE DE VISÉE Avant d’installer le MERLIN-13 sur la lunette de visée, il convient d’effectuer les mesures préparatoires suivantes : > Choisissez un adaptateur à bornes adapté au tube d'objectif de la lunette de visée. >... - Page 48 Installation > Installer l’insert d’adaptateur de filetage (8) sur le MERLIN-13 en le vissant dans le sens horaire. > Tourner la bague de verrouillage de l’oculaire (6) dans le sens anti-horaire afin de bloquer l’ insert d’adaptateur (8). > Installer l’insert de filetage (8) complètement dans l’...
-
Page 49: Menu / Icônes Dans La Barre D'état
06. MENU / ICÔNES DANS LA BARRE D’ÉTAT White-Hot Black-Hot Red-Hot Couleur Luminosité de l’écran Etalonnage manuel Etalonnage automatique Mode USB Indicateur de batterie 07. FONCTIONS OPÉRATIONNELLES 7.1 Interrupteur MARCHE / ARRÊT > Appuyer sur la touche P (2) et la maintenir enfon- cée pour mettre en marche l’appareil. -
Page 50: Mode Veille
7.2 Mode veille > Appuyer sur la touche P (2) et la maintenir enfoncée jusqu’à ce que le compte à rebours apparaisse, la relâcher dans les 3 secondes pour déclencher le mode veille du compte à rebours. > Appuyer sur la touche P (2) à nouveau pour quit- ter le mode veille. - Page 51 touche M (4) pour modifier les sens de déplace- ment. > Lors du passage au sens de déplacement horizon- tal, appuyer sur la touche P (2)pour se déplacer vers la gauche et appuyer sur la touche M (4) pour se déplacer vers la droite. La méthode de déplacement est la même que celle qui est per- pendiculaire à...
- Page 52 7.6 Menu de sélection rapide Dans l’interface utilisateur d’accueil, appuyer briè- vement sur la touche M (4) pour accéder au menu de sélection rapide. Dans le menu de sélection ra- pide, les options suivantes sont disponibles : Palette - Luminosité de l’écran - Etalonnage - Quitter. >...
-
Page 53: Consignes De Sécurité
08. CONSIGNES DE SÉCURITÉ > Ne jamais regarder directement les sources de lumière vive (par exemple, la lumière du soleil). > Éviter tout contact de la lentille de l'objectif avec des objets pointus. > Utiliser une pile standard. Ne jamais jeter de piles vides dans les ordures ménagères ou au feu. -
Page 54: Entretien
09. ENTRETIEN Les travaux d’entretien doivent être effectués au moins deux fois par an et comprennent les travaux suivants. > Essuyer les surfaces extérieures avec un chiffon en coton afin d'éliminer la poussière et la saleté des parties métalliques et plastiques. Pour cela, il est possible d’utiliser de la graisse de silicone. - Page 55 NOTES – MERLIN –13 · Mode d'emploi 11 / 2020...
- Page 56 Składając obietnicę zwrotu urządzenia optycznego w ciągu dziesięciu dni roboczych od momentu jego otrzymania, jak również oferując nawet 3-letnią gwarancję na nasze produkty, dziękujemy Państwu za zaufanie i życzymy udanych łowów! Zespół LIEMKE.
- Page 57 SPIS TREŚCI 01. DANE TECHNICZNE � � � � � � Strona 04 02. ZAKRES DOSTAWY � � � � � � Strona 05 03. PODZESPOŁY � � � � � � � Strona 05 04. MONTAŻ BATERII � � � � � � � Strona 06 05.
-
Page 58: Dane Techniczne
01. DANE TECHNICZNE MODEL MERLIN –13 Mikrobolometr Rozdzielczość (piksele) 256 ×192 Rozmiar piksela (μm) NEDT (mk) ≤ 50 Częstotliwość odświeżania obrazu (Hz) Dane techniczne obiektywu Soczewka obiektywu (mm) Pole widzenia (stopnie) 13.5 ×10.1 Powiększenie (×) 1× Zasięg detekcji (m) | (rozmiar celu: 1,7 m × 0,5 m;... -
Page 59: Zakres Dostawy
02. ZAKRES DOSTAWY – Merlin-13 – Adapter gwintowany M30 × 1 — M52 × 0,75 – Bateria CR123 – Instrukcja obsługi 03. PODZESPOŁY 01. Soczewka obiektywu 02. Przycisk włączania/wyłączania (P) 03. Złącze USB-C 04. Przycisk menu (M) 05. Komora baterii 06. Pierścień mocujący okular 07. -
Page 60: Montaż Baterii
04. MONTAŻ BATERII > Zdjąć osłonę komory baterii, obracając ją w lewo. > Włożyć baterię CR123 biegunem dodatnim skiero- wanym do wewnątrz. > Umieścić osłonę komory baterii na obudowie baterii i obrócić osłonę w prawo. WSKAZÓWKI! > Należy się upewnić, że uszczelka O-ring jest na swoim miejscu. -
Page 61: Montaż Urządzenia Merlin-13 Na Celowniku Teleskopowym
05. MONTAŻ URZĄDZENIA MERLIN-13 NA CELOWNI- KU TELESKOPOWYM Przed zamontowaniem urządzenia MERLIN-13 na celowniku teleskopowym należy wykonać następu- jące czynności przygotowawcze: > Wybrać adapter zaciskowy odpowiedni do tuby obiektywz celownika teleskopowego. > Przygotować gwintowany adapter (8), pasujący do złącza gwintowego okularu urządzenia MERLIN-13 i adaptera zaciskowego. - Page 62 Montaż > Zamontować gwintowany adapter (8) na urzą- dzeniu MERLIN-13, wkręcając go w prawo. > Obrócić pierścień mocujący okular (6) w lewo, aby zablokować adapter (8). > Zamontować gwintowany adapter (8) w adapte- rze zaciskowym (9). > Zamontować adapter zaciskowy (9) z urządze- niem MERLIN-13 na tubie obiektywu (10) celowni- ka teleskopowego.
-
Page 63: Menu / Symbole Napasku Stanu
06. MENU / SYMBOLE NA PASKU STANU White-Hot Black-Hot Red-Hot Kolor Jasność wyświetlacza Ręczna kalibracja Automatyczna kalibracja Tryb USB Wskaźnik stanu baterii 07. FUNKCJE OBSŁUGOWE 7.1 Przycisk włączania/wyłączania > Aby włączyć urządzenie, nacisnąć i przytrzymać przycisk P (2). Odczekać trzy sekundy na wyświe- tlenie głównego interfejsu użytkownika. -
Page 64: Tryb Czuwania
7.2 Tryb czuwania > Nacisnąć i przytrzymać przycisk P (2), aż pojawi się licznik, po czym po 3 sekundach zwolnić przy- cisk, aby uruchomić tryb oczekiwania licznika. > Ponownie nacisnąć przycisk P (2), aby wyjść z trybu oczekiwania. 7.3 Pasek stanu W głównym interfejsie użytkownika w dolnej części wyświetlacza znajdują... - Page 65 > Przy przełączaniu na kierunek poziomy należy na- cisnąć przycisk P (2), aby wykonać przesunięcie w lewo, i przycisk M (4), aby wykonać przesunię- cie w prawo. Metoda ruchu jest taka sama jak w przypadku pionowej na osi Y. > Nacisnąć i przytrzymać jednocześnie przycisk P (2) oraz przycisk M (4), aby zapisać...
- Page 66 7.6 Menu szybkiego wyboru W głównym interfejsie użytkownika nacisnąć przy- cisk M (4), aby przejść do menu szybkiego wyboru. W menu szybkiego wyboru są dostępne następują- ce opcje: Paleta — Jasność wyświetlacza — Kalibracja — Wyjście. > Paleta: Nacisnąć przycisk P (2), aby wybrać spośród trybów White-Hot —...
-
Page 67: Informacje Dotyczące Bezpieczeństwa
08. INFORMACJE DOTYCZĄCE BEZPIECZEŃSTWA > Nigdy nie patrzeć bezpośrednio w jasne źródła światła (np. światło słoneczne). > Zapobiegać kontaktowi soczewek obiektywu z ostrymi przedmiotami. > Używać standardowej baterii. Zużytych baterii nie wyrzucać do odpadów domowych ani wrzucać do ognia. > Nie wystawiać urządzenia na działa- nie temperatur otoczenia powyżej (60°C). -
Page 68: Konserwacja
09. KONSERWACJA Prace konserwacyjne należy przeprowadzać co najmniej dwa razy w roku. Obejmują one następują- ce czynności: > Powierzchnie zewnętrzne części metalowych i z tworzywa sztucznego oczyścić z pyłu i zabrudzeń bawełnianą ściereczką. Można do tego celu użyć oleju silikonowego. >... - Page 69 NOTATKI – MERLIN –13 · Instrukcja obsługi 11 / 2020...
- Page 70 NOTATKI...
- Page 71 Changes in design, technical implementation, scope of delivery and prices reserved. LIEMKE · MERLIN – 13 · Manual de instrucciones Última modificación: 11 / 2020 Con reserva de modificaciones en la construcción o la ejecución.
- Page 72 LIEMKE GmbH & Co.KG Detmolder Straße 629b D – 33699 Bielefeld Germany +49 (0) 521 329 695 - 0 office@liemke.com www.liemke.com Kontakt technischer Service Contact technical service Contactar con el servicio técnico Contactez le service technique Skontaktuj się z serwisem technicznym Blaser Group Wetzlar GmbH &...