Publicité

Les langues disponibles
  • FR

Les langues disponibles

Liens rapides

Gas Nailer
OPERATING INSTRUCTIONS MANUAL
MANUEL D'INSTRUCTIONS D'UTILISATION
MANUAL DE INSTRUCCIONES DE FUNCIONAMIENTO
CORDLESS FASTENING SYSTEM
SYSTÈME DE FIXATION SANS
CORDON
SISTEMA DE FIJACIÓN SIN
CABLES
SCHNURLOSES
BEFESTIGUNGSSYSTEM
SISTEMA DI FISSAZIONE
SENZA CORDONE
INDEX
INDEX
ÍNDICE
INDEX
INDICE ANALITICO
Please read instructions and warnings for this tool carefully before use. Failure to do so could lead to
WARNING
serious injury.
Keep these instructions with the tool for future reference.
Lisez soigneusement les instructions et les avertissements pour cet outil avant utilisation. Tout
AVERTISSEMENT
manquement à cette consigne pourrait entraîner des blessures graves.
Conservez ces instructions avec l'outil pour toute consultation ultérieure.
Lea detenidamente las instrucciones y advertencias de esta herramienta antes de usarla. De lo
ADVERTENCIA
contrario, pueden producirse lesiones corporales graves.
Conserve estas instrucciones junto con la herramienta para futuras consultas.
Bitte lesen Sie sich die Anweisungen und Warnungen für dieses Werkzeug vor der Verwendung
WARNUNG
sorgfältig durch. Anderenfalls könnte dies zu schweren Verletzungen führen.
Bewahren Sie diese Anweisungen zum späteren Nachschlagen mit dem Werkzeug zusammen auf.
Prima dell'uso, leggere con cura le istruzioni e le avvertenze relative a questo utensile. La mancata
AVVERTENZA
osservanza di questa indicazione potrebbe portare a gravi lesioni personali.
Conservare queste istruzioni insieme all'utensile per consultazioni future.
BETRIEBSANLEITUNG
ISTRUZIONI PER L'USO
ENGLISH
Page
FRANÇAIS
Page
ESPAÑOL
Página 18 a 26
DEUTSCH
Seite
ITALIANO
Pagine da 37 a 45
1 to 8
9 à 17
27 bis 36
FORCE ONE
Original Language English

Publicité

Table des Matières
loading

Sommaire des Matières pour CELO FORCE ONE

  • Page 1 BETRIEBSANLEITUNG ISTRUZIONI PER L’USO CORDLESS FASTENING SYSTEM SYSTÈME DE FIXATION SANS CORDON SISTEMA DE FIJACIÓN SIN CABLES SCHNURLOSES BEFESTIGUNGSSYSTEM SISTEMA DI FISSAZIONE SENZA CORDONE FORCE ONE INDEX ENGLISH Page 1 to 8 INDEX FRANÇAIS Page 9 à 17 ÍNDICE ESPAÑOL Página 18 a 26...
  • Page 2 Fig.1 Fig.2 Fig.3 0abc Fig.4 Fig.5 Fig.6 Fig.7 Fig.8 Fig.9 Fig.10 Fig.11 Fig.12...
  • Page 3 Fig.13 Fig.14 Fig.15 Fig.16 Fig.17 Fig.18 Fig.19...
  • Page 4: General Safety Rules

    Be sure the discharge outlet tions for which the tool is being used. Contact Celo authorized is not pointed toward people when connecting and discon- distributors for information on actuation systems options;...
  • Page 5 Before operating, inspect tool to confirm During operation, debris from workpiece and fastening/col- • use of proper power source - see Celo Operating In- lation system may be discharged. Take cautions of these structions Manual debris. • that tool is in proper working order Always wear impact-resistant eye protection with side •...
  • Page 6 If any 8. Do not breathe in the gas. abnormality is found, contact Celo authorized distributor. 9. Do not incinerate or recycle the empty Fuel Cell. Unplug the charger when it is not used.
  • Page 7 The troubleshooting and/or repairs shall be carried out only by the Celo authorized distributors or by other specialists. For the repair of the tools, only spare parts specified by Celo shall be used. When disposing the tool or its parts, follow the relevant national...
  • Page 8: Specifications And Technical Data

    Follower Holder AC Adapter NOTE: The triangle symbol marked as “ ” following its tool serial number indicated that safety yoke is equipped with this tool. TOOL SPECIFICATIONS PRODUCT NO. FORCE ONE HEIGHT 380 mm (15˝) WIDTH 123 mm (4-7/8˝) LENGTH 328 mm (13˝)
  • Page 9: Technical Data

    APPLICATIONS ∗ Fixing Celo Accessory to concrete, steel, wood or hollow concrete block ∗ Fixing drywall track to concrete or steel ∗ Fixing saddle band to concrete ∗...
  • Page 10 2. HOW TO USE THE BATTERY HOW TO CHARGE (Fig.2) If the Battery 1 is used up, remove it from the tool. AND THE CHARGER Firmly holding the tool body, press the latches 2 on both side of the Battery 1 with your fingers to remove. NOTICE: PROPER USE OF BATTERY (Fig.3) Insert the AC adapter’s 1 jack into the Charger 2 Fully charge and discharge the Battery.
  • Page 11: Instructions For Operation

    4. INSTRUCTIONS FOR OPERATION REPLACING THE BATTERY If the Battery is low, the red LED of the tool will be turned on. BEFORE OPERATION (Fig. 2) Firmly holding the grip, press the latches 2 on both sides of the Battery 1 to remove it. Wear Safety Glasses or Goggles.
  • Page 12: Les Employeurs, Les Propriétaires Et Opérateurs De L'outil Doivent Au Minimum

    Ne tendez pas le bras trop loin. Utilisez l’outil uniquement applications de travail pour lesquelles l’outil est utilisé. dans un lieu de travail sûr. Restez en permanence bien en Contactez les distributeurs agréés Celo pour plus équilibre sur les pieds. d’informations sur les options des systèmes d’activation ;...
  • Page 13 Vous ôtez des fixations coincées ; • qu'une source d'alimentation appropriée est utilisée - • Vous élevez, abaissez ou déplacez l’outil vers un nouvel voir le Manuel d'instructions d'utilisation Celo endroit ; • que l’outil est dans un état de fonctionnement approprié •...
  • Page 14 Utilisez uniquement des fixations et des accessoires conçus et recommandés par Celo ou des fixations et des Instructions supplémentaires de sécurité pour les outils à gaz accessoires équivalents à ceux recommandés par Celo.
  • Page 15: Dépannage/Réparation

    Le diagnostic de panne et/ou les réparations doivent être réalisés 15. Ne mettez pas le bornier de la batterie en court-circuit uniquement par des distributeurs autorisés de la société Celo ou (section métallique). Si vous le mettez en court-circuit, une tout autre spécialiste qui respectera les informations contenues...
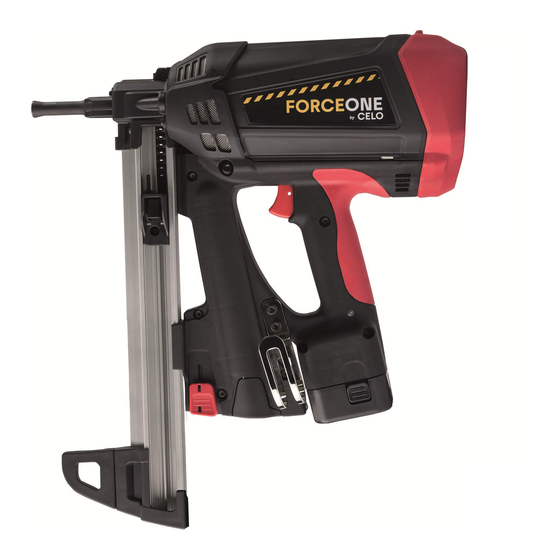
  • Page 16: Caractéristiques Techniques Et Accessoires

    Adaptateur secteur REMARQUE : le symbole triangulaire « » qui suit le numéro de série de l'outil indique qu'une fourche de sécurité équipe cet outil. SPÉCIFICATIONS DE L’OUTIL NUMÉRO DU PRODUIT FORCE ONE HAUTEUR 380 mm (15˝) LARGEUR 123 mm (4-7/8˝) LONGUEUR 328 mm (13˝)
  • Page 17: Données Techniques

    à usiner et du support de la pièce à usiner. APPLICATIONS ∗ Accessoire de fixation Celo sur béton, acier, bois ou bloc de béton creux ∗ Fixation de bâtis de cloison sèche sur du béton ou de l'acier ∗...
  • Page 18: Méthode D'utilisation De La Batterie Et Du Chargeur

    2. MÉTHODE D'UTILISATION DE • Aucune des LED rouge ou verte ne s'allume ou ne clignote si la batterie est en place dans le chargeur. LA BATTERIE ET DU • La LED verte ne s'allume pas 150 minutes après que la rouge se soit allumée.
  • Page 19: Consignes D'utilisation

    ∗ Lorsque le capuchon à carburant est fermé et que la batterie EXTRACTION DES CLOUS est dans l'outil, l'électrovanne de l'outil expulse l'air de la (Fig. 11) Tirez le support du suiveur 1 et appuyez le chambre de l'électrovanne et vous pouvez alors entendre le suiveur, puis remettez en place le support du suiveur 1.
  • Page 20: Ne Déclenchez Pas L'outil Sans Fixations À L'intérieur

    les instructions d’entretien de l’outil du fabricant sont disponibles pour le personnel qui procède à l’entretien ; les outils qui nécessitent une réparation sont retirés du service et que des étiquettes et une mise à l’écart physique sont utilisés comme moyens de contrôle ; tous les outils en leur possession sont correctement entretenus.
  • Page 21: Peligro De Explosión

    Póngase en en un lugar de trabajo seguro. Manténgase en todo contacto con un distribuidor autorizado de Celo para obtener momento en equilibrio, con los pies bien apoyados en el información sobre los diferentes sistemas de activación.
  • Page 22 Valore los riesgos específicos que puedan presentarse como debe ser reparada por personal cualificado que utilice resultado de cada uso concreto. piezas suministradas o recomendadas por Celo o piezas con un rendimiento equivalente. Peligros provocados por elementos proyectados Antes de usar la herramienta, inspecciónela para...
  • Page 23 Las herramientas de gas solo deben usarse con las pilas de Utilice únicamente clavos y accesorios fabricados o combustible indicadas en el manual de instrucciones de recomendados por Celo, o cuyo rendimiento sea funcionamiento de la herramienta. equivalente a los recomendados por Celo.
  • Page 24: Almacenamiento

    La solución de problemas y las reparaciones deben ser grasa. Si el cable de alimentación se deteriora, sustitúyalo confiadas únicamente a distribuidores autorizados de Celo o a por uno nuevo. otros técnicos cualificados.
  • Page 25: Especificaciones Y Datos Técnicos

    NOTA: El símbolo de triángulo marcado como “ ” a continuación del número de serie de la herramienta indica que la máquina está equipada con una abrazadera de seguridad. ESPECIFICACIONES DE LA HERRAMIENTA N° DE PRODUCTO FORCE ONE ALTURA 380 mm (15˝) ANCHURA 123 mm (4-7/8")
  • Page 26: Datos Técnicos

    APLICACIONES ∗ Fijación de accesorios Celo a hormigón, acero, madera o bloques huecos de hormigón ∗ Fijación de perfiles de paneles de yeso a hormigón o acero ∗ Fijación de abrazaderas a hormigón ∗...
  • Page 27: Cómo Insertar La Pila De Combustible En La Herramienta

    2. CÓMO USAR LA BATERÍA Y EL • El LED verde no se ilumina 150 minutos después de que el rojo se haya iluminado. CARGADOR • El LED rojo no se ilumina cuando la batería está insertada en el cargador. AVISO: USO ADECUADO DE LA BATERÍA CÓMO CARGAR LA BATERÍA Cargue y descargue por completo la batería.
  • Page 28: Antes Del Funcionamiento

    (Fig.7) Para finalizar, cierre la tapa del combustible hasta DISCO DE AJUSTE DE LA PROFUNDIDAD DE PENETRACIÓN que encaje haciendo clic. Para ajustar la profundidad de penetración, gire el disco de ∗ Cuando la tapa del combustible se cierra con la batería ajuste como se indica a continuación.
  • Page 29: Instrucciones De Mantenimiento

    5. INSTRUCCIONES DE MANTENIMIENTO ADVERTENCIA Debe realizarse un mantenimiento adecuado de la herramienta para garantizar un funcionamiento seguro. LOS EMPLEADOS, PROPIETARIOS DE LA HERRAMIENTA Y OPERARIOS SON RESPONSABLES DE GARANTIZAR QUE: Las instrucciones de mantenimiento de la herramienta estén a disposición del personal pertinente. La herramienta sea reparada ÚNICAMENTE POR PERSONAL CUALIFICADO.
  • Page 30: Allgemeine Sicherheitsvorschriften

    Seien Sie vorsichtig beim Umgang mit Befestigungsmitteln, Auslösesystem-Varianten wenden Sie sich bitte an einen insbesondere beim Einlegen und Herausnehmen, da die Vertragshändler von Celo. Befestigungsmittel scharfe Enden haben, die Verletzungen 3. die Bediener des Werkzeugs und die Benutzer in die sichere verursachen können.
  • Page 31 Lösen Sie das Werkzeug niemals in den freien Raum hinein qualifiziertes Personal darf das Werkzeug unter aus. Dadurch vermeiden Sie Gefahren, die durch frei Verwendung von Teilen, die von Celo bereitgestellt oder herumfliegende Befestigungsmittel und übermäßige empfohlen wurden, oder gleichwertigen Teilen reparieren.
  • Page 32 Griffkraft höher ist. Verwenden Sie nur Befestigungsmittel und Zubehörteile, Falls ein Bediener über längere Zeit Werkzeugvibrationen die von Celo hergestellt wurden oder empfohlen werden, ausgesetzt ist, besteht für ihn die Gefahr von Verletzungen oder Befestigungsmittel und Zubehörteile, die gleichwertig durch wiederholte Belastung (RSI-Syndrom).
  • Page 33 4. Verwenden Sie zum Laden des Akkus keinen Wenn Sie etwas Ungewöhnliches feststellen, wenden Transformator wie einen Verstärker, keinen Sie sich an einen Vertragshändler von Celo. Stromgenerator und keine Gleichstromversorgung. Das Ziehen Sie den Stecker des Ladegeräts heraus, wenn es Nichtbeachten dieser Warnung verursacht eine Störung...
  • Page 34 Die Störungsbeseitigung und/oder Reparaturen dürfen nur von Vertragshändlern von Celo oder anderen Fachleuten durchgeführt werden. Für die Reparatur des Werkzeugs dürfen nur die von Celo festgelegten Ersatzteile verwendet werden. Befolgen Sie bei der Entsorgung des Werkzeugs oder zugehöriger Teile die entsprechenden nationalen Vorschriften.
  • Page 35: Spezifikationen Und Technische Daten

    Nachläufer Netzstecker Nachläufer-Halterung Wechselstromadapter HINWEIS: Das Dreiecksymbol „ “ nach der Seriennummer des Werkzeugs zeigt an, dass dieses Werkzeug mit Auslösesicherung ausgestattet ist. WERKZEUGSPEZIFIKATIONEN PRODUKT-NR. FORCE ONE HÖHE 380 mm (15˝) BREITE 123 mm (4-7/8") LÄNGE 328 mm (13˝) GEWICHT 3,6 kg (7,9 lbs) (einschließlich Akku)
  • Page 36: Technische Daten

    Beispiel von der Griffkraft, der Kontakt-Anpresskraft, der Arbeitsrichtung, der Einstellung der Energieversorgung, dem Werkstück und der Werkstückauflage ab. ANWENDUNGSGEBIETE ∗ Befestigen von Celo-Zubehör an Beton, Stahl, Holz oder hohlen Betonblöcken ∗ Befestigen von Trockenbauwandschienen an Beton oder Stahl ∗ Befestigen von Sattel-Rohrschellen an Beton ∗...
  • Page 37 2. VERWENDUNG DES AKKUS Probleme mit dem Akkuladegerät Die folgenden Fälle werden als Probleme angesehen. Ersetzen UND DES LADEGERÄTS Sie das Ladegerät und den Akku durch neue. • Die grüne LED leuchtet nicht auf, wenn der Netzstecker des HINWEIS: ORDNUNGSGEMÄSSE VERWENDUNG DES Ladegeräts in eine Steckdose mit 100–240 V Wechselstrom AKKUS (Haushaltssteckdose) eingesteckt wird.
  • Page 38: Bedienung

    3. UMGANG MIT DER EINTREIBEN DER STIFTE Das Auslösesystem des Werkzeugs ist ausschließlich vom Typ BRENNSTOFFZELLE „Vollständige fortlaufende Auslösung“. Vorgehensweise Die Brennstoffzelle ist doppelt strukturiert: Der innere Behälter Setzen Sie den Akku und die Brennstoffzelle ein. wurde mit einem flüssigen Brenngas befüllt und der äußere mit (Fig.10) Drücken Sie die Kontaktnase gegen die Stelle, an einem Treibgas (einem anderen Druckgas).
  • Page 39 ENTFERNEN VERKLEMMTER STIFTE HINWEIS: • GEHEN SIE VORSICHTIG MIT DEM WERKZEUG UM. WARNUNG Lassen Sie das Werkzeug niemals fallen, mit etwas kollidieren oder gegen ein hartes Material stoßen. Es könnte verformt, • Trennen Sie IMMER den Akku und die Brennstoffzelle ab. rissig oder beschädigt werden.
  • Page 40 Per informazioni sulle opzioni dei sistemi di Tenere gli astanti e i bambini lontani (quando si lavora in azionamento, contattare i distributori autorizzati Celo; un'area in cui sussiste la probabilità di traffico di passaggio di 3. Addestrare gli operatori e gli utenti dell'utensile all'utilizzo in persone).
  • Page 41 Non utilizzare l'utensile come martello. utilizzando pezzi di ricambio forniti o consigliati da Celo o L'utensile deve essere utilizzato solo per lo scopo per il pezzi di ricambio che abbiano prestazioni equivalenti.
  • Page 42 Utilizzare esclusivamente elementi di fissaggio e accessori Gli utensili a gas vanno utilizzati esclusivamente con le celle fabbricati o consigliati da Celo, oppure elementi di fissaggio a combustibile elencate nel manuale d'uso dell'utensile in e accessori che offrano prestazioni equivalenti a quelli con- questione.
  • Page 43 La risoluzione dei problemi e/o le riparazioni vanno eseguite solo 15. Non cortocircuitare la morsettiera (sezione in metallo) della da distributori autorizzati Celo o da altri specialisti. batteria. Qualora venga cortocircuitata, si verifica un flusso Per la riparazione degli utensili, utilizzare esclusivamente pezzi di corrente estremamente elevato che surriscalda la di ricambio specificati da Celo.
  • Page 44: Specifiche E Caratteristiche Tecniche

    NOTA: Il simbolo del triangolo contrassegnato come “ ” che segue il relativo numero di serie dell'utensile indica che questo utensile è dotato di forcella di sicurezza. SPECIFICHE DELL'UTENSILE N. PRODOTTO FORCE ONE ALTEZZA 380 mm (15˝) LARGHEZZA 123 mm (4-7/8˝) LUNGHEZZA 328 mm (13˝)
  • Page 45: Caratteristiche Tecniche

    CAMPI DI APPLICAZIONE ∗ Fissaggio dell'accessorio Celo a calcestruzzo, acciaio, legno o blocco di calcestruzzo vuoto ∗ Fissaggio di binari per cartongesso su calcestruzzo o acciaio ∗ Fissaggio di cavallotti al calcestruzzo ∗...
  • Page 46 2. COME UTILIZZARE LA Problemi del caricabatterie I casi seguenti sono considerati come problemi. Sostituire il BATTERIA E IL caricabatterie e la batteria con nuove unità. • Il LED verde non si accende se la spina dell'alimentazione CARICABATTERIE elettrica del caricabatterie viene inserita in una presa elettrica da 100-240 V CA (per uso domestico) (con la batteria non NOTA: USO CORRETTO DELLA BATTERIA inserita).
  • Page 47: Prima Dell'uso

    Pertanto, è necessario adottare la massima cautela quando si MANOPOLA DI REGOLAZIONE DELLA PROFONDITÀ DI smaltisce la cella a combustibile vuota. APPLICAZIONE Regolare la profondità di applicazione ruotando la manopola di INSERIMENTO DELLA CELLA A COMBUSTIBILE regolazione come indicato di seguito. NELL'UTENSILE (Fig.5) Premere il dispositivo di chiusura, quindi tirare il tappo del carburante 1.
  • Page 48: Istruzioni Per La Manutenzione

    5. ISTRUZIONI PER LA MANUTENZIONE AVVERTENZA È richiesta una manutenzione corretta per mantenere l'utensile in una condizione di funzionamento in sicurezza. DATORI DI LAVORO, PROPRIETARI DELL'UTENSILE E OPERATORI DELL'UTENSILE HANNO LA RESPONSABILITÀ DI ASSICURARE CHE: le istruzioni di manutenzione dell'utensile siano disponibili per il personale appropriato;...
  • Page 49 FORCE ONE ESPLOSO DEI EXPLODED SCHEMA ECLATE ET DESPIECE DE LA EINZELTEILDAR- COMPONENTI ED VIEW AND SPARE LISTE DES PIECES MAQUINA Y LISTA STELLUNG UND ELENCO DELLE PARTS LIST DE RECHANGE DE RECAMBIOS ERSATZTEILLISTE PARTI DI RICAMBIO 204 205 209 210...
  • Page 50 FORCE ONE ITEM PART MATERIAL ENGLISH FRANÇAIS ESPAÑOL DEUTSCH ITALIANO COUVERCLE DE FILTRE À CUBIERTA DEL FILTRO LUFTFILTER- COPERTURA DEL FILTRO GN12465 Polypropylene AIR FILTER COVER DE AIRE ABDECKUNG DELL’ARIA GN12435 Polyurethane AIR FILTER FILTRE À AIR FILTRO DE AIRE LUFTFILTER FILTRO DELL’ARIA...
  • Page 51 FORCE ONE ITEM PART MATERIAL ENGLISH FRANÇAIS ESPAÑOL DEUTSCH ITALIANO FILTRO DE LA GN12086 Polyurethane HANDLE FILTER FILTRE DE POIGNÉE GRIFFFILTER FILTRO MANIGLIA EMPUÑADURA GN11590 Steel SQUARE NUT M5 ÉCROU CARRÉ M5 TUERCA CUADRADA M5 VIERKANTMUTTER M5 DADO QUADRATO M5 CONJUNTO DE VÁLVULA...
  • Page 52 FORCE ONE ITEM PART MATERIAL ENGLISH FRANÇAIS ESPAÑOL DEUTSCH ITALIANO CONJUNTO DE GN70190 TRIGGER ASSY ENS. DÉCLENCHEUR AUSLÖSER-BAUGRUPPE GRUPPO GRILLETTO DISPARADOR PARALLEL PIN GOUPILLE PARALLÈLE PERNO PARALELO ZYLINDERSTIFT PERNO PARALLELO FF31514 Stainless Steel (TRIGGER) (DÉCLENCHEUR) (DISPARADOR) (AUSLÖSER) (GRILLETTO) CAPOT DE BARRE DE...
  • Page 53 FORCE ONE ITEM PART MATERIAL ENGLISH FRANÇAIS ESPAÑOL DEUTSCH ITALIANO CONSTANT FORCE RESSORT À FORCE MUELLE DE FUERZA FEDER MIT KONSTANTER MOLLA A FORZA GN12067 Stainless Steel SPRING CONSTANTE CONSTANTE KRAFT COSTANTE GN12065 Polyacetal SPRING COLLAR COLLIER À RESSORT COLLARÍN DE MUELLE...
  • Page 56 • The content of this manual might be changed without notice for improvement. • Le contenu de ce manuel est sujet à modification sans préavis à des fins d’amélioration. • El contenido de este manual puede ser cambiado sin noticia previa para mejoramiento. •...

Table des Matières