Publicité
Liens rapides
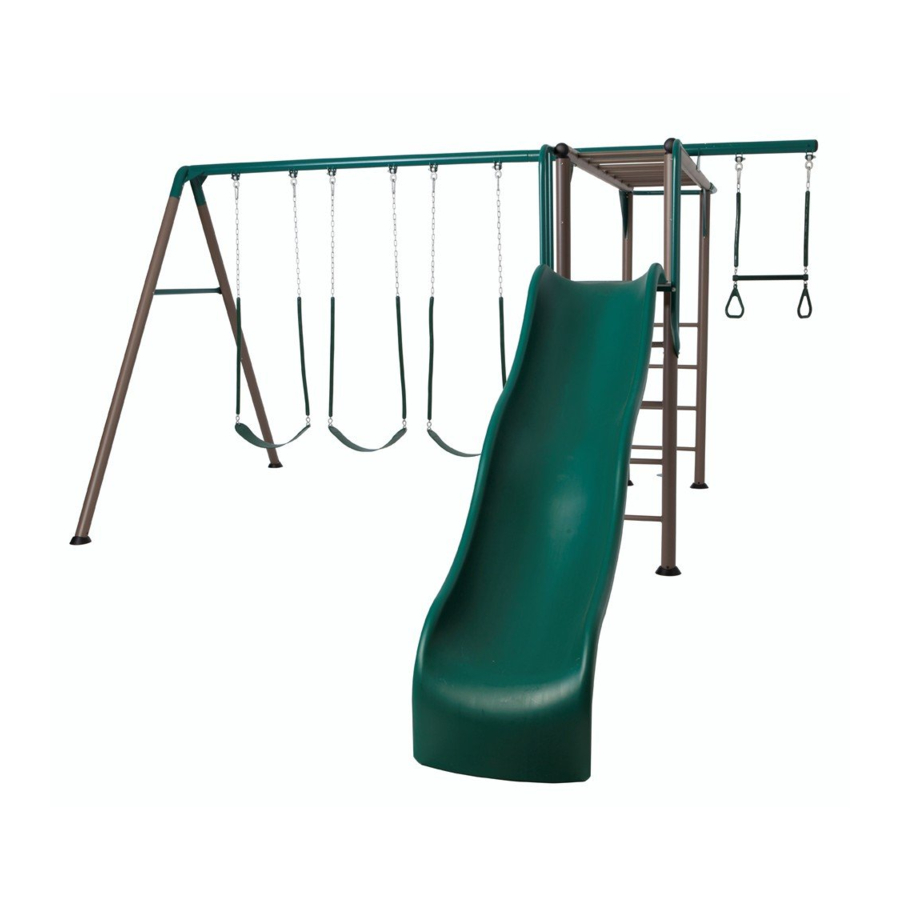
MONKEY BAR ADVENTURE
SWING SET
MODEL #60091
MODEL 91022
BEFORE ASSEMBLY :
• Prepare a level surface with the proper safety zone (see
page 12).
• 2 adults recommended for setup.
• Inspect all parts and hardware. Ensure all are
included using the Parts Identifier in the middle
of these instructions. The Parts Identifier , in
yellow, can be removed from the instructions for
quick reference.
ADDITIONAL ASSEMBLY HELP
ASSEMBLE IT WITH THE FREE BILT INTELLIGENT
INSTRUCTIONS APP
IN THE APP, SCAN OR SEARCH #1208951
IMPORTANT, RETAIN FOR FUTURE REFERENCE: READ CAREFULLY
TOOLS REQUIRED (NOT INCLUDED—UNLESS INDICATED OTHERWISE)
1/2 in/po (≈13 mm)
(1)
(1)
QUESTIONS?
CONTACT LIFETIME CUSTOMER SERVICE:
Call: 1-800-225-3865
7:00 am–5:00 pm (Monday–Friday) MST
and 9:00 am–1:00 pm Saturday MST
(English, French, Spanish)
WATCH THE INSTRUCTIONAL VIDEOS ON YOUTUBE
Scan the code, or visit go.lifetime.com/monkeybaradventure
7/16 in/po (≈11 mm)
(1)
(2)
(1)
(1)
Live Chat: www.lifetime.com/customerservice
(click on "LIVE CHAT" tab)
For customer service in mainland Europe:
E-mail: cs@lifetimeproducts.eu
ASSEMBLY INSTRUCTIONS
Pour le français, voir la page 2. Para el español, ver la página 3.
3/16 in/po (≈5 mm)
(1, included)
(2)
3/16 in/po (≈5 mm)
3/8 in/po (≈10 mm)
(1, included)
TABLE OF CONTENTS
Icon legend.................................4
Warnings and notices..................5
Safety information.....................6
Safe play area...........................12
A-frame assembly.....................13
Monkey bar assembly................23
Parts identifi er..........................i-iv
Fire pole assembly.....................35
Slide and swing assembly..........39
Maintenance instructions..........48
Registration...........................51
Warning sticker.........................52
Warranty..............................53
(1)
MODEL# AND PRODUCT ID
(you will need both when contacting us)
Model Number: 91022
Product ID:
Publicité

Manuels Connexes pour Lifetime 91022


Sommaire des Matières pour Lifetime 91022
- Page 1 ASSEMBLE IT WITH THE FREE BILT INTELLIGENT WATCH THE INSTRUCTIONAL VIDEOS ON YOUTUBE INSTRUCTIONS APP Scan the code, or visit go.lifetime.com/monkeybaradventure IN THE APP, SCAN OR SEARCH #1208951 IMPORTANT, RETAIN FOR FUTURE REFERENCE: READ CAREFULLY TOOLS REQUIRED (NOT INCLUDED—UNLESS INDICATED OTHERWISE) TABLE OF CONTENTS Icon legend.........4...
- Page 2 Enregistrement.......51 Autocollant d’avertissement..52 (1, inclus) Garantie......54 QUESTIONS ? JOINDRE LE SERVICE À LA CLIENTÈLE DE LIFETIME Clavardage : www.lifetime.com/customerservice Composer le 1-800-225-3865 NOS DE MODÈLE ET DE PRODUIT (vous aurez à nous fournir les deux) Lundi au vendredi : 7 h à 17 h (HR) (cliquer sur l’onglet « Live Chat »)
- Page 3 Autoadhesivo de advertencia..52 (1, incluido) Garantía......55 ® ¿PREGUNTAS? PONERSE EN CONTACTO CON LOS SERVICIOS DE CLIENTES LIFETIME Marcar : 1-800-225-3865 Chat en vivo: www.lifetime.com/customerservice MODEL E ID DEL PRODUCTO (necesitará los dos al contactarnos) (cliquee en la lengüeta «LIVE CHAT») Número de modelo: 91022...
- Page 4 ICON LEGEND / LÉGENDE DES ICÔNES / LEYENDA DE ÍCONOS • Indicates special heed should be taken when reading. • Indique qu’une attention spéciale doit être prise lors de la lecture. • Indica que uno debe prestar atención al leer. •...
- Page 5 WARNINGS & NOTICES / AVERTISSEMENTS ET AVIS / ADVERTENCIAS Y AVISOS SAFETY INSTRUCTIONS FAILURE TO FOLLOW THESE WARNINGS MAY RESULT IN SERIOUS INJURY OR PROPERTY DAMAGE AND WILL VOID WARRANTY. Owner must ensure that all players know and follow these rules for safe operation of the system. To ensure safety, do not attempt to assemble this product without following the instructions carefully.
- Page 6 **IMPORTANT SAFETY INFORMATION** PLEASE READ BEFORE BEGINNING ASSEMBLY: INSTALLATION AND GROUND PREPARATION INSTRUCTIONS • Place the equipment on level, well-drained ground, not less than 6.6 ft (2.0 m) from any structure or obstruction such as a fence, garage, house, overhanging branches, laundry lines, or electrical wires. •...
- Page 7 CONSUMER INFORMATION SHEET FOR PLAYGROUND SURFACING MATERIALS* Select Protective Surfacing—One of the most important things you can do to reduce the equipment support posts. That way you can easily see when to replenish and/ likelihood of serious head injuries is to install shock-absorbing protective surfacing or redistribute the surfacing.
- Page 8 **INFORMATIONS DE SÉCURITÉ IMPORTANTES** VEUILLEZ LIRE AVANT DE COMMENCER L’ASSEMBLAGE : INSTRUCTIONS D’INSTALLATION ET DE PRÉPARATION DE TERRAIN • Placez l’équipement sur un terrain de niveau et bien drainé, à plus de 2 m (6,6 pi) de toute structure ou obstruction telle qu’une clôture, un garage, une maison, des branches basses, des cordes à...
- Page 9 FEUILLE D’INFORMATION AU CLIENT POUR LES MATÉRIAUX DE SURFAÇAGE DE TERRAIN DE JEU* Sélectionner une surface protectrice—L’une des choses les plus importantes Vérifi er et maintenir la profondeur du matériel protecteur de surface en que vous puissiez faire pour réduire la probabilité de blessures graves à vrac.
- Page 10 **INFORMACIÓN DE SEGURIDAD IMPORTANTE** LEA POR FAVOR ANTES DE INICIAR EL ENSAMBLE: INSTRUCCIONES DE INSTALACIÓN Y DE PREPARACIÓN DEL PISO • Coloque el equipo sobre un piso nivelado, bien drenado, a no menos de 2.0 m (6.6 pies) de cualquier estructura u obstrucción como una cerca, cochera o una casa, ramas que cuelgan, lazos para tender ropa o cables eléctricos.
- Page 11 HOJA DE INFORMACIÓN DEL CONSUMIDOR PARA LOS MATERIALES DE REVESTIMIENTO SUPERFICIAL DEL EQUIPO DE PATIO DE RECREO* Seleccionar la superfi cie protectora—Una de las cosas más importantes Verifi car y mantener la profundidad de relleno suelto. Para mantener la que uno puede hacer para disminuir la probabilidad de lesiones graves profundidad correcta de relleno suelto, marque el nivel correcto en los en la cabeza es de instalar una superfi...
- Page 12 SAFE PLAY AREA / ZONE DE SÉCURITÉ / ZONA DE SEGURIDAD SAFETY ZONE — Place the equipment no less than 6' 6" (2,0 m) from any structure or obstruction such as a fence, garage, house, overhanging branches, laundry lines, or electrical wires. Make sure the clearance in front of and behind the swings is at least twice the height of the swing bar.
- Page 13 A-FRAME ASSEMBLY / ASSEMBLAGE DE LA CHARPENTE EN « A » / ENSAMBLE DEL ARMAZÓN EN «A» HARDWARE REQUIRED / QUINCAILLERIE REQUIS / HERRAJE REQUERIDO Hardware blister pack / Blister des quincaillerie Blíster de herraje DZR (x6) DSA (x10) GCB (1) EEO (x1) BTS (x12) GBW (x2)
- Page 14 • Si tiene problemas con esta sección, escanee el código abajo para ver un video del ensamble de la ensamble del armazón en «A». http://go.lifetime.com/monkeybaraframeassembly • Attach the pendulums (DZQ) to the swing bar (GER) using the hardware shown. Do this for each set of brackets on the swing bar.
- Page 15 SECTION 1 (CONTINUED) / SECTION 1 (SUITE) SECCIÓN 1 (CONTINUACIÓN) TOOLS AND HARDWARE REQUIRED / OUTILS ET QUINCAILLERIE REQUIS INSTRUMENTAL Y HERRAJE REQUERIDOS 3/16 in/po (≈5 mm) 3/16 in/po (≈5 mm) DSA (x4) BTS (x4) • Line up the holes in the upper swing legs (GEO) with the holes in the lower swing leg (GEP). Slide the lower swing leg into the upper swing legs.
- Page 16 SECTION 1 (CONTINUED) / SECTION 1 (SUITE) SECCIÓN 1 (CONTINUACIÓN) TOOLS AND HARDWARE REQUIRED / OUTILS ET QUINCAILLERIE REQUIS INSTRUMENTAL Y HERRAJE REQUERIDOS 3/16 in/po (≈5 mm) 3/16 in/po (≈5 mm) DSA (x4) BTS (x4) • Attach an A-frame pole to the swing bar (GER) in the location indicated. •...
- Page 17 SECTION 1 (CONTINUED) / SECTION 1 (SUITE) SECCIÓN 1 (CONTINUACIÓN) TOOLS AND HARDWARE REQUIRED / OUTILS ET QUINCAILLERIE REQUIS INSTRUMENTAL Y HERRAJE REQUERIDOS 3/16 in/po (≈5 mm) 3/16 in/po (≈5 mm) DSA (x2) BTS (x2) • Attach the turn bar (CBI) to the A-frame assembly using the hardware shown. •...
- Page 18 SECTION 1 (CONTINUED) / SECTION 1 (SUITE) SECCIÓN 1 (CONTINUACIÓN) TOOLS AND HARDWARE REQUIRED / OUTILS ET QUINCAILLERIE REQUIS INSTRUMENTAL Y HERRAJE REQUERIDOS 3/16 in/po (≈5 mm) 3/16 in/po (≈5 mm) GBW (x1) BTS (x1) • Place the foot cap (GBV) with the large edge facing the ground into the bottom of the lower swing leg. Line up the slots in the foot cap with the square holes in the lower swing leg.
- Page 19 SECTION 1 (CONTINUED) / SECTION 1 (SUITE) SECCIÓN 1 (CONTINUACIÓN) TOOLS AND HARDWARE REQUIRED / OUTILS ET QUINCAILLERIE REQUIS INSTRUMENTAL Y HERRAJE REQUERIDOS • Line up the bolt so that it faces out as shown. Grasp the anchor cable approximately 3-4 inches (76 - 102 mm) from the toggle end.
- Page 20 SECTION 1 (CONTINUED) / SECTION 1 (SUITE) SECCIÓN 1 (CONTINUACIÓN) TOOLS AND HARDWARE REQUIRED / OUTILS ET QUINCAILLERIE REQUIS INSTRUMENTAL Y HERRAJE REQUERIDOS • USING AT LEAST TWO ADULTS, fl ip the A-frame over to the other side. • À L’AIDE D’AU MOINS DEUX ADULTES, retournez le cadre en « A » de l’autre côté. •...
- Page 21 SECTION 1 (CONTINUED) / SECTION 1 (SUITE) SECCIÓN 1 (CONTINUACIÓN) TOOLS AND HARDWARE REQUIRED / OUTILS ET QUINCAILLERIE REQUIS INSTRUMENTAL Y HERRAJE REQUERIDOS 3/16 in/po (≈5 mm) 3/16 in/po (≈5 mm) GBW (x1) BTS (x1) 1.10 • Place the foot cap (GBV) with the large edge facing the ground into the bottom of the lower swing leg. Line up the slots in the foot cap with the square holes in the lower swing leg.
- Page 22 SECTION 1 (CONTINUED) / SECTION 1 (SUITE) SECCIÓN 1 (CONTINUACIÓN) TOOLS AND HARDWARE REQUIRED / OUTILS ET QUINCAILLERIE REQUIS INSTRUMENTAL Y HERRAJE REQUERIDOS 1.11 • Line up the bolt so that it faces out as shown. Grasp the anchor cable approximately 3-4 inches (76 - 102 mm) from the toggle end.
- Page 23 MONKEY BAR ASSEMBLY / ASSEMBLAGE DU CAGE À GRIMPER / ENSAMBLE DEL PASAMANOS HARDWARE REQUIRED / QUINCAILLERIE REQUIS / HERRAJE REQUERIDO Hardware blister pack / Blister des quincaillerie / Blíster de herraje DSA (x22) DZR (x2) BTS (x22) BZK (x10) AAN (x2) Hardware bag / Sac de quincaillerie...
- Page 24 MONKEY BAR ASSEMBLY / ASSEMBLAGE DU CAGE À GRIMPER / ENSAMBLE DEL PASAMANOS PARTS REQUIRED / PIÈCES REQUISES / PIEZAS REQUERIDAS CONTENTS OF BOX 1 / CONTENU DE LA BOÎTE 1 CONTENIDO DE LA CAJA 1 GEU (x1) CRY (x1) CRX (x1) CWV (x4) GES (x1)
- Page 25 • Si vous avez des problèmes avec cette section, scannez le code en bas pour voir un vidéo de l’assemblage de la montaje del pasamanos. http://go.lifetime.monkeybaradventuremonkeybarassembly • Attach the pendulums (DZQ) to the trapeze swing bar (GES) using the hardware shown.
- Page 26 SECTION 2 (CONTINUED) / SECTION 2 (SUITE) SECCIÓN 2 (CONTINUACIÓN) TOOLS AND HARDWARE REQUIRED / OUTILS ET QUINCAILLERIE REQUIS INSTRUMENTAL Y HERRAJE REQUERIDOS BZK (x2) • Attach the end cap (CSD) to the trapeze swing bar (GES). Secure the end cap with two (2) cap plugs (BZK). •...
- Page 27 SECTION 2 (CONTINUED) / SECTION 2 (SUITE) SECCIÓN 2 (CONTINUACIÓN) TOOLS AND HARDWARE REQUIRED / OUTILS ET QUINCAILLERIE REQUIS INSTRUMENTAL Y HERRAJE REQUERIDOS 3/16 in/po (≈5 mm) 3/16 in/po (≈5 mm) DSA (x8) BTS (x8) BZK (x8) • Attach the round foot caps (CSB) to the fi re pole ladder (CRX) and slide ladder (CRY) at the locations shown. Secure the round foot caps with cap plugs (BZK).
- Page 28 SECTION 2 (CONTINUED) / SECTION 2 (SUITE) SECCIÓN 2 (CONTINUACIÓN) TOOLS AND HARDWARE REQUIRED / OUTILS ET QUINCAILLERIE REQUIS INSTRUMENTAL Y HERRAJE REQUERIDOS 3/16 in/po (≈5 mm) 3/16 in/po (≈5 mm) DSA (x8) BTS (x8) • Attach the saddle caps (CSA) to the fi re pole ladder (CRX) and the slide ladder (CRY), then attach the ladders to the monkey bars (GEU) using the hardware shown.
- Page 29 PARTS IDENTIFIER / IDENTIFICATEUR DE PIÈCES / IDENTIFICADOR DE PIEZAS This page intentionally left blank Cette page est intentionnellement laissée en blanc Esta página ha sido dejada en blanco intencionalmente...
- Page 30 PARTS IDENTIFIER / IDENTIFICATEUR DE PIÈCES / IDENTIFICADOR DE PIEZAS CONTENTS OF BOX 1 / CONTENU DE LA BOÎTE 1 CONTENIDO DE LA CAJA 1 GEU (x1) CRQ (x2) CRX (x1) CRS (x1) CBI (x1) CRY (x1) GEQ (x1) 24” CRZ (x1) CWV (x4)
- Page 31 PARTS IDENTIFIER / IDENTIFICATEUR DE PIÈCES / IDENTIFICADOR DE PIEZAS CONTENTS OF BOX 1 / CONTENU DE LA BOÎTE 1 CONTENIDO DE LA CAJA 1 GER (x1) CRT (x1) GEO (x2) GEP (x2) GES (x1) GNB (x1) GBZ (x3) CONTENTS OF BOX 2 / CONTENU DE LA BOÎTE 2 CONTENIDO DE LA CAJA 2 FHU (x1)
- Page 32 PARTS IDENTIFIER / IDENTIFICATEUR DE PIÈCES / IDENTIFICADOR DE PIEZAS CONTENTS OF BOX 1 / CONTENU DE LA BOÎTE 1 CONTENIDO DE LA CAJA 1 Parts bag / Sac de pièces Bolsa de piezas GBV (x2) CSA (x4) Parts bag / Sac de pièces Bolsa de piezas Parts bag /...
- Page 33 SECTION 2 (CONTINUED) / SECTION 2 (SUITE) SECCIÓN 2 (CONTINUACIÓN) TOOLS AND HARDWARE REQUIRED / OUTILS ET QUINCAILLERIE REQUIS INSTRUMENTAL Y HERRAJE REQUERIDOS • Insert the end caps (CSD) into the openings at each end of the poles on the monkey bars assembly. Make sure the holes in each cap line up with the holes in the tubes of the monkey bars.
- Page 34 SECTION 2 (CONTINUED) / SECTION 2 (SUITE) SECCIÓN 2 (CONTINUACIÓN) TOOLS AND HARDWARE REQUIRED / OUTILS ET QUINCAILLERIE REQUIS INSTRUMENTAL Y HERRAJE REQUERIDOS 3/16 in/po (≈5 mm) 3/16 in/po (≈5 mm) DSA (x4) BTS (x4) • Stand the assembly on its feet. Using a ladder, attach the trapeze swing bar (GES) to the monkey bars assembly with the hardware shown.
- Page 35 SECTION 2 (CONTINUED) / SECTION 2 (SUITE) SECCIÓN 2 (CONTINUACIÓN) TOOLS AND HARDWARE REQUIRED / OUTILS ET QUINCAILLERIE REQUIS INSTRUMENTAL Y HERRAJE REQUERIDOS 3/16 in/po (≈5 mm) 3/16 in/po (≈5 mm) DSA (x2) BTS (x2) • Have one person hold the A-frame swing assembly in position. Standing carefully on a ladder, attach the A-frame assembly to the monkey bar assembly using the hardware shown.
- Page 36 SECTION 2 (CONTINUED) / SECTION 2 (SUITE) SECCIÓN 2 (CONTINUACIÓN) TOOLS AND HARDWARE REQUIRED / OUTILS ET QUINCAILLERIE REQUIS INSTRUMENTAL Y HERRAJE REQUERIDOS (x1) • Once the swing set is upright, be sure the foot caps (GBV) are fl at on the ground. If they are not, lift the legs of the swing set, one at a time, and twist the foot caps until they are fl...
- Page 37 SECTION 2 (CONTINUED) / SECTION 2 (SUITE) SECCIÓN 2 (CONTINUACIÓN) TOOLS AND HARDWARE REQUIRED / OUTILS ET QUINCAILLERIE REQUIS INSTRUMENTAL Y HERRAJE REQUERIDOS 3/16 in/po (≈5 mm) 3/16 in/po (≈5 mm) 2.11 • Move the swing set to the side until the legs are directly above and cover the anchors (GBH). •...
- Page 38 SECTION 2 (CONTINUED) / SECTION 2 (SUITE) SECCIÓN 2 (CONTINUACIÓN) TOOLS AND HARDWARE REQUIRED / OUTILS ET QUINCAILLERIE REQUIS INSTRUMENTAL Y HERRAJE REQUERIDOS 3/16 in/po (≈5 mm) 3/16 in/po (≈5 mm) 2.13 • While still holding and pushing in the nut/bolt assembly, use the second allen wrench (EEO) to turn the bolt to tighten the anchor cable.
- Page 39 FIRE POLE ASSEMBLY / ASSEMBLAGE DU MÂT / ENSAMBLE DE LA BARRA DE BOMBEROS HARDWARE REQUIRED / QUINCAILLERIE REQUIS / HERRAJE REQUERIDO Hardware blister pack / Blister des quincaillerie Blíster de herraje DXY (x1) DSA (x2) BTS (x3) PARTS REQUIRED / PIÈCES REQUISES / PIEZAS REQUERIDAS CONTENTS OF BOX 1 / CONTENU DE LA BOÎTE 1 CONTENIDO DE LA CAJA 1...
- Page 40 • Si vous avez des problèmes avec cette section, scannez le code en bas pour voir un vidéo de l’assemblage de la barra de bomberos. http://go.lifetime.monkeybaradventurefi repoleassembly • Make sure the playground is in the desired location and measure 21" diagonally from each pole of the fi re pole ladder (CRX) as shown, and mark the ground where the two measurements meet.
- Page 41 SECTION 3 (CONTINUED) / SECTION 3 (SUITE) SECCIÓN 3 (CONTINUACIÓN) TOOLS AND HARDWARE REQUIRED / OUTILS ET QUINCAILLERIE REQUIS INSTRUMENTAL Y HERRAJE REQUERIDOS 3/16 in/po (≈5 mm) 3/16 in/po (≈5 mm) DSA (x2) BTS (x2) • Slide the plate-end of the fi re pole (CRT) over the •...
- Page 42 SECTION 3 (CONTINUED) / SECTION 3 (SUITE) SECCIÓN 3 (CONTINUACIÓN) TOOLS AND HARDWARE REQUIRED / OUTILS ET QUINCAILLERIE REQUIS INSTRUMENTAL Y HERRAJE REQUERIDOS 3/16 in/po (≈5 mm) 3/16 in/po (≈5 mm) DXY (x1) BTS (x1) • Secure the fi re pole to the fi re pole hoop with the hardware shown. •...
- Page 43 SLIDE AND SWING ASSEMBLY / ASSEMBLAGE DU TOBOGGAN ET DES BALANÇOIRES / ENSAMBLE DEL TOBOGÁN Y LOS COLUMPIOS HARDWARE REQUIRED / QUINCAILLERIE REQUISE / HERRAJE REQUERIDO Hardware blister pack / Blister de quincaillerie Blíster de herraje DSA (x4) DXY (x2) DXX (x2) DWX (x3) BTS (x11)
- Page 44 SLIDE AND SWING ASSEMBLY / ASSEMBLAGE DU TOBOGGAN ET DES BALANÇOIRES / ENSAMBLE DEL TOBOGÁN Y LOS COLUMPIOS PARTS REQUIRED / PIÈCES REQUISES / PIEZAS REQUERIDAS CONTENTS OF BOX 1 / CONTENU DE LA BOÎTE 1 CONTENIDO DE LA CAJA 1 GBZ (x3) GNB (x1) TOOLS REQUIRED / OUTILS REQUIS / INSTRUMENTAL REQUERIDO...
- Page 45 • Si tiene problemas con esta sección, escanee el código abajo para ver un video del ensamble del tobogán y los columpios http://go.lifetime.monkeybaradventureslideandswingassembly • Attach a slide rail (CRQ) to the slide ladder in the position shown. Repeat this step for the other slide rail. Do not completely tighten the hardware until instructed later in the assembly.
- Page 46 SECTION 4 (CONTINUED) / SECTION 4 (SUITE) SECCIÓN 4 (CONTINUACIÓN) TOOLS AND HARDWARE REQUIRED / OUTILS ET QUINCAILLERIE REQUIS INSTRUMENTAL Y HERRAJE REQUERIDOS 3/16 in/po (≈5 mm) 3/16 in/po (≈5 mm) DXY (x2) 3/8 in/po (≈10 mm) BTS (x4) CVZ (x6) DXX (x2) •...
- Page 47 SECTION 4 (CONTINUED) / SECTION 4 (SUITE) SECCIÓN 4 (CONTINUACIÓN) TOOLS AND HARDWARE REQUIRED / OUTILS ET QUINCAILLERIE REQUIS INSTRUMENTAL Y HERRAJE REQUERIDOS 3/8 in/po (≈10 mm) • The slide assembly has two parts, the upper slide section (FHU) and the lower slide section (FHV). These parts have interlocking ridges that hold the slide together with hardware to secure them.
- Page 48 SECTION 4 (CONTINUED) / SECTION 4 (SUITE) SECCIÓN 4 (CONTINUACIÓN) TOOLS AND HARDWARE REQUIRED / OUTILS ET QUINCAILLERIE REQUIS INSTRUMENTAL Y HERRAJE REQUERIDOS 3/8 in/po (≈10 mm) • If necessary, drill four holes into the bottom part of the slide. •...
- Page 49 SECTION 4 (CONTINUED) / SECTION 4 (SUITE) SECCIÓN 4 (CONTINUACIÓN) TOOLS AND HARDWARE REQUIRED / OUTILS ET QUINCAILLERIE REQUIS INSTRUMENTAL Y HERRAJE REQUERIDOS 3/16 in/po (≈5 mm) 7/16 in/po (≈11 mm) FEH (x4) AZP (x4) CLM (x8) • Secure the slide parts with the hardware indicated. •...
- Page 50 SECTION 4 (CONTINUED) / SECTION 4 (SUITE) SECCIÓN 4 (CONTINUACIÓN) TOOLS AND HARDWARE REQUIRED / OUTILS ET QUINCAILLERIE REQUIS INSTRUMENTAL Y HERRAJE REQUERIDOS 3/16 in/po (≈5 mm) 3/16 in/po (≈5 mm) BTS (x3) DWX (x3) CVZ (x6) 4.10 • Place the slide over the holes in the slide deck (BEO) and secure with the hardware indicated. •...
- Page 51 SECTION 4 (CONTINUED) / SECTION 4 (SUITE) SECCIÓN 4 (CONTINUACIÓN) TOOLS AND HARDWARE REQUIRED / OUTILS ET QUINCAILLERIE REQUIS INSTRUMENTAL Y HERRAJE REQUERIDOS 4.11 • Attach the swings (GBZ) and trapeze (GNB) to the pendulums (DZQ). • Bien attacher les balançoires (GBZ) et le trapèze (GNB) aux pendules (DZQ). •...
- Page 52 MAINTENANCE INSTRUCTIONS If routine checks and maintenance procedures are not done, the equipment could overturn and/or be- come a hazard. At the beginning of each play season: • Tighten all hardware. • Lubricate all metallic moving parts. • Check all protective coverings on bolts, pipes, edges and corners. Replace if they are loose, cracked or missing. •...
- Page 53 INSTRUCTIONS DE L’ENTRETIEN Si des vérifications routinières et des procédures de maintenance ne sont pas assurés, l’équipement pourrait se renverser et/ou devenir dangereux. À la commencement de chaque saison de jouer : • Serrez tous les accessoires. • Lubrifiez tous les pièces en métal mobiles. •...
- Page 54 INSTRUCCIONES DE MANTENIMIENTO Si no se realizan las comprobaciones de rutina y se llevan a cabo los procedimientos de mantenimiento, el equipo puede volcarse o volverse riesgoso. Al comienzo de cada temporada de jugar: • Apriete todos los elementos de fijación. •...
- Page 55 REGISTER today! ENREGISTREZ VOTRE PRODUIT EN LIGNE AU WWW.LIFETIME.COM Chez Lifetime®, nous nous engageons à fournir des produits innovateurs de qualité. Lors de votre inscription, vous aurez l’occasion de nous faire parvenir vos commentaires. Votre opinion est importante pour nous.
- Page 56 1200380 Lifetime Products, Inc. 3/26/2019 PO Box 160010 • Freeport Center, Bldg. D-12 • Clearfield, UT 84016 • USA • 1-800-225-3865...
- Page 57 2. This warranty is nontransferable and is expressly limited to the repair or replacement of defective product. If the product is defective within the terms of this warranty, Lifetime Products, Inc. will repair or replace defective parts at no cost to the purchaser.
- Page 58 DISPONIBLES OR SONT OBSOLÈTES 1. Les systèmes de Terrain de Jeu Lifetime sont garantis pour l’acheteur original d’être libres de tout défaut de matériel ou main d’oeuvre pour une période d’un an à partir de la date d’achat originale sur la facture. Le mot « défaut » est défini comme une imperfection pouvant affecter l’utilisation du produit.
- Page 59 NO ESTÁN DISPONIBLES O SON OBSOLETAS. 1. Se garantiza al comprador original que los sistemas Lifetime Playground están libres de defectos en el material o la mano de obra durante un período de un año a partir de la fecha de la compra al menudeo original. La palabra «defectos» se define como las imperfecciones que afectan el uso del producto.
- Page 60 ® AMÉLIOREZ VOTRE ACHAT LIFETIME EN AJOUTANT DES ACCESSOIRES OU AUTRES PRODUITS Pour acheter des accessoires ou autres produits Lifetime ® , rendez-vous une visite à : www.lifetime.com Ou appelez-nous au 1.800.424.3865 Du lundi au vendredi 7 h – 17 h (HNR) et samedi 9 h – 13 h (HNR) ®...