Table des Matières
Publicité
Liens rapides
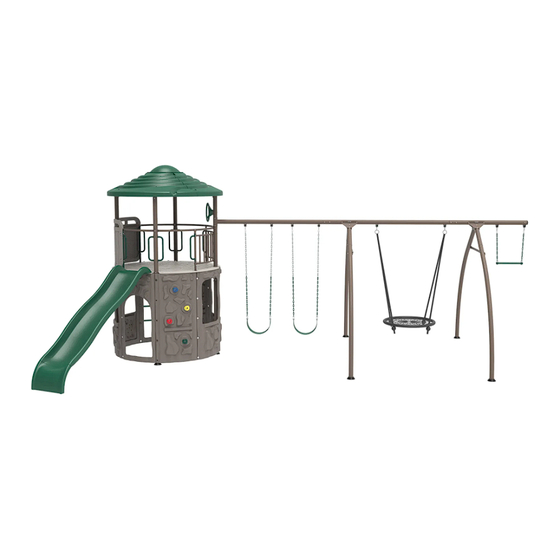
ADVENTURE TOWER
PLAYSET WITH SPIDER SWING
MODEL 91201
BEFORE ASSEMBLY:
• Prepare a level surface with the proper safety zone
(see page 12).
• 3+ people recommended for setup.
• Inspect all parts and hardware. Ensure all are
included using the Parts Identifier in the middle of
these instructions. The Parts Identifier , in yellow,
can be removed from the instructions for quick
reference.
WARNING: Only for domestic/residential use.
IMPORTANT, RETAIN FOR FUTURE REFERENCE: READ CAREFULLY
TOOLS REQUIRED
(1)
(2)
QUESTIONS?
CONTACT LIFETIME
Call: 1-800-225-3865
7:00 am–5:00 pm (Monday–Friday) MST
and 9:00 am–1:00 pm Saturday MST
(English, French, Spanish)
1/2 in (≈13 mm)
(2)
(1)
3/8 in (≈10 mm)
(1)
(1)
(1)
®
CUSTOMER SERVICE:
Live Chat: www.lifetime.com/customerservice
(click on "LIVE CHAT" tab)
For customer service in mainland Europe:
E-mail: cs@lifetimeproducts.eu
ASSEMBLY INSTRUCTIONS
Pour le français, voir la page 2. Para el español, ver la página 3.
7 mm
3/16 in (≈5 mm)
(1)
(2, included)
(1)
(1)
(3)
TABLE OF CONTENTS
Icon legend....................................4
Warnings & notices........................5
Safety information........................6
Safe play area..............................12
Tower assembly...........................13
Swing bar assembly.....................28
Deck assembly............................37
Parts identifi er.............................i-iv
Roof assembly.............................54
Tower walls assembly..................61
Climber, slide & swing
assembly.................................72
Anchor installation.......................83
Maintenance............................88
Registration..............................91
Warning sticker............................92
Warranty..................................93
Model Number: 91201
Product ID:
Publicité
Table des Matières

Manuels Connexes pour Lifetime ADVENTURE TOWER


Sommaire des Matières pour Lifetime ADVENTURE TOWER
- Page 1 ASSEMBLY INSTRUCTIONS Pour le français, voir la page 2. Para el español, ver la página 3. ADVENTURE TOWER PLAYSET WITH SPIDER SWING MODEL 91201 BEFORE ASSEMBLY: • Prepare a level surface with the proper safety zone (see page 12). • 3+ people recommended for setup.
-
Page 2: Instructions D'assemblage
Autocollant d’avertissement..92 Garantie........94 N° de modèle : 91201 ® QUESTIONS ? CONTACTEZ AUX SERVICES À LA CLIENTÈLE LIFETIME Référence du produit : Chat en direct: www.lifetime.com/customerservice Composer le 1-800-225-3865 (cliquer sur la languette « LIVE CHAT ») Du lundi au vendredi 7:00 hr – 17:00 hr (HNR) Pour les services à... -
Page 3: Table Des Matières
Autoadhesivo de advertencia..92 Garantía.........95 Número de modelo: 91201 ® ¿PREGUNTAS? PÓNGASE EN CONTACTO CON LOS SERVICIOS DE CLIENTES LIFETIME ID del producto: Chat en vivo: www.lifetime.com/customerservice Marcar al 1-800-225-3865 (cliquee en la lengüeta «LIVE CHAT») De lunes hasta viernes 7:00 h –17:00 h (MST) Para el servicio a clientes en el continente europeo: y sábado 9:00 hr–13:00 hr (MST) -
Page 4: Leyenda De Íconos
ICON LEGEND / LÉGENDE DES ICÔNES / LEYENDA DE ÍCONOS • Indicates special heed should be taken when reading. • Indique qu’une attention spéciale doit être prise lors de la lecture. • Indica que uno debe prestar atención al leer. •... -
Page 5: Advertencias Y Avisos
WARNINGS & NOTICES / AVERTISSEMENTS ET AVIS / ADVERTENCIAS Y AVISOS SAFETY INSTRUCTIONS FAILURE TO FOLLOW THESE WARNINGS MAY RESULT IN SERIOUS INJURY OR PROPERTY DAMAGE AND WILL VOID WARRANTY. Owner must ensure that all players know and follow these rules for safe operation of the system. To ensure safety, do not attempt to assemble this product without following the instructions carefully. - Page 6 **IMPORTANT SAFETY INFORMATION** PLEASE READ BEFORE BEGINNING ASSEMBLY: INSTALLATION & GROUND PREPARATION INSTRUCTIONS • Place the equipment on level, well-drained ground, not less than 6.6 ft (2.0 m) from any structure or obstruction such as a fence, garage, house, overhanging branches, laundry lines, or electrical wires. •...
- Page 7 CONSUMER INFORMATION SHEET FOR PLAYGROUND SURFACING MATERIALS* Select Protective Surfacing—One of the most important things you can do to on play equipment support posts. That way you can easily see when to reduce the likelihood of serious head injuries is to install shock-absorbing replenish and/or redistribute the surfacing.
-
Page 8: Veiller À Lire Avant De Commencer L'assemblage
**INFORMATIONS DE SÉCURITÉ IMPORTANTES** VEILLER À LIRE AVANT DE COMMENCER L’ASSEMBLAGE : INSTRUCTIONS D’INSTALLATION ET DE PRÉPARATION DE TERRAIN • Installer le module sur une surface plane et bien drainée, à au moins 2 m (6,6 pi) de toute structure ou de tout élément obstruant, comme une clôture, un garage, une maison, des branches d’arbre, une corde à... -
Page 9: Copeaux De Bois
FEUILLE D’INFORMATION AU CLIENT POUR LES MATÉRIAUX DE SURFAÇAGE DE TERRAIN DE JEU* Choix de la surface de protection – L’un des meilleurs moyens de prévenir Il est important de vérifi er périodiquement l’épaisseur du matériau en vrac les risques de blessure sérieuse à la tête consiste à installer une surface et de la rétablir au besoin. - Page 10 **INFORMACIÓN DE SEGURIDAD IMPORTANTE** LEER POR FAVOR ANTES DE INICIAR EL ENSAMBAJLE: INSTRUCCIONES DE INSTALACIÓN Y DE PREPARACIÓN DEL PISO • Colocar el equipo sobre un piso nivelado, bien drenado, a no menos de 2.0 m (6.6 pies) de cualquier estructura u obstrucción como una cerca, cochera o una casa, ramas que cuelgan, lazos para tender ropa o cables eléctricos.
- Page 11 HOJA DE INFORMACIÓN DEL CONSUMIDOR PARA LOS MATERIALES DE REVESTIMIENTO SUPERFICIAL DEL EQUIPO DE PATIO DE RECREO* Seleccionar la superfi cie protectora—Una de las cosas más importantes Verifi car y mantener la profundidad de relleno suelto. Para mantener la que uno puede hacer para disminuir la probabilidad de lesiones graves profundidad correcta de relleno suelto, marque el nivel correcto en los en la cabeza es de instalar una superfi...
-
Page 12: Safety Zone
SAFE PLAY AREA / ZONA DE SEGURIDAD / ZONE DE SÉCURITÉ SAFETY ZONE— Place the equipment no less than 6.6 ft. (2.0 m) from any structure or obstruction such as a fence, garage, house, overhanging branches, laundry lines, or electrical wires. Make sure the clearance in front of and behind the swings is at least twice the height of the swing bar. - Page 13 TOWER ASSEMBLY / ASSEMBLAGE DU TOUR / ENSAMBLAJE DE LA TORRE HARDWARE REQUIRED / QUINCAILLERIE REQUISE / HERRAJE REQUERIDO CONTENTS OF BOX 1 / CONTENU DE LA BOÎTE 1 CONTENIDO DE LA CAJA 1 Hardware blister pack / Blister de quincaillerie Blíster de herraje ASI (x6) DXZ (x11)
- Page 14 TOWER ASSEMBLY / ASSEMBLAGE DU TOUR / ENSAMBLAJE DE LA TORRE PARTS REQUIRED / PIÈCES REQUISES / PIEZAS REQUERIDAS CONTENTS OF BOX 1 / CONTENU DE LA BOÎTE 1 CONTENIDO DE LA CAJA 1 Parts bag / Sac de pièces Bolsa de piezas DWR (x4) DZO (x4)
- Page 15 SECTION 1 (CONTINUED) / SECTION 1 (SUITE) SECCIÓN 1 (CONTINUACIÓN) TOOLS AND HARDWARE REQUIRED / OUTILS ET QUINCAILLERIE REQUIS INSTRUMENTAL Y HERRAJE REQUERIDOS 3/16 in/po (≈5 mm) 1/2 in/po (≈13 mm) ASI (x1) AAN (x1) • Ensure you orient the short support tube (DWS) as shown. Attach two angled deck supports (DWU) to the short support tube. •...
- Page 16 SECTION 1 (CONTINUED) / SECTION 1 (SUITE) SECCIÓN 1 (CONTINUACIÓN) TOOLS AND HARDWARE REQUIRED / OUTILS ET QUINCAILLERIE REQUIS INSTRUMENTAL Y HERRAJE REQUERIDOS 3/16 in/po (≈5 mm) 1/2 in/po (≈13 mm) ASI (x5) AAN (x5) • Repeat step 1.1 to attach the remaining two angled supports (DWU) to the second small support tube (DWS). •...
- Page 17 Etiqueta adhesiva de advertencia par l’équipement, et causer l’étranglement or death. ou mort. o muerte. 1197685_B Lifetime Products, Inc. 6/27/2019 PO Box 160010 • Freeport Center, Bldg. D-11 • Clearfield, UT 84016 • USA • 1-800-225-3865...
- Page 18 SECTION 1 (CONTINUED) / SECTION 1 (SUITE) SECCIÓN 1 (CONTINUACIÓN) TOOLS AND HARDWARE REQUIRED / OUTILS ET QUINCAILLERIE REQUIS INSTRUMENTAL Y HERRAJE REQUERIDOS • Make sure the angled supports (DWU) are oriented as shown, with the dimpled holes on the angled supports facing downward, toward the foot cap (DZO).
- Page 19 SECTION 1 (CONTINUED) / SECTION 1 (SUITE) SECCIÓN 1 (CONTINUACIÓN) TOOLS AND HARDWARE REQUIRED / OUTILS ET QUINCAILLERIE REQUIS INSTRUMENTAL Y HERRAJE REQUERIDOS 3/16 in/po (≈5 mm) AUH (x1) AAN (x1) 1/2 in/po (≈13 mm) DXZ (x1) ARL (x2) BTS (x1) •...
- Page 20 SECTION 1 (CONTINUED) / SECTION 1 (SUITE) SECCIÓN 1 (CONTINUACIÓN) TOOLS AND HARDWARE REQUIRED / OUTILS ET QUINCAILLERIE REQUIS INSTRUMENTAL Y HERRAJE REQUERIDOS 3/16 in/po (≈5 mm) 1/2 in/po (≈13 mm) AUH (x2) AAN (x2) ARL (x1) • Secure the side of the swing support tower pole (GEA) with the hardware indicated. •...
- Page 21 SECTION 1 (CONTINUED) / SECTION 1 (SUITE) SECCIÓN 1 (CONTINUACIÓN) TOOLS AND HARDWARE REQUIRED / OUTILS ET QUINCAILLERIE REQUIS INSTRUMENTAL Y HERRAJE REQUERIDOS 3/16 in/po (≈5 mm) 1/2 in/po (≈13 mm) ARX (x2) AAN (x2) • Bend the braces (DWZ) toward the deck frame to align the holes. The braces are designed to be bent by hand. •...
- Page 22 SECTION 1 (CONTINUED) / SECTION 1 (SUITE) SECCIÓN 1 (CONTINUACIÓN) TOOLS AND HARDWARE REQUIRED / OUTILS ET QUINCAILLERIE REQUIS INSTRUMENTAL Y HERRAJE REQUERIDOS 3/16 in/po (≈5 mm) 1/2 in/po (≈13 mm) AUH (x3) AAN (x3) 1.10 • Secure foot caps (DZO) to the three remaining tower poles (GBR) with the hardware indicated. Make sure the end of the pole with the small notch remains open.
- Page 23 SECTION 1 (CONTINUED) / SECTION 1 (SUITE) SECCIÓN 1 (CONTINUACIÓN) TOOLS AND HARDWARE REQUIRED / OUTILS ET QUINCAILLERIE REQUIS INSTRUMENTAL Y HERRAJE REQUERIDOS 3/16 in/po (≈5 mm) AUH (x3) 1/2 in/po (≈13 mm) AAN (x3) ARL (x3) BTS (x1) DXZ (x1) 1.11 •...
- Page 24 SECTION 1 (CONTINUED) / SECTION 1 (SUITE) SECCIÓN 1 (CONTINUACIÓN) TOOLS AND HARDWARE REQUIRED / OUTILS ET QUINCAILLERIE REQUIS INSTRUMENTAL Y HERRAJE REQUERIDOS 3/16 in/po (≈5 mm) (x2) ARX (x6) AUH (x6) 1/2 in/po (≈13 mm) ARL (x6) (x2) DXZ (x2) BTS (x2) AAN (x12) 1.13...
- Page 25 SECTION 1 (CONTINUED) / SECTION 1 (SUITE) SECCIÓN 1 (CONTINUACIÓN) TOOLS AND HARDWARE REQUIRED / OUTILS ET QUINCAILLERIE REQUIS INSTRUMENTAL Y HERRAJE REQUERIDOS 3/16 in/po (≈5 mm) DXZ (x3) BTS (x3) 1.15 • Secure the tower extensions (EMM) to the tower poles (GBR) with the hardware shown. •...
- Page 26 SECTION 1 (CONTINUED) / SECTION 1 (SUITE) SECCIÓN 1 (CONTINUACIÓN) TOOLS AND HARDWARE REQUIRED / OUTILS ET QUINCAILLERIE REQUIS INSTRUMENTAL Y HERRAJE REQUERIDOS 3/16 in/po (≈5 mm) BTS (x2) DXZ (x2) 1.17 • Attach three of the handrails (DXE) to the tower frame with the hardware indicated. If the assembly is resting on a soft surface, such as grass or cardboard, roll the tower frame over to make it easier to attach the handrails.
- Page 27 SECTION 1 (CONTINUED) / SECTION 1 (SUITE) SECCIÓN 1 (CONTINUACIÓN) TOOLS AND HARDWARE REQUIRED / OUTILS ET QUINCAILLERIE REQUIS INSTRUMENTAL Y HERRAJE REQUERIDOS 3/16 in/po (≈5 mm) DXZ (x2) BTS (x2) 1.18 1.19 • Attach the handrail (DXE) to the tower frame •...
-
Page 28: Ensamblaje De La Barra De Columpios
SWING BAR ASSEMBLY / ASSEMBLAGE DE LA BALANÇOIRE / ENSAMBLAJE DE LA BARRA DE COLUMPIOS HARDWARE REQUIRED / QUINCAILLERIE REQUISE / HERRAJE REQUERIDO CONTENTS OF BOX 3 / CONTENU DE LA BOÎTE 3 CONTENIDO DE LA CAJA 3 Hardware blister pack / Blister de quincaillerie Blíster de herraje CUZ (x2) - Page 29 SWING BAR ASSEMBLY / ASSEMBLAGE DE LA BALANÇOIRE / ENSAMBLAJE DE LA BARRA DE COLUMPIOS PARTS REQUIRED / PIÈCES REQUISES / PIEZAS REQUERIDAS CONTENTS OF BOX 3 / CONTENU DE LA BOÎTE 3 CONTENIDO DE LA CAJA 3 CBO (x1) EZV (x1) EMN (x1) GSR (x4)
- Page 30 SECTION 2 (CONTINUED) / SECTION 2 (SUITE) SECCIÓN 2 (CONTINUACIÓN) TOOLS AND HARDWARE REQUIRED / OUTILS ET QUINCAILLERIE REQUIS INSTRUMENTAL Y HERRAJE REQUERIDOS 3/16 in/po (≈5 mm) 1/2 in/po (≈13 mm) DZQ (x8) DZR (x8) AAN (x8) • Secure the pendulums (DZQ) to the long swing bar (CBO), the short swing bar (EMN), and the middel swing bar (EZV) with the hardware indicated.
- Page 31 SECTION 2 (CONTINUED) / SECTION 2 (SUITE) SECCIÓN 2 (CONTINUACIÓN) TOOLS AND HARDWARE REQUIRED / OUTILS ET QUINCAILLERIE REQUIS INSTRUMENTAL Y HERRAJE REQUERIDOS 3/16 in/po (≈5 mm) DXZ (x3) BTS (x3) • Secure the cap (CSD) to the short swing bar (EMN) with the hardware shown. •...
- Page 32 SECTION 2 (CONTINUED) / SECTION 2 (SUITE) SECCIÓN 2 (CONTINUACIÓN) TOOLS AND HARDWARE REQUIRED / OUTILS ET QUINCAILLERIE REQUIS INSTRUMENTAL Y HERRAJE REQUERIDOS ADS (x4) CUZ (x4) CIH (x4) • Secure the extension poles (GSR) to the curved • THIS STEP CANNOT BE REVERSED! poles (GSQ) through the slits with the hardware •...
- Page 33 SECTION 2 (CONTINUED) / SECTION 2 (SUITE) SECCIÓN 2 (CONTINUACIÓN) TOOLS AND HARDWARE REQUIRED / OUTILS ET QUINCAILLERIE REQUIS INSTRUMENTAL Y HERRAJE REQUERIDOS 3/16 in/po (≈5 mm) AUH (x8) 1/2 in/po (≈13 mm) BTS (x8) AAN (x8) DXZ (x8) • Align the tabs in the foot cap (DZO) and pole cap (DWR) with the holes in the frame pole assembly. •...
- Page 34 SECTION 2 (CONTINUED) / SECTION 2 (SUITE) SECCIÓN 2 (CONTINUACIÓN) TOOLS AND HARDWARE REQUIRED / OUTILS ET QUINCAILLERIE REQUIS INSTRUMENTAL Y HERRAJE REQUERIDOS 3/16 in/po (≈5 mm) AUH (x8) 1/2 in/po (≈13 mm) AAN (x12) DZP (x4) 2.10 • Secure the swing bar brace (DWN) to the frame pole assembly with hardware shown. •...
- Page 35 SECTION 2 (CONTINUED) / SECTION 2 (SUITE) SECCIÓN 2 (CONTINUACIÓN) TOOLS AND HARDWARE REQUIRED / OUTILS ET QUINCAILLERIE REQUIS INSTRUMENTAL Y HERRAJE REQUERIDOS 3/16 in/po (≈5 mm) BTS (x2) DXZ (x2) 2.12 • Attach the long swing bar (CBO) to the middle swing bar as shown with the hardware indicated. •...
- Page 36 SECTION 2 (CONTINUED) / SECTION 2 (SUITE) SECCIÓN 2 (CONTINUACIÓN) TOOLS AND HARDWARE REQUIRED / OUTILS ET QUINCAILLERIE REQUIS INSTRUMENTAL Y HERRAJE REQUERIDOS 3/16 in/po (≈5 mm) DXZ (x2) BTS (x2) 2.13 • Have one adult hold the assembly in place while another adult on a ladder secures the long swing bar (CBO) to the swing support tower pole (GEA) with the hardware shown.
- Page 37 DECK ASSEMBLY / ASSEMBLAGE DE LA PLATE-FORME / ENSAMBLAJE DE LA CUBIERTA HARDWARE REQUIRED / QUINCAILLERIE REQUISE / HERRAJE REQUERIDO CONTENTS OF BOX 1 / CONTENU DE LA BOÎTE 1 CONTENIDO DE LA CAJA 1 Hardware blister pack / Blister de quincaillerie Blíster de herraje DXX (x16) ARN (x6)
- Page 38 DECK ASSEMBLY / ASSEMBLAGE DE LA PLATE-FORME / ENSAMBLAJE DE LA CUBIERTA PARTS REQUIRED / PIÈCES REQUISES / PIEZAS REQUERIDAS CONTENTS OF BOX 1 / CONTENU DE LA BOÎTE 1 CONTENIDO DE LA CAJA 1 DZV (x2) DXO (x2) DZW (x2) DXI (x2) Parts bag / Sac de pièces...
- Page 39 • Si tiene problemas con esta sección, escanee el código abajo para ver un video del ensamble de la plataforma. http://go.lifetime.com/towerdeckassembly • Using a 3/8 in (10 mm) drill bit, drill the deck at the eleven locations indicated. Ensure you drill down from the top-side.
- Page 40 SECTION 3 (CONTINUED) / SECTION 3 (SUITE) SECCIÓN 3 (CONTINUACIÓN) TOOLS AND HARDWARE REQUIRED / OUTILS ET QUINCAILLERIE REQUIS INSTRUMENTAL Y HERRAJE REQUERIDOS • Slide the deck (DYB) onto the deck frame at an angle, then lower the deck into position. Repeat for the other side. •...
- Page 41 SECTION 3 (CONTINUED) / SECTION 3 (SUITE) SECCIÓN 3 (CONTINUACIÓN) TOOLS AND HARDWARE REQUIRED / OUTILS ET QUINCAILLERIE REQUIS INSTRUMENTAL Y HERRAJE REQUERIDOS 3/16 in/po (≈5 mm) DXZ (x2) BTS (x2) CVZ (x2) • Securely tighten all hardware after all of the parts in this step have been attached. •...
- Page 42 SECTION 3 (CONTINUED) / SECTION 3 (SUITE) SECCIÓN 3 (CONTINUACIÓN) TOOLS AND HARDWARE REQUIRED / OUTILS ET QUINCAILLERIE REQUIS INSTRUMENTAL Y HERRAJE REQUERIDOS 3/16 in/po (≈5 mm) DXS (x2) DXX (x1) BTS (x3) • Securely tighten all hardware after all of the parts in this step have been attached. •...
- Page 43 SECTION 3 (CONTINUED) / SECTION 3 (SUITE) SECCIÓN 3 (CONTINUACIÓN) TOOLS AND HARDWARE REQUIRED / OUTILS ET QUINCAILLERIE REQUIS INSTRUMENTAL Y HERRAJE REQUERIDOS 3/16 in/po (≈5 mm) DXS (x2) DXX (x1) BTS (x3) • Securely tighten all hardware after all of the parts in this step have been attached. •...
- Page 44 SECTION 3 (CONTINUED) / SECTION 3 (SUITE) SECCIÓN 3 (CONTINUACIÓN) TOOLS AND HARDWARE REQUIRED / OUTILS ET QUINCAILLERIE REQUIS INSTRUMENTAL Y HERRAJE REQUERIDOS 3/16 in/po (≈5 mm) DXX (x1) DXS (x2) BTS (x3) • Securely tighten all hardware after all of the parts in this step have been attached. •...
- Page 45 SECTION 3 (CONTINUED) / SECTION 3 (SUITE) SECCIÓN 3 (CONTINUACIÓN) TOOLS AND HARDWARE REQUIRED / OUTILS ET QUINCAILLERIE REQUIS INSTRUMENTAL Y HERRAJE REQUERIDOS DXX (x1) DXS (x2) BTS (x3) 3/16 in/po (≈5 mm) ARL (x12) CUZ (x12) • Repeat step 3.6 for the remaining handrail support (DXI). •...
- Page 46 SECTION 3 (CONTINUED) / SECTION 3 (SUITE) SECCIÓN 3 (CONTINUACIÓN) TOOLS AND HARDWARE REQUIRED / OUTILS ET QUINCAILLERIE REQUIS INSTRUMENTAL Y HERRAJE REQUERIDOS ARN (x1) AUH (x1) AAN (x2) ARL (x2) • Only fi nger-tighten this hardware. • Ne serrez la quincaillerie qu’à la main. •...
- Page 47 SECTION 3 (CONTINUED) / SECTION 3 (SUITE) SECCIÓN 3 (CONTINUACIÓN) TOOLS AND HARDWARE REQUIRED / OUTILS ET QUINCAILLERIE REQUIS INSTRUMENTAL Y HERRAJE REQUERIDOS 3/16 in/po (≈5 mm) AUH (x1) ARN (x1) 1/2 in/po (≈13 mm) ARL (x2) DXX (x2) BTS (x2) AAN (x2) 3.11 •...
- Page 48 SECTION 3 (CONTINUED) / SECTION 3 (SUITE) SECCIÓN 3 (CONTINUACIÓN) TOOLS AND HARDWARE REQUIRED / OUTILS ET QUINCAILLERIE REQUIS INSTRUMENTAL Y HERRAJE REQUERIDOS 3/16 in/po (≈5 mm) DXZ (x1) BTS (x7) CVZ (x1) DXX (x6) 3.13 • Repeat step 3.12 to install the remaining “B” rail handles (DYA). •...
- Page 49 PARTS IDENTIFIER / IDENTIFICATEUR DE PIÈCES / IDENTIFICADOR DE PIEZAS This page intentionally left blank Cette page est intentionnellement laissée en blanc Esta página ha sido dejada en blanco intencionalmente...
- Page 50 PARTS IDENTIFIER / IDENTIFICATEUR DE PIÈCES / IDENTIFICADOR DE PIEZAS CONTENTS OF BOX 1 / CONTENU DE LA BOÎTE 1 CONTENIDO DE LA CAJA 1 DWT (x1) DWZ (x8) DWS (x2) GEA (x1) Warning sticker Autocollant d’avertissement Etiqueta adhesiva de advertencia GBR (x3) EMM (x3) DXO (x2)
- Page 51 PARTS IDENTIFIER / IDENTIFICATEUR DE PIÈCES / IDENTIFICADOR DE PIEZAS CONTENTS OF BOX 1 / CONTENU DE LA BOÎTE 1 CONTENIDO DE LA CAJA 1 Hardware blister packs / Blisters de quincaillerie Blísters de herraje CONTENTS OF BOX 2 / CONTENU DE LA BOÎTE 2 CONTENIDO DE LA CAJA 2 DWU (x4)
- Page 52 PARTS IDENTIFIER / IDENTIFICATEUR DE PIÈCES / IDENTIFICADOR DE PIEZAS CONTENTS OF BOX 4 / CONTENU DE LA BOÎTE 4 CONTENTS OF BOX 5 / CONTENU DE LA BOÎTE 5 CONTENIDO DE LA CAJA 4 CONTENIDO DE LA CAJA 5 FHV (x1) Hardware bag Sac de quincaillerie...
- Page 53 SECTION 3 (CONTINUED) / SECTION 3 (SUITE) SECCIÓN 3 (CONTINUACIÓN) TOOLS AND HARDWARE REQUIRED / OUTILS ET QUINCAILLERIE REQUIS INSTRUMENTAL Y HERRAJE REQUERIDOS 3/16 in/po (≈5 mm) BTS (x4) DXZ (x4) 3.15 • The correct rail handles (DXF) for this step are marked with an “A”.
- Page 54 SECTION 3 (CONTINUED) / SECTION 3 (SUITE) SECCIÓN 3 (CONTINUACIÓN) TOOLS AND HARDWARE REQUIRED / OUTILS ET QUINCAILLERIE REQUIS INSTRUMENTAL Y HERRAJE REQUERIDOS 3/16 in/po (≈5 mm) DXX (x4) DXZ (x4) CVZ (x4) BTS (x8) 3.17 • Secure the steel barriers (DZW) with the hardware shown. •...
- Page 55 SECTION 3 (CONTINUED) / SECTION 3 (SUITE) SECCIÓN 3 (CONTINUACIÓN) TOOLS AND HARDWARE REQUIRED / OUTILS ET QUINCAILLERIE REQUIS INSTRUMENTAL Y HERRAJE REQUERIDOS 3/8 in/po (≈10 mm) 3.19 • Have one adult hold the plastic barrier (DYC) so it is pressed against the tower pole. Using the hole in the bracket (EBT) as a guide, drill 3/8 in (10 mm) holes through the barrier in the locations shown.
- Page 56 SECTION 3 (CONTINUED) / SECTION 3 (SUITE) SECCIÓN 3 (CONTINUACIÓN) TOOLS AND HARDWARE REQUIRED / OUTILS ET QUINCAILLERIE REQUIS INSTRUMENTAL Y HERRAJE REQUERIDOS 3/16 in/po (≈5 mm) (x1) 1/2 in/po (≈13 mm) 3/8 in/po (≈10 mm) ARN (x4) AAN (x4) ARL (x4) 3.21 •...
- Page 57 SECTION 3 (CONTINUED) / SECTION 3 (SUITE) SECCIÓN 3 (CONTINUACIÓN) TOOLS AND HARDWARE REQUIRED / OUTILS ET QUINCAILLERIE REQUIS INSTRUMENTAL Y HERRAJE REQUERIDOS 3/16 in/po (≈5 mm) (x1) 1/2 in/po (≈13 mm) DXS (x4) BTS (x4) 3/8 in/po (≈10 mm) CVZ (x4) 3.22 •...
- Page 58 ROOF ASSEMBLY / ASSEMBLAGE DU TOIT / ENSAMBLAJE DEL TECHO HARDWARE REQUIRED / QUINCAILLERIE REQUISE / HERRAJE REQUERIDO CONTENTS OF BOX 1 / CONTENU DE LA BOÎTE 1 CONTENIDO DE LA CAJA 1 Hardware blister pack / Blister de quincaillerie Blíster de herraje AUH (x4) DWX (x12)
- Page 59 SECTION 4 (CONTINUED) / SECTION 4 (SUITE) SECCIÓN 4 (CONTINUACIÓN) TOOLS AND HARDWARE REQUIRED / OUTILS ET QUINCAILLERIE REQUIS INSTRUMENTAL Y HERRAJE REQUERIDOS 3/16 in/po (≈5 mm) DWX (x6) BTS (x6) CVZ (x12) • Securely tighten all hardware after all of the parts in this step have been attached. •...
- Page 60 SECTION 4 (CONTINUED) / SECTION 4 (SUITE) SECCIÓN 4 (CONTINUACIÓN) TOOLS AND HARDWARE REQUIRED / OUTILS ET QUINCAILLERIE REQUIS INSTRUMENTAL Y HERRAJE REQUERIDOS 3/16 in/po (≈5 mm) DWX (x6) BTS (x6) CVZ (x12) • The left edge of each roof panel (DXP) should rest on top of the roof panel immediately to the left. •...
- Page 61 SECTION 4 (CONTINUED) / SECTION 4 (SUITE) SECCIÓN 4 (CONTINUACIÓN) TOOLS AND HARDWARE REQUIRED / OUTILS ET QUINCAILLERIE REQUIS INSTRUMENTAL Y HERRAJE REQUERIDOS ARN (x1) AAN (x1) • Attach the roof supports (DXQ) in a raised “X” formation as shown. •...
- Page 62 SECTION 4 (CONTINUED) / SECTION 4 (SUITE) SECCIÓN 4 (CONTINUACIÓN) TOOLS AND HARDWARE REQUIRED / OUTILS ET QUINCAILLERIE REQUIS INSTRUMENTAL Y HERRAJE REQUERIDOS 3/16 in/po (≈5 mm) BTS (x8) DXY (x8) CVZ (x8) • Attach the roof supports to the roof using the hardware indicated. Tighten the hardware to secure the roof supports.
- Page 63 SECTION 4 (CONTINUED) / SECTION 4 (SUITE) SECCIÓN 4 (CONTINUACIÓN) TOOLS AND HARDWARE REQUIRED / OUTILS ET QUINCAILLERIE REQUIS INSTRUMENTAL Y HERRAJE REQUERIDOS 1/2 in/po (≈13 mm) 3/16 in/po (≈5 mm) CUZ (x8) • Tighten the hardware securing the roof supports, then install the domed roof cap (DXR) using the hardware shown. •...
- Page 64 SECTION 4 (CONTINUED) / SECTION 4 (SUITE) SECCIÓN 4 (CONTINUACIÓN) TOOLS AND HARDWARE REQUIRED / OUTILS ET QUINCAILLERIE REQUIS INSTRUMENTAL Y HERRAJE REQUERIDOS 3/16 in/po (≈5 mm) 1/2 in/po (≈13 mm) AUH (x4) AAN (x4) • Carefully place roof assembly into position. •...
- Page 65 TOWER WALLS ASSEMBLY / ASSEMBLAGE DES MURS / ENSAMBLAJE DE LOS MUROS DE LA TORRE HARDWARE REQUIRED / QUINCAILLERIE REQUISE / HERRAJE REQUERIDO CONTENTS OF BOX 1 / CONTENU DE LA BOÎTE 1 CONTENIDO DE LA CAJA 1 Hardware blister pack / Blister de quincaillerie Blíster de herraje ASD (x8)
- Page 66 • Si vous avez des problèmes avec cette section, scannez le code en bas pour voir un vidéo de l’assemblage des murs. • Si tiene problemas con esta sección, escanee el código abajo para ver un video del ensamble de los muros. http://go.lifetime.com/towerwalls-sw • Drill holes at the locations indicated.
- Page 67 SECTION 5 (CONTINUED) / SECTION 5 (SUITE) SECCIÓN 5 (CONTINUACIÓN) TOOLS AND HARDWARE REQUIRED / OUTILS ET QUINCAILLERIE REQUIS INSTRUMENTAL Y HERRAJE REQUERIDOS 3/16 in/po (≈5 mm) 1/2 in/po (≈13 mm) ASD (x8) AAN (x8) ARL (x8) DZX (x8) • Attach the hand holds (EAA, EAB, EAC and EAD) to the climbing wall (DZY) with the hardware shown.
- Page 68 SECTION 5 (CONTINUED) / SECTION 5 (SUITE) SECCIÓN 5 (CONTINUACIÓN) TOOLS AND HARDWARE REQUIRED / OUTILS ET QUINCAILLERIE REQUIS INSTRUMENTAL Y HERRAJE REQUERIDOS 3/16 in/po (≈5 mm) 1/2 in/po (≈13 mm) DZX (x9) ARN (x5) AAN (x5) • Secure one window wall panel (DZZ) onto the left side of one climbing wall panel (DZY).
- Page 69 SECTION 5 (CONTINUED) / SECTION 5 (SUITE) SECCIÓN 5 (CONTINUACIÓN) TOOLS AND HARDWARE REQUIRED / OUTILS ET QUINCAILLERIE REQUIS INSTRUMENTAL Y HERRAJE REQUERIDOS 3/16 in/po (≈5 mm) 1/2 in/po (≈13 mm) ARN (x5) AAN (x5) DZX (x9) • Secure one door wall panel (EAF) onto the left side of one window wall panel (DZZ).
- Page 70 SECTION 5 (CONTINUED) / SECTION 5 (SUITE) SECCIÓN 5 (CONTINUACIÓN) TOOLS AND HARDWARE REQUIRED / OUTILS ET QUINCAILLERIE REQUIS INSTRUMENTAL Y HERRAJE REQUERIDOS 3/16 in/po (≈5 mm) 1/2 in/po (≈13 mm) DZP (x5) AAN (x5) DZX (x5) • Secure the wall assembly from the previous step to the deck pole using the hardware indicated. •...
- Page 71 SECTION 5 (CONTINUED) / SECTION 5 (SUITE) SECCIÓN 5 (CONTINUACIÓN) TOOLS AND HARDWARE REQUIRED / OUTILS ET QUINCAILLERIE REQUIS INSTRUMENTAL Y HERRAJE REQUERIDOS 3/16 in/po (≈5 mm) 1/2 in/po (≈13 mm) ARN (x5) AAN (x5) DZX (x9) • Secure one window wall panel (DZZ) onto the left side of one door wall panel (EAF).
- Page 72 SECTION 5 (CONTINUED) / SECTION 5 (SUITE) SECCIÓN 5 (CONTINUACIÓN) TOOLS AND HARDWARE REQUIRED / OUTILS ET QUINCAILLERIE REQUIS INSTRUMENTAL Y HERRAJE REQUERIDOS 3/16 in/po (≈5 mm) 1/2 in/po (≈13 mm) DZP (x5) AAN (x5) DZX (x5) 5.10 • Secure the wall assembly from the previous step to the deck pole using the hardware indicated. •...
- Page 73 SECTION 5 (CONTINUED) / SECTION 5 (SUITE) SECCIÓN 5 (CONTINUACIÓN) TOOLS AND HARDWARE REQUIRED / OUTILS ET QUINCAILLERIE REQUIS INSTRUMENTAL Y HERRAJE REQUERIDOS 3/16 in/po (≈5 mm) 1/2 in/po (≈13 mm) ARN (x4) DZX (x8) AAN (x4) 5.11 • Secure one climbing wall panel (DZY) onto the left side of one window wall panel (DZZ).
- Page 74 SECTION 5 (CONTINUED) / SECTION 5 (SUITE) SECCIÓN 5 (CONTINUACIÓN) TOOLS AND HARDWARE REQUIRED / OUTILS ET QUINCAILLERIE REQUIS INSTRUMENTAL Y HERRAJE REQUERIDOS 3/16 in/po (≈5 mm) 1/2 in/po (≈13 mm) ARN (x1) DZX (x1) AAN (x1) 5.13 • Secure the wall panel assembly from the previous step to the bracket (DZS) in the location indicated. •...
- Page 75 SECTION 5 (CONTINUED) / SECTION 5 (SUITE) SECCIÓN 5 (CONTINUACIÓN) TOOLS AND HARDWARE REQUIRED / OUTILS ET QUINCAILLERIE REQUIS INSTRUMENTAL Y HERRAJE REQUERIDOS 3/16 in/po (≈5 mm) 1/2 in/po (≈13 mm) DZP (x10) DZX (x10) AAN (x10) 5.14 • Secure the wall assembly from the previous step to the deck poles in the locations indicated. •...
- Page 76 CLIMBER, SLIDE & SWING ASSEMBLY / ASSEMBLAGE DE L’ÉCHELLE, DU TOBAGGAN & DES BALANÇOIRES / ENSAMBLAJE DE ESCALADOR, RESBALADILLA, Y COLUMPIO HARDWARE REQUIRED / QUINCAILLERIE REQUISE / HERRAJE REQUERIDO CONTENTS OF BOX 1 / CONTENU DE LA BOÎTE 1 CONTENIDO DE LA CAJA 1 Hardware blister pack / Blister de quincaillerie Blíster de herraje...
- Page 77 CLIMBER, SLIDE & SWING ASSEMBLY / ASSEMBLAGE DE L’ÉCHELLE, DU TOBAGGAN & DES BALANÇOIRES / ENSAMBLAJE DE ESCALADOR, RESBALADILLA, Y COLUMPIO PARTS REQUIRED / PIÈCES REQUISES / PIEZAS REQUERIDAS CONTENTS OF BOX 1 / CONTENU DE LA BOÎTE 1 CONTENIDO DE LA CAJA 1 GBZ (x2) GCA (x1) CONTENTS OF BOX 2 /...
-
Page 78: Resbaladilla Y Columpio
• Si tiene problemas con esta sección, escanee el código abajo para ver un video del ensamble de escalador, resbaladilla, y columpio. http://go.lifetime.com/climberslideswingassembly • Secure the caps (EAI) to the left and right climber legs (EAG & EAH) with the hardware shown. - Page 79 SECTION 6 (CONTINUED) / SECTION 6 (SUITE) SECCIÓN 6 (CONTINUACIÓN) TOOLS AND HARDWARE REQUIRED / OUTILS ET QUINCAILLERIE REQUIS INSTRUMENTAL Y HERRAJE REQUERIDOS ARV (x16) • Attach the rungs (EAJ) to one of the climber legs (EAG or EAH). EAG is shown. •...
- Page 80 SECTION 6 (CONTINUED) / SECTION 6 (SUITE) SECCIÓN 6 (CONTINUACIÓN) TOOLS AND HARDWARE REQUIRED / OUTILS ET QUINCAILLERIE REQUIS INSTRUMENTAL Y HERRAJE REQUERIDOS 3/16 in/po (≈5 mm) 1/2 in/po (≈13 mm) 3/8 in/po (≈10 mm) ARX (x2) AAN (x2) ARL (x2) •...
- Page 81 SECTION 6 (CONTINUED) / SECTION 6 (SUITE) SECCIÓN 6 (CONTINUACIÓN) TOOLS AND HARDWARE REQUIRED / OUTILS ET QUINCAILLERIE REQUIS INSTRUMENTAL Y HERRAJE REQUERIDOS 3/8 in/po (≈10 mm) • Drill holes from underneath the deck. • Percez des trous de la surface inférieure du pont. •...
- Page 82 SECTION 6 (CONTINUED) / SECTION 6 (SUITE) SECCIÓN 6 (CONTINUACIÓN) TOOLS AND HARDWARE REQUIRED / OUTILS ET QUINCAILLERIE REQUIS INSTRUMENTAL Y HERRAJE REQUERIDOS 3/8 in/po (≈10 mm) • Drill three holes into the top part of the slide. • Percer trois trous dans la partie supérieure de la glissoire. •...
- Page 83 SECTION 6 (CONTINUED) / SECTION 6 (SUITE) SECCIÓN 6 (CONTINUACIÓN) TOOLS AND HARDWARE REQUIRED / OUTILS ET QUINCAILLERIE REQUIS INSTRUMENTAL Y HERRAJE REQUERIDOS 3/16 in/po (≈5 mm) 7/16 in/po (≈11 mm) FEH (x4) AZP (x4) CLM (x8) 6.11 • Place the slide parts upside-down. Slide the lower slide section (FHV) onto the upper slide section (FHU) until they align in place.
- Page 84 SECTION 6 (CONTINUED) / SECTION 6 (SUITE) SECCIÓN 6 (CONTINUACIÓN) TOOLS AND HARDWARE REQUIRED / OUTILS ET QUINCAILLERIE REQUIS INSTRUMENTAL Y HERRAJE REQUERIDOS 3/16 in/po (≈5 mm) 1/2 in/po (≈13 mm) ASD (x3) AAN (x3) ARL (x6) 6.13 • Secure the slide with the hardware indicated. •...
- Page 85 SECTION 6 (CONTINUED) / SECTION 6 (SUITE) SECCIÓN 6 (CONTINUACIÓN) TOOLS AND HARDWARE REQUIRED / OUTILS ET QUINCAILLERIE REQUIS INSTRUMENTAL Y HERRAJE REQUERIDOS 3/16 in/po (≈5 mm) EAK (x1) DZX (x1) CVZ (x1) BTS (x1) 6.14 • Attach the steering wheel (EIT) and the steering wheel clicker (CAB) to the pole between the metal barriers with the hardware indicated.
- Page 86 SECTION 6 (CONTINUED) / SECTION 6 (SUITE) SECCIÓN 6 (CONTINUACIÓN) TOOLS AND HARDWARE REQUIRED / OUTILS ET QUINCAILLERIE REQUIS INSTRUMENTAL Y HERRAJE REQUERIDOS 6.16 • Attach the belt swings (GBZ), the spider swing (EZZ), and the trapeze swing (GCA) to the swing bar as shown. •...
-
Page 87: Instalación De Los Anclajes
ANCHOR INSTALLATION / INSTALLATION DES ANCRES / INSTALACIÓN DE LOS ANCLAJES HARDWARE REQUIRED / QUINCAILLERIE REQUISE / HERRAJE REQUERIDO CONTENTS OF BOX 1 / CONTENU DE LA BOÎTE 1 CONTENIDO DE LA CAJA 1 Hardware bag Sac de quincaillerie Bolsa de herraje EMG (x2) EMI (x8) ENG (x2) - Page 88 SECTION 7 (CONTINUED) / SECTION 7 (SUITE) SECCIÓN 7 (CONTINUACIÓN) TOOLS AND HARDWARE REQUIRED / OUTILS ET QUINCAILLERIE REQUIS INSTRUMENTAL Y HERRAJE REQUERIDOS 3/16 in/po (≈5 mm) 1/2 in/po (≈13 mm) • Locate the two tower pole legs (GBR) shown here. •...
- Page 89 SECTION 7 (CONTINUED) / SECTION 7 (SUITE) SECCIÓN 7 (CONTINUACIÓN) TOOLS AND HARDWARE REQUIRED / OUTILS ET QUINCAILLERIE REQUIS INSTRUMENTAL Y HERRAJE REQUERIDOS 3/16 in/po (≈5 mm) EMH (x1) 1/2 in/po (≈13 mm) EMG (x1) ENG (x1) • Attach an anchor (EMG) and a washer (ENG) to the tower pole leg (GBR) using the nut (AAN) unscrewed in the last step. •...
- Page 90 SECTION 7 (CONTINUED) / SECTION 7 (SUITE) SECCIÓN 7 (CONTINUACIÓN) TOOLS AND HARDWARE REQUIRED / OUTILS ET QUINCAILLERIE REQUIS INSTRUMENTAL Y HERRAJE REQUERIDOS 7 mm EMI (x4) • Now, remove any slack in the cable (Fig. 1), then tighten the nuts already on the cable as shown (Fig. 2). Secure two additional sets of nuts (EMI) (Fig.
- Page 91 SECTION 7 (CONTINUED) / SECTION 7 (SUITE) SECCIÓN 7 (CONTINUACIÓN) TOOLS AND HARDWARE REQUIRED / OUTILS ET QUINCAILLERIE REQUIS INSTRUMENTAL Y HERRAJE REQUERIDOS 3/16 in/po (≈5 mm) EMH (x1) 7 mm EMI (x4) ENG (x1) EMG (x1) • Repeat the steps to secure the opposite tower pole to the ground. •...
-
Page 92: Maintenance Instructions
MAINTENANCE INSTRUCTIONS If routine checks and maintenance procedures are not done, the equipment could overturn and/or become a hazard. At the beginning of each play season: • Tighten all hardware. • Lubricate all metallic moving parts. • Check all protective coverings on bolts, pipes, edges and corners. Replace if they are loose, cracked or missing. -
Page 93: Instructions De L'entretien
INSTRUCTIONS DE L’ENTRETIEN Si des vérifi cations routinières et des procédures de maintenance ne sont pas assurés, l’équipement pourrait se renverser et/ou devenir dangereux. À la commencement de chaque saison de jouer : • Serrez tous les accessoires. • Lubrifi ez tous les pièces en métal mobiles. •... -
Page 94: Mantenimiento
INSTRUCCIONES DE MANTENIMIENTO Si no se realizan revisiones y mantenimiento de rutina, el equipo podría voltearse y/o volverse peligroso. Al comienzo de cada temporada de juegos: • Apriete todos el herraje. • Lubrique todas las piezas móviles metálicas. • Compruebe todas las cubiertas protectoras en los pernos, tubos, bordes y esquinas. Sustituya los elementos que estén fl... - Page 95 à des tiers, et ne leur permettra pas d’utiliser vos données personnelles à leurs propres fi ns. Nous vous invitons à lire notre politique de confi dentialité à www.lifetime.com (en anglais seulement) ENREGISTRER CE PRODUIT aujourd’hui! REGISTRAR EL PRODUCTO EN LÍNEA EN WWW.LIFETIME.COM...
-
Page 96: Autoadhesivo De Advertencia
1197685_B Lifetime Products, Inc. 6/27/2019 PO Box 160010 • Freeport Center, Bldg. D-11 • Clearfield, UT 84016 • USA • 1-800-225-3865... - Page 97 2. This warranty is nontransferable and is expressly limited to the repair or replacement of defective product. If the product is defective within the terms of this warranty, Lifetime Products, Inc. will repair or replace defective parts at no cost to the purchaser.
- Page 98 DISPONIBLES OR SONT OBSOLÈTES 1. Les systèmes de Terrain de Jeu Lifetime sont garantis pour l’acheteur original d’être libres de tout défaut de matériel ou main d’oeuvre pour une période d’un an à partir de la date d’achat originale sur la facture. Le mot « défaut » est défi ni comme une imperfection pouvant aff ecter l’utilisation du produit.
-
Page 99: Garantía
6. Esta garantía expresamente sustituye a todas las demás garantías, expresadas o implícitas, incluidas las garantías de uso comercial o adecuación de uso hasta el alcance permitido por la ley Federal y estatal. Ni Lifetime Products, Inc., ni ningún representante asume ninguna otra responsabilidad en conexión con este producto. Esta garantía le concede derechos legales específi... - Page 100 ® AMÉLIOREZ VOTRE ACHAT LIFETIME EN AJOUTANT DES ACCESSOIRES OU DES AUTRES PRODUITS ® Pour acheter des accessoires ou des autres produits Lifetime , rendez-vous une visite à : www.lifetime.com Ou appelez-nous au 1-800-424-3865 Du lundi au vendredi 7 h – 17 h (HNR) et samedi 9 h – 13 h (HNR) ®...