Publicité

Les langues disponibles
  • FR

Les langues disponibles

  • FRANÇAIS, page 16

Liens rapides

SOL10UC3
PWM SOLAR CHARGE REGULATOR
PWM-LAADREGELAAR
RÉGULATEUR SOLAIRE MLI
REGULADOR SOLAR PWM
PWM SOLAR-LADEREGLER
REGULATOR ŁADOWANIA PWM DO PANELI SŁONECZNYCH
CONTROLADOR DE CARGA SOLAR PWM
3
9
16
23
30
37
45

Publicité

Table des Matières
loading

Sommaire des Matières pour Velleman SOL10UC3

  • Page 1: Table Des Matières

    SOL10UC3 PWM SOLAR CHARGE REGULATOR PWM-LAADREGELAAR RÉGULATEUR SOLAIRE MLI REGULADOR SOLAR PWM PWM SOLAR-LADEREGLER REGULATOR ŁADOWANIA PWM DO PANELI SŁONECZNYCH CONTROLADOR DE CARGA SOLAR PWM USER MANUAL HANDLEIDING MODE D'EMPLOI MANUAL DEL USUARIO BEDIENUNGSANLEITUNG INSTRUKCJA OBSŁUGI MANUAL DO UTILIZADOR...
  • Page 2 SOL10UC3 V. 01 – 27/03/2017 ©Velleman nv...
  • Page 3: User Manual

    Respect the local environmental rules. If in doubt, contact your local waste disposal authorities. Thank you for choosing Velleman! Please read the manual thoroughly before bringing this device into service. If the device was damaged in transit, do not install or use it and contact your dealer.
  • Page 4: General Guidelines

     Nor Velleman nv nor its dealers can be held responsible for any damage (extraordinary, incidental or indirect) – of any nature (financial, physical…) arising from the possession, use or failure of this product.
  • Page 5 SOL10UC3 4. Overview Refer to the illustrations on page 2 of this manual. terminals solar panel setting button terminals battery battery status LEDs terminals load load status LED USB output charging LED mounting holes 5. Wiring photovoltaic panel load fuse...
  • Page 6 SOL10UC3 6. Operation 6.1 Charging and Load Status LEDs Status System Remark charging normal charging see chapter fast flashing over-voltage Troubleshooting normal when load amp is 1.25x rated current for 60s, load status slowly flashing overload or load amp is 1.5x rated...
  • Page 7: Battery Type Setting

    SOL10UC3 7. Setting 7.1 Load Work Mode When the regulator is switched on, press the setting button to control the load output. Note that the USB output is switched on only when the regulator is switched 7.2 Battery Type Setting Hold the setting button pressed for 5 seconds.
  • Page 8: Cleaning And Maintenance

    The information in this manual is subject to change without prior notice. © COPYRIGHT NOTICE The copyright to this manual is owned by Velleman nv. All worldwide rights reserved. No part of this manual may be copied, reproduced, translated or reduced to any electronic medium or otherwise without the prior written consent of the copyright holder.
  • Page 9: Handleiding

    SOL10UC3 HANDLEIDING 1. Inleiding Aan alle ingezetenen van de Europese Unie Belangrijke milieu-informatie betreffende dit product Dit symbool op het toestel of de verpakking geeft aan dat, als het na zijn levenscyclus wordt weggeworpen, dit toestel schade kan toebrengen aan het milieu. Gooi dit toestel (en eventuele batterijen) niet bij het gewone huishoudelijke afval;...
  • Page 10 SOL10UC3  Elektrocutiegevaar bij het openen van de behuizing. Raak geen kabels aan die onder stroom staan om dodelijke elektrische schokken te vermijden. Open de behuizing niet zelf. Laat het onderhoud van het toestel over aan een vakman.  Wanneer een zonnepaneel wordt blootgesteld aan (direct) zonlicht, staan de aansluitklemmen onder spanning.
  • Page 11: Algemene Richtlijnen

     Noch Velleman nv noch zijn verdelers kunnen aansprakelijk gesteld worden voor schade (buitengewoon, incidenteel of onrechtstreeks) – van welke aard dan ook (financieel, fysisch…) voortvloeiend uit het bezit, gebruik of falen van dit product.
  • Page 12 SOL10UC3 5. Aansluiting fotovoltaïsch paneel belasting zekering batterij Sluit de componenten aan op de laadregelaar in dezelfde volgorde als hierboven weergegeven. Let op de plus- en minpolen. Sluit eerst de batterij aan. Controleer of de batterijled groen oplicht. Is dit niet het geval, zie Probleemoplossing.
  • Page 13 SOL10UC3 6. Gebruik 6.1 Laad- en belastingsleds Status Systeem Opmerking opladen normaal batterij snel knipperen overspanning Probleemoplossing normaal belastinggsstroom is 1.25x nominale stroom gedurende langzaam 60s, of belasting overbelasting knipperen belastingsstroom is 1.5x nominale stroom gedurende snel knipperen kortsluiting Probleemoplossing 6.2 Laad- en belastingsleds...
  • Page 14: Problemen En Oplossingen

    SOL10UC3 batterijspanning 7. Instelling 7.1 Belastingsmodus Wanneer de laadregelaar ingeschakeld is, druk op de instelknop om de belastingsuitgang te regelen. Merk op dat de USB-uitgang alleen ingeschakeld is wanneer de laadregelaar ingeschakeld is. 7.2 Instelling batterijtype Houd de instelknop gedurende 5 seconden ingedrukt. De batterijleds (leds 1 tot 3, van links naar rechts) knipperen overeenkomstig.
  • Page 15: Reiniging En Onderhoud

    ........... 120.3 x 67 x 21.8 mm boordiameter ............4.5 mm gewicht ............... 102 g Gebruik dit toestel enkel met originele accessoires. Velleman nv is niet aansprakelijk voor schade of kwetsuren bij (verkeerd) gebruik van dit toestel. Voor meer informatie over dit product en de laatste versie van deze handleiding, zie www.velleman.eu.
  • Page 16: Mode D'emploi

    SOL10UC3 MODE D'EMPLOI 1. Introduction Aux résidents de l'Union européenne Informations environnementales importantes concernant ce produit Ce symbole sur l'appareil ou l'emballage indique que l’élimination d’un appareil en fin de vie peut polluer l'environnement. Ne pas jeter un appareil électrique ou électronique (et des piles éventuelles) parmi les déchets municipaux non sujets au tri...
  • Page 17: Directives Générales

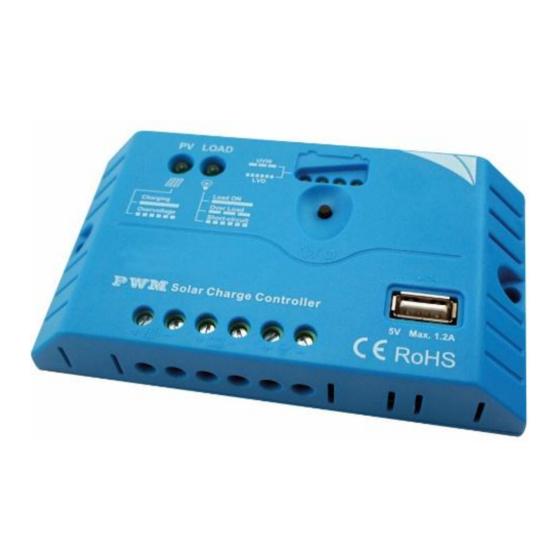
    S'assurer que les connexions sont bien serrées et exemptes de corrosion. 3. Directives générales Se référer à la garantie de service et de qualité Velleman® en fin de ce mode d'emploi.  Se familiariser avec le fonctionnement de l'appareil avant de l'utiliser.
  • Page 18 SOL10UC3 nature (financière, corporelle, etc.), causés par la possession, l’utilisation ou le dysfonctionnement de ce produit.  Garder ce mode d'emploi pour toute référence ultérieure. 4. Description Se référer aux illustrations en page 2 de ce mode d'emploi. connexions panneau bouton de réglage...
  • Page 19 SOL10UC3 Connecter la batterie en premier. Contrôler si l'indicateur de batterie s'allume en vert. Si tel n'est pas le cas, se référer à Problèmes et solutions. Connecter la charge (p.ex. lampe). La charge CC doit correspondre à la tension nominale de la batterie.
  • Page 20: Mode De Charge

    SOL10UC3 LED de batterie LED1 LED2 LED3 LED4 Etat clignote lentement sous-tension clignote décharge rapidement excessive LED de batterie lors d'une augmentation de la tension ● ● 12.8V<U <13.4V ● ● ● 13.4V<U <14.1V ● ● ● ● 14.1V<U LED de batterie lors d'une baisse de la tension ●...
  • Page 21: Problèmes Et Solutions

    SOL10UC3 8. Problèmes et solutions  La LED de charge ne s'allume pas alors que le panneau solaire est exposé au soleil. La tension d'entrée du panneau solaire est inférieure à la tension de la batterie. Contrôler la tension d'entrée du panneau solaire.
  • Page 22 être modifiés sans notification préalable. © DROITS D’AUTEUR Velleman SA est l’ayant droit des droits d’auteur de ce mode d'emploi. Tous droits mondiaux réservés. Toute reproduction, traduction, copie ou diffusion, intégrale ou partielle, du contenu de ce mode d'emploi par quelque procédé...
  • Page 23: Manual Del Usuario

    Si tiene dudas, contacte con las autoridades locales para residuos. ¡Gracias por elegir Velleman! Lea atentamente las instrucciones del manual antes de usar el aparato. Si ha sufrido algún daño en el transporte no lo instale y póngase en contacto con su distribuidor.
  • Page 24: Normas Generales

     Ni Velleman nv ni sus distribuidores serán responsables de los daños extraordinarios, ocasionales o indirectos, sea cual sea la índole V. 01 – 27/03/2017...
  • Page 25 SOL10UC3 (financiera, física, etc.), causados por la posesión, el uso o el fallo de este producto.  Guarde este manual del usuario para cuando necesite consultarlo. 4. Descripción Véase las figuras en la página 2 de este manual del usuario.
  • Page 26 SOL10UC3 Conecte los componentes al regulador solar (vease fig.). Tenga en cuenta el polo positivo y negativo. Primero, conecte la batería. Asegúrese de que el LED se ilumine en verde. Si no fuera el caso, consulte el capítulo 'Solución de problemas'.
  • Page 27: Modo De Carga

    SOL10UC3 manera lenta parpadear de descarga excesiva manera rápida LED de estado de la batería durante una subida de la tensión ● ● 12.8V<U <13.4V ● ● ● 13.4V<U <14.1V ● ● ● ● 14.1V<U LED de estado de la batería durante una bajada de la tensión ●...
  • Page 28: Solución De Problemas

    SOL10UC3 8. Solución de problemas  El panel solar está expuesto correctamente a la luz solar pero el LED de carga está apagado. La tensión de entrada del panel solar es inferior a la tensión de la batería. Compruebe la tensión de entrada del panel solar.
  • Page 29 © DERECHOS DE AUTOR Velleman NV dispone de los derechos de autor para este manual del usuario. Todos los derechos mundiales reservados. Está estrictamente prohibido reproducir, traducir, copiar, editar y guardar este manual del usuario o partes de ello sin el consentimiento previo por escrito del propietario del copyright.
  • Page 30: Bedienungsanleitung

    Falls Zweifel bestehen, wenden Sie sich für Entsorgungsrichtlinien an Ihre örtliche Behörde. Vielen Dank, dass Sie sich für Velleman entschieden haben! Lesen Sie diese Bedienungsanleitung vor Inbetriebnahme sorgfältig durch. Überprüfen Sie, ob Transportschäden vorliegen. Sollte dies der Fall sein, verwenden Sie das Gerät nicht und wenden Sie sich an Ihren Händler.
  • Page 31 SOL10UC3  Stromschlaggefahr beim Öffnen des Gehäuses. Das Berühren von unter Spannung stehenden Leitungen könnte zu lebensgefährlichen elektrischen Schlägen führen. Versuchen Sie niemals, selbst das Gerät zu öffnen oder zu demontieren. Die Reparation darf nur von einer Fachkraft durchgeführt werden.
  • Page 32: Allgemeine Richtlinien

    Garantieanspruch. Für daraus resultierende Folgeschäden übernimmt der Hersteller keine Haftung.  Weder Velleman nv noch die Händler können für außergewöhnliche, zufällige oder indirekte Schäden irgendwelcher Art (finanziell, physisch, usw.), die durch Besitz, Gebrauch oder Defekt verursacht werden, haftbar gemacht werden.
  • Page 33 SOL10UC3 5. Anschluss Photovoltaikmodul Last Sicherung Akku Verbinden Sie die Komponenten mit dem Laderegler (siehe Abb.). Beachten Sie die positiven und negativen Pole. Schließen Sie zuerst den Akku an. Vergewissern Sie sich, dass die Batterie-LED grün leuchtet. Ist dies nicht der Fall, konsultieren Sie das Kapitel 'Problemlösung'.
  • Page 34 SOL10UC3 siehe Kapitel schnell blinken Überspannung 'Problemlösung' eingeschaltet eingeschaltet normal ausgeschaltet ausgeschaltet Laststrom = 1.25x Nennstrom langsam während 60s, Last-Status Überlast blinken oder Laststrom = 1.5x Nennstrom während 5s siehe Kapitel schnell blinken Kurzschluss 'Problemlösung' 6.2 Lade- und Last-Status-LEDs Die Parameter der folgenden Liste gelten für ein 12 VDC-System @ 25 °C.
  • Page 35: Konfiguration

    SOL10UC3 7. Konfiguration 7.1 Last-Modus Ist der Laderegler eingeschaltet, drücken Sie auf den Einstellknopf, um den Lastausgang zu regeln. Achtung: der USB-Ausgang ist nur eingeschaltet wenn der Laderegler eingeschaltet ist. 7.2 Den Batterietyp einstellen Halten Sie den Einstellknopf während 5 Sekunden gedrückt. Die Status-LEDs für die Batterie (LEDs 1 bis 3, von links nach rechts) werden blinken.
  • Page 36: Reinigung Und Wartung

    Lochdurchmesser ............4.5 mm Gewicht ............... 102 g Verwenden Sie dieses Gerät nur mit originellen Zubehörteilen. Velleman NV übernimmt keine Haftung für Schaden oder Verletzungen bei (falscher) Anwendung dieses Gerätes. Mehr Informationen zu diesem Produkt und die neueste Version dieser Bedienungsanleitung finden Sie hier: www.velleman.eu.
  • Page 37: Instrukcja Obsługi

    W razie wątpliwości należy skontaktować się z lokalnym organem odpowiedzialnym za utylizację odpadów. Dziękujemy za zakup produktu Velleman! Prosimy o dokładne zapoznanie się z instrukcją obsługi przed użyciem urządzenia. Nie montować ani nie używać urządzenia, jeśli zostało uszkodzone podczas transportu - należy skontaktować...
  • Page 38 SOL10UC3  Uwaga: ryzyko porażenia prądem po otwarciu urządzenia. Dotknięcie przewodów pod napięciem może powodować zagrażające życiu porażenie prądem elektrycznym. Nie rozmontowywać ani nie otwierać obudowy samodzielnie. Naprawę urządzenia powierzyć wykwalifikowanemu personelowi.  Od chwili wystawienia panelu słonecznego na działanie światła (słonecznego) końcówki będą...
  • Page 39: Informacje Ogólne

     Firma Velleman ani jej dystrybutorzy nie ponoszą odpowiedzialności za jakiekolwiek szkody (nadzwyczajne, przypadkowe lub pośrednie) dowolnej natury (finansowe, fizyczne…), wynikające z posiadania, użytkowania lub awarii niniejszego produktu.
  • Page 40 SOL10UC3 5. Połączenia panel fotowoltaiczny obciążenie bezpiecznik bateria Podłączyć podzespoły do regulatora ładowania w kolejności pokazanej powyżej. Zwrócić uwagę na biegunowość. Najpierw podłączyć akumulator. Sprawdzić, czy wskaźnik akumulatora zapali się na zielono. Jeżeli nie, przejść do rozdziału "Wykrywanie i usuwanie usterek".
  • Page 41 SOL10UC3 6. Obsługa 6.1 Diody LED ładowania i stanu obciążenia Status System Uwaga włączony ładowanie normalne patrz rozdział ładowanie "Wykrywanie i miga szybko przepięcie usuwanie usterek" włączony włączony normalny wył. wył. gdy prąd obciążenia utrzymuje wartość równą 1,25 prądu miga powoli przeciążeniowe...
  • Page 42 SOL10UC3 Dioda LED stanu akumulatora dla wysokiego napięcia ● ● 12,8V<U <13,4V ● ● ● 13,4V<U <14,1V ● ● ● ● 14,1V<U Dioda LED stanu akumulatora dla niskiego napięcia ● ● ● 12,8V<U <13,4V ● ● 12,4V<U <12,8V ● <12,4V ●...
  • Page 43: Wykrywanie I Usuwanie Usterek

    SOL10UC3 8. Wykrywanie i usuwanie usterek  Panel słoneczny jest wystawiony na oddziaływanie promieni słonecznych, ale dioda LED ładowania nie świeci się. Napięcie wejściowe panelu jest niższe niż napięcie akumulatora. Sprawdzić napięcie wejściowe panelu słonecznego. Napięcie akumulatora jest niższe niż 6 V. Minimalne napięcie niezbędne do uruchomienia wynosi 6 V.
  • Page 44 © INFORMACJA O PRAWACH AUTORSKICH Właścicielem praw autorskich do niniejszej instrukcji jest firma Velleman nv. Wszelkie prawa są zastrzeżone na całym świecie. Żadna część niniejszej instrukcji nie może być kopiowana, powielana, tłumaczona ani przenoszona na jakikolwiek nośnik elektroniczny (lub w inny sposób) bez wcześniejszej pisemnej zgody właściciela praw autorskich.
  • Page 45: Manual Do Utilizador

    SOL10UC3 MANUAL DO UTILIZADOR 1. Introdução Aos cidadãos da União Europeia Importantes informações sobre o meio ambiente no que respeita a este produto Este símbolo no aparelho ou na embalagem indica que, enquanto desperdícios, poderão causar danos no meio ambiente. Não coloque a unidade (ou as pilhas) no depósito de lixo municipal;...
  • Page 46: Normas Gerais

    A instalação requer fusíveis/disjuntores (não incluídos).  Certifique-se de que todas as conexões estão devidamente apertadas e livres de corrosão. 3. Normas gerais Consulte a Garantia de serviço e qualidade Velleman ® na parte final deste manual do utilizador. ...
  • Page 47 SOL10UC3  Nem Velleman NV nem os seus distribuidores podem ser responsabilizados por quaisquer danos (extraordinário, incidental ou indireto) - de qualquer natureza decorrentes (financeira, física ...) a partir da posse, uso ou falha do produto.  Guarde este manual para posterior consulta.
  • Page 48 SOL10UC3 Ligue os componentes ao regulador de carga conforme indicado na seqüência acima. Preste atenção aos pólos positivo e negativo. Ligue primeiro a bateria. Confirme se o indicador da bateria fica verde. Caso contrário consulte o capítulo Resolução de Problemas.
  • Page 49 SOL10UC3 Estado do LED da bateria LED1 LED2 LED3 LED4 Estado intermitente lento sub-tensão intermitente sobredescarga rápido Estado do LED da bateria durante a subida da tensão ● ● 12.8V<U <13.4V ● ● ● 13.4V<U <14.1V ● ● ● ●...
  • Page 50: Resolução De Problemas

    SOL10UC3 8. Resolução de problemas  O painel solar está devidamente exposto à luz solar mas o LED de carregamento está desligado. A tensão de entrada do painel solar é inferior à tensão da bateria. Verifique a tensão de entrada do painel solar.
  • Page 51 © DIREITOS DE AUTOR A Velleman NV detém os direitos de autor deste manual do utilizador. Todos os direitos mundiais reservados. É estritamente proibido reproduzir, traduzir, copiar, editar e gravar este manual do utilizador ou partes deste sem prévia autorização escrita por parte da...
  • Page 52 • Op alle consumentengoederen geldt een garantieperiode van date of purchase. 24 maanden op productie- en materiaalfouten en dit vanaf de • Velleman® can decide to replace an article with an equivalent oorspronkelijke aankoopdatum. article, or to refund the retail value totally or partially when the •...
  • Page 53 Velleman®; • tuyau : il est conseillé de consulter la notice et de contrôler - se calcula gastos de transporte de y a Velleman® si el câbles, piles, etc. avant de retourner l’appareil. Un appareil aparato ya no está cubierto por la garantía.
  • Page 54 6 (sześć) Erlaubnis von Velleman® vorgenommen werden. miesięcy; • Im Fall einer Reparatur, wenden Sie sich an Ihren Velleman®- - Szkody wynikające ze źle zabezpieczonej wysyłki produktu; Verteiler. Legen Sie das Produkt ordnungsgemäß verpackt - Wszelkie szkody spowodowane przez nieautoryzowaną...
  • Page 55 Wraz z niesprawnym sem a autorização de SA Velleman®; produktem należy dołączyć jasny i szczegółowy opis jego - despesas de transporte de e para Velleman® se o aparelho usterki, wady; não estiver coberto pela garantia. • Wskazówka: Aby zaoszczędzić na kosztach i czasie, proszę...

Table des Matières