Black & Decker GH710 Mode D'emploi
Table des Matières
Les langues disponibles
Les langues disponibles
Liens rapides
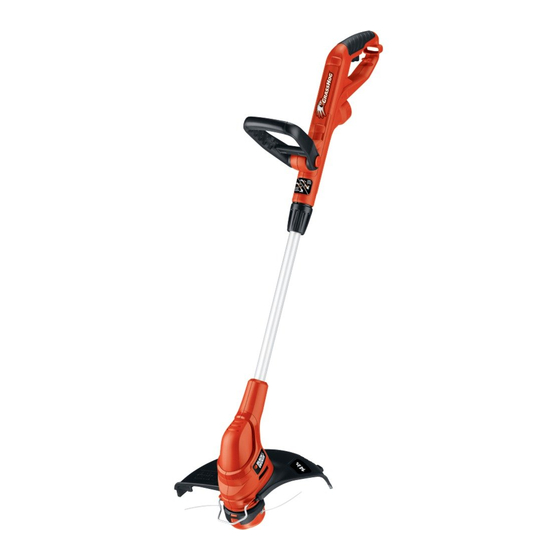
TRIMMER / EDGER
INSTRUCTION MANUAL
Model Number GH710
Thank you for choosing Black & Decker! Go
to www.BlackandDecker.com/NewOwner
to register your new product.
PLEASE READ BEFORE RETURNING
THIS PRODUCT FOR ANY REASON:
If you have a question or experience a problem with your
Black & Decker purchase, go to
WWW.BLACKANDDECKER.COM/INSTANTANSWERS
for instant answers 24 hours a day.
If you canʼt find the answer or do not have access to the internet,
call 1-800-544-6986 from 8 a.m. to 5 p.m. EST Mon. - Fri
to speak with an agent.
Please have the catalog number available when you call.
SAVE THIS MANUAL FOR FUTURE REFERENCE.
VEA EL ESPAÑOL EN LA CONTRAPORTADA.
POUR LE FRANÇAIS, VOIR LA COUVERTURE ARRIÈRE.
INSTRUCTIVO DE OPERACIÓN, CENTROS DE SERVICIO Y
PÓLIZA DE GARANTÍA. ADVERTENCIA: LÉASE ESTE
INSTRUCTIVO ANTES DE USAR EL PRODUCTO.
Model No. GH710
KEY INFORMATION YOU SHOULD KNOW:
• The guard must be installed before trimming or edging - if
not, the motor will overheat (page 5).
• When replacing the line, use only .065 inch diameter
ROUND line (B&D Model No. DF-065 is recommended) -
otherwise the tool will not function properly (page 8).
• Do not bump the feed head against the ground - it will
disrupt the feed mechanism.
• Always use the cord retention feature (page 7).
1
Chapitres
Table des Matières
Dépannage

Manuels Connexes pour Black & Decker GH710


Sommaire des Matières pour Black & Decker GH710
-
Page 12: Voici Des Renseignements Importants Quʼil Vous Faut Connaître
Numéro de modèle GH710 TAILLE-BORDURE / COUPE- BORDURE MODE D’EMPLOI Numéro de modèle GH710 Merci dʼavoir choisi Black & Decker! Consulter le site Web www.BlackandDecker.com/NewOwner pour enregistrer votre nouveau produit. A LIRE AVANT DE RETOURNER CE PRODUIT POUR QUELQUE RAISON QUE CE SOIT : Si des questions ou des problèmes surgissent après lʼachat dʼun produit... -
Page 13: Avertissements De Sécurité Et Directives De Première Importance
TABLE DES MATIÈRES AVERTISSEMENTS DE SÉCURITÉ ET DIRECTIVES DE PREMIÈRE IMPORTANCE Directives de sécurité - définitions ...........13 Avertissements de sécurité et directives de première importance ................13 Avertissements de sécurité et directives : Fiches polarisées...15 AVERTISSEMENT : Lorsque des outils de jardinage Avertissements de sécurité... - Page 14 • SʼASSURER que toute personne et animaux sont éloignés dʼau • NE PAS UTILISER dʼoutils électriques portatifs dans un milieu moins 30 m (100 pi). gazeux ou déflagrant. Les moteurs de ces outils produisent • POUR RÉDUIRE LE RISQUE de blessures par ricochet, normalement des étincelles qui pourraient enflammer des vapeurs.
-
Page 15: Avertissements De Sécurité Et Directives : Fiches Polarisées
AVERTISSEMENTS DE SÉCURITÉ ET AVERTISSEMENT : Pour prévenir un choc électrique ou une DIRECTIVES : FICHES POLARISÉES électrocution, se servir uniquement dʼune rallonge convenant à une utilisation à lʼextérieur. Toujours brancher les rallonges à une prise avec fusible ou protégée par un disjoncteur. Pour réduire le risque de chocs électriques, cet équipement •... -
Page 16: Composants
COMPOSANTS 1. Détente Calibre minimal des cordons de rallonge 120V 0-25 26-50 51-100 101-150 Tension Longueur totale du cordon en pieds 2. Dispositif de (0-7,6m) (7,6-15,2m) (15,2-30,4m) (30,4-45,7m) retenue du cordon 240V 0-50 51-100 101-200 201-300 (0-15,2m) (15,2-30,4m) (30,4-60,9m) (60,9-91,4m) 3. -
Page 17: Assemblage Et Réglage
• Utiliser un tournevis ASSEMBLAGE ET RÉGLAGE cruciforme, retirer la vis de la garde. OUTILS REQUIS POUR LʼASSEMBLAGE (NON FOURNIS) : • Insérer la vis du pare-main - Tournevis cruciforme comme lʼillustre la figure 2 POSE DU PARE-MAIN pour terminer lʼassemblage du pare-main. -
Page 18: Reglage De La Hauteur
REGLAGE DE LA HAUTEUR • Positionner la poignée comme le montre la figure E • La hauteur totale du taille- (le logo Black & Decker bordure peut être réglée en étant positionné vers le desserrant le collier (9) et en haut). -
Page 19: Mise En Marche Et Arret
CONVERTIR AU MODE COUPE-BORDURE DIRECTIVES DʼUTILISATION • Pour utiliser lʼappareil comme coupe- bordure dʼentretien, tourner le collier (9) comme lʼindique la partie 1 de la figure J. • Tenir la tige de métal et tourner le boîtier AVERTISSEMENT : Toujours utiliser une protection inférieur de 180°... -
Page 20: Accessoires De Rechange
FIL TRANCHANT / AVANCE DU FIL REMPLACER LA BOBINE Bobine de (FIGURES L ET M) rechange Votre taille-bordure utilise un fil de nylon ROND de 1,7 mm • Débrancher lʼoutil. N° de modèle (0,065 po) de diamètre. En cours dʼutilisation, les extrémités des •... -
Page 21: Entretien
• Détacher lʼextrémité de lʼautre fil de coupe et le faire passer dans • Couper le fil de coupe lʼautre œillet. Le fil doit sortir dʼenviron 136 mm (5 3/8 po) du boîtier. enroulé lorsquʼil atteint les encoches (j). (figure O). •... -
Page 22: Dépannage
4. Le coupe-fil sur le bord du dispositif de protection peut sʼémousser • Nettoyer avec précaution la bobine et son boîtier. avec le temps. Il est recommandé de sʼassurer régulièrement • Retirer la bobine, puis vérifier si le levier, situé dans le boîtier de que la lame est bien tranchante en utilisant une lime. -
Page 23: Remplacement Gratuit Des Etiquettes
Les centres Black & Decker et les centres de service autorisés sont répertoriés dans les pages jaunes, sous la rubrique « Outils électriques ». Cette garantie ne sʼapplique pas aux accessoires. Cette Imported by / Importé par garantie vous accorde des droits légaux spécifiques et vous Black &...