HP LaserJet M9040 MFP Guide De Mise En Route
HP LaserJet M9040/M9050 MFP
Getting Started Guide
EN
Guide de mise en route
FR
Leitfaden zur Inbetriebnahme
DE
Guida introduttiva
IT
Guía de instalación inicial
ES
Guia de primers passos
CA
Beknopte handleiding
NL
Guia de primeiros passos
PT
Read me First
A lire avant de continuer
Bittte zuerst lesen
Informazioni preliminari
Lea esto primero
Llegiu això primer
Lees eerst deze handleiding
Leia-me primeiro
Table des Matières

Manuels Connexes pour HP LaserJet M9040 MFP


Sommaire des Matières pour HP LaserJet M9040 MFP
- Page 1 HP LaserJet M9040/M9050 MFP Getting Started Guide Read me First Guide de mise en route A lire avant de continuer Leitfaden zur Inbetriebnahme Bittte zuerst lesen Guida introduttiva Informazioni preliminari Guía de instalación inicial Lea esto primero Llegiu això primer...
- Page 2 The information contained herein is subject to change without notice. Les informations contenues dans ce document peuvent être modifiées sans The only warranties for HP products and services are set forth in the express préavis. warranty statements accompanying such products and services. Nothing herein should be construed as constituting an additional warranty.
- Page 3 Overview Présentation Überblick Panoramica Visión general Descripció general Overzicht Visão geral In-box documentation Documentation fournie Mitgelieferte Dokumentation Documentazione acclusa alla confezione Documentación incluida Documentació que hi ha a la caixa Meegeleverde documentatie Documentação contida na caixa Device location Emplacement du périphérique Aufstellort des Geräts Posizione della periferica Ubicación del dispositivo...
-
Page 4: Documentation Fournie
• Controladores de software • Controladors de programari CD de HP Digital Sending Software 4.X CD del programa HP Digital Sending Software 4.X • Versión de prueba de DSS Advanced Features • Versió de prova de les característiques avançades de DSS... -
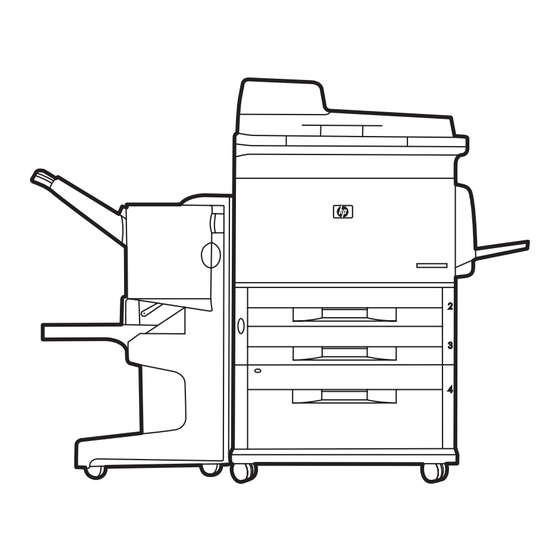
Page 5: Aufstellort Des Geräts
Device location Emplacement du périphérique Aufstellort des Geräts Posizione della periferica Ubicación del dispositivo Ubicació del dispositiu Apparaatlocatie Localização do dispositivo Select a well-ventilated, dust-free area to position the Device. Choisissez une zone correctement ventilée et exempte de poussière pour installer le périphérique. Stellen Sie das Gerät an einem gut belüfteten, staubfreien Ort auf. - Page 6 Power/Current specifications. Spécifications d’alimentation/électriques Specifiche di alimentazione. Netzanforderungen Especificaciones de alimentación/corriente eléctrica. Especificacions elèctriques i sobre l’alimentació. Stroomspecificaties. Especificações de energia/corrente. 110-volt models 220-volt models Modèles 110 volts Modèles 220 volts • 110 to 127 volts • 220 to 240 volts •...
-
Page 7: Unpack The Device
Unpack the Device Déballage du périphérique Auspacken des Geräts Estrazione della periferica dall’imballaggio Desempaquetar el dispositivo Desembalatge del dispositiu Het apparaat uitpakken Remover a embalagem do dispositivo Remove the outer box and the packing foam. Retirez la caisse extérieure et le carton d’emballage. Entfernen Sie die äußere Verpackung und die Styroporstücke. - Page 8 Installez les rampes. Bringen Sie die Rampen an. Installare le rampe. Install the ramps. Instale las rampas. Instal·leu les rampes. Plaats de steunrails. Instale as rampas. Use two people to gently roll the device off of the pallet. Faites que deux personnes se chargent de faire glisser doucement le périphérique hors du plateau de chargement. Rollen Sie das Gerät mit einer zweiten Person vorsichtig von der Palette herunter.
- Page 9 Remove the shipping tape. Retirez le ruban adhésif d’expédition. Entfernen Sie die Klebestreifen. Rimuovere il nastro di trasporto. Retire la cinta de embalaje. Retireu les cintes adhesives de transport. Verwijder de verpakkingstape. Remova a fita de embalagem. Open scanner lid and remove foam. Ouvrez le couvercle du scanner et retirez le carton.
- Page 10 Clean scanner glass with a dry, lint-free cloth. Nettoyez la vitre du scanner avec un chiffon sec non pelucheux. Reinigen Sie das Scannerglas mit einem trockenen und fusselfreien Tuch. Pulire il vetro dello scanner con un panno asciutto e privo di lanugine. Limpie el cristal del escáner con un paño seco que no desprenda pelusa.
- Page 11 Install the optional output device. Specific installation guides are shipped with each of the optional output devices. Installez le périphérique de sortie optionnel. Les différents guides d’installation sont expédiés avec chaque périphérique de sortie optionnel correspondant. Installieren Sie das optionale Ausgabegerät. Die entsprechenden Informationen finden Sie in der beiliegenden Anleitung. Installare la periferica di output opzionale.
-
Page 12: Configuration Du Périphérique
Set up the Device Configuration du périphérique Einrichten des Geräts Configurazione della periferica Instalar el dispositivo Configuració del dispositiu Het apparaat installeren Configuração do dispositivo Change the control panel language overlay (if necessary). Changez la langue du transparent du panneau de commande (si nécessaire). Wechseln Sie, falls erforderlich, die Sprachschablone für das Bedienfeld. - Page 13 Install the print cartridge. Installez la cartouche d’impression. Setzen Sie die Druckpatrone ein. Installare la cartuccia di stampa. Instale el cartucho de impresión. Instal·leu el cartutx d’impressió. Installeer de printcartridge. Instale o cartucho de impressão.
- Page 14 Connect a Network cable (optional). Branchez le câble réseau (facultatif). Schließen Sie ein Netzwerkkabel an (optional). Collegare il cavo di rete (opzionale). Conecte un cable de red (opcional). Connecteu un cable de xarxa (opcional). Sluit een netwerkkabel aan (optioneel). Conecte um cabo de rede (opcional). NOTE: Connection required for Device network features and utilities.
- Page 15 Lock the wheels on the printer stand. Bloquez les roues sur l’emplacement de l’imprimante. Blockieren Sie die Rollen des Geräts. Bloccare le ruote sul supporto della stampante. Bloquee las ruedas del soporte de la impresora. Bloquegeu les rodes de la impressora. Vergrendel de wielen in het onderstel van de printer.
- Page 16 Set language, date and time. If prompted, select your language, the date, and the time. Follow the instructions on the control panel touch screen. Configuration de la langue, la date et l’heure. Si vous y êtes invité, sélectionnez votre langue, la date et l’heure. Suivez les instructions données à...
- Page 17 Adjust the paper guide(s). Réglez le ou les guides du papier. Stellen Sie die Papierführungen ein. Regolare le guide della carta. Ajusteu les guies de paper. Ajuste las guías de papel. Corrija a(s) guia(s) do papel. Stel de papiergeleider(s) bij. Load the print media.
- Page 18 To connect to a network: By default, an IP Address will automatically be assigned using DHCP. To assign a static IP address for a network connection, do the following: On the control panel touch Administration. Scroll to and touch Initial Setup, and then touch Networking and I/O.
- Page 19 Verify functionality by printing a configuration page. From the control panel, A) scroll to and touch Administration. B) Touch Information. C) Touch Configuration/Status Pages. D) Touch Configuration Page. E) Touch Print. If you are connected using a network cable, the IP address will be on the Jetdirect page, under “TCP/IP”. IP is needed for software to install. Save the configuration page printout for use during the software installation.
- Page 20 Verify copy. Place configuration page, print side-down, in the ADF (Automatic Document Feeder), and press the Start button. The ADF will automatically feed the paper through the scanner and the copied page will be ejected into the output bin. Vérifiez la copie. Placez la page de configuration, face imprimée vers le bas, dans le BAA (bac d’alimentation automatique) et appuyez sur le bouton Démarrer.