Table des Matières
Publicité
Les langues disponibles
Les langues disponibles
Liens rapides
marca propiedad de | est une marque de | trade mark propiety of | marchio di proprietà di :
El fabricante se reserva el derecho de modificar sin previo aviso las características de sus productos para introducir mejoras técnicas o cumplir con nuevas regulaciones oficiales / The
manufacturer reserves the right to modify the specifications of its products in order to make technical improvements or comply with new regulations / Le constructeur se réserve le droit de
modifier les caractéristiques de ses produits en vue d'y apporter des améliorations techniques ou de respecter de nouvelles réglamentations / Il produttore si riserva il diritto di modificare le
specifiche dei propri prodotti al fine di apportare miglioramenti tecnici o adeguarsi a nuove normative
MANUAL DE USUARIO | MANUEL D'USAGER
USER'S MANUAL | MANUALE DI ISTRUZIONI
BR 40
ES|FR|EN|IT
INDICADOR
INDICATEUR
INDICATOR
INDICATORE
Pol. Empordà Internacional C/ Molló, 3
17469 VILAMALLA - (Girona) SPAIN
T. (34) 972 527 212
V.2.9
13/01/2023
Publicité
Table des Matières

Manuels Connexes pour Giropes Baxtran BR 40


Sommaire des Matières pour Giropes Baxtran BR 40
- Page 1 MANUAL DE USUARIO | MANUEL D’USAGER USER’S MANUAL | MANUALE DI ISTRUZIONI BR 40 ES|FR|EN|IT INDICADOR INDICATEUR INDICATOR INDICATORE V.2.9 13/01/2023 marca propiedad de | est une marque de | trade mark propiety of | marchio di proprietà di : Pol.
-
Page 2: Table Des Matières
BR40 ÍNDICE ÍNDICE INDICE BR 40 ES|FR|EN|IT 1. INTRODUCCIÓN 2. ESPECIFICACIONES 3. INSTALACION 3.1 INSTALACIÓN GENERAL 3.2 CONEXIÓN CÉLULA DE CARGA 4. DESCRIPCIÓN DE LAS TECLAS 5. DISPLAY 6. OPERATIVA 6.1 TECLA AUTO-CERO 6.2 FIJACIÓN DE LA TARA 6.3 PESO DE UNA MUESTRA 6.4 MODO CUENTAPIEZAS 6.5 CONTROL DE PESO (FUNCIÓN CHECKWEIGHER) 6.5.1 OPERATIVA... - Page 3 BR40 INDEX 1. INTRODUCTION 2. SPÉCIFICATIONS 3. INSTALLATION 3.1 INSTALLATION GÉNÉRALEÇ 3.2 CONNEXION DU CAPTEUR DE CHARGEMENT 4. DESCRIPTION DES TOUCHES 5. DISPLAY 6. OPÉRATIVE 6.1 TOUCHE AUTO ZÉRO 6.2 FIXATION DE LA TARE 6.3 POIDS D’UN ÉCHANTILLON 6.4 MODE COMPTAGE (FONCTION CHECKWEIGHER) 6.5 CONTRÔLE DE POIDS 6.5.1 OPERATIVE...
- Page 4 BR40 INDEX 1. INTRODUCTION 2. SPECIFICATIONS 3. INSTALLATION 3.1 GENERAL INSTALLATION 3.2 LOAD CELL PORT 4. DESCRIPTION OF THE KEYS 5. DISPLAY 6. OPERATIVE 6.1 KEY AUTO-ZERO 6.2 TARING 6.3 WEIGHING A SAMPLE 6.4 COUNTING MODE 6.5 WEIGHT CONTROL (FUNCTION CHECKWEIGHER) 6.5.1 OPERATIVE 6.5.1.1 TYPES OF WEIGHT CONTROL 6.5.1.2 AUDIBLE ALARM OPERATIONS...
- Page 5 BR40 INDICE INDICE 1. INTRODUZIONE 2. SPECIFICHE TECNICHE 3. INSTALLAZIONE 3.1 INSTALLAZIONE GENERALE 3.2 COLLEGAMENTO DELLA CELLA DI CARICO 4. DESCRIZIONE DEI TASTI 5. DISPLAY 6. FUNZIONAMENTO 6.1 TASTO ZERO AUTOMATICO 6.2 IMPOSTAZIONE DELLA TARA 6.3 PESATURA DI UN CAMPIONE 6.4 MODALITÀ...
-
Page 6: Introducción
MANUAL DE USUARIO BR40 1. INTRODUCCIÓN El indicador de peso BR40 es un indicador de uso general rápido, versátil y preciso con funciones de comprobación de peso. La pantalla es grande y fácil de leer de cristal líquido (LCD). La pantalla de cristal líquido dispone de retroiluminación mediante LED. También incluye búsqueda de cero, alarma sonora para pesos pre-establecidos y una acumulación que permite que los pesos individua- les se almacenen y puedan ser memorizados como acumulación total. -
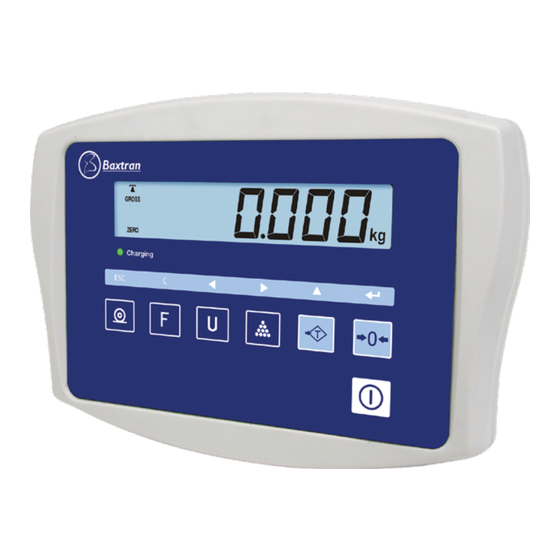
Page 7: Descripción De Las Teclas
MANUAL DE USUARIO BR40 4. DESCRIPCIÓN DE LAS TECLAS Charging 1a. función; Autocero. 2a. función; Fijar los parámetros u otras funciones. 1a. función; Fija la tara de la balanza, almacenando el peso actual en la memoria como valor de tara, resta el valor de tara del peso y muestra el resultado. -
Page 8: Display
MANUAL DE USUARIO BR40 5. DISPLAY La pantalla de visualización LCD mostrará un valor y una unidad a la derecha de los dígitos. Además hay cuatro indicadores para TARA (TARE); peso BRUTO (GROSS), CERO (ZERO) y para batería baja. SÍMBOLO DE ESTABILIDAD PIEZAS SÍMBOLO DE BATERÍA BAJA SÍMBOLOS DE COMPROBACIÓN DE PESADO... -
Page 9: Peso De Una Muestra
MANUAL DE USUARIO BR40 6.3 PESO DE UNA MUESTRA Para determinar el peso de una muestra tarar primero el contenedor vacío y después situar la muestra en el contenedor. La pantalla mostrará el peso y las unidades de peso programadas en este momento. 6.4 MODO CUENTAPIEZAS Charging Cuando el visor muestra el peso, pulse la tecla... -
Page 10: Programación De Límites
MANUAL DE USUARIO BR40 6.5.2 PROGRAMACIÓN DE LÍMITES PASOS DESCRIPCIÓN Charging F0 H-L Pulse la tecla y el display mostrará Charging Charging Pulse la tecla para entrar, use la tecla para seleccionar “ ” (programación del límite SET HI SET LO ” superior”... -
Page 11: Total Acumulado
MANUAL DE USUARIO BR40 6.6 TOTAL ACUMULADO Charging • Se puede configurar el visor para acumular manualmente pulsando la tecla . Vea la sección CONFIGURACIÓN para más detalles sobre la selección del modo utilizando “F5 PRT”. La función de acumulación sólo está disponible cuando se está pesando. Está des- activada cuando el visor está... -
Page 12: Configuración
MANUAL DE USUARIO BR40 7. CONFIGURACIÓN l visor tiene 6 parámetros de configuración que pueden ser fijados por el usuario, además de un método para entrar en la sección de calibración. PASOS DESCRIPCIÓN Charging Para fijar los parámetros pulse la tecla El display mostrará... -
Page 13: Configuración Del Menú De Funciones
MANUAL DE USUARIO BR40 7.1 CONFIGURACIÓN DEL MENÚ DE FUNCIONES Charging Se accede al menu desde el modo peso normal MENÚ SUB-MENÚ DESCRIPCIÓN Ajuste del valor umbral inferior F0 H-L SEt Lo Ajuste del valor umbral superior SEt HI Borrar totalización F1 toL to CLr No soportado... - Page 14 MANUAL DE USUARIO BR40 F5 Prt Después de configurar el modo RS232, el display mostrará la velocidad de comunicación actual “ bXXXX “ 600, b1200, b2400, b4800 y b9600. M+ formato - Fecha/Hora Pr 0 Pr0, Pr1, Pr2, Pr3, Pr4, Pr5, Pr6, Pr7 Solo para formato PPrt...
-
Page 15: Funcionamiento Con Bateria
MANUAL DE USUARIO BR40 8. FUNCIONAMIENTO CON BATERIA El indicador de peso puede funcionar a bateria. La vida de la batería es de aproximadamente 50 horas. Cuando la batería necesite recargarse aparecerá un símbolo en la pantalla de peso que se encenderá. La batería debe cargarse cuando se en- cienda el símbolo. -
Page 16: Interfaz Rs 232
MANUAL DE USUARIO BR40 9. INTERFAZ RS 232 Los visores de esta serie pueden incorporar opcionalmente un interfaz RS-232. ESPECIFICACIONES: • Interfaz RS-232 de datos de pesada. • Código ASCII • 8 bits de datos • Sin paridad CONECTOR: Tipo SUB-D de 9 pins •... -
Page 17: Calibración (Sólo Ersonal Técnico Autorizado Jumper K1)
MANUAL DE USUARIO BR40 10. CALIBRACIÓN (Sólo ersonal técnico autorizado JUMPER K1) Charging • Vuelva a encenderlo y durante el recuento de 9 a 0 pulse la tecla Charging Charging Charging • El display mostrará “CAL” durante unos segundos. Mientras muestre “CAL”, pulse las teclas en esta misma se- cuencia para entrar en la sección de calibración. -
Page 18: Configuración Técnica
MANUAL DE USUARIO BR40 12. CONFIGURACIÓN TÉCNICA Charging “F0 H-L”. Pulse la tecla cuando el visor esté en modo de pesaje normal y el display mostrará Charging Charging Pulse la tecla hasta que el display muestre “ ” y pulse para entrar. -
Page 19: Garantía
MANUAL DE USUARIO BR40 AJUSTES DE RANGO ÚNICO P2 CAL Configuración del punto decimal opción sólo Deci 0.00 C 0.000 C 0.0000 accesible Configuración del escalón con JUMPER interior K1 Sig r 00000 Entrar la capacidad de la báscula Linear Calibración lineal. -
Page 20: Introduction
MANUEL D’USAGER BR40 1. INTRODUCTION L’indicateur de poids BR40 est un indicateur d’utilisation générale rapide, universelle et précise avec des fonctions de vérification de poids. L’écran est grand et facile à lire de cristal liquide (LCD). L’écran de cristal liquide dispose de rétro-éclairage par LED. Inclut aussi recherche de de zéro, alarme sonore pour poids préétablis et une accumulation qui permet que les poids individuels se et soient pus être mémorisés comme accumulation totale. -
Page 21: Description Des Touches
MANUEL D’USAGER BR40 4. DESCRIPTION DES TOUCHES Charging 1a. fonction; Auto zéro. 2a. fonction; Fixer les paramètres ou d’autres fonctions. 1a. fonction; Cette touche fixe la tare de la balance, et enregistrant le poids actuel sur la mémoire comme valeur de tare, elle soustrait la valeur de tare du poids. -
Page 22: Display
MANUEL D’USAGER BR40 5. DISPLAY L’écran de visualisation LCD montrera une valeur et une unité à droite des digits. Aussi il y a quatre indicateurs pour Tare (TARE); Poids brut (GROSS), Zéro (ZERO) et pour batterie baisse. SYMBOLE DE STABILITÉ UNITÉS DE COMPTE DES PIÈCES SYMBOLE DE BATTERIE BAISSE... -
Page 23: Mode Comptage
MANUEL D’USAGER BR40 6.4 MODE COMPTAGE Charging Quand l’indicateur montre le poids, pousser la touche et la fonction comptage commencera. Charging “P 10 L’indicateur montrera ” sollicitant un échantillon de 10 pièces. Changer la valeur de l’échantillon appuyant sur la touche . -
Page 24: Programmation Des Limites
MANUEL D’USAGER BR40 6.5.2 PROGRAMMATION DES LIMITES ÉTAPES DESCRIPTION Charging “F0 H-L” Appuyer sur la touche et l’écran montrera Charging Charging Appuyer sur la touche pour entrer, utiliser la touche pour sélectionner “ ” SET HI (programmation de la limite supérieure) ou “ ”... -
Page 25: Total Accumulé
MANUEL D’USAGER BR40 6.6 TOTAL ACCUMULÉ Charging • On peut configurer l’indicateur pour accumuler manuellement poussant la touche . Voir la section CONFIGURATION pour plus de dé- tails sur la sélection du mode utilisant “F5 PRT”. La fonction d’accumulation seulement est disponible quand on pesse. Elle est désactivée quand l’indicateur est en mode comptage. -
Page 26: Configuration
MANUEL D’USAGER BR40 7. CONFIGURATION L’indicateur a 6 paramètres de configuration qui peuvent être fixés par l’usager, en plus d’une méthode pour entrer à la section de calibration. ÉTAPES DESCRIPTION Charging Pour fixer les paramètres on pousse la touche L’écran montrera la première fonction: F0 H-L Charging Si on pousse la touche... -
Page 27: Configuration Du Menu De Fonctions
MANUEL D’USAGER BR40 7.1 CONFIGURATION DU MENU DE FONCTIONS Charging On accède au menu en poussant depuis le mode de poids normal. MENU SUB-MENU DESCRIPTION Fixer une valeur comme limite inférieure. F0 H-L SEt Lo Fixer une valeur comme limite supérieure. SEt HI Effacer la mémoire accumulée sans imprimier les résultats. - Page 28 MANUEL D’USAGER BR40 F5 Prt Après de configurer le mode RS232, l’écran montrera l’actuelle vitesse de transmissio “ bXXXX “ 600, b1200, b2400, b4800 y b9600. M+ format - Date/Heure Pr 0 Pr0, Pr1, Pr2, Pr3, Pr4, Pr5, Seulement pour le format Pr6, Pr7 PPrt p prt, p auto...
-
Page 29: Fonctionnement Avec Batterie
MANUEL D’USAGER BR40 8. FONCTIONNEMENT AVEC BATTERIE La balance peut fonctionner sur batterie . La durée de la batterie est approximativement de 50 heures. Quand la batterie aura besoin d’être rechargée un symbole apparaître sur l’écran le poids qui sera allumé. La batterie doit être changée quand on allumera le symbole. -
Page 30: Interface Rs 232
MANUEL D’USAGER BR40 9. INTERFACE RS 232 Les viseurs de cette série peuvent incorporer éventuellement un interface RS-232. SPÉCIFICATIONS: • interface RS-232 de données de lourde. • Code ASCII • 8 bits de données • Sans parité CONNECTEUR: TYPE SUB-D DU 9 PINS •... -
Page 31: Étalonnage
MANUEL D’USAGER BR40 10. ÉTALONNAGE (Seulement personnel technique autorisé cavaliers K1) • Eteignez le viseur. Charging • Ramullez et pendant le comptage de 9 à 0 et appuyer sur la touche Charging Charging Charging • L’écran affiche “CAL” pendant quelques secondes. Alors affichez “CAL”, appuyez sur les touches dans cette même séquence pour entrer dans la section d’étalonnage. -
Page 32: Configuration Technique
MANUEL D’USAGER BR40 12. CONFIGURATION TECHNIQUE Charging F0 H-L” Appuyer sur la touche Lorsque le viseur est en mode de pesage normale et le display affiche “ Charging Charging Appuyer sur la touche Jusqu’à ce que l’écran affiche “ ” et Appuyer pour entrer. -
Page 33: Garantie
MANUEL D’USAGER BR40 AJUSTEMENTS DE RANG UNIQUE P2 CAL Configuration du point décimal Option Deci 0.00 C 0.000 C 0.0000 seulement Configuración del escalón accessible avec cavalier intérieur K1 Sig r 00000 Entrer la capacité de la bascules Linear Étalonnage linéaire. Appuyer sur la touche ENTER, il entame l’étalonnage nonlin Étalonnage normale... -
Page 34: Introduction
USER’S MANUAL BR40 1. INTRODUCTION BR40 weighing indicator is an accurate, versatil and fast indicator with check weighing functions. The large screen of liquid cristal type (LCD) allows on easy ti read view. The LCD’s are supplied with a LED backlight. All units include automatic zero tracking, audible alarm for pre-set weights, and an accumulation facility that allows the individual weights to be stored and recalled as accumulated total. -
Page 35: Description Of The Keys
USER’S MANUAL BR40 4. DESCRIPTION OF THE KEYS Charging 1a. function: Auto-zero. 2a. function: Set the parameters or other functions. 1a. function: Fix the tare weight of the balance, by storing the current weight in the memory as the value of Tara, subtracts the value of the tare weight and shaws the result. -
Page 36: Display
USER’S MANUAL BR40 5. DISPLAY The LCD display screen will show a value and a unit on the right of the digit. In addition there are four indicators for TARA (TARE): gross weight (Gross), ZERO (ZERO) and for low battery. STABILITY SYMBOL PIECES LOW BATTERY SYMBOL... -
Page 37: Counting Mode
USER’S MANUAL BR40 6.4 COUNTING MODE Charging When the display shows the weight, press the key and will start the counting function. Charging “ P 10 ” The display will show requesting a sample of 10 pieces. Change the value of the sample by pressing the key . -
Page 38: Programming Of Limits
USER’S MANUAL BR40 6.5.2 PROGRAMMING OF LIMITS STEPS DESCRIPTION Charging F0 H-L Press the key and the display will show Charging Charging SET HI ” Press the key to enter, use the key to select “ (programming of the upper limit” or “SET LO ”... -
Page 39: Total Accumulated
USER’S MANUAL BR40 6.6 TOTAL ACCUMULATED Charging • You can configure the indicator to manually accumulate by pressing the key . See the Configuration section for more details concerning the selection of the mode using the “F5 PRT”. The accumulation function is only available when weighing is on. Is desactivate when the indicator is in counting mode. -
Page 40: Configuration
USER’S MANUAL BR40 7. CONFIGURATION The viewer has 6 settings that can be set by the user, in addition to a method for entering the calibration section. STEPS DESCRIPTION Charging To set up the parameters press the key The display will show the first function: F0 H-L Charging If you press the key... -
Page 41: Configuration Of Functions Menu
USER’S MANUAL BR40 7.1 CONFIGURATION OF FUNCTIONS MENU Charging You can access to the menu from the user moder normal weight. MENU SUB-MENU description Set a value as the lower limit F0 H-L SEt Lo Set a value as the upper limit SEt HI Erases the accumulated memory without printing the results F1 toL... - Page 42 USER’S MANUAL BR40 F5 Prt After configure the RS232 mode, the display will show the current speed of communication“ bXXXX “ 600, b1200, b2400, b4800 y b9600. M+ format - Date/Time Pr 0 Pr0, Pr1, Pr2, Pr3, Pr4, Pr5, Pr6, Pr7 Only for prt format p, p auto PPrt M+ format - Gross/accumulation...
-
Page 43: Battery Operation
USER’S MANUAL BR40 8. BATTERY OPERATION The weighing indicator can be operated from the battery if desired. The battery life is approsimately 50 hours. When the battery needs charging a symbol on the weight display will turn on. The battery should be charged when the symbol is on. The scale will still operate for about 10 hours after which it will automatically switch off to protect the battery. -
Page 44: Rs 232 Interface
USER’S MANUAL BR40 9. RS 232 INTERFACE The viewers of this series can incorporate optionally a RS-232 interface. SPECIFICATIONS: • RS-232 interface data weighing. • ASCII code • 8 Data bits • Without parity CONNECTOR: SUB-D TYPE 9 PINS • Pin 2: Rx •... -
Page 45: Calibration (Only Personal Authorized Technician Jumper K1)
USER’S MANUAL BR40 10. CALIBRATION (Only personal authorized technician JUMPER K1) Charging • Turn it on again, and during the count from 9 to 0 press the key Charging Charging Charging • The display will show “CAL” for a few seconds. While it shows “CAL”, press the keys In this same sequence to enter in the calibration section. -
Page 46: Technical Configuration
USER’S MANUAL BR40 12. TECHNICAL CONFIGURATION Charging “F0 H-L” Press the key when the viewer will be in normal weight mode and the display will show Charging Charging “ PROG ” Press the key until the display shows and press for enter. -
Page 47: Guarantee
USER’S MANUAL BR40 FROM SINGLE RANGE P2 CAL Configuration of the decimal point Option only Deci 0.00 C 0.000 C 0.0000 Configuration of the step accessible by with K1 Sig r 00000 Enter the capacity of the scale Linear Linear Calibration. Pressing the ENTER key, it starts the calibration nonlin Normal calibration... -
Page 48: Introduzione
MANUALE DI ISTRUZIONI BR40 1. INTRODUZIONE L'indicatore BR40 è uno strumento rapido, versatile e preciso con funzioni di controllo del peso. Il display a cristalli liquidi (LCD) è grande e di facile lettura. Il display a cristalli liquidi è dotato di retroilluminazione a LED. Comprende anche le funzioni di ricerca dello zero, allarme acustico per i pesi prestabiliti e accumulo, che consente di salvare i singoli pesi e di memorizzarli come accumulo totale. -
Page 49: Descrizione Dei Tasti
MANUALE UTENTEBR40 4. DESCRIZIONE DEI TASTI Charging 1° funzione; Zero automatico. 2° funzione; Impostazione dei parametri o altre funzioni. 1° funzione; Imposta la tara della bilancia, memorizzando il peso corrente come valore di tara, sottrae il valore di tara dal peso e visualizza il risultato. Tale risultato è il peso netto. Se si immette un valore tramite la tastiera, questo verrà... -
Page 50: Display
MANUALE DI ISTRUZIONI BR40 5. DISPLAY Lo schermo di visualizzazione LCD mostra un valore e un'unità a destra delle cifre. Inoltre sono previsti quattro indicatori per TARA (TARE); peso LORDO (GROSS), ZERO e per livelli bassi di batteria. SIMBOLO DI STABILITÀ PEZZI SIMBOLO DI BATTERIA SCARICA... -
Page 51: Pesatura Di Un Campione
MANUALE UTENTEBR40 6.3 PESATURA DI UN CAMPIONE Per determinare il peso di un campione, tarare prima il contenitore vuoto, quindi posizionare il campione nel contenitore. Il display visua- lizza il peso e le unità di peso programmate in questo momento. 6.4 MODALITÀ... -
Page 52: Programmazione Dei Limiti
MANUALE DI ISTRUZIONI BR40 6.5.2 PROGRAMMAZIONE DEI LIMITI PASSAGGI DESCRIZIONE Charging Premere il tasto , il display visualizza F0 H-L Charging Charging Premere il tasto per entrare, utilizzare il tasto " (programmazione del limite superiore) "SET HI o"SET LO " (programmazione del limite inferiore) Charging Premere il tasto per entrare. -
Page 53: Totale Accumulato
MANUALE UTENTEBR40 6.6 TOTALE ACCUMULATO Charging • Il display può essere impostato per accumulare manualmente premendo il tasto . Vedere la sezione CONFIGURAZIONE per i dettagli sulla selezione della modalità utilizzando "F5 PRT". La funzione di accumulo è disponibile solo durante la pesatura. È disattivata quando il display è... -
Page 54: Configurazione
MANUALE DI ISTRUZIONI BR40 7. CONFIGURAZIONE ll display ha 6 parametri di configurazione impostabili dall'utente, più un metodo per l'inserimento della sezione di calibrazione. PASSAGGI DESCRIZIONE Charging Per fissare i parametri premere il tasto Il display mostra la prima funzione: F0 H-L Charging Premendo il tasto... -
Page 55: Configurazione Del Menu Funzioni
MANUALE UTENTEBR40 7.1 CONFIGURAZIONE DEL MENU FUNZIONI Charging L'accesso al menu avviene dalla modalità peso normale MENU SOTTOMENU DESCRIZIONE Setzen des unteren Schwellwertes F0 H-L SEt Lo Setzen des oberen Schwellwertes SEt HI Löschen Totalisierung F1 toL to CLr Wird nicht unterstützt to P-C Wird nicht unterstützt to Prt... - Page 56 MANUALE DI ISTRUZIONI BR40 F5 Prt Dopo aver configurato la modalità RS232, il display visualizza la velocità di comunicazione corrente “ bXXXXXX “ 600, b1200, b2400, b4800 e b9600. M+ formato - Data/Ora Pr 0 Pr0, Pr1, Pr2, Pr3, Pr4, Pr5, Pr6, Pr7 Solo per il formato PPrt...
-
Page 57: Funzionamento A Batteria
MANUALE UTENTEBR40 8. FUNZIONAMENTO A BATTERIA L'indicatore di peso può essere alimentato a batteria. La durata della batteria è di circa 50 ore. Quando la batteria necessita di essere ricaricata, sul display del peso viene visualizzato un simbolo che si accende. La batteria deve essere cari- cata quando il simbolo si accende. -
Page 58: Interfaccia Rs-232
MANUALE DI ISTRUZIONI BR40 9. INTERFACCIA RS-232 I display di questa serie possono incorporare opzionalmente un'interfaccia RS-232. SPECIFICHE TECNICHE: - Interfaccia RS-232 per i dati di pesatura. - Codice ASCII - 8 bit di dati - Nessuna parità CONNETTORE: Tipo SUB-D a 9 pin •... -
Page 59: Calibrazione (Solo Personale Tecnico Autorizzato Jumper K1)
MANUALE UTENTEBR40 10. CALIBRAZIONE (Solo personale tecnico autorizzato JUMPER K1) Charging • Riaccendere l’apparecchiatura e durante il conteggio da 9 a 0 premere il tasto Charging Charging Charging • Il display visualizza "PIN" per alcuni secondi. Durante la visualizzazione di "PIN", premere i tasti in questa sequenza per entrare nella sezione di calibrazione. -
Page 60: Configurazione Tecnica
MANUALE DI ISTRUZIONI BR40 Convertitore A/D fuori I valori del convertitore A/D non rientrano nell'intervallo normale. Err 6 intervallo Rimuovere il peso dalla piattaforma in caso di eccesso di peso. Indica che la cella di carico o l'elettronica potrebbero non funzionare correttamente. -
Page 61: Garanzia
MANUALE UTENTEBR40 IMPOSTAZIONI INTERVALLO UNICO P2 CAL Configurazione del punto decimale opzione Deci 0.00 C 0.000 C 0.0000 accessibile Configurazione della scala solo con JUMPER K1 Sig r interno 00000 Inserire la capacità della bilancia Lineare Calibrazione lineare Premendo il tasto ENTER si avvia la calibrazione nonlin Calibrazione normale Premendo il tasto ENTER si avvia la calibrazione... - Page 64 marca propiedad de | est une marque de | trade mark propiety of | marchio di proprietà di : Pol. Empordà Internacional C/ Molló, 3 17469 VILAMALLA - (Girona) SPAIN T. (34) 972 527 212...