Table des Matières
Publicité
Les langues disponibles
Les langues disponibles
Liens rapides
Publicité
Table des Matières
Dépannage

Manuels Connexes pour König Electronic DVB-T HDMI10


Sommaire des Matières pour König Electronic DVB-T HDMI10
- Page 1 DVB-T HDMI10 MANUAL (p. 5) ANLEITUNG (S. 21) FULL HD FTA RECEIVER FULL HD FTA RECEIVER MODE D’EMPLOI (p. 39) MANUALE (p. 57) RÉCEPTEUR DE CANAL GRATUIT RICEVITORE FTA FULL HD ENTIÈREMENT HD BRUKSANVISNING (s. 75) FULL HD FTA-mottagare 2012-12-21...
-
Page 2: Table Des Matières
Contents ENGLISH ........................5 GENERAL INFORMATION ......................5 Main Features........................5 For your safety:........................6 General information: ......................6 General Operation: ......................7 Remote control: ......................... 7 INSTALLATION ........................... 8 INSTALLATION GUIDE......................10 MAIN MENU..........................11 1. Program:........................11 2. Picture ......................... 13 3. - Page 3 INSTALLATION ......................... 43 GUIDE D'INSTALLATION......................45 MENU PRINCIPAL ........................46 1. Program :........................46 2. Image (Picture) ......................48 3. Recherche de canal..................... 48 4. Heure (Time)........................ 49 5. Option .......................... 50 6. Système........................51 7. USB ..........................52 8. Touche de fonction....................... 54 DÉPANNAGE..........................
- Page 4 7. USB ..........................87 8. Kortkommando ......................89 FELSÖKNING ........................... 90...
-
Page 5: English
ENGLISH FULL HD FTA RECEIVER GENERAL INFORMATION This Digital Terrestrial Receiver (DTR) will bring you into the new and exciting world of Digital Television. A world of crystal clear widescreen pictures, digital sound, more information and new services. All this and more is on “Free to Air” Digital Television. To make full use of your new DTR, please take the time to familiarise yourself with the extensive features of the unit detailed in this User's Guide. -
Page 6: For Your Safety
For your safety: To avoid the risk of electric shock, do not open Keep the receiver away from flower vases, tubs, the cabinet, refer to qualified personnel only. sinks etc in order to avoid damaging the equipment. Do not expose the receiver to sunlight and keep Do not block the ventilation holes of the receiver it away from any heat source. -
Page 7: General Operation
General Operation: Throughout this manual you will notice that the everyday operation of the receiver is based on a series of user friendly on screen displays and menus. These menus will help you get the most from your receiver, guiding you through installation, channel organising, viewing and many other functions. All functions can be carried out using the buttons on the RCU, and some of the functions can also be carried out using the buttons on the front panel. -
Page 8: Installation
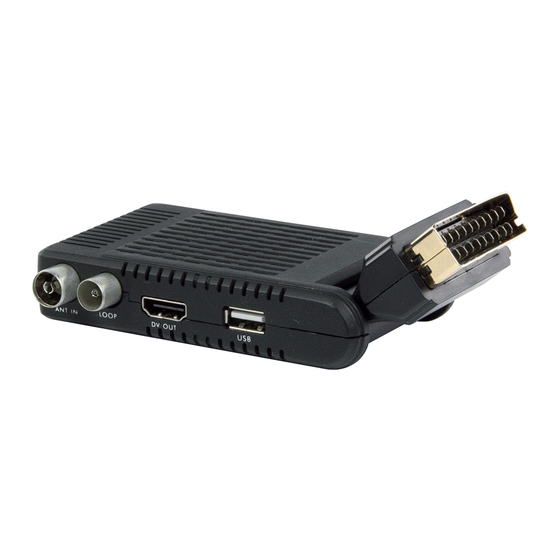
INSTALLATION Rear Panel ANT IN: CONNECTTO ANTENNA LOOP: CONNECT TOANOTHER RECEIVER CONNECT TO REMOVABLE DEVICE CONNECT TO TVSET HDMI INPUT CONNECT TO ADIGITAL AMPLIFIER CONNECT TO INFRARED RECEIVER CONNECT TO THE POWER SUPPLY Connecting to TV using SCART cable CONNECT TO TV USING HDMI SUPPORT Antenna... - Page 9 Connecting to power supply and external IR-sensor External IR-sensor CONNECT TO THE POWER SUPPLY Connecting to TV using HDMI support...
-
Page 10: Installation Guide
Connecting to Digital Amplifier DIGITALAUDIO CONVERTOR OR AMPLIFIER SPEAKER • The picture is only for reference, please make the object as the standard. INSTALLATION GUIDE When powering on for the first time, the Installation Guide will display as below. Press PR+, PR− keys to move highlight to select OSD language, Country and Channel Search. -
Page 11: Main Menu
MAIN MENU When you press [MENU] key, you enter the Main Menu. This menu consists of 7 major sub-menus as follows. - Program - Picture - Channel Search - Time - Option - System - USB 1. Program: This menu consists of 4 major sub-menus as follow: - Program edit - EPG - Sort... - Page 12 4. Select the program and press the green key to mark this program with the skip icon. You can cancel this mark by pressing the green key once more. 5. Select the program and press the blue key to pop up a warning dialogue box: “Do you want to delete this?”...
-
Page 13: Picture
1.3 SORT Select by service ID, LCN, ONID or service name. 1.4 LCN Select between On and Off. 2. Picture This menu consists of 4 major sub-menus as follows: - Aspect Ratio - Resolution - TV Format - Video Output 2.1 Aspect Ratio Select between 16:9 Pillar Box, 16:9 Pan&Scan, 4:3 Letter Box, 4:3 Pan&Scan, 4:3 Full, 16:9 Wide Screen and Auto. -
Page 14: Time
3.2 Manual search Frequency channel: Press key to select the channel. Frequency: Press the number key to input. Bandwidth: Press keys to select between 6, 7 and Through two colour bars at the bottom of the search window, users can see the signal quality and strength of the current channel. -
Page 15: System
5. Option There are 5 sub-menus in this menu - OSD Language - Subtitle Language - Audio Language - Digital Audio - Audio Description 5.1 OSD language Press keys to select the language in the circle. 5.2 Subtitle language Press keys to select the language in the circle. -
Page 16: Restore Factory Default
6.3 Restore factory default Choose the option of Restore Factory Default and press [OK] key to restore. Press [OK] key to start and press [EXIT] key to quit. Note: Please use this function carefully. 6.4 Information When you enter the Information menu, the screen displays the receiver information, such as model, SW version and so Press [EXIT] key to leave this menu. - Page 17 7.1.2 Photo Select the picture and press key to enter the slide show mode. Press the blue key to enter grid show mode. In this mode, select the picture and press the OK key to see it in full screen. 7.1.3 Movie Select the movie you want to watch and press the red key to enter full screen mode.
-
Page 18: Hotkey
7.3 Movie configuration: 1. Subtitle specific: Select normal, big or small. 2. Subtitle background: Select transparent, grey, white, and Yellow green. 3. Subtitle font color: Select red, white, black, blue or green. 7.4 PVR configuration 1. Record device: Here you see the information of the USB device 2. - Page 19 8.8 OK 1. During the viewing or listening, press OK key to Pop up the TV program list or the radio program list. 2. Press PR+, PR- keys to select the channel up or down and then press the OK key to play this channel in Full-screen. 3.
-
Page 20: Troubleshooting
8.14 Subtitle Press key to open the subtitle window on the screen. TROUBLESHOOTING Problem Possible causes What to do The display on the front panel Check that the main cable is Main cable is not connected. does not light up. plugged into the power socket. -
Page 21: Deutsch
- This manual was produced with care. However, no rights can be derived. König Electronic can not accept liability for any errors in this manual or their consequences. - Keep this manual and packaging for future reference. Attention: This product is marked with this symbol. It means that used electrical and electronic products should not be mixed with general household waste. -
Page 22: Für Ihre Sicherheit
• MP3/ JPEG/ BMP/ OGG Dateien • 2 h Voreinstellung, der Benutzer kann Einstellungen zur Endzeit (Untertitelunterstützung), zur Verschlüsselung und Entschlüsselung von Programmen vornehmen • Sperren/Löschen/Umbenennen, Wiedergabevorschau, Informationen zu den aufgenommenen Dateien aufrufen • Wiedergabe/Pause/Stopp Für Ihre Sicherheit: Durch das selbstständige Öffnen des Gehäuses Stellen Sie den Receiver nicht in die Nähe von können Sie einen Stromschlag erleiden. -
Page 23: Allgemeine Informationen
Allgemeine Informationen: 1 Fernbedienung 2x AAA-Batterien 1 Bedienungsanleitung 1 IR 1 P. SUP. 1 Empfänger Allgemeine Informationen zum Betrieb: Mit Hilfe dieser Bedienungsanleitung werden Sie feststellen, dass der alltägliche Betrieb Ihres Receivers auf einer Reiher benutzerfreundlicher Menüs und Darstellungen auf dem Display basiert. Dieser Menüs führen Sie durch die Einrichtung des Gerätes, die Programmierung der Sender, der Wiedergabe und viele andere Funktionen und helfen Ihnen, alle Möglichkeiten Ihres Receivers auszuschöpfen. -
Page 24: Fernbedienung
Fernbedienung: Taste: Funktion: Schaltet das Gerät EIN/AUS Stummschalten Wahl des Menüpunktes oder des Senders Wahl zwischen TV und Radio SHIFT Shift-Funktionstaste Die Favoritenliste wird angezeigt FIND Das Fenster „FIND“ wird angezeigt INFO Informationen werden angezeigt Drücken Sie diese Taste einmal, um das MENU auf dem MENU Bildschirm anzuzeigen Zum Hoch-/Herunterscrollen der Seite in der Liste... -
Page 25: Installation
INSTALLATION Rückseite: ANT IN: AN ANTENNE ANSCHLIESSEN LOOP: AN ANDEREN EMPFÄNGER ANSCHLIESSEN AN EXTERNES GERÄT ANSCHLIESSEN AN TV-SET HDMI-EINGANG ANSCHLIESSEN AN DIGITALEN VERSTÄRKER ANSCHLIESSEN AN INFRAROT-EMPFÄNGER ANSCHLIESSEN AN DIE STROMVERSORGUNG ANSCHLIESSEN Über ein Scartkabel an TV anschließen AN TV MIT HDMI-KABEL ANSCHLIESSEN Antenne... - Page 26 An die Stromversorgung und einen externen IR-Sensor anschließen Externer IR-Sensor AN DIE STROMVERSORGUNG ANSCHLIESSEN Über ein HDMI-Kabel an TV anschließen...
-
Page 27: Installationsanleitung
An digitalen Verstärker anschließen DIGITALUMWANDLER ODER VERSTÄRKER LAUTSPRECHER • Das Bild dient nur als Empfehlung, bitte verwenden Sie die Standardausführung. INSTALLATIONSANLEITUNG Wenn Sie das Gerät zum ersten Mal einschalten, sehen Sie die Installationsanleitung wie folgt. Drücken Sie die Tasten PR+, PR−, um die Optionen OSD Sprache, und Kanalsuche zu wählen. -
Page 28: Hauptmenü
HAUPTMENÜ wenn Sie die Taste [MENU] drücken gelangen Sie in das Hauptmenü. Das Hauptmenü besteht aus sieben verschiedenen Untermenüs. - Programme - Bild - Kanalsuche - Zeit - Option - System - USB 1. Programme: Dieser Menüpunkt besteht aus vier verschiedenen Untermenüs: - Bearbeiten von Programmen - EPG... - Page 29 3. Wählen Sie das Programm und drücken Sie die gelbe Taste, um das Programm mit dem Lock-Symbol zu markieren. Drücken Sie die gelbe Taste erneut und das Symbol erlischt wieder. 4. Wählen Sie das Programm und drücken Sie die grüne Taste, um dieses Programm mit dem Symbol zum Überspringen zu markieren.
-
Page 30: Bild
Drücken Sie die Taste OKum ein Programm zu wählen. Das gewählte Programm erscheint in der Buchungsliste. Um auf die Buchungsliste zuzugreifen, drücken Sie im EPG-Modus die Taste INFO. Alle gespeicherten Programme erscheinen in der Auflistung. Drücken Sie die rote Taste, um ein Programm zur Buchungsliste hinzuzufügen und drücken Sie die grüne Taste, um das Programm zu bearbeiten. -
Page 31: Sendersuche
3. Sendersuche Dieser Menüpunkt besteht aus vier verschiedenen Untermenüs: - Automatische Suche - Manuelle Suche - Land - Antennenspannung 3.1 Automatischer Suchlauf Drücken Sie bei Automatische Suche die Taste OK, um Sender zu suchen. Beim ersten Suchlauf werden alle gesuchten TV- und Radiosender in ihrer Reihenfolge in der Auflistung angezeigt. -
Page 32: Zeit
4. Zeit Dieser Menüpunkt besteht aus fünf Untermenüs Zeitverschiebung - Land Region - Zeitzone - Sleep - Gerät Ein/Aus Wählen Sie zwischen Auto und Manuell. Wenn Sie Auto wählen wird der Punkt Zeitzone grau unterlegt. Wählen Sie Manuell können Sie dem Punkt Zeitzone bearbeiten, der Punkt Länderregion wird grau unterlegt. -
Page 33: System
5.3 Audio Sprache Wählen Sie die Sprache in dem Kreis, indem Sie die Tasten drücken. 5.4 Digital Audio Drücken Sie die Tasten , um zwischen PCM/, RAW/HDMI RAW, RAW/HDMI PCM und Aus zu wählen. 5.5 Audio Beschreibung Wählen Sie zwischen 1-31 und Aus. 6. -
Page 34: Usb
6.4 Information Wenn Sie das Informationsmenu öffnen, werden auf dem Display die Receiver-Informationen wie das Modell, die SW-Version usw. angezeigt. Drücken Sie die Taste [EXIT], um das Menü zu verlassen. 6.5 Software Upgrade Es gibt zwei Updatemöglichkeiten: OTA Update und USB Update. - Page 35 7.1.2 oto Wählen Sie ein Bild und drücken Sie die Taste ►, um in den Modus Diaschau zu gelangen. Drücken Sie die blaue Taste, um in den Grid Show Modus zu gelangen. Wählen Sie in diesem Modus das Bild und drücken Sie die Taste OKum dieses im Vollbildmodus betrachten zu können.
-
Page 36: Hotkey
7.2 Foto Konfiguration 1. Zeit Dia Show: Wählen Sie einen Wert zwischen 1 s – 8 s. 2. Dia Schau-Modus: Wählen Sie 0 – 59 oder Random. 3. Bildformat: Wählen Sie zwischen keep und discard. 7.3 Filmeinstellungen: 1. Untertitel Spezifisch: Wählen Sie Normal, Gross oder Klein. - Page 37 8.7 Suchfunktion Drücken Sie die rote Taste (Finden), um das Suchfenster zu öffnen. Drücken Sie zur Buchstabeneingabe die Tasten 8.8 OK 1. Drücken Sie während der Wiedergabe von Musik oder Filmen OK, um sich die TV-Programmliste bzw. die Radio-Programmliste anzeigen zu lassen. 2.
-
Page 38: Fehlerbehebung
3. Wenn Sie keine Favoriten abgespeichert haben, erhalten Sie die Mitteilung „Kein Favoritenprogramm!“, sobald Sie die Taste FAV drücken. 8.13 EPG Bitte beachten Sie 1.2 EPG für weitere Informationen. 8.14 Untertitel Drücken Sie die Taste , um das Untertitelfenster zu öffnen. FEHLERBEHEBUNG Problem Mögliche Ursachen... -
Page 39: Français
Sicherheitsvorkehrungen: Um das Risiko eines elektrischen Schlags zu verringern, sollte dieses Produkt AUSSCHLIESSLICH von einem autorisierten Techniker geöffnet werden. Bei Problemen trennen Sie das Gerät bitte von der Spannungsversorgung und von anderen Geräten ab. Stellen Sie sicher, dass das Gerät nicht mit Wasser oder Feuchtigkeit in Berührung kommt. -
Page 40: Pour Votre Sécurité
• 8 groupes différents de sélection des chaînes préférées • Affichage sur écran (OSD) multilingue • Prise en charge complète du Guide des Programmes Électronique (EPG) sur 7 jours • Prise en charge d'image réaliste (PIG) • Affichage sur écran à 256 couleurs •... -
Page 41: Information Générale
Ne pas exposer le récepteur aux rayons directs Ne pas bloquer les trous d'aération du récepteur du soleil et le tenir loin des sources de chaleur. pour que l'air circule librement. Si c'est le cas, vous devez couper immédiatement Ne pas toucher le récepteur lors des orages, il y a l'alimentation. -
Page 42: Télécommande
Télécommande : Touche : Fonction : Alimentation ON/OFF Coupure du son (muet) Pour sélectionner le numéro de menu ou la chaîne à regarder Basculer entre la TV et la radio SHIFT Touche de fonction de décalage horaire Afficher la liste des groupes de chaînes préférées FIND Afficher la fenêtre «... -
Page 43: Installation
INSTALLATION Panneau arrière : ANT IN (ENTRÉE D'ANTENNE) : CONNEXION DE L’ANTENNE LOOP (BOUCLAGE) : CONNEXION D’UN AUTRE RÉCEPTEUR CONNEXION D’UN DISPOSITIF AMOVIBLE CONNEXION À L’ENTRÉE HDMI DU BOÎTIER TV CONNEXION D’UN AMPLIFICATEUR NUMÉRIQUE CONNEXION DU RÉCEPTEUR INFRAROUGE CONNEXION DE L’ALIMENTATION ÉLECTRIQUE Connexion à... - Page 44 Connexion à l’alimentation électrique et au capteur IR externe Capteur IR externe CONNEXION DE L’ALIMENTATION ÉLECTRIQUE Connexion au téléviseur en utilisant un câble HDMI...
-
Page 45: Guide D'installation
Connexion d’un amplificateur numérique DÉCODEUR OU AMPLIFICATEUR AUDIO NUMÉRIQUE ENCEINTE • Les images sont présentes comme référence, veuillez les adapter à votre situation. GUIDE D'INSTALLATION Lors de la première utilisation, le Guide d'installation s'affiche comme ci-après. Appuyez les touches PR+, PR− pour mettre en surbrillance et sélectionner OSD language (langue OSD) Country (Pays) et Channel Search (Recherche des chaînes). -
Page 46: Menu Principal
MENU PRINCIPAL Lorsque vous appuyez sur la touche [MENU], vous entrez dans le Main Menu (Menu principal). Ce menu est composé de 7 sous-menus principaux comme ci-après. - Program - Picture - Channel Search - Time - Option - System - USB 1. - Page 47 type de chaînes préférées disparaît derrière le programme. 3. Sélectionnez le programme et appuyez la touche jaune pour marquer ce programme avec l'icône Lock (Verrouillage). Vous pouvez éliminer cette icône en appuyant la touche jaune une fois de plus. 4. Sélectionnez le programme et appuyez la touche vertepour marquer ce programme avec l'icône «...
-
Page 48: Numéro De Chaîne Du Diffuseur (Lcn)
Appuyez la touche OK pour sélectionner le programme. Vous verrez le programme choisi dans la liste de programmation. En mode EPG, vous pouvez appuyer la touche INFO pour entrer dans la liste de programmation. Tous les programmes sélectionnés seront présents dans la programmation. Appuyez la touche rouge pour ajouter un programme à... -
Page 49: Recherche Automatique (Auto Search)
3.1 Recherche automatique (Auto search) Appuyez la touche OK sur Auto Search (Recherche automatique) pour lancer la recherche des chaînes. À la fin de la première recherche, la liste de toutes les chaînes TV et Radio détectées est affichée dans l'ordre. Grâce à la barre de couleur au bas de la fenêtre de recherche, les utilisateurs sont informés de la progression de la recherche des chaînes. - Page 50 4.3 Fuseau horaire (Time zone) Appuyez les touches pour sélectionner de GMT-12 à GMT+12. 4.4 Veille (Sleep) Appuyez les touches pour choisir parmi Off, 1 hour ou 12 hours. 4.5 Mise en Marche/Arrêt (Power On/Off) Power On/Off : Sélectionnez activer (enable) ou désactiver (disable).
-
Page 51: Système
6. Système 5 sous-menus sont présents dans ce menu. - Parental Guidance - Set Password - Restore Factory Default - Information - Software update 6.1 Contrôle parental (Parental guidance) L'utilisateur peut sélectionner un âge entre 4-18 ou Off. 6.2 Réglage du mot du passe (Set password) Input the old password (Saisir l'ancien mot de passe) : Saisissez le mot de passe en appuyant les touches numériques 0-9. -
Page 52: Mise À Niveau Du Logiciel (Software Upgrade)
6.5 Mise à niveau du logiciel (Software upgrade) Il existe 2 modes d'Update (mise à jour) : Mise à jour OTA et USB. 7. USB 5 sous-menus sont présents dans ce menu comme ci-après : Multimedia, Photo Configuration, Movie Configuration, PVR configuration et Record. -
Page 53: Enregistrement Vidéo Personnel (Pvr)
7.1.3 Film (Movie) Sélectionnez le film que vous voulez regarder et appuyez la touche rouge pour exécuter le mode d'affichage plein écran. 7.1.4 Enregistrement vidéo personnel (PVR) En mode normal, appuyez la touche RECORD de la télécommande, puis le symbole apparaîtra à... -
Page 54: Touche De Fonction
7.3 Configuration Film : 1. Caractère des sous-titres : Choisissez normal, big (grand) ou small (petit). 2. Surbrillance des sous-titres : Choisissez transparent, grey (gris), white (blanc), et Yellow green (jaune-vert). 3. Couleur des sous-titres : Choisissez red (rouge), white (blanc), black (noir), blue (bleu) ou green (vert). -
Page 55: Chaîne Préférée (Fav)
8.8 OK 1. Lors de la vision ou de l'écoute, appuyez la touche OK pour afficher la listes des programmes TV programme ou la listes des programmes radio. 2. Appuyez les touches PR+, PR- pour augmenter ou diminuer le numéro de chaîne et puis appuyez la touche OK pour lancer la lecture de cette chaîne en plein écran. -
Page 56: Guide Des Programmes Électroniques (Epg)
8.13 Guide des programmes électroniques (EPG) Veuillez consulter le paragraphe 1.2 EPG pour les explications. 8.14 Sous-titre (Subtitle) Appuyez la touche pour appeler la fenêtre de sous-titre à l'écran. DÉPANNAGE Problème Causes possibles Que faire Vérifiez que le câble L'afficheur sur le panneau avant Le câble d'alimentation secteur d'alimentation secteur est ne s'allume pas. -
Page 57: Entretien
Consignes de sécurité : Pour réduire le risque de choc électrique, ce produit ne doit être ouvert que par un technicien qualifié si une réparation s’impose. Débranchez l’appareil et les autres équipements du secteur s’il y a un problème. Ne pas exposer l’appareil à l’eau ni à... -
Page 58: Per La Vostra Sicurezza
• Display a schermo a 256 colori • Ricerca canali in automatico, ricerca manuale • Diverse funzioni di modifica canale (favorito, spostamento, blocco, rinomina e ricerca) • Controllo genitori • Sistema Menu semplice da usare • Aggiornamenti software tramite la porta USB •... -
Page 59: Informazioni Generali
Quando ciò accade dovete togliere Non toccare il ricevitore durante i temporali, l'alimentazione immediatamente. poiché potrebbe esserci il rischio di uno scossa elettrostatica. Informazioni generali: 1 Telecomando 2x batterie AAA 1 manuale utente 1 IR 1 p.sup 1 ricevitore Funzionamento Generale: Attraverso questo manuale noterete che il funzionamento quotidiano del ricevitore è... -
Page 60: Telecomando
Telecomando: Tasto: Funzione: ACCENSIONE/ SPEGNIMENTO Silenziamento suono Per selezionare il numero del menu o del canale da vedere Passa da TV a Radio SHIFT Tasto funzione Time shift Mostra la lista del gruppo favoriti FIND Mostra la finestra “TROVA” INFO Mostra le informazioni MENU Premere una volta per visualizzare a schermo il MENU... -
Page 61: Installazione
INSTALLAZIONE Pannello posteriore: ANT IN: COLLEGARE ALL’ANTENNA LOOP: COLLEGARE A UN ALTRO RICEVITORE COLLEGARE A UN DISPOSITIVO RIMOVIBILE COLLEGARE A UN INGRESSO TVSET HDMI COLLEGARE A UN AMPLIFICATORE DIGITALE COLLEGARE A UN RICEVITORE A INFRAROSSI COLLEGARE A UN ALIMENTATORE Collegare alla TV utilizzando un cavo SCART COLLEGARE ALLA TV UTILIZZANDO UN SUPPORTO HDMI... - Page 62 Collegare all’alimentatore e al sensore esterno IR Sensore esterno IR COLLEGARE A UN ALIMENTATORE Collegare alla TV utilizzando un supporto HDMI...
-
Page 63: Guida All'installazione
Collegare all’amplificatore digitale DIGITALAUDIO CONVERTITORE O AMPLIFICATORE CASSA • L’immagine è solo di riferimento, si prega di rendere l’oggetto come gli standard. GUIDA ALL'INSTALLAZIONE Quando si accende per la prima volta, la Guida di installazione verrà mostrata come segue. Premere i tasti PR+, PR− per muovere la selezione su OSD language (Lingua OSD), Country (Paese) e Channel Search (Ricerca Canale). -
Page 64: Menu Principale
MENU PRINCIPALE Quando premete il tasto [MENU], accederete al Menu Principale. Questo menu consiste di 7 sotto menu principali come segue. - Program (Programma) - Picture (Immagine) - Channel Search (Ricerca Canale) - Time (Ora) - Option (Opzione) - System (Sistema) - USB 1. - Page 65 3. Selezionare il programma e premere il tasto giallo per selezionare questo programma con l'icona di Blocco. Potete cancellare questa icona premendo il pulsante giallo nuovamente. 4. Selezionare il programma e premere il tasto verde per selezionare questo programma con l'icona di Passaggio. Potete cancellare questa icona premendo il pulsante verde nuovamente.
-
Page 66: Immagine
Premere il tasto OK per selezionare il programma. Potete vedere il programma selezionato nella lista segnalibro. In modalità EPG potete premere il tasto INFO per accedere alla lista dei preferiti. Tutti i programmi che avete segnato saranno nel programma. Premere il tasto rosso per aggiungere la lista dei preferiti e premere il tasto verde per modificare il programma. -
Page 67: Ricerca Automatica
3.1 Ricerca automatica Premere il tasto OK su ricerca Automatica per ricercare i canali. Per la prima ricerca, tutti i canali di TV ricercati e i canali Radio saranno visualizzati sulla lista in ordine. Attraverso una barra colore sul fondo della finestra di ricerca, gli utenti possono conoscere il progresso di ricerca del canale corrente. -
Page 68: Sistema
4.3 Fuso orario Premere i tasti per selezionare da GMT-12 a GMT+12 4.4 Sleep Premere i tasti per scegliere tra Off, 1 ore o 12 ore. 4.5 Accensione/Spegnimento Power On/Off (Accensione/Spegnimento): Selezionare attiva o disattiva. Quando si seleziona attiva potete modificare Power On/Off Time (Tempo acceso o spento) premendo i tasti numerici. -
Page 69: Ripristino Impostazioni Di Fabbrica
6.1 Guida genitori Il consumatore può impostare un età da 4 a 18 anni o Off. 6.2 Impostare la password Input the old password (Inserire la vecchia password): Inserire la password premendo i tasti 0-9. Input the new password (Inserire la nuova password): Inserire la password premendo i tasti 0-9. -
Page 70: Usb
7. USB Questo menu ha 5 sotto menu come: Multimedia, Photo Configuration (Configurazione Foto), Movie Configuration (Configurazione Film), PVR configuration (Configurazione PVR) e Record (Registrazione). 7.1 Multimedia Vi sono 4 sotto menu in questo menu. - Music (Musica) - Photo (Foto) - Movie (Film) - PVR Questi menu saranno disabilitati quando non vi è... -
Page 71: Configurazione Foto
7.1.4 PVR In modalità normale, premete il tasto RECORD sul RCU, quindi apparirà il simbolo sullo schermo. Significa che state registrando il programma in questo momento. Premere il tasto ■ e apparirà la finestra di dialogo: “Volete interrompere la registrazione?” Premere il tasto OK per interrompere la registrazione e salvarla o il tasto EXIT per continuare la registrazione. -
Page 72: Tasti Veloci
7.4 Configurazione PVR 1. Dispositivo di registrazione: Qui si vedono le informazioni del dispositivo USB 2. Formattare: Premere OK per formattare il disco. 8. Tasti veloci 8.1 Numero Utilizzare i tasti numerici (0-9) per inserire il numero del canale desiderato. Se il numero inserito è oltre il numero canale valido, il sistema leggera “numero invalido”, premere il tasto OK per chiudere questo messaggio. - Page 73 8.9 Audio 1. Premere il tasto AUDIO per accedere alla finestra AUDIO. 2. Premere i tasti per selezionare tra Sinistra-Sinistra, Destra-Destra, Sinistra-Destra. 3. IL cambiamento della modalità audio è connesso solo al canale corrente non a tutti i canali. 4. Premere il tasto EXIT per chiudere la finestra. 8.10 Richiama Premere il tasto per passare dal canale corrente al canale precedente.
-
Page 74: Risoluzione Dei Problemi
RISOLUZIONE DEI PROBLEMI Problema Cause possibili Cosa fare Il display sul pannello frontale Il cavo principale non è Controllare che il cavo principale non si accende. connesso. sia inserito nella presa. Non si sente nessun suono o immagine si vede, ma il Il ricevitore è... -
Page 75: Svenska
Attenzione: Il prodotto è contrassegnato con questo simbolo, con il quale si indica che i prodotti elettrici ed elettronici non devono essere gettati insieme ai rifiuti domestici. Per questi prodotti esiste un sistema di raccolta differenziata. SVENSKA FULL HD FTA-mottagare ALLMÄNNA UPPGIFTER Denna digitalmottagare för markbunden sändning (DTR) kommer att föra dig in en ny och spännande värld av digital-TV. -
Page 76: För Din Säkerhet
För din säkerhet: För att undvika risk för elektriska stötar ska du inte Placera inte mottagaren i närheten av blomvaser, öppna skåpet, låt endast behörig personal göra badkar, tvättställ etc. för att undvika skador på detta. utrustningen. Utsätt inte mottagaren för solljus och placera den För att luften ska kunna cirkulera fritt får inte inte i närheten av värmekällor. -
Page 77: Fjärrkontroll
mesta av din mottagare, vägleda dig genom installationen, organisera kanaler, visning och många andra funktioner. Alla funktioner kan utföras med knapparna på fjärrkontrollen och vissa funktioner kan också utföras med knapparna på frontpanelen. Mottagaren är enkel att använda, enkel att styra och anpassningsbar för framtida uppgraderingar. Observera att ny programvara kan ändra mottagarens funktionalitet. -
Page 78: Installation
INSTALLATION Bakre instrumenttavla: ANT IN: ANSLUT TILL ANTENN LOOP: ANSLUT TILL EN ANNAN MOTTAGARE ANSLUT TILL BORTTAGNINGSBAR ENHET ANSLUT TILL TV-APPARATENS HDMI-INGÅNG ANSLUT TILL EN DIGITAL FÖRSTÄRKARE ANSLUT TILL INFRARÖD MOTTAGARE ANSLUT TILL STRÖMFÖRSÖRJNINGEN Ansluter till TV med hjälp av SCART-kabeln Antenn... - Page 79 Ansluter till strömförsörningen och extern IR-sensor Externl IR-sensor ANSLUT TILL STRÖMFÖRSÖRJNINGEN Ansluter till TV med hjälp av HDMI-stöd...
-
Page 80: Installationsanvisningar
Ansluter till digitalförstärkare DIGITAL AUDIOOMVANDLARE ELLER FÖRSTÄRKARE HÖGTALARE • Bilden tjänar endast som referens, vänligen gör objektet till standard. INSTALLATIONSANVISNINGAR När du slår på för första gången kommer installationsguiden att visas som nedan. Tryck på tangenterna PR+, PR- för att flytta markeringen för att välja OSD language, Country och channel Search. -
Page 81: Main Menu
MAIN MENU När knappen [MENU] trycks ned kan du gå in på Main Menu. Denna meny består av 7 stora undermenyer enligt följande. - Program - Picture - Channel Search - Time - Option - System - USB 1. Program: Denna meny består av 4 stora undermenyer enligt följande: - Program edit - EPG... - Page 82 4. Välj program och tryck på grön knapp för att markera det här programmet med ikonen hoppa över. Du kan avbryta markeringen genom att trycka på grön knapp en gång till. 5. Välj program och tryck på blå knapp för att få upp en dialogruta för varning: ”Do you want to delete this?”...
-
Page 83: Bild
Tryck OK för att välja programmet. Du kan se det program du valt i bokningslistan. I EPG läget kan du trycka på INFO för att öppna bokningslistan. Alla program som du bokade kommer att finnas i schemat. Tryck den röda knappen om du vill lägga till ett program i bokningslistan och tryck på... -
Page 84: Kanalsökning
3. Kanalsökning Denna meny består av 4 stora undermenyer enligt följande: - Auto Search - Manual Search - Country - Antenna Power 3.1 Automatisk sökning Tryck på OK på Auto Search för att söka kanaler. Under den första sökningen, kommer alla sökta TV- och radiokanaler att visas på... -
Page 85: Alternativ
4.2 Landsområde Tryck på knapparna för att välja. 4.3 Tidszon Tryck på knapparna för att välja mellan GMT-12 till GMT+12 4.4 Sleep Tryck på knapparna för att välja bland Off, 1 hour eller 12 hours. 4.5 Ström På/Av Power On/Off: Välj aktivera eller inaktivera. När du väljer aktivera kan du redigera Power On/Off Time genom att trycka på... -
Page 86: System
6. System Det finns 5 undermenyer i menyn. - Parental Guidance - Set Password - Restore Factory Default - Information - Software update 6.1 Föräldrakontroll Konsumenten kan välja en ålder från 4-18 eller Off. 6.2 Ange lösenord Input the old password: Mata in lösenordet genom att trycka på... - Page 87 7. USB Denna meny har 5 undermenyer som: Multimedia, Photo Configuration, Movie Configuration, PVR configuration och Record. 7.1 Multimedia Det finns 4 undermenyer i menyn. - Music - Photo - Movie - PVR Dessa menyer inaktiveras när ingen USB-enhet är inkopplad. 7.1.1 Musik Tryck på...
- Page 88 7.1.4 PVR I normalläget trycker du på knappen RECORD på fjärrkontrollen, då visas symbolen på skärmen. Det betyder att du spelar in programmet nu. Tryck på knappen ■ och en dialogruta kommer att visas: ”Do you want to stop recording?” Tryck på OK för att stoppa inspelningen och spara den eller tryck på...
- Page 89 8. Kortkommando 8.1 Siffra Använd sifferknapparna (0-9) för att mata in önskad kanals nummer. Om det inmatade numret överskrider giltigt kanalnummer, kommer systemet att läsa ”Invalid number”, tryck på OK för att stänga meddelandet. 8.2 TV/Radio I normalläget, tryck på knappen TV/RADIO för att växla mellan läge för TV och Radio. 8.3 Upp/ner Tryck på...
- Page 90 8.10 Återkalla Tryck på knappen för att växla från aktuell kanal till föregående kanal. 8.11 Info Tryck på INFO för att öppna musikfönstret. 8.12 FAV 1. Tryck på knappen FAV för att få upp favoritgruppfönstret. 2. Tryck på knapparna för att välja önskad favoritgrupp.
- Page 91 Problem Möjliga orsaker Gör så här Kontrollera kabelanslutningarna, Ingen signal eller svag Inget ljud eller bild. antennen och annan utrustning kopplad signal. mellan antennen och mottagaren. Anslut en signaldämpare till Signalen är för stark. antenningången. Dålig bild/blockeringsfel. Antennbrusfaktorn är för Byt till en antenn med lägre brusfaktor.
- Page 92 Declare that product: / erklären, dass das Produkt: / Déclarons que le produit: / Intygar att produkten: Brand: / Marke: / Marque : / Märke: KÖNIG ELECTRONIC Model: / Modell: / Modèle : DVB-T HDMI10 Description: FULL HD FTA RECEIVER...