Table des Matières
Publicité
Les langues disponibles
Les langues disponibles
Liens rapides
Publicité
Chapitres
Table des Matières

Manuels Connexes pour IKEA UTNAMND Serie


Sommaire des Matières pour IKEA UTNAMND Serie
- Page 1 UTNÄMND...
- Page 3 ENGLISH DEUTSCH FRANÇAIS ITALIANO Please refer to the last page of this manual for the full list of IKEA appointed Authorized Service Centre and relative national phone number Konsultieren Sie die letzte Seite dieser Bedienungsanleitung, auf der die vollständige Liste der...
-
Page 4: Table Des Matières
Power limitation Rating plate Functions Environmental aspects Cooking Table IKEA GUARANTEE Safety information For your own safety and to ensure proper operation of the appliance, please read this manual carefully before installation and operation. Keep these instructions together with the appliance, even if it is sold or transferred to third parties. - Page 5 ENGLISH cable coming out of its anchor. • The manufacturer will not be liable for any damage resulting from incorrect or inadequate installation. • Check that the mains power supply corresponds to the one indicated on the rating plate fixed to the inside of the product.
- Page 6 ENGLISH person responsible for their safety. • This appliance may be used by children over the age of 8 years and by persons with limited physical, sensory or mental abilities or with insufficient experience and knowledge, provided they are carefully supervised and instructed on safe use of the appliance and on the dangers that it involves.
- Page 7 ENGLISH CAUTION: The cooking process must be supervised. A short cooking process must be constantly supervised. • The appliance is not designed to be started using an external timer or a separate remote controlled system. WARNING: Danger of fire: do not rest objects on the cooking surfaces.
-
Page 8: Installation
ENGLISH Installation Installation process must follow the laws, must be mounted with heat-resistant ordinances, directives and standards adhesives (min. 85° C): the use of (electrical safety rules and regulations, unsuitable material and adhesives may proper recycling in accordance with the result in warping and detachment. -
Page 9: Electrical Connection
• If the cables are damaged, replace with • The connection terminals can be accessed by original spare parts cables. Contact the removing the junction box cover. call center of your IKEA store. • Check that the domestic power supply characteristics (voltage, maximum power Caution! - Page 10 ENGLISH Connection diagram product side L1 L2 L3 N1 N2 ENGLISH Connection diagram product side Insert the shunts between the screws as illustrated Insert the shunts between the screws as shown ENGLISH Brown Connection diagram product side Black Blue Insert the shunts between the screws as ENGLISH Yellow / Green...
-
Page 11: Product Description
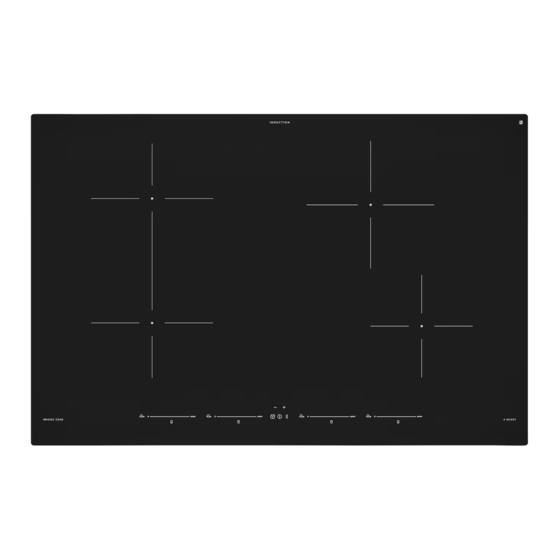
ENGLISH Product description Single cooking area (210 x 190 mm) 2100W, with Booster 3000W. Single cooking area (210 x 190 mm) 2100W, with Booster 3000W. Single cooking area (200 mm) 2300W, with Booster 3000W. Single cooking area (160 mm) 1400W, with Booster 2100W. Control panel Bridge cooking area (210 x 380 mm) 3000W, with Booster 3700W. -
Page 12: Control Panel
ENGLISH Control panel On/Off Pause function button Timer control and cooking time indicator Bridge symbol Timer symbol Power level indicator Melting function symbol Melting function button Scroll keypad Lock function button The cooking areas can be activated by pressing on the corresponding scroll keypad. The digit lights up to confirm the operation. -
Page 13: Power Limitation
ENGLISH Power limitation When first connecting to the domestic power supply, the installer must set the power of the hob cooking areas based on the actual abilities and capacity of the power supply itself. If this is not necessary, the hob can be turned on directly using , otherwise, follow the operations below to access the menu. -
Page 14: Functions
ENGLISH Functions Each cooking area can be set to an extra power level for 5 minutes at most. To activate: select one of the 4 cooking areas and select the value “Boost” Boost on the scroll keypad. The corresponding digit displays To deactivate: select one of the other possible values on the scroll keypad. - Page 15 ENGLISH Timer with alarm for generic use. To activate: turn the hob on, press “+” and "-” to set the Timer. Press individually on “+” and “-” to set the countdown. The Time increase and decrease during set-up varies according to the time to be set. The Displays Timer (generic) in the Timer management commands area show the countdown.
-
Page 16: Cooking Table
ENGLISH To activate: select one of the 4 cooking areas and press The digit for the selected area will show Melting function To deactivate: press or press This function allows 2 cooking areas to be connected, so that they can be controlled as a single, large cooking area. -
Page 17: Power Management
ENGLISH Power Management This product is equipped with electronically controlled Power Management. See the illustration. This function monitors electric loading and limits the maximum power output to 3700 W for each cooking area group (1+2 and 3+4), optimizing the power distribution and preventing the system from overloading. -
Page 18: Cookware Guidance
ENGLISH Cookware guidance What pots to use Empty or thin-based pots/pans Only use pots and pans with bottom made Do not use empty or thin-based pots/pans from ferromagnetic material which are on the hob as it will not be able to monitor suitable for use with inductions hobs: the temperature or turn off automatically if •... -
Page 19: Care And Cleaning
ENGLISH surfaces where different materials meet. regulate the temperature of the electronic The noise occurs on the cookware and can system. The fan may also continue to run vary depending on the amount of food or after the appliance is turned off if the liquid and the cooking method (e.g., boiling, detected temperature of the cooktop is still simmering, frying). -
Page 20: Troubleshooting
ENGLISH Troubleshooting Error Description Possible causes of the error Solution code Continuous key activation Hob switches off detected. Remove water or cookware from glass after 10 sec. Water or cookware placed on and Control panel. Control panel. Let the hob cool down. Please check if the hob has sufficient The internal temperature of ER21... - Page 21 If the problem cannot be resolved, contact your IKEA store or the After Sales Service. You can find a full list of IKEA appointed contacts at the end of this user manual. When contacting the After Sales Service please provide the following...
-
Page 22: Hob Technical Data
ENGLISH Hob technical data Unit Value Type of product Built-in Hob Width Dimensions Depth Min./max height Total power 7400 Parameter Value 220-240 V, 50 Hz; 220 V, 60 Hz Power supply voltage/frequency 2N~ 380-415 V, 50 Hz; 2N~ 380 V, 60 Hz; Weight of the appliance 10,4 Kg Energy efficiency of hob... -
Page 23: Rating Plate
EEC Directives. product.” Rating plate Made in Italy © Inter IKEA Systems B.V.1999 304.678.22 ® Design and Quality IKEA of Sweden 23199 IKEA of Sweden AB SE-343 81 Älmhult... -
Page 24: Environmental Aspects
IKEA. This will then, at its sole discretion, either repair guarantee applies to domestic use only. the defective product or replace it with the The exceptions are specified under the same or a comparable product. - Page 25 • the Assembly Instructions and User use. Manual Safety Information; • Transportation damages. If a customer transports the product to their home or other address, IKEA is not liable for any damage that may occur during...
- Page 26 Important! SAVE THE SALES RECEIPT! IKEA appliances: It is Your proof of purchase and required Please do not hesitate to contact IKEA After for the guarantee to apply. Note that the Sales Service to: receipt reports also the IKEA article name 1.
- Page 27 Leistungsbegrenzung Typenschild Funktionen Informationen zum Umweltschutz Gartabelle IKEA GARANTIE Sicherheitsinformationen Lesen Sie bitte für Ihre eigene Sicherheit und die korrekte Funktion des Geräts diese Betriebsanleitung sorgfältig durch, bevor Sie es installieren und in Betrieb nehmen. Verwahren Sie die Bedienungsanleitung stets zusammen mit dem Gerät, auch wenn Sie dieses an Dritte...
- Page 28 DEUTSCH Bei Geräten mit Stromkabel sind die Klemmen bzw. der Drahtquerschnitt zwischen dem Kabelverankerungspunkt und den Klemmen so anzuordnen, dass der spannungsführende Leiter stromaufwärts zum Erdkabel beim Austreten aus seiner Verankerung herausgezogen werden kann. • Der Hersteller haftet nicht für etwaige Schäden, die durch die fehlerhafte Installation oder falschen Gebrauch entstehen könnten.
- Page 29 DEUTSCH führen. • Reinigungs- und Wartungsarbeiten dürfen nicht von Kindern durchgeführt werden, es sei denn unter Aufsicht eines Erwachsenen. • Kinder müssen beaufsichtigt werden, damit sichergestellt wird, dass sie nicht mit dem Gerät spielen. • Dieses Gerät darf nicht von Personen (einschließlich Kindern) mit eingeschränkten körperlichen, sensorischen oder geistigen Fähigkeiten oder ohne Erfahrung und Wissen verwendet werden, es sei denn, sie werden sorgfältig...
- Page 30 DEUTSCH • Nehmen Sie das Gerät nicht in Betrieb, wenn die Oberfläche Risse aufweist oder wenn sichtbare Schäden in der Materialstärke vorhanden sind. • Berühren Sie das Gerät nicht mit den Händen oder mit nassen Körperteilen. • Verwenden Sie zur Reinigung des Produkts keine Dampfgeräte •...
- Page 31 DEUTSCH vollständige Trennung unter Überlastbedingungen der Kategorie III gewährleistet, von der Stromversorgung getrennt werden kann. • Das Gerät darf keinen Witterungseinflüssen (Regen, Sonne) ausgesetzt werden. • Verpackungen außerhalb der Reichweite von Kindern und Haustieren aufbewahren. • Stellen Sie sicher, dass das Gerät direkt an eine Steckdose angeschlossen ist.
-
Page 32: Installation
DEUTSCH Installation Bei der Installation sind die im die Brandschutzvorschriften strikt Verwendungsland geltenden Gesetze, einzuhalten. Verordnungen, Richtlinien und • Bei Einbaugeräten müssen die Normen (Vorschriften für die Sicherheit Bauteile (Kunststoff und furniertes elektrischer Anlagen, ordnungsgemäße Holz) mit hitzebeständigen Klebstoffen Wiederverwertung von Bauteilen usw.) (min. -
Page 33: Elektroanschluss
Warning strips show that specialist should do the connecting water, gas and electricity: durch die jeweiligen Original-Ersatzkabel. • Stellen Sie sicher, dass die Eigenschaften der Wenden Sie sich an das Callcenter in Ihrem Hauselektrik (Spannung, maximale Leistung IKEA Einrichtungshaus vor Ort. und Stromstärke) mit denen des Geräts übereinstimmen. ENGLISH ACHTUNG! Führen Sie keine... - Page 34 DEUTSCH Anschlussplan Produktseite L1 L2 L3 N1 N2 ENGLISH Connection diagram product side Insert the shunts between the screws as illustrated Fügen Sie die Stromabzweiger wie abgebildet zwischen die Klemmen ein ENGLISH Brown Connection diagram product side Black Blue Insert the shunts ENGLISH between the screws as Yellow / Green...
-
Page 35: Produktbeschreibung
DEUTSCH Produktbeschreibung Einzelkochzone (210 x 190 mm) 2100 W, mit Booster-Funktion 3000 W. Einzelkochzone (210 x 190 mm) 2100 W, mit Booster-Funktion 3000 W. Einzelkochzone (200 mm) 2300 W, mit Booster-Funktion 3000 W. Einzelkochzone (160 mm) 1400 W, mit Booster-Funktion 2100 W. Bedienfeld Kochzone kombinierbar (210 x 380 mm) 3000 W, mit Booster-Funktion 3700 W. -
Page 36: Bedienfeld
DEUTSCH Bedienfeld Ein/Aus Pausenfunktions-Taste Timer-Kontrolle und Kochzeitanzeige Symbol der “Brücken”-Funktion Timer-Symbol Erhöhen / Erniedrigen der Leistungsstufe Symbol der Schmelzfunktion Schmelzfunktions-Taste Scroll-Tastatur Blockierfunktions-Taste Die Kochzonen können durch Drücken der entsprechenden Scroll-Tastatur aktiviert werden. Die Digit- Taste leuchtet heller auf, um den Vorgang zu bestätigen. Darüber hinaus können Sie die Kochzonen auch aktivieren, indem Sie einfach einen Topf auf die Kochzone stellen. -
Page 37: Leistungsbegrenzung
DEUTSCH Leistungsbegrenzung Wenn das Gerät zum ersten Mal an die häusliche Stromversorgung angeschlossen wird, muss der Installateur die Leistung der Kochzonen entsprechend der tatsächlichen Kapazitäten der häuslichen elektrischen Anlage einstellen. Wenn dies nicht erforderlich ist, können Sie das Kochfeld direkt mit einschalten oder alternativ das unten beschriebene Verfahren befolgen, um auf das Menü... -
Page 38: Funktionen
DEUTSCH Funktionen Jede Kochzone kann für bis zu 5 Minuten auf eine zusätzliche Leistungsstufe eingestellt werden. Zum Aktivieren: Wählen Sie eine der 4 Kochzonen sowie den Wert “Boost” Boost-Funktion auf der Leistungsskala. Die entsprechende Digit-Taste zeigt Zum Deaktivieren: Wählen Sie einen der anderen möglichen Werte in der Leistungsskala. - Page 39 DEUTSCH Timer mit Universalalarm. Zum Aktivieren: Schalten Sie das Kochfeld ein und drücken Sie "+" und "-", um den Timer einzustellen. Drücken Sie einzeln "+" und "-", um den Zeituhrprogrammierungswert einzustellen. Die Erhöhung und Verringerung des Wertes während der Einstellung ändert sich je nach der einzustellenden Zeit.
-
Page 40: Gartabelle
DEUTSCH Aktivierung: Wählen Sie eine der 4 Kochzonen und drücken Sie Schmelzfunktions- Die Digit-Taste des gewählten Bereiches zeigt Taste Zum Deaktivieren: Drücken Sie oder Mit dieser Funktion können Sie 2 Kochzonen verbinden, um sie als eine einzige, größere Kochzone zu verwenden und zu kontrollieren. Dies bietet die Möglichkeit, größere Töpfe mitzuverwenden. -
Page 41: Leistungsmanagement-Funktion
DEUTSCH Leistungsmanagement-Funktion Dieses Produkt ist mit einer elektronisch gesteuerten Leistungsmanagement-Funktion ausgestattet. Siehe Illustration. Diese Funktion steuert die maximale Ausgangsleistung von 3700 W zwischen den im kombinierten Modus (1+2 und 3+4) verwendeten Kochzonen, wodurch die Leistungsverteilung optimiert und Systemüberlastungen vermieden werden. Kochfeld auf maximaler Leistungsstufe - die Funktion verteilt die Leistung zwischen den im kombinierten Betrieb verwendeten Kochzonen und reduziert bei Bedarf automatisch die Leistung der anderen Kochzonen (der letzte Befehl hat die höchste Priorität). -
Page 42: Leitfaden Zur Verwendung Von Töpfen
DEUTSCH Leitfaden zur Verwendung von Töpfen Welche Töpfe zu verwenden sind Leere dünnbödige Töpfe und Pfannen Verwenden Sie nur Töpfe mit Verwenden Sie keine leeren Töpfe und ferromagnetischem Boden, die für die Pfannen oder solche mit dünnem Boden Verwendung auf Induktionskochfeldern auf dem Kochfeld, da Sie dadurch die geeignet sind: Temperatur nicht regeln oder die Kochzone... -
Page 43: Reinigung Und Wartung
DEUTSCH Materialien besteht. Es entsteht durch Dazu ist das Kochfeld mit einem Kühlgebläse Vibrationen auf den Oberflächen, an ausgestattet, das aktiviert wird, um die denen die verschiedenen Materialien Temperatur des elektronischen Systems zu aufeinandertreffen. Das Geräusch tritt reduzieren bzw. zu steuern. Dieses Gebläse am Kochgerät auf und kann je nach kann noch aktiv sein, wenn das Gerät zwar Inhaltsmenge und Kochmethode (z. -
Page 44: Anleitung Zur Fehlerbehebung
DEUTSCH Anleitung zur Fehlerbehebung Fehlercode Beschreibung Mögliche Fehlerursache Abhilfe Kontinuierliche Tastenaktivierung Das Kochfeld Entfernen Sie das Wasser oder den Topf erkannt. schaltet sich nach von der Glaskeramikoberfläche und dem Wasser oder Topf auf dem 10 Sekunden ab. Bedienfeld. Bedienfeld. Lassen Sie das Kochfeld abkühlen. Die Innentemperatur der Prüfen Sie, ob das Kochfeld ausreichend Das Kochfeld... - Page 45 Sie, eine Lösung zu finden, indem Sie die Anweisungen in der Anleitung zur Problemlösung befolgen. Wenn das Problem nicht gelöst werden kann, wenden Sie sich an Ihr IKEA Einrichtungshaus oder an Ihren Kundendienst. Eine vollständige Liste der von IKEA benannten Kundendienstzentren und der zugehörigen Kontaktinformationen...
-
Page 46: Technische Daten
DEUTSCH Technische Daten Einheit Wert Produkttyp Integriertes Kochfeld Breite Abmessungen Tiefe Höhe min./max. Gesamtleistung 7400 Parameter Wert 220-240 V, 50 Hz; 220 V, 60 Hz Versorgungsspannung / -frequenz 2N~ 380-415 V, 50 Hz; 2N~ 380 V, 60 Hz; Gewicht des Gerätes 10.4 kg Energieeffizienz des Kochfelds UTNÄMND... -
Page 47: Typenschild
“Die technischen Daten sind auf dem EWG-Richtlinien entworfen, Typenschild auf der Unterseite des Produkts hergestellt und vermarktet. angegeben.” Typenschild Made in Italy © Inter IKEA Systems B.V.1999 304.678.22 ® Design and Quality IKEA of Sweden 23199 IKEA of Sweden AB SE-343 81 Älmhult... -
Page 48: Informationen Zum Umweltschutz
Organisation oder sein Netz kann. Diese Bedingungen entsprechen autorisierter Servicepartner aus. den UE-Richtlinien (99/44/EG) und den anwendbaren örtlichen Verordnungen. Was ist von der Garantie gedeckt? Altteile gehen in das Eigentum von IKEA Die Garantie gilt für Material- und/oder über. Konstruktionsfehler des Elektrogeräts und... - Page 49 • Solche Fälle, in denen der Techniker nach seinem Dafürhalten, ob es unter die keine Defekte festgestellt hat. Garantie fällt. Liegt ein Garantiefall vor, lässt • Reparaturen, die nicht von einem IKEA der entsprechende IKEA Servicepartner Servicepartner durchgeführt wurden, das mangelhafte Produkt nach seinem sowie die Verwendung von nicht Dafürhalten durch seine eigenen...
- Page 50 Geräte, die Sie in diesem Handbuch Wenden Sie sich in den folgenden Fällen an finden. Bevor Sie uns kontaktieren, sollten den After-Sales-Kundendienst von IKEA: Sie den IKEA Produkt-Code (8-stellig) des 1. Anforderung eines Kundendiensts auf Elektrogeräts, für das Sie Unterstützung Garantie;...
- Page 51 Limitation de la puissance Plaque signalétique Fonctions Aspects environnementaux Tableau de cuisson GARANTIE IKEA Consignes de sécurité Pour votre sécurité et pour garantir le fonctionnement correct de l’appareil, veuillez lire attentivement ce manuel avant son installation et sa mise en fonction. Toujours conserver ces instructions avec l’appareil, même en cas de...
- Page 52 FRANÇAIS d’ e xtraire le conducteur sous tension en amont du câble de mise à la terre au cas où le cordon sortirait de son ancrage. • En aucun cas le fabricant ne pourra être tenu pour responsable des dommages éventuellement provoqués par une installation ou une utilisation impropre.
- Page 53 FRANÇAIS surveillés par un adulte. • Surveiller les enfants. S’ a ssurer qu’ils ne jouent pas avec cet appareil. • Cet appareil ne doit pas être utilisé par des personnes (enfants compris) dont les capacités physiques, sensorielles ou mentales sont diminuées ou ayant une expérience et des connaissances insuffisantes, à...
- Page 54 FRANÇAIS • Ne pas actionner l’ a ppareil si sa surface est fissurée ou si des dommages sont visibles dans l’ é paisseur du matériau. • Ne pas toucher l’appareil avec les mains ou des parties du corps mouillées. • Ne pas utiliser des appareils à vapeur pour nettoyer le produit.
- Page 55 FRANÇAIS écart entre les contacts (3 mm) à même d’assurer le sectionnement complet dans des conditions de surtension de catégorie III. • Ne jamais exposer l’ a ppareil aux agents atmosphériques (pluie, soleil). • Ranger les emballages hors de portée des enfants et des animaux domestiques.
-
Page 56: Installation
FRANÇAIS Installation Le technicien chargé de l’installation est les composants (en matière plastique tenu de se conformer à la législation, ou en bois plaqué) avec des colles aux réglementations, aux directives et résistant à la chaleur (min. 85 °C) : aux normes (règlements sur la sécurité l’utilisation de matériaux ou de colles des installations électriques, le recyclage inadaptés risque de provoquer la... -
Page 57: Raccordement Électrique
• Les bornes de connexion sont accessibles en rechange d’ o rigine. Contacter le call center retirant le couvercle de la boîte de jonction. du magasin IKEA le plus proche. • S’ a ssurer que les caractéristiques de l’installation électrique domestique Attention! Ne pas souder les câbles! -
Page 58: Schéma De Branchement Côté Produit
FRANÇAIS Schéma de branchement côté produit L1 L2 L3 N1 N2 ENGLISH Connection diagram product side Insert the shunts between the screws as illustrated Insérer des shunts entre les bornes, comme illustré dans la figure: ENGLISH Brown Connection diagram product side Black Blue Insert the shunts... -
Page 59: Description Du Produit
FRANÇAIS Description du produit Zone de cuisson simple (210 x 190 mm) 2100 W, avec fonction Boost de 3000 W. Zone de cuisson simple (210 x 190 mm) 2100 W, avec fonction Boost de 3000 W. Zone de cuisson simple (200 mm) 2300 W, avec fonction Boost de 3000 W. Zone de cuisson simple (160 mm) 1400W, avec fonction Boost de 2100W. -
Page 60: Bandeau De Commande
FRANÇAIS Bandeau de commande Branché/Débranché Touche fonction Pause Contrôle du minuteur et indicateur du temps de cuisson Symbole de la fonction Bridge Symbole du minuteur Indicateur de niveau de puissance. Symbole de la fonction Fondre Touche fonction Fondre Clavier de défilement Touche fonction Verrouillage Pour activer les zones de cuisson, appuyer sur le clavier de défilement correspondant. -
Page 61: Limitation De La Puissance
FRANÇAIS Limitation de la puissance Lors du premier branchement de l’appareil au secteur, l’installateur doit régler la puissance des zones de cuisson en fonction de la capacité réelle de l’installation électrique domestique. Si cela n’est pas nécessaire, la table de cuisson peut être activée directement en intervenant sur autrement, suivre la marche ci-après pour accéder au menu. -
Page 62: Fonctions
FRANÇAIS Fonctions Chaque zone de cuisson peut être réglée à un niveau de puissance extra pendant 5 minutes maximum. Pour activer: sélectionner une des 4 zones de cuisson et sélectionner la valeur “Boost” sur le clavier de défilement. Le digit correspondant affiche Fonction Boost ... - Page 63 FRANÇAIS Minuteur avec alarme pour une utilisation générique. Pour activer: brancher la table de cuisson et appuyer sur “+” et sur "-” pour régler le minuteur. Appuyer individuellement sur “+” et sur “-” pour régler le compte à rebours. L’augmentation et la diminution de la valeur durant le Minuteur réglage varient en fonction du temps à...
-
Page 64: Tableau De Cuisson
FRANÇAIS Pour activer: sélectionner une des 4 zones de cuisson et appuyer sur la touche Touche fonction Le digit de la zone sélectionnée affiche Fondre Pour désactiver: appuyer sur ou sur Cette fonction permet de coupler 2 zones de cuisson en une seule plus grande pour les utiliser ensemble et les contrôler comme une seule zone de cuisson. -
Page 65: Fonction De Gestion De La Puissance
FRANÇAIS Fonction de gestion de la puissance Ce produit intègre une fonction de gestion de la puissance à contrôle électronique. Voir la figure. Cette fonction permet de surveiller la charge électrique et limite la puissance maximale fournie à 3700 W pour chaque groupe de zones de cuisson (1+2 et 3+4), en optimisant la distribution de la puissance et en évitant la surcharge du système. -
Page 66: Guide À L'utilisation Des Casseroles
FRANÇAIS Guide à l’utilisation des casseroles Quelles casseroles utiliser Casseroles ou poêles vides ou avec un Utiliser exclusivement des casseroles avec fond peu épais un fond en matériau ferromagnétique, elles Ne pas utiliser de casseroles ou de poêles sont adaptées à une utilisation sur les tables vides ou avec fond peu épais sur la table de cuisson à... -
Page 67: Nettoyage Et Entretien
FRANÇAIS d’ustensiles de cuisson comprenant plusieurs électronique, il est nécessaire de réguler couches de différentes matériaux. Il résulte la température de la table de cuisson. des vibrations des surfaces de différents Pour cela, la table de cuisson est équipée matériaux en contact les unes avec les d’un ventilateur qui s’active pour réduire autres. -
Page 68: Solution Des Inconvénients
FRANÇAIS Solution des inconvénients Code Description Cause possible de l’erreur Solution d’erreur La table de Détection d’une activation continue Enlever l’eau ou la casserole de la surface cuisson s’éteint des touches. en vitrocéramique ou du bandeau de après 10 Eau ou casserole présente sur le commande. -
Page 69: Entretien Et Réparation
à la solution des inconvénients. Si le problème persiste, contactez votre magasin IKEA ou le service après-vente. Vous trouverez une liste complète des services après-vente agréés par IKEA et les informations de contact correspondantes à... -
Page 70: Caractéristiques Techniques
FRANÇAIS Caractéristiques techniques Unité Valeur Type de produit Table de cuisson intégrée Largeur Dimensions Profondeur Hauteur min/max Puissance totale 7400 Paramètre Valeur 220-240 V, 50 Hz; 220 V, 60 Hz Tension/fréquence d’alimentation 2N~ 380-415 V, 50 Hz; 2N~ 380 V, 60 Hz; Poids de l’appareil 10,4 kg Efficacité... -
Page 71: Informations Sur Le Produit Conformément Au Règlement N° 66/2014 Normes De Référence
“Les données techniques figurent sur la commercialisé conformément aux plaque appliquée sur le fond du produit.” directives CEE. Plaque signalétique Made in Italy © Inter IKEA Systems B.V.1999 304.678.22 ® Design and Quality IKEA of Sweden 23199 IKEA of Sweden AB SE-343 81 Älmhult... -
Page 72: Aspects Environnementaux
à condition que l’accès désigné par IKEA par le biais de sa propre à l’appareil pour la réparation ne comporte organisation ou de son propre réseau de pas de frais particuliers. - Page 73 Application des lois nationales compartiments à lessive. La garantie IKEA donne au client des droits • Les dommages occasionnés sur des légaux spécifiques en plus des droits prévus éléments tels que vitrocéramique, par la loi et qui varient selon les pays.
- Page 74 Le service ne fournira pas appareils, veuillez contacter votre magasin d’assistance ou d’éclaircissements au sujet IKEA le plus proche. Nous vous prions de lire de : attentivement la documentation fournie avec l’installation de cuisines complètes IKEA ;...
- Page 75 Limitazione della potenza Targhetta dati Funzioni Aspetti ambientali Tabella di cottura GARANZIA IKEA Informazioni sulla sicurezza Per la propria sicurezza e per assicurare il corretto funzionamento dell’ a pparecchio, si prega di leggere attentamente questo manuale prima dell’installazione e della messa in funzione.
- Page 76 ITALIANO eventuali danni risultanti da un’installazione o utilizzazione impropria. • Controllare che l’ a limentazione di rete corrisponda a quella indicata sulla targhetta dati fissata all’interno del prodotto. • I dispositivi di sezionamento devono essere installati nell’impianto fisso in conformità alle normative sui sistemi di cablaggio.
- Page 77 ITALIANO dell’ a pparecchio da una persona responsabile per la loro sicurezza. • Questo apparecchio può essere utilizzato da bambini di età non inferiore a 8 anni e da persone con ridotte capacità psico-fisico-sensoriali o con esperienza e conoscenze insufficienti, purché attentamente sorvegliati e istruiti in merito all’utilizzo sicuro dell’...
- Page 78 ITALIANO esempio con un coperchio o una coperta antifiamma. ATTENZIONE: Il processo di cottura deve essere sorvegliato. Un breve procedimento di cottura deve essere sorvegliato costantemente. • L’ a pparecchio non è progettato per essere messo in funzione per mezzo di un timer esterno o un sistema di telecomando separato.
-
Page 79: Installazione
ITALIANO Installazione Per la procedura di installazione è • Per le unità da incasso, i componenti d’ o bbligo attenersi alle leggi, ordinanze, (in materiale plastico e legno direttive e norme (regolamenti per la impiallacciato) devono essere applicati sicurezza degli impianti elettrici, il corretto con collanti termoresistenti (min. -
Page 80: Collegamento Elettrico
Warning strips show that specialist should do the connecting water, gas and electricity: originali. Contattare il call center del proprio • I morsetti di collegamento sono accessibili negozio IKEA. rimuovendo la copertura della scatola di giunzione. • Verificare che le caratteristiche dell’impianto... - Page 81 ITALIANO Schema di collegamento lato prodotto L1 L2 L3 N1 N2 ENGLISH Connection diagram product side Insert the shunts between the screws as illustrated Inserire derivatori di corrente tra i morsetti come illustrato ENGLISH Brown Connection diagram product side Black Blue Insert the shunts ENGLISH...
-
Page 82: Descrizione Del Prodotto
ITALIANO Descrizione del prodotto Zona di cottura singola (210 x 190 mm) 2100 W, con funzione Booster da 3000 W. Zona di cottura singola (210 x 190 mm) 2100 W, con funzione Booster da 3000 W. Zona di cottura singola (200 mm) 2300 W, con funzione Booster da 3000 W. Zona di cottura singola (160 mm) 1400W, con funzione Booster da 2100W. -
Page 83: Pannello Comandi
ITALIANO Pannello comandi Acceso/Spento Tasto della funzione Pausa Controllo del timer e indicatore del tempo di cottura Simbolo della funzione “ponte” Simbolo del timer Indicatore del livello di potenza Simbolo della funzione Scioglimento Tasto della funzione Scioglimento Tastiera a scorrimento Tasto della funzione Blocco Le zone di cottura possono essere attivate premendo la corrispondente tastiera a scorrimento. -
Page 84: Limitazione Della Potenza
ITALIANO Limitazione della potenza Al primo collegamento dell’apparecchio all’alimentazione di rete domestica, l’installatore deve impostare la potenza delle zone di cottura in base alle capacità effettive dell’impianto elettrico domestico. Se questo non è necessario, si può accendere direttamente il piano cottura utilizzando o, in alternativa, seguire la procedura descritta sotto per accedere al menu. -
Page 85: Funzioni
ITALIANO Funzioni Ogni zona di cottura può essere impostata ad un livello di potenza supplementare per un massimo di 5 minuti. Per attivare: selezionare una delle 4 zone di cottura e selezionare il valore “Boost” Funzione Boost sulla tastiera a scorrimento. Il digit corrispondente indica Per disattivare: selezionare uno degli altri valori possibili sulla tastiera a scorrimento. - Page 86 ITALIANO Timer con allarme per uso generico. Per attivare: accendere il piano cottura, quindi premere “+” e "-” per impostare il timer. Premere singolarmente “+” e “-” per impostare il conto alla rovescia. L’aumento e la diminuzione del valore durante l’impostazione varia in base al tempo da impostare.
-
Page 87: Tabella Di Cottura
ITALIANO Per attivare: selezionare una delle 4 zone di cottura e premere Il digit della zona selezionata indica Tasto della funzione Scioglimento Per disattivare: premere o premere Questa funzione permette di collegare 2 zone di cottura per utilizzarle e controllarle come una singola e più ampia zona di cottura. Questo offre la possibilità... -
Page 88: Funzione Di Gestione Della Potenza
ITALIANO Funzione di Gestione della potenza Questo prodotto è dotato di una funzione di gestione della potenza a controllo elettronico. Vedere illustrazione. Questa funzione controlla l’erogazione della potenza massima di 3700 W tra le zone di cottura utilizzate in modalità combinata (1+2 e 3+4), ottimizzando la distribuzione di potenza ed evitando situazioni di sovraccarico del sistema. -
Page 89: Guida All'uso Delle Pentole
ITALIANO Guida all’uso delle pentole Quali pentole utilizzare Pentole/padelle vuote o con fondo sottile Utilizzare esclusivamente pentole con il fondo Non usare pentole/padelle vuote o con fondo in materiale ferromagnetico idoneo per l’uso su sottile sul piano cottura, perché ciò non piani cottura a induzione: consentirebbe di controllare la temperatura o •... -
Page 90: Pulizia E Manutenzione
ITALIANO formate da diversi materiali a contatto tra il piano cottura è dotato di una ventola di loro. Il rumore viene prodotto dalla pentola raffreddamento che si attiva per ridurre e può variare a seconda della quantità di e regolare la temperatura del sistema cibo o di liquidi e del metodo di cottura (es. -
Page 91: Guida Alla Risoluzione Dei Problemi
ITALIANO Guida alla risoluzione dei problemi Codice di Descrizione Possibile causa dell'errore Soluzione errore Rilevata un’attivazione continua Il piano cottura si dei tasti. Rimuovere l'acqua o la pentola dalla superficie spegne dopo 10 Acqua o pentola presente sul in vetroceramica e dal pannello comandi secondi. - Page 92 Se non è possibile risolvere il problema, contattare il proprio negozio IKEA o il Servizio Assistenza. Un elenco completo dei centri di assistenza nominati da IKEA e delle relative informazioni di contatto è...
-
Page 93: Dati Tecnici
ITALIANO Dati tecnici Unità Valore Tipo di prodotto Piano cottura integrato Larghezza Dimensioni Profondità Altezza min./max Potenza totale 7400 Parametro Valore 220-240 V, 50 Hz; 220 V, 60 Hz Tensione/frequenza di alimentazione 2N~ 380-415 V, 50 Hz; 2N~ 380 V, 60 Hz; Peso dell’apparecchio 10,4 kg Efficienza energetica del piano cottura... -
Page 94: Norme Di Riferimento
“I dati tecnici sono forniti sulla targhetta dati progettato, fabbricato e applicata sul fondo del prodotto.” commercializzato in conformità alle Direttive CEE. Targhetta dati Made in Italy © Inter IKEA Systems B.V.1999 304.678.22 ® Design and Quality IKEA of Sweden 23199 IKEA of Sweden AB SE-343 81 Älmhult... -
Page 95: Aspetti Ambientali
GARANZIA IKEA dalla data di acquisto dell’ e lettrodomestico Per quanto è valida la garanzia IKEA? presso un punto vendita IKEA. La garanzia Questa garanzia è valida per cinque è valida solo su elettrodomestici destinati (5) anni dalla data originale di acquisto all’impiego domestico. - Page 96 ITALIANO Il fornitore del servizio assistenza incaricato • Riparazioni non effettuate dal fornitore da IKEA esaminerà il prodotto e deciderà, del servizio nominato da IKEA o da a propria esclusiva discrezione, se lo un partner di assistenza autorizzato o stesso rientra nella copertura di garanzia.
- Page 97 Consultare l’ e lenco completo dei fornitori • specifiche tecniche del paese in cui è di servizio IKEA e dei relativi numeri di richiesta l'applicazione della garanzia; telefono nazionali nell’ultima pagina del • informazioni per la sicurezza contenute presente manuale.
- Page 99 Country name in local languages Telephone number Opening times Victoria: (03) 8523 2154 New South Wales: (02) 5020 6641 Australia Queensland: (07) 3380 6800 IKEA Perth: (08) 9201 4532 IKEA Adelaide: (08) 8154 4532 Österreich 13602771461 Mo-Fr: 8 - 20 België / Belgique 26200311...
- Page 100 23199 © Inter IKEA Systems B.V. 2020 AA-2231739-5...