Table des Matières
Publicité
Les langues disponibles
Les langues disponibles
Liens rapides
Publicité
Table des Matières

Manuels Connexes pour auna iTuner CD


Sommaire des Matières pour auna iTuner CD
- Page 3 Sehr geehrter Kunde, wir gratulieren Ihnen zum Erwerb Ihres Gerätes. Lesen Sie die folgenden Hinweise sorgfältig durch und befolgen Sie diese, um möglichen Schäden vorzubeugen. Für Schäden, die durch Missachtung der Hinweise und unsachgemäßen Gebrauch entstehen, übernehmen keine Haftung. Scannen Sie den QR-Code, um Zugriff auf die aktuellste Bedienungsanleitung weitere...
-
Page 4: Technische Daten
TECHNISCHE DATEN Artikelnummer 10032753 10032754 100-240 V ~ 50/60 Hz , 1 A Stromversorgung Netzgerät USB-Ausgang , 1 A Audio Ausgangsleistung 2 x 5 W RMS UKW-Radio Frequenzbereich 87,5 MHz - 108 MHz Frequenzgang 20 Hz - 20 Khz Frequenzbereich 174-240 MHz WLAN-Spezifikationen Standard... -
Page 5: Sicherheitshinweise
SICHERHEITSHINWEISE Allgemeine Sicherheitshinweise • Lesen Sie alle Hinweise genau durch, bevor Sie das Gerät verwenden und bewahren Sie die Bedienungsanleitung für den zukünftigen gebrauch auf. • Verwenden Sie ausschließlich die Stromspannung, die auf dem Typenschild des Geräts angegeben ist. Vergewissern Sie sich, dass Ihre Steckdose geerdet ist. - Page 6 • Achten Sie darauf, dass der Netzstecker des Radios während eines Gewitters nicht in der Steckdose steckt. • Das Gerät wird warm, wenn es über einen längeren Zeitraum verwendet wird. Das ist normal und weist nicht auf ein Problem des Geräts hin. Stromanschluss •...
-
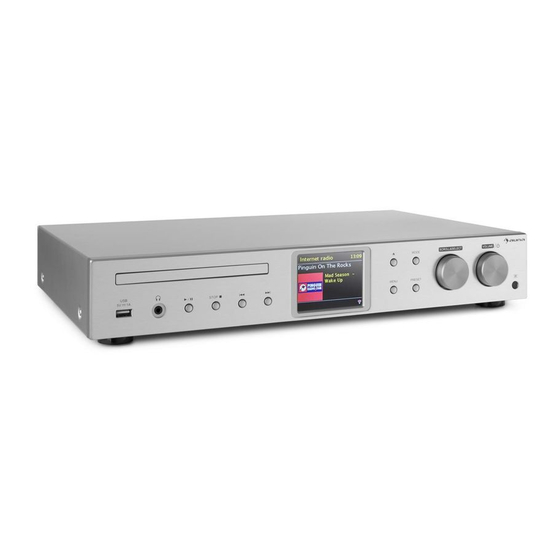
Page 7: Geräteübersicht
GERÄTEÜBERSICHT Vorderseite CD-Lade CD-Lade öffnen/schließen IR-Sensor 10 Menü Einstellungen Köpfhöreranschluss Wiedergabe/Pause 12 Modus Stopp - Wiedergabe anhalten 13 Scrollen/auswählen Titel zurück 14 Lautstärke / Ein-Aus Titel vor 15 IR-Empfänger Display Rückseite 16 Stromanschluss 20 Optischer Ausgang (digital) 17 WLAN-Antenne 21 Koaxialausgang (digital) 18 Audioausgang (analog) 22 LAN-Eingang 19 Audioeingang (analog) - Page 8 FERNBEDIENUNG...
- Page 9 Ein/Standby 19 Uhr Zahlentasten 20 Timer Wiederholung 21 Anspielen von Titeln Menü 22 Zufallswiedergabe Mono/Stereo 23 Zurück Sendersuche zurück 24 EQ Pfeiltaste hoch 25 Sendersuche vor Lautstärke - 26 Lautstärke Pfeiltaste runter 27 Enigabe / Bestätigen 10 Verzeichnis 28 Verzeichnis + CD/USB 29 Internet 12 FM / DAB...
- Page 10 Batterie der Fernbedienung auswechseln 1. Drücken Sie die Batteriefachabdeckung nach unten und ziehen Sie den Batteriehalter heraus. 2. Legen Sie eine LR6-Batterie in den Batteriehalter der Fernbedienung ein (nicht im Lieferumfang enthalten) und achten Sie beim Einlegen darauf, dass die „+“ und „-“ Polaritätsmarkierungen auf Batterie um im Batteriehalter übereinstimmen.
- Page 11 ANSCHLUSS Das Gerät ans Stromnetz anschließen 1. Auf der Rückseite befinden sich der Audioeingang und -ausgang (analog), der optische Ausgang (digital) und der Koaxialausgang (digital) für den Anschluss an einen Verstärker oder ein HiFi-System. 2. Schließen Sie die mitgelieferte Stabantenne an. Zur gewünschten Länge ausfahren.
- Page 12 INBETRIEBNAHME Gerät ein-/ausschalten 1. Drücken Sie zum Einschalten des Radios die Standby-Taste auf dem Gerät oder auf der Fernbedienung. 2. Drücken Sie die Standby-Taste, um das Gerät wieder in den Standby- Modus zu versetzen. Modus wählen Drücken Sie mehrfach die Taste MODE am Gerät oder die Tasten CD/USB, FM/DAB, AUDIO IN, Internet, Spofity, um zwischen den Modi Musicplayer, DAB-Radio, FM-Radio, CD, Line in, Internetradio and Spotify Connect zu wechseln.
- Page 13 3. Hier wählen Sie die Quelle (DAB/FM/Netwerk/Kein Update) , die das System verwendet, um Zeit und Datum zu beziehen. Wenn "Update from Network" ausgwählt wurde, fahren Sie mit dem nächsten Schritt fort, um die Zeitzone zur korrekten Anzeige der Zeit einstellen. Wählen Sie anschließen "Daylight saving"...
-
Page 14: Systemeinstellungen
SYSTEMEINSTELLUNGEN Drücken Sie die Taste MENU um das Menü anzuzeigen, drücken Sie PRESET ∧/∨ , um die System Einstellungen auszuwählen und drücken Sie zum Bestätigen die Taste SELECT. Equalizer Dieses Gerät unterstützt eine Vielzahl von Equalizern und Soundeffekten. Drücken Sie die Taste EQ, um im Menü zur Equalizereinstellung zu gelangen. - Page 15 SSID- wählen Die das gewünschte drahtlose Netzwerk aus.Suche- suchen Sie nach verfügbaren Netzwerken. Manuelle Netzwerk-Assistent Konfiguration- wählen Sie ein drahtloses Netzwerk mit DHCP aktiviert/deaktiviert aus Wählen Sie auf dem Radio PBC aus und drücken Sie die PBC Taste auf dem Gerät PBC-WLAN- aus, mit dem Sie sich verbinden möchten.
- Page 16 Aktualisierungen aus dem DAB/FM Automatisches Netzwerk oder keine Aktualisierung. Aktualisieren Format einstellen 12/24 Stunden Format Zeitzone auswählen. (Nur verfügbar, wenn die automatische Netzwerkaktualisierung Zeitzone einstellen aktiviert ist.) Sommer-Winterzeit auswählen. Nur verfügbar, wenn die automatische Sommer-/Winterzeit Netzwerkaktualisierung aktiviert ist.) Hinweis: Die voreingestellte automatische Zeitaktualisierung ist „Aktualisierung vom Netzwerk“.
- Page 17 HINWEIS: Wenn Sie das System aus Werkseinstellungen zurücksetzen werden alle von Ihnen eingestellten Radiosender, Internet und voreingestellte DAB & FM Sender gelöscht. Software Update ∧/∨ 1. Drücken Sie während des Systemeinstellungsmodus die PRESET um „Software Update“ auszuwählen und drücken Sie zum Bestätigen die Taste SELECT.
-
Page 18: Internet Radio
INTERNET-RADIO Dieses Gerät kann tausende Radiosender und Podcasts aus der ganzen Welt über die Internetbreitbandverbindung abspielen. Wenn Sie den Internet-Radio-Modus ausgewählt haben, verbindet sich das Radio mit dem Frontier Silicon Internet-Radio-Portal um eine Senderliste herunterzuladen. Wenn ein Sender einmal ausgewählt wurde, wird das Radio sich direkt mit diesem Sender verbinden. - Page 19 Favoriten werden im Internet-Radio-Portal gespeichert und sind auf allen Internet Radios, die mit dem gleichen Account verwendet werden verfügbar. Damit Sie die Favoriten verwenden können, müssen Sie das Radio zunächst im Internet-Radio-Portal registrieren. Zum Registrieren gehen Sie zunächst auf die Homepage des Portals (www.wifiradio-frontier.com).
- Page 20 Wählen Sie Podcasts aus den folgenden Kategorien im Podcastmenü aus: Ort, Genre. Sie können durch die Eingabe von Schlüsselwörtern Podcasts auch nach bestimmten Episoden eines Podcasts suchen. Auch wenn das Internet-Radio-Portal tausende von Sendern enthält, kann es vorkommen, dass Sie einen Sender hören wollen, der dort nicht gelistet ist.
-
Page 21: Spotify Premium
SPOTIFY PREMIUM Begrüße mit uns Spotify Premium Mit Spotify Premium kannst du dir Millionen von Songs ohne Werbung anhören. Deine Lieblingskünstler, die aktuellsten Hits und neue Entdeckungen – nur für dich! Einfach auf ‘Play’ drücken und du hörst jeden Song, der dir gefällt, bei höchster Soundqualität. Schau dir unsere Premium- Abonnement Angebote auf spotify.com/premium an. -
Page 22: Bedienung Des Musikplayers
BEDIENUNG DES MUSIKPLAYERS Der im Gerät integrierte Musikplayer ermöglicht es Ihnen, ungeschützte Audio Dateien (AAC, MP3, WMA, FLAC) abzuspielen, die auf einem mit dem Netzwerk verbundenen Computer gespeichert sind. Um die Musik vom Computer abzuspielen, müssen Sie auf dem Computer eine gemeinsame Datei oder eine Medienbibliothek erstellen. - Page 23 Funktion Taste Drücken, um die Wiedergabe zu pausieren oder die / Wiedergabe fortzusetzen. Drücken, um den vorherigen Musiktitel zu überspringen. Drücken und halten, um den vorherigen Musiktitel zurückzuspulen. Drücken, um den nächsten Musiktitel zu überspringen. Drücken um halten, um den nächsten Musiktitel vorzuspulen.
-
Page 24: Usb-Wiedergabe
USB-WIEDERGABE Wenn ein USB-Speichermedium am Gerät angeschlossen ist, erscheint in der Anzeige "USB disk attached - open folder?". Die SELECT-Taste drücken und mit YES bestätigen. ODER ∧/∨ USB playback Im Musikplayer-Modus PRESET drücken, um die USB-Wiedergabe auszuwählen und zur Auswahl SELECT drücken. USB disk attached - Open folder? ∧/∨... - Page 25 DAB-RADIO Drücken Sie mehrfach die MODE Taste am Gerät oder die FM/DAB-Taste auf der Fernbedienung, um „DAB Radio“ auszuwählen. Das Gerät wird in den DAB-Modus wechseln und die automatische Suchfunktion starten. Während der Suche wird das Display „Suche…“ und einen Balken, der den Fortschritt und die bisher gefundenen Sender angibt, anzeigen.
- Page 26 DAB Anzeigeoptionen Jedes Mal, wenn Sie die Taste INFO auf der Fernbedienung oder auf Ihrem Gerät drücken, wird das Display die folgenden Anzeigeoptionen aufzeigen: DLS-Programmtyp-Ensemble/Frequenz-Signalfehler/-stärke- Übertragungsgeschwindigkeit/Codec/Sender-Datum. Löschen nicht länger verfügbarer Sender Sie haben die Möglichkeit, nicht länger verfügbare Sender zu löschen. 1.
-
Page 27: Manuelle Sendereinstellung
FM-RADIO Von DAB zu FM wechseln Um das Gerät von DAB in den FM-Modus zu wechseln, drücken Sie mehrfach die MODE Taste, bis FM angezeigt wird. Das Display wird Ihnen die Frequenz anzeigen. radio FM Radi o Automatische Suche Drücken und halten Sie die TUNING-Tasten, um die Suche nach einem Sender zu starten. - Page 28 ∧/∨ 3. Wählen Sie mit PRESET „Ja“ aus, um Mono zu hören oder wählen Sie „Nein“ aus, wenn das Gerät Mono oder Stereo selbst auswählen soll. 4. Bestätigen Sie Ihre Auswahl mit der Taste SELECT. CD-BETRIEB Kompatible Disktypen Disktyp Disk-Logo Medieninhalt CD-R (Aufnahme-CD) Audio...
- Page 29 Wiederholung der Wiedergabe 1. Drücken Sie die Taste REPEAT wiederholt, um einen Wiedergabemodus zu wählen. Den aktuellen Titel wiederholen. Alle Dateien im aktuellen Ordner wiederholen. (nur für Daten-CDs) Alle Titel wiederholen. 2. Drücken Sie die Taste REPEAT erneut, so dass die Wiederholen-Funktion ausgeschaltet wird.
-
Page 30: Audioeingang (Line In)
AUDIOEINGANG (LINE IN) Sie können Musik von externen Quellen wiedergen. 1. Schließen Sie das externe Gerät an die Cinch-Anschlüsse auf der Rückeseite an. 2. Drücken Sie wiederholt die MODE-Taste am Gerät, um den Line-In- Modus auszuwählen. 3. Stellen Sie die gewünschte Lautstärke über den lautstärkeregler am Gerät oder mittels +/- Tasten an der Fernbedienung ein. - Page 31 NET-REMOTE Das Gerät kann über Net-Remote von einem Smartphone oder Tablet mit iOS oder Androidsystem bedient werden. Durch den Download der App namens UNDOK können Sie alle Modi einsehen (Internet-Radio, Musik Wiedergabe, DAB und FM) und den gewünschten Modus auf Ihrem Tablet oder Smartphone auswählen.
-
Page 32: Schlafmodus
SCHLAFMODUS Diese Funktion ermöglicht es dem Gerät, nach einem voreingestellten Zeitraum von alleine in den Standby-Modus zu wechseln. 1. Um die Funktion zu aktivieren, drücken Sie mehrfach die Taste SLEEP. Bei jedem Drücken wird sich der Zeitraum, wie unten dargestellt, ändern: Sleep OFF 15MINS 30MINS... - Page 33 WECKFUNKTION Wecker einstellen 1. Drücken Sie auf Ihrer Fernbedienung die Taste ALARM, das Display zeigt dann „Alarm (1 oder 2): Aus[hh:mm]“ an. ∧/∨ 2. Drücken Sie PRESET , um Wecker Nummer 1 oder 2 auszuwählen und drücken Sie SELECT um die Einstellung der folgenden Parameter vorzunehmen.
- Page 34 Cha Tec GmbH Wa str 15 10179 Ber n www cha tec com Die Spo ify-Sof wa e u e ieg de Nu zu gs ec e vo D i a bie e , die auf fo ge de Sei e ei gese e we de kö e ps //www spo iy com/co ec / i d-pa y- ice ses A e aufgefü...
-
Page 35: Konformitätserklärung
HINWEISE ZUR ENTSORGUNG Wenn es in Ihrem Land eine gesetzliche Regelung zur Entsorgung von elektrischen und elektronischen Geräten gibt, weist dieses Symbol auf dem Produkt oder auf der Verpackung darauf hin, dass dieses Produkt nicht im Hausmüll entsorgt werden darf. Stattdessen muss es zu einer Sammelstelle für das Recycling von elektrischen und elektronischen Geräten gebracht werden. - Page 37 Dear Customer, Congratulations on purchasing this device. Please read the following instructions carefully and follow them to prevent possible damages. We assume no liability for damage caused by disregard of the instructions and improper use. Scan the QR code to get access to the latest user manual and more product information.
-
Page 38: Technical Data
TECHNICAL DATA Item number 10032753 10032754 100-240 V ~ 50/60 Hz , 1 A Mains Adaptor USB jack , 1 A 2 x 5 W RMS Audio output FM Radio Frequency range 87,5 MHz - 108 MHz Compact Disc Frequency Response 20 Hz - 20 Khz Frequency range 174-240 MHz... -
Page 39: Safety Instructions
SAFETY INSTRUCTIONS Read all the instructions carefully before using the unit and keep them for future reference. • Check that the voltage marked on the rating label matches your mains voltage. • The unit must be placed on a flat stable surface and should not be subjected to vibrations. -
Page 40: Service/Maintenance
Interference • Do not place the unit on or near appliances which may cause electromagnetic interference. If you do, it may adversely affect the operating performance of the unit, and cause a distorted sound. Supervision • Children should be supervised to ensure that they do not play with the unit. -
Page 41: Device Description
DEVICE DESCRIPTION Front Disk Tray Open/Close Disk Tray Button USB 5V 1A Charging Port 10 MENU Button Earphone Jack PRESET Button Play/Pause Button 12 MODE Button STOP Button 13 SCROLL / SELECT Control Prev. Button 14 VOLUME Control /Button Next Button 15 Remote Control Sensor Display Rear... -
Page 42: Remote Control
REMOTE CONTROL... - Page 43 ON/STANDBY button 19 CLOCK button Number buttons 20 TIMER button REPEAT button 21 INTRO button MENU button 22 RANDOM button MONO/ST. button 23 BACK button TUNING button 24 EQ button PRESET button 25 TUNING button VOLUME - button 26 VOLUME+ button PRESET button 27 ENTER button 10 FOLDER - button...
- Page 44 Battery replacement for the remote control 1. Open the battery cover. 2. Insert the LR6 1.5V AA/AM3 battery (not included). Make sure to match the (+) and ( - ) ends of the battery with the (+) and ( - ) ends indicated in the battery compartment.
-
Page 45: Network Connection
CONNECTIONS 1. The audio input/output (analogue), optical out (digital) and coaxial out (digital) are available on the back of the unit to connect A/V amplifier or HiFi system. 2. Connect the rod antenna included in the supply to the antenna connection and extend it to the desired length. -
Page 46: Getting Started
GETTING STARTED Powering ON/OFF 1. Press the Standby button on the unit or remote control to switch the unit 2. Press the Standbybutton on the unit or remote control to switch the unit back to standby mode. Selecting Modes Press the MODE button repeatedly on the unit or press the CD/USB, FM/ DAB, AUDIO IN, INTERNET, SPOTIFY button on the remote control to switch between Music player, DAB radio, FM radio, CD, Line in, Internet radio and Spotify Connect modes. - Page 47 3. Here it is possible to select which source (DAB/FM/Network/No update) the unit uses to obtain and update the time and date. If "Update from Network" selected, proceed to the next step to select time zone to ensure that the time is displayed correctly. And then select the "Daylight savings"...
-
Page 48: System Settings
SYSTEM SETTINGS ∧/∨ Press the MENU button to display the menu, press the PRESET buttons to select System settings and then press the SELECT button to confirm. Equalizer This system supports a variety of equalizers and sound effects. Press the EQ button to access the Equaliser menu Alternatively: ∧/∨... - Page 49 3. Press the BACK button on the unit or on the remote control to cancel the setting and return back to the previous menu. Time/Date The Time/Date can be automatically set once it has been connected to the Internet, DAB+ or FM radio station with time/date information. You may also adjust the Time/Date manually.
- Page 50 Language 1. During System settings mode, press the / buttons to select Language and then press the SELECT button to confirm. 2. Press the / buttons to change the display language of your choice. 3. Press the SELECT button to confirm.. Factory Reset There may be times when you need to reset your unit back to the factory settings especially when you have moved house.
-
Page 51: Backlight
Backlight 1. During System settings mode, press the / buttons to select Backlight and then press the SELECT button to confirm. 2. For the other settings under Backlight, press the / buttons to select the following options and then press the SELECT button to confirm. High / Medium/ Low Operation Mode Timeout... -
Page 52: Internet Radio
INTERNET RADIO This radio can play thousands of radio stations and podcasts from all over the world via a broadband internet connection. When Internet Radio mode is selected, the radio connects with the Frontier Silicon Internet radio portal to download a list of stations. Once a station is selected, the radio will connect directly to that station. - Page 53 Favourites are stored in the Internet radio portal and are available to all Internet radios that are registered with the same account. You must register the radio in the Internet radio portal before making use of the favourites. To register your radio with the portal (www.wifiradio-frontier. com).
- Page 54 Select podcasts from the categories in the Podcast menu: Location, Genre. Podcasts You can also select a particular episode by entering keywords to search podcasts Even though the Internet radio portal contains thousands of stations, you may want to listen to stations not listed. You can add your own stations via the portal My added (www.wifiradio-frontier.com).
-
Page 55: Spotify Premium
SPOTIFY PREMIUM Say hello to Spotify Premium Spotify Premium lets you listen to millions of songs ad-free – the artists you love, the latest hits and discoveries just for you. Simply hit play to hear any song you like, at the highest sound quality. Check out our current Premium offers at spotify.com/premium. -
Page 56: Music Player Operation
MUSIC PLAYER OPERATION This function is for more advanced users. The built-in Music Player allows you to play unprotected audio files (AAC, MP3, WMA, FLAC) stored on a networked computer. To play music from the computer, you must setup a shared file or media library on the computer. Press the MODE button repeatedly to select Music Player mode. -
Page 57: Button Function
Function Button Press to pause playback or resume normal playback. / Press to skip to the previous track. Press and hold to fast rewind the current track. Press to skip to the next track. Press and hold to fast forward the current track. Repeat Mode ∧/∨... -
Page 58: Usb Player Operation
USB PLAYER OPERATION When a USB device is connected to the unit, the display shows “USB disk attached – Open folder?” (F.5), press the SELECT button to confirm YES. Alternatively: USB playback ∧/∨ During Music Player mode, press the PRESET buttons to select USB playback and press the SELECT button to confirm. - Page 59 Press the MODE button repeatedly or press the FM/DAB button on the remote control to select “DAB radio”. The unit will enter DAB mode and perform the auto scan function. During the scan the display will show “Scanning… ” together with a slide bar that indicates the progress of the scan and the amount of stations that have been found so far.
- Page 60 Prune Invalid You may remove all unavailable stations from the list. ∧/∨ 1. During DAB mode, press the MENU button and press the PRESET buttons to select Prune invalid and then press the SELECT button to confirm. ∧/∨ 2. Press the PRESET buttons to select YES and press the SELECT button to confirm, or select NO to cancel.
- Page 61 FM OPERATION Switching from DAB to FM Mode To switch the unit to FM mode, press the MODE button repeatedly to switch to FM mode. The display will show the frequency. radio FM Radi o Auto Scan Press and hold the TUNINGbuttons to start searching for a station. NOTE: The search may not stop at a station with a very week signal..
- Page 62 CD OPERATION Compatible disc types Disc type Disk-Logo Medieninhalt CD-Recordable Audio CD-RW Audio (CD Rewritable) Audio CD (Compact Audio Disc Digital Audio) Press MODE repeatedly on the unit or press CD/USB repeatedly on the remote control to select CD mode. Playback 1.
- Page 63 Repeat playback 1. Press the REPEAT button repeatedly to choose a function. It will play the current track repeatedly. It will play all les in the current folder repeatedly (for data CDs only). Alle Titel wiederholen. 2. Press the REPEAT button once more again, the REPEAT function will turn off.
-
Page 64: Audio Input
AUDIO INPUT You can play sound from an external device via the device. 1. Connect the external device to the Audio Input on the device through suitable RCA cable. 2. Press the MODE button repeatedly on the unit or press the AUDIO IN button on the remote to select Line in mode. - Page 65 NET-REMOTE The device gives a feature of NetRemote by smartphone or tablet in iOS or Android system. By downloading the app named UNDOK, you can view all the modes of Internet radio, Spotify, Music player, DAB and FM. And select the mode on your smartphone or tablet.
-
Page 66: Sleep Setting
SLEEP SETTING This function allows you to program the unit to turn to standby mode by itself after a set period of time. 1. To activate the sleep function, press the SLEEP button repeatedly. The time will change in the below sequence on every press: Sleep OFF 15MINS 30MINS... - Page 67 ALARM Setting the Alarm 1. Press the ALARM button on the remote control, the display shows “Alarm (1 or 2): Off [hh:mm]”. ∧/∨ 2. Press the PRESET buttons to select the Alarm number (1 or 2) and then press the SELECT button to start thesetting of the following parameters.
- Page 68 Cha Tec GmbH Wa str 15 10179 Ber n, Germany www cha tec com T e Spo ify sof wa e is subjec o i d pa y ice ses fou d e e ps //www spo iy com/co ec / i d-pa y- ice ses A is ed b a ds a e adema ks of ei compa ies E o s a d omissio s excep ed, a d subjec o ec ica c a ge Ou ge e a e ms of de ive y a d payme a e app ied...
-
Page 69: Disposal Considerations
DISPOSAL CONSIDERATIONS If there is a legal regulation for the disposal of electrical and electronic devices in your country, this symbol on the product or on the packaging indicates that this product must not be disposed of with household waste. Instead, it must be taken to a collection point for the recycling of electrical and electronic equipment. - Page 71 Chère cliente, cher client, Toutes nos félicitations pour l’acquisition de ce nouvel appareil. Veuillez lire attentivement et respecter les instructions de ce mode d’emploi afin d’éviter d’éventuels dommages. Nous ne saurions être tenus pour responsables des dommages dus au non-respect des consignes et à la mauvaise utilisation de l’appareil.
-
Page 72: Fiche Technique
FICHE TECHNIQUE Numéro d'article 10032753 10032754 100-240 V ~ 50/60 Hz , 1 A Alimentation de l'adaptateur secteur Sortie USB , 1 A Audio Puissance de sortie 2 x 5 W RMS Radio FM Plage de fréquences 87,5 MHz - 108 MHz Plage de fréquences 20 Hz - 20 Khz Plage de fréquences... -
Page 73: Consignes De Sécurité
CONSIGNES DE SÉCURITÉ Consignes générales de sécurité • Lisez attentivement toutes les instructions avant d'utiliser l'appareil et conservez le mode d'emploi pour vous y référer ultérieurement. • N'utilisez que la tension indiquée sur la plaque signalétique de l'appareil. Assurez-vous que votre prise de courant est mise à la terre. •... - Page 74 Branchement • Assurez-vous que la prise d'alimentation de la radio ne reste pas branchée pendant un orage. • L'appareil chauffe lorsqu'il est utilisé pendant une longue période. Ceci est normal et n'est pas signe d'un problème. Parasites • Ne placez pas la radio sur ou à proximité d'un autre équipement susceptible de provoquer des interférences électromagnétiques.
-
Page 75: Aperçu De L'appareil
APERÇU DE L'APPAREIL Face avant Tiroir de CD Ouverture / fermeture du tiroir Capteur IR 10 Menu Prise casque Paramètres Lecture / Pause 12 Mode Stop – mettre en pause la lecture 13 Parcourir /sélectionner Titre précédent 14 Volume / marche-arrêt Titre suivant 15 Capteur IR Écran... - Page 76 TELECOMMANDE...
- Page 77 Marche /veille 19 Heure Touches chiffrées 20 Minuterie Répétition 21 Lecture du début des titres Menu 22 Lecture aléatoire Mono/Stéréo 23 Retour Recherche de stations arrière 24 Egaliseur Touche fléchée haut 25 Recherche de stations avant Volume - 26 Volume + Touche fléchée bas 27 saisie / confirmation 10 Répertoire -...
- Page 78 Remplacement de la pile de la télécommande 1. Appuyez sur le couvercle du compartiment de la batterie et retirez le support de la batterie. 2. Insérez une pile LR6 dans le support de pile de la télécommande (non fourni) et vérifiez que vous avez respecté les marques de polarité "+" et "-"...
-
Page 79: Connexion Au Réseau
BRANCHEMENT Branchement de l'appareil au secteur 1. Au dos de l'appareil se trouvent l'entrée et la sortie audio (analogiques), la sortie optique (numérique) et la sortie coaxiale (numérique) pour la connexion à un amplificateur ou à un système hi-fi. 2. Connectez l'antenne rigide fournie. Étirez-la à la longueur désirée. 3. -
Page 80: Mise En Marche
MISE EN MARCHE Mettre en marche / éteindre l'appareil 1. Appuyez sur le bouton de veille de l'appareil ou de la télécommande pour allumer la radio. 2. Appuyez sur le bouton de veille pour remettre l'appareil en mode veille. Choix du mode Appuyez plusieurs fois sur la touche MODE d l'appareil ou sur les touches CD/USB, FM/DAB, AUDIO IN, Internet, Spofity, pour basculer entre les modes lecteur de musique, radio DAB, radio FM, CD, Line in, radio Internet... - Page 81 3. Sélectionnez ici la source (DAB / FM / Réseau / Pas de mise à jour) que le système doit utiliser pour mettre à jour l'heure et la date. Si "Mise à jour à partir du réseau" a été sélectionné, passez à l'étape suivante pour régler correctement le fuseau horaire.
-
Page 82: Paramètres Système
PARAMÈTRES SYSTÈME Appuyez sur la touche MENU pour afficher le menu, appuyez sur PRESET ∧/∨ , pour sélectionner les paramètres système et confirmez en appuyant sur la touche SELECT. Egaliseur Cet appareil prend en charge une variété d'égaliseurs et d'effets sonores. Appuyez sur la touche EQ pour accéder au menu de réglage de l'égaliseur. - Page 83 SSID - Sélectionnez le réseau sans fil souhaité. Recherche - Recherchez les réseaux disponibles. Configuration manuelle Assistant réseau - choisissez une connexion réseau sans fil avec DHCP activé / désactivé. Sur la radio, sélectionnez PBC et appuyez sur la touche PBC de l'appareil auquel vous Configuration PBC-Wifi voulez vous connecter.
- Page 84 Actualisation par le réseau DAB/FM ou pas Actualisation d'actualisation. automatique Réglage du format Format horaire d'affichage 12/24 Choisissez votre fuseau. (disponible Réglage du fuseau uniquement si l'actualisation automatique horaire par le réseau est activée.) Choisissez d'activer l'heure d'été. (disponible Heure d'été / heure uniquement si l'actualisation automatique d'hiver par le réseau est activée.)
-
Page 85: Rétroéclairage
REMARQUE : Si vous réinitialisez le système aux paramètres d'usine, toutes les stations de radio, Internet et les stations DAB et FM préréglées que vous avez définies seront supprimées. Software Update 1. En mode de configuration du système, appuyez sur la touche PRESET ∧/∨... -
Page 86: Radio Internet
RADIO INTERNET Cet appareil peut lire des milliers de stations de radio et de podcasts partout dans le monde par sa connexion Internet à haut débit. Si vous avez sélectionné le mode Radio Internet, la radio se connecte au portail Frontier Silicon Internet Radio pour télécharger une liste de stations. -
Page 87: Mes Favoris
Les favoris sont stockés sur le portail radio Internet et sont disponibles sur toutes les radios Internet connectées avec le même compte. Pour pouvoir utiliser les favoris, vous devez d'abord enregistrer la radio sur le portail radio Internet. Pour vous inscrire, rendez-vous d'abord sur la page d'accueil du portail (www.wifiradio-frontier.com). - Page 88 Sélectionnez des podcasts parmi les catégories suivantes dans le menu de podcast : Emplacement, Genre. Podcasts Vous pouvez également rechercher des épisodes spécifiques d'un podcast en entrant des mots clés. Même si le portail de la radio Internet contient des milliers de chaînes, vous pouvez écouter une chaîne qui n'y figure pas.
-
Page 89: Spotify Premium
SPOTIFY PREMIUM Dites bonjour à Spotify Premium Avec Spotify Premium, vous pouvez écouter des millions de chansons sans publicité. Vos artistes préférés, les derniers succès et les nouvelles découvertes - rien que pour vous! Appuyez simplement sur 'Play' et vous écouterez toutes les chansons que vous aimez, avec la plus haute qualité... -
Page 90: Utilisation Du Lecteur De Musique
UTILISATION DU LECTEUR DE MUSIQUE Le lecteur de musique intégré vous permet de lire des fichiers audio non protégés (AAC, MP3, WMA, FLAC) stockés sur un ordinateur connecté au réseau. Pour lire la musique à partir de l'ordinateur, vous devez créer un fichier ou une bibliothèque partagés sur l'ordinateur. -
Page 91: Touche Fonction
Touche Fonction Appuyez pour mettre la lecture en pause ou pour la / poursuivre. Appuyez pour passer au titre précédent. Appuyez et maintenez pour parcourir à rebours le titre en cours. Appuyez pour aller au titre suivant. Appuyez et maintenez ... -
Page 92: Lecture Sur Usb
LECTURE SUR USB Si un périphérique de stockage USB est connecté à l'appareil, "USB disk attached - open folder?" S'affiche à l'écran. Appuyez sur le bouton SELECT et confirmez avec YES. OU BIEN ∧/∨ En mode lecteur de musique, appuyez sur PRESET pour sélectionner la USB playback lecture USB et appuyez sur SELECT pour confirmer. -
Page 93: Radio Dab
RADIO DAB Appuyez plusieurs fois sur la touche MODE de l'appareil ou sur la touche FM/DAB de la télécommande pour sélectionner "Radio DAB". L'appareil passe en mode DAB et lance la recherche automatique. Pendant la recherche, l'écran affiche "recherche ..." et une barre qui indique la progression et les stations trouvées au fur et à... - Page 94 Options d'affichage de DAB Chaque fois que vous appuyez sur la touche INFO de la télécommande ou de votre appareil, les options d'affichage suivantes s'affichent : DLS-Type de programme-Ensemble / Fréquence-erreur de signal / Niveau Vitesse de transmission / Codec / Station-Date. Supprimer les stations qui ne sont plus accessibles Vous pouvez supprimer les stations qui ne sont plus accessibles.
- Page 95 RADIO FM Pour passer de DAB à FM Pour que l'appareil passe de DAB à FM, appuyez plusieurs fois sur la touche MODE jusqu'à ce que l'écran affiche FM. L'écran vous indiquera la fréquence. Recherche automatique radio FM Radi o Appuyez sur les touches TUNING et maintenez-les pour démarrer la recherche d'une station.
- Page 96 ∧/∨ 4. Appuyez sur PRESET pour sélectionner "paramètres audio" et appuyez sur SELECT pour confirmer. FONCTIONNEMENT DU CD Types de disques compatibles Type de disque Logo Contenu média CD-R (CD Audio enregistrable) CD-RW (CD Audio réenregistrable) Audio CD Audio (Kompaktdisk) Appuyez plusieurs fois sur la touche MODE de l'appareil (ou sur CD/USB sur la télécommande) pour activer la lecture de CD.
- Page 97 Répétition de la lecture 1. Appuyez plusieurs fois sur la touche REPEAT pour choisir un mode de répétition. Répéter le titre en cours. Répéter tous les fichiers du dossier en cours. (uniquement pour les CD de données) Répéter tous les titres. 2.
-
Page 98: Entrée Audio (Line In)
ENTRÉE AUDIO (LINE IN) Vous pouvez lire de la musique provenant de sources externes. 1. Connectez l'appareil externe aux connecteurs RCA au dos. 2. Appuyez plusieurs fois sur MODE sur l'appareil pour sélectionner l'entrée de ligne. 3. Réglez le volume souhaité avec le contrôle du volume sur l'appareil ou avec les touches +/- de la télécommande. - Page 99 NET-REMOTE L'appareil peut être utilisé via Net-Remote à partir d'un smartphone ou d'une tablette iOS ou Android. En téléchargeant l'application UNDOK vous pourrez voir tous les modes (radio Internet, lecture de musique, DAB et FM) et sélectionner le mode désiré sur votre tablette ou smartphone. Avant d'utiliser l'application UNDOK, assurez-vous que votre smartphone/ tablette est connecté...
-
Page 100: Arrêt Automatique
ARRÊT AUTOMATIQUE Cette fonction permet à l'appareil de basculer automatiquement en mode veille après une durée prédéfinie. 1. Pour activer la fonction, appuyez plusieurs fois sur la touche SLEEP. Chaque appui modifie la durée comme indiqué ci-dessous : Sleep OFF 15MINS 30MINS 45MINS... -
Page 101: Fonction Réveil
FONCTION RÉVEIL Réglage du réveil 1. Appuyez sur la touche ALARM de votre télécommande, l'écran affiche "Alarm (1 ou 2): Off [hh: mm]". ∧/∨ 2. Appuyez sur PRESET pour sélectionner le numéro d'alarme 1 ou 2 et appuyez sur SELECT pour régler les paramètres suivants. ∧/∨... - Page 102 Cha Tec GmbH Wa str 15 10179 Ber n www cha tec com Le ogicie Spo ify es soumis à des d oi s d'u i isa io de ie s, co su ab es su a page suiva e ps //www spo iy com/co ec / i d-pa y- ice ses Tou es es ma ques so des ma ques déposées de eu s socié...
-
Page 103: Conseils Pour Le Recyclage
CONSEILS POUR LE RECYCLAGE S‘il existe une réglementation pour l‘élimination ou le recyclage des appareils électriques et électroniques dans votre pays, ce symbole sur le produit ou sur l‘emballage indique que cet appareil ne doit pas être jeté avec les ordures ménagères. Vous devez le déposer dans un point de collecte pour le recyclage des équipements électriques et électroniques. - Page 105 Estimado cliente, Le felicitamos por la adquisición de este producto. Lea atentamente las siguientes instrucciones y sígalas para evitar posibles daños. No asumimos ninguna responsabilidad por los daños causados por el incumplimiento de las instrucciones y el uso inadecuado. Escanee el siguiente código QR para obtener acceso a la última guía del usuario y más información sobre el producto.
-
Page 106: Datos Técnicos
DATOS TÉCNICOS Número de artículo 10032753 10032754 100-240 V ~ 50/60 Hz , 1 A Alimentación Salida USB , 1 A Audio Potencia de salida 2 x 5 W RMS Radio VHF Rango de frecuencia 87,5 MHz - 108 MHz Respuesta de frecuencia 20 Hz - 20 Khz Rango de frecuencia... -
Page 107: Indicaciones De Seguridad
INDICACIONES DE SEGURIDAD Instrucciones generales de seguridad • Lea atentamente todas las instrucciones antes de utilizar el equipo y guarde el manual de instrucciones para futuras consultas. • Utilice sólo el voltaje indicado en la placa de identificación de la unidad. Asegúrese de que la toma de corriente esté... - Page 108 Toma de corriente • No sitúe el producto sobre el cable de alimentación, ya que el peso del producto puede dañarlo y constituir un peligro para la seguridad. • Si el cable de conexión de la unidad está dañado, debe ser sustituido por el fabricante, el servicio técnico u otra persona cualificada para evitar daños.
-
Page 109: Vista General Del Equipo
VISTA GENERAL DEL EQUIPO Parte delantera Bandeja de CD Abrir/cerrar la bandeja de CD Sensor infrarrojo 10 Menú Ajustes Conexión de auriculares Reproducir/Pausar 12 Modo STOP - Detener la reproducción 13 Desplazar / Seleccionar Un título atrás 14 Volúmen / Encender-apagar Un título adelante 15 Receptor de infrarrojos Pantalla... -
Page 110: Control Remoto
CONTROL REMOTO... - Page 111 Encender/En espera 19 Reloj Teclas numéricas 20 Temporizador Repetición 21 Reproducción de títulos Menú 22 Reproducción aleatoria Mono / Estéreo 23 Atrás Búsqueda de emisoras atrás 24 EQ Tecla de flecha hacia arriba 25 Búsqueda de emisoras por delante Volúmen 26 Volúmen Tecla de flecha hacia abajo 27 Entrar / Confirmar...
- Page 112 Sustitución de la pila del control remoto 1. Empuje la tapa de la batería hacia abajo y saque el soporte de la batería. 2. Inserte una pila LR6 en el soporte de la pila del control remoto (no incluida) y asegúrese de que las polaridades "+" y "-" de la pila coinciden. 3.
-
Page 113: Conexión De Red
CONEXIÓN Conectar el aparato a la toma de corriente 1. En la parte de atrás se encuentran la entrada y salida de audio (analógica), la salida óptica (digital) y la salida coaxial (digital) para la conexión a un amplificador o sistema de alta fidelidad. 2. -
Page 114: Arranque Inicial
ARRANQUE INICIAL Encender/apagar el equipo 1. Pulse el botón Standby de la unidad o del control remoto para encender la radio. 2. Presione el botón de espera para volver a poner la unidad en el modo de espera. Seleccione el modo Pulse el botón MODE de la unidad repetidamente o los botones CD/ USB, FM/DAB, AUDIO IN, Internet, Spotify para cambiar entre los modos Reproductor de música, Radio DAB, Radio FM, CD, Line In, Radio de Internet... - Page 115 3. Seleccione la fuente (DAB/FM/Red/No actualización) que el sistema utiliza para obtener la hora y la fecha. Si selecciona "Actualizar desde la red", vaya al paso siguiente para ajustar la zona horaria y mostrar la hora correctamente. A continuación, seleccione "Ahorro de luz natural" [ON] u [OFF] (horario de verano activado o desactivado).
-
Page 116: Ajustes Del Sistema
AJUSTES DEL SISTEMA ∧/∨ Pulse el botón MENU para visualizar el menú, pulse PRESET para seleccionar la configuración del sistema y pulse el botón SELECT para confirmar. Ecualizador Esta unidad soporta una variedad de ecualizadores y efectos de sonido, pulse el botón EQ para acceder al menú de ajuste del ecualizador. ∧/∨... - Page 117 SSID - seleccione la red inalámbrica deseada. Buscar - busca las redes disponibles. Configuración manual - Asistente de red seleccione una red inalámbrica con DHCP habilitado/deshabilitado En la radio, seleccione PBC y pulse el botón Configuración de PBC- PBC del dispositivo al que desee conectarse. WLAN Pulse el botón ENTER para continuar.
- Page 118 Actualizaciones desde la red DAB/FM o Actualización ninguna actualización. automática Configurar formato Formato de 12/24 horas Seleccione la zona horaria. (Sólo disponible Configurar zona si está activada la actualización automática horaria de la red.) Seleccione el horario de verano/invierno. Horario de verano/ (Sólo disponible si está...
- Page 119 NOTA: Si usted reinicia el sistema desde los ajustes de fábrica, todas las emisoras de radio, Internet y las emisoras DAB y FM preestablecidas que haya configurado se eliminarán. Actualización de software ∧/∨ 1. Durante el modo de configuración del sistema, pulse PRESET para seleccionar "Actualización de software"...
-
Page 120: Radio De Internet
RADIO DE INTERNET Este dispositivo puede reproducir miles de estaciones de radio y podcasts de todo el mundo a través de la conexión de banda ancha al Internet. Si ha seleccionado el modo de radio por Internet, la radio se conecta al portal de radio por Internet Frontier Silicon para descargar una lista de emisoras. -
Page 121: Mis Favoritos
Los favoritos se guardan en el portal de radio de Internet y están dispon bles en todas las radios de Internet que se utilizan con la misma cuenta. Para utilizar los Favoritos, primero debe registrar la radio en el Portal de Radio de Internet. - Page 122 Seleccione podcasts de las siguientes categorías en el menú de podcasts: Lugar, género. También puede buscar episodios específicos de un Podcasts podcast introduciendo palabras clave. Incluso si el portal de radio de Internet contiene miles de emisoras, es posible que desee escuchar una emisora que no aparezca en la lista.
-
Page 123: Spotify Premium
SPOTIFY PREMIUM Bienvenido a Spotify Premium Con Spotify Premium podrás escuchar millones de canciones sin publicidad. Tus artistas favoritos, los últimos éxitos y nuevos descubrimientos - ¡sólo para ti! Sólo tienes que tocar 'Play' y escucharás cualquier canción con la mejor calidad de sonido. - Page 124 EL MANEJO DEL REPRODUCTOR DE MÚSICA El reproductor de música integrado le permite reproducir archivos de audio libres de protección (AAC, MP3, WMA, FLAC) almacenados en un ordenador conectado a la red. Para reproducir música desde el equipo, debe crear un archivo compartido o una biblioteca multimedia en el equipo.
- Page 125 Función Tecla Pulse para pausar o continuar la reproducción. / Pulse para saltar la canción anterior. Mantenga pulsado para rebobinar la canción anterior. Pulse para saltar la canción siguiente. Manténgalo pulsado para adelantar la próxima canción. Modo de repetición ∧/∨...
-
Page 126: Reproducción Usb
REPRODUCCIÓN USB Si se conecta un dispositivo de memoria USB al dispositivo, en la pantalla aparece "USB disk attached - open folder?” Pulse la tecla SELECT y confirme con “YES”. USB playback ∧/∨ En el modo de reproductor de música, pulse PRESET para seleccionar la reproducción USB y pulse SELECT para seleccionarla. -
Page 127: Radio Dab
RADIO DAB Pulse el botón MODE de la unidad o el botón FM/DAB del control remoto repetidamente para seleccionar "DAB Radio". La unidad cambiará al modo DAB e iniciará la función de búsqueda automática. Durante la búsqueda, la pantalla mostrará el mensaje " Buscando... " y una barra que indica el radio DAB Radi o progreso y las emisoras encontradas hasta el momento. - Page 128 Opciones de visualización DAB Cada vez que pulse el botón INFO en el mando a distancia o en su dispositivo, la pantalla mostrará las siguientes opciones de visualización: DLS tipo de programa conjunto/señal de frecuencia error/fuerza velocidad de transmisión/codec/fecha del transmisor. Borrar emisoras que ya no están disponibles Puede borrar emisoras que ya no estén disponibles.
- Page 129 RADIO FM Cambiar de DAB a FM Para cambiar la unidad del modo DAB al modo FM, pulse el botón MODE repetidamente hasta que aparezca FM. La pantalla le mostrará la frecuencia. radio FM Radi o Búsqueda automática Mantenga pulsados los botones TUNING para iniciar la búsqueda de una emisora.
- Page 130 3. Pulse PRESET </> para seleccionar "Yes" para escuchar mono o seleccione "No" si desea que la unidad seleccione mono o estéreo. 4. Confirme la selección con la tecla SELECT. Discos compatibles Tipo de CD Logo del disco Contenido mediático CD-R (CD grabable) Audio CD-RW (CD multi-...
- Page 131 Reproducción repetida 1. Pulse el botón REPEAT repetidamente para seleccionar un modo de reproducción. Repetir la canción actual. Repetir todos los archivos de la carpeta actual. (sólo para CDs de datos) Repetir todas las canciones. 2. Pulse el botón REPEAT de nuevo para desactivar la función de repetición. Reproducción aleatoria Todas las canciones se pueden reproducir en orden aleatorio.
-
Page 132: Conexión De Auriculares
ENTRADA DE SONIDO (LINE IN) Usted puede reproducir música desde fuentes externas. 1. Conecte el dispositivo externo a los conectores RCA del lado de atrás. 2. Repite el botón MODE de la unidad para activar el modo Line-In. 3. Utilice el control de volumen de la unidad o los botones +/- del control remoto para ajustar el volumen deseado. - Page 133 NET-REMOTE El dispositivo puede ser operado vía "Net-Remote" desde un smartphone o tablet con sistema iOS o Android. Al descargar la aplicación llamada UNDOK, puede ver todos los modos (radio por Internet, reproducción de música, DAB y FM) y seleccionar el modo deseado en su tableta o smartphone.
-
Page 134: Modo Sueño
MODO SUEÑO Esta función permite que el dispositivo cambie al modo de espera por sí solo después de un período de tiempo preestablecido. 1. Para activar la función, pulse el botón SLEEP varias veces. Cada vez que presione, el período de tiempo cambiará como se muestra a continuación: Sleep OFF 15MINS... - Page 135 ALARMA Ajustar la alarma 1. Pulse el botón ALARM de su control remoto, la pantalla mostrará "Alarma (1 o 2): Apagar[hh:mm]". ∧/∨ 2. Pulse PRESET para seleccionar el número de alarma 1 o 2 y pulse SELECT para ajustar los siguientes parámetros. ∧/∨...
- Page 136 Cha Tec GmbH Wa str 15 10179 Ber n www cha tec com E sof wa e Spo ify es á suje o a os de ec os de uso de e ce os, que puede se co - su ados e a pági a siguie e ps //www spo iy com/co ec / i d-pa y- ice ses Todas as ma cas de fáb ica e ume adas so ma cas egis adas de as compañ...
-
Page 137: Retirada Del Aparato
RETIRADA DEL APARATO Si el aparato lleva adherida la ilustración de la izquierda (el contenedor de basura tachado) entonces rige la normativa europea, directiva 2012/19/UE. Este producto no debe arrojarse a un contenedor de basura común. Infórmese sobre las leyes territoriales que regulan la recogida separada de aparatos eléctricos y electrónicos. - Page 139 Gentile cliente, La ringraziamo per aver acquistato il dispositivo. La preghiamo di leggere attentamente le seguenti istruzioni per l’uso e di seguirle per evitare possibili danni. Non ci assumiamo alcuna responsabilità per danni scaturiti da una mancata osservazione delle avvertenze di sicurezza e da un uso improprio del dispositivo.
-
Page 140: Dati Tecnici
DATI TECNICI Numero articolo 10032753 10032754 100-240 V ~ 50/60 Hz , 1 A Alimentazione Uscita USB , 1 A Audio Potenza di uscita 2 x 5 W RMS Radio FM Intervallo di frequenza Intervallo di frequenza 20 Hz - 20 Khz Intervallo di frequenza 174-240 MHz Specifiche WLAN... -
Page 141: Avvertenze Di Sicurezza
AVVERTENZE DI SICUREZZA Avvertenze di sicurezza generali • Leggere attentamente tutte le avvertenze prima dell’utilizzo e conservare il manuale d’uso per future consultazioni. • Utilizzare solo tensioni corrispondenti a quelle indicate sulla targhetta del dispositivo. Assicurarsi che la presa di corrente utilizzata sia dotata di messa a terra. - Page 142 Collegamento alla rete elettrica • Assicurarsi che il dispositivo non si trovi sopra al cavo di alimentazione, dato che il peso del dispositivo potrebbe danneggiarlo e causare rischi per la sicurezza. • Se il cavo di alimentazione è danneggiato, deve essere sostituito dal produttore, dal servizio di assistenza ai clienti o da una persona qualificata, in modo da evitare danneggiamenti.
-
Page 143: Descrizione Del Dispositivo
DESCRIZIONE DEL DISPOSITIVO Fronte Vano CD Aprire/chiudere vano CD Sensore IR 10 Menu Impostazioni Connessione cuffie Play/Pausa 12 Modalità Stop – fermare la riproduzione 13 Scorrere/selezionare Titolo precedente 14 Volume On/Off Titolo successivo 15 Ricevitore IR Display Retro 16 Connessione di alimentazione 20 Uscita ottica (digitale) 17 Antenna WLAN 21 Uscita coassiale (digitale) - Page 144 TELECOMANDO...
- Page 145 On/Standby 19 Orologio Tasti numerici 20 Timer Ripeti 21 Riprodurre i brani Menu 22 Riproduzione casuale Mono/Stereo 23 Indietro Cerca emittente precedente 24 EQ Tasto freccia in alto 25 Cerca emittente successiva Volume - 26 Volume Tasto freccia in basso 27 Inserisci/Conferma 10 Indice 28 Indice +...
- Page 146 Sostituire la batteria del telecomando 1. Premere verso il basso la copertura del vano della batteria ed estrarre il supporto della batteria. 2. Inserire una batteria LR6 (non inclusa nel volume di consegna) nel supporto delle batterie del telecomando e assicurarsi di posizionare correttamente polo positivo e negativo.
-
Page 147: Connessione Alla Rete
CONNESSIONE Collegare il dispositivo alla linea elettrica 1. Sul retro del dispositivo si trovano un ingresso e un’uscita audio (analogici), l’uscita ottica (digitale) e l’uscita coassiale (digitale) per il collegamento con un amplificatore o un impianto Hi-Fi. 2. Collegare l’antenna inclusa in consegna. Estrarla alla lunghezza desiderata. -
Page 148: Messa In Funzione
MESSA IN FUNZIONE Accendere/spegnere il dispositivo 1. Premere Standby sul dispositivo o sul telecomando per accendere la radio. 2. Premere nuovamente Standby per far passare il dispositivo in modalità standby. Selezionare la modalità Premere più volte MODE sul dispositivo o i tasti CD/USB, FM/DAB, AUDIO IN, Internet, Spofity per passare tra le diverse modalità: lettore musicale, radio DAB, radio FM, CD, Line In, web radio, Spotify Connect. - Page 149 3. Ora si seleziona la fonte (DAB/FM/Rete/Nessun aggiornamento), che il sistema utilizza per risalire a data e ora. Se si seleziona "Update from Network", procedere al passaggio successivo per impostare il fuso orario per visualizzare l’ora esatta. Selezionare poi "Daylight saving" [ON] o [OFF] (ora legale On o Off).
-
Page 150: Impostazioni Di Sistema
IMPOSTAZIONI DI SISTEMA ∧/∨ Premere MENU per mostrare il menu, premere PRESET per selezionare le impostazioni di sistema e premere SELECT per confermare. Equalizzatore Questo dispositivo supporta numerosi equalizzatori ed effetti sonori. Premere il tasto EQ per raggiungere il menu delle impostazioni dell’equalizzatore. - Page 151 SSID - selezionare la rete senza fili desiderata. Cerca - cercare reti disponibili. Assistente di rete Configurazione manuale – selezionare una rete senza fili con DHCP attivato/disattivato. Selezionare PBC sulla radio e premere il tasto PBC sul dispositivo con cui ci si Configurazione PBC- desidera connettere.
- Page 152 Aggiornamento dalla rete DAB/FM o nessun Aggiornamento aggiornamento. automatico Impostare formato Formato 12/24 ore. Selezionare il fuso orario (disponibile solo Impostare il fuso se l’aggiornamento automatico di rete è orario attivato). Selezionare ora solare/ora legale (disponibile solo se l’aggiornamento Ora legale/ora solare automatico di rete è...
- Page 153 NOTA: se si riporta il sistema alle impostazioni di fabbrica, tutte le emittenti radio, web e le emittenti predefinite DAB & FM vengono cancellate. Aggiornamento del software ∧/∨ 1. Premere PRESET in modalità impostazioni di sistema per selezionare “Software Update” e premere SELECT per confermare. ∧/∨...
-
Page 154: Internet Radio
INTERNET RADIO Questo dispositivo può riprodurre migliaia di emittenti radio e podcast da tutto il mondo tramite la connessione a Internet. Dopo aver selezionato la modalità Web radio, la radio si connette con il portale web radio Frontier Silicon per scaricare un elenco di emittenti. Una volta selezionata un’emittente, la radio si connetterà... - Page 155 I preferiti sono salvati nel portale web radio e sono disponibili su tutte le web radio utilizzate con lo stesso account. Per poter utilizzare i Preferiti è necessario registrare la radio al portale web radio. Per la registrazione, andare sulla homepage del portale (www.wifiradio-frontier.com).
- Page 156 Selezionare i podcast dalle seguenti categorie nel menu dei podcast: Località, Genere. Particolari episodi dei podcast possono essere Podcast cercati inserendo parole chiave. Anche se il portale web radio contiene migliaia di emittenti, può capitare di voler ascoltare un’emittente non presente nella lista. È possibile Le mie emittenti aggiungere le emittenti desiderate tramite il portale aggiunte...
-
Page 157: Spotify Premium
SPOTIFY PREMIUM Dai il benvenuto a Spotify Premium momento e nuove scoperte su misura per voi. Basta premere “Play” e potrete ascoltare tutte le canzoni che desiderate, con un sound della migliore qualità. Date un’occhiata alle nostre offerte per abbonamenti Premium su spotify.com/premium. -
Page 158: Utilizzo Del Lettore Musicale
UTILIZZO DEL LETTORE MUSICALE Il lettore musicale integrato nel dispositivo permette di riprodurre file non protetti (AAC, MP3, WMA, FLAC), che si trovano su un computer connesso alla rete. Per riprodurre la musica dal computer, è necessario creare sul computer un file o una cartella condivisa. Premere più volte MODE sul dispositivo per selezionare la modalità... -
Page 159: Tasto Funzione
Funzione Tasto Premere per avviare o mettere in pausa la riproduzione. / Premere per saltare il titolo precedente. Tenere premuto per tornare indietro nel titolo precedente. Premere per saltare il titolo successivo. Tenere premuto per avanzare nel titolo successivo. Modalità... -
Page 160: Riproduzione Usb
RIPRODUZIONE USB Se un dispositivo di memoria USB è connesso, compare l’indicazione “USB DISK ATTACHED – open folder?”. Premere SELECT è confermare con YES. OPPURE ∧/∨ Premere PRESET in modalità Lettore musicale per selezionare la USB playback riproduzione USB e premere SELECT per confermare. USB disk attached - ∧/∨... - Page 161 RADIO DAB Premere più volte MODE per selezionare “Radio DAB”. Il dispositivo passa in modalità DAB e inizia la ricerca automatica. Durante la ricerca, il display mostrerà “Ricerca…” e una barra che indica il progresso e le emittenti trovate fino a quel momento. (F.7) Una volta finita la ricerca, il dispositivo selezionerà...
- Page 162 Opzioni per le indicazioni DAB Ogni volta che si preme INFO sul telecomando o sul dispositivo, il display mostra le seguenti opzioni di indicazione: Insieme di tipologia di programma DLS/Errore del segnale di frequenza/intensità di frequenza- Velocità di trasmissione/Codec/Emittente-Data. Cancellare emittenti non più disponibili È...
- Page 163 RADIO FM Passare da DAB a FM Per passare dalla modalità DAB a quella FM, premere più volte MODE, fino a quando viene mostrato FM. Il display indicherà la frequenza. Ricerca automatica Tenere premuto TUNING per iniziare la ricerca di un’emittente. radio FM Radi o NOTA: può...
- Page 164 FUNZIONE CD Tipologie di disco compatibili Tipo di disco Logo del disco Tipo di contenuto CD-R (CD registrato) Audio CD-RW (CD riscriv bile) Audio Audio CD (Compact Audio Disc) Premere ripetutamente MODE sul dispositivo (o CD/USB sul telecomando) per attivare la riproduzione CD. Riproduzione 1.
- Page 165 Ripetere la riproduzione 1. Premere ripetutamente REPEAT per selezionare una modalità di riproduzione. Ripetere il titolo attuale Ripetere tutti i titoli nella cartella attuale (solo per CD di file) Ripetere tutti i titoli 2. Premere nuovamente REPEAT per spegnere la funzione di ripetizione. Riproduzione casuale Tutti i titoli possono essere riprodotti casualmente.
-
Page 166: Ingresso Audio (Line In)
INGRESSO AUDIO (LINE IN) Può essere riprodotta musica da fonti esterne. 1. Collegare il altro dispositivo esterno alle connessioni RCA sul retro. 2. Premere più volte MODE per raggiungere la modalità Line In. 3. Utilizzare la manopola sul dispositivo o +/- sul telecomando per regolare il volume sul dispositivo desiderato. - Page 167 NET-REMOTE Il dispositivo può essere utilizzato da uno smartphone o tablet con sistema iOS o Android tramite Net-Remote. Scaricando la app UNDOK è possibile visualizzare tutte le modalità (web radio, riproduzione musicale, DAB, FM) e selezionare quella desiderata su tablet o smartphone. Prima di utilizzare UNDOK, è...
-
Page 168: Modalità Notturna
MODALITÀ NOTTURNA Questa funzione permette di far passare il dispositivo automaticamente in standby dopo un determinato lasso di tempo. 1. Premere più volte SLEEP per attivare la funzione. Ogni pressione modifica il tempo come indicato di seguito: Sleep OFF 15MINS 30MINS 45MINS 60MINS... -
Page 169: Funzione Sveglia
FUNZIONE SVEGLIA Impostazione sveglia Premere sul telecomando ALARM, il display mostra “Alarm (1 o 2): off (hh:mm)”. ∧/∨ 1. Premere PRESET per selezionare sveglia 1 o 2 e SELECT per confermare l’impostazione dei seguenti parametri. ∧/∨ Per le seguenti impostazioni premere PRESET e SELECT per confermare. - Page 170 Cha Tec GmbH Wa str 15 10179 Ber n www cha tec com sof wa e Spo ify è so opos o a ice ze di u i izzo di pa i e ze c e posso o esse e co su a i p esso ps //www spo iy com/co ec / i d-pa y- ice ses Tu i i ma c i so o ma c i egis a i de e ispe ive azie de...
-
Page 171: Dichiarazione Di Conformità
AVVISO DI SMALTIMENTO Se nel proprio paese si applicano le regolamentazioni inerenti lo smaltimento di dispositivi elettrici ed elettronici, questo simbolo sul prodotto o sulla confezione segnala che questi prodotti non possono essere smaltiti con i rifiuti normali e devono essere portati a un punto di raccolta di dispositivi elettrici ed elettronici. - Page 173 Geachte klant, hartelijk gefeliciteerd met de aanschaf van dit apparaat. Lees de hierna volgende handleiding aandachtig door en volg de instructies op om schade voorkomen. Voor schade veroorzaakt door het niet in acht nemen van de instructies of door onjuist gebruik nemen wij geen verantwoordelijkheid.
-
Page 174: Techische Gegevens
TECHISCHE GEGEVENS Artikelnummer 10032753 10032754 100-240 V ~ 50/60 Hz , 1 A Stroomvoorziening USB uitgang , 1 A Audio 2 x 5 W RMS Uitgangsvermogen FM radio Frequentiebereik 87,5 MHz - 108 MHz Frequentie 20 Hz - 20 Khz Frequentiebereik 174-240 MHz WLAN specificaties... - Page 175 VEILIGHEIDSINSTRUCTIESES Algemene veiligheidsinstructies • Lees de handleiding nauwkeurig door voordat u het apparaat in gebruik neemt en bewaar deze voor toekomstig gebruik. • Gebruik uitsluitend de spanning die op het typeplaatje van het apparaat is weergegeven. Verzeker uzelf ervan dat het stopcontact geaard is. •...
- Page 176 Stroomaansluiting • Let erop dat het apparaat niet op de stroomkabel staat. De kabel zou door het gewicht van het apapraat kunnen beschadigen en dit vormt een veiligheidsrisico. • Wanneer de aansluitkabel beschadigd is moet deze door de klantenservice van de fabrikant of door een ander, hiervoor gekwalificeerd, persoon worden vervangen om schade te voorkomen.
-
Page 177: Overzicht Apparaat
OVERZICHT APPARAAT Voorkant CD lader CD lader openen / sluiten IR sensor 10 Menu Instellingen Koptelefoonaansluiting Play / Pauze 12 Modus Stop – afspelen onderbreken 13 Scrollen / kiezen Vorige titel 14 Volume / Aan-Uit Volgende titel 15 IR ontvanger Display Achterkant 16 Stroomaansluiting... - Page 178 AFSTANDSBEDIENING...
- Page 179 Aan/ Stand-by 19 Klok Cijfertoetsen 20 Timer Repeat 21 Afspelen van titels Menu 22 Random play Mono/ Stereo 23 Terug Vorige zender zoeken 24 EQ Pijltjestoets omhoog 25 Volgende zender zoeken Volume - 26 Volume + Pijltjestoets omlaag 27 Invoer / Bevestigen 10 Directory - 28 Directory + CD/ USB...
- Page 180 Vervangen van de batterij van de afstandsbediening 1. Druk de afdekking van het batterijenvak naar onderen en haal de batterijhouder eruit. 2. Leg een LR6 batterij (AA alkaline – niet inbegrepen) in de batterijhouder van de afstandsbediening en let er bij het terugplaatsen op dat de + en – polariteitsmarkeringen op de batterij en die in het vak overeenkomen.
- Page 181 AANSLUITING Het apparaat op het stoomnet aansluiten 1. Aan de achterkant vindt u de audio-ingang en –uitgang (analoog), de optische uitgang (digitaal) en de coaxiale uitgang (digitaal) voor het aansluiten van een versterker of een hifi systeem. 2. Sluit de meegeleverde staafantenne aan. Tot de gewenste lengte uittrekken.
-
Page 182: Ingebruikname
INGEBRUIKNAME Apparaat aanzetten / uitschakelen 1. Druk op de stand-by toets op het apparaat of op de afstandsbediening om de radio aan te zetten. 2. Druk opnieuw op de stand-by toets om het apparaat weer in de stand-by modus te zetten. Modus kiezen Druk meerdere keren op de MODE toets op het apparaat of op de toetsen CD/USB, FM/DAB, AUDIO IN, internet en Spotify om tussen de modi... - Page 183 3. Hier kiest u de bron (DAB/ FM/ netwerk/ geen update) die het systeem gebruikt om datum en tijdstip te verkrijgen. Wanneer ‘Update from Network’ is geselecteerd gaat u door met de volgende stap om de tijdzone voor een correcte weergave in te stellen. Kies aansluitend ‘Daylight saving’...
-
Page 184: Systeeminstellingen
SYSTEEMINSTELLINGEN ∧/∨ Druk op de toets MENU om het menu weer te geven. Druk op PRESET om de systeeminstellingen te selecteren en druk ter bevestiging op de toets SELECT. Equalizer Dit apparaat ondersteunt talrijke equalizers en geluidseffecten. Druk op de toets EQ om in het menu bij de equalizerinstellingen te komen. - Page 185 SSID – kies het gewenste draadloze netwerk. Zoeken – zoek naar beschikbare netwerken.Manuele configuratie – kies Netwerkassistent een draadloos netwerk met DHCP actief/ inactief. Selecteer PBC op de radio en druk de PBC knop op de modem waarmee u wilt PBC wifi configuratie verbinden.
- Page 186 Actualiseren uit het DAB/FM netwerk of Automatisch geen actualisering. actualiseren Format instellen 12/ 24 uurs format. Tijdzone selecteren (alleen beschikbaar wanneer de automatische Tijdzone instellen netwerkactualisering geactiveerd is.) Zomer- en wintertijd selecteren (alleen beschikbaar wanneer de automatische Zomertijd / Wintertijd netwerkactualisering geactiveerd is.) Let op! De vooraf ingestelde automatische tijdactualisering is ‘Actualisering van het netwerk’.
-
Page 187: Achtergrondverlichting
LET OP! Wanneer u het systeem op fabrieksinstellingen terugzet worden alle door u opgeslagen radiozenders, internet- en vooraf ingestelde DAB+ en FM zenders gewist. Software Update ∧/∨ 1. Druk in de systeeminstellingsmodus op PRESET om ‘Software update’ te selecteren en druk ter bevestiging op SELECT. ∧/∨... - Page 188 INTERNETRADIO Dit toestel kan duizenden radiozenders en podcasts van over de hele wereld afspelen via de breedbandverbinding. Wanneer u de internet radiomodus heeft geselecteerd verbindt de radio zich met het Frontier Silicon internetradioportaal om een zenderlijst te downloaden. Wanneer een zender eenmaal selecteerd is verbindt de radio zich hier direct mee. Druk voor het selecteren van de internetradiomodus meermaals de toets MODE.
- Page 189 Favorieten worden in het internetradioportaal opgeslagen en zijn beschikbaar op alle inernetradio’s die met hetzelfde account worden gebruikt. Om uw favorieten te kunnen gebruiken moet u de radio in het internetradioportaal registreren. Voor de registratie gaat u vervolgens naar de homepage van het portaal (www.wifiradio-frontier.
- Page 190 Kies podcasts uit de volgende categorieën in het podcastmenu: locatie, genre. U kunt door het gebruik van sleutelwoorden ook Podcasts naar specifieke afleveringen van een podcast zoeken. Ook wanneer het internetradioportaal duizenden zenders omvat kan het voorkomen dat u een zender wilt horen die niet in de lijst voorkomt.
- Page 191 SPOTIFY PREMIUM Begroet Spotify Premium met ons Met Spotify premium kun je miljoenen liedjes luisteren zonder reclame. Je favoriete artiest, de laatste hits en nieuwe ontdekkingen – allemaal voor jou! Gewoon op ‘Play’ drukken en je hoort alle liedjes die je leuk vind met de beste geluidskwaliteit.
-
Page 192: Gebruik Van De Mediaspeler
GEBRUIK VAN DE MEDIASPELER De in het apparaat ingebouwde mediaspeler maakt het mogelijk om onbeschermde audiobestanden (AAC, MP3, WMA, FLAC) af te spelen die op een met het netwerk verbonden computer zijn opgeslagen. Om de muziek van de computer af te spelen dient u op de computer een gezamenlijk bestand of mediabibliotheek te creëren. - Page 193 Functie Toets Indrukken om het afspelen te pauzeren of om door te gaan / met afspelen. Drukken om het vorige nummer over te slaan. Ingedrukt houden om nummers terug te spoelen. Drukken om het komende nummer over te slaan. Ingedrukt ...
-
Page 194: Usb Weergave
USB WEERGAVE Wanneer een USB opslagmedium op het apparaat aangesloten is verschijnt in het display ‘USB disk attached – open folder?’. De SELECT toets indrukken en met YES bevestigen. ∧/∨ USB playback In mediaspeler modus PRESET drukken om de USB weergave te selecteren en SELECT indrukken om te kiezen. -
Page 195: Dab Radio
DAB RADIO Druk meerdere malen de MODE toets op het apparaat of de FM/DAB toets op de afstandsbediening om ‘DAB radio’ te selecteren. Het apparaat wisselt naar DAB modus en start automatisch de zoekfunctie. Tijdens het zoeken verschijnt op het display ‘Zoeken...’ en een balk die de voortgang en de tot dusver gevonden zenders aangeeft. - Page 196 DAB weergaveopties Telkens wanneer u de toets INFO op de afstandsbediening of op het apparaat indrukt zal het display de volgende weergaveopties laten zien: DLS programmatype - ensemble/ frequentie - signaalfout/ signaalsterkte – transmissiesnelheid/ codec/ zender – datum. Verwijderen van zenders die niet meer beschikbaar zijn Het is mogelijk om zenders te verwijderen die niet meer beschikbaar zijn..
-
Page 197: Audio-Instelling
FM RADIO Van DAB naar FM wisselen Om het apparaat van DAB naar FM modus te wisselen drukt u meerdere malen de MODE toets totdat FM wordt weergegeven. Het display laat u de frequentie zien. radio FM Radi o Automatisch zoeken Druk de TUNING toets in en houdt deze ingedrukt om te beginnen met de zenderzoektocht. - Page 198 ∧/∨ 3. Kies met PRESET voor ‘ja’ om mono te horen of kies voor ‘nee’ wanneer het toestel zelf voor mono of stereo dient te kiezen. 4. Bevestig uw keuze met de SELECT toets. CD WEERGAVE Compatibele disks Disctype Disclogo Media-inhoud CD-R (opname CD) Audio...
- Page 199 Weergave herhalen 1. Druk meerdere malen op de toets REPEAT om de weergavemodus van uw keuze te selecteren.. Actuele titel herhalen. Alle bestanden in de actuele ordner herhalen (alleen voor gegevensdiscs). Alle titels herhalen. 2. Druk de toets REPEAT opnieuw om het herhalen uit te schakelen. Random Play Alle titels kunnen in een willekeurig gekozen volgorde worden afgespeeld.
-
Page 200: Audio-Ingang (Line In)
AUDIO-INGANG (LINE IN) Het is mogelijk om muziek van externe bronnen af te spelen. 1. Sluit het externe apparaat aan op de cinch aansluitingen aan de achterkant. 2. Druk op de MODE toets op het apapraat om de Line-In modus in te schakelen. -
Page 201: Remote Network
REMOTE NETWORK Het apparaat kan via een remote network van je smartphone of tablet met iOS of Android worden bediend. Via het downloaden van de UNDOK app kunt u alle modi bekijken (internetradio, muziekweergave, DAB en FM) en de gewenste modus op uw tablet of smartphone selecteren. Voordat u de UNDOK app gebruikt dient u er zeker van te zijn dat uw smartphone/ tablet met hetzelfde wifi netwerk verbonden is als uw apparaat. - Page 202 SLAAPMODUS Deze functie maakt het mogelijk dat het apparaat na een vooraf ingestelde tijd zelfstandig in de stand-by modus gaat. 1. Om de functie te activeren drukt u meerdere malen de toets SLEEP. Elke keer dat u drukt verandert de tijd zoals u hieronder aangegeven: Sleep OFF 15MINS 30MINS...
- Page 203 WEKFUNCTIE De wekker instellen 1. Druk op de afstandsbediening op de ALARM toets. Het display geeft nu ‘Alarm (1 of 2): Uit [hh:mm]’ aan. ∧/∨ 2. Druk op PRESET om wekker nummer 1 of 2 te kiezen en druk op SELECT om de instelling van de volgende parameter uit te voeren.
- Page 204 Cha Tec GmbH Wa str 15 10179 Ber n www cha tec com De Spo ify sof wa e is o de wo pe aa de geb uiks ec e va de de , die op de vo ge de pagi a ku e wo de bekeke ps //www spo iy com/co ec / i d-pa y- ice ses A e ve me de me ke zij a de sme ke va de espec ieve ijke bed ijve...
-
Page 205: Instructies Voor Afvoer
INSTRUCTIES VOOR AFVOER Wanneer in uw land een wettelijke regeling geldt voor het afvoeren van elektrische en elektronische apparaten, wijst het hiernaast afgebeelde symbool, op het product zelf of op de verpakking, erop dat het betreffende product niet met het huisvuil afgevoerd mag worden.