
Manuels Connexes pour Baninni LIVING


Sommaire des Matières pour Baninni LIVING
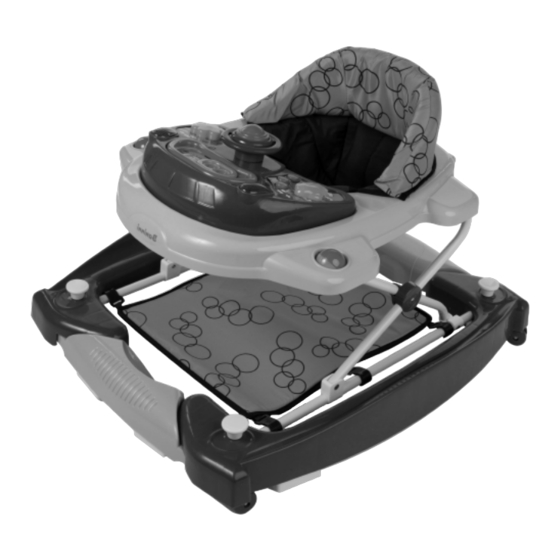
- Page 1 All manuals and user guides at all-guides.com LIVING HANDLEIDING MODE D’EMPLOI MANUAL GEBRAUCHSHANTLEITUG BABY WALKER CLASSIC “THE FIRST STEPS TO KNOWLEDGE”...
-
Page 2: Montage Richtlijnen
All manuals and user guides at all-guides.com HANDLEIDING BABY WALKER CLASSIC MONTAGE RICHTLIJNEN Volg, om veiligheidsredenen, onderstaande richtlijnen. Bij vragen of problemen met de loopwagen, neemt u contact op met de leverancier waar u het product kocht. Bij uw plaatstelijke verkoper kan u het best terecht om onmiddelijk te voldoen aan alle eisen. -
Page 3: Montage-Instructies
All manuals and user guides at all-guides.com MONTAGE-INSTRUCTIES MONTAGE VAN DE VEILIGHEIDSRUBBERTJES EN DE WIELEN (fig. 1): Plaats alle veiligheidsrubbertjes en wielen in de juiste openingen onderaan fig. 1 MONTAGE VAN DE DECORATIEVE DELEN (fig. 2). (kies methode A of B volgens de structuur van het product) fig. - Page 4 All manuals and user guides at all-guides.com HANDLEIDING MONTAGE VAN HET ZITJE (fig. 3) (kies methode A of B volgens de structuur van het product) fig. 3 A) Steek, volgens ‘a’ of ‘b’ hierboven, de pinnen van het zitje volledig in de openingen van het plateau.
- Page 5 All manuals and user guides at all-guides.com Plaats het multifunctioneel speelblad in het blad en bevestig met moeren. Druk de moeren omhoog en draai ze 90 graden. Zoals u op de foto van figuur 1 ziet, zijn er 4 snel-fix onderdelen (a, b) op zowel de voor-en achterzijde.
- Page 6 All manuals and user guides at all-guides.com HANDLEIDING HOOGTEREGELING (fig. 5): Plaats, om het loopwagentje in de juiste stand te brengen (3 standen) één hand bovenop het wagentje en draai de knop van de hoogteregelaar onder het bovenste plateau 90 graden met de andere hand.
- Page 7 All manuals and user guides at all-guides.com SCHOMMELFUNCTIE (fig. 6): Met veiligheidsrubbers onder de chassi en 4 globale wielen om te vermijden dat het kind van de trappen valt of dat het wagentje kantelt. 1. Trek de knop omhoog en draai en hem met de klok mee of tegen om hem te bevestigen op het hoogste punt.
- Page 8 All manuals and user guides at all-guides.com HANDLEIDING WAARSCHUWINGEN - Voor baby’s ouder dan 7 maanden en jonger dan 15 maanden. - Niet gebruiken voordat de baby zelfstandig kan zitten. - Laat het kind nooit onbewaakt achter! Houd het kind steeds in het oog als het in de loopwagen zit.
- Page 9 All manuals and user guides at all-guides.com geen schuur-of bleekmiddelen. - Als u het zitje om enige reden moet verwijderen, zorg er dan voor dat het nadien correct wordt teruggeplaatst en dat alle haken en bouten correct zijn teruggeplaatst. - De veiligheid en het gebruik van het loopwagentje moeten regelmatig gecontroleerd worden.
-
Page 10: Assembly Guidelines
All manuals and user guides at all-guides.com MANUAL BABY WALKER CLASSIC ASSEMBLY GUIDELINES For safety reasons please follow the instructions below Should you have any questions about your baby walker, or experience any difficulties, please contact the retailer from which you purchased the product. Your local retailer is in the best position to address any requirements. - Page 11 All manuals and user guides at all-guides.com ASSEMBLY INSTRUCTIONS ASSEMBLY OF SAFETY RUBBER AND WHEELS (pic. 1): Insert all the safety rubbers and wheels into the correct holes on the bottom. pic. 1 ASSEMBLY OF THE DECORATIVE PARTS (pic. 2). (Please choose method A or B according to different product structure) pic.
- Page 12 All manuals and user guides at all-guides.com MANUAL ASSEMBLY OF SEAT (pic. 3) (Please choose method A or B according to different product structure) pic. 3 A)Insert the pins on the seat into the holes of the tray completely. B) Insert the pins on the seat into the holes of the tray completely. And turn the white plastic claspers by 90 degree to ensure it was fixed tightly on the tray.
- Page 13 All manuals and user guides at all-guides.com Kindly remind: there are different kinds of toy trays are optional, follow the methods A,B,C to assemble them respectively A. Insert the multifunctional playboard into the tray and fix with bolts. B. Press the bolts up and turn the them 90 degrees.
- Page 14 All manuals and user guides at all-guides.com MANUAL HEIGHT ADJUSTMENT (pic. 5): to adjust the walker to desired position (3 positions available) place one hand on the top of the walker, and turn the red button on the height adjustment mechanism beneath the top tray by 90 degrees with the other hand, then push the button up, it will return to original position, the mechanism is locked automatically.
- Page 15 All manuals and user guides at all-guides.com 1. Pull up the bottun maximumly and turn it clockwise or counterclockwise a little to fix it at the highest point. Then turn both bottoms by 90 degrees, put the button back to the original position 2.
- Page 16 All manuals and user guides at all-guides.com MANUAL WARNING - For the baby up 7 months and under 15 months. - Do not use until baby can sit unassisted. - Never leave child unattended. Always keep child in view while in walker.
- Page 17 All manuals and user guides at all-guides.com performance. Ensure there is no damage, that the height adjustment is properly locked and the castors operate smoothly. - Adult assembly is necessary. - keep away from fire. - Non-rechargeable batteries are not to be charged. - Different types of batteries are not to be mixed.
- Page 18 All manuals and user guides at all-guides.com MODE D’EMPLOI BABY WALKER CLASSIC INSTRUCTIONS DE MONTAGE Pour des raisons de securite, suivez les directives suivantes En cas de questions ou de problèmes relatives au trotteur, contactez le fournisseur où vous avez acheté le produit.
- Page 19 All manuals and user guides at all-guides.com INSTRUCTIONS DE MONTAGE MONTAGE DES STOPPEURS DE SECURITE ET DES ROUES (image 1): Placez tous les stoppeurs de sécurité et les roues dans les trous correspondants de la base, voir image 1. Image 1 MONTAGE DES PIECES DECORATIVES (image 2).
- Page 20 All manuals and user guides at all-guides.com MODE D’EMPLOI MONTAGE DU SIEGE (image 3) (Choisissez la méthode A ou B en fonction de la structure du produit) image 3 A) Placez selon a où b ci-après, les broches du siège complètement dans les trous du plateau.
- Page 21 All manuals and user guides at all-guides.com A) Placez le jeu de jouets dans le plateau et fixez-le à l’aide d’écrous. B) Poussez les écrous vers le haut et tournez- les de 90 degrés. 1. Comme vous pouvez le voir sur la photo de la figure 1, il ya quatre composantes fast-Fix (a, b) à...
- Page 22 All manuals and user guides at all-guides.com MODE D’EMPLOI AJUSTEMENT DE LA HAUTEUR (image 5): Pour mettre le porteur en positions souhaitée (3 positions) placez une main sur le porteur et tournez le bouton rouge du mécanisme d’ajustement en-dessous du plateau supérieur de 90 degrés avec l’autre main.
- Page 23 All manuals and user guides at all-guides.com 1. Etirez le bouton maximalement et tournez-le un peu dans le sens des aiguilles d’une montre ou en contresens pour le fixer au point supérieur. Tournez alors les 2 fonds de 90°. Remettez le bouton dans sa position initiale.
-
Page 24: Avertissements
All manuals and user guides at all-guides.com MODE D’EMPLOI AVERTISSEMENTS - Pour les bébés âgés de 7 mois à 15 mois. - Ne pas utiliser avant que le bébé peut rester assis tout seul. - Ne laissez jamais l’enfant sans surveillance! Surveillez toujours l’enfant lorsqu’il se trouve dans le porteur. - Page 25 All manuals and user guides at all-guides.com les crochets et écrous soient remis en place correctement. - Contrôlez régulièrement la sécurité et les prestations du porteur. Rassurez-vous qu’il n’y pas de dommages, que la hauteur est correctement verrouillée et que les roues fonctionnent convenablement.
- Page 26 All manuals and user guides at all-guides.com GEBRAUCHSANLEITUNG BABY WALKER CLASSIC MONTAGEANLEITUNG Bitte befolgen sie aus sicherheitsgründen die hinweise in dieser anleitung Wenn Sie Fragen haben über, oder Probleme haben mit dem Lauflerngerät, nehmen Sie Kontakt auf mit Ihr lokaler Händler, bei dem Sie das Produkt gekauft haben.
- Page 27 All manuals and user guides at all-guides.com MONTAGEHINWEISE MONTAGE DER GUMMITEILE UND RÄDER (ABB. 1): Alle Gummiteile und Räder auf der Unterseite in den richtigen Löchern stecken, wie in der Abbildung 1 gezeigt. fig. 1 MONTAGE DER DEKORATIVEN TEILE (ABB. 2). (Whälen Sie, abhängig von der Struktur des Produkts, Methode A oder B) fig.
- Page 28 All manuals and user guides at all-guides.com GEBRAUCHSANLEITUNG MONTAGE DES SITZES (ABB. 3) (Whälen Sie, abhängig von der Struktur des Produkts, Methode A oder B) fig. 3 A) Wie in der Abbildung a), b) unten gezeigt, die Bolzen des Sitzes in den Löchern des oberen Rahmens stecken.
- Page 29 All manuals and user guides at all-guides.com A) Das Spielbrett im Rahmen einsetzen und mit den Muttern befestigen. B) Die Muttern hochschieben und um 90 drehen. C) 1. Wie Sie auf dem Foto in Abbildung 1 sehen können, gibt es vier Fast-fix Komponenten (a, b) sowohl auf der Vorder- und Rückseite.
- Page 30 All manuals and user guides at all-guides.com GEBRAUCHSANLEITUNG HÖHENEINSTULLUNG (ABB. 5): Um das Lauflerngerät auf die gewünschte Höhe einzustellen (3 positionen) legen Sie eine Hand auf das Gerät und drehen Sie mit der anderen hand die rote Taste der Hebel unter dem Rahmen um 90 Grad. Um die Höhe einzustellen, die Taste hochschieben.
- Page 31 All manuals and user guides at all-guides.com 1. Der knopf so hoch wie möglich ziehen, im Uhrzeigersinn oder gegen den Uhrzeigersinn drehen und an der höchsten Stelle befestigen. Die zwei Rahmen um 90 Grad drehen. Der Knopf wieder in die ursprüngliche Position bringen.
- Page 32 All manuals and user guides at all-guides.com GEBRAUCHSANLEITUNG WARNUNG - Geeignet für Babys zwischen 7 und 15 Monaten. - Nicht geeignet für Kinder, die nicht alleine aufrecht sitzen können. - Lassen Sie Ihr Kind nie unbeaufsichtigt! Behalten Sie Ihr Kind während der Verwendung des Lauflerngerätts immer im Auge.
- Page 33 All manuals and user guides at all-guides.com - Dass Gestell des Lauflerngeräts kann mit einem feuchten Tuch und milder Seife gereingt werden. Keine scharfen Reinigungsmittel oder Bleichmittel verwenden. Falls Sie den Sitz aus irgendwelchem Grund herausnhemen müssen, vergewissern Sie sich, dass Sie den Sitz nachher wieder korrekt zusammenstellen und das alle Haken und Bolzen korrekt montiert werden.
- Page 34 All manuals and user guides at all-guides.com LIVING “THE FIRST STEPS TO KNOWLEDGE” Voortstraat 12 2490 Balen - Belgium www.baninni.com Find us on Facebook & Instagr.am Imported by Baninni...