
Manuels Connexes pour Mettler Toledo FiveGo


Sommaire des Matières pour Mettler Toledo FiveGo
- Page 1 Operating Instructions Bedienungsanleitung Mode d‘emploi Instrucciones de manejo Istruzioni d'uso 取扱説明書 FiveGo™ DO meter FG4...
-
Page 5: Table Des Matières
Table of contents Table of contents Introduction Safety measures Installation Installing the batteries FiveGo™ clip Installing the IP54 cover Operating the FiveGo™ DO meter The display Key controls Calibration 4.3.1 Running a one-point calibration 4.3.2 Running a two-point calibration Sample measurement Temperature measurement 4.5.1... -
Page 7: Introduction
Other acces- sories such as electrodes, solutions, or a carry bag are of course also available from METTLER TOLEDO. You will find many helpful and exciting features in this meter: ●... -
Page 8: Safety Measures
Measures for your operational safety ● Never unscrew the two halves of the housing! ● Have the meter serviced only by METTLER TOLEDO Service! ● Any spillage should be wiped off immediately! Some solvents might cause cor- Caution ro sion of the housing. -
Page 9: Installation
Replace the battery cover. 3.2 FiveGo™ clip The FiveGo™ clip is an electrode holder that can be placed next to the display on either side of the hous- ing. Mounting the clip is easy: a) Remove the cover from the clip’s fixing point (available on both sides of the meter). - Page 10 Installation 3.3 Installing the IP54 cover Use the small plastic tool as shown in the diagram: DO meter FG4...
-
Page 11: Operating The Fivego™ Do Meter
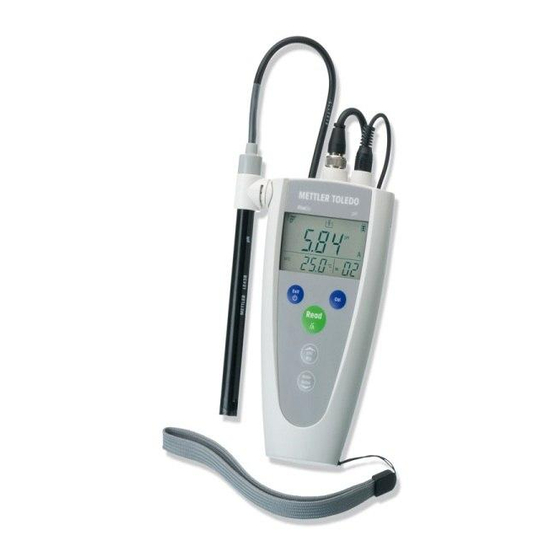
Operating the FiveGo™ DO meter 4 Operating the FiveGo™ DO meter 4.1 The display Electrode condition icon Slope: 80125% Slope: 7079% Slope: 6069% Electrode is in good condition Electrode needs cleaning Electrode is faulty Calibration icon - calibration in progress... - Page 12 Start meter self-diagnosis 4.3 Calibration The FiveGo™ DO meter allows you to run a 1point or 2point calibration. The first calibration must be run in air. The second calibration (optional) must be run in a zero-oxygen solution. 4.3.1 Running a onepoint calibration Before starting the calibration, make sure that the correct barometric pressure is entered (see "Baro-...
- Page 13 Operating the FiveGo™ DO meter e) Press READ to finish the calibration. – or – Press EXIT to reject the calibration. Preparing a zero oxygen solution A zero oxygen solution is prepared by dissolving a zero oxygen tablet in 40 mL of deionized water and stir ring for 5 minutes (see "Sensors, solutions and accessories"...
- Page 14 Operating the FiveGo™ DO meter 4.6 Using the memory 4.6.1 Storing a reading The FiveGo™ FG4 DO meter can store up to 30 endpointed results. Press STO when the measurement has endpointed. M01 indicates that one result has been stored.
- Page 15 Operating the FiveGo™ DO meter c) Press READ to confirm your selection. – or – d) Press EXIT to return to the measurement screen. 4.7.2 Barometric pressure entry In the Setup menu, after setting the barometric pressure unit, the value for the barometric pressure is shown.
-
Page 16: Maintenance
Maintenance 5 Maintenance 5.1 Meter maintenance Never unscrew the two halves of the housing! The meters do not require any maintenance other than an occasional wipe with a damp cloth and the replace ment of dead batteries. The housing is made of acrylonitrile butadiene styrene/polycarbonate (ABS/PC). -
Page 17: Sensors, Solutions And Accessories
Sensors, solutions and accessories 6 Sensors, solutions and accessories Parts Order No. FiveGo™ DO meter 51302956 Shorting plug BNC 51302859 FiveGo™ electrode clip 51302960 Rubber clip covers (for electrode clip slot) 51302961 Battery cover 51302962 Wrist strap 51302964 FiveGo™ carry bag... -
Page 18: Specifications
1 mm Hg 1 mbar 1hPa sure range Calibration para me ter Calibration points 2 points FiveGo™ DO meter – general information Power require Ratings Batteries ments 6 V DC, 5 mA Powered with bat- ter ies: 4 x AAA/LR3 1.5 V or NiMH 1.2... -
Page 19: Appendix
Appendix 8 Appendix 8.1 Error messages Error Description Resolution Err 0 Memory access error Reset to factory settings Err 1 Self-diagnosis failed Repeat the self-diagnosis procedure and make sure that you fin ish pressing all five keys within two minutes. Err 2 Measured values out of range Make sure that the electrode wetting cap has been removed and the electrode is properly connected and placed in the... - Page 21 Inhaltsverzeichnis Inhaltsverzeichnis Einführung Sicherheitsmassnahmen Inbetriebnahme Einlegen der Batterien FiveGo™-Aufsteckclip Anbringen der IP54-Abdeckung Bedienung des DOMessgerätes FiveGo™ Die Anzeige Tastenregelung Kalibrieren 4.3.1 Durchführung einer Einpunkt-Kalibrierung 4.3.2 Durchführung einer Zweipunkt-Kalibrierung Messen von Proben Temperaturmessung 4.5.1 Automatische Temperaturkompensation (ATC) 4.5.2 Manuelle Temperaturkompensation (MTC) Verwendung des Speichers 4.6.1...
-
Page 23: Einführung
Einführung 1 Einführung METTLER TOLEDO bedankt sich für das Vertrauen, das Sie dem Unternehmen mit dem Kauf dieses Mess ge rä tes geschenkt haben. Wir entwickeln alle unsere Produkte unter den Gesichtspunkten Be die nungs- freund lich keit, Zuverlässigkeit der Ergebnisse und ergonomisches Design. -
Page 24: Sicherheitsmassnahmen
Ätzungsgefahr Massnahmen zur Betriebssicherheit ● Die beiden Hälften des Gehäuses niemals auseinander schrauben! ● Lassen Sie das Messgerät nur vom METTLER TOLEDO Service warten! ● Spritzer sofort entfernen! Einige Lösemittel können am Gehäuse Korrosion ver- Achtung ur sa chen. ●... -
Page 25: Inbetriebnahme
Bringen Sie die Batterieabdeckung wieder an. 3.2 FiveGo™-Aufsteckclip Der FiveGo™-Clip ist ein Elektrodenhalter, der an beiden Seiten des Gehäuses neben der Anzeige be fes- tigt werden kann. Das Anbringen des Clips ist einfach: a) Die Abdeckung des Clip-Befestigungspunkts entfernen (auf beiden Seiten des Messgerätes vor han- den). - Page 26 Inbetriebnahme 3.3 Anbringen der IP54-Abdeckung Das kleine Plastikwerkzeug wie abgebildet verwenden: DO meter FG4...
-
Page 27: Bedienung Des Domessgerätes Fivego
Bedienung des DO-Messgerätes FiveGo™ 4 Bedienung des DOMessgerätes FiveGo™ 4.1 Die Anzeige Symbol für Elektrodenzustand Steilheit: 80125 % Steilheit: 7079 % Steilheit: 6069 % Elektrode ist in gutem Zu- Elektrode muss gereinigt wer- Elektrode ist defekt stand Symbol für Kalibrierung - wird während einer Kalibrierung angezeigt Symbol für Messung - wird während einer Messung oder Kalibrierung angezeigt... - Page 28 Selbstdiagnose des Messgeräts starten 4.3 Kalibrieren Mit dem DO-Messgerät FiveGo™ können 1- oder 2-Punkt-Kalibrierungen durchgeführt werden. Die erste Ka li brie rung muss in Luft ausgeführt werden. Die zweite Kalibrierung (optional) muss in einer sau er stoff- frei en Lösung erfolgen.
- Page 29 Bedienung des DO-Messgerätes FiveGo™ Das Symbol für Messung wird angezeigt. Das Messgerät bestimmt den Endwert der Kalibrierung gemäß der vorgewählten End punkt me- tho de nach der Stabilisierung des Signals. d) READ drücken. Der entsprechende Kalibrierungswert wird angezeigt und gespeichert; auf dem Display wird das Sym bol für Messung nun nicht mehr angezeigt.
- Page 30 Der Vorgabewert ist 25 °C. 4.6 Verwendung des Speichers 4.6.1 Einen Messwert speichern Das DO-Messgerät FiveGo™ FG4 kann bis zu 30 Endwertergebnisse speichern. Die Taste STO drücken, wenn die Messung den Endpunkt erreicht hat. Die Anzeige M01 gibt an, dass ein Ergebnis gespeichert wurde.
- Page 31 Bedienung des DO-Messgerätes FiveGo™ CLr blinkt. c) Nochmals READ drücken, um die Löschung zu bestätigen. – oder – d) EXIT drücken, um in den Messmodus zurückzukehren ohne Daten zu löschen. 4.7 Luftdruck Für die Kalibrierung und Messung ist der tatsächliche Luftdruck sehr wichtig, da er den Wert des gelösten Sau er stoffs beeinflusst.
- Page 32 Bedienung des DO-Messgerätes FiveGo™ Drücken Sie gleichzeitig die Tasten Read und Cal und halten Sie sie gedrückt, bis das Messgerät den voll stän di gen Bildschirm anzeigt. Alle Symbole werden nacheinander blinkend angezeigt. Sie können überprüfen, ob alle Symbole kor rekt angezeigt werden.
-
Page 33: Wartung
Wartung 5 Wartung 5.1 Wartung des Messgerätes Die beiden Hälften des Gehäuses niemals auseinander schrauben! Die Messgeräte benötigen keine Wartung ausser gelegentlichem Abwischen mit einem feuchten Tuch und dem Wechseln der verbrauchten Batterien. Das Gehäuse ist aus Akrylnitril-Butadien-Styrol/Polykarbonat ge fer tigt. Dieses Material wird von einigen organischen Lösungsmitteln angegriffen, z.B. von Toluol, Xylol und Methylethylketon (MEK). -
Page 34: Sensoren, Lösungen Und Zubehör
Sensoren, Lösungen und Zubehör 6 Sensoren, Lösungen und Zubehör Teile Best.Nr. DO-Messgerät FiveGo™ 51302956 BNC-Kurzschlussstecker 51302859 Elektroden-Aufsteckclip für FiveGo™ 551302960 Gummiabdeckungen für Clip (Öffnung für Elektroden-Aufsteckclip) 51302961 Batterieabdeckung 51302962 Trageschlaufe 51302964 Tragetasche für FiveGo™ 51302966 Elektrodenkappen IP54 51302965 Dichtungssatz (O-Ringe für Batteriefach) 51302967 Bedienungsanleitung für FG4... -
Page 35: Spezifikationen
Luftdruckbereich 1 mm Hg 1 mbar 1 hPa Ka li brie rungs pa ra me ter Kalibrierpunkte 2 Punkte DOMessgerät FiveGo™ – allgemeine Information Stromversorgung Einstufung Batterien 6 V DC, 5 mA Stromversorgung durch Batterien: 4 x AAA/LR3 1,5 V... -
Page 36: Anhang
Anhang 8 Anhang 8.1 Fehlermeldungen Fehler Beschreibung Auflösung Err 0 Speicherzugriffsfehler Auf ursprüngliche Werkseinstellungen zurückstellen Err 1 Selbstdiagnose fehlerhaft Wiederholen Sie die gesamte Selbstdiagnose und achten Sie dar auf, dass alle fünf Tasten innerhalb von 2 Minuten ge- drückt werden. Err 2 Gemessene Werte außerhalb Stellen Sie sicher, dass die Wässerungskappe der Elektrode... - Page 37 Table des matières Introduction Mesures de sécurité Installation Installation des piles Clip FiveGo™ Installation du cache IP54 Utilisation de l’oxymètre FiveGo™ L’écran Commandes de touche Etalonnage 4.3.1 Effectuer un étalonnage à un point 4.3.2 Effectuer un étalonnage à deux points Mesurage d’échantillon...
-
Page 39: Introduction
Introduction 1 Introduction Merci d’avoir acheté cet instrument de mesure METTLER TOLEDO. Facilité d’utilisation, fiabilité des ré sul tats et design ergonomique – tels sont nos objectifs concernant nos produits. Les instruments de mesure de la gamme "Five" ont un excellent rapport prix/performance et de nom- breux accessoires utiles (p. -
Page 40: Mesures De Sécurité
Mesures pour la sécurité de fonctionnement ● Ne dévissez jamais les deux moitiés du boîtier! ● Ne faites appel qu'au Service après vente METTLER TOLEDO! ● Tout liquide renversé doit être immédiatement essuyé! Certains solvants peu- Prudence vent corroder le boîtier. -
Page 41: Installation
Remettez le couvercle des piles en place. 3.2 Clip FiveGo™ Le clip FiveGo™ est un porte-électrodes qui peut être placé à proximité de l’écran de chaque côté du boî- tier. Le montage du clip est facile : a) Retirez le couvercle du point de fixation du clip (disponible des deux côtés de l’instrument de me... - Page 42 Installation 3.3 Installation du cache IP54 Utilisez le petit outil en plastique comme indiqué sur le schéma : DO meter FG4...
-
Page 43: Utilisation De L'oxymètre Fivego
Utilisation de l’oxymètre FiveGo™ 4 Utilisation de l’oxymètre FiveGo™ 4.1 L’écran Symbole d’état de l’électrode Pente : 80125% Pente : 7079% Pente : 6069% l’électrode est en bon état l’électrode a besoin d’être net- l’électrode est défectueuse toyée Symbole d’étalonnage - étalonnage en cours Symbole de Mesurage - mesurage ou étalonnage en cours... - Page 44 Démarrer l’auto-diagnostic de l’instru- ment de mesure 4.3 Etalonnage L’oxymètre FiveGo™ vous permet d’effectuer un étalonnage à 1 ou 2 points. Le premier étalonnage doit s’effectuer dans l’air. Le deuxième étalonnage (en option) doit s’effectuer dans une solution zéro oxy- gène.
- Page 45 Utilisation de l’oxymètre FiveGo™ c) Appuyez sur CAL. Le symbole de mesurage apparaît. instrument de mesure atteint le point final selon le mode de point final présélectionné après que le signal soit stabilisé. d) Appuyez sur READ. La valeur d’étalonnage appropriée est affichée et mémorisée ; Le symbole de mesure disparaît de l’affichage.
- Page 46 Le réglage par défaut est 25 °C. 4.6 Utilisation de la mémoire 4.6.1 Mémorisation d’une mesure L’oxymètre FiveGo™ FG4 peut mémoriser jusqu’à 30 résultats terminés. Appuyez sur STO lorsque le point final de la mesure est atteint. M01 indique qu’un résultat a été mémorisé.
- Page 47 Utilisation de l’oxymètre FiveGo™ 4.7 Pression barométrique Pour l’étalonnage et les mesures, la pression barométrique actuelle est très importante étant donné qu’el- le influence la valeur d’oxygène dissous. Assurezvous d’entrer toujours la pression barométrique cor recte. 4.7.1 Réglage de l’unité de pression barométrique L’instrument peut afficher la pression barométrique en trois unités : millibar (mbar), hectopascal (hPa)
- Page 48 Utilisation de l’oxymètre FiveGo™ Les symboles clignotent les uns après les autres. Vous pouvez contrôler si tous les symboles sont affichés correctement. La prochaine étape consiste à vérifier que les touches fonctionnent correctement. Ceci nécessite l’interac- tion de l’utilisateur. Lorsque clignote, cinq symboles sont affichés.
-
Page 49: Maintenance
Maintenance 5 Maintenance 5.1 Maintenance de l'appareil de mesure Ne dévissez jamais les deux moitiés du boîtier! Les appareils de mesure nécessitent aucune maintenance si ce n‘est un nettoyage périodique avec un chif fon humide et le remplacement des piles usées. Le boîtier est en acrylonitrile butadiène sty rène/po ly- car bo nate (ABS/PC). -
Page 50: Capteurs, Solutions Et Accessoires
Caches en caoutchouc pour clip (pour l’encoche du clip d’électrode) 51302961 Couvercle de pile 51302962 Bracelet anti-statique 51302964 Sac de transport FiveGo™ 51302966 Capuchons d’électrode IP54 51302965 Kit d’étanchéité (joints toriques pour le compartiment de pile) 51302967 Mode d‘emploi FG4... -
Page 51: Caractéristiques Techniques
1 mm Hg 1 mbar 1hPa ba ro mé trique Paramètres d’éta lonnage Etalonnage 2 points Oxymètre FiveGo™ – informations générales Alimentation élec Indices Piles trique 6 V c.c., 5 mA Alimenté par des piles: 4 x AAA/LR3 1.5 V ou NiMH 1.2 V re char... -
Page 52: Annexe
Annexe 8 Annexe 8.1 Messages d’erreur Erreur Description Résolution Err 0 Erreur d’accès mémoire Rétablir l’état de livraison Err 1 Echec de l’auto-diagnostic Répétez la procédure d’auto-diagnostic et veillez à appuyer sur toutes les cinq touches en l’espace de deux minutes. Err 2 Valeurs mesurées hors plage Assurezvous que le capuchon d’humidification a été... - Page 53 Índices de contenidos Introducción Medidas de seguridad Instalación Colocación de las pilas Pinza FiveGo™ Instalación de la cubierta IP54 Manejo del medidor de oxígeno disuelto FiveGo™ La pantalla Controles de las teclas Calibrar 4.3.1 Realizar una calibración a un punto 4.3.2 Realización de una calibración a dos puntos...
-
Page 55: Introducción
Introducción 1 Introducción Gracias por adquirir este medidor de METTLER TOLEDO. Facilidad de empleo, resultados fiables y di se ño ergonómico: estos son los retos para nuestros productos. Los medidores de la serie Five ofrecen una excelente relación calidad/precio y su equipamiento están- dar in clu ye varios accesorios de gran utilidad (p. -
Page 56: Medidas De Seguridad
● No desatornille nunca las dos mitades de la carcasa. ● ¡Realice mantenimientos del medidor únicamente con el Servicio Técnico de METTLER TOLEDO! Precaución ● Si se derrama alguno de estos productos, limpie inmediatamente. Algunos sol ven tes pueden causar corrosión en la carcasa. -
Page 57: Instalación
Vuelva a colocar la cubierta. 3.2 Pinza FiveGo™ La pinza FiveGo™ es un soporte del electrodo que puede colocarse al lado de la pantalla en cualquiera de los lados de la carcasa. La pinza se monta fácilmente: a) Quite la cubierta desde el punto de fijación de la pinza (disponible a ambos lados del medidor). - Page 58 Instalación 3.3 Instalación de la cubierta IP54 Use la pequeña herramienta de plástico como se muestra en el diagrama: DO meter FG4...
-
Page 59: Manejo Del Medidor De Oxígeno Disuelto Fivego
Manejo del medidor de oxígeno disuelto FiveGo™ 4 Manejo del medidor de oxígeno disuelto FiveGo™ 4.1 La pantalla Icono Condiciones del electrodo Pendiente: 80125% Pendiente: 7079% Pendiente: 6069% El electrodo está en buenas El electrodo necesita limpieza El electrodo falla con di cio nes Icono Calibración: calibración en curso... - Page 60 Iniciar autodiagnóstico del medidor 4.3 Calibrar Con el medidor DO FiveGo™ puede realizar una calibración a 1 ó a 2 puntos. La primera calibración de be realizarse en aire. La segunda calibración (opcional) debe realizarse en una solución sin oxígeno.
- Page 61 Manejo del medidor de oxígeno disuelto FiveGo™ Una vez que la señal se haya estabilizado, el medidor indicará el resultado de acuerdo con el mo do de punto final preseleccionado. d) Pulse READ. Se visualiza y guarda el valor de calibración relevante; el icono de medición desaparece de la pan ta lla.
- Page 62 4.6 Manejo de la memoria 4.6.1 Almacenar una lectura El medidor DO FiveGo™ FG4 puede almacenar hasta 30 resultados de valores medidos. Pulse la tecla STO cuando la medición haya llegado al punto final. M01 indica que se ha guardado un resultado.
- Page 63 Manejo del medidor de oxígeno disuelto FiveGo™ 4.7 Presión barométrica La presión barométrica real es muy importante para la calibración y las mediciones, ya que influye en el va lor del oxígeno disuelto. Asegúrese de que siempre introduce la presión barométrica correcta.
- Page 64 Manejo del medidor de oxígeno disuelto FiveGo™ El paso siguiente consiste en comprobar que las teclas funcionan correctamente. Para ello, se requiere la interacción del usuario. Cuando parpadea, se muestran cinco iconos. a) Pulse las cinco teclas en cualquier orden.
-
Page 65: Mantenimiento
Mantenimiento 5 Mantenimiento 5.1 Mantenimiento del medidor No desatornille nunca las dos mitades de la carcasa. Los medidores no requieren mantenimiento, sólo alguna limpieza ocasional con un paño húmedo y la sus ti tu ción de las pilas gastadas. La caja está fabricada con acrilonitrilo butadieno-es ti re no/po li car bo- na to (ABS/PC). -
Page 66: Sensores, Soluciones Y Accesorios
Cubiertas de goma de la pinza (para la ranura de la pinza para el electrodo) 51302961 Cubierta del compartimiento de las pilas 51302962 Correa muñequera 51302964 Maletín para transportar en el campo FiveGo™ 51302966 Cubiertas del electrodo IP54 51302965 Kit de sellado (juntas tóricas para el compartimiento de las pilas) 51302967... -
Page 67: Especificaciones
Parámetro de ca li bra ción Puntos de ca li bra A 2 puntos ción Medidor DO FiveGo™ – Información general Requisitos de po Régimen Pilas ten cia 6 V CC, 5 mA Alimentado con pi las: 4 x AAA/ LR3 1,5 V ó... -
Page 68: Apéndice
Apéndice 8 Apéndice 8.1 Mensajes de errores Error Descripción Resolución Err 0 Error de acceso a la memoria Restablecer configuración de fabrica Err 1 Fallo de auto-diagnóstico Repita el procedimiento de autodiagnosis y asegúrese de que ha terminado de pulsar las cinco teclas durante dos minutos. Err 2 Valores medidos fuera del Asegúrese de que el capuchón de humectación del electrodo... - Page 69 Indice Introduzione Misure di sicurezza Installazione Inserimento delle batterie Clip FiveGo™ Montaggio delle protezioni IP54 Utilizzo dello strumento FiveGo™ DO Il display Regolazioni tramite pulsanti Calibrazione 4.3.1 Svolgimento di una calibrazione su un punto 4.3.2 Svolgimento di una calibrazione su due punti...
-
Page 71: Introduzione
Introduzione 1 Introduzione METTLER TOLEDO Vi ringrazia per avere acquistato questo strumento. Tutti i nostri prodotti sono stati svi lup pa ti allo scopo di garantirvi facilità d’uso, affidabilità dei risultati e design ergonomico. Gli strumenti della serie Five hanno un ottimo rapporto qualità-prezzo e sono dotati di numerosi utili ac- ces so ri (per esempio la clip portaelettrodo e il cinturino da polso), compresi nella dotazione di fornitura stan dard. -
Page 72: Misure Di Sicurezza
● Non smontare mai la struttura esterna. ● Per qualsiasi intervento di manutenzione sul misuratore, rivolgersi esclu si va- men te al servizio assistenza METTLER TOLEDO. Attenzione ● Evitare qualsiasi fuoriuscita di campione. Alcuni solventi potrebbero corrodere la struttura esterna. -
Page 73: Installazione
Rimettere a posto il coperchio. 3.2 Clip FiveGo™ La clip FiveGo™ è un porta-elettrodo che può essere posizionato su uno dei due lati dello strumento. Il mon tag gio della clip è molto semplice: a) Rimuovere il coperchio dal punto di fissaggio della clip (disponibile su entrambi i lati dello stru men... - Page 74 Installazione 3.3 Montaggio delle protezioni IP54 Utilizzare la protezione in plastica come indicato nella figura: DO meter FG4...
-
Page 75: Utilizzo Dello Strumento Fivego™ Do
Utilizzo dello strumento FiveGo™ DO 4 Utilizzo dello strumento FiveGo™ DO 4.1 Il display Icona Condizioni dell’elettrodo Pendenza: 80125% Pendenza: 7079% Pendenza: 6069% L’elettrodo è in buono stato L’elettrodo deve essere pulito L’elettrodo è difettoso Icona Calibrazione - calibrazione in corso Icona Misurazione - misurazione o calibrazione in corso Icona Setup i- lo strumento è... - Page 76 Avviare l’auto-diagnosi dello strumento 4.3 Calibrazione FiveGo™ DO permette lo svolgimento di una calibrazione su 1 punto o su 2 punti. La prima calibrazio- ne de ve essere eseguita in aria. La seconda calibrazione (opzionale) deve essere eseguita in una solu- zione a zero ossigeno.
- Page 77 Utilizzo dello strumento FiveGo™ DO c) Premere CAL. Appare l’icona Misurazione. Lo strumento raggiunge il punto finale in base alla relativa modalità selezionata in precedenza (ma nua le o automatico), dopo che il segnale si è stabilizzato. d) Premere READ.
- Page 78 4.6 Utilizzo della memoria 4.6.1 Memorizzazione di una valore di misura FiveGo™ FG4 DO può memorizzare fino a 30 risultati relativi al punto finale. Premere STO quando la misurazione ha raggiunto il punto finale. M01 indica che è stato memorizzato un risultato.
- Page 79 Utilizzo dello strumento FiveGo™ DO d) Premere EXIT per tornare alla modalità di misurazione senza cancellare alcun dato. 4.7 Pressione barometrica La pressione barometrica effettiva è molto importante per la calibrazione e le misurazioni, dato che in- flui sce sul valore dell’ossigeno disciolto. Assicurarsi di avere sempre inserito la pressione barometrica cor ret ta.
- Page 80 Utilizzo dello strumento FiveGo™ DO Una dopo l’altra lampeggiano tutte le icone. Verificare che tutte le icone vengano visualizzate cor ret ta men te. Il passaggio successivo è la verifica del corretto funzionamento di tutti i pulsanti. A tale scopo scopo è...
-
Page 81: Manutenzione
Manutenzione 5 Manutenzione 5.1 Manutenzione del misuratore Non smontare mai la struttura esterna. I misuratori non richiedono alcuna manutenzione oltre alla pulizia occasionale con un panno umido ed al la sostituzione delle batterie scariche. La struttura esterna è realizzata in acrilonitrile butadiene sti re ne/ po li car bo na to (ABS/PC). -
Page 82: Sensori, Soluzioni E Accessori
Sensori, soluzioni e accessori 6 Sensori, soluzioni e accessori Componenti N. d’ordine Misuratore FiveGo™ DO 51302956 Protezione per connettore BNC 51302859 Clip porta-elettrodi per FiveGo™ 51302960 Coperchi in gomma per l'alloggiamento della clip porta-elettrodi 51302961 Coperchio vano batterie 51302962 Cinturino da polso 51302964 Valigetta per FiveGo™... -
Page 83: Specifiche
Parametri di ca li bra zio ne Punti d ca li bra 2 punti zio ne Misuratore FiveGo™ DO – Informazioni generali Requisiti di ali Categorie Batterie men ta zio ne 6 V c.c., 5 mA Alimentato a bat- te rie: 4 x AAA/ LR3 1.5 V o NiMH... -
Page 84: Appendice
Appendice 8 Appendice 8.1 Messaggi di errore Errore Descrizione Soluzione Err 0 Errore di accesso al sistema Ripristinare le condizioni di fabbrica Err 1 Auto-diagnosi fallita Ripetere tutta la procedura di auto-diagnosi e facendo at ten- zio ne che tutti i cinque pulsanti vengano premuti entro due mi nu ti. - Page 85 目次 目次 はじめに 安全にお使いいただくために 据付 バッテリーの取り付け ファイブゴー電極クリップ IP54コネクションキャップの取り付け ファイブゴー溶存酸素メーターの操作 ディスプレイ キー操作 校正 4.3.1 1点校正の実施 4.3.2 2点校正の実施 サンプル測定 温度測定 4.5.1 自動温度補償(ATC) 4.5.2 手動温度補償(MTC) メモリの使用 4.6.1 測定結果の保存 4.6.2 保存結果の呼び出し 4.6.3 保存結果の削除 大気圧 4.7.1 気圧単位の設定 4.7.2 大気圧の入力 塩分濃度の入力 自己診断 メンテナンス メーターのメンテナンス センサの保守 廃棄 センサ、溶液、アクセサリ...
- Page 87 はじめに 1 はじめに メトラー・トレドのメーターをご購入いただきありがとうございました。本製品は人間工学 に基づいた優れた設計で、最適な使いやすさを実現しています。 ファイブシリーズメーターはコストパフォーマンスに優れているだけでなく、電極クリッ プ、リストストラップ等の便利な付属品が含まれています。センサや無酸素液用錠剤、キャ リーバッグをはじめとするその他のアクセサリーもご用意しています。 ファイブゴーSG4メーターは次のような特徴をもつ、使いやすいメーターです。 ● 測定値が安定すると自動的に終点を検出する自動終点測定 ● 保護等級IP54防水規格に適合した設計 ● 塩分濃度および気圧に対する補正機能 溶存酸素メーターFG4...
- Page 88 安全にお使いいただくために 2 安全にお使いいただくために ご使用になる方を保護するための安全対策 ● 爆発の危険がある場所での使用は絶対に避けてください!メーターは 気密構造になっておりません(ガスの侵入による内部の腐食、爆発す る危険があります)。 爆発の危険 ● 化学薬品や溶剤を使用する際は、製造元の指示に従い、現場の安全規 則に従ってください! 腐食の危険 メーター本体の安全対策 ● セブンゴーの本体は、決して分解しないでください! メーターの整備はメトラー・トレドのサービス担当者以外はおこなわ ● ないでください! 注意 ● セブンゴーに液体が付着した場合は、すぐに拭き取ってください!溶 剤の中には本体外部の腐食の原因となるものがあります。 ● 下記の環境での使用は避けてください。 • 強い振動がある場所 直射日光が当たる場所 • • 湿度が80%以上の場所 • 腐食性ガスが発生、またはそのおそれのある場所 • 気温が5°C以下または40°C以上の場所 • 強い電磁波がある場所 溶存酸素メーターFG4...
- Page 89 据付 3 据付 簡単に短時間で据付できます。 a) メーターと付属品を箱から取り出します。 b) 試験成績証、保証書などの書類は安全な場所に保管してください。 3.1 バッテリーの取り付け a) バッテリーカバー取り付け部を矢印の方向へ引き、 b) フタを持って取り外します。 c) バッテリーケース内の記号に沿って電池を入れます。 d) バッテリーカバーを元の場所に取り付けます。 3.2 ファイブゴー電極クリップ ファイブゴー電極クリップはハウジングに設けられたディスプレイの両側どちらにも取り付 けられる電極ホルダーです。クリップの取り付けは簡単です。 a) メーターの両側にあるクリップ取り付け部のカバー1つを外します。 b) クリップの取り付け部にクリップを押し込んで取り付けます。 c) センサーのシャフトをクリップの上側から差し込みます。 溶存酸素メーターFG4...
- Page 90 据付 3.3 IP54コネクションキャップの取り付け 図のように小さなプラスチック工具を使用します。 溶存酸素メーターFG4...
- Page 91 ファイブゴー溶存酸素メーターの操作 4 ファイブゴー溶存酸素メーターの操作 4.1 ディスプレイ センサ状態アイコン スロープ: 80~125% スロープ: 70~79% スロープ: 60~69% センサは良い状態 センサの洗浄が必要 センサ不良 校正アイコン - 校正が行われているときに表示されます。 測定アイコン - 測定または校正が行われているときに表示されます。 設定アイコン - 設定モード中に表示されます。 バッテリーアイコン -電池の残量を3段階(完全充電、50%、完全放電)で表示し ます。 溶存酸素量または校正(mg/L、ppm、%)、気圧の入力(mbar、hpa、mmHg) 、塩分濃度の入力 自動/手動温度補償の表示 終点の安定表示 、自動終点測定の表示 測定時の温度もしくは校正時のオフセット値 校正点(Cal)、メモリー番号(MR)、エラー表示(Err) 4.2 キー操作 キー 押して離す 3秒間押し続ける ON/OFFまた 電源を入れる...
- Page 92 ファイブゴー溶存酸素メーターの操作 READ/AUTO 測定の開始および終了 自動終点/手動終点の切り替え ENDPOINTス 設定確認、入力値の保存 、 イ ッチ STORE/RECAL L 現在の測定値をメモリーに保存 保存データの呼び出し スイッチ 設定値を上げる メモリー内を上方向にスクロール MODE/SETUP ス %、mg/L、ppmへの切り替え 設定モードへの切り替え イッチ 設定中に設定値を下げる 保存データを呼び出す際 は、MODE/SETUPキーを3秒間押 メモリー内を下方向にスクロール して、別の画面を表示させます。 メーター自己診断開始 4.3 校正 ファイブゴー溶存酸素メーターは、1点または2点校正が可能です。1点目の校正は空気中 で行う必要があります。2点目の校正(オプション)は無酸素溶液の中で行う必要がありま す。 4.3.1 1点校正の実施 校正を始める前に、正確な気圧が入力されていることを確認してください(「気圧の入 力」を参照のこと)。 a) センサを空気中に用意します。 b) CALを押します。 校正アイコンと測定アイコンが画面に表示されます。...
- Page 93 ファイブゴー溶存酸素メーターの操作 c) CALを押します。 測定アイコンが表示されます。 メーターはあらかじめ選択しておいた終点モードに基づいて終点を決定します。( 手動終点のときはREADを押す。) d) READを押します。 メーターが該当する校正値を表示し、保存します。 測定アイコンが消えます。 オフセットと、スロープが3秒間表示されます。 e) READキーを押して校正を終了します。 あるいは、 EXITキーを押して校正結果を拒否します。 無酸素溶液の準備 無酸素錠剤を40 mLの純水に溶かし、5分間攪拌します(注文番号は「センサー、溶液、ア クセサリ」を参照のこと)。 4.4 サンプル測定 溶存酸素の測定値は%、mg/L、ppmの各単位で表示が可能です。単位は、測定前、測定中、 測定後にかかわらずMODEキーを押すと切り替わります。 ● 安定した値を得るには、サンプルを攪拌する必要があります。 ● センサ全体における最小流量が5 cm/秒であることを確認してください。 a) センサをサンプルに入れます。 b) READキーを押して測定を開始します。 小数点が点滅し、画面にサンプルの溶存酸素量が表示されます。 メーターは、デフ ォルトで自動終点に設定されています。 溶存酸素センサの出力が安定したら自動的 に小数点の点滅が終わり、ディスプレイの溶存酸素値が確定し、 が表示されます。 c) READを長押しして、自動終点モードから手動終点モードに切り替えます。 d) READを押して、手動終点で測定を終了します。...
- Page 94 ファイブゴー溶存酸素メーターの操作 a) MTC温度を設定するには、画面に設定アイコンが表示されるまでMODE/SETUPを繰り返 し押します。 b) READを3回押すと、ºCが表示されます。 または を押し、ºCと°Fを切り替えます。 d) READを押して設定を確定します。 または を押し、温度値を調整します。 READを押して設定を確定します。 あるいは、 g) EXITを押し、メニューに戻ります。 デフォルトの設定は25°C です。 4.6 メモリの使用 4.6.1 測定結果の保存 ファイブゴー溶存酸素メーターFG4は最大30件の測定結果を保存することができます。 測定結果を保存するときは、測定が終了時に、STOキーを押します。 M01は1件の結果が保存されたことを示します。 M30が表示されているときにSTOキーを押すとFULが表示され、メモリがいっぱいで あることを示します。 次のデータを保存するにはメモリ内に保存されている結果を削除する必要があります(「保 存結果の削除」を参照)。 4.6.2 保存結果の呼び出し a) 測定をしていないときに、RCLキーを長押しして、メモリから保存している結果を呼び 出します。 メーターには測定結果が表示されます。 または キーを押し、保存されている結果と結果の間をスクロールします。 R01からR30の番号は、どの結果が表示されているのかを表しています。 c) MODE/SETUPを3秒間押し続けます。 測定値、入力された圧力の値、塩分濃度値が交互に表示されます。...
- Page 95 ファイブゴー溶存酸素メーターの操作 c) 再びREADを押して削除を確定します。 あるいは、 d) EXITを押し、データを削除しないで測定モードに戻ります。 4.7 大気圧 校正と測定をする際に、実際の大気圧を知ることは溶存酸素量に影響を与えるため非常に重 要です。 常に正しい大気圧の値が入力されていることを確認してください。 4.7.1 気圧単位の設定 メーターは気圧をミリバール(mbar)、ヘクトパスカル(hPa)、ミリ水銀(mmHg)の3 単位で表示できます。 a) MODE/SETUPを長押しします。画面に設定アイコンが表示されます。 気圧の単位が表示されます。 と を使用して、mbar、hPa、mmHgを切り替えます。 c) READを押して選択を確定します。 あるいは、 d) EXITを押し、測定画面に戻ります。 4.7.2 大気圧の入力 気圧の単位を設定した後、設定メニューに気圧が表示されます。 と を押し、値を調整します。 b) READを押し、入力を確定します。 あるいは、 c) EXITを押し、測定画面に戻ります。 4.8 塩分濃度の入力 塩分濃度は溶存酸素値に影響を及ぼすため、適切な塩分濃度値を加えることが重要です。 メ ーターが補正できる水溶液の塩分濃度の範囲は0~50 pptです。塩分濃度のデフォルトの値 は0.0 pptですが、以下の手順で変更することができます。...
- Page 96 ファイブゴー溶存酸素メーターの操作 その後各アイコンが次々に点滅します。すべてのアイコンが正常に表示されているか 確認してください。 次のステップではキーが正しく機能しているかをチェックします。次の手順のとおり、メー ターの指示にしたがってキーを操作します。 アイコンが点滅すると、アイコンが5個表示されます。 a) 5個のキーを任意の順番で押します。 キーを押すとアイコンが画面から消えます。 b) 全てのアイコンが消えるまで続けて残りのキーを押します。 自己診断が完了するとPASが表示されます。 あるいは、 自己診断が失敗した場合にはErr 1が表示されます(「エラーメッセージ」を参照のこ と)。 溶存酸素メーターFG4...
- Page 97 メンテナンス 5 メンテナンス 5.1 メーターのメンテナンス メーターは、決して分解しないでください! ファイブゴーは、ときおり湿った布で拭き、バッテリーを交換する以外は、メンテナンス の必要はありません。本体外部の材質はアクリロニトリル・ブタジエン・スチレン/ポリ カーボネート(ABS/PC)製です。 この材質はトルエン、キシレン、メチルエチルケトン (MEK)等の有機溶媒の影響で変質することがあります。 ファイブゴーに液体が付着した場合は、すぐに拭き取ってください。 5.2 センサの保守 溶存酸素センサは酸素濃度を電気的に測定します。また、溶存酸素センサは溶媒に含まれる 酸素濃度に比例してmVで出力を発生します。酸素は膜を通じて拡散し、陰極(カソード) で消費され、電流が生じます。消費される酸素量は低いが、測定を正しく行うためにサンプ ルが常にセンサの膜に動きを持った状態で触れている必要があります。 長い寿命と高精度を保つには、センサを正しく取り扱う必要があります。使用後は、清潔な 純水または脱イオン水でセンサを洗浄し、柔らかいティッシュペーパーで拭き取ります。セ ンサを長期間保存する場合は、センサが標準付属品の保護キャップに入っていることを確認 してください。また、膜に付いた付着物は、酸素が膜を通じて拡散する妨げとなるため、テ ィッシュペーパーで取り除いてください。 注意 センサキャップ内の電解液はNaCl(塩化ナトリウム)10%です。洗浄溶液および電解液は、 毒性や腐食性を持つ物質を扱う場合と同様に慎重にお取り扱いください。 5.3 廃棄 欧州の電気・電子機器廃棄物リサイクル指令(WEEE)2002/96/ECの要 求に従い、本装置を一般廃棄物として廃棄してはなりません。これはEU 以外の国々に対しても適用されますので、各国の該当する法律に従って ください。 本製品は、各地域の条例に定められた電気・電子機器のリサイクル回収 所に廃棄してください。 ご不明な点がおありの場合は、行政の担当部署または本装置の購入店へ お問い合わせください。 本装置を他人へ譲渡する場合は (私的使用、商業/工業使用を問わず) 、本廃棄規定の内容についても正しくお伝えください。 環境保護へのご協力を何卒よろしくお願いいたします。 溶存酸素メーターFG4...
- Page 98 センサ、溶液、アクセサリ 6 センサ、溶液、アクセサリ 部品 品番 ファイブゴー溶存酸素メーター 51302956 BNC短絡プラグ 51302859 電極クリップ 51302960 クリップカバー(電極クリップスロット用) 51302961 バッテリーカバー 51302962 ファイブゴー リストストラップ 51302964 キャリーバッグ 51302966 IP54コネクションカバー 51302965 ファイブゴーシーリングキット 51302967 取扱説明書(FG4) 51710761 クイックガイド(FG4) 51710769 LE611、DOセンサ、ケーブル(1.5 m) 51340401 LE612、DOセンサ、ケーブル(5 m) 51340402 LE621、DOセンサ(温度センサ内蔵)、ケーブル(1.5 m) 51340405 LE622、DOセンサ(温度センサ内蔵)、ケーブル(5 m) 51340406 温度センサ NTC30kΩ 51300164 無酸素液用錠剤...
- Page 99 仕様 7 仕様 ファイブゴー溶存酸素メーター 測定パラメータ % mg/L 温度 測定表示範囲 0.0 ~ 199.9%、 0.0 ~ 45.0 mg/L 0.0 ~ 45.0 ppm 0 ~ 50 °C 200 ~ 400% 分解能 1% 0.1 mg/L 0.1 ppm 0.1 °C 再現性 ± 1% ± 1% ±...
- Page 100 別表 8 別表 8.1 エラーメッセージ エラー 詳細 分解能 Err0 メモリのアクセスエラー 工場出荷時の設定にリセットします。 Err 1 自己診断エラー 自己診断の手順を繰り返し、すべてのキーを2分以内 に押してください。 Err2 測定値が範囲外 センサの保護キャップが取り外され、サンプル溶液内 に入っていることを確認してください。 次にセンサがメーターに正しく接続されていることを 確認します。 Err3 測定温度が範囲外(0 ~ 温度を校正または測定範囲内に維持してください(0 50℃) ~50℃)。 Err4 Cal 2が範囲外 正しい標準液を使用していることを確認してくださ い。 Err5 Cal 1が範囲外 正しい標準液を使用していることを確認してくださ い。 Err 9 測定結果はすでに保存済...
- Page 104 Subject to technical changes. *51710761* © Mettler-Toledo AG 2009 51710761 0909/2.52 Printed in China MettlerToledo AG, Analytical, Sonnenbergstrasse 74, CH8603 Schwerzenbach, Switzerland Tel. ++41 (0)44 806 77 11, Fax ++41 (0)44 806 73 50, Internet: www.mt.com...