Télécharger Imprimer la page

Publicité

Les langues disponibles
  • FR

Les langues disponibles

  • FRANÇAIS, page 23

Liens rapides

AXIS P13 Series
AXIS P1364 Network Camera
AXIS P1365 Network Camera
Installation Guide

Publicité

loading

Sommaire des Matières pour Axis P13 Serie

  • Page 1 AXIS P13 Series AXIS P1364 Network Camera AXIS P1365 Network Camera Installation Guide...
  • Page 2 Every care has been taken in the preparation of this • Restrictions of Hazardous Substances (RoHS) Directive document. Please inform your local Axis office of any 2011/65/EU. See Disposal and Recycling 3. inaccuracies or omissions. Axis Communications AB cannot A copy of the original declaration of conformity may be be held responsible for any technical or typographical errors obtained from Axis Communications AB.
  • Page 3 • find answers to resolved problems in the FAQ database. 地してください。 Search by product, category, or phrase • report problems to Axis support staff by logging in to Korea your private support area AXIS P1364: 이 기기는 업무용(A급) 전자파적합기 •...
  • Page 5 AXIS P13 Series Safety Information Read through this Installation Guide carefully before installing the product. Keep the Installation Guide for future reference. Hazard Levels DANGER Indicates a hazardous situation which, if not avoided, will result in death or serious injury.
  • Page 6 Battery The Axis product uses a 3.0 V CR2032 lithium battery as the power supply for its internal real-time clock (RTC). Under normal conditions this battery will last for a minimum of five years. Low battery power affects the operation of the RTC, causing it to reset at every power-up. When the battery needs replacing, a log message will appear in the product’s server report.
  • Page 7 WARNING • Risk of explosion if the battery is incorrectly replaced. • Replace only with an identical battery or a battery which is recommended by Axis. • Dispose of used batteries according to local regulations or the battery manufacturer's instructions.
  • Page 9 AXIS P13 Series Installation Guide This Installation Guide provides instructions for installing AXIS P1364/P1365 Network Camera on your network. For other aspects of using the product, see the User Manual available at www.axis.com Installation Steps 1. Make sure the package contents, tools and other materials necessary for the installation are in order.
  • Page 10 AXIS P13 Series Hardware Overview Status LED Built-in microphone microSD card slot Audio in Audio out Network connector (PoE) Power LED Network LED Control button 10 I/O connector 11 Iris connector 12 Power connector (DC) 13 RS485/422 connector...
  • Page 11 AXIS P13 Series AXIS P1364 AXIS P1365 Focus ring Lock screw for focus ring Zoom puller LED Indicators Note • The Status LED can be configured to be unlit during normal operation. To configure, go to Setup > System Options > Ports & Devices > LED. See the online help for more information.
  • Page 12 AXIS P13 Series Power LED Indication Green Normal operation. Amber Flashes green/amber during firmware upgrade. Status LED Behavior for Focus Assistant The status LED flashes when the Focus Assistant is active. Indication Color The image is out of focus. Adjust the lens.
  • Page 13 (LPS) with either a rated output power limited to ≤100 W or a rated output current limited to ≤5 A. Audio Connector The Axis product has the following audio connectors: • Audio in (pink) – 3.5 mm input for a mono microphone, or a line-in mono signal.
  • Page 14 Enabling the Focus Assistant. Press and very quickly release the Control button. • Resetting the product to factory default settings. See page 20. • Connecting to an AXIS Video Hosting System service or AXIS Internet Dynamic DNS Service. For more information about these services, see the User Manual. Specifications Operating Conditions The Axis product is intended for indoor use.
  • Page 15 AXIS P13 Series Function Notes Specifications 0 V DC 0 V DC (-) DC output Can be used to power auxiliary equipment. 12 V DC Note: This pin can only be used as power out. Max load = 50 mA 3–...
  • Page 16 AXIS P13 Series RS485/422 Connector Two 2-pin terminal blocks for RS485/RS422 serial interface. The serial port can be configured to support: • Two-wire RS485 half duplex • Four-wire RS485 full duplex • Two-wire RS422 simplex • Four-wire RS422 full duplex point to point...
  • Page 17 AXIS P13 Series Connection Diagrams I/O Connector 0 V DC (-) DC output 12 V, max 50 mA I/O configured as input I/O configured as output Install the Hardware NO TICE TICE TICE • Due to local regulations or the environmental and electrical conditions in which the product is to be used, a shielded network cable (STP) may be appropriate or required.
  • Page 18 7. Aim the camera in the right direction and use the supplied Allen key to tighten the ball joint. Access the Product AXIS IP Utility and AXIS Camera Management are recommended methods for finding Axis products on the network and assigning them IP addresses in Windows®. Both applications are free and can be downloaded from www.axis.com/techsup The product can be used with most operating systems and browsers.
  • Page 19 • If movements in front of the camera cannot be avoided, the Focus Assistant should not be used. • If the control button is not released within two seconds, AXIS Dynamic DNS Service is enabled instead of the Focus Assistant.
  • Page 20 For the latest version of this document, see www.axis.com The User Manual is available at www.axis.com Visit www.axis.com/techsup to check if there is updated firmware available for your network product. To see the currently installed firmware version, go to Setup > About.
  • Page 21 AXIS P13 Series Warranty Information For information about Axis’ product warranty and thereto related information, see www.axis.com/warranty/...
  • Page 23 AXIS P13 Series Informations sur la sécurité Lisez attentivement ce guide d'installation avant d'installer l'appareil. Conservez le guide d'installation pour toute référence ultérieure. Niveaux de risques DANGER Indique une situation dangereuse qui, si elle n'est pas évitée, entraînera le décès ou des blessures graves.
  • Page 24 éviter d'endommager le produit. Batterie Le produit Axis utilise une batterie au lithium CR2032 3,0 V comme alimentation de son horloge en temps réel interne (RTC). Dans des conditions normales, cette batterie a une durée de vie minimale de cinq ans.
  • Page 25 La batterie doit être remplacée uniquement en cas de besoin, et pour ce faire, contactez l'assistance technique d'Axis à l'adresse www.axis.com/techsup et obtenir de l'aide. Les piles boutons 3,0 V au lithium contiennent du 1,2-diméthoxyéthane, éthylène glycol diméthyl éther (EGDME), CAS N°...
  • Page 27 AXIS P13 Series Guide d’installation Ce guide d'installation vous explique comment installer la caméra réseau AXIS P1364/P1365 sur votre réseau. Pour toute autre information relative à l’utilisation du produit, consultez le manuel de l’utilisateur disponible sur le site www.axis.com Procédures d’installation 1.
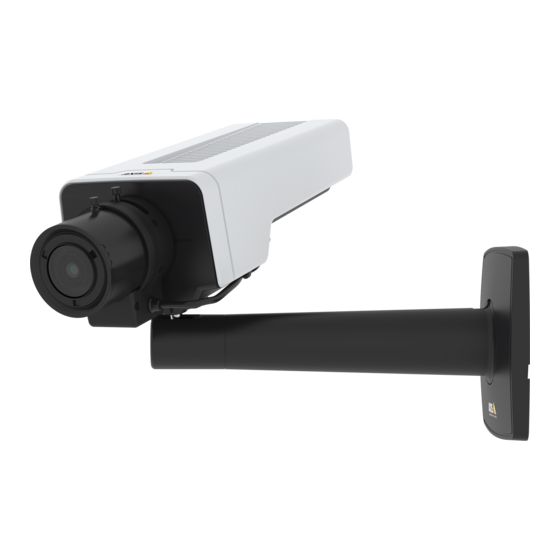
  • Page 28 AXIS P13 Series Aperçu du matériel Voyant d'état Microphone intégré Logement de carte microSD Entrée audio Sortie audio Connecteur réseau (PoE) Voyant d’alimentation Voyant DEL réseau Bouton de commande 10 Connecteur E/S 11 Connecteur de l’iris 12 Connecteur d'alimentation (CC)
  • Page 29 AXIS P13 Series AXIS P1364 AXIS P1365 Bague de mise au point Vis de verrouillage de la bague de mise au point Commande de zoom Voyants Note • Le voyant d'état peut être éteint pendant le fonctionnement normal. Pour ce faire, rendez-vous dans Setup >...
  • Page 30 AXIS P13 Series Voyant d'alimentation Indication Vert Fonctionnement normal. Orange Le voyant vert/orange clignote pendant la mise à niveau du microprogramme. Comportement du voyant d’état pour l'assistant de mise au point Le voyant d’état clignote lorsque l’assistant de mise au point est activé.
  • Page 31 Storage > SD Card (Configuration > Options du système > Stockage > Carte SD) et cliquez sur Unmount (Démonter). Cet appareil est compatible avec des cartes microSD/microSDHC/microSDXC (cartes non fournie). Pour obtenir des conseils sur la carte SD, rendez-vous sur www.axis.com...
  • Page 32 • Réinitialisation du produit aux paramètres d’usine par défaut. Cf. page 38. • Connexion au service du Système d'hébergement vidéo AXIS ou au service AXIS Internet Dynamic DNS. Pour plus d'informations sur ces services, reportez-vous au Manuel de l'utilisateur. Caractéristiques techniques Conditions d'utilisation Le produit Axis est uniquement destiné...
  • Page 33 AXIS P13 Series Connecteurs Connecteur d'E/S Bloc terminal à 4 broches Pour un exemple de schéma, consultez Schémas de connexion page 35. Fonction Broche Notes Caractéristiques 0 V CC 0 V CC (-) Sortie CC Peut servir à alimenter le matériel 12 V CC auxiliaire.
  • Page 34 AXIS P13 Series Connecteur audio Connecteurs audio 3,5 mm (stéréo) 1 Pointe 2 Anneau 3 Manchon Masse Entrée audio Entrée micro/ligne Sortie audio Masse Sortie ligne (mono) Connecteur RS485/422 Blocs terminaux à 2 broches pour interface série RS485/RS422. Le port série peut être configuré pour la prise en charge de : •...
  • Page 35 AXIS P13 Series Schémas de connexion Connecteur d'E/S 0 V CC (-) Sortie CC 12 V, maxi. 50 mA Entrée/sortie configurée comme entrée Entrée/sortie configurée comme sortie Installation du matériel A A A VIS • Les réglementations locales ou les conditions environnementales et électriques dans lesquelles le produit est utilisé...
  • Page 36 Utilisez le produit Si vous souhaitez rechercher des produits Axis sur le réseau ou leur affecter des adresses IP sous Windows®, nous recommandons l’utilisation des applications AXIS IP Utility et AXIS Camera Management. Ces deux applications sont gratuites et peuvent être téléchargées depuis www.axis.com/techsup...
  • Page 37 • Si les mouvements devant la caméra ne peuvent pas être évités, l’assistant de mise au point ne doit pas être utilisé. • Si vous ne relâchez pas le bouton de commande dans les deux secondes, le service AXIS Dynamic DNS sera activé au lieu de l’assistant de mise au point.
  • Page 38 AXIS P13 Series 4. Installez la caméra ou placez-la de façon à ce qu’elle ne puisse pas bouger. 5. Desserrez la commande de zoom en la tournant dans le sens inverse des aiguilles d’une montre. Déplacez la commande pour régler le niveau du zoom. Resserrez la commande de zoom.
  • Page 39 Visitez le centre d’apprentissage en ligne Axis sur le site www.axis.com/academy pour en savoir plus sur les formations, les webinaires, les tutoriels et les guides. Informations sur la garantie Pour obtenir de plus amples informations sur la garantie du produit AXIS et des renseignements connexes, allez sur le site www.axis.com/warranty/...
  • Page 41 AXIS P13 Series Sicherheitsinformation Lesen Sie das Installationshandbuch sorgfältig durch bevor sie das Produkt installieren. Bewahren Sie das Installationshandbuch für zukünftige Zwecke auf. Gefährdungsstufen GEFAHR Weist auf eine gefährliche Situation hin, welche, falls nicht verhindert, zu Tod oder schweren Verletzungen führt.
  • Page 42 Außengehäusen installiert werden. • Lagern Sie das Axis Produkt in einer trockenen und belüfteten Umgebung. • Achten Sie darauf, dass das Axis Produkt weder Stößen noch starkem Druck ausgesetzt ist. • Installieren Sie das Produkt nicht an instabilen Halterungen, Oberflächen oder Wänden.
  • Page 43 Produkts, wenn ein Batteriewechsel erforderlich ist. Weitere Informationen über den Serverbericht finden Sie auf den Setup-Seiten des Produkts, oder wenden Sie sich an den Axis Support. Die Batterie sollte nur bei Bedarf ersetzt werden. Wenden Sie sich in diesem Fall an den Axis Support unter www.axis.com/techsup.
  • Page 45 AXIS P13 Series Installationsanleitung In dieser Anleitung wird die Installation der AXIS P1364/P1365 Netzwerk-Kamera in Ihrem Netzwerk beschrieben. Weitere Informationen zur Nutzung dieses Produkts finden Sie im Benutzerhandbuch unter www.axis.com. Installationsschritte 1. Stellen Sie sicher, dass die Packungsinhalte, Werkzeuge und andere notwendige Materialien für die Installation in Ordnung sind.
  • Page 46 AXIS P13 Series Übersicht über die Hardware Status-LED Integriertes Mikrofon microSD-Karteneinschub Audioeingang Audioausgang Netzwerkanschluss (PoE) Netz-LED Netzwerk-LED Steuertaste 10 E/A-Anschluss 11 Blendenanschluss 12 Netzanschluss (DC) 13 RS485/422-Anschluss...
  • Page 47 AXIS P13 Series AXIS P1364 AXIS P1365 Fokusring Feststellschraube für den Fokusring Zoomregler LEDs Beachten • Die Status-LED kann so eingestellt werden, dass sie während des Normalbetriebs nicht leuchtet. Diese Konfiguration können Sie unter Setup > System Options > Ports &...
  • Page 48 AXIS P13 Series Netz-LED Bedeutung Normaler Betrieb. Grün Gelb Blinkt grün/gelb bei der Firmware-Aktualisierung. Verhalten der LED-Statusanzeige für den Fokus-Assistenten Die Status-LED blinkt, wenn der Fokus-Assistent aktiviert ist. Farbe Bedeutung Bild unscharf. Objektiv einstellen. Bild fest scharf. Gelb Feineinstellung des Objektivs vornehmen.
  • Page 49 Schutzkleinspannung (SELV) kompatible Stromquelle mit begrenzter Leistung (LPS) mit einer Nennausgangsleistung von ≤100 W oder einem dauerhaft auf ≤5 A begrenzten Nennausgangsstrom. Audioanschlüsse Das Axis-Produkt ist mit den folgenden Audioanschlüssen ausgestattet: • Audioeingang (rosa) – 3,5-mm-Anschluss für ein Monomikrofon oder ein Monosignal.
  • Page 50 Aktivierung des Fokus-Assistenten. Drücken Sie kurz die Steuertaste. • Zurücksetzen des Produkts auf die Werkseinstellungen. Siehe Seite 56. • Verbinden mit einem AXIS Video Hosting System-Service oder einem AXIS Internet Dynamic DNS-Service. Weitere Informationen zu diesen Diensten finden Sie in der Bedienungsanleitung. Technische Daten Betriebsbedingungen Das Axis Produkt ist für die Verwendung in Innenräumen konzipiert.
  • Page 51 AXIS P13 Series Anschlüsse E/A-Anschluss 4-poliger Anschlussblock Ein Beispielschaltbild finden Sie unter Anschlussschaltbilder auf Seite 53. Funktion Kon- Hinweise Technische Daten takt 0 V DC 0 V DC (-) Gleichstrom- Kann für die Stromversorgung von 12 V DC ausgang Zusatzgeräten verwendet werden.
  • Page 52 AXIS P13 Series Audioanschlüsse 3,5-mm- Audioanschlüsse (stereo) 2 Ring 1 Spitze 3 Schaft Audioeingang Masse Mikrofon-/Leitungseingang Audioausgang Masse Leitungsausgang (mono) RS485/422-Anschluss Zwei 2-polige Anschlussblöcke für serielle Schnittstellen vom Typ RS485/RS422. Der serielle Anschluss kann in den folgenden Anschlussmodi konfiguriert werden: •...
  • Page 53 AXIS P13 Series Anschlussschaltbilder E/A-Anschluss 0 V (-) DC DC-Ausgang 12 V, max. 50 mA E/A als Eingang konfiguriert E/A als Ausgang konfiguriert Installieren der Hardware HINWEIS HINWEIS HINWEIS • Aufgrund örtlicher Vorschriften oder der umweltbedingten und elektrischen Bedingungen, unter denen das Produkt verwendet wird, kann ein abgeschirmtes Netzwerkkabel (STP) empfehlenswert oder notwendig sein.
  • Page 54 Kugelgelenk mithilfe des mitgelieferten Inbusschlüssels. Zugriff auf das Produkt Für die Suche nach Axis Produkten im Netzwerk und zur Zuweisung einer IP-Adresse unter Windows® werden AXIS IP Utility und AXIS Camera Management empfohlen. Beide Anwendungen sind kostenlos und können von unserer Website unter www.axis.com/techsup heruntergeladen werden.
  • Page 55 Fokus-Assistenten nicht verwenden. • Wenn Sie die Steuertaste nicht innerhalb von zwei Sekunden loslassen, wird anstelle des Fokus-Assistenten der AXIS Dynamic DNS Service aktiviert. • Wenn die Kamera so montiert ist, dass die Betätigung der Steuertaste nicht möglich ist, können Sie den Fokus-Assistenten trotzdem verwenden. Befolgen Sie die Anweisungen.
  • Page 56 AXIS P13 Series 3. Wenn die Bildschärfe bereits eingestellt wurde, klicken Sie auf Reset (Zurücksetzen), um das Auflagemaß zurückzusetzen. 4. Fixieren oder platzieren Sie die Kamera so, dass sie nicht bewegt werden kann. 5. Lösen Sie den Zoomregler, indem Sie ihn entgegen dem Uhrzeigersinn drehen. Bewegen Sie den Regler und stellen Sie die Zoomstärke ein.
  • Page 57 Firmware-Version zu sehen, gehen Sie auf Setup > About (Setup > Über). Besuchen Sie das Axis-Schulungszentrum www.axis.com/academy für anregende Schulungen, Webinare, Lernprogramme und Anleitungen. Gewährleistungsinformationen Informationen zur Gewährleistung der Axis Produkte und andere, hierzu relevante Informationen, finden Sie unter www.axis.com/warranty/...
  • Page 59 AXIS P13 Series Informazioni di sicurezza Leggere con attenzione la guida all'installazione prima di installare il dispositivo. Conservare questo documento per usi futuri. Livelli di pericolo PERICOLO Indica una situazione pericolosa che, se non evitata, provoca morte o lesioni gravi.
  • Page 60 • Durante il trasporto del dispositivo Axis, utilizzare l'imballaggio originale o equivalente per evitare danni al dispositivo. Batteria Il dispositivo Axis utilizza una batteria al litio da 3,0 V CR2032 come alimentazione per il suo real-time clock (RTC) interno. In condizioni normali questa batteria avrà una durata minima di cinque anni.
  • Page 61 • Rischio di esplosione se la batteria viene sostituita in modo errato. • Sostituire solo con una batteria identica o una batteria consigliata da Axis. • Smaltire le batterie usate in base alle normative locali o alle istruzioni del produttore...
  • Page 63 AXIS P13 Series Guida all'installazione La presente Guida all'installazione fornisce le istruzioni necessarie per installare la telecamera di rete AXIS P1364/P1365 nella rete in uso. Per ulteriori informazioni sull'utilizzo del prodotto, consultare la Guida per l'utente disponibile all'indirizzo www.axis.com. Procedura di installazione 1.
  • Page 64 AXIS P13 Series Panoramica dell'hardware LED di stato Microfono incorporato Slot per scheda microSD Ingresso audio Uscita audio Connettore di rete (PoE) LED di alimentazione LED di rete Pulsante di comando 10 Connettore I/O 11 Connettore del diaframma 12 Morsettiera di alimentazione...
  • Page 65 AXIS P13 Series AXIS P1364 AXIS P1365 Ghiera di messa a fuoco Vite di arresto della ghiera di messa fuoco Levetta zoom Indicatori LED Nota • Lo stato del LED può essere configurato per essere spento durante il normale funzionamento. Per configurarlo, selezionare Setup > System Options > Ports & Devices >...
  • Page 66 AXIS P13 Series LED di alimentazione Indicazione Verde Normale utilizzo. Giallo Luce lampeggiante verde/gialla: aggiornamento firmware. Comportamento del LED di stato per Focus Assistant Il LED di stato lampeggia quando Focus Assistant è attivo. Colore Indicazione Rosso L'immagine è sfocata.
  • Page 67 > Storage > SD Card (Configurazione > Opzioni di sistema > Archiviazione > Scheda SD) e fare clic su Unmount (Smonta). Questo dispositivo supporta schede microSD/microSDHC/microSDXC (scheda di memoria non inclusa). Per i consigli sulla scheda SD, visitare il sito Web www.axis.com.
  • Page 68 • Ripristino del dispositivo alle impostazioni predefinite di fabbrica. Consultare pagina 74. • Collegamento a un servizio AXIS Video Hosting System o AXIS Internet Dynamic DNS Service. Per ulteriori informazioni su questi servizi, consultare il Manuale Utente. Dati tecnici Condizioni di funzionamento Il dispositivo Axis è...
  • Page 69 AXIS P13 Series Connettori Connettore I/O Morsettiera a 4 pin Per un esempio di schema, consultare Schema delle connessioni alla pagina 71. Funzione Note Specifiche 0 V CC 0 V CC (-) Uscita CC Può essere utilizzato anche per alimentare 12 V CC una periferica ausiliaria.
  • Page 70 AXIS P13 Series Connettore audio Connettori audio da 3,5 mm (stereo) 1 Punta 2 Anello 3 Guaina Ingresso audio Terra Ingresso microfono/linea Uscita audio Terra Uscita linea (mono) Connettore RS485/422 Due morsettiere a 2 pin per interfaccia seriale RS485/RS422. La porta seriale può essere configurata per supportare: •...
  • Page 71 AXIS P13 Series Schema delle connessioni Connettore I/O 0 V CC (-) Uscita CC 12 V, max 50 mA I/O configurato come ingresso I/O configurato come uscita Installazione dell'hardware A A A VVISO VVISO VVISO • A causa di normative locali o condizioni ambientali ed elettriche in cui il prodotto deve essere utilizzato, può...
  • Page 72 Accedere al dispositivo AXIS IP Utility e AXIS Camera Management sono i metodi consigliati per trovare i dispositivi Axis in rete e assegnare loro un indirizzo IP in Windows®. Queste applicazioni sono entrambe gratuite e possono essere scaricate da www.axis.com/techsup...
  • Page 73 • Se non si rilascia il pulsante di comando entro due secondi, viene abilitata la funzione AXIS Dynamic DNS Service (Servizio DNS dinamico) anziché Focus Assistant.
 • È possibile utilizzare Focus Assistant anche se la posizione di installazione della telecamera non consente l'accesso al tasto di comando.
  • Page 74 IP. Nota Gli strumenti per l'installazione e la gestione del software sono disponibili nelle pagine dedicate all'assistenza sul sito Web www.axis.com/techsup. Per ripristinare il dispositivo alle impostazioni predefinite di fabbrica: 1. Scollegare l'alimentazione dal dispositivo. 2. Tenere premuto il pulsante di controllo e ricollegare l'alimentazione. Consultare Panoramica dell'hardware alla pagina 64.
  • Page 75 > Manutenzione) e fare clic su Default (Predefinito). Ulteriori Informazioni Per la versione più recente di questo documento, visitare il sito all'indirizzo www.axis.com Il Manuale per l'utente è disponibile all'indirizzo www.axis.com Visitare il sito all’indirizzo www.axis.com/techsup per verificare se sono stati pubblicati aggiornamenti del firmware per il proprio dispositivo di rete.
  • Page 77 AXIS P13 Series Información de seguridad Lea esta Guía de instalación con atención antes de instalar el producto. Guarde la Guía de instalación para poder consultarla en otro momento. Niveles de peligro PELIGRO Indica una situación peligrosa que, si no se evita, provocará lesiones graves o la muerte.
  • Page 78 Batería Este producto de Axis utiliza una batería de litio CR2032 de 3,0 V como fuente de alimentación del reloj interno en tiempo real. En condiciones normales, esta batería durará un mínimo de cinco años.
  • Page 79 La batería no debe sustituirse a menos que sea necesario; no obstante, si precisa hacerlo, póngase en contacto con el servicio de asistencia técnica de Axis en www.axis.com/techsup para solicitar ayuda. Las pilas tipo célula de litio de 3,0 V contienen 1,2-dimetoxietano; éter dimetílico de etilenglicol (EGDME), n.º...
  • Page 81 AXIS P13 Series Guía de instalación Esta guía de instalación incluye las instrucciones necesarias para instalar las cámaras de red AXIS P1364/P1365 en su red. Para conocer otros aspectos de uso del producto, vea el manual del usuario disponible en www.axis.com.
  • Page 82 AXIS P13 Series Información general del hardware LED de estado Micrófono integrado Ranura para tarjetas microSD Entrada de audio Salida de audio Conector de red (PoE) LED de alimentación LED de red Botón de control 10 Conector de E/S 11 Conector de iris 12 Conector de alimentación (CC)
  • Page 83 AXIS P13 Series AXIS P1364 AXIS P1365 Anillo de enfoque Tornillo de bloqueo del anillo de enfoque Palanca de zoom Indicadores LED Nota • Se puede configurar el LED de estado para que se apague durante el funcionamiento normal. Para ello, vaya a Setup > System Options > Ports & Devices > LED (Configuración >...
  • Page 84 AXIS P13 Series LED de alimentación Indicación Verde Funcionamiento normal. Parpadea en verde/ámbar durante la actualización del firmware. Ámbar Comportamiento del indicador LED de estado del Asistente de Enfoque Cuando el LED de estado parpadea, el Asistente de Enfoque está activado.
  • Page 85 ≤100 W o una corriente nominal de salida limitada a ≤5 A. Conector de audio El producto de Axis integra los siguientes conectores de audio: • Entrada de audio (rosa): entrada de 3,5 mm para micrófono mono, o entrada de línea de señal mono.
  • Page 86 Restablecer el producto a la configuración predeterminada de fábrica. Consulte página • Conectarse a un servicio AXIS Video Hosting System o al Servicio de DNS dinámico de Internet de AXIS. Para obtener más información sobre estos servicios, consulte el Manual del usuario.
  • Page 87 AXIS P13 Series Conectores Conector de E/S Bloque de terminales de 4 pines Para ver un ejemplo del diagrama, consulte Diagramas de conexión en la página 89. Notas Especificaciones Función 0 V CC 0 V CC (-) Salida de CC...
  • Page 88 AXIS P13 Series Conector de audio Conectores de audio de 3,5 mm (estéreo) 1 Punta 2 Anillo Manguito Entrada de Tierra Entrada de línea/micrófono audio Salida de Tierra Salida de línea (mono) audio Conector RS485/422 Dos bloques de terminales de 2 pines para la interfaz serie RS485/RS422.
  • Page 89 AXIS P13 Series Diagramas de conexión Conector de E/S 0 V CC (-) Salida de CC 12 V, 50 mA máx. E/S configurada como entrada E/S configurada como salida Instalación del hardware A A A VISO VISO VISO • Debido a la normativa local o a las condiciones ambientales y eléctricas en las que se vaya a utilizar el producto, puede que sea adecuado u obligatorio el uso de un cable de red blindado (STP).
  • Page 90 Acceso al producto Se recomiendan AXIS IP Utility y AXIS Camera Management como métodos para buscar los productos de Axis en la red y asignarles direcciones IP en Windows®. Ambas aplicaciones son gratuitas y pueden descargase de www.axis.com/techsup El producto se puede utilizar con la mayoría de los sistemas operativos y navegadores. Los navegadores recomendados son ®...
  • Page 91 • Si el botón de control no se suelta en dos segundos, se activará el Servicio DNS dinámico de AXIS en lugar del Asistente de Enfoque. • Si la cámara está montada de manera que no es posible acceder al botón de control, todavía se puede utilizar el Asistente de Enfoque.
  • Page 92 Nota Las herramientas del software de instalación y gestión están disponibles en las páginas de asistencia técnica en www.axis.com/techsup. Para restablecer el producto a la configuración predeterminada de fábrica: 1. Desconecte la alimentación del producto. 2. Mantenga pulsado el botón de control y vuelva a conectar la alimentación. Vea Información general del hardware en la página 82.
  • Page 93 Visite el centro de aprendizaje de www.axis.com/academy para consultar guías, tutoriales, seminarios web y cursos que pueden resultarle útiles. Información de garantía Para obtener más detalles sobre la garantía del producto Axis y la información relacionada con ella, consulte www.axis.com/warranty/...
  • Page 95 AXIS P13 Series 安 安 安 全 全 全 情 情 情 報 報 報 本製品を設置する前に、このインストールガイドをよくお読みください。 インス トールガイドは、後で参照できるように保管しておいてください。 危 危 危 険 険 険 レ レ レ ベ ベ ベ ル ル ル 危 危 危 険 険 険 回避しない場合、死亡または重傷につながる危険な状態を⽰します。...
  • Page 96 AXIS P13 Series 安 安 安 全 全 全 ⼿ ⼿ ⼿ 順 順 順 注 注 注 記 記 記 • 本製品は、お使いになる地域の法律や規制に準拠して使⽤してください。 • 本製品を屋外またはそれに準じる環境で使⽤する場合は、認定済みの屋外⽤ 筐体に収納して設置する必要があります。 • 本製品は乾燥した換気のよい環境に保管してください。 • 本製品に衝撃または強い圧⼒を加えないでください。 • 本製品を不安定なブラケット、表⾯、または壁に設置しないでください。 • 本製品を設置する際には、適切な⼯具のみを使⽤してください。 電動⼯具を 使⽤して過剰な⼒をかけると、製品が損傷することがあります。 • 化学薬品、腐⾷剤、噴霧式クリーナーは使⽤しないでください。 • 清掃には、きれいな⽔に浸した清潔な布を使⽤してください。...
  • Page 97 AXIS P13 Series 必要な場合以外はバッテリーを交換しないでください。バッテリーの交換が必要な場 www.axis.com/techsup 合は、Axisサポート ( ) までご連絡ください。 リチウムコイン型3.0 V電池は、1,2-ジメトキシエタン (エチレングリコールジメチル エーテル (EGDME)、CAS番号110-71-4) を含有しています。 警 警 警 告 告 告 • バッテリーは、正しく交換しないと爆発する危険があります。 • 交換⽤バッテリーとしては、同⼀品またはAxisが推奨するバッテリーのみを 使⽤してください。 • 使⽤済みバッテリーは、地域の規制またはバッテリーメーカーの指⽰に 従って廃棄してください。...
  • Page 99 AXIS P13 Series イ イ イ ン ン ン ス ス ス ト ト ト ー ー ー ル ル ル ガ ガ ガ イ イ イ ド ド ド このインストールガイドでは、AXIS P1364/P1365ネットワークカメラをお使いのネッ トワークにインストールする⼿順について説明します。 製品の使⽤の詳細について www.axis.com は、 で⼊⼿できるユーザーズマニュアルを参照してください 設 設 設 置 置 置 ⼿ ⼿ ⼿ 順 順 順...
  • Page 100 AXIS P13 Series ハ ハ ハ ー ー ー ド ド ド ウ ウ ウ ェ ェ ェ ア ア ア の の の 概 概 概 要 要 要 ステータスLED 内蔵マイクロフォン microSDカードスロット ⾳声⼊⼒ ⾳声出⼒ ネットワークコネクター (PoE) 電源LED ネットワークLED コントロールボタン...
  • Page 101 AXIS P13 Series AXIS P1364 AXIS P1365 フォーカスリング フォーカスリング固定ネジ ズーム調節レバー LED イ イ イ ン ン ン ジ ジ ジ ケ ケ ケ ー ー ー タ タ タ ー ー ー 注意 • ステータスLEDは、正常動作時に消灯させることができます。 設定は、 [Setup - - - System...
  • Page 102 AXIS P13 Series ⻩ 10 Mbit/sネットワークに接続している場合、点灯し ます。 ネットワークパケットを送受信した場合、点 滅します。 無点灯 ネットワーク接続なし。 電 電 電 源 源 源 LED 説 説 説 明 明 明 緑 正常動作。 ⻩ ファームウェアアップグレード中は緑と⻩の交互点滅。 フ フ フ ォ ォ ォ ー ー ー カ カ カ ス ス ス ア ア ア シ シ シ ス ス ス タ タ タ ン ン ン ト ト ト ⽤ ⽤ ⽤ ス ス ス テ テ テ ー ー ー タ タ タ ス ス ス LED LED の...
  • Page 103 AXIS P13 Series I/O コ コ コ ネ ネ ネ ク ク ク タ タ タ ー ー ー 外部装置を接続し、カメラに対するいたずらの警報、動体検知、イベントトリ ガー、低速度撮影、アラーム通知などを使⽤することができます。 I/Oコネクター は、0 V DC基準点と電⼒ (DC出⼒) に加えて、以下のインターフェースを提供します。 デ デ デ ジ ジ ジ タ タ タ ル ル ル 出 出 出 ⼒ ⼒ ⼒ ̶ リレーやLEDなどの外部デバイスを接続します。 接続され...
  • Page 104 フォーカスアシスタントを有効にする。 コントロールボタンを押して、す • ぐに離します。 110ページ 製品を⼯場出荷時の設定にリセットする。 を参照してください。 • AXIS Video Hosting SystemサービスまたはAXIS Internet Dynamic DNSサービ • スに接続する。 これらのサービスの詳細については、ユーザーズマニュ アルを参照してください。 仕 仕 仕 様 様 様 動 動 動 作 作 作 条 条 条 件 件 件 本製品は屋内⽤です。 製 製 製 品 品 品...
  • Page 105 AXIS P13 Series 消 消 消 費 費 費 電 電 電 ⼒ ⼒ ⼒ 注 注 注 記 記 記 定格出⼒が100Wまたは5A以下の有限電源 (LPS) を使⽤します。 Power over over Ethernet Ethernet (PoE) (PoE) IEEE IEEE 製 製 製 品 品 品 Power...
  • Page 106 AXIS P13 Series 電 電 電 源 源 源 コ コ コ ネ ネ ネ ク ク ク タ タ タ DC電源⼊⼒⽤2ピンターミナルブロック。 定格出⼒が100 W以 下または5 A以下の安全特別低電圧 (SELV) に準拠した有限電 源 (LPS) を使⽤してください。 ⾳ ⾳ ⾳ 声 声 声 コ コ コ ネ ネ ネ ク ク ク タ タ タ...
  • Page 107 AXIS P13 Series 機 機 機 能 能 能 ピ ピ ピ ン ン ン 備 備 備 考 考 考 RS485Bまたは すべてのモードのRXペア (2ワイヤーRS485のRX/TXペ RS485/422 RX(B) ア) RS485A5Bまたは RS485/422 RX(A) RS485/RS422 TX(B) RS422および4ワイヤーRS485のTXペア RS485/RS422 TX(A) 重要 ケーブルの推奨最⼤⻑は30 mです。 接 接 接 続 続 続 図 図 図...
  • Page 108 6. すべてのケーブルをカメラに接続します。 7. カメラを正しい⽅向に向け、付属の六⾓レンチでボールジョイントを締 めます。 製 製 製 品 品 品 へ へ へ の の の ア ア ア ク ク ク セ セ セ ス ス ス ネットワーク上でAxis製品を検索したり、Windows®でそれにIPアドレスを割り当て るには、AXIS IP UtilityまたはAXIS Camera Managementの使⽤をお勧めします。 いず www.axis.com/techsup れのアプリケーションも無料で、 からダウンロードできます 本製品は、ほとんどのオペレーティングシステムとブラウザーでご利⽤いただけま...
  • Page 109 フ フ フ ォ ォ ォ ー ー ー カ カ カ ス ス ス ア ア ア シ シ シ ス ス ス タ タ タ ン ン ン ト ト ト に に に よ よ よ る る る フ フ フ ォ ォ ォ ー ー ー カ カ カ ス ス ス の の の 調 調 調 節 節 節 注意 • フォーカス調節中はカメラの前の被写体が変化しないようにしてください。 カメラが動いたり、レンズの前に指やその他の物体が⼊り込んだ場合は、 ⼿順を再開します。 • カメラの前で被写体が動いてしまう場合は、フォーカスアシスタントを使⽤ しないでください。 • コントロールボタンを2秒以上押し続けると、フォーカスアシスタントの代 わりにAXIS Dynamic DNS Serviceが使⽤できるようになります。 • コントロールボタンに⼿が届かない場所にカメラを設置する場合でも、 フォーカスアシスタントを使⽤できます。 指⽰に従いますが、カメラの設置 前にフォーカスアシスタントを有効にします。...
  • Page 110 AXIS P13 Series 1. 製品のホームページを開き、[Setup Setup - Basic Setup Basic Setup Basic Setup Setup - Focus Focus ] (設定 - 基本設定 - Focus フォーカス) を選択します。 2. [Basic] [Basic] [Basic] ( ( ( ベ ベ ベ ー ー ー シ シ シ ッ ッ ッ ク ク ク ) ) ) タブで、[Open...
  • Page 111 AXIS P13 Series 1. 本製品の電源を切ります。 100ページ 2. コントロールボタンを押し続けながら電源を再投⼊します。 「 の、ハードウェアの概要 」を参照してください。 3. ステータスLEDインジケーターが⻩⾊に点滅するまで、コントロールボ タンを15〜30秒間押し続けます。 4. コントロールボタンを離します。 プロセスが完了すると、ステータスLEDが 緑⾊に変わります。 これで本製品は⼯場出荷時の設定にリセットされまし た。 ネットワーク上に利⽤可能なDHCPサーバーがない場合、デフォルトの IPアドレスは192.168.0.90になります。 5. インストール・管理ソフトウェアツールを使⽤して、IPアドレスの割り当 て、パスワードの設定、ビデオストリームへのアクセスを⾏います。 6. 本製品のフォーカスを調節します。 Webインターフェースを使⽤して、各種パラメーターを⼯場出荷時の設定に戻すこ ともできます。 [Setup [Setup [Setup - - - System System System Options Options - - - Maintenance] Options Maintenance] ( ( ( 設...
  • Page 113 AXIS P13 Series 安 安 安 全 全 全 信 信 信 息 息 息 安装该产品前请仔细通读该安装指南。请保管好安装指南以供以后查阅。 危 危 危 险 险 险 等 等 等 级 级 级 危 危 危 险 险 险 表示有危险的情形,如果不能避免,将导致死亡或严重的个人伤害。 警 警 警 告 告 告...
  • Page 114 AXIS P13 Series 安 安 安 全 全 全 说 说 说 明 明 明 注 注 注 意 意 意 • 使用该安讯士产品必须符合当地法律法规要求。 • 如要在室外或相似环境中使用该安讯士产品,必须将其安装在符合标准的 室外防护罩中。 • 安讯士产品应存放在干燥通风的环境中。 • 应避免对安讯士产品造成冲撞或重压。 • 不得将本产品安装于不稳固的支架、表面或墙面上。 • 安装安讯士产品时,请使用适用工具。使用电动工具时过度用力可能对产品 造成损坏。 • 请勿使用化学制剂、腐蚀性制剂或气雾性清洁剂。 • 使用浸有净水的干净抹布进行清洁。 • 所用附件必须符合该产品的技术规格要求。可由安讯士或第三方供应商提供。...
  • Page 115 AXIS P13 Series 警 警 警 告 告 告 • 电池更换不当将引发爆炸危险。 • 请务必使用相同或安讯士推荐的电池进行更换。 • 请按照当地法规或电池制造商的说明来处理废旧电池。...
  • Page 117 AXIS P13 Series 安 安 安 装 装 装 指 指 指 南 南 南 本安装指南说明了如何在网络上安装 AXIS P1365 网络摄像机。有关使用该产品的其他 www.axis.com 信息,请参见用户手册,网址: 安 安 安 装 装 装 步 步 步 骤 骤 骤 页 117 1. 确保安装必需的包装内容、工具和其它材料井然有序。参见 。 页 118 2.
  • Page 118 AXIS P13 Series 硬 硬 硬 件 件 件 概 概 概 览 览 览 LED 状态指示灯 内置麦克风 microSD 卡插槽 音频输入 音频输出 网络接口(PoE) LED 电源指示灯 LED 网络指示灯 控制按钮 10 I/O 接口 11 光圈接口 12 电源接口 (DC) 13 RS485/422 接口...
  • Page 119 AXIS P13 Series AXIS P1364 AXIS P1365 对焦环 对焦环的锁定螺丝 变焦拉杆 LED 指 指 指 示 示 示 灯 灯 灯 备注 • LED 状态指示灯可被配置为在工作正常时不亮。进行配置请访问设 设 设 置 置 置 > > > 系 系 系 统 统 统 选 选 选...
  • Page 120 AXIS P13 Series 使 使 使 用 用 用 对 对 对 焦 焦 焦 助 助 助 手 手 手 时 时 时 的 的 的 LED LED 状 状 状 态 态 态 指 指 指 示 示 示 灯 灯 灯 运 运 运 行 行 行 状 状 状 态 态 态...
  • Page 121 AXIS P13 Series 音 音 音 频 频 频 接 接 接 口 口 口 安讯士产品具有以下音频接口: 音 音 音 频 频 频 输 输 输 入 入 入 ( ( ( 粉 粉 粉 色 色 色 ) ) ) –3.5 毫米单声道麦克风输入接口,或一路单声道输入信号。...
  • Page 122 AXIS P13 Series 产 产 产 品 品 品 温 温 温 度 度 度 湿 湿 湿 度 度 度 AXIS P1365 0°C 至 55°C 10-85% 相对湿度(无冷 ( 32°F 至 凝) 131°F) 功 功 功 耗 耗 耗 注 注 注 意 意 意...
  • Page 123 AXIS P13 Series 3– 可配置(输 0 至最大 30 V DC 数字输入– 连接到针脚 1 以启用或断开 入或输出) 连接(未连接)以停用。 0 至最大 30 V DC,开 数字输出 – 启用后连接至针脚 1,停用 后断开连接(未连接)。如果与继电器 漏, 100 mA 等电感负载一起使用,必须将二极管与 负载并联,以防止电压瞬变。 电 电 电 源 源 源 接 接 接 口 口 口...
  • Page 124 AXIS P13 Series RS485/422 连 连 连 接 接 接 器 器 器 RS485/422 RS485/422 用于 RS485/RS422 串行接口的 2 个双针接线端 子。 通过配置使串行端口支持: • 双线 RS485 半双工 • 四线 RS485 全双工 • 双线 RS422 单工 • 四线 RS422 全双工点对点通信 功 功 功 能 能 能...
  • Page 125 AXIS P13 Series 连 连 连 接 接 接 图 图 图 I/O 接 接 接 口 口 口 0 V DC (-) DC 输出 12 V ,最大 50 mA I/O 配置为输入 I/O 配置为输出 安 安 安 装 装 装 硬 硬 硬 件 件 件...
  • Page 126 4. 将支架安装于墙壁或天花板上,确保螺丝和插头适用于相关材料(如木材、 金属、石头)。 5. 将摄像机安装在支架上,并拧紧三脚架螺丝。 6. 将所有线缆连接至摄像机。 7. 将摄像机对准正确方向,并使用随附的艾伦内六角扳手拧紧球头。 访 访 访 问 问 问 产 产 产 品 品 品 AXIS IP Utility 和AXIS Camera Management 推荐用于查找网络上的安讯士产品, 并在 Windows 中为它们分配 IP 地址®。两款应用都免费提供,并可在下列网址中 www.axis.com/techsup 下载: 该产品可配合多数操作系统和浏览器使用。推荐下列浏览器 Internet Explorer (搭配 Windows)...
  • Page 127 备注 • 在调节对焦的过程中,摄像机前面的视图不应改变。如果移动了摄像机,或是 镜头前出现手指或其他物体,则重新开始该程序。 • 如果无法避免摄像机前的物体移动,则不应使用对焦助手。 • 如果未在 2 秒钟内松开控制按钮,则将启用 AXIS Dynamic DNS Service 而非 对焦助手。 • 如果摄像机已安装,因此无法使用控制按钮,则您仍可使用对焦助手。遵照下 列说明,但在安装摄像机前启用对焦助手。 1. 打开产品主页并进入设 设 设 置 置 置 > 基 基 基 本 本 本 设 设 设 置 置 置 > 对 对 对 焦 焦 焦 。...
  • Page 128 AXIS P13 Series 重 重 重 置 置 置 为 为 为 出 出 出 厂 厂 厂 默 默 默 认 认 认 设 设 设 置 置 置 重要 重置为出厂默认设置应慎用。重置为出厂默认设置将把所有设置重置为出厂默 认值,包括 IP 地址。 备注 www.axis.com/techsup 安装和管理软件工具可通过以下网站中的支持页面获取: 要将产品重置为出厂默认设置,请执行以下操作: 1. 断开产品电源。...
  • Page 130 Installation Guide Ver. M2.3 AXIS P13 Series Date: December 2015 © Axis Communications AB, 2015 Part No. 1535725...

Ce manuel est également adapté pour:

P1364P1365