oneConcept Heat Spike Mode D'emploi

oneConcept Heat Spike Mode D'emploi

Radiateur tour

Publicité

Les langues disponibles
  • FR

Les langues disponibles

Liens rapides

Hinweis: Dieses Produkt ist nur für gut isolierte
Räume oder für den gelegentlichen Gebrauch
geeignet.
Note: This product is only suitable for well
insulated spaces or occasional use.
Advertencia: Este producto está indicado
únicamente en lugares abrigados o para una
utilización punctual.
Remarque : Ce produit ne peut être utilisé
que dans des locaux bien isolés ou de manière
occasionnelle.
Nota: Questo prodotto è adatto solo per spazi
ben isolati o uso occasionale.
Heat Spike
Turmheizgerät
Tower Heater
Radiateur tour
Torre calefactora
Stufa a torre
10033141

Publicité

Table des Matières
loading

Sommaire des Matières pour oneConcept Heat Spike

  • Page 1 Remarque : Ce produit ne peut être utilisé que dans des locaux bien isolés ou de manière occasionnelle. Nota: Questo prodotto è adatto solo per spazi ben isolati o uso occasionale. Heat Spike Turmheizgerät Tower Heater Radiateur tour Torre calefactora...
  • Page 3: Table Des Matières

    Sehr geehrter Kunde, wir gratulieren Ihnen zum Erwerb Ihres Gerätes. Lesen Sie die folgenden Hinweise sorgfältig durch und befolgen Sie diese, um möglichen Schäden vorzubeugen. Für Schäden, die durch Missachtung Hinweise unsachgemäßen Gebrauch entstehen, übernehmen wir keine Haftung. Scannen Sie den QR-Code, um Zugriff auf die aktuellste Bedienungsanleitung und weitere Informationen rund um das Produkt zu erhalten.
  • Page 4: Sicherheitshinweise

    SICHERHEITSHINWEISE Bei der Verwendung von elektrisch betriebenen Geräten sind stets die grundlegenden Sicherheitsvorkehrungen zu beachten, einschließlich der folgenden: BITTE LESEN SIE ALLE ANWEISUNGEN SORGFÄLTIG DURCH, BEVOR SIE DAS PRODUKT VERWENDEN. WARNUNG - zur Verringerung der Gefahr von Bränden, Stromschlägen oder Verletzungen von Personen oder Gegenständen: •...
  • Page 5 das Gerät oder das flexible Kabel keinem Regen, Feuchtigkeit oder einer anderen Flüssigkeit aus, als derjenigen, die für den ordnungsgemäßen Betrieb des Geräts erforderlich ist. • Dieses Gerät sollte nicht in unmittelbarer Nähe von Wasser verwendet werden, wie z.B. Badewanne, Waschbecken, Badezimmer- Schwimmbecken usw., wo die Wahrscheinlichkeit des Eintauchens oder Spritzens auftreten kann.
  • Page 6: Geräteübersicht

    GERÄTEÜBERSICHT Bedienfeld Griff Anzeige Rückseite Luftauslass Stahlrohr...
  • Page 7 Fernbedienung Ein/Aus-Schalter Temperatur Leistungsstufe einstellung 1200 W erhöhen 2000 W Timer Schwingbewegung Temperatur- einstellung verringern Bedienfeld...
  • Page 8: Inbetriebnahme

    INBETRIEBNAHME Aufstellungsort Das Gerät ist in einem Mindestabstand von 90 cm zu brennbaren Gegenständen (wie Gardinen), Wänden oder anderen Objekten aufzustellen. Netzkabel 1. Verwenden Sie nur zertifizierte Verlängerungskabel, die für die Geräteklasse geeignet sind. 2. Verlegen Sie das Kabel nicht unter einem Teppich. Legen Sie keine Läufer, Matten oder ähnliches darüber.
  • Page 9: Bedienung

    BEDIENUNG 1. Nehmen Sie das Heizgerät aus dem Karton und der Plastiktüte. 2. Stellen Sie das Heizgerät auf eine ebene Fläche. 3. Stellen Sie den Netzschalter am Gerätesockel auf OFF. Stecken Sie den Netzstecker in eine Steckdose mit 220 - 240 V~. 4.
  • Page 10 1 Stunde an. Auf dem Display erscheint 1h, was anzeigt, dass das Heizgerät 1 Stunde lang läuft, bevor es in den Standby-Modus geschaltet wird. Um die Betriebszeit zu erhöhen, drücken Sie die Taste „+“ weiter, bis die gewünschte Betriebszeit angezeigt wird. Um die Timerfunktion zu deaktivieren, drücken Sie die Taste „-“, bis die Anzeige der Gesamtzeit erlischt.
  • Page 11: Wartung

    WARTUNG • Vor der Reinigung ist Ihr Gerät am Hauptschalter auszuschalten (OFF) und von der Stromversorgung zu trennen. • Reinigen Sie das Gerät mit einem feuchten Tuch, einem Staubsauger oder Staubwedel. • Verwenden Sie zur Reinigung keine brennbaren Stoffe oder Scheuermittel, wie Benzol oder Spiritus.
  • Page 12: Hinweise Zur Entsorgung

    HINWEISE ZUR ENTSORGUNG Befindet sich die linke Abbildung (durchgestrichene Mülltonne auf Rädern) auf dem Produkt, gilt die Europäische Richtlinie 2012/19/EU. Diese Produkte dürfen nicht mit dem normalen Hausmüll entsorgt werden. Informieren Sie sich über die örtlichen Regelungen zur getrennten Sammlung elektrischer und elektronischer Gerätschaften.
  • Page 13: Technische Parameter

    Technische Parameter 10033141 Modellkennung(en) Angabe Symbol Wert Einheit Angabe Einheit Wärmeleistung Nur bei elektrischen Speicher-Einzelraumheizgeräten: Art der Regelung der Wärmezufuhr Nennwärmeleistung Manuelle Regelung der Wärmezufuhr mit nein integriertem Thermostat Mindestwärmeleistung Manuelle Regelung der Wärmezufuhr nein (Richtwert) mit Rückmeldung der Raum- und/oder Außentemperatur Maximale kontinuierliche Elektronische Regelung der Wärmezufuhr...
  • Page 15 Dear Customer, Congratulations on purchasing this equipment. Please read this manual carefully and take care of the following hints to avoid damages. Any failure caused by ignoring the items and cautions mentioned in the instruction manual are not covered by our warranty and any liability.
  • Page 16: Safety Instructions

    SAFETY INSTRUCTIONS When using any electrically powered product, basic safety precautions should always be followed, including the following: PLEASE READ ALL INSTRUCTIONS CAREFULLY BEFORE USING THE PRODUCT. WARNING - to reduce the risk of fire, electrical shock or injury to persons or property: •...
  • Page 17 • A common cause of overheating is deposits of dust and fluff entering the heater. Ensure these deposits are removed regularly by unplugging the heater, allowing it to cool and cleaning as described in the Care, Cleaning and Storage section. •...
  • Page 18: Device Decription

    DEVICE DECRIPTION Control panel Handle Indicator panel Back frame Wind outlet Stahlrohr Base...
  • Page 19 Fernbedienung Standby Power level 1200 W Raise set temperature 2000 W Timer Swing Lower set temperature Control panel...
  • Page 20: Getting Started

    GETTING STARTED Location The appliance should be placed with a minimum distance of 90 cm away from flammable objects (e.g. curtains), walls or other structures! Power cord 1. Use only an approved extension cord that is suitable for the appliance rating! 2.
  • Page 21: Operation

    OPERATION 1. Carefully remove the heater from the plastic bag and the carton. 2. Place the heater on a firm level surface,. 3. Setting the master button to “off”, on the base of the unit, plug the cord set into a 220-240 V~AC electrical outlet. 4.
  • Page 22: Overheat Protection

    until the desired operation time is displayed. To cancel the timer feature press the "-" button until all time indicator light off. This returns the heater to continuous running. Each press increase 1 hour. Temperature setting 1. The LED screen will display the room temperature, to adjust the temperature, press “+”...
  • Page 23: Maintenance

    MAINTENANCE • Your appliance must be switch OFF via the main power supply and unplugged before proceeding with any cleaning work. • Clean the housing with a lightly damp cloth, a vacuum cleaner or a dusting brush. • Never use flammable or abrasive cleaning agents such as benzene or spirit to clean the appliance.
  • Page 24: Disposal Considerations

    DISPOSAL CONSIDERATIONS According to the European waste regulation 2012/19/ EU this symbol on the product or on its packaging indicates that this product may not be treated as household waste. Instead it should be taken to the appropriate collection point for the recycling of electrical and electronic equipment.
  • Page 25: Technical Parameters

    Technical parameters 10033141 Model identifier(s): Item Symbol Value Unit Item Unit Heat output Type of heat input, for electric storage local space heaters only Nominal heat output manual heat charge control, with integrated thermostat Minimum heat output manual heat charge control with room (indicative) and/or outdoor temperature feedback Maximum continuous...
  • Page 27: Fiche Technique

    Chère cliente, cher client, Toutes nos félicitations pour l’acquisition de ce nouvel appareil. Veuillez lire attentivement et respecter les instructions de ce mode d’emploi afin d’éviter d’éventuels dommages. Nous ne saurions être tenus pour responsables des dommages dus au non-respect des consignes et à...
  • Page 28: Consignes De Sécurité

    CONSIGNES DE SÉCURITÉ L’utilisation d’appareils électrique exige de toujours respecter les règles de sécurité élémentaires, notamment les suivantes : VEUILLEZ LIRE ATTENTIVEMENT TOUTES LES INSTRUCTIONS AVANT D‘UTILISER LE PRODUIT. MISE EN GARDE - réduire les risques d‘incendie, de choc électrique? de blessure aux personnes ou de dégâts matériels : •...
  • Page 29 • Mettez l‘appareil hors tension et débranchez le cordon d‘alimentation lorsque vous ne l‘utilisez pas, avant de monter ou de démonter des pièces et avant de le nettoyer. Débranchez-le en tenant la fiche - ne tirez pas sur le câble. •...
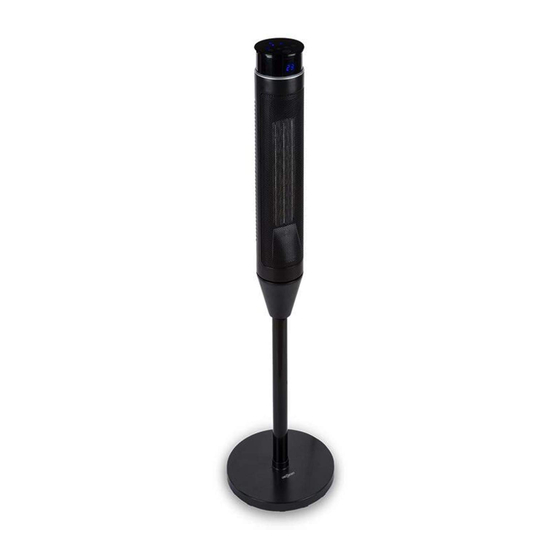
  • Page 30: Aperçu De L'appareil

    APERÇU DE L‘APPAREIL Panneau de commande Poignée Affichage Dos de l‘appareil Sortie d‘air Tube d‘acier...
  • Page 31 TÉLÉCOMMANDE Bouton de marche/arrêt Niveau de Augmenter puissance1200 W le réglage 2000 W de la tem- pérature Minuterie Oscillation Réduire le réglage de la température Panneau de commande...
  • Page 32: Mise En Marche

    MISE EN MARCHE Emplacement L‘appareil doit être placé à au moins 90 cm des objets inflammables (tels que des rideaux), des murs ou d‘autres objets. Câble secteur 1. Utilisez uniquement des rallonges certifiées adaptées à la classe d‘appareils. 2. Ne faites jamais passer le câble sous une moquette. Ne mettez pas de tapis, de matelas ou autres par-dessus.
  • Page 33: Utilisation

    UTILISATION 1. Sortez le radiateur de la boîte et du sac en plastique. 2. Placez le radiateur sur une surface plane. 3. Mettez l‘interrupteur d‘alimentation de la base de l‘appareil sur OFF. Branchez la fiche d‘alimentation dans une prise de courant 220 240 V~. 4.
  • Page 34 avant de passer en mode veille. Pour augmenter la durée de fonctionnement, continuez d‘appuyer sur la touche „+“ jusqu‘à ce que la durée de fonctionnement souhaitée s‘affiche. Pour désactiver la fonction de minuterie, appuyez sur la touche „-“ jusqu‘à ce que l‘affichage de la durée disparaisse. Cela remet le radiateur en marche continue.
  • Page 35: Maintenance

    MAINTENANCE • Avant le nettoyage, éteignez l‘appareil avec l‘interrupteur principal (OFF) et débranchez-le de l‘alimentation. • Nettoyez l‘appareil avec un chiffon humide, un aspirateur ou un chiffon. • N‘utilisez pas de substances inflammables ou d‘abrasifs tels que le benzène ou de l‘alcool pour le nettoyage. •...
  • Page 36: Informations Sur Le Recyclage

    INFORMATIONS SUR LE RECYCLAGE Vous trouverez sur le produit l’image ci-contre (une poubelle sur roues, barrée d‘une croix), ce qui indique que le produit se trouve soumis à la directive européenne 2012/19/UE. Renseignez-vous sur les dispositions en vigueur dans votre région concernant la collecte séparée des appareils électriques et électroniques.
  • Page 37: Fiche De Données Produit

    FICHE DE DONNÉES PRODUIT 10033140 Référence (s) du produit Donnée Symbole Valeur Unité Donnée Unité Puissance calorifique Uniquement pour les radiateurs électriques à accumulation : Type de régulation de l'apport de chaleur Puissance calorifique Pnom Régulation manuelle de l'apport de chaleur nominale avec thermostat intégré...
  • Page 39 Estimado cliente, le felicitamos por la adquisición de su aparato. Lea atentamente las siguientes instrucciones y sígalas para evitar posibles daños. No asumimos ninguna responsabilidad por los daños que resulten del incumplimiento de las instrucciones y del uso inadecuado. Escanee el siguiente código QR para acceder al manual de usuario más reciente y a otra información sobre el producto: ÍNDICE...
  • Page 40: Instrucciones De Seguridad

    INSTRUCCIONES DE SEGURIDAD Cuando se utilizan dispositivos eléctricos, deben observarse siempre las precauciones básicas de seguridad, entre las que se incluyen las siguientes: LEA ATENTAMENTE TODAS LAS INSTRUCCIONES ANTES DE UTILIZAR EL PRODUCTO. ADVERTENCIA - para reducir el riesgo de incendio, descarga eléctrica o lesiones a personas o bienes: •...
  • Page 41 • Cuando no esté en uso, apague y desenchufe el aparato antes de ensamblar, desensamblar o limpiar cualquier pieza. Quítelo agarrando la clavija - no tire del cable. • Una causa común de sobrecalentamiento son los depósitos de polvo y pelusa que penetran en el calentador.
  • Page 42: Vista General Del Aparato

    VISTA GENERAL DEL APARATO Panel de control Mango Pantalla Parte posterior Salida de aire Tubo de acero...
  • Page 43 MANDO A DISTANCIA Interruptor de encendido/apagado Nivel de potencia Ajuste de 1200 W temperatu- 2000 W ra - aumen- Cronómetro Movimiento Ajuste de oscilante temperatura - reducir Panel de control...
  • Page 44: Puesta En Marcha

    PUESTA EN MARCHA Lugar de instalación El aparato debe ser colocado a una distancia mínima de 90 cm de objetos inflamables (como cortinas), paredes u otros objetos. Cable eléctrico 1. Utilice únicamente cables de prolongación certificados que sean adecuados para la clase de equipo. 2.
  • Page 45: Funcionamiento

    FUNCIONAMIENTO 1. Retire el calentador de la caja y de la bolsa de plástico. 2. Coloque el calentador sobre una superficie plana. 3. Ponga el interruptor de alimentación de la toma del aparato en la posición OFF. Enchufe el enchufe a una toma de corriente de 220-240 V. 4.
  • Page 46 La pantalla mostrará 1 hora, indicando que el calefactor está funcionando durante 1 hora antes de entrar en el modo de espera. Para aumentar el tiempo de funcionamiento, pulse la tecla „+“ hasta que aparezca el tiempo de funcionamiento deseado. Para desactivar la función de temporizador, pulse la tecla „-“...
  • Page 47: Mantenimiento

    MANTENIMIENTO • Antes de limpiar el aparato, apáguelo (OFF) en el interruptor principal y desconéctelo de la red eléctrica. • Limpie el aparato con un paño húmedo, una aspiradora o un plumero. • No utilice sustancias inflamables o limpiadores abrasivos como benceno o alcohol para la limpieza.
  • Page 48: Retirada Del Aparato

    RETIRADA DEL APARATO Si el aparato lleva adherida la ilustración de la izquierda (el contenedor de basura tachado) entonces rige la normativa europea, directiva 2012/19/UE. Este producto no debe arrojarse a un contenedor de basura común. Infórmese sobre las leyes territoriales que regulan la recogida separada de aparatos eléctricos y electrónicos.
  • Page 49: Hoja De Datos Del Producto

    HOJA DE DATOS DEL PRODUCTO 10033141 Denominación del modelo Dato Símbolo Valor Unidad Dato Unidad Potencia térmica Solo con disposítivos de acumulación de calor eléctricos para abastecimiento local: Tipo de regulación del abastecimiento de calor Potencia térmica nominal Pnom Regulación manual del abastecimiento de calor con termostato integrado: Potencia térmica mínima Pmin...
  • Page 51: Dati Tecnici

    Gentile Cliente, La ringraziamo per aver acquistato il dispositivo. La preghiamo di leggere attentamente le seguenti istruzioni per l’uso e di seguirle per evitare possibili danni tecnici. Non ci assumiamo alcuna responsabilità per danni scaturiti da una mancata osservazione delle avvertenze di sicurezza e da un uso improprio del dispositivo.
  • Page 52: Avvertenze Di Sicurezza

    AVVERTENZE DI SICUREZZA Quando si utilizzano dispositivi alimentati elettricamente, è necessario seguire procedure di sicurezza fondamentali, tra cui quanto segue: LEGGERE ATTENTAMENTE TUTTE LE INDICAZIONI PRIMA DI UTILIZZARE IL DISPOSITIVO. AVVERTENZA - Per ridurre il rischio di incendi, folgorazioni o danni a cose o persone: •...
  • Page 53 • Spegnere il dispositivo e staccare la spina quando non è in funzione, quando si smontano o montano componenti e prima di pulirlo. Quando si scollega il dispositivo dalla rete elettrica, impugnare la spina e non tirare dal cavo. • Una causa frequente di surriscaldamento sono accumuli di polvere e peluzzi che penetrano nella stufa.
  • Page 54: Descrizione Del Dispositivo

    DESCRIZIONE DEL DISPOSITIVO Pannello di controllo Impugnatura Schermo Parte posteriore Uscita aria Tubo d’acciaio...
  • Page 55 TELECOMANDO Interruttore On/Off Livello riscaldante Aumentare 1200 W impostazio- 2000 W ne tempe- ratura Timer Oscillazione Abbassare impostazione temperatu- Pannello di controllo...
  • Page 56: Messa In Funzione

    MESSA IN FUNZIONE Luogo di posizionamento Il dispositivo deve essere posizionato ad almeno 90 cm da oggetti infiammabili (come tende), pareti o altri oggetti. Cavo di alimentazione 1. Utilizzare solo prolunghe certificate e adatte alla classe del dispositivo. 2. Non far passare il cavo sotto a tappeti. Non poggiare tappeti, passatoie o materassini sopra al cavo.
  • Page 57: Utilizzo

    UTILIZZO 1. Togliere la stufa dal cartone e dal sacchetto di plastica. 2. Posizionare la stufa su una superficie piana. 3. Posizionare l’interruttore sul basamento su OFF. Inserire la spina in una presa elettrica da 220-240 V~. 4. Accendere l’interruttore. Il dispositivo è in standby. Sullo schermo LED compare la temperatura ambiente in °C.
  • Page 58 tempo complessivo scompare. La stufa torna al funzionamento continuo. Ogni pressione aumenta il tempo di 1 ora. Impostazione della temperatura 1. Lo schermo LED mostra la temperatura ambiente. Per impostare la temperatura desiderata, premere + per aumentarla e – per abbassarla. 2.
  • Page 59: Manutenzione

    MANUTENZIONE • Prima della pulizia, spegnere il dispositivo dall’interruttore principale (OFF) e staccare la spina. • Pulire il dispositivo con un panno umido, un aspirapolvere o un piumino. • Non utilizzare sostanze infiammabili o abrasive, come benzolo o spirito, per pulire il dispositivo. •...
  • Page 60: Smaltimento

    SMALTIMENTO Se sul prodotto è presente la figura a sinistra (il bidone dei rifiuti con le ruote), si applica la direttiva europea 2012/19/UE. Questi prodotti non possono essere smaltiti con i rifiuti normali. Informarsi sulle disposizioni vigenti per la raccolta di dispositivi elettrici ed elettronici.
  • Page 61: Scheda Informativa Del Prodotto

    SCHEDA INFORMATIVA DEL PRODOTTO 10033141 Identificazione del modello (i) Indicazione Simbolo Valore Unità Indicazione Unità Potenza termica Solo per gli apparecchi per il riscaldamento d'ambiente locale elettrici ad accumulo: Tipo di controllo dell´apporto termico Potenza termica nominale Pnom Controllo manuale del carico termico con termostato integrato Potenza termica minima Pmin...

Ce manuel est également adapté pour:

10033141

Table des Matières