Table des Matières
Publicité
Les langues disponibles
Les langues disponibles
Liens rapides
OWNER'S MANUAL
BLUE WAVE
CARTRIDGE FILTER PUMP
FOR ABOVE GROUND SWIMMING POOLS
RX600 / RX1000 / RX1500 Models
READ AND KEEP THESE INSTRUCTIONS FOR FUTURE REFERENCE
For answers to common questions, setup videos and
To order parts and accessories,
troubleshooting tips, please visit support.polygroupstore.com
please visit
or call: +1 (888) 919-0070
www.polygroupstore.com
DO NOT RETURN PRODUCT TO STORE
DO NOT RETURN
CALL 800-759-0977 Questions, problems, missing parts?
Before returning to your retailer, call our Consumer Hotline at 1-800-759-0977, Monday - Friday, 8 am - 5 pm (CST)
Publicité
Table des Matières
Dépannage

Manuels Connexes pour Blue Wave RX600


Sommaire des Matières pour Blue Wave RX600
- Page 1 OWNER’S MANUAL BLUE WAVE CARTRIDGE FILTER PUMP FOR ABOVE GROUND SWIMMING POOLS RX600 / RX1000 / RX1500 Models READ AND KEEP THESE INSTRUCTIONS FOR FUTURE REFERENCE For answers to common questions, setup videos and To order parts and accessories, troubleshooting tips, please visit support.polygroupstore.com...
- Page 2 Limited Warranty BLUE WAVE products at the best quality we are able to offer. All BLUE WAVE products have been inspected against defects in materials and workmanship prior to leaving factory. BLUE WAVE is happy to offer warranty for the repair or replacement of pool products for 180 days from the date of purchase.
- Page 3 IN ORDER TO COMPLY WITH STATE OR LOCAL LAWS REGARDING FENCING AND OTHER SAFETY REQUIREMENTS. CUSTOMERS SHOULD CONTACT THEIR LOCAL BUILDING CODE ENFORCEMENT OFFICE FOR FURTHER DETAILS. BLUE WAVE IS NOT RESPONSIBLE FOR ANY ADDITIONAL EXPENSES THAT YOU MAY INCUR.
-
Page 4: Risk Of Electrocution
Pump Operation Hours based on pool types and sizes. Clean and replace filter cartridge frequently. Replace only with a genuine BLUE WAVE Brand filter cartridge. Refer to the Filter Pump manual for additional water care information. -
Page 5: First Aid
OWNER’S MANUAL First Aid 1. Keep a working phone and a list of emergency numbers near the pool. 2. Become certified in cardiopulmonary resuscitation (CPR). In the event of an emergency, immediate use of CPR can make a lifesaving difference. Special Warning 1. -
Page 6: Installer Responsibilities
ASME American Society of Mechanical Engineers Two Park Avenue, New York NY 10016-5990 Contact: 800-843-2763 (U.S. & Canada) 973-882-1170 (outside North America) www.asme.org NSPI National Spa and Pool Institute (see APSP) UL Underwriters Laboratories 333 Pfingsten Road,Northbrook IL 60062-2096 Contact: 877-854-3577 or 847-272-8800 www.ul.com NSF NSF International P.O. -
Page 7: Preliminary Steps
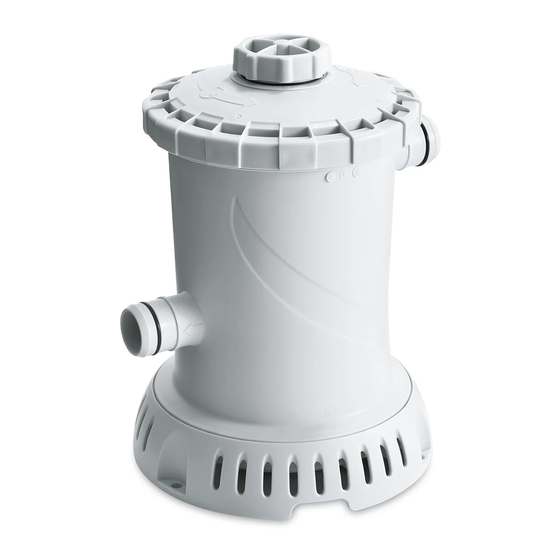
3. DO NOT use this product to dispense powdered chlorine, shock treatment, or any other types of chemicals as this will damage the pump, filter cartridge and pool. 4. This Filter Pump is manufactured by BLUE WAVE and ETL control number 4000608 and 4006317 – double insulated and grounded – 120VAC 60Hz. All units must have a minimum of 105VAC to start and run properly. - Page 8 RX600 RX1000 RX1500 RETURN FITTING SUCTION FITTING...
- Page 9 OWNER’S MANUAL RX1000 RX600 RX1500...
-
Page 10: Setup Instructions
SETUP INSTRUCTIONS Before assembly, take a few minutes to identify and become familiar with all the parts. WARNING: CLIMBING HAZARD! PLEASE PREVENT CHILDREN FROM CLIMBING ON THE FILTER CANISTER TO GAIN ACCESS TO THE POOL. Suction & Return Fittings Installation 1. -
Page 11: Before Using The Pump
OWNER’S MANUAL 5. Connect the Suction Fitting to the Pump inlet with a Hose and one 6. Connect the Return Fitting to the Pump outlet with another Hose and Clamp on each end. one Clamp on each end. Make sure the Hose Clamps seals tightly over both the Hose and O-Rings... -
Page 12: Pump Maintenance
USE OF PUMP 1. Plug the GFCI Power Cord Set to a properly grounded receptacle at least 15 feet (4.5m) away from the pool. How to use the GFCI plug 2. To turn on the Pump, press the RESET button of the GFCI Plug. 3. -
Page 13: Pool Water Care
(see POOL WATER CARE, below). 5. Dispose of any used filter media in accordance with applicable regulations/legislation. 6. Always use genuine BLUE WAVE Filter Cartridges; they are available at where you purchased your pool or from polygroupstore.com. POOL WATER CARE 1. - Page 14 PUMP DISASSEMBLY & STORAGE 1. Unplug the Pump from the power outlet. 2. For the Suction Fitting : seal it with the SF Cap For the Return Fitting : remove the RF Diverter , and seal it with the Service Plug 3.
- Page 15 Shaft End Caps) Washer Shaft End Cap RX600/RX1000 RX1500 4. Once the inspection or replacement is done, carefully insert the Rotor Assembly back into the Pump Body. The force of the magnet will pull the Rotor down in place. 5. Align the Volute Cover with the top End Cap of the Rotor, then tighten with the Volute Cover Lock Nut or Bolts & Nuts (depends on the pump model).
-
Page 16: Bottom View
3. Slowly insert the Motor back into the Canister. There’s a groove on the bottom of the Motor (marked "ALIGN"). Make sure that the groove aligns with notch on the Canister (only visible from bottom), otherwise the Pump Base may leak even already locked in place. Also, the Rubble Nozzle should be aligned with the Canister's water outlet. -
Page 17: Troubleshooting Guide
OWNER’S MANUAL TROUBLESHOOTING GUIDE PROBLEM CAUSE SOLUTION A Not plugged in A Plug the Pump to a 3-wire grounded power outlet. Motor doesn’t B GFCI Power Cord Set and/or B Reset your circuit breaker on the electrical panel. If problem persists, have the circuit checked start, or kicks on circuit breaker tripped by a qualified electrician. -
Page 18: Replacement Parts Ordering Information
REPLACEMENT PARTS ORDERING INFORMATION RX600 RX1000 RX1500 P58PF1520K01 P58PF1520K01 P58PF1520K01 P58281283W05 P58284283W05 P58284283W05 P582812838UN P582842838UN P582842838UN P582812837CN P582842837CN P582842837CN P58PF1510K01 P58PF1510K01 P58PF1510K01 P58PF15108UN P58PF15108UN P58PF15108UN P58PF15107CN P58PF15107CN P58PF15107CN P58PF1430W05 P58PF1430W05 P58PF1430W05 P58PF14308UN P58PF14308UN P58PF14308UN P58PF14307CN P58PF14307CN P58PF14307CN P58PF2820P01 P58PF2820P01 P58PF2820P01... - Page 19 OWNER’S MANUAL RX600 RX1000 RX1500 P58PP3750K01 P58PP3750K01 P58185201K01 P58X600C0000 P58X1000C000 P58X1501C000 P581041037PR P581041080PR P581041080PR P58050137001 P58050505001 P58050506001 P58PF1009K01 P58PF1009K01 P58184501K01 P58PF1010K01 P58PF1010K01 P5800400080A P58030001K01 P58037000K01 P58037000K01 P584150006W1 P584150006W1 P584150006W1 P58PF5620P01 P58PF5620P01 P58PF5620P01 P58003689W05 P58003689W05 P58003689W05 P5810170AE01 P5810170AE01 P5810170AE01 P53RX0609W05 P53RX1009W05...
- Page 20 ASME COMPLIANT SUCTION FITTING INFORMATION PSF-100A and PSF-100B Suction Outlet Fitting (For Aboveground Pool) 1. PSF-100A and PSF-100B Suction Outlet Fitting are certified by IAPMO in accordance with the ASME/ANSI/APSP/ICC-16 2011 Suction Fittings for Use in Swimming Pools, Wading Pools, Spas, and Hot Tubs. 2.
-
Page 21: Blue Wave Pompe À Filtre Au Cartouche
POMPE À FILTRE AU CARTOUCHE POUR PISCINES HORS-SOL RX600 / RX1000 / RX1500 Modèles LIRE ET GARDER CES INSTRUCTIONS POUR CONSULTATION ULTÉRIEURE Pour obtenir des réponses aux questions les plus fréquentes, des vidéos de configuration et des conseils de dépannage, Pour commander des pièces... -
Page 22: Table Des Matières
BLUE WAVE des produits de la meilleure qualité possible. Tous les produits BLUE WAVE ont été inspectés pour s'assurer qu’ils sont exempts de tout vice de matière et de fabrication avant de quitter l’usine. BLUE WAVE offre une garantie de 180 jours à compter de la date d’achat pour la réparation ou le remplacement des produits de piscine. -
Page 23: Barrières De Piscine
DE SÉCURITÉ. LES CLIENTS DOIVENT CONTACTER L’AGENCE LOCALE CHARGÉE DE L’APPLICATION DU CODE DE LA CONSTRUCTION POUR PLUS DE DÉTAILS. BLUE WAVE NE PEUT ÊTRE TENU RESPONSABLE DES FRAIS SUPPLÉMENTAIRES QUE VOUS POURRIEZ ENGAGER. Mesures de sécurité pour les enfants 1. -
Page 24: Systèmes De Circulation
Lavez et remplacez fréquemment la cartouche filtrante. Remplacez-la exclusivement par une cartouche filtrante d'origine de la marque BLUE WAVE . -
Page 25: Risque De Choc Electrique
MANUEL DE L'UTILISATEUR 3. Placez les meubles (par exemple les tables et les chaises) loin de la piscine de manière à ce que les enfants ne puissent pas monter pour avoir accès à la piscine. Risque de choc electrique 1. Gardez tous les fils électriques, radios, haut-parleurs et autres appareils électriques à l’écart de la piscine. 2. -
Page 26: Systèmes De Filtration
APSP Association of Pool & Spa Professionals (formerly National Spa and Pool Institute) 2111 Eisenhower Avenue, Suite 500 Alexandria VA 22314-4679 Contact : 703 838-0083 www.apsp.org ASME American Society of Mechanical Engineers Two Park Avenue, New York NY 10016-5990 Contact : 800 843-2763 (États-Unis et Canada) ou 973 882-1170 (hors de l’Amérique du Nord) www.asme.org NSPI National Spa and Pool Institute (see APSP) UL Underwriters Laboratories... -
Page 27: Étapes Préliminaires
4. Cette pompe de filtration est fabriquée sous les numéros de contrôle BLUE WAVE et ETL 4000608 et 4006317 - à double isolation et avec mise à la terre - 120 VCA 60Hz. Toutes les unités doivent avoir un minimum de 105VAC pour démarrer et fonctionner correctement. -
Page 28: Raccord De Refoulement
RX600 RX1000 RX1500 RACCORD DE REFOULEMENT RACCORD D’ASPIRATION... - Page 29 MANUEL DE L'UTILISATEUR RX1000 RX600 RX1500...
-
Page 30: Instructions D'assemblage
INSTRUCTIONS D’ASSEMBLAGE Avant le montage, prenez quelques minutes afin d’identifier et vous familiariser avec toutes les pièces. AVERTISSEMENT : GRIMPAGE DANGEREUX ! VEUILLEZ EMPÊCHER LES ENFANTS DE GRIMPER SUR LE SYSTÈME DE FILTRATION POUR ALLER DANS LA PISCINE. Installation des raccords d’aspiration et de refoulement 1. -
Page 31: Avant D'utiliser La Pompe
MANUEL DE L'UTILISATEUR 5. Brancher le raccord d’aspiration à l’entrée de la pompe avec un 6. Brancher le raccord de refoulement à la sortie de la pompe avec tuyau et une bride à chaque bout. un autre tuyau et une bride à chaque bout. S’assurer que les colliers de serrage de tuyau scellent hermétiquement par-dessus à... -
Page 32: Utilisation De La Pompe
UTILISATION DE LA POMPE 1. Brancher l’ensemble de cordon d’alimentation GFCI à une prise correctement mise à la terre au moins 15 pieds (4,5 m) Utilisation de la prise GFCI à l’écart de la piscine. 2. Pour mettre la pompe en marche, appuyer sur le bouton RESET (« RÉINITIALISER ») de la fiche GFCI. 3. -
Page 33: Entretien De L'eau De La Piscine
3. Nettoyez régulièrement votre piscine avec un aspirateur à tuyau d'arrosage de BLUE WAVE ou provenant de tout autre magasin de fournitures de piscine. 4. L’emploi d’un bain de pied avant d’entrer dans la piscine aidera à garder la piscine propre. -
Page 34: Démontage Et Rangement De La Pompe
DÉMONTAGE ET RANGEMENT DE LA POMPE 1. Débrancher la pompe de la prise électrique. 2. Pour le raccord d’aspiration : le fermer hermétiquement avec le bouchon pour raccord d’aspiration Pour le raccord de refoulement : enlever le partiteur de raccord de refoulement , et le fermer hermétiquement avec le bouchon 3. -
Page 35: Étape 2 : Inspection/Remplacement Du Rotor
Écrou Couvercle de la tige RX600/RX1000 RX1500 4. Une fois l’inspection ou le remplacement terminés, soigneusement réinsérer le bloc du rotor dans le corps de la pompe. La force de l’aimant tirera le rotor vers le bas et en place. -
Page 36: Vue Du Dessous
3. Lentement réinsérer le moteur dans le boîtier. Il y a une rainure sur le fond du moteur (marquée « ALIGN »). S’assurer que la rainure s’aligne avec l’encoche sur le boîtier (seulement visible à partir du fond), sinon la base de la pompe pourrait fuir même si elle est déjà verrouillée en place. La buse en caoutchouc doit également être alignée avec la sortie d’eau du boîtier. -
Page 37: Guide De Dépannage
MANUEL DE L'UTILISATEUR GUIDE DE DÉPANNAGE PROBLÈME CAUSE SOLUTION A N’est pas branché A Brancher la pompe à une prise de courant à trois fils mise à la terre. Le moteur B L’ensemble de cordon ne démarre pas B Réenclencher votre disjoncteur sur le panneau électrique. Si le problème persiste, d’alimentation GFCI ou s’interrompt faire contrôler le circuit par un électricien qualifié. -
Page 38: Renseignements Relatifs Aux Commandes De Pièces De Rechange 18
RENSEIGNEMENTS RELATIFS AUX COMMANDES DE PIÈCES DE RECHANGE RX600 RX1000 RX1500 P58PF1520K01 P58PF1520K01 P58PF1520K01 P58281283W05 P58284283W05 P58284283W05 P582812838UN P582842838UN P582842838UN P582812837CN P582842837CN P582842837CN P58PF1510K01 P58PF1510K01 P58PF1510K01 P58PF15108UN P58PF15108UN P58PF15108UN P58PF15107CN P58PF15107CN P58PF15107CN P58PF1430W05 P58PF1430W05 P58PF1430W05 P58PF14308UN P58PF14308UN P58PF14308UN P58PF14307CN P58PF14307CN... - Page 39 MANUEL DE L'UTILISATEUR RX600 RX1000 RX1500 P58PP3750K01 P58PP3750K01 P58185201K01 P58X600C0000 P58X1000C000 P58X1501C000 P581041037PR P581041080PR P581041080PR P58050137001 P58050505001 P58050506001 P58PF1009K01 P58PF1009K01 P58184501K01 P58PF1010K01 P58PF1010K01 P5800400080A P58030001K01 P58037000K01 P58037000K01 P584150006W1 P584150006W1 P584150006W1 P58PF5620P01 P58PF5620P01 P58PF5620P01 P58003689W05 P58003689W05 P58003689W05 P5810170AE01 P5810170AE01 P5810170AE01 P53RX0609W05...
-
Page 40: Info Sur Le Raccord D'aspiration Conforme À La Norme Asme
INFO SUR LE RACCORD D'ASPIRATION CONFORME À LA NORME ASME Dispositifs D’aspiration PSF-100A et PSF-100B (Pour Piscine Hors Sol) 1. Les orifices d’aspiration PSF-100A et PSF-100B sont certifiés par IAPMO en accordance avec la norme ASME/ANSI/APSP/ICC-16 2011 sur les Dispositifs d’Aspiration pour utilisation dans les piscines, les pataugeoires, les cuves thermales et les bains tourbillon.