JVC KD-LH911 Manuel D'instructions
Masquer les pouces
Voir aussi pour KD-LH911:
- Manuel d'installation (4 pages) ,
- Manuel d'installation/raccordement (4 pages)
Table des Matières
Les langues disponibles
Les langues disponibles
Liens rapides
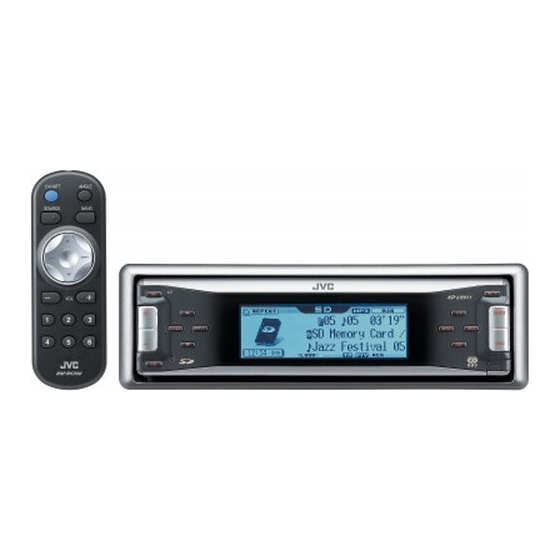
CD/SD RECEIVER
RECEPTEUR CD/SD
KD-LH911
For canceling the display demonstration, see page 9.
Pour annuler la démonstration des affichages, référez-vous à la page 9.
For installation and connections, refer to the separate manual.
Pour l'installation et les raccordements, se référer au manuel séparé.
INSTRUCTIONS
MANUEL D'INSTRUCTIONS
GET0275-003A
[EX/EU]
Chapitres
Table des Matières
Dépannage

Manuels Connexes pour JVC KD-LH911


Sommaire des Matières pour JVC KD-LH911
- Page 1 CD/SD RECEIVER RECEPTEUR CD/SD KD-LH911 For canceling the display demonstration, see page 9. Pour annuler la démonstration des affichages, référez-vous à la page 9. For installation and connections, refer to the separate manual. Pour l’installation et les raccordements, se référer au manuel séparé.
- Page 58 Merci pour avoir acheté un produit JVC. Veuillez lire attentivement toutes les instructions avant d’utiliser l’appareil afin de bien comprendre son fonctionnement et d’obtenir les meilleures performances possibles. IMPORTANT POUR PRODUITS LASER 1. PRODUIT LASER CLASSE 1 2. ATTENTION: N’ouvrez pas le couvercle supérieur. Il n’y a aucune pièce réparable par l’utilisateur à...
- Page 59 Comment accéder aux divers menus ..sonores ..........27 Panneau de commande — Affichages graphiques ... 29 ....... 6 KD-LH911 Procédure de base ....... 29 Identification des parties ......Téléchargement de fichiers ....30 Télécommande — Suppression de fichiers ......31 Mise en service des fichiers téléchargés ...
-
Page 60: Comment Lire Ce Manuel
Comment lire ce manuel Comment forcer l’éjection d’un disque Les méthodes suivantes sont utilisées pour rendre les explications simples et faciles à Si un disque ne peut pas être reconnu ou ne peut comprendre. pas être éjecté par l’autoradio, forcez l’éjection •... -
Page 61: Comment Changer Le Modèle D'affichage
Comment changer le modèle Comment accéder aux divers menus d’affichage Le menu principal contient six menus (MODE, PSM, SEL, PICT, EQ, TITLE). Ex.: Quand le tuner est choisi comme source Déplacez le curseur pour choisir le Affichage de la source/ menu souhaité... -
Page 62: Panneau De Commande
Panneau de commande — KD-LH911 Identification des parties q Touche ∞ (bas) 1 Touche + / – w Capteur de télécommande 2 Touche (attente/sous tension, • N’EXPOSEZ PAS le capteur de atténuation) télécommande à une forte lumière 3 Touche 5 (haut) (lumière directe du soleil ou éclairage... -
Page 63: Télécommande
Télécommande — RM-RK300 Mise en place de la pile-bouton au Composants principaux et caractéristiques lithium (CR2025) • Pour l’utiliser, dirigez la télécommande directement sur le capteur de télécommande de l’autoradio. Assurez-vous 1 Touche (attente/sous tension/ qu’il n’y a pas d’obstacle entre les deux. atténuation) •... -
Page 64: Pour Commencer
Pour commencer Opérations de base ⁄ Ajustez le volume. Ÿ Pour afficher le niveau sonore (voir page 36). Vous ne pouvez pas choisir certaines sources si elles ne sont pas prêtes. • Pour le tuner FM/AM Ajustez le son comme vous le uniquement souhaitez. -
Page 65: Annulation De La Démonstration Des Affichages
Annulation de la démonstration Réglage de l’horloge des affichages Affichez le menu PSM (voir page 5). Si aucune opération n’est effectuée pendant environ 20 secondes, la démonstration des Réglez les heures, les minutes et le affichages démarre. système de l’horloge. [Réglage initial: Demo]—voir page 34. -
Page 66: Fonctionnement De La Radio
Fonctionnement de la radio Écoute de la radio Pour accorder une station manuellement À l’étape ! ci-à gauche... Ÿ 2 Choisissez la fréquence de station Affichage de l’horloge souhaitée. Démarrez la recherche d’une station. Quand une station est reçue, la recherche s’arrête. -
Page 67: Mémorisation Des Stations
Quand une émission FM stéréo est difficile Mémorisation des stations à recevoir 1 Affichez le menu MODE (voir page 5). Vous pouvez prérégler six stations pour chaque bande. 2 Choisissez “Mono”. Préréglage automatique des stations FM —SSM (Mémorisation automatique séquentielle des stations puissantes) 3 Choisissez “On”. -
Page 68: Écoute D'une Station Préréglée
Préréglage manuel Mémorisez la station. Ex.: Mémorisation de la station FM de fréquence 92,5 MHz sur le numéro de préréglage 4 de la bande FM1. Écoute d’une station préréglée • La liste des stations préréglées apparaît aussi en maintenant pressées 5/∞ (voir l’étape 7 ci-dessous). -
Page 69: Utilisation Du Système Fm Rds
Utilisation du système FM RDS Recherche de votre programme FM RDS préféré Vous pouvez accorder une station diffusant votre Démarrez la recherche de votre programme préféré en effectuant une recherche programme préféré. par code PTY. • Pour mémoriser votre programme préféré, référez-vous à... -
Page 70: Mémorisation De Vos Programmes Préférés
Choisissez un code PTY. Présentation du système RDS Le système RDS (Radio Data System) permet aux stations FM d’envoyer un signal additionnel en même temps que le signal de leur programme ordinaire. En recevant les données RDS, cet autoradio peut effectuer ce qui suit: •... -
Page 71: Utilisation De L'attente De Réception
Attente de réception PTY Utilisation de l’attente de L’attente de réception PTY permet à l’autoradio réception de commuter temporairement sur votre programme PTY préféré à partir de n’importe Attente de réception TA quelle source autre que AM. • Cette fonction affecte aussi le tuner DAB. L’attente de réception TA permet à... -
Page 72: Poursuite Du Même Programme-Poursuite De Réception En Réseau
Quittez le réglage. Poursuite du même programme— Poursuite de réception en réseau Lorsque vous conduisez dans une région où la réception FM n’est pas suffisamment forte, cet autoradio accorde automatiquement une autre station FM RDS du même réseau, susceptible de diffuser le même programme avec un signal plus fort (voir l’illustration ci-dessous). -
Page 73: Utilisation D'un Disque Ou D'une Carte Sd
Utilisation d’un disque ou d’une carte SD Lecture d’un disque dans l’autoradio Toutes les plages sont reproduites répétitivement jusqu’à ce que vous changiez la source ou éjectiez le disque. • Lors de l’insertion d’un disque CD audio A propos des disques MP3 et WMA ou CD Text: Durée totale Les “plages”... -
Page 74: Lecture De Disques Dans Le Changeur
• Quand le disque actuel est un disque MP3: À propos du changeur de CD Il est recommandé d’utiliser un changeur de CD JVC compatible MP3 avec votre autoradio. • Vous pouvez aussi connecteur un autre changeur de CD de la série CH-X (sauf le Affichage de l’horloge... -
Page 75: Lecture D'une Carte Sd
Lecture d’une carte SD Ÿ À propos de la carte SD Fente d’insertion de Vous pouvez reproduire des plages MP3/ la carte SD WMA enregistrées sur une carte SD et afficher les images mémorisées sur l’affichage pendant la lecture—Image Link. (Voir pages 17, 34 et 52 pour les détails.) Le format requis pour l’enregistrement sur une carte SD est FAT 12/16 et le volume... - Page 76 Si une carte SD est insérée..Attachez le panneau de commande. Durée de Numéro lecture de la plage Numéro du écoulée actuelle dossier actuel ⁄ • Le panneau de commander retourne dans sa position précédente (voir page 42). Nom de la plage Nom du dossier Le nom de l’album/interprète avec l’indicateur...
- Page 77 Pour faire avancer ou reculer rapidement la Autres fonctions principales plage Sélection d’un disque/dossier/plage sur la liste Avance rapide. Affichez le menu MODE (voir page 5). Retour rapide. Choisissez “List”. Pour aller aux plages suivantes ou précédentes Pour aller aux plages suivantes.
- Page 78 Pour démarrer la lecture. Lors de l’utilisation de la télécommande..• Si vous choisissez le disque MP3 actuel (mis en valeur sur l’affichage), sa liste • Pour choisir directement un disque dans des dossiers apparaît. le changeur de CD • Pour choisir directement une plage d’un Quand “Folder”...
- Page 79 Interdiction de l’éjection du disque Sélection des modes de lecture Vous pouvez verrouiller un disque dans la fente d’insertion. Vous pouvez utiliser un des modes de lecture suivants à la fois. Affichez le menu MODE (voir page 5). Choisissez un des modes de lecture — “Intro”, “Repeat”...
- Page 80 Mode Reproduit les 15 premières secondes de... Lecture des introductions Track: Toutes les plages du disque actuel ou de la carte SD. • Pendant la lecture, allumé. Folder* : La première plage des dossiers du Ex.: Quand “Track Intro” est choisi disque actuel ou de la carte SD.
-
Page 81: Ajustements Sonores
Ajustements sonores Réglage du menu de sélection du son de base — SEL Vous pouvez ajuster les caractéristiques du son comme vous le souhaitez. Ajustez le réglage choisi. A Fad/Bal Affichez le menu SEL (voir page 5). Ÿ Choisissez un réglage— “Fad/Bal”, “Subwoofer”, 1 Pour ajuster la balance de sortie “VolAdjust”, ou “Loudness”. - Page 82 B Subwoofer C VolAdjust 1 Pour choisir la fréquence de Pour ajuster le niveau d’entrée de coupure du caisson de grave. chaque source (sauf FM). Ajustez ce réglage de façon que le niveau d’entrée corresponde au niveau sonore FM. –5 (min.) à...
-
Page 83: Sélection Des Modes Sonores Préréglés (I-Eq: Égaliseur Intelligent)
Sélection des modes sonores préréglés (i-EQ: égaliseur intelligent) Choisissez les éléments sonores à ajuster. Vous pouvez sélectionner un mode sonore A Ajustez le niveau d’amélioration préréglé adapté à votre genre de musique. 1 Choisissez “Low”, “Mid” ou “High”. Modes sonores disponibles Flat (Aucun mode sonore n’est appliqué), Hard Rock, R&B (Rhythm&Blues), Pop, Jazz, Dance, Country, Reggae,... - Page 84 C Choisissez une bande passante Répétez l’étape pour ajuster les autres bandes de fréquence. Mémorisez les ajustements. Valeurs préréglées Indication High Niveau –06 –06 –06 (min.) (min.) (min.) à à à (max.) (max.) (max.) Fréquence 60 Hz Fixe 8 kHz 80 Hz 10 kHz centrale...
-
Page 85: Affi Chages Graphiques
Affi chages graphiques Procédure de base Avant de commencer la procédure suivante, préparez un CD-R ou une carte SD avec des Choisissez l’élément. images fixes et des animations (séquences vidéo). • Avec Image Converter (Wide Ver 1.2) compris sur le CD-ROM fourni, vous pouvez créer vos propres images et animations. - Page 86 Transfert d’images ou d’une IMPORTANT: animation • Référez-vous aussi fichiers PDF compris • Il faut un certain temps pour transférer une avec Image Converter dans le dossier animation. Pour les détails, référez-vous à la “Manual” dans le CD-ROM fourni. page 53. •...
- Page 87 Choisissez un fichier. Suppression de fichiers Suppression des images et des animations mémorisées À l’étape ! de la page 29, choisissez “Delete”. Choisissez le type d’affichage— “Picture”, “Movie”, “Opening” ou • Vous pouvez passer aux autres listes “Ending”. en appuyant sur 4/¢. •...
- Page 88 Choisissez “Picture”. • Quand un fichier est supprimé, la liste des fichiers apparaît à nouveau. 4 Répétez l’étape 2 pour supprimer d’autres images. • Pour supprimer l’animation Choisissez “All Delete”. mémorisée Quittez le réglage. Suppression de toutes les images et animations mémorisées Pour supprimer toutes les images mémorisées...
-
Page 89: Mise En Service Des Fichiers Téléchargés
Pour supprimer tous les fichiers mémorisés À l’étape de la page 29, choisissez “All Delete”. * Si aucune image ou animation n’a été transférée, “No Picture”, “No Movie” ou “No Slide” apparaît. Picture: Une de vos propres images fixe mémorisée dans “Picture”... -
Page 90: Réglages Généraux - Psm
Réglages généraux — PSM Ajustez le réglage. Procédure de base Vous pouvez changer les options PSM (mode des réglages préférés) de la table suivante. Affichez le menu PSM (voir page 5). Répétez les étapes pour ajuster les autres options PSM si nécessaire. Choisissez une option PSM. - Page 91 Indications Réglages pouvant être choisis, [page de référence] Clock Hr 0 – 23 (1 – 12), [9] [Réglage initial: 0 (0:00)] Heures Clock Min 00 – 59, [9] Minutes [Réglage initial: 00 (0:00)] 12Hours O 24Hours, [9] 24H/12H Système d’horloge [Réglage initial: 24Hours] Clock Adj Auto: [Réglage initial];...
- Page 92 Indications Réglages pouvant être choisis, [page de référence] LCD Type Auto: [Réglage initial]; Un affichage positif est choisi pendant Type d’affichage la journée* ; alors qu’un affichage négatif est utilisée pendant la nuit* Positive: L’affichage positif est utilisé. Negative: Affichage négatif (sauf pour les images fixes et les animations) Font Type Vous pouvez choisir la police de caractères de l’affichage.
- Page 93 On: [Réglage initial]; Met en service la tonalité sonore des touches. Tonalité sonore des Off: Met hors service la tonalité sonore des touches. touches Ext Input* Changer: [Réglage initial]; Pour utiliser un changeur de CD JVC, Entrée extérieure [18]. Ext In: Pour utiliser un appareil extérieur, [43].
- Page 94 Affichez l’écran de réglage de la Sélection du mode de gradateur minuterie. Vous pouvez assombrir l’affichage la nuit ou en fonction du réglage de la minuterie. Affichez le menu PSM (voir page 5). Choisissez “Dimmer”. Ajustez l’intervalle d’utilisation du gradateur. Réglez l’heure de début du gradateur.
- Page 95 Choisissez la couleur. Changement de la couleur de l’affichage Vous pouvez choisir votre couleur préférée pour chaque source (ou pour toutes les sources). O Aqua O Sky O Sea O Every* Réglage la couleur de l’affichage Leaves O Grass O Apple O Rose O Affichez le menu PSM (voir page 5).
- Page 96 Création de votre propre couleur— Ajustez le niveau (00 – 11) de la User couleur primaire choisie. Vous pouvez créer vos propres couleurs— “Day Color” et “NightColor”. Affichez le menu PSM (voir page 5). Choisissez “Color Set”. Répétez les étapes pour ajuster les autres couleurs primaires.
-
Page 97: Autres Fonctions Principales
Autres fonctions principales 2 Choisissez un caractère. Affectation de titres aux sources Pour savoir quels sont les caractères Vous pouvez affecter des titres au CD (dans disponibles, référez- cet autoradio et dans le changeur de CD) et aux vous à la page 49. appareils extérieurs (EXT-IN). -
Page 98: Changement De L'angle Du Panneau De Commande
Changement de l’angle du Retrait du panneau de commande panneau de commande Lors du retrait ou de la fixation du panneau de commande, assurez-vous de ne pas endommager les connexion à l’arrière du panneau de commande et sur le porte-panneau. Retrait du panneau de commande L’angle du panneau de commande change de la façon suivante:... -
Page 99: Utilisation D'un Appareil Extérieur
Utilisation d’un appareil extérieur Lecture d’un appareil extérieur Ÿ Vous pouvez connecter un appareil extérieur à la prise du changeur de CD à l’arrière de Mettez l’appareil connecté sous l’appareil en utilisant l’adaptateur d’entrée de tension et démarrez la lecture de ligne KS-U57 (non fourni). -
Page 100: Fonctionnement Du Tuner Dab
Fonctionnement du tuner DAB Écoute du tuner DAB Pour accorder un ensemble manuellement À l’étape ! ci-à gauche... Ÿ 2 Choisissez la fréquence de l’ensemble Démarrez la recherche d’un souhaité. ensemble. Affichage de l’horloge Quand un ensemble est reçu, la recherche s’arrête. - Page 101 Il est recommandé d’utiliser le tuner DAB (Digital Audio Broadcasting) KT-DB1000 avec votre autoradio. Si vous possédez un autre tuner DAB, consultez votre revendeur autoradio JVC. • Référez-vous aussi aux Manuel d’instructions fournies avec votre tuner DAB. L’indicateur DRC apparaît.
-
Page 102: Mémorisation De Services Dab
Mémorisation de services DAB Vous pouvez prérégler 6 services DAB (primaires) pour chaque bande. • En appuyant sur 4/¢, vous pouvez Ex.: Mémorisation d’un ensemble (service aller aux listes des autres bandes DAB. primaire) sur le numéro de préréglage 1 de Ne changez pas la bande DAB en utilisant 4/¢... -
Page 103: Utilisation De L'attente De Réception
Pour mettre en service l’attente de Utilisation de l’attente de réception d’annonce réception Affichez le menu MODE (voir page 5). Vous pouvez utiliser trois types d’attente de Choisissez “Announce”. réception. • Attente de réception d’informations routières—attente de réception TA (voir ci- après). -
Page 104: Poursuite Du Même Programme-Réception Alternative
Pour mettre hors service l’attente de Pour afficher l’information du segment réception d’annonce d’étiquette dynamique (DLS) Choisissez “Off” à l’étape 3 de la page 47. L’indicateur ANN s’éteint. Lors de l’écoute d’un ensemble prenant en charge l’information DLS..Attente de réception PTY L’attente de réception PTY permet à... -
Page 105: Entretien
Entretien Comment nettoyer les connecteurs Pour garder les disques propres Un détachement fréquent détériorera les Un disque sale peut ne pas être connecteurs. reproduit correctement. Pour minimiser ce problème, frottez Si un disque est sale, essuyez-le périodiquement les connecteurs avec un coton avec un chiffon doux, en ligne tige ou un chiffon imprégné... -
Page 106: Pour En Savoir Plus À Propos De Cet Autoradio
Pour en savoir plus à propos de cet autoradio Opérations de base Utilisation du système FM RDS • La poursuite de réception en réseau Mise sous tension de l’appareil nécessite deux types de signaux RDS • En appuyant sur SOURCE sur l’autoradio, vous —PI (identification du programme) et AF pouvez aussi mettre l’appareil sous tension. - Page 107 Insertion d’un disque Lecture d’un CD-R ou CD-RW • Si un disque est inséré à l’envers, le panneau • Utilisez uniquement des CD-R ou CD-RW de commande s’abaisse et le disque est éjecté “finalisés”. automatiquement de la fente d’insertion. • Cet autoradio peut uniquement reproduire les •...
- Page 108 Lecture d’une plage MP3/WMA • Cet auroradio peut reproduire les fichiers enregistrés au mode VBR (débit binaire • Cet autoradio peut reproduire les fichiers variable). MP3/WMA portant le code d’extension Les fichiers enregistrés au mode VBR <.mp3> ou <.wma> (quel que soit la casse des affichent une durée écoulée différente et lettres—majuscules/minuscules).
- Page 109 Éjection d’un disque • Si le nombre total d’image d’une animation dépasse le nombre suivant, les images en trop • Si le disque éjecté n’est pas retiré avant 15 (dépassant ce nombre) sont ignorées. secondes, il est réinséré automatiquement – Pour “Opening” et “Ending”: 30 dans la fente d’insertion pour le protéger de la –...
-
Page 110: Guide De Dépannage
Guide de dépannage Ce qui apparaît être un problème n’est pas toujours sérieux. Vérifiez les points suivants avant d’appeler un centre de service. Symptôme Causes Remèdes • Aucun son n’est entendu Le niveau de volume est Ajustez-le sur le niveau des enceintes. - Page 111 Symptôme Causes Remèdes • “No Files” apparaît un Aucun fichier MP3/WMA Changez le disque ou la carte n’est enregistré sur le disque. instant, puis le disque est éjecté. Les plages MP3/WMA n’ont Ajoutez le code d’extension pas de code d’extension <.mp3>...
- Page 112 Symptôme Causes Remèdes • Le transfert semble ne Il faut beaucoup de temps jamais se terminer. pour transférer une animation composée de beaucoup d’images (voir page 53). • L’animation d’ouverture et “KeyIn CFM” est réglé sur Choisissez “On” (voir page de fermeture n’apparaît pas.
-
Page 113: Spécifications
Spécifications SECTION DE L’AMPLIFICATEUR AUDIO SECTION DU LECTEUR CD/SD Puissance de sortie maximum: Type: Lecteur de disque compact Système de détection du signal: Capteur optique Avant: 50 W par canal sans contact (laser semi-conducteur) Arrière: 50 W par canal Nombre de canaux: 2 canaux (stéréo) Puissance de sortie en mode continu (RMS): Avant: 19 W par canal pour 4 Ω, 40 Hz... - Page 114 Having TROUBLE with operation? Please reset your unit Refer to page of How to reset your unit Vous avez des PROBLÈMES de fonctionnement? Réinitialisez votre appareil Référez-vous à la page intitulée Comment réinitialiser votre appareil EN, FR © 2005 Victor Company of Japan, Limited 0105DTSMDTJEIN...