Table des Matières

Publicité

Les langues disponibles

Les langues disponibles

Liens rapides

GEBRUIKSAANWIJZING
Speed Oven +
Lees deze gebruikershandleiding aandachtig alvorens de oven te gebruiken.
De fabrikanten zijn niet verantwoordelijk voor mogelijke problemen veroorzaakt door het
niet naleven van deze instructies door de gebruiker.
MA3884VC
MA3884VCT
www.lg.com
MFL33716112_06
Copyright © 2016 - 2018 LG Electronics Inc. Alle rechten voorbehouden.

Publicité

Table des Matières
loading

Sommaire des Matières pour LG Speed Oven + MA3884VC

  • Page 1 Lees deze gebruikershandleiding aandachtig alvorens de oven te gebruiken. De fabrikanten zijn niet verantwoordelijk voor mogelijke problemen veroorzaakt door het niet naleven van deze instructies door de gebruiker. MA3884VC MA3884VCT www.lg.com MFL33716112_06 Copyright © 2016 - 2018 LG Electronics Inc. Alle rechten voorbehouden.
  • Page 2: Table Des Matières

    Inhoud Inhoud __________________________________________________2 De werking van de microgolffunctie BELANGRIJKE VEILIGHEIDSINSTRUCTIES Microgolven zijn een vorm van energie die vergelijkbaar is met radio- en tv- LEES ZORGVULDIG EN BEWAAR VOOR RAADPLEGING IN DE golven en gewoon daglicht. Normaal gesproken worden de microgolven op TOEKOMST ______________________________________________3 ~ 20 hun reis door de atmosfeer zodanig verspreid dat ze geen effect hebben op Voorzorgsmaatregelen ____________________________________21...
  • Page 3: Belangrijke Veiligheidsinstructies Lees Zorgvuldig En Bewaar Voor Raadpleging In De Toekomst

    Bewaar voor toekomstig gebruik. Lees alle instructies en volg deze op BELANGRIJKE VEILIGHEIDSINSTRUCTIES voordat u uw stofzuiger gaat gebruiken opdat u het risico op brand, elektrocutie, persoonlijk letsel, of schade tijdens het gebruik van de oven LEES ZORGVULDIG EN BEWAAR VOOR voorkomt.
  • Page 4 Bewaar voor toekomstig gebruik. Lees alle instructies en volg deze op BELANGRIJKE VEILIGHEIDSINSTRUCTIES voordat u uw stofzuiger gaat gebruiken opdat u het risico op brand, elektrocutie, persoonlijk letsel, of schade tijdens het gebruik van de oven LEES ZORGVULDIG EN BEWAAR VOOR voorkomt.
  • Page 5 Bewaar voor toekomstig gebruik. Lees alle instructies en volg deze op BELANGRIJKE VEILIGHEIDSINSTRUCTIES voordat u uw stofzuiger gaat gebruiken opdat u het risico op brand, elektrocutie, persoonlijk letsel, of schade tijdens het gebruik van de oven LEES ZORGVULDIG EN BEWAAR VOOR voorkomt.
  • Page 6 Bewaar voor toekomstig gebruik. Lees alle instructies en volg deze op BELANGRIJKE VEILIGHEIDSINSTRUCTIES voordat u uw stofzuiger gaat gebruiken opdat u het risico op brand, elektrocutie, persoonlijk letsel, of schade tijdens het gebruik van de oven LEES ZORGVULDIG EN BEWAAR VOOR voorkomt.
  • Page 7 Bewaar voor toekomstig gebruik. Lees alle instructies en volg deze op BELANGRIJKE VEILIGHEIDSINSTRUCTIES voordat u uw stofzuiger gaat gebruiken opdat u het risico op brand, elektrocutie, persoonlijk letsel, of schade tijdens het gebruik van de oven LEES ZORGVULDIG EN BEWAAR VOOR voorkomt.
  • Page 8 Bewaar voor toekomstig gebruik. Lees alle instructies en volg deze op BELANGRIJKE VEILIGHEIDSINSTRUCTIES voordat u uw stofzuiger gaat gebruiken opdat u het risico op brand, elektrocutie, persoonlijk letsel, of schade tijdens het gebruik van de oven LEES ZORGVULDIG EN BEWAAR VOOR voorkomt.
  • Page 9 Bewaar voor toekomstig gebruik. Lees alle instructies en volg deze op BELANGRIJKE VEILIGHEIDSINSTRUCTIES voordat u uw stofzuiger gaat gebruiken opdat u het risico op brand, elektrocutie, persoonlijk letsel, of schade tijdens het gebruik van de oven LEES ZORGVULDIG EN BEWAAR VOOR voorkomt.
  • Page 10 Bewaar voor toekomstig gebruik. Lees alle instructies en volg deze op BELANGRIJKE VEILIGHEIDSINSTRUCTIES voordat u uw stofzuiger gaat gebruiken opdat u het risico op brand, elektrocutie, persoonlijk letsel, of schade tijdens het gebruik van de oven LEES ZORGVULDIG EN BEWAAR VOOR voorkomt.
  • Page 11 Bewaar voor toekomstig gebruik. Lees alle instructies en volg deze op BELANGRIJKE VEILIGHEIDSINSTRUCTIES voordat u uw stofzuiger gaat gebruiken opdat u het risico op brand, elektrocutie, persoonlijk letsel, of schade tijdens het gebruik van de oven LEES ZORGVULDIG EN BEWAAR VOOR voorkomt.
  • Page 12 Bewaar voor toekomstig gebruik. Lees alle instructies en volg deze op BELANGRIJKE VEILIGHEIDSINSTRUCTIES voordat u uw stofzuiger gaat gebruiken opdat u het risico op brand, elektrocutie, persoonlijk letsel, of schade tijdens het gebruik van de oven LEES ZORGVULDIG EN BEWAAR VOOR voorkomt.
  • Page 13 Bewaar voor toekomstig gebruik. Lees alle instructies en volg deze op BELANGRIJKE VEILIGHEIDSINSTRUCTIES voordat u uw stofzuiger gaat gebruiken opdat u het risico op brand, elektrocutie, persoonlijk letsel, of schade tijdens het gebruik van de oven LEES ZORGVULDIG EN BEWAAR VOOR voorkomt.
  • Page 14 Bewaar voor toekomstig gebruik. Lees alle instructies en volg deze op BELANGRIJKE VEILIGHEIDSINSTRUCTIES voordat u uw stofzuiger gaat gebruiken opdat u het risico op brand, elektrocutie, persoonlijk letsel, of schade tijdens het gebruik van de oven LEES ZORGVULDIG EN BEWAAR VOOR voorkomt.
  • Page 16 Bewaar voor toekomstig gebruik. Lees alle instructies en volg deze op BELANGRIJKE VEILIGHEIDSINSTRUCTIES voordat u uw stofzuiger gaat gebruiken opdat u het risico op brand, elektrocutie, persoonlijk letsel, of schade tijdens het gebruik van de oven LEES ZORGVULDIG EN BEWAAR VOOR voorkomt.
  • Page 17 Bewaar voor toekomstig gebruik. Lees alle instructies en volg deze op BELANGRIJKE VEILIGHEIDSINSTRUCTIES voordat u uw stofzuiger gaat gebruiken opdat u het risico op brand, elektrocutie, persoonlijk letsel, of schade tijdens het gebruik van de oven LEES ZORGVULDIG EN BEWAAR VOOR voorkomt.
  • Page 18 Bewaar voor toekomstig gebruik. Lees alle instructies en volg deze op BELANGRIJKE VEILIGHEIDSINSTRUCTIES voordat u uw stofzuiger gaat gebruiken opdat u het risico op brand, elektrocutie, persoonlijk letsel, of schade tijdens het gebruik van de oven LEES ZORGVULDIG EN BEWAAR VOOR voorkomt.
  • Page 19 Bewaar voor toekomstig gebruik. Lees alle instructies en volg deze op BELANGRIJKE VEILIGHEIDSINSTRUCTIES voordat u uw stofzuiger gaat gebruiken opdat u het risico op brand, elektrocutie, persoonlijk letsel, of schade tijdens het gebruik van de oven LEES ZORGVULDIG EN BEWAAR VOOR voorkomt.
  • Page 20 Metalen verpakkingen voor voedsel en dranken kunnen niet in de magnetron geplaatst worden tijdens het koken. Deze voorwaarde is niet van toepassing als de fabrikant op voorhand aangeeft dat metalen verpakkingen met een bep- aalde grootte en vorm wel geschikt zijn voor koken met de magnetron.
  • Page 21: Voorzorgsmaatregelen

    Voorzorgsmaatregelen Voorzorgsmaatregelen om mogelijke blootstelling aan overmatige microgolfenergie te vermijden. Voorzorgsmaatregelen om mogelijke blootstelling aan overmatige Bij het opwarmen van vloeistoffen, bv. soepen, sauzen en dranken, in uw microgolfenergie te vermijden. oven kan het voorkomen dat de vloeistof aanvankelijk niet borrelt en pas daarna plots begint te borrelen.
  • Page 22: Uitpakken En Installeren

    LAAG REK (Voor magnetron- en STOOMPLAAT * DEZE OVEN MAG NIET WORDEN GEBRUIKT VOOR COMMERCIËLE convectiemodus) CATERING. * DEZE OVEN KAN WORDEN GEBRUIKT ALS INGEBOUWD TYPE. STOOMSCHAAL * DE INBOUWSET GEMAAKT DOOR LG ELECTRONICS IS HIERVOOR METALEN SCHAAL (CRISPPLAAT) VEREIST.
  • Page 23 Steek de stekker in een standaard stopcontact. Druk op de STOP/WISSEN-toets. Controleer of de oven het enige elektrische Druk vervolgens één keer op de huishoudelijke apparaat is dat op deze wandcontactdoos START/Q-START-toets om een bereidingstijd is aangesloten. Indien de oven niet juist functioneert, trek dan de van 30 seconden in te stellen.
  • Page 24: Bedieningspaneel

    Bedieningspaneel 1. Display: U kunt de modusfunctie, de tijd van de dag, de kooktijd, de 7. Instellen/Klok: U kunt de geselecteerde kookcategorie, het vermogen of de vermogensstand. en kookcategorieën tonen. temperatuur van de magnetron bepalen en u kunt de tijd van de dag instellen.
  • Page 25: Klok Instellen

    Klok U kunt een 12-uurs of 24-uurs klok instellen. In het instellen volgende voorbeeld ziet u hoe u de tijd op 14:35 instelt voor de 24-uurs klok. Verzeker uzelf ervan uw oven correct te hebben geïnstalleerd, zoals eerder beschreven in deze handleiding. Druk op de toets STOP/WISSEN.
  • Page 26: Kinderslot

    Kinderslot Druk op de toets STOP/WISSEN. Houd STOP/WISSEN ingedrukt totdat “L” en op het scherm Uw oven is uitgerust met een verschijnt en er een PIEP te horen is. veiligheidssysteem dat voorkomt dat uw Het KINDERSLOT is nu ingeschakeld. oven ongewild in werking wordt gesteld.
  • Page 27: Snelstart

    Snelstart In het volgende voorbeeld wordt uitgelegd hoe voedsel in 2 minuten bereid wordt met een hoog vermogen van 900 W. Druk op de toets STOP/WISSEN. Druk viermaal op de toets START/Q-START om 2 minuten bereidingstijd Dankzij de snelstartfunctie kunt u via een met een HOOG vermogen (900 W) in te stellen.
  • Page 28: Bereidingen Met De Magnetronfunctie

    Bereidingen met In het volgende voorbeeld wordt uitgelegd hoe u in 5 minuten en 30 seconden voedsel kunt bereiden de Magnetronfunctie op 600 W. Verzeker uzelf ervan uw oven correct te hebben geïnstalleerd, zoals eerder beschreven in deze handleiding. Druk op de toets STOP/WISSEN. Draai aan de FUNCTIE knop om Magnetron te selecteren ( Uw oven beschikt over vijf Druk op Instellen/Klok voor bevestiging van modus.
  • Page 29: Vermogensstanden Van De Magnetronfunctie

    Vermogensstanden van de Deze oven is uitgerust met 5 vermogensstanden, die u maximale flexibiliteit en controle Magnetronfunctie over het bereidingsproces geven. Onderstaande tabel toont voorbeelden van levensmiddelen en de aanbevolen vermogensstand om hen in deze oven te bereiden. WATT GEBRUIK TOEBEHOREN VERMOGENSSTAND HOOG...
  • Page 30: Grillen

    Grillen In het volgende voorbeeld wordt er uitgelegd hoe u de grill gebruikt om in 12 minuten en 30 seconden voedsel te bereiden. Druk op de toets STOP/WISSEN. Draai aan de FUNCTIE knop om de Grill modus te selecteren ( Druk op Instellen/Klok voor bevestiging van modus.
  • Page 31: Convectie Voor Het Koken

    Convectie voor het In het volgende voorbeeld wordt er uitgelegd hoe de convectiemodus gebruikt voor het bereiden koken van voedsel gedurende 50 minuten op een temperatuur van 220 °C. De convectie-oven heeft een 1. Voor voorverwarmen 2. Voor koken temperatuurbereik van 40 °C, 100 ~ 230 °C. Drukt u op STOP/WISSEN.
  • Page 32: Snel Koken In De Combinatie Modus

    Snel Koken In het volgende voorbeeld wordt uitgelegd hoe u uw oven moet programmeren met een in de Combinatie modus (magnetron) vermogen van 360 W en de grillfunctie geactiveerd, voor een kooktijd van 25 minuten. Speed Combi Druk op STOP/WISSEN. (Co-1, 2, 3) Draai aan de FUNCTIEL knop en selecteer snelle combinatie ( ) voor...
  • Page 33 Snel Koken Na het koken moet u ovenhandschoenen dragen om de metalen schaal / bak uit de in de Combinatie modus oven te halen omdat deze heet is. Speed Combi Druk op STOP/WISSEN. (Co-4) Draai aan de FUNCTIEL knop en selecteer snelle combinatie ( ) voor het selecteren van de snelle combinatiemodus (Co-4).
  • Page 34 Snel Koken In het volgende voorbeeld wordt er uitgelegd hoe u uw oven programmeert met een in de Combinatie modus magnetronvermogen van 360 W en een convectietemperatuur van 200 °C gedurende een kooktijd van 25 minuten. Speed Combi Druk op STOP/WISSEN. (Co-5) Draai aan de FUNCTIEL knop en selecteer snelle combinatie ( ) voor...
  • Page 35: Snelmenu

    Snelmenu In het volgende voorbeeld wordt er uitgelegd hoe u 0,6 kg aan gepofte aardappelen bereidt (Ac 8). Druk op STOP/WISSEN. Druk op Snelmenu ( Menu's voor Snelmenu worden geprogrammeerd en hiermee kunt u uw meeste favoriete voedsel snel koken door het selecteren van het type voedsel en het gewicht van het voedsel.
  • Page 36 Gewichts Voedsel- Categorie Aanwijzingen Functie Kookgerei limiet temperatuur Ac 1 Bevroren 0,30 ~ 0,50 kg Metalen schaal Bevroren Deze functie is voor het bereiden van bevroren pizza. Verwijder alle Snelmenu Pizza verpakkingen en plaats op het rek op de metalen bak. Laat na het koken 1-2 minuten afkoelen.
  • Page 37 Gewichts Voedsel- Categorie Aanwijzingen Functie Kookgerei limiet temperatuur Ac 7 Gebraden 0,80 ~ 1,80 kg Laag rek + Gekoeld Smeer het rundvlees in met gesmolten margarine of boter. Plaats op het lage Snelmenu Rundvlees Metalen schaal rek. Draai het voedsel om na de PIEP. Druk om het koken te hervatten.
  • Page 38 Gewichts Voedsel- Categorie Aanwijzingen Functie Kookgerei limiet temperatuur Ac 12 Rijst/ 0,10 ~ 0,30 kg Metalen schaal Kamertemperatuur Plaats de rijst en het kookwater met Snelmenu tot 1 koffielepel zout in een Pasta + Voor magnetron diepe en grote kom (900 ml). Bij het piepsignaal roert u eenmaal de geschikte kom met rijst om.
  • Page 39: Stomen

    Stomen In onderstaand voorbeeld ziet u hoe u 0,6 kg aan groene bonen bereidt (St 8). Druk op de toets STOP/WISSEN. Met deze functie kunt u stomen. Let op: 1. Gebruik altijd ovenhandschoenen wanneer u een stoomschaal uit de oven haalt.
  • Page 40 HANDLEIDING VOOR STOMEN Temperatuur Grootte van Functie Ingrediënt Gewicht Kooktoestel voorafgaand Bereidingsmethode ingrediënt aan koken Stomen Stoomdeksel St 1 Garnalen 0,20 ~ 0,80 kg Koelkast Kleine garnalen (garnalen, Was de garnalen. Giet 400 ml water of witte Stoomplaat grote garnalen, kleine wijn in de stoomoven.
  • Page 41 Temperatuur Grootte van Functie Ingrediënt Gewicht Kooktoestel voorafgaand Bereidingsmethode ingrediënt aan koken Stomen St 5 Stoomdeksel Wortel 0,20 ~ 0,80 kg Kamertemperatuur Ronde plakjes of fijngehakt Giet 400 ml water in de stoomoven. Plaats de Stoomplaat stoomplaat met de groente bovenop de Stoomwaterbak stoomoven.
  • Page 42 Temperatuur Grootte van voorafgaand Functie Ingrediënt Gewicht Kooktoestel Bereidingsmethode ingrediënt aan koken Stomen St 11 Stoomdeksel Aardappel 0,20 ~ 0,80 kg Kamertemperatuur Hele Giet 400 ml water in de stoomoven. Plaats de Stoomplaat stoomplaat met de groente bovenop de Stoomwaterbak stoomoven.
  • Page 43 De temperatuur en de dichtheid van voedsel varieert. Het wordt daarom aangeraden om het voedsel hierop te controleren Automatisch alvorens het te beginnen bereiden. Let in het bijzonder op bij grote stukken vlees en kip. Sommige voedingsmiddelen moeten niet volledig ontdooid zijn vooraleer ze worden bereid. Vis, bijvoorbeeld, is zo snel gaar dat het soms beter is om dit reeds te Ontdooien beginnen bereiden wanneer hij nog licht bevroren is.
  • Page 44: Richtlijnen Voor Het Ontdooien

    RICHTLIJNEN VOOR HET ONTDOOIEN * Plaats de te ontdooien levensmiddelen in een voor de magnetron geschikte container onafgedekt op het lage rek op de metalen plaat. * Scherm indien nodig kleine stukken vlees of gevogelte af met vlakke gedeelten aluminiumfolie. Zo voorkomt u dat dunne gedeelten warm worden tijdens het ontdooien.
  • Page 45: Langere/Kortere Bereidingstijd

    Langere/Kortere In het volgende voorbeeld wordt er uitgelegd hoe u de tijden van de vooraf ingestelde bereidingstijd programma’s uit het Snelmenu kunt verlengen of verkorten. Druk op de toets STOP/WISSEN. Als u van mening bent dat het voedsel te Stel het vereiste programma uit het Snelmenu in. lang of te kort gekookt heeft bij het * Zie Snelmenu programma's.
  • Page 46: Ez-Clean

    EZ-Clean In het volgende voorbeeld, kunt u zien hoe u geurtjes uit de oven verwijdert. Druk op de toets STOP/WISSEN. De oven heeft een speciale functie om de Draai aan de FUNCTIE knop om EZ-Clean te selecteren ( geur in de oven te verwijderen. Druk op Instellen/Klok voor EZ-Clean bevestiging.
  • Page 47: Voor Magnetron Geschikt Kookgerei

    Voor Magnetron geschikt kookgerei Gebruik nooit metalen of met metaal afgeboorde keukengerei wanneer u de Papier magnetronfunctie gebruikt. Papieren borden en houders zijn geschikt en veilig voor gebruik met de Microgolven kunnen metaal niet binnendringen. Ze worden afgekaatst door magnetronfunctie, op voorwaarde dat de bereidingstijd kort is en dat het metalen voorwerpen in de oven, waardoor vonken ontstaan die op bliksems lijken voedsel dat ze bevatten een laag vet- en vochtgehalte heeft.
  • Page 48: Voedseleigenschappen En Bereidingen Met De Combimagnetron

    Voedseleigenschappen en bereidingen met de combimagnetron De zaken in het oog houden Vochtigheidsgehalte van het voedsel De recepten in het boek zijn met grote zorgvuldigheid geformuleerd, maar het succes van de Aangezien de warmte die wordt opgewekt door microgolven vocht doet verdampen moet betrekkelijk bereiding hangt af van hoeveel aandacht u aan het voedsel besteedt terwijl het bereidt.
  • Page 49 Voedseleigenschappen en bereidingen met de combimagnetron Roeren Uw oven reinigen Roeren is een van de belangrijkste technieken bij het koken met de combimagnetron. Bij conventioneel koken wordt het voedsel geroerd om het beter te mengen. Bij het koken met microgolven dient het roeren om de warmte te spreiden en te herverdelen.
  • Page 50: Vragen En Antwoorden

    Vragen en antwoorden V Wat scheelt er als het ovenlichtje niet brandt? V Is het mogelijk om popcorn te bereiden in deze oven? A Er zijn tal van mogelijke oorzaken als het ovenlichtje niet brandt. A Ja, bij gebruik van een van de twee hieronder omschreven methoden Bijvoorbeeld: 1 Keukengerei voor poffen van popcorn dat specifiek is ontworpen voor Het lampje is stuk.
  • Page 51: Technische Gegevens

    Vervanging van de voedingskabel en/of enige interventie waarbij het apparaat moet worden geopend, mag alleen • U kunt de gebruikershandleiding downloaden van de site: worden uitgevoerd door gekwalificeerd technisch personeel. http://www.lg.com...
  • Page 53 MFL33716112_06 Copyright © 2016 - 2018 LG Electronics Inc. Tous droits réservés.
  • Page 54: Comment Fonctionne Le Micro-Ondes

    Sommaire Comment fonctionne le micro-ondes Sommaire _______________________________________________2 CONSIGNES DE SÉCURITÉ IMPORTANTES Les micro-ondes constituent une forme d’énergie similaire aux ondes de À LIRE ATTENTIVEMENT ET À CONSERVER SOIGNEUSEMENT __3 ~ 20 radio et de télévision et à la lumière du jour. Normalement, les micro- Précautions ______________________________________________21 ondes se dirigent vers l’extérieur lorsqu’elles traversent l’atmosphère et elles Déballage et installation ___________________________________________22 ~ 23...
  • Page 55: Consignes De Sécurité Importantes

    CONSIGNES DE SÉCURITÉ IMPORTANTES LIRE AVEC ATTENTION ET GARDER POUR FUTURES UTILISATIONS. Suivez toutes les instructions avant d’utiliser votre four pour éviter les risques d’incendie, de À LIRE ATTENTIVEMENT ET À choc électrique, de blessures ou de dégâts pour le four lors de son utilisation. Ce guide ne recouvre pas toutes les conditions possibles.
  • Page 56: Consignes De Sécurité Importantesà Lire Attentivement Et Àconserver Soigneusement

    CONSIGNES DE SÉCURITÉ IMPORTANTES LIRE AVEC ATTENTION ET GARDER POUR FUTURES UTILISATIONS. Suivez toutes les instructions avant d’utiliser votre four pour éviter les À LIRE ATTENTIVEMENT ET À risques d’incendie, de choc électrique, de blessures ou de dégâts pour le four lors de son utilisation.
  • Page 57 CONSIGNES DE SÉCURITÉ IMPORTANTES LIRE AVEC ATTENTION ET GARDER POUR FUTURES UTILISATIONS. Suivez toutes les instructions avant d’utiliser votre four pour éviter les risques d’incendie, de À LIRE ATTENTIVEMENT ET À choc électrique, de blessures ou de dégâts pour le four lors de son utilisation. Ce guide ne recouvre pas toutes les conditions possibles.
  • Page 58 CONSIGNES DE SÉCURITÉ IMPORTANTES LIRE AVEC ATTENTION ET GARDER POUR FUTURES UTILISATIONS. Suivez toutes les instructions avant d’utiliser votre four pour éviter les À LIRE ATTENTIVEMENT ET À risques d’incendie, de choc électrique, de blessures ou de dégâts pour le four lors de son utilisation.
  • Page 59 CONSIGNES DE SÉCURITÉ IMPORTANTES LIRE AVEC ATTENTION ET GARDER POUR FUTURES UTILISATIONS. Suivez toutes les instructions avant d’utiliser votre four pour éviter les risques d’incendie, de À LIRE ATTENTIVEMENT ET À choc électrique, de blessures ou de dégâts pour le four lors de son utilisation. Ce guide ne recouvre pas toutes les conditions possibles.
  • Page 60 CONSIGNES DE SÉCURITÉ IMPORTANTES LIRE AVEC ATTENTION ET GARDER POUR FUTURES UTILISATIONS. Suivez toutes les instructions avant d’utiliser votre four pour éviter les À LIRE ATTENTIVEMENT ET À risques d’incendie, de choc électrique, de blessures ou de dégâts pour le four lors de son utilisation.
  • Page 61 CONSIGNES DE SÉCURITÉ IMPORTANTES LIRE AVEC ATTENTION ET GARDER POUR FUTURES UTILISATIONS. Suivez toutes les instructions avant d’utiliser votre four pour éviter les risques d’incendie, de À LIRE ATTENTIVEMENT ET À choc électrique, de blessures ou de dégâts pour le four lors de son utilisation. Ce guide ne recouvre pas toutes les conditions possibles.
  • Page 62 CONSIGNES DE SÉCURITÉ IMPORTANTES LIRE AVEC ATTENTION ET GARDER POUR FUTURES UTILISATIONS. Suivez toutes les instructions avant d’utiliser votre four pour éviter les À LIRE ATTENTIVEMENT ET À risques d’incendie, de choc électrique, de blessures ou de dégâts pour le four lors de son utilisation.
  • Page 63 CONSIGNES DE SÉCURITÉ IMPORTANTES LIRE AVEC ATTENTION ET GARDER POUR FUTURES UTILISATIONS. Suivez toutes les instructions avant d’utiliser votre four pour éviter les risques d’incendie, de À LIRE ATTENTIVEMENT ET À choc électrique, de blessures ou de dégâts pour le four lors de son utilisation. Ce guide ne recouvre pas toutes les conditions possibles.
  • Page 64 CONSIGNES DE SÉCURITÉ IMPORTANTES LIRE AVEC ATTENTION ET GARDER POUR FUTURES UTILISATIONS. Suivez toutes les instructions avant d’utiliser votre four pour éviter les À LIRE ATTENTIVEMENT ET À risques d’incendie, de choc électrique, de blessures ou de dégâts pour le four lors de son utilisation.
  • Page 65 CONSIGNES DE SÉCURITÉ IMPORTANTES LIRE AVEC ATTENTION ET GARDER POUR FUTURES UTILISATIONS. Suivez toutes les instructions avant d’utiliser votre four pour éviter les risques d’incendie, de À LIRE ATTENTIVEMENT ET À choc électrique, de blessures ou de dégâts pour le four lors de son utilisation. Ce guide ne recouvre pas toutes les conditions possibles.
  • Page 66 CONSIGNES DE SÉCURITÉ IMPORTANTES LIRE AVEC ATTENTION ET GARDER POUR FUTURES UTILISATIONS. Suivez toutes les instructions avant d’utiliser votre four pour éviter les À LIRE ATTENTIVEMENT ET À risques d’incendie, de choc électrique, de blessures ou de dégâts pour le four lors de son utilisation.
  • Page 68 CONSIGNES DE SÉCURITÉ IMPORTANTES LIRE AVEC ATTENTION ET GARDER POUR FUTURES UTILISATIONS. Suivez toutes les instructions avant d’utiliser votre four pour éviter les À LIRE ATTENTIVEMENT ET À risques d’incendie, de choc électrique, de blessures ou de dégâts pour le four lors de son utilisation.
  • Page 69 CONSIGNES DE SÉCURITÉ IMPORTANTES LIRE AVEC ATTENTION ET GARDER POUR FUTURES UTILISATIONS. Suivez toutes les instructions avant d’utiliser votre four pour éviter les risques d’incendie, de À LIRE ATTENTIVEMENT ET À choc électrique, de blessures ou de dégâts pour le four lors de son utilisation. Ce guide ne recouvre pas toutes les conditions possibles.
  • Page 70 CONSIGNES DE SÉCURITÉ IMPORTANTES LIRE AVEC ATTENTION ET GARDER POUR FUTURES UTILISATIONS. Suivez toutes les instructions avant d’utiliser votre four pour éviter les À LIRE ATTENTIVEMENT ET À risques d’incendie, de choc électrique, de blessures ou de dégâts pour le four lors de son utilisation.
  • Page 71 CONSIGNES DE SÉCURITÉ IMPORTANTES LIRE AVEC ATTENTION ET GARDER POUR FUTURES UTILISATIONS. Suivez toutes les instructions avant d’utiliser votre four pour éviter les risques d’incendie, de À LIRE ATTENTIVEMENT ET À choc électrique, de blessures ou de dégâts pour le four lors de son utilisation. Ce guide ne recouvre pas toutes les conditions possibles.
  • Page 72 Il n’est pas autorisé d’utiliser des récipients ATTENTION métalliques pour aliments et boissons dans le 36. Les opérations de dépannage ou de four à micro -ondes. réparation impliquant le retrait du Cette exigence n’est pas applicable si le fabri- couvercle qui protège contre l’exposition cant spécifie la taille et la forme des récipients métalliques appropriés pour la cuisson dans aux micro-ondes, doivent être...
  • Page 73: Précautions

    Précautions Précautions à prendre pour éviter toute exposition excessive aux ondes. Il est impossible d’utiliser votre micro-ondes avec la porte ouverte en raison Lorsque vous réchauffez des liquides, par exemple des soupes, des sauces et des boissons dans votre four à micro-ondes, une ébullition soudaine du des dispositifs de sécurité...
  • Page 74: Déballage Et Installation

    * CE FOUR NE DOIT PAS ETRE UTILISE A DES FINS PROFESSIONNELLES CUISEUR chaleur tournante) (TRAITEURS). PLAT VAPEUR * CE FOUR PEUT ÊTRE UTILISÉ DANS UN MEUBLE ENCASTRÉ. PLATEAU (À REMPLIR * LE KIT D'ENCASTREMENT DE LG ELECTRONICS DOIT ÊTRE UTILISÉ. D'EAU) METALLIQUE...
  • Page 75 Branchez votre four sur une prise standard. Assurez- Appuyez sur la touche STOP/WISSEN, vous que votre four est le seul appareil à être branché puis appuyez une fois sur la touche sur cette prise. Si votre four ne fonctionne pas START/Q-START pour régler le temps de cuisson à...
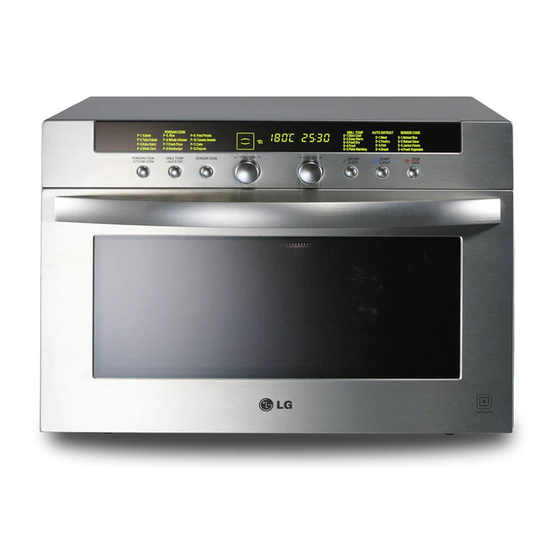
  • Page 76: Bandeau De Commande

    Bandeau de commande 1. Afficheur: Indique l’heure, le temps de cuisson, le niveau de puissance et 6. Molette de BEDIENING: les types de cuisson. • Vous pouvez fixer le temps de cuisson, la température ou la puissance, 2. Snelmenu: Cette fonction vous permet de cuisiner rapidement la plupart de le poids et les programmes de cuisson.
  • Page 77: Réglage De L'horloge

    Réglage de L’exemple suivant vous montre comment régler l’heure : par exemple 14:35. Assurez-vous que vous l’horloge avez enlevé tous les emballages de votre four. Assurez-vous que vous avez bien suivi les conseils donnés dans ce manuel d’utilisation pour l’installation de votre four. Appuyez sur STOP/WISSEN.
  • Page 78: Sécurité Enfant

    Sécurité Enfant Appuyez sur STOP/WISSEN. Votre four possède une fonction qui Appuyez et maintenez enfoncée la touche STOP/WISSEN jusqu’à voir permet d’éviter les accidents. affichés “L” et “ “ et entendre un bip. Une fois la sécurité enfant activée, La SECURITE ENFANT est maintenant activée. aucune fonction ne peut être utilisée et aucune cuisson ne peut être effectuée.
  • Page 79: Démarrage Rapide

    Démarrage L’exemple suivant vous montre comment régler un temps de cuisson de 2 minutes sur la position de puissance rapide MAXIMUM (900 W). Appuyez sur STOP/WISSEN. Appuyez quatre fois sur START/Q-START pour sélectionner un temps de La fonction Quick Start vous permet de cuisson de 2 minutes sur la position de puissance MAXIMUM définir des intervalles de 30 secondes sur (900 W).
  • Page 80: Micro-Ondes(Cuisson Avec Modulation De Puissance)

    Micro-ondes L’exemple suivant vous montre comment cuire des aliments avec une puissance de 600 W, pendant (Cuisson avec modulation de puissance) 5 minutes et 30 secondes. Assurez-vous que vous avez installé votre four correctement en suivant les instructions indiquées dans ce manuel d’utilisation. Appuyez sur STOP/WISSEN.
  • Page 81 Niveaux Pour vous donner plus de souplesse et vous permettre de mieux contrôler la cuisson, votre four à micro-ondes de puissance possède 5 niveaux de puissance différents. Le tableau ci-dessous montre des exemples d’aliments et fournit des recommandations sur les niveaux de puissance de votre four à micro-ondes. NIVEAU DE PUISSANCE UTILISATION...
  • Page 82 Cuisson L’exemple suivant vous montre comment utiliser la fonction Gril-1 pour cuire des aliments pendant 12 minutes Gril et 30 secondes. Appuyez sur STOP/WISSEN. Tournez la molette de Sélection de FUNCTIE pour sélectionner Gril ( Cette fonction vous permettra de dorer Appuyez sur Instellen/Klok pour confirmer la fonction Gril.
  • Page 83: Cuisson Chaleur

    Cuisson Chaleur L’exemple suivant vous montre comment utiliser la chaleur tournante pour cuisiner certains aliments Tournante pendant 50 minutes à 220 °C. En mode Chaleur tournante, la température 1. Pour préchauffer le four. 2. Pour cuire. du four peut varier entre 40 °C et Appuyez sur STOP/WISSEN.
  • Page 84: Niveaux De Puissance

    Cuisson combinée L’exemple suivant vous montre comment programmer votre four avec une puissance micro de 360 W et gril rapide pour un temps de cuisson de 25 minutes. Speed Combi (Co-1, 2, 3) Appuyez sur STOP/WISSEN. Tournez la molette de Sélection de FUNCTIE ( ) pour sélectionner le mode de cuisson combinée (Co-1, 2, 3).
  • Page 85 Cuisson combinée L’exemple suivant vous montre comment programmer votre four avec une puissance de 360 W et à une rapide température de convection de 200 °C, pour un temps de cuisson de 25 minutes. Speed Combi Appuyer sur STOP/WISSEN . (Co-4) Tournez la molette de Sélection de FUNCTIE ( ) pour sélectionner le...
  • Page 86 Cuisson combinée L’exemple suivant vous montre comment programmer votre four avec une puissance de 360 W et à une rapide température de 200 °C, pour un temps de cuisson de 25 minutes. Speed Combi (Co-5) Appuyez sur STOP/WISSEN. Tournez la molette de Sélection de FUNCTIE ( ) pour sélectionner le mode de cuisson combinée (Co-5).
  • Page 87: Cuisson Automatique Rapide

    Cuisson automatique L’exemple suivant vous montre comment cuire 0,6 kg de pommes de terres (Ac 8). rapide Appuyez sur STOP/WISSEN. Appuyez sur Snelmenu ( CUISSON AUTOMATIQUE RAPIDE vous permet de cuire facilement la plupart de vos aliments favoris en sélectionnant le type d’aliments et le poids de ceux-ci.
  • Page 88: Guide Cuisson Automatique Rapide

    GUIDE CUISSON AUTOMATIQUE RAPIDE Température Instructions Catégorie Fonction Limite de poids Ustensile des aliments Cuisson Ac 1 Pizza 0,30 ~ 0,50 kg Plateau métallique Congélation Cette fonction permet de cuire des pizzas surgelées. Enlevez tous les surgelée emballages et placez la pizza sur le plateau métallique. Après la cuisson, automatique laissez reposer la pizza 1 à...
  • Page 89 GUIDE CUISSON AUTOMATIQUE RAPIDE Température Catégorie Instructions Fonction Limite de poids Ustensile des aliments Cuisson Ac 6 Rôti de 0,80 ~ 1,80 kg Réfrigération Grille basse + Dégraissez le rôti de porc. Enduisez-le de margarine fondue ou de beurre. Placez-le automatique porc Plateau métallique...
  • Page 90 GUIDE CUISSON AUTOMATIQUE RAPIDE Température Catégorie Instructions Fonction Limite de poids Ustensile des aliments Cuisson Ac 11 Légumes 0,20 ~ 1,00 kg Grille basse + Congélation Placez les légumes dans un récipient spécial micro-ondes. Ajoutez de l’eau. surgelés Plateau métallique Recouvrez-les d’un film.
  • Page 91: Vapeur Du Chef

    Cuisson à la Dans l’exemple suivant, je vous montrerai comment cuisiner 0,6 kg de Haricots verts (St 8). Vapeur du Chef Cette fonction vous permet de cuisiner à Appuyez sur STOP/WISSEN. la vapeur. AVERTISSEMENT: 1. Utilisez toujours des gants de protection pour retirer un CUITVAPEUR du four.
  • Page 92: Cuisson À La Vapeur Du Chef

    GUIDE DE LA CUISSON VAPEUR Température Fourchette de Aliments Taille de l’ingrédient Fonction Ustensile Méthode de cuisson poids initiale Cuisson St 1 Gambas 0,20 - 0,80 kg Cloche Steamchef Réfrigération Petites gambas gambas Laver les crevettes. Verser 400 ml d’eau Grille basse + (gambas, grosses crevettes, ou de vin blanc dans le cuiseur.
  • Page 93 GUIDE DE LA CUISSON VAPEUR Fourchette de Température Aliments Taille de l’ingrédient Fonction Ustensile Méthode de cuisson initiale poids Cuisson St 5 Carottes 0,20 - 0,80 kg Cloche Steamchef Temp. Coupés en rondelles ou en dés Verser 400 ml d’eau ou de vin blanc dans Grille basse + ambiante le cuiseur.
  • Page 94 GUIDE DE LA CUISSON VAPEUR Fourchette Température Aliments Taille de l’ingrédient Fonction Ustensile Méthode de cuisson initiale de poids Cuisson St 9 Epinards 0,20 - 0,50 kg Cloche Steamchef Cuire comme indiqué ci-dessus. Temp. Grille basse + ambiante vapeur Plateau métallique Petite tou e St 10 Choux...
  • Page 95: Décongélation Automatique

    La température et la densité des aliments varient. Avant de commencer la cuisson, il est recommandé de vérifier Décongélation les aliments avant de commencer la cuisson. Faites particulièrement attention aux gros morceaux de viande et de poulet, certains aliments peuvent ne pas être complètement décongelés avant de les cuire. Par exemple, le poisson automatique cuit tellement vite qu’il est souvent conseillé...
  • Page 96: Guide De Décongélation

    GUIDE DE DÉCONGÉLATION * Les aliments à décongeler doivent être placés dans un récipient adapté pour micro-ondes et doivent être non couverts sur le trépied bas sur le plateau métallique. * Si nécessaire, couvrez les petites parties de viande ou de volaille avec des bandes de papier aluminium. Cela permettra aux parties fines de ne pas se refroidir pendant la décongélation.
  • Page 97: Touche Plus Ou Moins(Cuisson Plus Ou Moins Longue)

    Touche Plus ou Moins L’exemple suivant vous montre comment modifier les programmes prédéfinis (Cuisson Plus ou moins longue) de CUISSON RAPIDE AUTOMATIQUE pour obtenir un temps de cuisson plus long ou plus court, selon le cas. Appuyez sur STOP/WISSEN. Choisissez le programme Snelmenu. Si vous trouvez que votre aliment est trop * Voir Cuisson automatique.
  • Page 98: Désodoriser

    Désodoriser L´exemple suivant vous montre comment éliminer les odeurs du four à micro-ondes. Appuyez sur STOP/WISSEN. Le four est doté d'une fonction spéciale Tournez la molette de Sélection de FUNCTIE pour sélectionner pour y enlever les odeurs. Désodoriser( Vous pouvez utiliser la fonction de Appuyez sur Instellen/Klok pour confirmer.
  • Page 99: Spécifiques Micro-Ondes

    Ustensiles Spécifiques micro-ondes Si vous utilisez la fonction micro-ondes, n’utilisez jamais d’ustensiles Récipients en carton et essuie-tout métalliques ou d’ustensiles qui ont des garnitures métalliques Les assiettes et récipients en carton peuvent être utilisés sans danger dans Les ondes ne peuvent pas pénétrer le métal. Elles risquent de faire rebondir tout votre four à...
  • Page 100: Caractéristiques Des Aliments Et Cuisson Au Micro-Ondes

    Caractéristiques des aliments et Cuisson au micro-ondes Surveiller les aliments pendant la cuisson Teneur en humidité des aliments Les recettes du livre ont été concoctées avec une grande attention, mais votre réussite dans la Etant donné que la chaleur générée par les micro-ondes a tendance à évaporer l’humidité, il faut préparation de ces recettes dépend de l’attention que vous apportez aux aliments pendant leur arroser les aliments relativement secs, tels que les rôtis et certains légumes avec un peu d’eau, avant la cuisson.
  • Page 101: Pour Nettoyer Votre Four

    Caractéristiques des aliments et Cuisson au micro-ondes Remuer les aliments Pour nettoyer votre four Le fait de remuer les aliments est une des techniques les plus importantes de la cuisson au micro-ondes. En cuisine traditionnelle, les aliments sont remués pour bien les mélanger. Toutefois, les aliments cuits au micro- 1 Garder l’intérieur du four propre ondes doivent être remués pour répandre et redistribuer la chaleur.
  • Page 102: Questions Et Réponses

    Questions et Réponses Q Que se passe-t-il si la lampe-témoin du four ne s’allume pas ? Q Est-il possible de faire du pop corn dans un four à micro-ondes ? R Il peut y avoir plusieurs raisons pour lesquelles la lampe du four ne R R Oui, si vous utilisez une des deux méthodes indiquées ci-dessous s’allume pas.
  • Page 103: Spécifications Techniques

    (risque d’éclatement du récipient, avant, pendant ou oprès domestique. l’ouverture de la parte) Le remplacement du cable d’alimentation et/ou toute intervention nécessitant l’ouverture de l’appareil ne doit s’effectuer que par du • Vous pouvez télécharger le manuel d'utilisation sur le site : personnel technique qualifié. http://www.lg.com...
  • Page 105 Please read this owner's manual thoroughly before operating. The manufacturers are not liable for any problems caused by the user's failure to observe these instructions. MA3884VC MA3884VCT www.lg.com MFL33716112_06 Copyright © 2016 - 2018 LG Electronics Inc. All Rights Reserved.
  • Page 106 Contents Contents _________________________________________________2 How the Microwave Function Works IMPORTANT SAFETY INSTRUCTIONS Microwaves are a form of energy similar to radio and television waves and READ CAREFULLY AND KEEP FOR FUTURE REFERENCE ________3 ~ 20 ordinary daylight. Normally, microwaves spread outwards as they travel Precautions_______________________________________________21 through the atmosphere and disappear without effect.
  • Page 107: Important Safety Instructions

    Please keep for future reference. Read and follow all instructions before IMPORTANT SAFETY INSTRUCTIONS using your oven to prevent the risk of fire, electric shock, personal injury, READ CAREFULLY AND KEEP FOR or damage when using the oven. This guide do not cover all possible conditions that may occur.
  • Page 108: Important Safety Instructions Read Carefully And Keep For Future Reference

    Please keep for future reference. Read and follow all instructions before IMPORTANT SAFETY INSTRUCTIONS using your oven to prevent the risk of fire, electric shock, personal injury, READ CAREFULLY AND KEEP FOR or damage when using the oven. This guide do not cover all possible conditions that may occur.
  • Page 109 Please keep for future reference. Read and follow all instructions before IMPORTANT SAFETY INSTRUCTIONS using your oven to prevent the risk of fire, electric shock, personal injury, READ CAREFULLY AND KEEP FOR or damage when using the oven. This guide do not cover all possible conditions that may occur.
  • Page 110 Please keep for future reference. Read and follow all instructions before IMPORTANT SAFETY INSTRUCTIONS using your oven to prevent the risk of fire, electric shock, personal injury, READ CAREFULLY AND KEEP FOR or damage when using the oven. This guide do not cover all possible conditions that may occur.
  • Page 111 Please keep for future reference. Read and follow all instructions before IMPORTANT SAFETY INSTRUCTIONS using your oven to prevent the risk of fire, electric shock, personal injury, READ CAREFULLY AND KEEP FOR or damage when using the oven. This guide do not cover all possible conditions that may occur.
  • Page 112 Please keep for future reference. Read and follow all instructions before IMPORTANT SAFETY INSTRUCTIONS using your oven to prevent the risk of fire, electric shock, personal injury, READ CAREFULLY AND KEEP FOR or damage when using the oven. This guide do not cover all possible conditions that may occur.
  • Page 113 Please keep for future reference. Read and follow all instructions before IMPORTANT SAFETY INSTRUCTIONS using your oven to prevent the risk of fire, electric shock, personal injury, READ CAREFULLY AND KEEP FOR or damage when using the oven. This guide do not cover all possible conditions that may occur.
  • Page 114 Please keep for future reference. Read and follow all instructions before IMPORTANT SAFETY INSTRUCTIONS using your oven to prevent the risk of fire, electric shock, personal injury, READ CAREFULLY AND KEEP FOR or damage when using the oven. This guide do not cover all possible conditions that may occur.
  • Page 115 Please keep for future reference. Read and follow all instructions before IMPORTANT SAFETY INSTRUCTIONS using your oven to prevent the risk of fire, electric shock, personal injury, READ CAREFULLY AND KEEP FOR or damage when using the oven. This guide do not cover all possible conditions that may occur.
  • Page 116 Please keep for future reference. Read and follow all instructions before IMPORTANT SAFETY INSTRUCTIONS using your oven to prevent the risk of fire, electric shock, personal injury, READ CAREFULLY AND KEEP FOR or damage when using the oven. This guide do not cover all possible conditions that may occur.
  • Page 117 Please keep for future reference. Read and follow all instructions before IMPORTANT SAFETY INSTRUCTIONS using your oven to prevent the risk of fire, electric shock, personal injury, READ CAREFULLY AND KEEP FOR or damage when using the oven. This guide do not cover all possible conditions that may occur.
  • Page 118 Please keep for future reference. Read and follow all instructions before IMPORTANT SAFETY INSTRUCTIONS using your oven to prevent the risk of fire, electric shock, personal injury, READ CAREFULLY AND KEEP FOR or damage when using the oven. This guide do not cover all possible conditions that may occur.
  • Page 120 Please keep for future reference. Read and follow all instructions before IMPORTANT SAFETY INSTRUCTIONS using your oven to prevent the risk of fire, electric shock, personal injury, READ CAREFULLY AND KEEP FOR or damage when using the oven. This guide do not cover all possible conditions that may occur.
  • Page 121 Please keep for future reference. Read and follow all instructions before IMPORTANT SAFETY INSTRUCTIONS using your oven to prevent the risk of fire, electric shock, personal injury, READ CAREFULLY AND KEEP FOR or damage when using the oven. This guide do not cover all possible conditions that may occur.
  • Page 122 Please keep for future reference. Read and follow all instructions before IMPORTANT SAFETY INSTRUCTIONS using your oven to prevent the risk of fire, electric shock, personal injury, READ CAREFULLY AND KEEP FOR or damage when using the oven. This guide do not cover all possible conditions that may occur.
  • Page 123 Please keep for future reference. Read and follow all instructions before IMPORTANT SAFETY INSTRUCTIONS using your oven to prevent the risk of fire, electric shock, personal injury, READ CAREFULLY AND KEEP FOR or damage when using the oven. This guide do not cover all possible conditions that may occur.
  • Page 124 Metallic containers for food and bever- ages are not allowed during microwave 36. It is hazardous for anyone other cooking. than a competent person to carry This requirement is not applicable if the out any service or repair operation manufacturer specifies size and shape that involves the removal of a cover of metallic containers suitable for micro- which gives protection against...
  • Page 125: Precautions

    Precautions Precautions to avoid possible exposure to excessive microwave energy. You cannot operate your oven with the door open due to the safety interlocks When heating liquids, e.g. soups, sauces and beverages in your oven with built into the door mechanism. These safety interlocks automatically switch off microwave function, delayed eruptive boiling can occur without evidence of any cooking activity when the door is opened;...
  • Page 126: Unpacking & Installing

    * THIS OVEN SHOULD NOT BE USED FOR COMMERCIAL CATERING STEAM WATER PURPOSES. BOWL * THIS OVEN CAN BE USED AS BUILT-IN TYPE. METAL TRAY (CRISP TRAY) * MUST USE THE BUILT-IN KIT THAT IS MADE BY LG ELECTRONICS.
  • Page 127 Plug your oven into a standard household socket. Make Press the STOP/WISSEN button, and sure your oven is the only appliance connected to the press the START/Q-START button one socket. If your oven does not operate properly, unplug it time to set 30 seconds of cooking time. from the electrical socket and then plug it back in.
  • Page 128: Control Panel

    Control Panel 1. DISPLAY WINDOW: You can show mode function, time of day, cooking 7. Instellen/Klok: You can determine the selected cooking category, time, power level and cooking categories. microwave power level or temperature and you can set the time of day. 2.
  • Page 129: Setting The Clock

    Setting the In the following example I will show you how to set the time for 14:35 when using the 24 clock. Clock Make sure that you have removed all packaging from your oven. Make sure that you have correctly installed your oven as described earlier in this book.
  • Page 130: Child Lock

    Child Lock Press STOP/WISSEN. Press and hold STOP/WISSEN until “L” and appears on the display Your oven has a safety feature that and BEEP sounds. prevents accidental running of the oven. The CHILD LOCK is now set. Once the child lock is set, you will be unable to use any functions and no The time will disappear on the display but will reappear on the display cooking can take place.
  • Page 131: Quick Start

    Quick In the following example I will show you how to set 2 minutes of cooking on high power (900 W). Start Press STOP/WISSEN. Press START/Q-START four times to select 2 minutes on HIGH power The Quick Start feature allows you to set (900 W).
  • Page 132: Micro Power Cooking

    Micro Power In the following example I will show you how to cook some food on 600 W power for 5 minutes and 30 seconds. Cooking Make sure that you have correctly installed your oven as described earlier in this book. Press STOP/WISSEN.
  • Page 133 Micro Power This oven is equipped with 5 power levels to give you maximum flexibility and control over cooking. Level The table below shows the examples of food and their recommended cooking power levels for use with this oven. OUTPUT ACCESSORY POWER LEVEL HIGH...
  • Page 134: Grill Cooking

    Grill In the following example I will show you how to use the Grill-1 to cook some foods for 12 minutes and Cooking 30 seconds. Press STOP/WISSEN. Turn FUNCTIEL dial to select Grill. The following indication is displayed: “ “ This feature will allow you to brown and crisp food quickly.
  • Page 135: Convection Cooking

    Convection In the following example I will show you how to use the convection mode to cook some foods for 50 minutes at Cooking 220 °C temperature. The convection oven has a temperature 1. To Preheat 2. To Cook range.(40 °C, 100 ~ 230 °C) Press STOP/WISSEN.
  • Page 136: Speed Combi Cooking

    Speed combi In the following example I will show you how to programme your oven at micro power 360 W and grill for a Cooking cooking time of 25 minutes. Press STOP/WISSEN. Speed Combi (Co-1, 2, 3) Turn FUNCTIEL dial speed combi ( ) to select grill combination mode(Co-1, 2, 3).
  • Page 137 Speed combi In the following example I will show you how to programme your oven with micro power 360 W Cooking and at a temperature 200 °C for a cooking time of 25 minutes. Speed Combi Press STOP/WISSEN. (Co-4) Turn FUNCTIEL dial speed combi ( ) to select speed combination mode(Co-4).
  • Page 138 Speed combi In the following example I will show you how to programme your oven with:- micro power 360 W and at a Cooking convection temperature 200 °C for a cooking time of 25 minutes. Speed Combi Press STOP/WISSEN. (Co-5) Turn FUNCTIEL dial speed combi ( ) to select convection combination mode(Co-5).
  • Page 139: Speed Auto Cooking

    Speed Auto In the following example I will show you how to cook 0.6 kg of jacket potatoes(Ac 8). Cooking Press STOP/WISSEN. Press Snelmenu ( Speed Auto Cook menus are programmed and allows you to cook most of your favorite food quickly by selecting the food type and the weight of the food.
  • Page 140 Weight Category Instructions Function Utensil Food Temp. Limit Ac 1 Frozen 0.30 ~ 0.50 kg Metal tray Frozen This function is for cooking frozen pizza. Remove all package and Auto cooking Pizza place on the metal tray. After cooking, stand for 1~2 minutes. Ac 2 French 0.20 ~ 0.75 kg...
  • Page 141 Weight Category Instructions Function Utensil Food Temp. Limit Ac 7 Roast Beef 0.80 ~ 1.80 kg Low rack Refrigerated Brush the beef with melted margarine or butter. Place on the low rack. Auto cooking + Metal tray When BEEP, turn food over. And then press start to continue cooking.
  • Page 142 Weight Category Instructions Function Utensil Food Temp. Limit Ac 12 Rice / 0.10 ~ 0.30 kg Metal tray Room Place rice/pasta and boiling water with to 1 teaspoon salt in a Auto cooking Pasta + Microwave- deep and large bowl(3 L). When BEEP, stir once. safe bowl with Weight 100 g...
  • Page 143: Steam Cook

    Steam In the following example I will show you how to cook 0.6 kg of green beans(St 8). Cook This feature allows you steamed cook. Press STOP/WISSEN. CAUTION: 1. Always use oven gloves when removing a STEAMER from the oven. It’s very hot.
  • Page 144 STEAM COOK GUIDE Temp. prior Ingredient Cooking method Function Weight Cooking device Size of ingredient to cooking Steam Steam cover St 1 Shrimp 0.20 ~ 0.80 kg Refrigerator Small shrimps (shrimps, Wash the shrimps. Pour 400 ml of water or Steam plate Cook large shrimps, small crab...
  • Page 145 Temp. prior Cooking method Function Ingredient Weight Cooking device Size of ingredient to cooking Steam Steam cover St 5 Carrot 0.20 ~ 0.80 kg Room temperature Sliced round or diced Pour 400 ml of water in the steamer. Put the Steam plate Cook steam plate with the vegetables on top of the...
  • Page 146 Temp. prior Ingredient Cooking method Function Weight Cooking device Size of ingredient to cooking Steam Steam cover St 11 Potato 0.20 ~ 0.80 kg Room temperature Whole Pour 400 ml of water in the steamer. Put the Steam plate Cook steam plate with the vegetables on top of the Steam water bowl steamer.
  • Page 147: Auto Defrost

    The temperature and density of food varies, I would recommend that the food be checked before cooking Auto commences. Pay particular attention to large joints of meat and chicken, some foods should not be completely thawed before cooking. For example fish cooks so quickly that it is sometimes better to begin Defrost cooking while still slightly frozen.
  • Page 148: Defrosting Guide

    Defrosting Guide * Food to be defrosted should be in a suitable microwave proof container and should be placed uncovered on the low rack on the metal tray. * If necessary, shield small areas of meat or poultry with flat pieces of aluminum foil. This will prevent thin areas becoming warm during defrosting. Ensure the foil does not touch the oven walls.
  • Page 149: More Or Less Cooking

    More or Less In the following example I will show you how to change the preset SPEED AUTO COOK programmes for a longer Cooking or shorter cooking time. Press STOP/WISSEN. If you find that your food is over or Set the required AUTO COOK programme. undercooked when using the Auto Cook *See AUTO COOK guide.
  • Page 150: Ez Clean

    In the following example I will show you how to remove smell in the oven. Clean Press STOP/WISSEN. The oven has a special function to Turn FUNCTIEL dial to select EZ Clean ( remove the smell in the oven. Press Instellen/Klok for ez clean confirmation. You can use the EZ Clean function without food in the oven.
  • Page 151: Microwave - Safe Utensils

    Microwave-safe Utensils Never use metal or metal trimmed utensils in using microwave function Paper Microwaves cannot penetrate metal. They will bounce off any metal object in Paper plates and containers are convenient and safe to use in using the oven and cause arcing, an alarming phenomenon that resembles microwave function, provided that the cooking time is short and foods to be lightning.
  • Page 152: Food Characteristics & Microwave Cooking

    Food characteristics & Microwave cooking Keeping an eye on things Moisture content of food The recipes in the book have been formulated with great care, but your success in Since the heat generated from microwaves tends to evaporate moisture, relatively dry food preparing them depends on how much attention you pay to the food as it cooks.
  • Page 153: To Clean Your Oven

    Food characteristics & Microwave cooking Stirring To Clean Your Oven Stirring is one of the most important of all microwaving techniques. In conventional cooking, food is stirred for the purpose of blending. Microwaved food, however, is stirred in order to spread and redistribute heat. Always stir from the outside towards the centre 1.
  • Page 154: Questions & Answers

    Questions & Answers Q What’s wrong when the oven light will not glow? Q Is it possible to cook popcorn in this oven? A There may be several reasons why the oven light will not glow. A Yes, if using one of the two methods described below Light bulb has blown 1 Popcorn-popping utensils designed specifically for microwave cooking.
  • Page 155: Technical Specifications

    (risk of the container bursting, prior to, during, or after opening the door) used for domestic purposes. Replacement of the power supply cable and/or any intervention requiring • You can download the user manual on the site: the opening of the device must only be carried out by qualified technical http://www.lg.com personnel.
  • Page 156 3. U kunt uw apparaat meenemen naar de winkel waar u het product hebt gekocht, of u kunt contact opnemen met uw plaatselijke afvalinstantie voor de gegevens van uw dichtstbijzijnde geautoriseerde WEEE-verzamelpunt. Voor de meest geactualiseerde informatie voor uw land wordt verwezen naar www.lg.com/global/recycling Recyclage de votre ancien appareil 1.

Ce manuel est également adapté pour:

Speed oven+ ma3884vct

Table des Matières