Table des Matières
Publicité
Les langues disponibles
Les langues disponibles
Liens rapides
Publicité
Chapitres
Table des Matières

Manuels Connexes pour Electrolux GT22311


Sommaire des Matières pour Electrolux GT22311
- Page 1 ..................... GT22311 DE GEFRIERTRUHE BENUTZERINFORMATION FR CONGÉLATEUR COFFRE NOTICE D'UTILISATION IT CONGELATORE A POZZO ISTRUZIONI PER L’USO EN CHEST FREEZER USER MANUAL...
-
Page 2: Table Des Matières
12. TECHNISCHE DATEN ........... . 16 WIR DENKEN AN SIE Vielen Dank, dass Sie sich für ein Electrolux Gerät entschieden haben. Sie haben ein Produkt gewählt, hinter dem eine jahrzehntelange professionelle Erfahrung und Innovation steht. Bei der Entwicklung dieses großartigen und eleganten Geräts haben wir an Sie gedacht. -
Page 3: Sicherheitshinweise
DEUTSCH SICHERHEITSHINWEISE Lesen Sie zu Ihrer Sicherheit und für eine Tür oder auf dem Deckel ersetzt, ma- optimale Nutzung des Geräts vor der chen Sie den Schnappverschluss vor Montage und dem ersten Gebrauch das dem Entsorgen des Altgerätes un- vorliegende Benutzerhandbuch ein- brauchbar. - Page 4 – Offene Flammen und Zündfunken 1.3 Täglicher Gebrauch vermeiden • Stellen Sie keine heißen Töpfe auf die – Den Raum, in dem das Gerät instal- Kunststoffteile des Gerätes. liert ist, gut lüften • Lagern Sie keine feuergefährlichen Ga- • Technische und anderweitige Änderun- se oder Flüssigkeiten in dem Gerät.
-
Page 5: Kundendienst
DEUTSCH Bewahren Sie in diesem Fall die Verpa- • Wenden Sie sich für Reparaturen und ckung auf. Wartung nur an Fachkräfte der autori- sierten Kundendienststellen und verlan- • Lassen Sie das Gerät mindestens vier gen Sie stets Original-Ersatzteile. Stunden stehen, bevor Sie es elektrisch anschließen, damit das Öl in den Kom- pressor zurückfließen kann. -
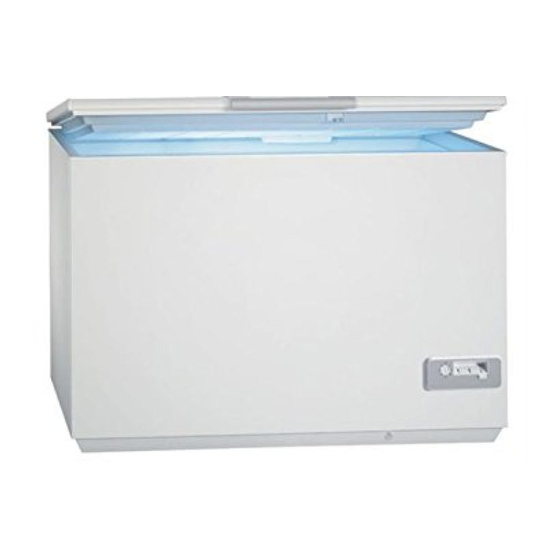
Page 6: Gerätebeschreibung
2. GERÄTEBESCHREIBUNG Deckelgriff Abtauwasserauslauf Typenschild Ventil: erleichtert das erneute Öffnen des Deckels Trennvorrichtung aus Kunststoff Low-Frost-System Bedienfeld und Temperaturregler Lampe... -
Page 7: Betrieb
DEUTSCH 3. BETRIEB 3.1 Einschalten des Geräts Stecken Sie den Stecker in die Netzsteck- dose. Drehen Sie den Temperaturregler auf „Volle Beladung“ und lassen Sie das Ge- rät 24 Stunden lang in Betrieb, damit die richtige Temperatur erreicht wird, bevor Sie Lebensmittel hinein legen. -
Page 8: Erste Inbetriebnahme
5. ERSTE INBETRIEBNAHME Verwenden Sie keine aggressiven 5.1 Reinigung des Innenraums Reinigungsmittel oder Scheuerpul- Bevor Sie das Gerät in Betrieb nehmen, ver, die die Oberfläche beschädi- beseitigen Sie den typischen „Neugeruch“ gen. am besten durch Reinigen der Innenteile mit lauwarmem Wasser und einer neutra- len Seife. -
Page 9: Praktische Tipps Und Hinweise
DEUTSCH 6.6 Einsatzkörbe Hängen Sie die Körbe auf die Oberkante des Gefriergeräts (A) oder in das Innere des Geräts (B). Drehen und fixieren Sie die Griffe in diesen beiden Positionen wie in der Abbildung gezeigt. Die Körbe schieben sich dann ineinander. Weitere Körbe können Sie bei Ihrem Fachhändler beziehen. -
Page 10: Reinigung Und Pflege
10 www.electrolux.com 8. REINIGUNG UND PFLEGE VORSICHT! Die beste Zeit zum Abtauen für des Ge- Ziehen Sie bitte vor jeder Reini- friergerät ist dann, wenn er nur wenig gungsarbeit immer den Netzste- oder keine Lebensmittel enthält. cker aus der Steckdose. -
Page 11: Was Tun, Wenn
DEUTSCH Schalten Sie das Gerät aus. Möchten Sie bei einer längeren Abwesenheit das Gerät weiterlau- Trennen Sie den Netzstecker von der fen lassen, bitten Sie jemanden, Netzversorgung. gelegentlich die Temperatur zu Entnehmen Sie alle Lebensmittel. prüfen, damit das Gefriergut bei Tauen Sie das Gerät ab;... - Page 12 12 www.electrolux.com Störung Mögliche Ursache Abhilfe Die Temperatur in dem Versuchen Sie, die Tempe- Raum, in dem sich das ratur des Raums zu sen- Gerät befindet, ist zu hoch ken, in dem sich das Gerät für einen effizienten Be- befindet.
- Page 13 DEUTSCH Störung Mögliche Ursache Abhilfe Das Gerät war vor dem Lassen Sie das Gerät aus- Einfrieren nicht ausrei- reichend vorkühlen. chend vorgekühlt. Es wurden zu große Men- Warten Sie einige Stunden gen an Lebensmitteln und prüfen Sie dann die gleichzeitig zum Einfrieren Temperatur erneut.
-
Page 14: Montage
14 www.electrolux.com 9.2 Austauschen der Lampe für die Innenbeleuchtung Ziehen Sie den Netzstecker aus der Netzsteckdose. Ersetzen Sie die defekte Lampe durch eine Lampe mit der gleichen Leistung, die speziell für Haushaltsgeräte vorge- sehen ist. (Die maximal zulässige Leistung finden Sie auf der Abde- ckung der Lampe.) -
Page 15: Geräusch
DEUTSCH Das Gerät entspricht den EWG-Richtlini- Vergewissern Sie sich, dass der Ab- stand zwischen dem Gerät und dem Schrank 5 cm beträgt. 10.3 Anforderungen an die Vergewissern Sie sich, dass der Ab- stand zwischen dem Gerät und den Belüftung Seiten 5 cm beträgt. Die Luftzirkulation hinter dem Gerät muss Stellen Sie des Gerät in horizontaler ausreichend groß... -
Page 16: Technische Daten
16 www.electrolux.com HISSS! HISSS! BLUBB! CRACK! CRACK! BLUBB! 12. TECHNISCHE DATEN Abmessun- Höhe × Breite × Tiefe (mm): Weitere technische Informatio- nen befinden sich auf dem Ty- penschild auf der rechten Au- 876 × 1201 × 665 ßenseite des Gerätes. -
Page 17: Nous Pensons À Vous
12. CARACTÉRISTIQUES TECHNIQUES ........31 NOUS PENSONS À VOUS Merci d'avoir choisi ce produit Electrolux. Avec ce produit, vous bénéficiez de dizaines d'années d'expérience professionnelle et d'innovation. Ingénieux et élégant, il a été conçu sur mesure pour vous. -
Page 18: Instructions De Sécurité
18 www.electrolux.com INSTRUCTIONS DE SÉCURITÉ Pour votre sécurité et garantir une utilisa- Ceci afin d'éviter aux enfants de s'en- tion correcte de l'appareil, lisez attentive- fermer dans l'appareil et de mettre ainsi ment cette notice, y compris les conseils leur vie en danger. - Page 19 FRANÇAIS – évitez les flammes vives et toute au- 1.3 Utilisation quotidienne tre source d'allumage • Ne posez pas d'éléments chauds sur – aérez soigneusement la pièce où se les parties en plastique de l'appareil. trouve l'appareil • Ne stockez pas de gaz ou de liquides •...
-
Page 20: Protection De L'environnement
20 www.electrolux.com • Avant de brancher votre appareil, lais- 1.7 Protection de sez-le au moins 4 heures au repos afin l'environnement de permettre à l'huile de refluer dans le compresseur. Le système frigorifique et l'isola- tion de votre appareil ne contien- •... -
Page 21: Description De L'appareil
FRANÇAIS 2. DESCRIPTION DE L'APPAREIL Poignée du couvercle Goulotte d'évacuation de l'eau de dé- givrage Plaque signalétique Vanne de réouverture facile du couver- Séparateur en plastique Système Low Frost Bandeau de commande et régulateur Éclairage de température... -
Page 22: Fonctionnement
22 www.electrolux.com 3. FONCTIONNEMENT 3.1 Mise en marche Insérez la fiche dans la prise murale. Placez le thermostat sur la position Char- ge pleine et attendez 24 heures pour que la température à l'intérieur de l'appareil soit bonne avant d'y placer les aliments. -
Page 23: Première Utilisation
FRANÇAIS 5. PREMIÈRE UTILISATION que du "neuf" puis séchez soigneuse- 5.1 Nettoyage intérieur ment. Avant d'utiliser l'appareil pour la première N'utilisez pas de produits abrasifs, fois, nettoyez l'intérieur et tous les acces- poudre à récurer, éponge métalli- soires internes avec de l'eau tiède savon- que pour ne pas abîmer la finition. -
Page 24: Paniers De Rangement
24 www.electrolux.com 6.6 Paniers de rangement Accrochez les paniers sur le bord supéri- eur du congélateur (A) ou placez-les à l'in- térieur (B). Tournez et bloquez les poi- gnées en fonction de ces deux positions, comme indiqué. Les paniers s'emboîtent l'un dans l'autre. -
Page 25: Entretien Et Nettoyage
FRANÇAIS 8. ENTRETIEN ET NETTOYAGE ATTENTION 8.2 Dégivrage du congélateur débrancher l'appareil avant toute Dégivrez le congélateur lorsque l'épais- opération d'entretien. seur de la couche de givre est d'environ Cet appareil contient des hydro- 10-15 mm. carbures dans son circuit réfrigé- Nous vous conseillons de dégivrer le con- rant : l'entretien et la recharge ne gélateur lorsque l'appareil est peu chargé... -
Page 26: En Cas D'absence Prolongée Ou De Non-Utilisation
26 www.electrolux.com Maintenez le couvercle ouvert pen- 8.3 En cas d'absence prolongée dant toute la durée de non-utilisation ou de non-utilisation pour éviter la formation d'odeurs. Si l'appareil n'est pas utilisé pendant de Si, toutefois, vous n'avez pas la longues périodes, prenez les précautions possibilité... - Page 27 FRANÇAIS Anomalie Cause possible Solution Le voyant Alarme La température à l'intérieur Consultez le paragraphe haute température du congélateur est trop "Alarme haute températu- est allumé. élevée. re". L'appareil a été mis en Consultez le paragraphe fonctionnement il y a peu "Alarme haute températu- de temps et la températu- re".
- Page 28 28 www.electrolux.com Anomalie Cause possible Solution Avant la congélation, la Laissez refroidir l'appareil à température à l'intérieur de vide pendant un temps suf- l'appareil n'était pas suffi- fisant. samment froide. Trop de produits frais ont Attendez quelques heures été introduits dans l'appa- et vérifiez de nouveau la...
-
Page 29: Remplacement De L'ampoule
FRANÇAIS le modèle et le numéro de série de votre plaque signalétique, située sur le côté ex- appareil. Ces numéros se trouvent sur la térieur droit de l'appareil. 9.2 Remplacement de l'ampoule Débranchez l'appareil de la prise sec- teur. Remplacez l'ampoule défectueuse par une ampoule neuve de puissance identique, spécifiquement conçue pour les appareils électroménagers. -
Page 30: Conditions Requises En Matière De Circulation D'air
30 www.electrolux.com Laissez un espace de 5 cm entre 10.3 Conditions requises en l'appareil et le mur arrière. matière de circulation d'air Laissez un espace de 5 cm entre Placez l'appareil parfaitement l'appareil et les côtés. d'aplomb sur une surface plane et Veillez à... -
Page 31: Caractéristiques Techniques
FRANÇAIS CRACK! CRACK! BLUBB! BLUBB! 12. CARACTÉRISTIQUES TECHNIQUES Dimensions Hauteur × Largeur × Profon- Les caractéristiques techniques deur (mm) : détaillées figurent sur la plaque signalétique située sur le côté 876 × 1201 × 665 droit à l'extérieur de l'appareil. Temps de 53 heures montée en... - Page 32 12. DATI TECNICI ............46 PENSATI PER VOI Grazie per aver acquistato un'apparecchiatura Electrolux. Avete scelto un prodotto che ha alle spalle decenni di esperienza professionale e innovazione. Ingegnoso ed elegante, è stato progettato pensando a voi.
-
Page 33: Istruzioni Di Sicurezza
ITALIANO ISTRUZIONI DI SICUREZZA Per garantire un impiego corretto e sicuro diventi una trappola mortale per i bam- dell'apparecchio, prima dell'installazione e bini. del primo utilizzo leggere con attenzione il libretto istruzioni, inclusi i suggerimenti e le 1.2 Norme di sicurezza generali avvertenze. -
Page 34: Uso Quotidiano
34 www.electrolux.com AVVERTENZA! steriore (per le apparecchiature di tipo Tutti i componenti elettrici (cavo di no-frost) alimentazione, spina, compresso- • Gli alimenti congelati non devono esse- re) devono essere sostituiti da un re ricongelati una volta scongelati. tecnico certificato o da personale •... -
Page 35: Assistenza Tecnica
ITALIANO • L'apparecchiatura non deve essere col- lo strato di ozono nel circuito refri- locata vicino a termosifoni o piani di gerante o nei materiali isolanti. cottura. L'apparecchio non deve essere smaltito assieme ai rifiuti urbani e • Installare l'apparecchiatura in modo che alla spazzatura. -
Page 36: Descrizione Del Prodotto
36 www.electrolux.com 2. DESCRIZIONE DEL PRODOTTO Maniglia di apertura del coperchio Scarico acqua di sbrinamento Targhetta dei dati Valvola: riapertura facile del coperchio Separatore in plastica basso Sistema low-frost Pannello dei comandi e regolatore del- Luce la temperatura... -
Page 37: Uso Dell'apparecchio
ITALIANO 3. USO DELL'APPARECCHIO 3.1 Accensione Inserire la spina nella presa a muro. Ruotare il regolatore di temperatura in po- sizione Pieno Carico e lasciare l'apparec- chiatura in funzione per 24 ore affinché raggiunga la corretta temperatura prima di conservare gli alimenti all'interno. Impostare il regolatore di temperatura in base alla quantità... -
Page 38: Primo Utilizzo
38 www.electrolux.com 5. PRIMO UTILIZZO dei prodotti nuovi, quindi asciugare accu- 5.1 Pulizia dell'interno ratamente. Prima di utilizzare l'apparecchio per la pri- Non usare detergenti corrosivi o ma volta, lavare l'interno e gli accessori in- polveri abrasive che danneggiano terni con acqua tiepida e un po' di sapone le finiture. -
Page 39: Consigli E Suggerimenti Utili
ITALIANO 6.6 Cestelli Appendere i cestelli al bordo superiore del congelatore (A) o collocarli al suo interno (B). Ruotare e fissare le maniglie in base alla posizione prescelta, seguendo le indi- cazioni della figura. I cestelli possono scorrere l'uno nell'altro. È... -
Page 40: Pulizia Periodica
40 www.electrolux.com tuate esclusivamente da tecnici quest'ultima in una bacinella. Usare autorizzati. un raschietto per rimuovere il ghiaccio più velocemente. 8.1 Pulizia periodica Una volta completato lo sbrinamento, asciugare accuratamente l'interno e Spegnere l'apparecchiatura. reinserire la spina. Estrarre la spina dalla presa di corren- Accendere l'apparecchiatura. -
Page 41: Cosa Fare Se
ITALIANO 9. COSA FARE SE… ATTENZIONE Durante l'uso, alcuni rumori di fun- Prima della ricerca guasti, estrarre zionamento (come quelli del com- la spina dalla presa. pressore o del circuito refrigeran- Le operazioni di ricerca guasti non te) sono da considerarsi normali. descritte nel presente manuale devono essere eseguite esclusiva- mente da elettricisti qualificati o da... - Page 42 42 www.electrolux.com Problema Possibile causa Soluzione Il coperchio non è perfet- Controllare che il coperchio tamente chiuso. si chiuda perfettamente e che le guarnizioni siano in- tegre e pulite. La temperatura non è re- Impostare una temperatura golata correttamente. superiore.
-
Page 43: Servizio Di Assistenza
ITALIANO Problema Possibile causa Soluzione Il coperchio viene aperto Limitare il più possibile l'a- frequentemente. pertura del coperchio. Il coperchio è rimasto Limitare il più possibile il aperto a lungo. tempo di apertura del co- perchio. La temperatura al- La temperatura non è re- Impostare una temperatura l'interno del conge- golata correttamente. -
Page 44: Installazione
44 www.electrolux.com 10. INSTALLAZIONE ghetta corrispondano ai valori della rete 10.1 Luogo d'installazione elettrica domestica. AVVERTENZA! L'apparecchio deve essere collegato a Qualora occorra ritirare dall'uso massa. La spina del cavo di alimentazione un'apparecchiatura con serratura, è dotata di un contatto a tale scopo. Se la si raccomanda di rendere que- presa della rete elettrica domestica non è... - Page 45 ITALIANO HISSS! BRRR SSSRRR! SSSRRR! HISSS! HISSS! CRACK! CRACK! BLUBB! BLUBB!
-
Page 46: Dati Tecnici
46 www.electrolux.com 12. DATI TECNICI Dimensioni Altezza x Larghezza x Profon- Ulteriori dati tecnici sono ripor- dità (mm): tati sulla targhetta del modello applicata sul lato esterno destro 876 × 1201 × 665 dell'apparecchiatura. Tempo di sa- 53 ore lita 13. -
Page 47: Customer Care And Service
13. GARANTIE, GARANZIA, GUARANTEE ........59 WE’RE THINKING OF YOU Thank you for purchasing an Electrolux appliance. You’ve chosen a product that brings with it decades of professional experience and innovation. Ingenious and stylish, it has been designed with you in mind. -
Page 48: Safety Instructions
48 www.electrolux.com SAFETY INSTRUCTIONS In the interest of your safety and to ensure Keep ventilation openings, in the appli- the correct use, before installing and first ance enclosure or in the built-in structure, using the appliance, read this user manual clear of obstruction. -
Page 49: Environment Protection
ENGLISH Power cord must not be length- • Ice lollies can cause frost burns if con- ened. sumed straight from the appliance. Make sure that the power plug is not squashed or damaged by the 1.4 Care and cleaning back of the appliance. A squashed •... -
Page 50: Product Description
50 www.electrolux.com circuit or insulation materials. The obtain from your local authorities. appliance shall not be discarded Avoid damaging the cooling unit, together with the urban refuse and especially at the rear near the heat rubbish. The insulation foam con- exchanger. -
Page 51: Operation
ENGLISH 3. OPERATION 3.1 Switching on Insert the plug into the wall socket. Turn the Temperature Regulator to the Full Loaded position and let the appliance run for 24 hours to allow the correct tem- perature to be reached before placing food inside. -
Page 52: First Use
52 www.electrolux.com 5. FIRST USE smell of a brand-new product, then dry 5.1 Cleaning the interior thoroughly. Before using the appliance for the first Do not use detergents or abrasive time, wash the interior and all internal ac- powders, as these will damage cessories with lukewarm water and some the finish. -
Page 53: Storage Baskets
ENGLISH 6.6 Storage baskets Hang the baskets on the upper edge of the freezer (A) or place them inside the freezer (B). Turn and fix the handles for these two positions as shown in the pic- ture. The baskets will slide into each other. You can purchase additional baskets from your local Service Centre. -
Page 54: Periodic Cleaning
54 www.electrolux.com lect all defrost water on a tray. Use a 8.1 Periodic cleaning scraper to remove ice quickly. Switch off the appliance. When defrosting is completed, dry Disconnect the mains plug from the the interior thoroughly and refit the mains socket. -
Page 55: What To Do If
ENGLISH 9. WHAT TO DO IF… CAUTION! There are some sounds during Before troubleshooting, discon- normal use (compressor, refriger- nect the power supply. ant circulation). Only a qualified electrician or com- petent person must do the trou- bleshooting that is not in this man- ual. - Page 56 56 www.electrolux.com Problem Possible cause Solution The lid gaskets are dirty or Clean the lid gaskets. sticky. Food packages are block- Arrange the packages in ing the lid. the right way, see the stick- er in the appliance. The lid is difficult to The lid gaskets are dirty or Clean the lid gaskets.
-
Page 57: Customer Service
ENGLISH Problem Possible cause Solution There is no voltage in the Call an electrician. mains socket (try to con- nect another appliance in- to it). model and serial number of your appli- 9.1 Customer Service ance which can be found either on the If your appliance is still not working prop- guarantee certificate or on the rating plate erly after making the above checks, con-... -
Page 58: Electrical Connection
58 www.electrolux.com 10.2 Electrical connection 10.3 Ventilation requirements Before plugging in, ensure that the volt- Put the freezer in horizontal position age and frequency shown on the rating on a firm surface. The cabinet must plate correspond to your domestic power be on all four feet. -
Page 59: Technical Data
ENGLISH HISSS! HISSS! BLUBB! CRACK! CRACK! BLUBB! 12. TECHNICAL DATA Dimensions Height × Width × Depth (mm): Further technical information are situated in the rating plate on 876 × 1201 × 665 the external right side of the ap- Rising Time 53 hours pliance. -
Page 60: Environment Concerns
60 www.electrolux.com Servicestellen Points de Serv- Servizio dopo Point of vendita Service 9000 St. Gallen Zürcher- strasse 204e 4052 Basel St. Jakob- Turm Birsstrasse 320B 6020 Emmenbrücke See- talstrasse 11 7000 Chur Comercial- strasse 19 Ersatzteilverkauf/Points de vente de d’un tiers non autorisé, de l’emploi de rechange/Vendita pezzi di ricambio/ pièces de rechange non originales, d’er-... - Page 61 ENGLISH...
- Page 62 62 www.electrolux.com...
- Page 63 ENGLISH...
- Page 64 www.electrolux.com/shop...