Publicité

Les langues disponibles

Les langues disponibles

Liens rapides

Installation and operating instruction
Aircirculation Heater
Instrucciones de instalación y operación Calefactor de
circulación de aire
Notice de montage et de Fonctionnement Chauffage
par circulation d'air
PALMA
US
ES
FR

Publicité

Table des Matières
loading

Sommaire des Matières pour Bio Green PALMA

  • Page 1 Installation and operating instruction Aircirculation Heater Instrucciones de instalación y operación Calefactor de circulación de aire Notice de montage et de Fonctionnement Chauffage par circulation d‘air PALMA...
  • Page 2 Read all instructions first before installing the Palma Heater! Do not drink any alcohol or take any drugs before or during the installation of the Palma Heater and follow the safety instructions carefully. ¡Lea todas las instrucciones antes de instalar el...
  • Page 3 Introduction This manual is intended for the Palma RAW and Palma. The Palma RAW consists of an air circulation heater. The Palma consists of the air circulation heater and a wet room thermostat Thermol.The electric air circulation heater Palma and Palma RAW serves to control the temperature of greenhouses and conservatories.
  • Page 4: Main Component Parts

    1.2 Main component parts Palma-Digital (1) 1. Air intake opening 2. Air output opening 3. Thermostat switch 4. Selector switch 5. Operation lamp Image 1...
  • Page 5 ”Thermo 2” (2) (optional) 1. Socket of the Thermo 2 6. Thermometer 2. Display 7. 2x Mounting holes 3. On/off button 8. On/off indication lamp 4. Button up 9. Heating / cooling mode 5. Button down Image 2...
  • Page 6: Safety And Hazard Notes

    2. Preventive measures and safety instructions Warning! A warning indicates the risk of damage to the user or the product if the user does not carry out the procedures with care. Please note! A comment makes the user aware of possible problems. 2.2 Safety and hazard notes Warning! Keep the product out of reach of children.
  • Page 7 Please note! This device is not designed for use by persons (including children) who have limited physical, sensory or mental capabilities and also not by persons with insufficient experience or knowledge of handling this product except where they are monitored or instructed by a person who is responsible for their safety.
  • Page 8 3. Installation Warning! Do not leave the packaging materials (plastic bags, polystyrene, nails etc.) within reach of children as they represent potential hazards. Warning! Electrical devices may only be operated in wet rooms connected to a residual current circuit breaker. Warning! Before initial operation of the device please ensure that this connection is provided at the planned connection location.
  • Page 9 When using the Palma heater you have the choice of operation with or without the included wet room thermostat Thermo 2. However for exact temperature regulation and energy-saving operation we urgently recommend using the Thermo 2. Image 3...
  • Page 10 3.2 Installation of Palma heater Warning! The distance from the inflammable objects should be at least 20”. Adjust the heater so that there is a distance of at least 16” between the wall and the air intake opening. Warning! A free space of 1.5 meters should be left in front of the output opening if possible.
  • Page 11 Never pull the power cord itself; only remove the plug from the socket holding the grips on the mains plug. To set the Palma RAW to wintermode, see section 4.2. To set the Palma to wintermode, see section 4.3.
  • Page 12: General Operation

    4. Use the Palma and Palma RAW 4.1 General operation The Palma air circulation heater is fitted with a selector switch and a thermostat. Use the selector switch to choose one of the 3 possible operating modes. Set the desired room temperature using the thermostat.
  • Page 13 4.2 Use the Palma RAW in winter mode Select position 3 as the mode on the selector switch and set the thermostat to maximum. The operation lamp will light up when the Palma 2.0 RAW starts with heating (8). Image 8 Check the room temperature using a thermometer (9) .
  • Page 14 When the desired room temperature is reached then slowly turn the thermostat in an anticlockwise direction until the operation lamp switches off (10). Image 10 The heater will now maintain the set temperature by re-starting the heating function when the room temperature falls below this level.
  • Page 15 4.3 Use the Palma in winter mode Set the desired room temperature on the wet room thermostat Thermo 2 (11). The setting can be found in the Thermo 2 operating instructions. Image 11 Select position 3 as the mode on the selector switch. And set the heater thermostat to the maximum setting (12).
  • Page 16 In the summer months use of the air circulation mode can achieve substantial reduction of the greenhouse temperature. Select mode 2 on the selector switch of the Palma heater and open the door or the roof window on your greenhouse (13). The position of the thermostat switch is irrelevant here.
  • Page 17: Safety Feature

    4.5 Safety feature Temperature controlled circuit breaker: If the device overheats the temperature-controlled circuit breaker will switch the device off temporarily. To switch the device back on, turn the heater off for 5 to 10 minutes to cool down (14). Image 14 Another reason for the shutdown would be blockage of the intake or outlet opening.
  • Page 18: Cleaning And Maintenance

    The manufacturer does not accept responsibility for any damage caused by frost, insufficient heating performance for the room dimensions or insufficient heat insulation. 6. MANUFACTURER’S REPRESENTATIONS AND WARRANTIES c/o Bio Green Inc. 2881 Busse Road, Elk Grove Village, IL 60007 United States Email: info@biogreen-products.com...
  • Page 19 1.8. Company does not authorize any person or party to assume or create for it any other obliga- tion or liability in connection with the Products except as set forth herein. 1.9. All requests and notices under this Warranty shall be directed to: c/o Bio Green Inc. 2881 Busse Road, Elk Grove Village, IL 60007 United States Email: info@biogreen-products.com...
  • Page 20 2. Limitation of Liability: 2.1. IN NO EVENT SHALL COMPANY BE LIABLE FOR ANY INDIRECT, INCIDENTAL, PUNITIVE, SPE- CIAL OR CONSEQUENTIAL DAMAGES, INCLUDING BUT NOT LIMITED TO, DAMAGES FOR LOSS OF PROFITS, REVENUE, GOODWILL OR USE, INCURRED BY CUSTOMER OR ANY THIRD PARTY, WHETHER IN AN ACTION IN CONTRACT, TORT, STRICT LIABILITY, OR IMPOSED BY STATUTE, OR OTHERWISE, EVEN IF ADVISED OF THE POSSIBILITY OF SUCH DAMAGES.
  • Page 21 Introducción Este manual está dirigido a Palma RAW y Palma 2.0. Palma RAW es un calefactor de circulación de aire. Palma está compuesto por un calefactor de circulación de aire y un termostato de ambiente Thermol. Los sistemas de calefacción de circulación de aire Palma y Palma 2.0 RAW sirven para controlar la temperatura de invernaderos y jardines de invierno.
  • Page 22 1.2 Componentes Palma-Digital (1) 1. Apertura de aire adicional 2. Abertura de salida de aire 3. Interruptor del termostato 4. Interruptor selector 5. Luz de funcionamiento Imagen 1...
  • Page 23 ”Thermo 2” (2) (opcional) 1. Conector de Thermo 2 6. Termómetro 2. Pantalla 7. 2x Agujeros de montaje 3. Botón de encendido/apagad 8. Luz indicadora de encendido/apagado 4. Botón hacia arriba 9. Modo de calefacción/enfriamiento 5. Botón hacia abajo Imagen 2...
  • Page 24 2. Medidas preventivas e instrucciones de seguridad ¡Advertencia! Una advertencia indica el riesgo de daños para el usuario o el producto si el usuario no lleva a cabo los procedimientos cuidadosamente. ¡Por favor tenga en cuenta! Los comentarios advierten al usuario de posibles problemas.
  • Page 25 ¡Por favor tenga en cuenta! Este dispositivo no está diseñado para ser utilizado por personas (incluidos niños) que poseen capacidades físicas, sensoriales o mentales limitadas y tampoco por per- sonas con experiencia o conocimiento insuficientes sobre la manipulación de este producto, excepto bajo la vigilancia o instrucción de una persona responsable de su seguridad.
  • Page 26 3. Instalación ¡Advertencia! No dejar los materiales de embalaje (bolsas de plástico, poliestireno, clavos, etc.) al alcance de los niños, ya que representan peligros potenciales. ¡Advertencia! Los aparatos eléctricos sólo deben ser puestos en cuartos húmedos conectados a un disyuntor de corriente residual. ¡Advertencia! Antes de utilizar por primera vez el dispositivo, por favor asegúrese de que la cone- xión se realiza en un lugar con conexión planificado.
  • Page 27 Al utilizar el calefactor Palma, tendrá la opción de operar con o sin el termostato de ambiente húmedo Thermo 2 incluido con el aparato. Sin embargo, para una regulación de la temperatura exacta y ahorro de energía, se recomienda encarecidamente utilizar el Thermo 2.
  • Page 28 3.2 Instalación del calefactor Palma ¡Advertencia! La distancia a objetos inflamables debe ser de al menos de 50 cm. Ajuste el calenta- dor de modo que haya una distancia de al menos 40 cm. entre la pared y la abertura de toma de aire.
  • Page 29 Nunca tire del cable de alimentación; solo retire el enchufe de la toma sujetando los agarres del enchufe de la red. Para configurar RAW Palma 2,0 en modo de invierno, vea la sección 4.2. Para configurar Palma 2,0 en modo de invierno, vea la sección 4.3.
  • Page 30: Funcionamiento General

    4. Uso de Palma y Palma RAW 4.1 Funcionamiento general El calefactor de circulación de aire Palma está equipado con un interruptor selector y un termo- stato. Utilice el selector para elegir uno de los 3 modos de funcionamiento posibles. Ajuste la temperatura ambiente deseada usando el termostato.
  • Page 31: Uso De Palma Raw En Modo Invierno

    4.2 Uso de Palma RAW en modo invierno Seleccione la posición 3 como el modo en el interruptor selector y ajuste el termostato al máximo. La luz de funcionamiento se iluminará cuando Palma RAW comience a funcionar (8). Imagen 8 Revise la temperatura ambiente usando un termómetro (9) .
  • Page 32 Cuando se alcanza la temperatura deseada en la habitación, gire lentamente el termostato en sentido anti-horario hasta que el indicador de funcionamiento se apague (10). Imagen 10 Ahora el calentador mantendrá la temperatura programada y volverá a iniciar la función de cale- facción cuando la temperatura ambiente descienda por debajo de este nivel.
  • Page 33: Uso De Palma En Modo Invierno

    4.3 Uso de Palma en modo invierno Ajustar la temperatura deseada en el termostato de ambiente húmedo Thermo 2 (11). La configura- ción se puede encontrar en el manual de instrucciones de Thermo 2. Imagen 11 Seleccione la posición 3 en el interruptor selector. Y fije el termostato del calentador al máximo (12).
  • Page 34 Seleccione el Modo 2 en el interruptor de selección del calefactor Palma y abra la puerta o la ventana del techo en su invernadero (13). La posición del interruptor del termostato es irrelevante aquí.
  • Page 35: Características De Seguridad

    4.5 Características de seguridad Disyuntor de temperatura controlada: Si el dispositivo se recalienta, el disyuntor de temperatura controlada apagará el dispositivo de forma temporal. Para volver a encender el dispositivo, apa- gue el calefactor durante 5 a 10 minutos para enfriarlo (14). Image 14 Otra razón para el apagado sería el bloqueo de la entrada o la salida de apertura.
  • Page 36 El fabricante no se hace responsable de los daños causados por las heladas, el rendimiento de calefacción insuficiente para las dimensiones de la sala o de aislamiento térmico insuficiente. 6. REPRESENTACIONES Y GARANTÍAS DEL FABRICANTE c/o Bio Green Inc. 2881 Busse Road, Elk Grove Village, IL 60007 United States Email: info@biogreen-products.com...
  • Page 37 Productos, excepto como se establece en el presente documento. 1.9. Todas las solicitudes y notificaciones bajo esta Garantía deben ser dirigidas a: c/o Bio Green Inc. 2881 Busse Road, Elk Grove Village, IL 60007 United States Email: info@biogreen-products.com...
  • Page 38 2. Limitación de responsabilidad: 2.1. EN NINGÚN CASO LA EMPRESA SERÁ RESPONSABLE DE CUALQUIER DAÑO INDIRECTO, INCIDENTAL, PUNITIVO, ESPECIAL O DERIVADOS, INCLUYENDO PERO NO LIMITADO A, DAÑOS POR PÉRDIDA DE GANANCIAS, INGRESOS, FONDO DE COMERCIO O USO, INCURRIDO POR EL CLIENTE O UN TERCERO, YA SEA EN UNA ACCIÓN CONTRACTUAL, AGRAVIO, RESPONSABILI- DAD OBJETIVA O IMPUESTA POR LEY, O DE OTRO MODO, INCLUSO SI SE ADVIRTIÓ...
  • Page 39: Avertissements

    Introduction Cette notice est destinée au Palma RAW, Palma. Le Palma RAW est composé d’un chauffage par circulation d’air et d’un thermostat conçus pour les pièces humides. Les chauffages Palma RAW et Palma servent à contrôler la température des serres et des jardins d’hiver.
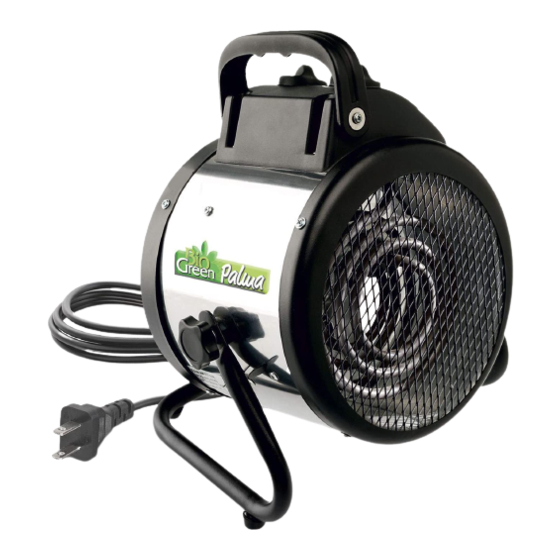
  • Page 40: Eléments Principaux

    1.2 Eléments principaux Palma-Digital (1) 1. Ouverture d’arrivée d’air 2. Ouverture de sortie d’air 3. Interrupteur du thermostat 4. Interrupteur de sélection 5. Voyant de fonctionnement Image 1...
  • Page 41 ”Thermo 2” (2) (en option) 1. Prise de courant du Thermo 2 6. Thermomètre 2. Affichage 7. 2x trous de montage 3. Bouton On/off 8. Voyant On/off 4. Bouton d’augmentation 9. Mode chauffage / refroidissement 5. Bouton de diminution Image 2...
  • Page 42: Mesures De Prévention Et Consignes De Sécurité

    2. Mesures de prévention et consignes de sécurité Avertissement ! Un avertissement indique un risque de dégât/blessure pour l’utilisateur ou le produit si l’utilisateur ne suit pas minutieusement les procédures . Veuillez noter ! Un commentaire pour prévenir l’utilisateur qu’il peut y avoir des problèmes éventuels. 2.2 Indications pour les dangers et la sécurité...
  • Page 43 Veuillez noter ! Cet appareil n’est pas conçu pour être utilisé par des personnes (dont des enfants) qui ont des capacités physiques, sensorielles ou mentales limitées. Cela est aussi valable pour les personnes qui n’ont pas assez d’expérience ou de connaissances pour utiliser cet appareil, à...
  • Page 44 3. Installation Avertissement ! Ne laissez pas l’emballage (sacs plastiques, polystyrène, clous, etc.) à la portée des enfants car ils représentent un danger potentiel. Avertissement ! Les appareils électriques utilisés dans les pièces humides doivent être branchés sur un disjoncteur à courant résiduel uniquement. Avertissement ! Avant la première utilisation, assurez-vous que l’appareil est bien connecté...
  • Page 45 Lorsque vous utilisez le chauffage Palma, vous pouvez utiliser ou non le thermostat inclus pour pièces humides Thermo 2. Cependant, pour une régulation précise de la température et un foncti- onnement économe en énergie, nous vous recommandons fortement d’utiliser Thermo 2.
  • Page 46: Installation Du Chauffage Palma

    3.2 Installation du chauffage Palma Avertissement ! L’appareil doit se trouver à au moins 20” des objets inflammables. Placez le chauffage de manière à ce qu’il y ait un espace de 16” entre le mur et l’ouverture d’arrivée d’air. Avertissement ! Il doit y avoir un espace de 1.5 mètres devant l’ouverture de la sortie si possible..
  • Page 47 Ne tirez jamais sur la corde ; retirez la prise en la tenant par les rayures sur la tête de la prise. Pour régler le Palma RAW sur le mode hiver, voir section 4.2. Pour régler le Palma sur le mode hiver, voir section 4.3.
  • Page 48: Utiliser Le Palma Et Le Palma Raw

    4. Utiliser le Palma et le Palma RAW 4.1 Fonctionnement général Le chauffage à circulation d’air Palma est équipé d’un sélecteur de mode et d’un thermostat. Utili- sez le bouton sélecteur pour choisir l’un des 3 modes de fonctionnement. Réglez la température de la pièce désirée à...
  • Page 49: Utiliser Le Palma Raw En Mode Hiver

    4.2 Utiliser le Palma RAW en mode hiver Sélectionnez la position 3 avec le sélecteur de mode et réglez le thermostat au maximum. Le voy- ant s’allumera lorsque le Palma RAW se mettra à chauffer (8). Image 8 Vérifiez la température en utilisant un thermomètre (9) .
  • Page 50 Lorsque la température désirée est atteinte, tournez doucement le thermostat dans le sens contrai- re des aiguilles d’une montre jusqu’à ce que le voyant de fonctionnement s’éteigne (10). Image 10 Le chauffage va maintenant maintenir le réglage de la température en redémarrant la fonction chauffage lorsque la température descend en dessous de ce niveau.
  • Page 51: Utiliser Le Palma En Mode Hiver

    4.3 Utiliser le Palma en mode hiver Réglez le thermostat de pièce humide Thermo 2 (11) à la température désirée de la pièce. Le régla- ge se trouve dans la notice du Thermo 2. Image 11 Sélectionnez la position 3 du sélecteur de mode. Et réglez le thermostat du chauffage dans la position maximale (12).
  • Page 52: Utiliser Le Palma Et Le Palma Raw En Mode Été

    Sélectionnez le mode 2 sur le sélecteur de mode du chauffage Palma et ouvrez la fenêtre de toit de votre serre (13). Inutile de régler la position de l‘interrupteur du thermostat dans ce cas là.
  • Page 53: Fonction De Sécurité

    4.5 Fonction de sécurité Disjoncteur de contrôle de température. Si l‘appareil est en surchauffe, le disjoncteur qui contrôle la température va éteindre l‘appareil temporairement. Pour rallumer l‘appareil, éteignez le chauf- fage et attendez qu‘il refroidisse pendant 5 à 10 minutes (14). Image 14 Un autre cause d‘arrêt peut être le blocage de l‘ouverture d‘entrée ou de sortie.
  • Page 54: Nettoyage, Entretien, Environnement Et Élimination

    United States Email: info@biogreen-products.com Ces représentations et garanties s‘appliquent à tous les Clients (les „Clients“ et chaque, indivi- duellement, un „Client“) qui achètent des Produits (les „Produits“) fabriqués par Bio Green oHG (l‘“Entreprise) 1. Garanties et Limites : 1.1. L‘Entreprise garantie uniquement à l‘acheteur initial des Produits, pendant la période de garantie (définie ci-dessous), que les Produits ne comportent aucun défaut de matériel et de fa-...
  • Page 55 Produits à l‘exception de ce qui est stipulé dans la pré- sente. 1.9. All requests and notices under this Warranty shall be directed to: c/o Bio Green Inc. 2881 Busse Road, Elk Grove Village, IL 60007 United States Email: info@biogreen-products.com...
  • Page 56: La Garantie Citée Dans La Section 1.1 Remplace Toutes Les Autres Garanties

    1.10. LA GARANTIE CITÉE DANS LA SECTION 1.1 REMPLACE TOUTES LES AUTRES GARANTIES (QU‘ELLES SOIENT EXPLICITES OU IMPLICITES, LES DROITS OU LES CONDITIONS ET LE CLIENT RECONNAIT QUE, SAUF POUR UNE TELLE GARANTIE LIMITÉE, LES PRODUITS SONT FOURNIS „EN L‘ÉTAT“. L‘ENTREPRISE DÉCLINE EXPRESSÉMENT, SANS LIMITATIONS, TOUTES LES AUTRES GARANTIES, EXPLICITES OU IMPLICITES, EN TOUS GENRES, DONT, LES GARANTIES SANS LIMIT- ATIONS, LES GARANTIES IMPLICITES DE VALEUR MARCHANDE ET D‘ADAPTATION A UN USA- GE QUELCONQUE, NON-ONTREFACON, ET CES GARANTIES QUI RÉSULTENT DES MODALITÉS...
  • Page 60 Bio Green Inc. 2881 Busse Road, Elk Grove Village, IL 60007 United States www.biogreen-products.com...

Table des Matières