Optika Italy B-380 Serie Manuel D'instructions

Masquer les pouces Voir aussi pour B-380 Serie:
Table des Matières

Publicité

Les langues disponibles
  • FR

Les langues disponibles

Liens rapides

Ver. 3.0.1
B-380 - B-380ALC
OPERATION MANUAL
GUIDA UTENTE
MANUEL D'INSTRUCTIONS
MANUAL DE INSTRUCCIONES
BEDIENUNGSANLEITUNG
OPTIKA MICROSCOPES - ITALY
www.optikamicroscopes.com - info@optikamicroscopes.com

Publicité

Table des Matières
loading

Sommaire des Matières pour Optika Italy B-380 Serie

  • Page 1 Ver. 3.0.1 B-380 - B-380ALC OPERATION MANUAL GUIDA UTENTE MANUEL D’INSTRUCTIONS MANUAL DE INSTRUCCIONES BEDIENUNGSANLEITUNG OPTIKA MICROSCOPES - ITALY www.optikamicroscopes.com - info@optikamicroscopes.com...
  • Page 2: Table Des Matières

    INDEX 1.0 DESCRIPTION pag. 3 2.0 INTRODUCTION pag. 5 3.0 UNPACKING AND ASSEMBLY pag. 6 4.0 USING THE MICROSCOPE pag. 7 4.1 Observation head 4.2 Place the specimen on the stage 4.3 Illumination system settings 4.4 Interpupillary distance 4.5 Focus tension adjustment 4.6 Diopter adjustment 4.7 Condenser 4.8 Numerical aperture setting...
  • Page 3: Description

    1.0 DESCRIPTION PHOTO/VIDEO PORT DIOPTRIC ADJUSTMENT RING EYEPIECE HEAD LOCKING SCREW (1) REVOLVING NOSEPIECE OBJECTIVE STAGE IRIS DIAPHRAGM (3) TRANSLATION KNOBS CONDENSER CONDENSER CENTERING BRIGHTNESS SCREWS (2) ADJUSTMENT (LEFT SIDE) LED ILLUMINATOR Page 3...
  • Page 4: Interpupillary Distance

    1.0 DESCRIPTION INTERPUPILLARY DISTANCE SLIDE CLAMP CONDENSER HEIGHT ADJUSTMENT (4) FINE FOCUSING KNOB COARSE FOCUSING KNOB TENSION ADJUSTMENT KNOB (5) FOCUS STOP KNOB Page 4...
  • Page 5: Introduction

    2.0 INTRODUCTION This microscope is a scientific precision instrument designed to last for many years with a minimum of main- tenance. It is built to high optical and mechanical standards and to withstand daily use. Optika reminds you that this manual contains important information on safety and maintenance, and that it must therefore be made accessible to the instrument users.
  • Page 6: Unpacking And Assembly

    3.0 UNPACKING AND ASSEMBLY The microscope is located in a styrofoam moulded packaging. After removing the adhesive tape from all packaging, lift the top half of the packaging. Pay attention not to drop or damage the optical com- ponents (objectives and eyepieces). Extract the microscope from its packaging with both hands (one around the top arm and one around the base) and place it on a stable surface.
  • Page 7: Using The Microscope

    4.0 USING THE MICROSCOPE Once positioned and installed with the necessary components, the microscope is ready to be used. Your microscope is a laboratory instrument designed to last. Handle it always carefully and avoid abrupt vibrations or shocks. Always disconnect the power cable from the microscope when not in use for long time, while you clean it or when you perform any maintenance.
  • Page 8: Diopter Adjustment

    4.0 USING THE MICROSCOPE Diopter adjustment Turn the dioptric adjustment ring on the left eyepiece to the zero position. Turn the coarse focus knob in order to focus the slide with an objective with low magnification. Adjust the fine focus knob until you obtain a clear and defined picture observing with the right eye, and then act on the left dioptric com- pensation ring observing with the left eye.
  • Page 9 4.0 USING THE MICROSCOPE Insert the 10x objective rotating the nosepiece. Rotate the turret of the condenser until you reach the inscription “10”. Loosening the lock screw of the centering telescope, focus on the light ring that you observe. Rotate the two centering screws in order to move the bright ring until it is perfectly aligned with the dark ring.
  • Page 10: Automatic Light Control (B-382-Alc Models)

    5.0 AUTOMATIC LIGHT CONTROL (B-382-ALC MODELS) B-382-ALC models have a special function called “Automatic Light Control”. The level of light is adjusted by the microscope in order to maintain the same level as the one the user has chosen, no matter if the aperture of the diaphragm changes, another objective is inserted, opacity of the sample changes, etc.
  • Page 11: Maintenance

    6.0 MAINTENANCE Microscopy environment This microscope is recommended to be used in a clean, dry and shock free environment with a tem- perature of 0-40°C and a maximum relative humidity of 85 % (non condensing). Use a dehumidifier if needed. Before and after using the microscope - The microscope should always be kept vertically when moving it and be careful so that no moving parts, such as the eyepieces, fall out.
  • Page 12: Recovery And Recycling

    7.0 RECOVERY AND RECYCLING Art.13 Dlsg 25 july 2005 N°151. “According to directives 2002/95/EC, 2002/96/EC and 2003/108/EC relating to the reduction in the use of hazardous substances in electrical and electronic equipment and waste disposal.” The basket symbol on equipment or on its box indicates that the product at the end of its useful life should be collected separately from other waste.
  • Page 14 INDICE 1.0 DESCRIZIONE pag. 15 2.0 INTRODUZIONE pag. 17 3.0 RIMOZIONE DELL’IMBALLAGGIO E MONTAGGIO pag. 18 4.0 USO DEL MICROSCOPIO pag. 19 4.1 Regolazione della testata di osservazione 4.2 Posizionamento del campione sul tavolino portapreparati 4.3 Regolazione del sistema di illuminazione 4.4 Regolazione della distanza interpupillare 4.5 Regolazione della tensione di messa a fuoco 4.6 Regolazione della compensazione diottrica...
  • Page 15: Descrizione

    1.0 DESCRIZIONE USCITA FOTO/VIDEO ANELLO DI REGOLAZIONE DIOTTRICA OCULARI VITE SERRAGGIO TESTA (1) REVOLVER PORTAOBIETTIVI OBIETTIVI TAVOLINO TRASLATORE MANOPOLE REGOLAZIONE DIAFRAMMA A IRIDE (3) SPOSTAMENTO TAVOLO CONDENSATORE VITI DI CENTRAGGIO CONDENSATORE (2) REGOLAZIONE LUMINOSITÀ (LATO SINISTRO) ILLUMINATORE A LED Pagina 15...
  • Page 16 1.0 DESCRIZIONE DISTANZA INTERPUPILLARE PINZA PORTAPREPARATI REGOLAZIONE ALTEZZA DEL CONDENSATORE (4) COMANDO FUOCO MICROMETRICO COMANDO FUOCO MACROMETRICO REGOLAZIONE DELLA TENSIONE (5) LEVA DI BLOCCO FOCUS Pagina 16...
  • Page 17: Introduzione

    2.0 INTRODUZIONE Il presente microscopio è uno strumento scientifico di precisione studiato per durare molti anni con una manu- tenzione minima, essendo costruito secondo i migliori standard ottici e meccanici e progettato per un utilizzo quotidiano. Optika ricorda che il presente manuale contiene informazioni importanti per un uso sicuro e una corretta ma- nutenzione dello strumento.
  • Page 18: Rimozione Dell'imballaggio E Montaggio

    3.0 RIMOZIONE DELL’IMBALLAGGIO E MONTAGGIO Il microscopio si trova in un imballaggio di polistirolo espanso stampato. Dopo aver tolto il nastro ade- sivo da tutti gli imballi, sollevare la metà superiore dell’imballaggio. Fare attenzione a non far cadere o danneggiare le componenti ottiche (obiettivi e oculari). Estrarre il microscopio dal suo imballaggio con entrambe le mani (una intorno al braccio e una intorno alla base) e appoggiarlo su di un piano stabile.
  • Page 19: Uso Del Microscopio

    4.0 USO DEL MICROSCOPIO Una volta posizionato e installato con i necessari componenti, il microscopio è pronto per l’utilizzo. Il vostro microscopio è uno strumento da laboratorio progettato per durare a lungo. Maneggiatelo sempre con cura ed abitate brusche vibrazioni o colpi. Scollegare sempre il cavo di alimentazione dal microscopio quando non viene utilizzato per lunghi tempi, mentre lo si pulisce o quando si esegue una qualsiasi manutenzione.
  • Page 20: Regolazione Della Compensazione Diottrica

    4.0 USO DEL MICROSCOPIO Regolazione della compensazione diottrica Ruotare l’anello di compensazione diottrica sull’oculare sinistro fino alla posizione di zero. Ruotare la manopola di messa a fuoco macrometrica per focalizzare il vetrino con un obiettivo con basso potere di ingrandimento. Regolare la manopola di messa a fuoco micrometrica fino ad ottenere un’immagine chiara e definita osservando con l’occhio destro, quindi ripetere l’operazione con l’anello di compen- sazione diottrica sinistro e l’occhio sinistro.
  • Page 21 4.0 USO DEL MICROSCOPIO Inserire l’obiettivo 10x ruotando il revolver portaobiettivi. Ruotare la torretta del condensatore fino a visualizzare la scritta “10”. Ruotare le due viti di centraggio in modo tale che l’anello luminoso sia perfettamente allineato con l’anello scuro. Ripetere l’operazione per gli altri obiettivi (solo come verifica di un corretto centraggio).
  • Page 22: Automatic Light Control (Modello B-382-Alc)

    5.0 AUTOMATIC LIGHT CONTROL (MODELLO B-382-ALC) Il modello B-382-ALC ha una speciale funzione denominata “Automatic Light Control”. Il livello di luminosità impostato sul microscopio viene mantenuta sempre costante così come fissata dall’operatore, indipendentemente dal fatto che cambi l’apertura del diaframma, venga inserito un diverso obiettivo, o cambi il grado di opacità...
  • Page 23: Manutenzione

    6.0 MANUTENZIONE Ambiente di lavoro Si consiglia di utilizzare il microscopio in un ambiente pulito e secco, privo di urti, ad una temperatura fra 0°C e 40°C e con una umidità relativa massima dell’85% (in assenza di condensazione). Si consi- glia l’uso di un deumidificatore se necessario.
  • Page 24: Misure Ecologiche

    7.0 MISURE ECOLOGICHE Ai sensi dell’articolo 13 del decreto legislativo 25 luglio 2005 n°151. “Attuazione delle direttive 2002/95/CE, 2002/96/CE e 2003/108/CE, relative alla riduzione dell’uso di sostanze pericolose nelle apparecchiature elettriche ed elettroniche, nonché allo smaltimento dei rifiuti”. Il simbolo del cassonetto riportato sulla apparecchiatura o sulla sua confezione indica che il prodotto alla fine della propria vita utile deve essere raccolto separatamente degli altri rifiuti.
  • Page 26 SOMMAIRE 1.0 DESCRIPTION pag. 27 2.0 INTRODUCTION pag. 29 3.0 DÉBALLAGE ET MONTAGE DU MICROSCOPE pag. 30 4.0 UTILISATION DU MICROSCOPE pag. 31 4.1 Réglage de la tête d’observation 4.2 Positionnement de la préparation sur la platine 4.3 Réglage du système d’éclairage 4.4 Réglage de la distance inter pupillaire 4.5 Réglage de la mise au point 4.6 Réglage de la compensation dioptrique...
  • Page 27: Description

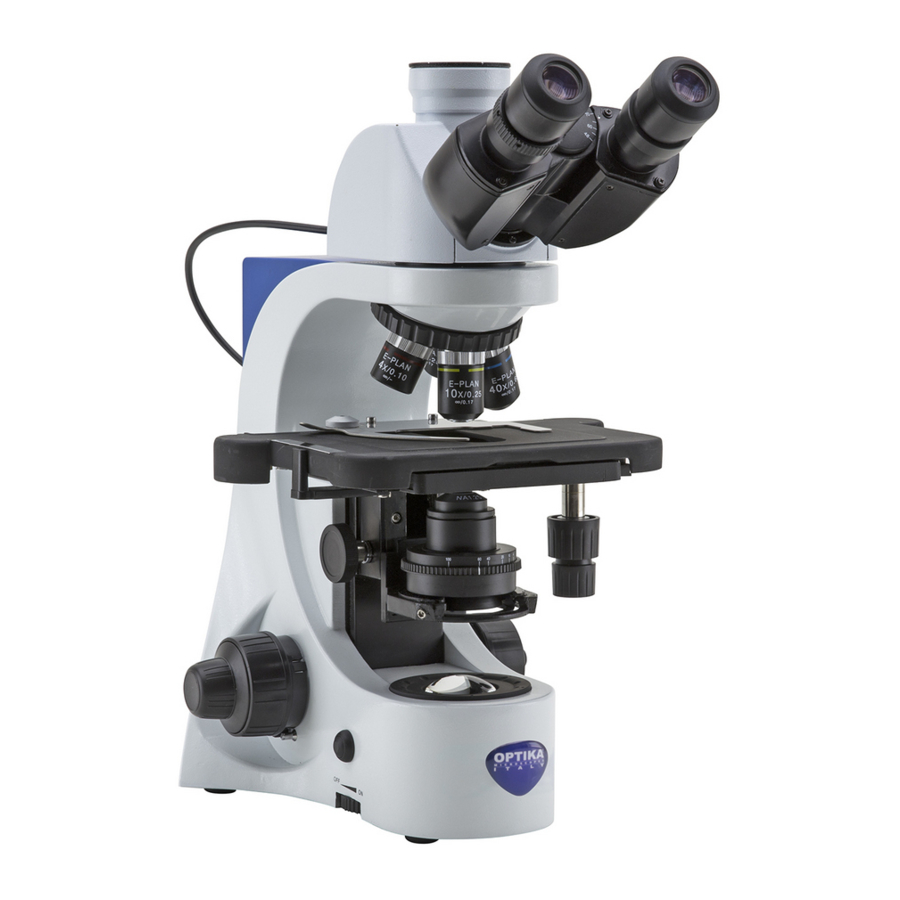
    1.0 DESCRIPTION SORTIE PHOTO VIDÉO RÉGLAGE DE LA DISTANCE INTER PUPILLAIRE OCULAIRES VIS DE FIXATION DE LA TÊTE (1) RÉVOLVER OBJECTIFS SURPLATINE MÉCANIQUE COMMANDES COAXIALES DIAPHRAGME À IRIS (3) CONDENSEUR VIS DE RÉGLAGE DE CONDENSEUR (2) AJUSTEMENT LUMINOSITE (CÔTÉ GAUCHE) ECLAIRAGE LED Page 27...
  • Page 28 1.0 DESCRIPTION RÉGLAGE DE LA DISTANCE INTER PUPILLAIRE PINCE POUR MAINTENIR LES PRÉPARATIONS RÉGLAGE DE LA HAUTEUR DU CONDENSEUR COMMANDE DE MISE AU POINT MICROMÉTRIQUE COMMANDE DE MISE AU POINT COMMANDE DE MACROMÉTRIQUE RÉGLAGE DE TENSION VERROUILLAGE DU FOYER Page 28...
  • Page 29: Introduction

    2.0 INTRODUCTION Ce microscope est un appareil scientifique de précision pensé pour durer de nombreuses années avec un entretient minimum. Pour son élaboration il a été utilisé des éléments optiques et mécaniques de grande qui le convertisse en un appareil idéal pour une utilisation journalière dans les salles de classes et les labora- toires.
  • Page 30: Déballage Et Montage Du Microscope

    3.0 DÉBALLAGE ET MONTAGE DU MICROSCOPE Le microscope est livré dans un emballage en polystyrène. Après avoir sortie l’emballage en polystyrène de son carton, enlevez la partie supérieure en enlevant de l’emballage en ayant enlevé au préalable la bande adhésive qui se trouve tout au tour. Faites bien attention de ne pas endommager les composants optiques (objectifs et oculaires) et évitez que l’appareil ne tombe.
  • Page 31: Utilisation Du Microscope

    4.0 UTILISATION DU MICROSCOPE Votre microscope est un instrument de laboratoire conçu por durer longtemps. Traitez le avec soin et évitez de le soumettre à chocs et vibrations. Débranchez toujours le câble d’alimentation quand le microscope n’est pas utiliser pendant longtemps, lors du nettoyage ou lorsque que vous en effectuez l’entretien.
  • Page 32: Réglage De La Compensation Dioptrique

    4.0 UTILISATION DU MICROSCOPE Réglage de la compensation dioptrique Tourner l’anneau de réglage dioptrique sur l’oculaire gauche jusqu’à atteindre la position zéro. Enle- vez la vis qui fixe le bouton de l’ouverture de mise au point et desserrez le bouton. Faites la mise au point de la préparation en tournant la commande micrométrique et en utilisant l’objectif le plus faible.
  • Page 33 4.0 UTILISATION DU MICROSCOPE Choisir l’objectif 10x en tournat le revolver. Tourner la tourelle du condenseur jusqu’à ce que vous voyez l’inscription “10”. Régler la mise au point de l’anneau lumineux que vous observez en dessérant la vis du télescope de centrage.
  • Page 34: Contrôle Automatique De La Lumière (Modèles B-382Alc)

    5.0 CONTRÔLE AUTOMATIQUE DE LA LUMIÈRE (MODÈLES B-382ALC) Les modèles B-382-ALC ont une fonction spéciale appelée “Contrôle automatique de la lumière”. Le niveau de lumière est réglé par le microscope pour maintenir le même niveau que celui que l’uti- lisateur a choisi, n’importe si l’ouverture du diaphragme change, si un autre objectif est inséré, si l’opacité...
  • Page 35: Entretient Du Microscope

    6.0 ENTRETIEN DU MICROSCOPE Environnement pour utilisation Il est conseillé d’utiliser ce microscope dans un environnement propre et sec, il faut aussi éviter les chocs. La température recommandée pour travailler est entre 0 et 40°C et l’humidité relative maxi- male conseillée est de 85 % (sans condensation). Si cela est nécessaire, utilisez un déshumidifiant. Conseils avant et après l’utilisation du microscope - Pendant les déplacements, gardez le microscope en position verticale, et faite bien attention que les accessoires mobiles ne tombent pas, comme par exemple les oculaires.
  • Page 36: Recyclage Et Récupération

    7.0 RECYCLAGE ET RÉCUPÉRATION Conformément à l’Article 13 du D.L du 25 Juillet 2005 nº151 Action des Directives 2002/95/CE, 2002/96/CE et 2003/108/CE, relatives à la réduction de l’utili- sation de substances dangereuses dans l’appareil électrique et électronique et à l’élimination des résidus.
  • Page 38 INDICE 1.0 DESCRIPCIÓN pag. 39 2.0 INTRODUCCIÓN pag. 41 3.0 DESEMBALAJE Y MONTAJE pag. 42 4.0 UTILIZACIÓN DEL MICROSCOPIO pag. 43 4.1 Regulación del cabezal de observación 4.2 Colocación de la muestra en la platina portapreparados 4.3 Regulación del sistema de iluminación 4.4 Regulación de la distancia interpupilar 4.5 Regulación de la tensión del enfoque 4.6 Regulación de la compensación dióptrica...
  • Page 39: Descripción

    1.0 DESCRIPCIÓN SALIDA PHOTO / VIDEO ANILLO DE AJUSTE DE DIOPTRÍAS OCULARES TORNILLO DE BLOQUEO DEL CABEZAL (1) REVÓLVER PORTAOBJETIVOS OBJETIVOS PLATINA PORTAPREPARADOS MANDOS COAXIALES DE DESPLAZAMIENTO DE LA DIAFRAGMA IRIS (3) PLATINA CONDENSADOR TORNILLOS DE CENTRADO DEL CONDENSADOR (2) AJUSTE BRILLO (A LA IZQUIERDA)
  • Page 40 1.0 DESCRIPCIÓN DISTANCIA INTERPUPILAR PINZA DE SUJECIÓN DE MUESTRAS MANDO DE REGULACIÓN DE LA ALTURA DEL CON- DENSADOR (4) MANDO DE ENFOQUE MICROMÉTRICO MANDO DE ENFOQUE MACROMÉTRICO REGULACIÓN DE LA TENSIÓN (5) BLOQUEO DEL MANDO DE ENFOQUE Página 40...
  • Page 41: Introducción

    2.0 INTRODUCCIÓN El presente microscopio es un instrumento científico de precisión proyectado para durar muchos años con un mínimo nivel de mantenimiento. Para su construcción se han utilizado elementos ópticos y mecánicos de elevada calidad que lo convierten en el instrumento ideal para ser utilizado a diario en las aulas y en el laboratorio.
  • Page 42: Desembalaje Y Montaje Del Microscopio

    3.0 DESEMBALAJE Y MONTAJE DEL MICROSCOPIO El microscopio se entrega con un embalaje de poliestireno. Después de abrir el embalaje, abrir la parte superior del mismo. Prestar atención para evitar dañar los componentes ópticos (objetivos y oculares) y para evitar que el instrumento se caiga. Extraer el microscopio de su embalaje utilizando las dos manos (con una mano sostener el brazo y con la otra, la base) y apoyarlo en una superficie estable.
  • Page 43: Utilización Del Microscopio

    4.0 UTILIZACIÓN DEL MICROSCOPIO El microscopio es un instrumento de laboratorio proyectado para durar mucho tiempo. Manejarlo siempre con mucha precaución, evitando las vibraciones bruscas y los golpes. Desconectar siempre el cable de alimentación del microscopio cuando no se utiliza durante un largo periodo de tiempo, mientras se limpia o cuando se realiza cualquier trabajo de mantenimiento.
  • Page 44: Regulación De La Compensación Dióptrica

    4.0 UTILIZACIÓN DEL MICROSCOPIO Regulación de la compensación dióptrica Girar el anillo de compensación dióptrica del ocular izquierdo hasta la posición cero. Girar el mando de enfoque macrométrico para enfocar la muestra con un objetivo de bajo poder de aumentos. Ob- servando con el ojo derecho, regular el mando de enfoque micrométrico hasta obtener una imagen clara y bien definida.
  • Page 45 4.0 UTILIZACIÓN DEL MICROSCOPIO Girando el revólver portaobjetivos, situar el objetivo en 10x. Girar el anillo del condensador hasta que se visualice el número “10”. Gire los dos tornillos de centrado con el fin de mover el anillo brillante hasta que esté perfectamente alineada con el anillo oscuro.
  • Page 46: Control Automático De Luz (Modelos B-382-Alc)

    5.0 CONTROL AUTOMÁTICO DE LUZ (MODELOS B-382-ALC) Los modelos B-382-ALC están provistos de una función especial denominada “control automático de luz” (ALC). La intensidad de luz se ajusta automáticamente en el microscopio para mantener el mismo nivel de iluminación seleccionado por el usuario, aunque éste haga cambios en la apertura del diafragma, en el objetivo o varie la opacidad de las muestras, etc.
  • Page 47: Ambiente De Trabajo

    6.0 MANTENIMIENTO Ambiente de trabajo Se aconseja utilizar este microscopio en un ambiente limpio y seco; también se deben evitar los im- pactos. La temperatura de trabajo recomendada es 0-40°C y la humedad relativa máxima es 85 % (en ausencia de condensación). Si fuera necesario, utilizar un deshumidificador. Antes y después de la utilización del microscopio - Durante los desplazamientos, mantener el microscopio en posición vertical y prestar mucha atención para evitar que se caigan los accesorios móviles, por ejemplo, los oculares.
  • Page 48: Medidas Ecológicas

    7.0 MEDIDAS ECOLÓGICAS En conformidad con el Art. 13 del D.L. de 25 julio 2005 n°151.Actuación de las Directivas 2002/95/ CE, 2002/96/CE y 2003/108/CE, relativas a la reducción del uso de sustancias peligrosas en la ins- trumentación eléctrica y electrónica y a la eliminación de residuos. El símbolo del contenedor que se muestra en la instrumentación o en su embalaje indica que el producto cuando alcanzará...
  • Page 50 INHALT 1.0 BESCHREIBUNG Seite 51 2.0 EINLEITUNG Seite 53 3.0 AUSPACKEN UND MONTAGE Seite 54 4.0 VERWENDUNG DES MIKROSKOPS Seite 55 4.1 Kopfeinstellung für Objektbetrachtung 4.2 Objektträger auf den Tisch legen 4.3 Beleuchtungseinstellung 4.4 Einstellung des Augenabstandes 4.5 Fokusverstellung 4.6 Dioptrienverstellung 4.7 Einstellung des Kondensors 4.8 Einstellung der numerischen Apertur 4.9 Zentrierung der Phasenkontrastringe (B-380PH)
  • Page 51: Beschreibung

    1.0 BESCHREIBUNG OUTPUT PHOTO / VIDEO EINSTELLRING DIOPTER OKULARE KOPFBEFESTIGUNGSCHRAUBE (1) REVOLVER OBJEKTIVE KREUZTISCH KNÖPFE IRISBLENDE (3) KREUZTISCHBEWEGUNG KONDENSOR SCHRAUBEN KONDENSOREINSTELLUNG (2) EINSTELLUNG HELLIGKEIT (LINKE SEITE) LED BELEUCHTUNG Seite 51...
  • Page 52 1.0 BESCHREIBUNG PRÄPARATENKLEMMEN KONDENSOREINSTELLUNG (4) FEINTRIEB GROBTRIEB SPANNUNGSEINSTELLUNG FOKUSSPEICHER Seite 52...
  • Page 53: Sicherheitshinweise

    2.0 EINLEITUNG Dieses Mikroskop ist ein wissenschaftliches Präzisionsgerät, es wurde entwickelt für eine jahrelange Verwen- dung bei einer minimalen Wartung. Dieses Gerät wurde nach den höchsten optischen und mechanischen Standards und zum täglichen Gebrauch hergestellt. Diese Bedienungsanleitung enthält wichtige Informationen zur korrekten und sicheren Benutzung des Geräts.
  • Page 54: Auspacken Und Montage

    3.0 AUSPACKEN UND MONTAGE Das Mikroskop wird in einer Verpackung aus Polyestere geliefert. Nehmen Sie das Klebeband von der Verpackung ab, dann heben Sie den oberen Teil der Verpackung. Achten Sie darauf, die optischen Komponenten (Objektive, Okulare) nicht zu beschädigen oder diese nicht fallen zu lassen. Ziehen Sie das Mikroskop aus der Verpackung mit beiden Händen heraus (einem rund um das Stativ und einem um den Fuß) und stellen es auf eine flache, stabile Oberfläche.
  • Page 55: Verwendung Des Mikroskops

    4.0 VERWENDUNG DES MIKROSKOPS Dieses Mikroskop wurde für eine lange Verwendung entwickelt. Behandeln Sie es mit Vorsicht und gebrauchen Sie nicht zu viel Kraft. Entfernen Sie immer das Netzkabel vom Mikroskop als es für eine lange Zeit nicht verwendet wird, bei der Reinigung und der Wartung.
  • Page 56: Dioptrienverstellung

    4.0 VERWENDUNG DES MIKROSKOPS Dioptrienverstellung Drehen Sie den Dioptrienverstellungring auf der linken Okular bis dem Position ‘null‘. Lockern Sie die Fokussperrschraube, suchen Sie durch den Grobtriebknopf den Fokus mit einem Objektiv mit niedri- ger Vergrößerung, dann die Schraube nochmals einschrauben. Stellen Sie den Feintriebknopf ein bis ein klares und scharfes Bild durch Betrachtung mit dem rechten Auge zu sehen ist.
  • Page 57 4.0 VERWENDUNG DES MIKROSKOPS Bei den Geräten mit Phasenkontrast müssen die Phasenringe zentriert werden. Nehmen Sie ein Okular heraus und setzen das Zentrierungsokular in den Tubus hinein. Wählen Sie das 10x Objektiv aus. Drehen Sie die Kondensorscheibe auf die Position 10. Lockern Sie die Zentrierungsokularschraube und stellen den hellen Ring scharf, den Sie betrachten können.
  • Page 58: Automatische Lichtkontrolle (B-382-Alc Modelle)

    5.0 AUTOMATISCHE LICHTKONTROLLE (B-382-ALC MODELLE) Die Modelle B-382-ALC haben eine spezielle Funktion: die automatische Lichtkontrolle. Das Lichtsniveau wird durch das Mikroskop eingestellt, um das gleiche Niveau zu behalten, als das, das vom Benutzer ausgewählt wurde, egal ob die Öffnung der Blende ändert, ob ein anderes Objektiv eingesetzt ist, ob die Opazität der Probe ändert, u.s.w.
  • Page 59: Wartung

    6.0 WARTUNG Arbeitsumfeld Wir empfehlen, das Mikroskop in einem sauberen, trockenen und stoßsicheren Ort zu verwenden, bei einer Temperatur zwischen 0° und 40° und einer Feuchtigkeit nicht hoher als 85% (ohne Kondensation). Wenn nötig wird die Verwendung eines Luftentfeuchters empfohlen. Vor und nach der Verwendung - Im Falle von Bewegungen muss das Gerät immer aufrecht gehalten werden.
  • Page 60: Wiederverwertung

    7.0 WIEDERVERWERTUNG Gemäß dem Artikel 13 vom Dekret Nr. 151 vom 25.07.2005 “Umsetzung der Richtlinien 2002/95/EG, 2002/96/EG und 2003/108/EG in Bezug auf die Verwen- dung gefährlicher Stoffe in elektrischen und elektronischen Geräten sowie die Abfallentsorgung” Das Symbol vom Müllcontainer erscheint auf dem Gerät oder der Verpackung und weist darauf hin, dass das Produkt Ende des Lebens separat von anderen Abfällen entsorgt werden muss.
  • Page 64 Edited with the trial version of Foxit Advanced PDF Editor To remove this notice, visit: www.foxitsoftware.com/shopping www.optikamicroscopes.com info@optikamicroscopes.com OPTIKA S.R.L. Via Rigla 30, Ponteranica (BG) - ITALY Tel.: ++39 035 571392 (6 linee) Telefax: ++ 39 035 571435 MAD Iberica Aparatos Cientificos c/.

Ce manuel est également adapté pour:

B-380alc

Table des Matières