ARO SHC5065 Notice D'utilisation

Manuels Connexes pour ARO SHC5065

Sommaire des Matières pour ARO SHC5065
- Page 1 Instruction manual (EN) Notice d’utilisation (FR) Electric cooker / Cuisinière électrique SHC5065 IO-CFS-1984 / 8511148 (09.2020 V1)
- Page 35 CHER(S) CLIENT(S), La cuisinière combine à la perfection la facilité d’utilisation et une efficacité optimale. Après lecture de ce mode d’emploi, vous n’aurez aucun problème pour utiliser ses fonctionnalités. À la sortie de l’usine, avant d’être emballée, la cuisinière a passé tous les tests de sécurité et de compatibilité.
-
Page 36: Garantie
GARANTIE La garantie légale s’applique à ce produit. Toute réclamation doit être formulée immédiatement après constatation La demande de garantie peut être formulée par l’acheteur ou par un tiers. Le droit de garantie ne s’applique pas dans les cas suivants : mauvaise utilisation ou fausse manipulation, stockage ou rangement non soigné, mauvais branchement ou montage, violence faite à... - Page 37 INDICE Informations générales ..................35 Consignes de sécurité ..................38 Conseils d’économie d’énergie ...................44 Description de l’appareil ..................46 Caractéristiques du produit ..................47 Installation ......................48 Branchement de la cuisinière à l’installation électrique ..........49 Mode d’utilisation ....................51 Fonctions du four et de son utilisation .................54 Utilisation du four –...
-
Page 38: Consignes De Sécurité
CONSIGNES DE SECURITE Les principes et les dispositions contenus dans ce mode d’emploi doivent s’appliquer obligatoirement. Ne pas permettre l’utilisation de la cuisinière aux personnes n’ayant pas pris connaissance de ce mode d’emploi. Installation Les matériaux d’emballage (par ex. les films plastiques, les polystyrènes) repré- sentent un danger pour les enfants - risque d’asphyxie ! Conservez-les hors de portée des enfants ... - Page 39 CONSIGNES DE SECURITE MISE EN GARDE: Pour évi- ter le risque de basculement de l’appareil, le dispositif de stabilisation par les fixations anti-basculement doit être mis en place. Utilisation Cet appareil doit être utilisé uniquement pour l’usage pour lequel il a été conçu, c’est à...
- Page 40 CONSIGNES DE SECURITE Ne pas brancher l’appareil à une prise de courant non protégée contre les surchar- ges (fusible). Ne jamais utiliser de prises multiples ou de rallonge pour brancher l’appareil. Cet appareil n’est pas destiné à être mis en fonctionnement au moyen d’une mi- nuterie extérieure ou par un système de commande à...
- Page 41 CONSIGNES DE SECURITE Ne rayez pas la plaque de cuisson avec des objets pointus. N’utilisez pas la table comme surface de travail. Après l’utilisation, éteignez l’interrupteur de contrôle. N’utilisez jamais ce produit si le câble d’alimentation, le bandeau de commande, la vitre sont endommagés de manière telle que l’intérieur de l’appareil est acces- sible.
- Page 42 CONSIGNES DE SECURITE situés à l’intérieur du four. Ne pas poser sur la porte du four ouverte des objets d’un poids supérieur à 15 kg et sur la table de cuisson d’un poids supérieur à 25 kg. Il est interdit de ranger dans le tiroir des récipients ou d’autre élément ainsi que des matériaux inflammables ;...
- Page 43 CONSIGNES DE SECURITE fabricant de l’appareil dans les instructions d’utilisa- tion comme adaptés ou les dispositifs de protection de table de cuisson intégrés à l’appareil. L’utilisation de dispositifs de protection non appropriés peut entrainer des accidents. ATTENTION : Le processus de cuisson doit être ...
-
Page 44: Conseils D'économie D'énergie
CONSEILS D’ÉCONOMIE D’ÉNERGIE Une utilisation responsable Utilisation de la chaleur résiduelle du four de l’énergie est une source Si le temps de cuisson est supérieur à 40 d’économie mais aussi un minutes, éteindre le four 10 minutes avant geste très important pour la fin de la cuisson. -
Page 45: Déballage
FIN DE VIE DE L’APPAREIL DÉBALLAGE Pour la sécurité du transport, Cet appareil est marqué du cet appareil a été emballé avec symbole du tri sélectif relatif des protections. Veuillez recycler aux déchets d’équipements les éléments de cet emballage électriques et électroniques. conformément aux normes de Cela signifie que ce produit protection de l’environnement. -
Page 46: Description De L'appareil
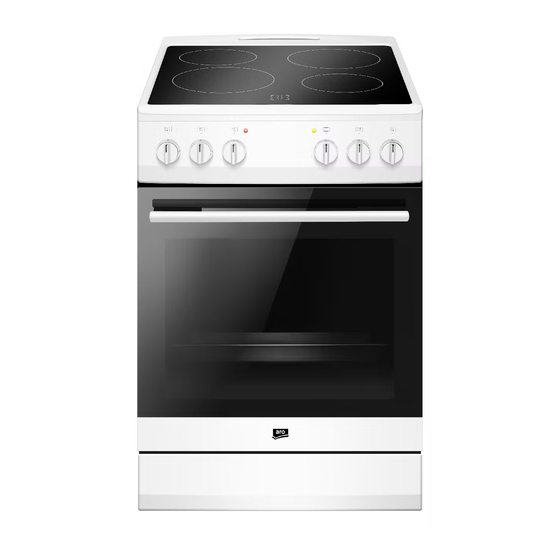
DESCRIPTION DE L’APPAREIL 5, 6 3, 4 1 : Manette de réglage de la température du four 2 : Manette des programmes du four 3, 4, 5, 6 : Manettes des foyers du plan de cuisson 7 : Voyant de contrôle du thermorégulateur 8 : Voyant de contrôle du four 9 : Plaque vitrocéramique 10 : Poignée de la porte du four... -
Page 47: Caractéristiques De L'appareil
CARACTÉRISTIQUES DE L’APPAREIL Ce tableau vous permettra de vous familiariser avec l’équipement de votre cuisinière Plaque de cuisson Diamètre Puissance Four Puissance Foyer arrière gauche 14,5 cm 1,2 kW Rèsistance supèrieure 0,9 kW Foyer avant gauche 18,0 cm 1,8 kW Rèsistance infèrieure 1,1 kW Foyer arrière droit... -
Page 48: Installation
INSTALLATION Montage de la fixation Aménagement de la cuisine anti basculement Pour éviter le basculement de la cuisinière, Le local ou la cuisine doit être sec et facile installez la fixation fournie avec votre produit à aérer, disposer d’une ventilation efficace en procédant comme suit : et la disposition de son équipement doit Sur le mur contre lequel sera installée la... -
Page 49: Raccordement De La Cuisinière À L'installation Électrique
INSTALLATION Raccordement de la cuisinière à l’installation électrique Note : N’oubliez pas de brancher la prise Note : de terre au bornier de la cuisinière marqué par le symbole . L’alimen- Le raccordement à l’installation élec- tation électrique de la cuisinière doit trique ne peut être réalisé... -
Page 50: Schéma Des Branchements Possibles
INSTALLATION SCHÉMA DES BRANCHEMENTS POSSIBLES Note : la tension des éléments chauffants est de 230V. Note : Dans tous les cas de raccordement, la prise de terre doit être reliée au le bornier au niveau du symbole Type de câble de raccor- dement recommandé... -
Page 51: Mode D'utilisation
MODE D’UTILISATION Avant la première utlisation de la cuisinière • enlever tous les éléments de l’emballage, vider le tiroir, nettoyer le four afin de sup- primer tous les restes de produits utilisés pour le protéger, • enlever tous les accessoires du four et les nettoyer à... - Page 52 MODE D’UTILISATION Commande des foyers de la plaque de cuisson vitrocéramique. Pour les informations concernant les différents types des foyers, voir le chapitre « Caractéri- stiques de l’appareil. » Choix du récipient Un récipient correctement choisi est un récipient dont la taille et la forme du fond correspondent approximativement à...
- Page 53 MODE D’UTILISATION Indication de la température de la zone de chauffe Si la température de la zone de chauffe est supérieure à 50°C, le voyant correspondant à cette zone s’allume. Le voyant allumé informe l’utilisateur que le foyer est chaud, afin d’éviter tout contact accidentel avec la surface brûlante.
-
Page 54: Fonctions Du Four Et De Son Utilisation
MODE D’UTILISATION Les fonctions du four et de son Positions du bouton des fonctions du four utilisation. Les informations concernant l’équipement du Réglage zéro four et de ses éléments chauffants se trouvent dans le tableau du chapitre « Caractéristiques Montée en température rapide de l’appareil »... - Page 55 MODE D’UTILISATION Voyants de contrôle Convection naturelle Cette fonction permet de cuire les Quand le four est allumé, deux voyants aliments sur un seul niveau. s’éclairent, un voyant orange et un voyant rouge. Le voyant orange indique que le four est activé.
- Page 56 MODE D’UTILISATION Utilisation du gril Les plats sont grilés par rayons infrarouges émis par la résistance incandescente du gril. Pour allumer le gril, il faut : tourner la manette sur la position monter le four en température durant approximativement 5 minutes (porte du four fermée).
-
Page 57: Cuisson Au Four - Conseils Pratiques
CUISSON AU FOUR – CONSEILS PRATIQUES Pâtisseries pour la préparation de vos pâtisseries/gâteaux, nous vous recommandons l’utilisation de la lèchefrite livrée avec l’appareil ou de la plaque à pâtisserie posée sur la grille il est également possible d’utiliser les moules et lèchefrites achetés dans le ... - Page 58 CUISSON AU FOUR – CONSEILS PRATIQUES Mode de cuisson ECO en utilisant le mode ECO, la cuisson est optimisée par un programme spécifique qui se met en route pour économiser de l’énergie lors de la préparation des plats. la durée de cuisson ne sera pas réduite par un réglage plus élevé de la tempé- ...
- Page 59 CUISSON AU FOUR – CONSEILS PRATIQUES Type de plat/ Fonction du four Température ( Niveau Temps (min.) cuisson Tarte biscotte 160 - 200 2 - 3 30 - 50 Muffins 160 - 170 25 - 40 Muffins 155 - 170 25 - 40 Pizza 220 - 240...
- Page 60 PLATS DE TEST. Conformément à la norme EN 60350-1. Cuisson de gâteaux Type de plat Accessoires Niveau Fonctions Température Temps de de cuisson cuisson (min.) Plaque pour 160 - 170 25 - 40 pain Petits gâteaux Plaque pour 155 - 170 25 - 40 pain Plaque pour...
- Page 61 PLATS DE TEST. Conformément à la norme EN 60350-1. Mode gril Type de plat Accessoires Niveau Fonctions Température Durée de cuisson (min.) Grille 1,5 - 2,5 Pain blanc grillé Grille 2 - 3 Grille + plaque pour rôti 4 - grille Hamburgers 1 page 10 - 15 (pour récupé-...
-
Page 62: Nettoyage Et Maintenance De La Cuisinière
NETTOYAGE ET MAINTENANCE DE LA CUISINIÈRE Afin de prolonger la vie de la cuisinière, l’uti- Note : faire toujours entrer le bord lisateur doit l’entretenir correctement selon tranchant à l’intérieur du grattoir (il les recommandations du fabricant. suffit d’appuyer sur la partie saillante avec le pouce). - Page 63 NETTOYAGE ET MAINTENANCE DE LA CUISINIÈRE Four Le four doit être nettoyé après chaque utilisation. Pour plus de visibilité, nettoyer le four l’éclairage allumé. Laver l’intérieur du four uniquement avec de l’eau chaude et une petite quantité de produit nettoyant.
- Page 64 NETTOYAGE ET MAINTENANCE DE LA CUISINIÈRE Comment enlever la porte Comment enlever la vitre intérieure Afin de pouvoir nettoyer plus facilement 1. Décrocher la plinthe supérieure de la l’enceinte du four, il est possible d’enlever porte à l’aide d’un tournevis plat, en la la porte.
-
Page 65: Comment Changer L'ampoule D'éclairage Du Four
NETTOYAGE ET MAINTENANCE DE LA CUISINIÈRE Comment changer l’ampoule 3. Décrochez la vitre intérieure de sa fixa- d’éclairage du four tion (en partie inférieure de la porte). Ex- traire la vitre intérieure. (fig. D). 4. Laver la vitre à l’eau chaude avec un peu Afin d’éviter une électrocution, avant de de produit de nettoyage. -
Page 66: Situations D'urgence
SITUATIONS D’URGENCE Dans chaque situation d’urgence, il faut: • Fermer les manettes de la cuisinière • Débrancher l’appareil de la source d’alimentation • Contacter le service après-vente Des petits dysfonctionnements peuvent être solutionnés par les utilisateurs à l’aide du tableau ci-après. -
Page 67: Données Techniques
DONNEES TECHNIQUES Tension nominale 230 / 400V~50 Hz Puissance nominale 9,5 kW Plaque vitrocéramique 6,0 kW Dimensions de la cuisinière 85 / 50 / 60 cm (auteur/largeur/profondeur) Le produit est conforme aux normes EN 60335-1, EN 60335-2-6, en vigueur dans l’Union européenne. - Page 68 MCC TRADING INTERNATIONAL GMBH SCHLÜTERSTRASSE 5 / 40235 DÜSSELDORF GERMANY...