Table des Matières
Publicité
Les langues disponibles
Les langues disponibles
Liens rapides
Publicité
Chapitres
Table des Matières
Dépannage

Manuels Connexes pour Korg WAVEDRUM mini sondius xg


Sommaire des Matières pour Korg WAVEDRUM mini sondius xg
- Page 1 Owner’s Manual Manuel d’utilisation Bedienungsanleitung...
-
Page 3: Table Des Matières
Table Of Contents Precautions ............4 Using effects ............ 12 Cautions for use ..........5 Playing and overdubbing rhythm patterns ..12 Overdubbing phrases (Looper) ......13 Introduction ..........5 Editing the settings ........14 Main features .............5 Editing procedure ..........14 Getting to know the WAVEDRUM Mini ..6 Parameter list .......... -
Page 4: Precautions
AC adapter from the wall outlet. chemical symbol is displayed below the Then contact your nearest Korg dealer or the store “crossed-out wheeled bin” symbol on the bat- where the equipment was purchased. -
Page 5: Cautions For Use
Unexpected malfunctions can result in the loss of long the WAVEDRUM Mini is in contact with the memory contents. Korg cannot accept any responsi- other object. bility for any loss or damage which you may incur as a result of data loss. -
Page 6: Rhythm Patterns
Getting to know the WAVEDRUM Mini 100 sounds, 10 effects Looper The 100 sounds cover all styles from percussion to The Looper function lets you create grooves from sound effects. The sounds produce totally different scratch. tones depending on your playing style. Different It's a great way to create your very own original sounds can be independently assigned to the pad grooves. -
Page 7: Getting Ready To Play
Getting ready to play Getting ready to play Connecting the clip to the WAVE- Connecting the power DRUM Mini 1. Connect the DC plug of the included AC Adapter to the DC9V jack located on the right side of the 1. -
Page 8: Adjusting The Volume
Getting ready to play If you're using headphones with a 1/4" mini adapter Adjusting the volume plug, be sure to grasp the adapter when inserting or removing the plug. • Turn the VOLUME knob toward right to To protect your hearing, avoid listening at high increase the volume, or toward the left to lower volume for extended periods of time when the volume. -
Page 9: Replacing The Batteries
Getting ready to play 1. To open the battery cover, lightly press and lift up Attaching the included clip to an object, or the latches indicated by the arrows in the illustra- detaching it tion. By attaching the WAVEDRUM Mini's clip to a 2. - Page 10 Getting ready to play 3. Place the WAVEDRUM Mini on your leg as Attaching and detaching the included strap shown in the illustration, and secure it with the You can use the included strap to attach the WAVE- strap. Pass the strap around your leg and latch the DRUM Mini to your leg for performances.
-
Page 11: Performing
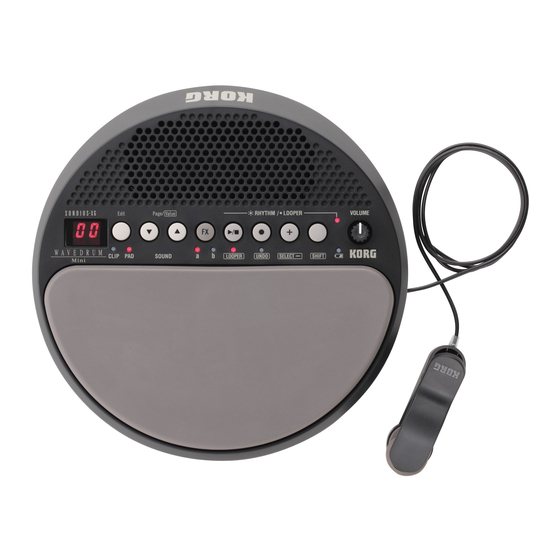
Performing Performing Display Rhythm pattern / Looper selection indicator Sound select Rhythm pattern / Looper transport Effect select Do not strike any part of the WAVEDRUM Performance techniques Mini other than its pad; e.g., do not strike the control panel or speaker. The WAVEDRUM Mini lets you independently Do not strike the clip itself. -
Page 12: Using Effects
Performing By holding down the + button, you can step Using effects through the rhythm patterns. The pattern number in the display will blink while Here's how to apply an effect to the sound. You can the rhythm pattern is switching. Once the change use either effect 'a' or b', but not both. -
Page 13: Overdubbing Phrases (Looper)
Performing off. When muted, the rhythm pattern / looper 4. When you've finished performing, press the select indicator will blink. button. If you press the button, recording will end and note: If you select another rhythm pattern (or switch playback will continue. If you press the but- to the Looper) while muted, muting will automati- ton, recording will end and playback will stop. -
Page 14: Editing The Settings
Editing the settings Editing the settings Edit select (press for Edit page Edit select (press for two two seconds) select seconds) / Page select Numeric input The WAVEDRUM Mini lets you adjust the volume note: You can also exit the edit pages by pressing of the pad, clip, and rhythm pattern. -
Page 15: Effect Parameters
Editing the settings : Scale (temperament) [0...6] : Effect 'a': Dry/wet [0...99] Some sounds allow you to play phrases in a scale. Adjusts the balance between the effect sound and Some phrases will sound randomly with a different direct sound. With a setting of 0, only the direct pitch of the scale being heard each time you strike, sound will be heard. - Page 16 Editing the settings 0: Conventional echo. Pitch is set near 24, and a longer setting is appropri- Plays delayed sound in the rhythm “ta ta ta (rest)” ate when the Pitch is set at a more distant value. Plays delayed sound in the rhythm “ta (rest) ta ta” Parameter 3: Delay Time [0...99] Plays delayed sound in the rhythm “ta ta (rest) ta”...
-
Page 17: Appendix
If you suspect a malfunction, check the following global settings and effect settings to their factory-set points first. If this does not resolve the problem, condition. contact your nearby Korg dealer. 1. While holding down the button, press the power switch to turn on the power. -
Page 18: Specifications
Appendix The sound is different than another WAVE- Specifications DRUM Mini As with many other instruments, each WAVE- DRUM Mini will sound slightly different. This is Dynamic Percussion Synthesizer due to many factors, such as the environment where Sounds: 100 it's being played and how it has been maintained. - Page 19 Sommaire Précautions ............20 Utilisation des effets ........28 Précautions lors de l’utilisation ......20 Ecouter et accompagner des motifs rythmiques . 28 Enregistrement de plusieurs parties (Looper) .. 29 Introduction ..........21 Changer les réglages ........30 Caractéristiques principales ......21 Procédure d’édition ......... 30 Présentation du WAVEDRUM Mini ....22 Liste de paramètres .........
-
Page 20: Précautions
Afin de pouvoir exploiter au mieux toutes les possi- courant et contactez votre revendeur korg le plus bilités offertes par l’instrument, veuillez lire atten- proche ou la surface où vous avez acheté l’instru- tivement ce manuel. -
Page 21: Effet Larsen
Des dysfonctionnements imprévisibles peuvent Quand vous jouez sur le WAVEDRUM Mini en écou- entraîner une perte de données. Korg décline toute tant le son à travers un grand système de sonorisation, responsabilité pour toute perte ou dommage résultant le signal du WAVEDRUM Mini produit par les de la perte de données. -
Page 22: Accompagnements Rythmiques
Présentation du WAVEDRUM Mini Accompagnements rythmiques Haut-parleur interne et fonctionnement sur Vous pouvez vous lancer dans des sessions d’impro piles en accompagnant un des 100 motifs rythmiques cou- Poids plume et compact, le WAVEDRUM Mini peut vrant un large éventail de genres et de tempos. vous accompagner n’importe où. -
Page 23: Préparations
Préparations Préparations Connexion de la pince au WAVE- Connexion à une prise électrique DRUM Mini 1. Connectez la fiche de courant continu de l’adapta- teur secteur à la prise DC9V située sur le côté droit 1. Assurez-vous que le WAVEDRUM Mini est hors du WAVEDRUM Mini. -
Page 24: Réglage Du Volume
Préparations tard le soir. Insérez la fiche de votre casque dans la Réglage du volume prise pour casque située sur le côté droit du WAVE- DRUM Mini. • Tournez la commande VOLUME vers la droite Si vous utilisez un casque doté d’une fiche adaptatrice pour augmenter le volume ou vers la gauche pour jack 1/4"–mini-jack, veillez à... -
Page 25: Remplacer Les Piles
Préparations Ne mélangez pas des piles partiellement utilisées câble audio pour qu’ils ne restent accrochés avec des piles neuves et ne mélangez pas diffé- nulle part. rents types de piles. 1. Pour ouvrir le couvercle du compartiment à piles, Attacher/détacher la pince d’un objet appuyez légèrement sur les languettes indiquées En attachant la pince du WAVEDRUM Mini à... -
Page 26: Attacher/Détacher La Lanière
Préparations 3. Placez le WAVEDRUM Mini sur votre jambe de la Attacher/détacher la lanière façon illustrée et fixez-le avec la lanière. Passez la Vous pouvez utiliser la lanière fournie pour attacher le lanière autour de votre jambe et fermez la boucle. WAVEDRUM Mini à... -
Page 27: Jeu
Ecran Témoin RHYTHTMUS/LOOPER Sélection de sons Transport pour motif rythmique/Looper Sélection d’ e ffets Techniques de jeu Sélection de sons Le WAVEDRUM Mini vous permet d’assigner diffé- Vous avez le choix parmi 100 sons différents. rents sons au pad et à la pince. 1. -
Page 28: Utilisation Des Effets
Le numéro de motif clignote à l’écran quand vous Utilisation des effets changez de motif. Quand le changement est effec- tué, l’écran affiche à nouveau le numéro du son. Vous pouvez traiter le son avec un effet. Vous avez le Pour en savoir plus sur les différents motifs ryth- choix entre l’effet [a] ou [b] mais pas les deux. -
Page 29: Enregistrement De Plusieurs Parties (Looper)
la coupure du son. Quand vous coupez le son du Enregistrement de la deuxième partie et des motif rythmique, le témoin RHYTHM/LOOPER suivantes clignote. 1. Appuyez sur le bouton pour lancer la repro- Remarque: Si vous changez de motif rythmique (ou duction du “Looper”... -
Page 30: Procédure D'édition
Changer les réglages Changer les réglages Edit (maintenez enfoncé Sélection de la page Sélection du mode d’édition (maintenez enfoncé 2 secondes) d’ é dition 2 secondes)/Sélection de page Entrée numérique Le WAVEDRUM Mini vous permet de régler le Remarque: Vos changements sont automatiquement volume du pad, de la pince et du motif rythmique. -
Page 31: Paramètres D'effet
Changer les réglages (page 68) indique la valeur à laquelle la hauteur d’un : Effet a: Dry/Wet [0...99] son transposable se replie. Détermine la balance entre le signal d’effet et le signal sec. Avec un réglage “0”, seul le signal direct : Gamme (tempérament) [0...6] est audible. -
Page 32: Type D'effet 5: Pitch Shifter
Changer les réglages Paramètre 1: Mode [0...4] Paramètre 2: Tracking [0...99] Définit la combinaison de têtes utilisée (écho à Règle la vitesse de l’effet Pitch Shift. Pour des bande). valeurs “Pitch” allant jusqu’à “24”, sélectionnez une valeur relativement basse. Quand l’intervalle “Pitch” 0: Echo conventionnel. -
Page 33: Appendice
SHIFT enfoncé et appuyez sur le bouton FX. ment le WAVEDRUM Mini hors tension et contactez • Le paramètre général G. 6 (niveau du motif ryth- votre revendeur Korg. mique) est-il réglé sur “0”? Impossible d’utiliser les boutons Le numéro de motif clignote à l’écran quand vous changez de motif rythmique. -
Page 34: Fiche Technique
Appendice Le son est différent de celui d’un autre Fiche technique WAVEDRUM Mini Comme de nombreux autres instruments, chaque Synthétiseur dynamique de percussion WAVEDRUM Mini a un son qui lui est propre. C’est Sons: 100 dû à de nombreux facteurs tels que l’environnement Effets: 10 dans lequel il est utilisé... - Page 35 Inhaltsübersicht Vorsichtsmaßnahmen ........36 Verwendung der Effekte ........44 Vorsicht bei der Handhabung ......37 Anwahl und Wiedergabe eines Rhythmus-Pattern ........... 44 Vorweg ............37 Aufnahme mehrerer Parts (Looper) ....45 Die wichtigsten Funktionen ......37 Editieren der Einstellungen ......46 Vorstellung der WAVEDRUM Mini ....38 Arbeitsweise zum Editieren ......
-
Page 36: Vorsichtsmaßnahmen
Beachten Sie, daß keinerlei Fremdkörper in das Gerät machen. gelangen. Sollte ein Fremdkörper in das Gerät gelangt sein, so trennen Sie es sofort vom Netz. Wenden Sie sich dann an Ihren KORG-Fachhändler. Vorsichtsmaßnahmen Hinweis zur Entsorgung (Nur EU) Aufstellungsort Wenn Sie das Symbol mit der „durchgek- reuzten Mülltonne“... -
Page 37: Vorsicht Bei Der Handhabung
Bei unvorhergesehenen Funktionsstörungen könnte der Speicherinhalt gelöscht werden. Korg haftet nicht Auch Alterungserscheinungen können zu Verfär- für Schäden oder Verdienstausfälle, die auf einen bungen führen – und nach einer Weile spielt es kaum solchen Datenverlust zurückzuführen sind. -
Page 38: Vorstellung Der Wavedrum Mini
Vorstellung der WAVEDRUM Mini 100 Klänge, 10 Effekte Looper Die 100 Klänge decken alles zwischen Percussion- Mit der „Looper“-Funktion können Sie Part für Part Klangfarben bis hin zu Klangeffekten ab. Der neue Grooves aufzeichnen. erzeugte Klang richtet sich hauptsächlich nach Ihrer So können Sie also auch eigene Grooves und Rhyth- Spieltechnik. -
Page 39: Vor Dem Ersten Einsatz
Vor dem ersten Einsatz Vor dem ersten Einsatz Anschließen des Clips an die Anschließen ans Stromnetz WAVEDRUM Mini 1. Verbinden Sie den Gleichstromstecker des Netz- teils mit der DC9V-Buchse auf der rechten Seite 1. Schalten Sie die WAVEDRUM Mini zunächst aus. der WAVEDRUM Mini. -
Page 40: Einstellen Der Lautstärke
Vor dem ersten Einsatz Verbindung niemals am Kabel, sondern nur am Stek- Einstellen der Lautstärke ker ziehen. Um sich keinen Hörschaden zuzuziehen, sollten • Drehen Sie den VOLUME-Regler nach links, um Sie niemals über einen längeren Zeitraum hin- die Lautstärke zu verringern bzw. nach rechts, um weg einen hohen Kopfhörerpegel verwenden. -
Page 41: Auswechseln Der Batterien
Vor dem ersten Einsatz 1. Um das Batteriefach zu öffnen, müssen Sie die mit Befestigen und Entfernen des Clips an/von Pfeilen markierten Klemmen drücken und anheben. einem Gegenstand 2. Legen Sie 6 Ni-MH-Batterien (AA) ein. Achten Wenn Sie den Clip der WAVEDRUM Mini an einem Sie beim Einlegen der Batterien auf die richtige Gegenstand in der Nähe anbringen und auf jenen Polarität („+“... - Page 42 Vor dem ersten Einsatz 3. Legen Sie die WAVEDRUM Mini wie in der Anbringen und Entfernen des Gurts Abbildung gezeigt auf ein Bein und schließen Sie Mit dem beiliegenden Gurt können Sie die WAVED- den Gurt. Winden Sie den Gurt um Ihr Bein und RUM Mini an einem Bein oder anderen Körperteil verschließen Sie den Gurt.
-
Page 43: Spielen
Spielen Spielen Display RHYTHTMUS/LOOPER-Anzeige Klanganwahl Rhythmus-Pattern/Transportfunktionen des Loopers Effektanwahl Schlagen Sie niemals auf den Clip selbst. Spieltechniken Die WAVEDRUM Mini erlaubt die Anwahl unter- Klanganwahl schiedlicher Klänge für das Pad und den Clip. Das Ausgangssignal richtet sich nach den Klängen, Mit folgendem Verfahren kann jeweils einer von 100 die Sie wählen und reagiert sehr empfindlich, variiert Klängen gewählt werden:... -
Page 44: Verwendung Der Effekte
Spielen Halten Sie den +-Taster gedrückt, um ein weiter Verwendung der Effekte entferntes Pattern zu wählen. Während der Anwahl blinkt die Pattern-Nummer Bei Bedarf können Sie die Klangfarben mit Effekt im Display. Sobald das Pattern einsatzbereit ist, versehen. Sie können entweder Effekt [a] oder [b] zeigt das Display wieder die Klangnummer an. -
Page 45: Aufnahme Mehrerer Parts (Looper)
Spielen 7. Bei Bedarf können Sie die Rhythmus-Begleitung Zweiter und nachfolgende Parts stummschalten (oder wieder aktivieren). Wenn Sie 1. Drücken Sie den -Taster, um die Looper- das Rhythmus-Pattern stummschalten, hören Sie Wiedergabe zu starten (die Diode leuchtet). nur noch die von Ihnen gespielten Parts. Wählen Sie den Klang, den Sie zum Spielen ver- Halten Sie den SHIFT-Taster gedrückt, während wenden möchten. -
Page 46: Editieren Der Einstellungen
Editieren der Einstellungen Editieren der Einstellungen Edit (2 Sekunden Anwahl der Editierseite Wahl des Editmodus’ (2 Sekunden gedrückt halten) gedrückt halten)/Seitenanwahl Numerische Eingabe Die WAVEDRUM Mini erlaubt das Einstellen der Anmerkung: Die Transposition oder Skala kann man Lautstärke für das Pad, den Clip und das Rhythmus- nur ändern, wenn man vor Aufrufen der Editierseite Pattern. -
Page 47: Übersicht Der Effekttypen
Editieren der Einstellungen : Skala (Stimmungssystem) [0...6] : Effekt ‘a’: Dry/Wet [0...99] Bestimmte Klänge erlauben das Spielen von Melodien. Hiermit regeln Sie die Balance zwischen dem Effekt- und Original-Signal. Der Wert „0“ bedeutet, dass Sie Bestimmte Phrasen wählen die Noten einer Skala nur das Direktsignal hören. - Page 48 Editieren der Einstellungen Parameter 1: Mode [0...4] Parameter 2: Tracking [0...99] Hiermit wählen Sie die Anzahl der simulierten Ton- Regelt die Geschwindigkeit des Pitch Shifter-Effekts köpfe (des Bandechos). (seine Ansprache). Für „Pitch“-Werte bis „24“ sollten 0: Herkömmlicher Echoeffekt. Sie einen relativ niedrigen Wert wählen. Bei größe- Das Delay-Signal verwendet den Rhythmus „ta ta ta (Pause)“.
-
Page 49: Anhang
Wenn sie blinkt, ist die Rhythmusfunktion die WAVEDRUM Mini sofort aus und wenden Sie stummgeschaltet. Um die Stummschaltung zu deak- sich an Ihren Korg-Händler. tivieren, müssen Sie den SHIFT-Taster gedrückt halten, während Sie den FX-Taster betätigen. • Haben Sie Parameter (Rhythmuspegel) auf „0“... -
Page 50: Technische Daten
Anhang Die Klänge sind nicht dieselben wie auf einer Technische Daten anderen WAVEDRUM Mini Wie bei den meisten Instrumenten gleicht keine WAVEDRUM Mini exakt der anderen. Die wich- Dynamischer Percussion-Synthesizer tigsten Gründe hierfür sind die Stimmung, wie man Klangfarben: 100 darauf spielt und wie gut man sie pflegt. -
Page 52: Voice Name List
Voice Name List Voice Name List Sounds Name Category Name Category Tabla Drum/Perc. Instrument 9 (A) Club Kit Drum Kit Djembe Drum/Perc. Instrument Big Tom Drum/Perc. Instrument Elektro Slider Drum/Perc. Instrument Katim Drum/Perc. Instrument Chord Hit Synth Bass 6 (F#) Ran./Vel. -
Page 53: Pitch Change
Voice Name List Scale Rhythm Patterns 0 Major Name [bpm] Name [bpm] Dreamy Planets [104] Waterphone [102] Techno Kick&Hat [128] Tragedy [82] Submarine [100] Spacey [80] 1 Major Pentatonic Ambi Windy [97] Orgel [84] AquaCity 1 [120] Murk [128] Hip Hop Windy [90] Afrikana [105] Wavesequence Beat [130] DubStep Drama [145]... - Page 54 Garantie des Herstellers oder Importeurs hinfällig lassen werden. Bitte bewahren Sie diese Quittung als Kaufbeleg auf, da andernfalls das Produkt von der Garantie des Herstellers oder Importeurs ausgeschlossen werden kann. 4015-2 Yanokuchi, Inagi-city, Tokyo 206-0812 Japan © 2011 KORG INC.