
Manuels Connexes pour Graco READY2GROW 2.0


Sommaire des Matières pour Graco READY2GROW 2.0
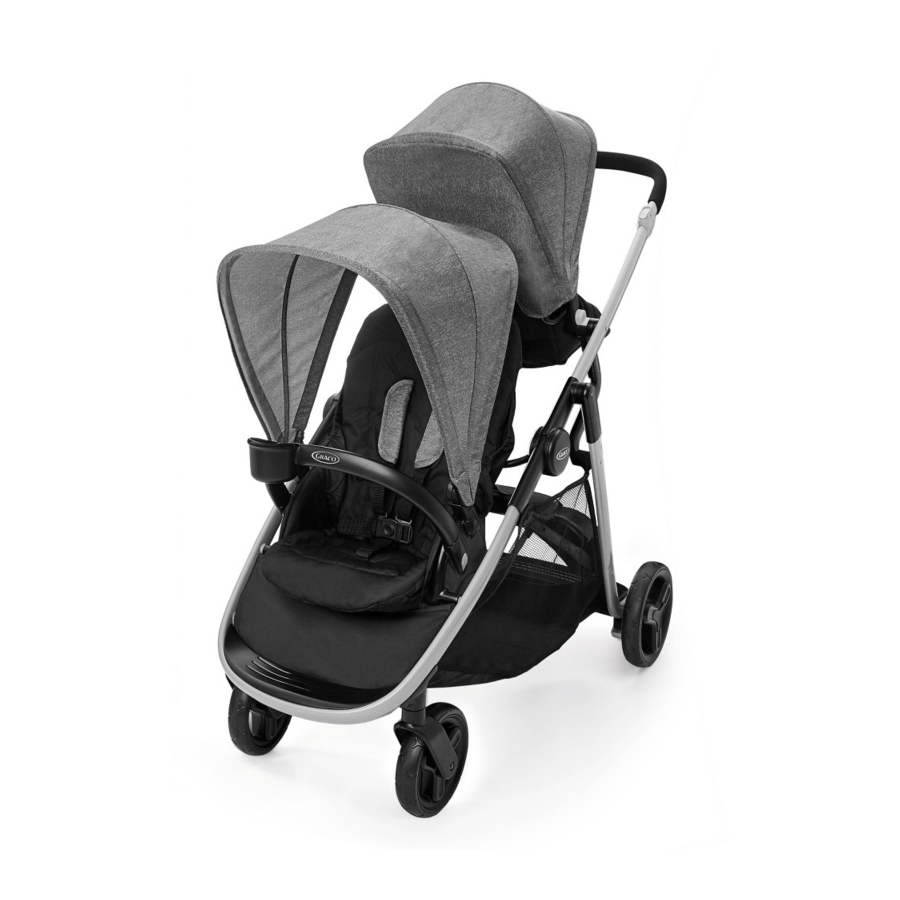
- Page 1 READY2GROW ™ READY2GROW LX 2.0 ™ Stroller Poussette Cochecito • • Owner’s Manual Manual du propriétaire Manual del propietario • • www.gracobaby.com www.gracobaby.ca ©2020 Graco NWL0001117951G 10/20...
- Page 2 1 WARNING • MISE EN GARDE Pages • Páginas • ADVERTENCIA 2 Features • Caractéristiques 10-11 Pages • Páginas • Características READY2GROW™ 2.0 Use Positions • Positions d’utilisation de READY2GROW™ 2.0 • Posiciones del uso READY2GROW™ 2.0 Parts List • Liste des pièces • Lista de piezas 3 Assembly •...
- Page 3 To Attach Graco® Infant Car Seat to Rear Position • Installation du siège d’auto pour bébé Graco® en position arrière • Para sujetar el asiento de automóvil para bebé Graco® en la posición trasera To Attach Graco® Infant Car Seat to Front Position •...
- Page 4 Failure to follow these warnings and the assembly instructions could result in serious injury or death. Only use product as instructed. PLEASE SAVE OWNER’S USE OF THE FRONT SEAT, MANUAL FOR FUTURE USE. BENCH SEAT OR STANDING PLATFORM with a child weighing ADULT ASSEMBLY REQUIRED.
- Page 5 USING GRACO® INFANT CAR Refer to the sections “To Attach SEAT WITH STROLLER: Graco® Infant Car Seat to Rear Position” and “To Attach Graco® • TO AVOID INJURY TO YOUR Infant Car Seat to Front Position”...
- Page 6 Manquer de suivre ces avertissements et les instructions d’assemblage peut entraîner de sérieuses blessures ou un décès. Utiliser ce produit uniquement tel qu’indiqué. PRIÈRE DE CONSERVER LE NE JAMAIS UTILISER LA MODE D’EMPLOI POUR UNE POUSSETTE DANS LES UTILISATION SUBSÉQUENTE. ESCALIERS ou les escaliers mécaniques.
-
Page 7: Un Siège De Voiture Graco® Click Connect
Consulter les sections « Installation du siège d’auto pour bébé Graco® en position arrière » et « Installation du siège d’auto pour bébé Graco® en position avant », pages 37 à 46. UTILISER UN SIÈGE DE VOITURE... - Page 8 ADVERTENCIA No observar estas advertencias y las instrucciones de ensamblaje podría resultar en lesiones serias o la muerte. Use solamente el producto según las instrucciones. POR FAVOR, GUARDE EL EL USO DEL ASIENTO MANUAL DEL PROPIETARIO DELANTERO, ASIENTO ESTILO PARA USO FUTURO. BANCO O PLATAFORMA PARA VIAJAR PARADO con un niño que REQUIERE QUE LO ARME UN...
- Page 9 PROVISTOS CON ESTE Consulte las secciones “Para COCHECITO. sujetar el asiento de automóvil para bebé Graco® en la posición USO DEL ASIENTO DE trasera” y “Para sujetar el asiento AUTOMÓVIL PARA BEBÉ de automóvil para bebé Graco®...
- Page 10 READY2GROW™ 2.0 Use Positions • Positions d’utilisation de READY2GROW™ 2.0 • Posiciones del uso READY2GROW™ 2.0 WARNING DO NOT allow child to stand on standing platform facing backwards. To avoid falling, child must hold onto handles. MISE EN GARDE NE PAS laisser l’enfant se tenir debout sur la plateforme face vers l’arrière.
- Page 11 2-B Parts List • Liste des pièces • Lista de piezas This model may not Ce modèle peut ne pas Este modelo podría no include some incluir algunas de las comprendre certaines des features shown below. características que se caractéristiques décrites CHECK that you have indican a continuación.
- Page 12 To Open Stroller • Ouverture de la poussette • Abrir el cochecito Be sure to place stroller on top of a piece of cardboard or some other protective cover to prevent any damage to floor. S’assurer de placer la poussette sur un morceau de carton ou un autre revêtement de protection pour prévenir tout dégât au plancher.
- Page 13 3. CHECK that the stroller is completely latched open every time you open the stroller and before continuing with the rest of the assembly steps. 3. VÉRIFIER que la poussette est entièrement verrouillée en position ouverte à chaque ouverture et avant d’effectuer les autres étapes du montage.
- Page 14 Rear Wheels • Roulettes arrière • Las ruedas traseras 2. Place wheel on axle. 2. Installer la roue sur l’essieu. 2. Ponga la rueda en el eje. 3. Locate the red bag and remove its cotter pins and hardware. Push straight side of pin through axle hole.
- Page 15 4. Snap hubcap over pin as shown. Repeat with other hubcap. 4. Enclencher l’enjoliveur de roue sur la cheville tel qu’illustré. Répéter pour l’autre enjoliveur. 4. Trabe el tapacubos sobre la clavija como se indica. SNAP! Repite con la otra tapacubos. ENCLENCHEZ! ¡CRAC!
- Page 16 Front Wheels • Roulettes avant • Las ruedas delanteras 1. Attach front wheels to front leg tubes as shown. SNAP! 1. Fixer les roulettes avant aux tubes ENCLENCHEZ! ¡RUIDO! des pattes avant, tel qu’illustré. 1. Sujete las ruedas delanteras a los tubos de las patas delanteras como se indica.
- Page 17 Parent’s Cupholder • Porte-gobelet pour adulte • Apoyavasos para padres 1. Line up opening in cupholder with mount on stroller and press onto stroller tube. 1. Aligner l’ouverture du porte-gobelet avec le support situé sur la poussette et appuyer sur le tube de la poussette. 1.
- Page 18 Canopy • Baldaquin • Capota Front Seat Canopy Baldaquin du siège avant Capota del asiento delantero 1. Insert front canopy into the canopy mounts on each side of the stroller. 1. Insérer le baldaquin avant dans les supports de baldaquin situés de chaque côté...
- Page 19 Rear Seat Canopy Baldaquin du siège arrière Capota del asiento trasero 3. Attach canopy into the canopy mounts on each side of the rear seat as shown. MAKE SURE canopy is behind the rear seat back. 3. Fixer le baldaquin dans les supports de chaque côté...
- Page 20 5. Pull forward to open canopy. 5. Tirer vers l’avant pour ouvrir le baldaquin. 5. Tire hacia adelante para abrir la capota. 6. Push backwards to close canopy. 6. Pousser vers l’arrière pour fermer le baldaquin. 6. Empuje hacia atrás para cerrar la capota.
- Page 21 Child’s Arm Bar • Accoudoir pour enfant • Barra para los brazos del niño WARNING Always secure your child with the seat belt. The arm bar is not a restraint device. DO NOT lift the stroller by the child’s arm bar. Use care when installing the arm bar on the stroller with a child in the stroller.
- Page 22 2. Pull on child’s arm bar to ensure it is secure. 2. Tirer sur l’accoudoir pour enfant afin de s’assurer qu’il est solidement fixé en place. 2. Tire de la barra para los brazos del niño para asegurarse de que esté...
- Page 23 Elevated Rear Seat • Siège arrière élevé • Asiento trasero elevado WARNING • Do not allow child to stand on seat. • ONLY USE rear seat on the stroller and do not remove or carry the rear seat while child is in it. •...
- Page 24 To Remove Elevated Rear Seat • Retrait du siège arrière surélevé • Para retirar el asiento trasero elevado 1. Push buttons on both sides of the seat and pull up as shown. 1. Appuyer sur les boutons situés des deux côtés du siège et soulever, tel qu’illustré.
- Page 25 To Secure Child • Installation sécuritaire de l’enfant • Cómo sujetar al niño WARNING Falling Hazard: Always use the seat belt. MISE EN GARDE Danger de chute : toujours se servir de la ceinture de sécurité. ADVERTENCIA Peligro de caídas: Use siempre el cinturón de seguridad. 5 Point Harness (Front and Elevated Rear Seats Only) •...
- Page 26 3. Use slide adjuster at shoulder and waist for tighter adjustment. To Use slide adjuster at shoulder and change shoulder harness slots, waist for further adjustment. see page 29. Repeat on other side. 3. Utiliser le régulateur coulissant à Utilisez le régulateur coulissant l’épaule et à...
- Page 27 3. Remove shoulder straps from stroller. 3. Retirer les courroies d’épaule de la poussette. 3. Saque las correas para los hombros del cochecito. 4. Attach waist straps to harness buckle as shown. 4. Fixer les courroies abdominales à la boucle du harnais, tel qu’illustré.
- Page 28 Adjusting Shoulder Harness position • Réglage de la position du harnais d’épaules • Ajustar la posición del arnés para los hombros Shoulder harness anchor Harnais d ‘ancrage à l’épaule Anclaje del arnés del hombro Slide adjuster Dispositif de réglage à glissière Ajustador deslizable...
- Page 29 1. Push harness anchor through the front of the seat then re-insert through desired slots at the same height level. Use either shoulder harness anchor in the slots that are closest to child’s shoulder height. Use slide adjuster for further adjustment. 1.
- Page 30 To Recline • Inclinaison • Para reclinar WARNING When making adjustments to the stroller seat, make sure child’s head, arms, and legs are clear of moving seat parts and stroller frame. MISE EN GARDE Lors du réglage du siège de la poussette, s’assurer que la tête de l’enfant, ses bras, et ses jambes sont loin des pièces du siège et de l’armature de la poussette en mouvement.
- Page 31 2. To raise: (a) Pull up on recline bar, (b) rotate recline bar upward toward the seat and down until seat back is in upright position (c). 2. Pour relever : (a) soulever la barre d’inclinaison, (b) faire pivoter la barre d’inclinaison vers le haut en direction du siège, puis vers le bas jusqu’à...
- Page 32 Brakes • Freins • Los frenos WARNING CHECK that brakes are on by trying to push stroller. MISE EN GARDE S’ASSURER que les freins fonctionnent en essayant de pousser la poussette. ADVERTENCIA INSPECCIONE los frenos tratando de empujar el cochecito. 1.
- Page 33 Easy Access Storage Basket • Porte-bagages facile d’accès • Canasta de almacenamiento de fácil acceso Child seat rotates out of way for better access to storage basket. Le siège d’enfant pivote afin de permettre un meilleur accès au porte-bagages. El asiento del niño se gira para apartarlo y obtener un mejor acceso a la canasta de almacenamiento.
- Page 34 Bench Seat • Banquette • Asiento estilo banco WARNING Do not allow child to stand on seat. MISE EN GARDE Ne pas laisser l’enfant se tenir debout sur le siège. ADVERTENCIA No deje que el niño se pare sobre el asiento. 1.
- Page 35 4. Press button on buckle to release the waist straps. 4. Demander à l’enfant de s’asseoir sur le siège. 4. Haga que el niño se siente en el asiento. 5. Have child sit in seat and hold onto handles. 5. Demander à l’enfant de s’asseoir sur le siège et de tenir les poignées.
- Page 36 Platform • Plateforme • Plataforma WARNING • DO NOT allow child to stand on platform, facing backwards. • To avoid falling, child must hold onto stroller frame. MISE EN GARDE • NE PAS laisser l’enfant se tenir debout sur la plateforme, face vers l’arrière.
- Page 37 Sticker varies result in serious injury or death. Read the manual by model provided with your Graco car seat before using it with your product. • Always secure your child with infant car seat harness when using the car seat in the product. If your child is already in the car seat, check that the child is secured with the harness.
- Page 38 El uso inadecuado de este producto con un asiento para automóvil podría resultar en lesiones serias o la muerte. Lea el manual incluido con su asiento para automóvil Graco antes de usarlo con su producto. • Sujete siempre a su niño con el arnés del asiento para automóvil cuando usa el asiento para automóvil en el producto.
- Page 39 Remove Pad from Elevated Seat Frame to Attach Infant Car Seat • Retrait du coussin du cadre du siège surélevé pour fixer le siège d’auto pour bébé • Retire la almohadilla del armazón del asiento elevado para fijar el asiento de automóvil para bebé...
- Page 40 3. At the head end, press button on rear of seat in and disconnect from seat tube. 3. À la tête, appuyer sur le bouton situé à l’arrière du siège et détacher du tube du siège. 3. En el extremo superior, oprima el botón en la parte posterior del asiento y desconecte del tubo del asiento.
- Page 41 5. MAKE SURE front seat canopy is folded forward. Attach rear seat frame to stroller frame as shown. 5. S’ASSURER que le baldaquin du siège avant est rabattu vers l’avant. Attacher le cadre du siège arrière au cadre de la poussette, tel qu’illustré.
- Page 42 8. To remove car seat: squeeze release handle at back of car seat, and lift car seat out of the stroller. 8. Pour retirer le siège d’auto : appuyer sur la poignée de déverrouillage à l’arrière du siège d’auto, et soulever le siège d’auto hors de la poussette.
- Page 43 2. Attach hook on foot end of seat pad to other end of frame. 2. Fixer le crochet situé au pied du coussin de siège à l’autre extrémité du cadre. 2. Fije el gancho del extremo inferior de la almohadilla del asiento al otro extremo del armazón.
- Page 44 Infant Car Seat to Front ® Position • Installation du siège d’auto pour bébé Graco® en position avant • Para sujetar el asiento de automóvil para bebé Graco® en la posición delantera 1. Infant car seat can be inserted in seat rear facing.
- Page 45 4. Rotate front canopy forward or backwards, and close front canopy. If moving canopy backward, first remove the rear seat frame, move canopy, then reattach rear seat frame if using. ALWAYS keep front canopy attached when car seat is installed. 4.
- Page 46 6. Insert car seat into stroller and push down on car seat until the latches snap into the seat attachment mounts. 6. Insérer le siège d’auto dans la poussette en appuyant dessus jusqu’à ce que les loquets s’enclenchent sur les supports de fixation du siège.
- Page 47 To Fold Stroller Frame • Pliage du cadre de la poussette • Para plegar el armazón del cochecito NOTE: Stroller can be folded with or without elevated rear seat installed. DO NOT fold stroller with a car seat in front or rear position. REMARQUE : La poussette peut être repliée avec ou sans le siège arrière surélevé...
- Page 48 1. Before folding stroller: a. remove infant car seats b. lock brakes c. close canopies and rotate front canopy forward 1. Avant de replier la poussette : a. retirer le siège d’auto pour bébé SNAP! b. verrouiller les freins. ENCLENCHEZ! c.
- Page 49 3. Push handle down. 3. Abaisser la poignée. 3. Empuje la manija hacia abajo. 4. Storage latch will engage, and stroller will rest on the rear wheels and handle. 4. Le loquet de rangement s’enclenchera et la poussette reposera sur les roulettes arrière et la poignée.
- Page 50 Harness Covers • Housses du harnais • Fundas del arnés 1. To attach harness covers, slide onto harness straps. 1. Glisser les housses du harnais sur le harnais pour les fixer. 1. Para sujetar las fundas del arnés, deslícelas sobre las correas del arnés.
- Page 51 4-M Body Support (on certain models) • Support corporel (sur certains modèles) • Soporte para el cuerpo (en determinados modelos) WARNING • ONLY USE body support when harness is in lowest 2 harness positions. MISE EN GARDE • UTILISER le support corporel UNIQUEMENT lorsque le harnais est installé dans l’une des deux positions les plus basses.
- Page 52 • FROM TIME TO TIME, CHECK YOUR STROLLER for loose screws, worn parts, torn material or stitching. Replace or repair the parts as needed. Use only Graco replacement parts. • EXCESSIVE EXPOSURE TO SUN OR HEAT could cause fading or warping of parts.
- Page 53 Cambie o repare las piezas según sea necesario. Use solamente piezas de repuesto de marca Graco. • LA EXPOSICIÓN EXCESIVA CON EL SOL O EL CALOR podría causar que se destiña o se tuerzan algunas piezas.
- Page 54 Notes • Notas...
- Page 55 Notes • Notas...
- Page 56 Pour le moment nous n’acceptons pas d’inscriptions de produits des résidents hors des États-Unis. Para registrar su producto Graco desde dentro de los EE.UU., visítenos en línea en www.gracobaby.com/productregistration o envíe la tarjeta de registro provista con su producto. Actualmente no aceptamos registros de los...