Télécharger Imprimer la page

Gima SP-10 Notice D'utilisation

Spiromètre de poche avec bluetooth
Masquer les pouces Voir aussi pour SP-10:

Publicité

Les langues disponibles

Les langues disponibles

Liens rapides

ARTICOLI & APPARECCHI PER MEDICINA
SPIROMETRO SP-10
BLUETOOTH
Manuale utente
ATTENZIONE: Gli operatori devono leggere e capire
completamente questo manuale prima di utilizzare il prodotto.
33535 / SP10W
CONTEC MEDICAL SYSTEMS CO., LTD
ADD: No 112 Qinhuang West Street, Economic & Technical Development Zone,
Qinhuangdao, Hebei Province, 066004, PEOPLE'S REPUBLIC OF CHINA
Made in China
Shanghai International Holding Corp. GmbH (Europe)
Eiffestrasse 80, 20537 Hamburg, Germany
Importatore: Gima S.p.A. - Via Marconi, 1
20060 Gessate (MI) Italy
Gima S.p.A.
Via Marconi, 1 - 20060 Gessate (MI) Italy
gima@gimaitaly.com - export@gimaitaly.com
www.gimaitaly.com
0168
0123

Publicité

loading

Sommaire des Matières pour Gima SP-10

  • Page 1 ADD: No 112 Qinhuang West Street, Economic & Technical Development Zone, 0123 Qinhuangdao, Hebei Province, 066004, PEOPLE’S REPUBLIC OF CHINA Made in China Shanghai International Holding Corp. GmbH (Europe) Eiffestrasse 80, 20537 Hamburg, Germany Importatore: Gima S.p.A. - Via Marconi, 1 20060 Gessate (MI) Italy...
  • Page 2: Istruzioni Per L'utente

    ITALIANO Istruzioni per l’Utente Egregi utenti, vi ringraziamo per aver acquistato lo SPIROMETRO. Vi invitiamo a leggere attentamente il Manuale d’Uso prima di utilizzare questo prodotto. Il Manuale d’Uso de- scrive le procedure operative a cui attenersi scrupolosamente. L’inosservanza di queste istruzioni può generare monitoraggi anomali, danni alle apparecchiature e lesioni personali.
  • Page 3: Table Des Matières

    ITALIANO Sommario Capitolo 1 Sicurezza ............................4 1.1. Istruzioni per il funzionamento in condizioni di sicurezza ............4 1.2 Avviso ............................5 1.3 Attenzione ........................... 6 Dichiarazione EMC ............................... 6 1.4 Controindicazioni ......................... 6 1.4.1 Controindicazioni assolute ....................6 1.4.2 Controindicazioni relative ....................7 Capitolo 2 Informazioni generali ........................
  • Page 4: Istruzioni Per Il Funzionamento In Condizioni Di Sicurezza

    ITALIANO 6.1.6 Carica ..........................23 6.1.7 Caricamento dati ......................23 6.2 Attenzione ..........................24 Capitolo 7 Manutenzione, Trasporto, Stoccaggio ..................24 7.1 Pulizia e disinfezione ......................... 24 7.2 Manutenzione ..........................25 7.3 Trasporto e Conservazione......................25 Capitolo 8 Guida alla Risoluzione dei Problemi .................... 26 Capitolo 9 Legenda dei Simboli ........................
  • Page 5: Avviso

    ITALIANO 1.2 Avviso  Si prega di non misurare il dispositivo con tester funzionali per le relative informazioni del dispositivo.  Pericolo di esplosione — NON utilizzare lo SPIROMETRO in ambienti con materiali infiammabili, quali anestetici.  Si prega di controllare la confezione prima dell’uso per assicurarsi che il dispositivo ed i suoi accessori siano pienamente conformi all’elenco d’imballaggio, altrimenti il dispositivo potrebbe funzionare in modo anomalo.
  • Page 6: Dichiarazione Emc

    ITALIANO tasto “ripeti misurazione” per rimisurare o “spegni” per riavviare.  La vita normale dell’apparecchio dura tre anni dalla prima accensione.  Quando i dati scendono al di sotto del limite, sulla schermata principale compare “Errore!”.  Il dispositivo non è adatto a tutti gli utenti: se risulta impossibile ottenere risultati corretti, si prega di interrom- perne l’uso.
  • Page 7: Controindicazioni Relative

    ITALIANO 1.4.2 Controindicazioni relative • Frequenza cardiaca a più di 120 battiti al minuto; • Avere uno pneumotorace o una bolla polmonare gigante e non aver pianificato un intervento chirurgico; • Essere in gravidanza; • Avere una perforazione della membrana timpanica (prima di effettuare una misurazione, è necessario chiudere il canale uditivo interessato);...
  • Page 8: Caratteristiche

    ITALIANO poi lo schermo mostrerà direttamente la Capacità Vitale Forzata (FVC), il Volume Espiratorio Forzato in un secondo (FEV1), il Picco di Flusso Espiratorio (PEF), con alta veridicità e ripetizione. 2.1 Caratteristiche 1) Design ultra piatto, compatto e alla moda. 2) Ridotto nel volume, leggero e pratico da trasportare.
  • Page 9: Specifiche Tecniche

    ITALIANO Ambiente di Funzionamento: Temperatura: +10°C+40°C Umidità relativa: ≤80% Pressione atmosferica: 700 hPa~1060 hPa Capitolo 3 INTRODUZIONE In primo luogo, il soggetto testato inspira profondamente, poi sigilla le labbra intorno al boccaglio ed espira con più forza possibile, il gas espirato si trasforma in un circolo d’aria rotatorio grazie alla turbina facendo rotare la lama. La parte ricevente dei diodi a infrarossi (uno per emissioni a infrarossi, l’altro per la ricezione) verso la lama è...
  • Page 10: Principali Parametri

    ITALIANO flusso di FVC (FEF75) e il flusso medio tra il 25% e il 75% di FVC (FEF2575). Inoltre, le condizioni del paziente possono essere mostrate dal rapporto tra il valore determinato e il valore previsto. • Visualizzazione del Grafico Flusso Espiratorio-Volume e il Grafico Volume–Tempo. •...
  • Page 11: Vista Del Pannello Frontale

    ITALIANO Capitolo 5 INSTALLAZIONE 5.1 Vista del pannello frontale Turbina Indicatore ricarica Pulsante su Pulsante giù Accensione, menu, tasto conferma Ripeti misurazione: premerlo quando (avviso: lo spegnimento era si desidera procedere alla prossima controllato dal menu principale) misurazione (premere a lungo questo pulsante soltanto se si desidera ripetere Figura 5-1 Vista del pannello anteriore la misurazione, altrimenti non premerlo)
  • Page 12: Accessori

    ITALIANO 2) Inserire il boccaglio monouso nell’apertura della turbina. 5.3 Accessori 1) Manuale d’Uso 2) Cavo USB 3) Boccaglio monouso 4) Adattatore di corrente (opzionale) 5) CD (software per PC) 6) Una pinza stringinaso (opzionale) Altri tipo di adattatori dovrebbero soddisfare le seguenti condizioni: voltaggio in uscita: DC 5V; corrente in uscita ≥500mA, l’adattatore di corrente deve soddisfare i requisiti degli standard relativi a EN60601 e avere il marchio CE.
  • Page 13: Misurazione

    ITALIANO 6.1.2 Misurazione 1) Dopo l’installazione, tenere premuto il tasto “Accensione” (Power On) per accendere l’alimentazione. 2) Dopo l’accensione, il dispositivo si trova nell’interfaccia di selezione come in Figura 6-1, premere i tasti “Su” (Up), “Giù” (Down) per modificare, selezionare “No” per l’interfaccia “Test” (Testing) come in Figura 6-2. Figura 6-1 Figura 6-2 3) Poi inspirare profondamente e sigillare le labbra intorno al boccaglio ed espirare con più...
  • Page 14 ITALIANO Il valore previsto è un riferimento rispetto alla situazione che è stata impostata dai valori (genere, età, altezza, ecc.), è un valore da stimare Capacità Vitale Forzata Volume Espiratorio Forzato in un secondo Il rapporto fra il valore misurato Picco del flusso espiratorio Force e il valore previsto...
  • Page 15: Uso Del Menù

    ITALIANO Figura 6-4 Grafico flusso espiratorio-volume Figura 6-5 Grafico volume-time 6.1.4 Uso del menù Durante il test, premere “Menù” sul menù principale come da Figura 6-6, l’utente può quindi scegliere altri pa- rametri ed eseguire le impostazioni di controllo, le informazioni del paziente, l’impostazione del tempo reale, lo spegnimento, ecc.
  • Page 16 ITALIANO a. ALTRI PARAMETRI Premere “Altri Parametri” (Other Par) nel sottomenù del menù come da Figura 6-7 che mostra altri parametri, ad eccezione dei tre parametri del menù principale (vedere le pagine successive per i dettagli), premere il tasto conferma (confirm) per tornare al menu principale (premere i tasti “Su”, “Giù” in questa interfaccia non ha alcun effetto).
  • Page 17 ITALIANO Figura 6-8. Figura 6-9 Figura 6-10 2) Informazioni di Modifica Selezionare “Modifica” (Review Fun) dal sottomenù. Se la schermata precedente è su “SPENTO” (OFF), premere il tasto conferma per aprire la funzione (Nota: la funzione di modifica può essere aperta solo quando i numeri di pratica sono più...
  • Page 18 ITALIANO Attenzione: Aprendo la funzione di modifica è possibile esaminare tutti i dati rilevati, il percorso è: Entrare nel menù principale come da Figura 6-6, selezionare “Info Paziente” (Patient Info), premere il tasto conferma per entrare nel sottomenù, come da Figura 6-20. Selezionare “Numero” (Number) e premere il tasto conferma per passare all’interfaccia del numero di pratica, come da Figura 6-11 (la funzione può...
  • Page 19 ITALIANO Setting) come da Figura 6-14; nel caso compaia questo stato, premere esci fino all’interfaccia come da Figura 6-1, poi è possibile continuare il test. Selezionare “No” per uscire direttamente dall’interfaccia, come da Figura 6-14. Figura 6-14 Figura 6-15 5) Trasmissione Wireless Se il dispositivo è...
  • Page 20 ITALIANO Se è necessario terminare lo Scaler (Calibrazione), premere il tasto conferma per uscire dall’interfaccia prece- dente allo Scaler (Calibrazione). (L’interfaccia precedente lo Scaler (Calibrazione) fa riferimento a: Se, dopo aver completato la misurazione, lo Scaler (Calibrazione) torna all’interfaccia impostazioni di controllo per poi passare all’interfaccia di misurazione, come da Figura 6-1).
  • Page 21 ITALIANO 1) Numero: “Numero” (Number) riporta i dati attuali del paziente. Attenzione: Se la funzione modifica è aperta, premere il tasto di conferma per passare all’interfaccia numero di pratica e modificare le informazioni del paziente. Consultare “Informazioni di Modifica” (Review Information) per dettagli sulla funzione.
  • Page 22: Misura Ripetuta (Repeated Measure)

    ITALIANO Figura 6-21 Figura 6-22 5) Uscita Premere i tasti “Su” e “Giù” fino a “Esci” (Exit) per uscire dall’interfaccia “Info Paziente” e tornare al menù prin- cipale. d. SPEGNIMENTO Premere “Spegni” (Power Off) per spegnere il dispositivo. Attenzione: Il dispositivo è impostato su Spegnimento automatico dopo un minuto di non funzionamento. e.
  • Page 23: Carica

    ITALIANO Figura 6-23. 6.1.6 Carica Esistono due metodi di caricamento: 1) Connettere il dispositivo al computer con la linea dati — il dispositivo è sotto carica. 2) Connettere il dispositivo alla corrente con l’adattatore di corrente, il dispositivo è sotto carica. NON utilizzare il dispositivo quando è...
  • Page 24: Attenzione

    ITALIANO 1) Connettere il dispositivo al computer con la linea dati, fare doppio click sull’icona per aprire la procedura del software del PC. 2) Premere il tasto corrispondente per caricare i dati, cancellare i casi, stampare informazioni, eseguire il back- ground, selezionare la lingua, convertire il formato PDF, impostare le informazioni del paziente ecc.
  • Page 25: Manutenzione

    ITALIANO della parte lucente, mantenerlo lontano da oggetti, quali come capelli o sedimenti minori. Immergere la turbina in soluzioni disinfettanti dopo l’uso, pulire con acqua pulita e asciugare verticalmente dopo averlo immerso per qualche minuto (non risciacquare la turbina direttamente con acqua). Questo metodo non causa inquinamento ambientale.
  • Page 26: Guida Alla Risoluzione Dei Problemi

    ITALIANO Capitolo 8 GUIDA ALLA RISOLUZIONE DEI PROBLEMI Problema Possibile Causa Soluzione Il dispositivo non termina La velocità iniziale è troppo lenta, Rimisurare conformemente misurazioni di lungo periodo il dispositivo non misura. al manuale d’uso. e i dati non sono visualizzati. Malfunzionamento del dispositivo.
  • Page 27 ITALIANO Lo schermo scompare Il dispositivo è impostato Normale. improvvisamente. su spegnimento automatico dopo un minuto di non funzionamento. La batteria è quasi o completa- Si prega di ricaricare la batteria. mente esaurita. Il dispositivo non può essere usato La batteria non è completamente Si prega di ricaricare la batteria.
  • Page 28: Capitolo 9 Legenda Dei Simboli

    ITALIANO Capitolo 9 LEGENDA DEI SIMBOLI Simbolo Significati Leggere attentamente le istruzioni per l’uso IP22 Classe di Protezione IP Pericolo o avvertenza - prestare attenzione RAEE Parte applicata del tipo BF Batteria carica Batteria scarica Errore I valori rilevati sono al di sotto dei limiti Rappresentante autorizzato nella Comunità...
  • Page 29 ITALIANO Barra di stato 106kPa Limite pressione atmosferica 50kPa Limite umidità +55% Limite temperatura -40% Fragile, maneggiare con cura Conservare in luogo fresco ed asciutto Questo lato su Produttore. Data di produzione Numero di serie...
  • Page 30: Capitolo 10 Introduzione Parametri

    ITALIANO Capitolo 10 INTRODUZIONE PARAMETRI Parametri misurati Parametro Descrizione Unità Capacità Vitale Forzata FEV1 Volume Espiratorio Forzato in un secondo Picco del Flusso Espiatorio FEV1 FEV1/FVC×100 FEF25 25% flusso del FVC FEF2575 Flusso medio tra 25% e 75% del FVC FEF75 75% flusso del FVC...
  • Page 31: Appendice

    ITALIANO Appendice Raccomandazioni e dichiarazione del costruttore – emissioni elettromagnetiche – per ogni SISTEMA e APPARECCHIATURA Raccomandazioni e dichiarazione del costruttore – emissioni elettromagnetiche Lo Spirometro è destinato all’uso in un ambiente elettromagnetico dalle caratteristiche specificate di seguito. Il cliente o l’utente dello Spirometro sono tenuti ad assicurarsi che il dispositivo sia utilizzato in un ambiente con- forme a tali caratteristiche.
  • Page 32 ITALIANO Raccomandazioni e dichiarazione del costruttore – immunità elettromagnetica – per ogni SISTEMA e AP- PARECCHIATURA Indicazioni e dichiarazione del produttore - immunità elettromagnetica Lo Spirometro è destinato all’uso in un ambiente elettromagnetico dalle caratteristiche specificate di seguito. Il cliente o l’utente dello Spirometro sono tenuti ad assicurarsi che il dispositivo sia utilizzato in un ambiente con- forme a tali caratteristiche.
  • Page 33 ITALIANO Raccomandazioni e dichiarazione del costruttore – immunità elettromagnetica – per SISTEMI e APPAREC- CHIATURE che non siano SALVAVITA Indicazioni e dichiarazione del produttore - immunità elettromagnetica Lo Spirometro è destinato all’uso in un ambiente elettromagnetico dalle caratteristiche specificate di seguito. Il cliente o l’utente dello Spirometro sono tenuti ad assicurarsi che il dispositivo sia utilizzato in un ambiente con- forme a tali caratteristiche.
  • Page 34 ITALIANO L’intensità dei campi emessi da trasmettitori in radiofre- quenza fissi, determinata da un rilevamento elettroma- gnetico in loco , deve risultare inferiore al livello di con- formità corrispondente a ciascuna gamma di frequenza. Possono verificarsi interferenze in prossimità di dispositivi contrassegnate dal seguente simbolo: NOTA 1 A 80 MHz e 800 MHz vale la gamma di frequenza più...
  • Page 35 ITALIANO Distanza di separazione consigliata tra apparecchiature di comunicazione RF portatili e mobili e i SISTEMI o le APPARECCHIATURE – per STRUMENTI e SISTEMI che non siano SALVAVITA Distanza di separazione consigliate tra apparecchiature di comunicazione RF portatili e mobili e lo Spirometro Lo Spirometro è...
  • Page 37 ADD: No 112 Qinhuang West Street, Economic & Technical Development Zone, 0123 Qinhuangdao, Hebei Province, 066004, PEOPLE’S REPUBLIC OF CHINA Made in China Shanghai International Holding Corp. GmbH (Europe) Eiffestrasse 80, 20537 Hamburg, Germany Importer: Gima S.p.A. - Via Marconi, 1 20060 Gessate (MI) Italy...
  • Page 38: Instructions To User

    ENGLISH Instructions to User Dear users, thank you very much for purchasing the SPIROMETER. Please read the User Manual carefully before using this product. The User Manual which describes the operating procedures should be followed strictly. Failure to follow the User Manual may cause measuring abnormality, equipment damage and human injury.
  • Page 39 ENGLISH Contents Chapter 1 Safety ..............................4 1.1 Instructions for safe operations ....................4 1.2 Warning ............................5 1.3 Attention ............................5 EMC declaration: ..............................6 1.4 Contraindication .......................... 6 1.4.1 Absolute contraindication ....................6 1.4.2 Relative contraindication ....................7 Chapter 2 Overview ............................
  • Page 40: Instructions For Safe Operations

    ENGLISH 6.1.6 Charge ..........................23 6.1.7 Upload data ........................23 6.2 Attention ............................ 24 Chapter 7 Maintenance,Transportation and Storage .................. 24 7.1 Cleaning and disinfection ......................24 7.2 Maintenance ..........................25 7.3 Transportation and storage ....................... 25 Chapter 8 Troubleshooting ..........................26 Chapter 9 Key of Symbols ..........................
  • Page 41: Warning

    ENGLISH 1.2 Warning  Please don’t measure this device with functional tester for the device’s related information.  Explosive hazard—DO NOT use the SPIROMETER in the environment with tinder such as anesthetic.  Please check the packing before use to make sure the device and accessories are totally in accordance with the packing list, or else the device may have the possibility of working abnormally.
  • Page 42: Emc Declaration

    ENGLISH  When data can’t be displayed at all times or other cases happened during testing, press “repeated measure” key to remeasure, or power off to restart.  The device has normal life for three years since the first electrified use. ...
  • Page 43: Relative Contraindication

    ENGLISH 1.4.2 Relative contraindication • Heart rate >120 beats/min; • The one with pneumothorax or giant pulmonary bulla and not plan for surgical treatment; • The one with pregnancy; • The one with tympanic membrane perforation (need to block the ear canal of affected side before taking meas- urement);...
  • Page 44: Features

    ENGLISH 2.1 Features 1) Ultra-thin design, concise and fashion. 2) Small in volume, light in weight and convenient in carrying. 3) Low power consumption. 4) TFT display. 5) Reflect lung function by measuring FVC, FEV1, PEF etc. 6) Take the function of wireless transmission. 2.2 Major applications and scope The SPIROMETER is a hand-held equipment for examining lung function.
  • Page 45: Technical Specifications

    ENGLISH Chapter 3 PRINCIPLE Firstly, testee deep inspires, then seals the lips around the mouthpiece and blasts all air out as forcefully as possi- ble, the exhalant gas transforms to rotary airflow by turbine, then makes the blade rotate. The reception part of the infrared pair diodes (one is for infrared emission, the other is reception) towards to the blade is used for receiving the infrared ray, when the blade rotates, the received ray strength of the reception diode will be different as the difference of the blade angle, so form the various signal of same proportion in reception diode, which forms ac-...
  • Page 46: Main Parameters

    ENGLISH • Automatic power off when there is no operation in one minute. • Rechargeable lithium battery and with charging tips. • Battery power display. 4.2 Main parameters Volume Range: 0 L ~ 10 L Flow range: 0 L/s~16 L/s Volume accuracy: ±3% or 0.05L (whichever is greater) Flow accuracy: ±5 % or 0,2 L/s (whichever is greater) Working current: 60mA...
  • Page 47: View Of The Front Panel

    ENGLISH Chapter 5 INSTALLATION 5.1 View of the front panel Turbine Charging indicator Up key Down key Power on, menu, confirm key Repeated measure: press it when you want (notice: Power off was controlled to next Measure (only need repeat measure by main menu) to press this key for a long time, other times please don’t press it...
  • Page 48: Accessories

    ENGLISH 2) Insert the disposable mouthpiece into the turbine port. 5.3 Accessories 1) An User Manual 2) An USB data line 3) Disposable mouthpiece 4) A power adapter (optional) 5) A CD (PC software) 6) A nose clip (optional) Other type adapter should meet the following conditions: output voltage:DC 5V; output current ≥500mA, the power adapter must meet the requirements of EN60601 related standards and have the CE mark Chapter 6...
  • Page 49: Measurement

    ENGLISH 6.1.2 Measurement 1) Long press “Power On” key to turn on the power after installed. 2) The device is in selective interface after turn on as Figure 6-1, press “Up”, “Down” key to adjust, select “No” to “Testing” interface as Figure 6-2. Figure 6-1 Figure 6-2 3) Then breath in fully and seal the lips around the mouthpiece and blast all air out as forcefully as possible in best...
  • Page 50 ENGLISH Force Forced Peak Figure 6-3. Stat (Note: Status indicator bar indicates the measured state, displays the testee condition by the ratio of measured value and the predicted value. I.e. Compared the measured value with the reference value in same situation, when the value is lower than 50% indicates that should be noticed and hospitalized in time;...
  • Page 51: Menu Operations

    ENGLISH Figure 6-4 Flow rate-volume chart Figure 6-5 Volume-time chart 6.1.4 Menu operations When testing, press “Menu” to its main-menu as Figure 6-6, then user can browse other parameters, and control setting, patient information, real time setting, power off etc. can be operated, the detail methods are as following: Figure 6-6.
  • Page 52: Control Setting

    ENGLISH a. OTHER PARAMETERS Press “Other Par” in main menu to its sub-menu as Figure 6-7 which displays other parameters except for the three parameters in main menu (see following for details), press confirm key to return to the main menu (press “Up”, “Down”...
  • Page 53 ENGLISH Figure 6-8. Figure 6-9 Figure 6-10 2) Review Information Select “Review Fun” to its sub-menu. If the previous display state is “OFF”, then press the confirm key to open the function (Note: the review function only can be opened when the case numbers are more than one), then the interface will jump to Number interface as shown in Figure 6-11.
  • Page 54 ENGLISH Attention: Open the review function can browse all measured data, the path is:Enter the main menu as Figure 6-6, select “Patient Info”, press the confirm key to enter its sub-menu as Figure 6-20. Select “Number”, then press the confirm key to case number interface as Figure 6-11 (The function only can be selected in case of opening the review function), then use “Up”...
  • Page 55 ENGLISH Figure 6-14 Figure 6-15 5) Wireless Transmission When select “Wireless”, if the device has built-in wireless module, press the confirm key to achieve turning on/off the wireless module, when it is ON, it can transmit data. 6) Scaler Operation(Calibration) Select “Scaler (Calibration)”...
  • Page 56: Patient Information

    ENGLISH Figure 6-16 Figure 6-17 Figure 6-18 Figure 6-19 7) Exit Select “Exit” to exit “Control Setting” interface and return to the main menu. c. PATIENT INFORMATION Press “Patient Info” to its sub-menu as Figure 6-20 (Note: Figure 6-1 is selective interface, and “Yes” indicates that you can edit patient information). Figure 6-20...
  • Page 57 ENGLISH 1) Number “Number” is the current patient data.if you are the twelfth testee,the “Number” will display 12. Attention: If the review function is open,press the confirm key to case number interface to review patient’s infor- mation, refer to “Review Information” for the detailed operations. 2) Gender Settings Press “Up”, “Down”...
  • Page 58: Repeated Measure

    ENGLISH Figure 6-21 Figure 6-22 5) Exit Press “Up”, “Down” key in “Personal Info” interface to “Exit” to exit “Patient Info” interface and return to the main menu. d. POWER OFF Press “Power Off” to turn off the device. Attention: the device will Automatic power off when there is no operation in one minute. e.
  • Page 59: Charge

    ENGLISH Figure 6-23 6.1.6 Charge There are two kinds of charging methods: 1) Connect the device with computer by data line – then the device should be under charging state. 2) Connect the device with power supply by power adapter, then the device should be under charging state. DO NOT use the device when it is under charging state.
  • Page 60: Attention

    ENGLISH 1) Connect the device with computer by data line, double press the icon to open the PC software procedure. 2) Press the corresponding key to achieve upload data, delete case, print information, background, select lan- guage, switch PDF format, set the testee information etc. 3) Press “Exit”...
  • Page 61: Maintenance

    ENGLISH 7.2 Maintenance 1) Please clean and disinfect the device before using according to the User Manual (7.1). 2) Please recharge the battery when the screen shows low-power (the battery power is 3) Recharge the battery soon after the over-discharge. The device should be recharged every six months when it is not regular used.
  • Page 62: Chapter 8 Troubleshooting

    ENGLISH Chapter 8 TROUBLESHOOTING Trouble Possible Reason Solution The device can't finish The start speed is too low, Remeasure according to the user manual. measurement for a long the device does not measure. time, and the data can't The malfunction of the device. Press “Repeated Measure”...
  • Page 63 ENGLISH The device can not be used The battery is not full charged. Please recharge the battery. for full time after charge The battery is broken. Please contact the local service center. The battery can not be The battery is broken. Please contact the local service center.
  • Page 64: Chapter 9 Key Of Symbols

    ENGLISH Chapter 9 KEY OF SYMBOLS Symbol Meanings Please read instructions carefully IP22 International Protection Read instructions carefully WEEE Type BF Applied part Full-power Low-power Error Measured value goes beyond the limits Authorized representative in the European community Keep away from sunlight...
  • Page 65 ENGLISH Status indicator bar 106kPa Atmospheric pressure limitation 50kPa Humidity limitation +55% Temperature limitation -40% Fragile, handle with care Keep in a cool, dry place This way up Manufacturer Date of manufacture. Serial number...
  • Page 66 ENGLISH Chapter 10 PARAMETER INTRODUCTION Measured parameters Parameter Description Unit Forced vital capacity FEV1 Forced expired volume in one second Peak expiratory flow FEV1% FEV1/FVC×100 FEF25 25% flow of the FVC FEF2575 Average flow between 25% and 75% of the FVC FEF75 75% flow of the FVC...
  • Page 67: Appendix

    ENGLISH Appendix Guidance and manufacturer’s declaration – electromagnetic emissions for all EQUIPMENT and SYSTEMS Guidance and manufacturer’s declaration – electromagnetic emission The Spirometer is intended for use in the electromagnetic environment specified below. The customer of the user of the Spirometer should assure that it is used in such and environment. Emission test Compliance Electromagnetic environment –...
  • Page 68 ENGLISH Guidance and manufacturer’s declaration – electromagnetic immunity – for all EQUIPMENT and SYSTEMS Guidance and manufacturer’s declaration – electromagnetic immunity The Spirometer is intended for use in the electromagnetic environment specified below. The customer or the user of Spirometer should assure that it is used in such an environment. Immunity test IEC 60601 Compliance...
  • Page 69 ENGLISH Guidance and manufacturer’s declaration – electromagnetic immunity – for EQUIPMENT and SYSTEMS that are not LIFE-SUPPORTING Guidance and manufacturer’s declaration – electromagnetic immunity The Spirometer is intended for use in the electromagnetic environment specified below. The customer or the user of Spirometer should assure that it is used in such an environment.
  • Page 70 ENGLISH Field strengths from fixed RF transmitters, as determi- ned by an electromagnetic site survey, should be less than the compliance level in each frequency range. Interference may occur in the vicinity of equipment marked with the following symbol: NOTE 1 At 80 MHz and 800 MHz, the higher frequency range applies. NOTE 2 These guidelines may not apply in all situations.
  • Page 71 ENGLISH Recommended separation distances between portable and mobile RF communications equipment and the EQUIPMENT or SYSTEM – for EQUIPMENT or SYSTEM that are not LIFE-SUPPORTING Recommended separation distances between portable and mobile RF communications equipment and the Spirometer The Spirometer is intended for use in an electromagnetic environment in which radiated RF disturbances are con- trolled.
  • Page 73 ADD: No 112 Qinhuang West Street, Economic & Technical Development Zone, 0123 Qinhuangdao, Hebei Province, 066004, PEOPLE’S REPUBLIC OF CHINA Made in China Shanghai International Holding Corp. GmbH (Europe) Eiffestrasse 80, 20537 Hamburg, Germany Importador: Gima S.p.A. - Via Marconi, 1 20060 Gessate (MI) Italy...
  • Page 74 ESPAÑOL Instrucciones del usuario Estimado usuario, muchas gracias por haber comprado el ESPIRÓMETRO. Por favor, lea el Manual del Usuario antes de utilizar este producto. El Manual del Usuario describe los procedi- mientos de funcionamiento que se deben seguir estrictamente. No seguir las indicaciones dadas en el Manual del Usuario puede causar anomalías en la medición, daños al equipo y lesiones a personas.
  • Page 75 ESPAÑOL Contenidos Capítulo 1 Seguridad ..............……………………………………………………..4 1.1 Instrucciones para un funcionamiento seguro ................4 1.2 Advertencias ...........................5 1.3 Precaución .............................5 Certificación EMC ..............................6 1.4 Contraindicación ..........................6 1.4.1 Contraindicación absoluta ....................6 1.4.2 Contraindicación relativa .......................7 Capítulo 2 Información general ...........................7 2.1 Características ..........................8 2.2 Principales aplicaciones y alcance ....................8 2.3 Requisitos ambientales ........................8 Capítulo 3 Introducción ............................9...
  • Page 76: Instrucciones Para Un Funcionamiento Seguro

    ESPAÑOL 6.1.6 Carga ...........................23 6.1.7 Carga de datos ........................23 6.2 Precaución ...........................24 Capítulo 7 Mantenimiento, Transporte y Conservación ..................24 7.1 Limpieza y Desinfección .......................24 7.2 Mantenimiento ..........................25 7.3 Transporte y conservación ......................25 Capítulo 8 Solución de problemas ........................26 Capítulo 9 Leyenda de los Símbolos .........................28 Capítulo 10 Introducción de Parámetros ......................30 Anexo ..................................31 Capítulo 1...
  • Page 77: Advertencias

    ESPAÑOL 1.2 Advertencias  Por favor, no mida este dispositivo con un dispositivo de pruebas funcional para comprobar la información relacionada con el dispositivo.  Peligro de explosión - NO utilice el ESPIRÓMETRO en ambientes con materiales inflamables como anestésicos. ...
  • Page 78: Certificación Emc

    ESPAÑOL  Cuando los datos no se visualizan en todo momento o si sucede durante la prueba, presione la tecla “Repeated Measure” (Medida Repetida) para volver a medir o “Power Off” (Apagar) para reiniciar.  El dispositivo tiene una vida útil normal de cinco años desde el primer uso. ...
  • Page 79: Contraindicación Relativa

    ESPAÑOL 1.4.2 Contraindicación relativa • Si la frecuencia cardíaca es de >120 latidos/minuto; • Si tiene una bulla pulmonar gigante o neumotórax y no planea someterse a cirugía; • Si está embarazada; • Si tiene una perforación de la membrana timpánica (necesita bloquear el canal auditivo del lado afectado antes de tomar medidas);...
  • Page 80: Características

    ESPAÑOL la pantalla mostrará directamente la capacidad vital forzada (CVF), el volumen espiratorio forzado en un segundo (VEF1), y el flujo espiratorio máximo (FEM) con la máxima veracidad y repetición. 2.1 Características 1) Diseño ultradelgado, pequeño y actual. 2) Volumen limitado, ligero y cómodo para transportar. 3) Bajo consumo de energía.
  • Page 81: Especificaciones Técnicas

    ESPAÑOL Ambiente operativo: Temperatura: +10°C~+40°C Humedad relativa: ≤80% Presión atmosférica: 700hPa~1060hPa Capítulo 3 INTRODUCCIÓN En primer lugar, el paciente inspira profundamente, luego sella los labios alrededor de la boquilla y sopla todo el aire con tanta fuerza como le sea posible, la turbina transforma el gas de exhalación en un flujo de aire rotatorio que hace que la pala gire.
  • Page 82: Parámetros Principales

    ESPAÑOL CVF (FEF75) y el flujo promedio entre 25 % y 75 % de la CVF (FEF2575). Además, se puede mostrar la condición del paciente por la relación del valor medido y el valor predicho. • Visualización del gráfico flujo-volumen y el gráfico volumen-tiempo. •...
  • Page 83: Vista Del Panel Frontal

    ESPAÑOL Capítulo 5 Instalación 5.1 Vista del panel frontal Turbina Indicador de carga Tecla arriba Tecla abajo Encendido, menú, tecla Medida repetida: Presione para mediciones de confirmación (aviso: El menú posteriores (esta tecla debe ser presionada Figure 5-1 Vista del panel frontal principal controla el apagado).
  • Page 84: Accesorios

    ESPAÑOL 5.3 Accesorios 1) Un Manual del Usuario 2) Una línea de datos USB 3) Una boquilla desechable 4) Un adaptador de corriente (opcional) 5) Un CD (software de PC) 6) Un clip nasal (opcional) Otro tipo de adaptador tipo debe responder a las siguientes condiciones: Tensión de salida: 5V DC;...
  • Page 85: Medición

    ESPAÑOL 6.1.2 Medición 1) Después de la instalación, mantenga pulsada la tecla “Power On” (Encendido) para encender la unidad. 2) Después de encenderlo, el dispositivo está en la interfaz de selección, como se muestra en la figura 6-1. Pulse la tecla “Up” (Arriba), “Down” (Abajo) para modificarlo. Seleccione “No” para la interfaz “Testing” (Prue- ba), como se muestra en la Figura 6-2.
  • Page 86 ESPAÑOL El valor previsto es consecuente a la configuración de los valores (sexo, edad, altura, etc.) y es un valor difundido. Capacidad Vital Forzada Volumen Espiratorio Forzado en un segundo Relación entre el valor medido y el valor Flujo Espiratorio Máximo Force predicho.
  • Page 87: Uso Del Menú

    ESPAÑOL Figura 6-4 Diagrama tasa de flujo-volumen Figura 6-5 Diagrama volumen-tiempo 6.1.4 Uso del Menú Durante la prueba, al pulsar “Menú” en el menú principal, como en la Figura 6-6, el usuario puede examinar otros parámetros, y hacer los ajustes de control, introducir información del paciente, la configuración del tiempo real, apagar el dispositivo, etc.
  • Page 88: Otros Parámetros

    ESPAÑOL a. OTROS PARÁMETROS Pulse “Other Par” (Otros Parámetros) en el submenú del menú principal, como se muestra en la Figura 6-7. Aquí se muestran otros parámetros con excepción de los tres parámetros del menú principal (ver los detalles en las páginas siguientes).
  • Page 89 ESPAÑOL Figura 6-8 Figura 6-9 Figura 6-10 2) Información de Modificación Seleccionar “Review Fun” (Modificación) del submenú. Si la pantalla anterior está en “OFF” (Apagado), pulse la tecla de confirmación para abrir la función (Nota: la función de modificación solamente se puede abrir cuando hay más de un expedientes).
  • Page 90 ESPAÑOL Atención: Al abrir la función de modificación es posible examinar todos los datos obtenidos, la ruta es: Entrar en el menú principal, como en la Figura 6-6, seleccionar “Patient Info” (Información del paciente), pulsar la tecla de confirmación para entrar en el submenú, como en la figura 6-20. Seleccionar “Number” (Número) y pulsar la tecla de confirmación para pasar a la interfaz del número de expediente, como en la Figura 6-11 (la función solo se puede seleccionar si está...
  • Page 91 ESPAÑOL 4) Eliminación de Datos Seleccione “Delete Data” (Eliminar datos) del submenú, como en la figura 6-15, seleccionar “Yes” (Sí) para elimi- nar todos los datos y visualizar “waiting...” (espera...), a continuación, vuelva a la interfaz “Control Setting”, como en la figura 6-14. En el caso de que aparezca este estado, pulsar “Exit” hasta la interfaz, como muestra la figura 6-1, luego, es posible continuar con la prueba.
  • Page 92: Información Del Paciente

    ESPAÑOL Si aparece la Figura 6-18, significa que hay un error en el Scaler (Calibración), por tanto, debe repetirlo hasta tener éxito. Si aparece la figura 6-19, por favor, compruebe que el volumen entre el Scaler (Calibración) y el seleccio- nado sea acorde, luego, repita la calibración hasta tener éxito.
  • Page 93 ESPAÑOL 1) Número “Number” (Número) son los datos actuales del paciente. Si usted es la duodécima persona evaluada, se mostrará el número 12. Atención: Si la función de modificación está abierta, pulse la tecla de confirmación para pasar a la interfaz número de expediente y modificar la información del paciente.
  • Page 94: Medida Repetida

    ESPAÑOL Figura 6-21 Figura 6-22 5) Salir Pulse las teclas “Up” o “Down” hasta “Exit” para salir de la interfaz “Patient Info” (Información del paciente) y volver al menú principal. d. APAGAR Pulse la tecla “Power Off” (Apagar) para apagar el dispositivo. Atención: El dispositivo se apagará...
  • Page 95: Carga

    ESPAÑOL la medición. Pulsar “No” para regresar al menú principal. Figura 6-23 6.1.6 Carga Existen dos tipos de métodos de carga: 1) Conectar el dispositivo con el ordenador mediante la línea de datos, el dispositivo se está cargando. 2) Conectar el dispositivo a la corriente con el adaptador de corriente, el dispositivo se está cargando. NO utilice el dispositivo cuando se esté...
  • Page 96: Precaución

    ESPAÑOL 1) Conectar el dispositivo a la computadora con la línea de datos, pulse dos veces en el icono para abrir los procedimientos de software para PC. 2) Pulse la tecla correspondiente para cargar los datos, borrar los expedientes, imprimir información, ejecutar procesos en segundo plano, seleccionar el idioma, convertir el formato PDF, establecer la información del paciente etc.
  • Page 97: Mantenimiento

    ESPAÑOL Sumerja la turbina en un desinfectante durante unos minutos después de cada uso, límpiela con agua limpia y déjela secar verticalmente (no enjuague la turbina directamente con agua). Este método no causa contaminación al medio ambiente. (Nota: el desinfectante es alcohol al 75%) 7.2 Mantenimiento 1) Por favor, limpie y desinfecte el dispositivo antes de utilizarlo como lo indica el Manual del Usuario.
  • Page 98: Capítulo 8 Solución De Problemas

    ESPAÑOL Capítulo 8 SOLUCIÓN DE PROBLEMAS Problemas Posible causa Solución El dispositivo no puede terminar La velocidad de arranque es muy Vuelva a medir de acuerdo mediciones largas y no se lenta, el dispositivo no mide. con el Manual del Usuario. visualizan los datos.
  • Page 99 ESPAÑOL La pantalla se apaga El dispositivo está configurado Normal. repentinamente. para la desconexión automática cuando no se realiza ninguna operación en un minuto. La batería está agotada o casi Por favor, cargue la batería. agotada. El dispositivo no se puede usar La batería no está...
  • Page 100: Capítulo 9 Leyenda De Los Símbolos

    ESPAÑOL Capítulo 9 LEYENDA DE LOS SÍMBOLOS Símbolo Significados Leer atentamente las instrucciones de uso IP22 Protección Internacional Leer y seguir atentamente las instrucciones de uso WEEE Pieza aplicada de tipo BF Batería cargada Batería agotada Error Los valores obtenidos están por debajo de los límites Representante Europeo Autorizado Conservar al amparo de la luz solar...
  • Page 101 ESPAÑOL Barra de estado 106kPa Límite de la presión atmosférica 50kPa Límite de humedad +55% Límite de temperatura -40% Frágil, manéjese con cuidado Conservar en un lugar fresco y seco Este lado hacia arriba Fabricante Fecha de fabricación Número de serie...
  • Page 102: Capítulo 10 Introducción De Parámetros

    ESPAÑOL Capítulo 10 INTRODUCCIÓN DE PARÁMETROS Parámetros medidos Parámetro Descripción Unidad Capacidad vital forzada VEF1 Volumen espiratorio forzado en un segundo Flujo espiratorio máximo VEF1% VEF1/CVF×100 FEF25 25% del flujo CVF FEF2575 Flujo medio entre 25% y 75% de CVF FEF75 75% del flujo CVF...
  • Page 103: Anexo

    ESPAÑOL Anexo Orientación y declaración del fabricante: emisiones electromagnéticas, para todos los EQUIPOS y SISTE- Orientación y declaración del fabricante: emisión electromagnética El RS Espirómetro está diseñado para su uso en el entorno electromagnético especificado a continuación. El cliente del usuario del Espirómetro debe asegurarse de que se utiliza en este entorno. Prueba de emisiones Cumplimiento Entorno electromagnético: guía...
  • Page 104 ESPAÑOL Orientación y declaración del fabricante: inmunidad electromagnética, para todos los EQUIPOS y SISTE- Orientación y declaración del fabricante: inmunidad electromagnética El RS Espirómetro está diseñado para su uso en el entorno electromagnético especificado a continuación. El cliente del usuario del Espirómetro debe asegurarse de que se utiliza en este entorno. Prueba de Nivel de prueba Nivel de...
  • Page 105 ESPAÑOL Orientación y declaración del fabricante: inmunidad electromagnética, para los EQUIPOS o SISTEMAS que no sean de SOPORTE VITAL Orientación y declaración del fabricante: inmunidad electromagnética El RS Espirómetro está diseñado para su uso en el entorno electromagnético especificado a continuación. El cliente del usuario del Espirómetro debe asegurarse de que se utiliza en este entorno.
  • Page 106 ESPAÑOL Las intensidades de campo de los transmisores fijos de RF según determina un estudio electromagnético del lugar, deben ser inferiores al nivel de cumplimiento de cada rango de frecuencia. Pueden producirse interferencias en las proximidades de los equipos marcados con el siguiente símbolo: NOTA 1 a 80 MHz y 800 MHz, se aplica el intervalo de frecuencia superior.
  • Page 107 ESPAÑOL Distancias de separación recomendadas entre equipos de comunicaciones de RF portátiles y móviles y el EQUIPO o SISTEMA. Para los EQUIPOS o SISTEMAS que no sean de SOPORTE VITAL Distancias de separación recomendadas entre Equipos de comunicaciones de RF portátiles y móviles y el Espirómetro.
  • Page 109: Spiromètre De Poche Sp-10 Avec Bluetooth

    ADD: No 112 Qinhuang West Street, Economic & Technical Development Zone, 0123 Qinhuangdao, Hebei Province, 066004, PEOPLE’S REPUBLIC OF CHINA Made in China Shanghai International Holding Corp. GmbH (Europe) Eiffestrasse 80, 20537 Hamburg, Germany Importateur: Gima S.p.A. - Via Marconi, 1 20060 Gessate (MI) Italy...
  • Page 110: Instructions À L'utilisateur

    FRANÇAIS Instructions à l’utilisateur Chers clients, merci d’avoir choisi notre SPIROMÈTRE. Veuillez lire attentivement le Mode d’emploi avant d’utiliser ce produit. Les instructions décrivent les procédures d’utilisation, qui doivent être formellement suivies. Le non respect de ces instructions peut causer des anomalies dans les résultats, des dommages corporels et à...
  • Page 111 FRANÇAIS Sommaire Chapitre 1 Sécurité ...............................4 1.1 Instructions pour une utilisation en toute sécurité .................4 1.2 Mises en garde ..........................5 1.3 Attention ............................5 Déclaration CEM ..............................6 1.4 Contre-indication ...........................6 1.4.1 Contre-indication absolue ....................6 1.4.2 Contre-indication relative ......................7 Chapitre 2 Introduction ............................7 2.1 Caractéristiques ..........................8 2.2 Fonctions principales et utilité...
  • Page 112: Instructions Pour Une Utilisation En Toute Sécurité

    FRANÇAIS 6.1.6 Chargement ........................23 6.1.7 Téléchargement des données .....................23 6.2 Attention ............................24 Chapitre 7 Entretien, transport et stockage ....................24 7.1 Nettoyage et Désinfection ......................24 7.2 Entretien ............................25 7.3 Transport et stockage ........................25 Chapitre 8 Résolution des problèmes .......................26 Chapitre 9 Légende des symboles ........................28 Chapitre 10 Signification des valeurs ........................30 Annexe ..................................31 Chapitre 1...
  • Page 113: Mises En Garde

    FRANÇAIS 1.2 Mises en garde  Veuillez ne pas utiliser de testeurs fonctionnels pour obtenir des informations relatives à l’appareil.  Risques d’explosion: NE PAS utiliser le SPIROMÈTRE dans un lieu contenant des produits inflammables, tels que des produits anesthésiants. Veuillez contrôler le colis avant l’utilisation pour vous assurer que l’appareil et tous ses accessoires corres- pondent exactement à...
  • Page 114: Déclaration Cem

    FRANÇAIS  Le temps d’affichage des données dure moins de 5 secondes, mais peut changer en fonction des différentes valeurs du rythme cardiaque.  En cas de problème dans l’affichage des données ou en cas d’autres problèmes pendant le test, appuyer sur la touche «repeated measure»...
  • Page 115: Contre-Indication Relative

    FRANÇAIS 1.4.2 Contre-indication relative • Fréquence cardiaque> 120 battements / min; • Personne atteinte de pneumothorax ou qui présentent une bulle pulmonaire géante et ne prévoit pas de traite- ment chirurgical; • En cas de grossesse; • La personne avec une perforation de la membrane tympanique (nécessité de bloquer le canal auditif du côté affecté...
  • Page 116: Caractéristiques

    FRANÇAIS dement possible; l’écran affichera alors directement la Capacité Vitale Forcée, le Volume Expiratoire Forcé durant la première seconde (VEF1), le Débit Expiratoire de Pointe (DEP) avec un niveau de fiabilité élevé et la possibilité de répéter le test. 2.1 Caractéristiques 1) Forme ultra fine, compact et tendance.
  • Page 117: Chapitre 3 Introduction

    FRANÇAIS Conditions d’utilisation: Température: +10°C~+40°C Humidité relative: ≤ 80% Pression atmosphérique: 700 hPa~1060 hPa Chapitre 3 INTRODUCTION Tout d’abord, le patient inspire profondément puis presse les lèvres autour de l’embout avant de souffler tout l’air aussi fort que possible, l’air exhalé transformé en flux d’air rotatif par une turbine fait tourner une hélice. La paire de diodes réceptrice près de l’hélice reçoit les rayons infrarouges (l’une sert à...
  • Page 118: Principaux Paramètres

    FRANÇAIS 25% et 75% de la CVF (DEF2575). De plus, les conditions du patient peuvent être évaluées parle rapport entre la valeur mesurée et la valeur de référence. • Affichage du graphique volume-débit et du graphique volume-durée. • Enregistrement, suppression, chargement et affichage des données. •...
  • Page 119: Chapitre 5 Installation

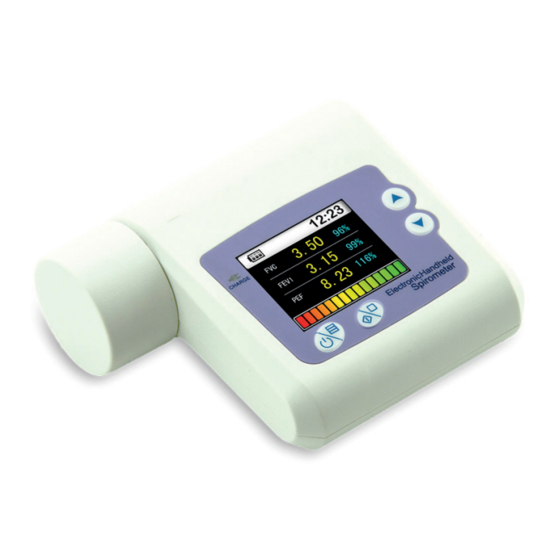
    FRANÇAIS Chapitre 5 INSTALLATION 5.1 Vue du panneau avant Turbine Indicateur de charge Touche haut Touche bas Mise sous tension, menu, touche Repeated measure: enfoncez la touche de confirmation (notice: la mise lorsque vous voulez allez sur la mesure Figure 5-1 Vue avant hors tension a été...
  • Page 120: Accessoires

    FRANÇAIS 5.3 Accessoires 1) Un mode d’emploi 2) Un câble de transmission de données USB 3) Embout jetable 4) Un adaptateur de tension (en option) 5) Un CD (logiciel PC) 6) Une pince à nez (en option) Tout autre type d’adaptateur doit remplir les conditions suivantes: tension à la sortie: 5V CC, cou- rant de sortie ≥...
  • Page 121: Mesures

    FRANÇAIS 6.1.2 Mesures 1) Maintenir la touche «Power on» appuyée pour allumer l’appareil après l’avoir installé. 2) Maintenir la touche «Power on» appuyée pour allumer l’appareil après l’avoir installé (voir Figure 6-1), appuyer sur les touches de sélection «haut» et «bas» pour sélectionner, sélectionner «No» et entrer dans le mode «Tes- ting»...
  • Page 122 FRANÇAIS La valeur prévue est une référence dans la situation où les valeurs (sexe, âge, taille, etc.) ont été définies, c’est une valeur de population. Capacité vitale forcée Volume expiratoire forcé durant la première seconde Le rapport entre la valeur mesurée Débit Expiratoire de Pointe Force et la valeur prévue...
  • Page 123: Menu Opérations

    FRANÇAIS Figure 6-4 Graphique volume-débit Figure 6-5 graphique volume-durée 6.1.4 Menu opérations Pendant l’opération de mesure, appuyer sur «menu» pour accéder au menu principal (voir Fig.6-6), et sélectionner les modes: autres valeurs mesurées, réglage des paramètres,informations patient, réglage en temps réel, éteindre etc., en suivant les instructions suivantes.
  • Page 124: Autres Valeurs Mesurées

    FRANÇAIS a. AUTRES VALEURS MESURÉES Appuyer sur “Other Par” dans le menu principal pour accéder au sous-menu (voir Fig. 6-7), pour afficher les autres valeurs mesurées sauf les trois valeurs visibles dans le menu principal (voir les détails ci-dessous), appuyer sur la touche «confirmation»...
  • Page 125 FRANÇAIS Figure 6-8 Figure 6-9 Figure 6-10 2) Informations d’analyse Sélectionner «Review Fun» dans le sous-menu. Si la fonction est sur «OFF», appuyer sur la touche «confirmation» pour activer la fonction (Remarque: cette fonction ne s’ouvrira que si plus d’un numéro de cas est enregistré). L’interface des Numéros de cas s’affichera alors comme dans la Fig.
  • Page 126 FRANÇAIS Attention: Ouvrir la fonction «review» signifie accéder à toutes les données mesurées, par ce chemin: entrer dans le menu principal (voir Fig. 6-6), puis aller sur “Patient Info”, et appuyer sur la touche confirmation pour entrer dans le sous-menu (voir Figure 6-20). Sélectionner “Number”, (numéro), puis appuyer sur la touche de confirma- tion pour afficher les numéros de cas (voir Fig.
  • Page 127 FRANÇAIS 4) Delete Data (Suppression des données) Sélectionner “Delete Data” pour accéder à son sous-menu (voir Figure 6-15), sélectionner “Yes” pour supprimer toutes les données jusqu’à l’écran «Display», puis retourner à l’écran “Control Setting” (voir Figure 6-14), si dans cet état, pour continuer à effectuer les mesures, sortir pour afficher l’interface comme dans la Figure 6-1. Sélec- tionner «No»...
  • Page 128: Informations Patient

    FRANÇAIS l’écran indiqué dans la Fig.6-18 apparaît, cela signifie que l‘étalonnage a échoué. Répéter alors l’opération, jusqu’à ce qu’elle réussisse. Si la Fig. 6-19 apparaît, confirmer que le volume correspond à l’échelle (étalonnage), puis continuer l’étalonnage jusqu’à ce qu’apparaisse «OK!». Pour interrompre l’étalonnage, appuyer sur la touche de confirmation pour retourner au mode précédent .
  • Page 129 FRANÇAIS 1) Nombre «Number» indique le numéro du cas. Si vous êtes le douzième patient, le numéro affiché est 12. Attention: Si la fonction «review» (affichage des données) est activée, appuyer sur la touche de confirmation dans l’interface des numéros de cas pour voir les données concernant le patient (voir «Affichage des informations» pour plus de détails).
  • Page 130: Repeated Measure (Répéter La Mesure)

    FRANÇAIS Figure 6-21 Figure 6-22 5) Exit (quitter) Dans l’interface «Personal Info», appuyez sur «haut» ou «bas» jusqu’à «Exit» avec les flèches pour sortir des infor- mations patient et revenir au menu principal. d. POWER OFF (ÉTEINDRE) Appuyer sur “Power Off” pour éteindre l’appareil. Attention: L’appareil s’éteint automatiquement s’il n’est pas utilisé...
  • Page 131: Chargement

    FRANÇAIS Figure 6-23 6.1.6 Chargement Deux méthodes de chargement sont possibles: 1) Brancher l’appareil à l’ordinateur avec le câble de transfert de données. L’appareil devrait alors se mettre en charge. 2) Brancher un adaptateur à une prise de courant et à l’appareil. L’appareil devrait alors se mettre en charge. NE PAS utiliser cet appareil lorsqu’il est en charge avec l’adaptateur.
  • Page 132: Attention

    FRANÇAIS 1) Connecter l’appareil avec l’ordinateur par le câble de données, appuyer deux fois sur l’icône pour lancer le logiciel PC. 2) Appuyer sur la touche correspondante pour télécharger les données, éliminer des dossiers, imprimer les infor- mations, sélectionner la langue, enregistrer en format PDF, renseigner les informations patient, etc. 3) Appuyer sur «exit»...
  • Page 133: Entretien

    FRANÇAIS tenant la partie transparente nette et exempte de saletés (telles que des cheveux ou d’autres dépôts). Immerger la turbine dans une solution détergente après l’utilisation, puis la rincer en la trempant dans de l’eau propre quelques minutes (mais ne pas l’exposer directement à un jet d’eau), ce type de rinçage ne pollue pas l’environnement. (Note: Remarque: le désinfectant est alcool à...
  • Page 134: Chapitre 8 Résolution Des Problèmes

    FRANÇAIS Chapitre 8 RÉSOLUTION DES PROBLÈMES Problème Cause possible Solutions L’appareil ne peut pas finir La vitesse de lancement est trop Effectuer de nouveau le test l’opération de mesure après faible pour que l’appareil puisse en suivant les indications un long intervalle de temps mesurer.
  • Page 135 FRANÇAIS L’affichage disparaît L’appareil s’éteint automatique- Normal. soudainement. ment s’il n’est pas utilisé pendant plus d’une minute. La batterie est déchargée Recharger la batterie. ou presque déchargée. L’appareil ne peut pas être utilisé La batterie n’a pas été entièrement Recharger la batterie. pour toute la durée prévue après rechargée.
  • Page 136: Chapitre 9 Légende Des Symboles

    FRANÇAIS Chapitre 9 LÉGENDE DES SYMBOLES Symbole Signification Leggere attentamente le istruzioni per l’uso IP22 Protection internationale Lire et suivre attentivement la notice DEEE Parties appliquées sécurisées de type BF Piles pleines Piles faibles Erreur Les valeurs mesurées dépassent les limites Représentant Agréé...
  • Page 137 FRANÇAIS Barre d’état 106kPa Limites de pression atmosphérique 50kPa Limites d’humidité +55% Limites de température -40% Fragile, manier avec précautions Á conserver dans un endroit frais et sec Sens vers le haut Fabricant Date de fabrication Numéro de série...
  • Page 138: Chapitre 10 Signification Des Valeurs

    FRANÇAIS Chapitre 10 SIGNIFICATION DES VALEURS Valeurs mesurées Valeurs Description Unité de mesure Capacité Vitale Forcée (CVF) FEV1 Volume Expiratoire Forcé durant la 1ère seconde(VEF1) Débit expiratoire de pointe (DEP) FEV1% VEF1/CVF×100 FEF25 25% du débit CVF FEF2575 Moyenne du débit entre 25% et 75% de la CVF FEF75 75% du débit CVF...
  • Page 139: Annexe

    FRANÇAIS Annexe Instructions et déclaration du fabriquant sur les émissions électromagnétiques - pour tous les DISPOSI- TIFS et les SYSTEMES Instructions et déclaration du fabriquant sur les émissions électromagnétiques Le Spiromètre est prévu pour être utilisé dans l’environnement électromagnétique décrit ci-dessous. Le client ou l’utilisateur du Spiromètre doit s’assurer qu’il est utilisé...
  • Page 140 FRANÇAIS Instructions et déclaration du fabriquant sur la résistance aux émissions électromagnétiques - pour tout le matériel et tous les systèmes Instructions et déclaration du fabriquant sur la résistance aux émissions électromagnétiques Le Spiromètre est prévu pour être utilisé dans l’environnement électromagnétique décrit ci-dessous. Le client ou l’utilisateur du Spiromètre doit s’assurer qu’il est utilisé...
  • Page 141 FRANÇAIS Instructions et déclaration du fabriquant sur la résistance aux émissions électromagnétiques - pour les DISPOSITIFS et les SYSTEMES qui NE SONT PAS INDISPENSABLES A LA SURVIE Instructions et déclaration du fabriquant sur la résistance aux émissions électromagnétiques Le Spiromètre est prévu pour être utilisé dans l’environnement électromagnétique décrit ci-dessous. Le client ou l’utilisateur du Spiromètre doit s’assurer qu’il est utilisé...
  • Page 142 FRANÇAIS Le champ de force émis par l’émetteur d’ondes radio fixe, selon un relevé électromagnétique mené sur site, devrait être plus faible que le niveau de conformité pour toutes les plages de fréquence. Des interférences peuvent se créer à proximité d’un appareil portant le symbole suivant : REMARQUE 1 à...
  • Page 143 FRANÇAIS Distances de séparation recommandées entre les équipements de communication RF portables et mobiles et LE DISPOSITIF ou le SYSTÈME - Pour les ÉQUIPEMENTS ou les SYSTÈMES qui ne sont pas DE SURVIE Distances de séparation recommandées entre les appareils de communications RF portables et mobiles et le Spiromètre Le Spiromètre est prévu pour une utilisation dans un environnement électromagnétique dans lequel les pertur- bations des RF rayonnées sont contrôlées.

Ce manuel est également adapté pour:

Sp10w33535