Publicité

Les langues disponibles
  • FR

Les langues disponibles

  • FRANÇAIS, page 21

Liens rapides

Heimsport-Trainingsgerät
ET 6 VR
D
91071(A)
Montage- und Bedienungsanleitung für Bestell-Nr.
GB
Assembly and exercise instructions for Order No.
F
Notice de montage et d'utilisation du
No. de commande
NL
Montage- en bedieningshandleiding voor
Bestellnummer
RU
Инструкция по монтажу и эксплуатации
№ заказа
1

Publicité

Table des Matières
loading

Sommaire des Matières pour Christopeit Sport 91071

  • Page 1 Heimsport-Trainingsgerät ET 6 VR 91071(A) Montage- und Bedienungsanleitung für Bestell-Nr. Assembly and exercise instructions for Order No. Notice de montage et d’utilisation du No. de commande Montage- en bedieningshandleiding voor Bestellnummer Инструкция по монтажу и эксплуатации № заказа...
  • Page 2: Table Des Matières

    Inhaltsübersicht Contents Page 1. Wichtige Empfehlungen und Sicherheitshinweise Seite 2. Einzelteileübersicht Seite 3 - 4 3. Stückliste-Ersatzteilliste Seite 5 - 6 4. Montageanleitung mit Explosionsdarstellungen Seite 7 - 8 5. Benutzung des Gerätes, Garantiebestimmungen Seite Sommaire Page 6. Computeranleitung Seite 10 - 11 7.
  • Page 5: Stückliste-Ersatzteilliste

    Stückliste - Ersatzteilliste Nach Öffnen der Verpackung bitte kontrollieren, ob alle Teile ent- sprechend der nachfolgenden Montageanleitung vorhanden sind. ET 6 VR Best.-Nr. 91071(A) Ist dies der Fall, können Sie mit dem Zusammenbau beginnen. Technische Daten: Stand: 01. 09. 2009 Wenn ein Bauteil nicht in Ordnung ist oder fehlt, oder wenn Sie in Zukunft ein Ersatzteil benötigen, wenden Sie sich bitte an:...
  • Page 6 Abbildungs- Bezeichnung Abmessung Menge Montiert an ET-Nummer Stück Schraube ¾“ x 10-32 36-9805-24-BT Schraube für Höhenausgleich 36-9805-25-BT Unterlegscheibe 10//20 18,78 36-9718-40-BT Kugellager 6000ZZ 39-9998 Befestigungsteil 16,18 33-9814-09-SI Vierkantstopfen 39-9881 Rundstopfen 36-9718-12-BT Achsmutter 3/8x26 36-9107-12-BT Stellmotor 1,55 36-9107107-BT Anschlußbuchsenaufnahme 36-9107108-BT Anschlußkabel mit Buchse 35+48 36-9107109-BT Schraube...
  • Page 7: Montageanleitung Mit Explosionsdarstellungen

    Montageanleitung Bevor Sie mit der Montage beginnen, unbedingt unsere Empfehlungen und Sicherheitshinweise beachten. Bitte entnehmen Sie alle Einzelteile dem Karton und prüfen Sie die Vollständigkeit anhand der Stückliste. Einige Teile sind bereits vormontiert. Schritt 1: Montage des Vorderen und Hinteren Fuß Führen Sie den Hinteren Fuß...
  • Page 8 Schritt 4: Montage des Lenkers und des Computers Nehmen Sie den Computer (22) und stecken Sie das Verbindungskabel (14) in die Rückseite des Computers (22) ein. Schrauben Sie den Computer (22) an die Computerhalterung am Len- kerstützrohr (13) mittels der Schrauben (23) fest, ohne das Kabel dabei einzuquetschen.
  • Page 9: Benutzung Des Gerätes, Garantiebestimmungen

    Benutzung des Gerätes Transport des Gerätes: Es befinden sich 2 Transportrollen im vorderen Fuß. Um das Gerät an einen anderen Ort zu stellen oder zu lagern, fassen sie den Lenker und kippen Sie das Gerät auf den vorderen Fuß so weit, sodass sich das Gerät leicht auf den Transportrollen bewegen lässt und schieben Sie es zum gewünschten Ort.
  • Page 10: Computeranleitung

    Computeranleitung zu ET 6 VR ANZEIGEN 1.Start /Stop Taste: Startet und Stoppt das Training 2. ZEIT: Zeigt die verstrichene Zeit in Minuten und Sekunden an. Der Computer zählt in Sekundenintervallen zwischen 0:00 und 99:59 aufwärts. Der Computer kann auch so programmiert werden, dass er von einem einge- geben Wert herunter zählt.
  • Page 11 4) Personal (U0-U4 benutzerdefiniertes Programm) WEB-RACING Entwerfen Sie Ihr eigenes Programmprofil. Bei den Personal- (Benutzer-) Pro- Die Tastenbelegung bei einem Betrieb mit der NetAthlon Software ist wie grammen kann der Widerstand jedes Segmentes selbst bestimmt werden. folgt: +/- Drehknopf regelt eine Erhöhung oder Verringerung des Wertes. Die Programmeinstellungen werden automatisch gespeichert.
  • Page 12: Trainingsanleitung

    Trainingsanleitung Minuten lang, Dehnungsübungen und/oder leichte gymnastische Übungen Um spürbare körperliche und gesundheitliche Verbesserungen zu erreichen, durchgeführt werden. müssen für die Bestimmung des erforderlichen Trainingsaufwandes die folgenden Faktoren beachtet werden: 4. Motivation Der Schlüssel für ein erfolgreiches Programm ist ein regelmäßiges Training. 1.
  • Page 13: Friedrichstr. 55

    Contents 1. Summary of Parts Page 3 - 4 2. Important Recommendations and Safety Information Page 13 3. Parts List (List of spare parts) Page 14 - 15 4. Assembly Instructions With Exploded Diagrams Page 16 - 17 5. Mount, Use & Dismount Page 18 6.
  • Page 14: Parts List (List Of Spare Parts)

    Parts list – List of spare parts Please check after opening the packing that all the parts shown in the following parts lists are there. Once you are sure that this is the ET 6 VR order No. 91071(A) case, you can start assembly. Technical data: Issue: 01.
  • Page 15 Illustration Designation Dimensions Quantity Attached to ET number illustration No. Round screw for adjustable height 36-9805-25-BT Washer 10//20 18,78 36-9718-40-BT Bearing 6000ZZ 39-9998 Fix plate 16,18 33-9814-09-SI Plastic bush 39-9881 Handlebar cap 36-9718-12-BT Axle nut 3/8x26 36-9107-12-BT Servo motor 1,55 36-9107107-BT DC cable support 36-9107108-BT...
  • Page 16: Assembly Instructions With Exploded Diagrams

    Assembly Instructions Before beginning assembly, be sure to observe our recommendat-ions and safety instruction. Remove all the part of your cycle from the carton and place them on the floor carefully. Some parts are pre-assembled. Step 1: Attach the stabilizer Attach the rear stabilizer (8) assembled with 2 rear cross bar caps (9) and 2 adjustable knob (41) to main frame (1), using 2 allen head bolts (10), 2 washers (5) and 2 spring washers(6).
  • Page 17 Step 4: Attach the handlebar and computer Put the plug of middle section motor cable (14) into the socket from monitor (22) backside. Attach the monitor (22) to top monitor bracket of front post (13) with screws (23). (Attention: Ensure that the cable loom are not crunched or pinched during installation.) Attach the handlebar (27) with hand pulses (26) to welded clamp of front post (13) and secure with clamp, clamp decoration cover (28) and star...
  • Page 18: Important

    Mount, Use & Dismount Transportation of Equipment: There are two rollers equipped on the front foot. For moving, you can lift up the rear foot and drive it to where you would like to locate or store it. Adjustment – Seat Position For an effective workout, the seat must be adjusted properly.
  • Page 19: Computer Instructions

    Computer instructions for ET 6 VR 2. Distance: Displays kilo meters. The computer count up if no distance was pre-entered. If pre-entered distance with +/- turn-key, the value counts down. After reach value 0:00 a signal sounds for end of exercising. 3.
  • Page 20: Training Instructions

    WEB-RACING 6) RANDOM The key function of Web racing with NetAthlon Software as follows: This exercise computer creates amazing exercising program chart by auto- +/- turn-key increase or decrease the value. Enter-key starts the Web racing random producing. games Start/Stop-key stops the web racing game Sometimes user is tired of user pre-setting program charts, he/she can All information for Installation of Software and Using the programs you find on choose RANDOM to let computer auto-producing it’s program chart.
  • Page 21: Sommaire

    Sommaire 1. Aperçu des pièces Page 2. Recommandations importantes et règles de sécurité Page 3. Nomenclature Page 22 - 23 4. Notice de montage avec écorchés Page 24 - 25 5. Monter, utiliser & descendre Page 6. Manuel d’utilisation du calculateur électronique Page 27 - 28 7.
  • Page 22: Friedrichstr. 55

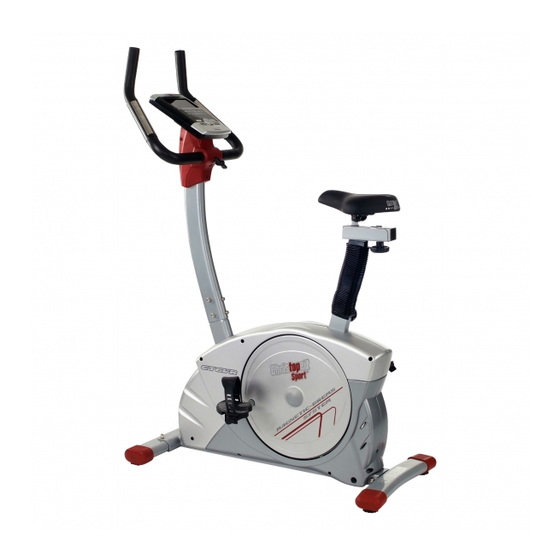
    Liste des pièces- Liste des pièces de rechange Après avoir ouvert l’emballage, veuillez contrôler s’il y a toutes les pièces conformément à la liste suivante. Si c’est le cas, vous pouvez ET 6 VR N° de commande 91071(A) commencer l’assemblage. Caractéristiques techniques : Version du : 01/ 09/ 2009 Si une pièce n’est pas correcte, s’il manque une pièce ou si vous...
  • Page 23 Schéma Désignation Dimensions Quantité Monté sur Numéro ET n° en mm Unités schéma n° Rondelle intercalaire 10//20 18,78 36-9718-40-BT Roulement à billes 6000ZZ 39-9998 Fixation 16,18 33-9814-09-SI Bouchon carré 39-9881 Bouchon rond 36-9718-12-BT Ecrou de axe 3/8x26 36-9107-12-BT Servomoteur 1,55 36-9107107-BT Fixation de N°.
  • Page 24: Notice De Montage Avec Écorchés

    Instructions de montage Il est strictement conseillé d’observer nos recommandations et consignes de sécurité avant de commencer le montage. Veuillez retirer les pièces détachées du carton et vérifiez si les pièces sont complètes à l’aide de la liste des pièces. Certaines pièces ont été...
  • Page 25 Etape n° 4: Montage du guidon et de l’ordinateur Prenez ensuite l’ordinateur (22) et fixez son câble de connexion (14) à l’arrière de l’ordinateur (22). Vissez la fixation de l’ordinateur (22) au tube de support (13) avec la vis 23. Evitez ce faisant d’abîmer le cable. Placez le guidon (27) dans le guide de fixation ouvert du le tube de support (13) et serrez-y le guidon (27).
  • Page 26: Monter, Utiliser & Descendre

    Monter, utiliser & descendre Transport de la machine: La machine est équipée de 2 rouleaux sur le pied avant. Si vous voulez transporter la machine, soulevez le pied postérieur et roulez la machine vers la destination désirée. Réglage de la position de la selle Un entraînement efficace demande un correct réglage de la selle.
  • Page 27: Manuel D'utilisation Du Calculateur Électronique

    Guide d’utilisation de l’ordinateur ET 6 VR mode stop, appuyez sur la touche pour démarrer l’exercice. 4. RECOVERY -touche : Appuyez la touche pour activer la fonction récu- pération de pouls. (F1-F6) 5. QUICK START -touche : Si vous ne souhaitez pas choisir des fonctions, il suffit d’appuyer cette touche pour vous exercer.
  • Page 28: Mesure Des Pulsations

    votre propre battement du coeur visé) ou sélectionnez un des programmes WEB-RACING 55%, 75%ou 90%. Veuillez insérer votre âge dans les User Data Fonction de touché pour NetAthlon Software programme: +/- touche : (données d’utilisateur) pour vous assurer que votre battement du coeur augmenter et diminuer ou sélectionner option..
  • Page 29: Recommandations Pour L'entraînement

    Recommandations pour l’entraînement Les facteurs ci-après doivent être pris en compte pour la détermination de l’entraînement indispensable afin d’améliorer concrètement son physique et sa santé: 1. Intensité: L’entraînement n’aura d’effets positifs que si les efforts déployés dépassent ceux de la vie quotidienne, mais sans être hors d’haleine et/ou se sentir épui- sé.
  • Page 30: Inhoudsopgave

    Inhoudsopgave 1. Overzicht van de losse delen pagina 3 - 4 2. Belangrijke aanbevelingen en veiligheidsinstructies pagina 30 3. Stuklijst pagina 31 - 32 4. Montagehandleiding met explosietekeningen pagina 33 - 34 5. Opstappen, Gebruiken & Afstappen pagina 35 6. Handleiding bij de computer pagina 36 - 37 7.
  • Page 31: Stuklijst

    Stuklijst - reserveonderdelenlijst Controleer na het openen van de verpakking a.u.b. aan de hand van de onderstaande stuklijst of alle onderdelen aanwezig zijn. Wanneer ET 6 VR best.nr. 91071(A) dit het geval is, kunt u met de montage beginnen. Technische specificatie: Stand: 01.09.
  • Page 32 Afbeeldings- Beschrijving Afmetingen Aantal Gemonteerd aan ET-nummer stuks afbeeldingsnr. Onderlegplatje 10//20 18,78 36-9718-40-BT Lager 6000ZZ 39-9998 Klemstuk 16+18 33-9814-09-SI Dopsluiting 39-9881 Ronde dop 36-9718-12-BT As moer 3/8x26 36-9107-12-BT Stelmotor 1,55 36-9107107-BT DC kabel houder 36-9107108-BT DC kabel 35+48 36-9107109-BT Schroef M5 x 18 1,48 39-10190...
  • Page 33: Montagehandleiding Met Explosietekeningen

    Montagehandleiding Vooraleer met de montage te beginnen, absoluut onze aanbevelingen en veiligheidsaanwijzingen in acht nemen. De details vindt u op het karton. Controleer of de zending volledig is met behulp van de stuklijst. Sommige delen zijn al voorgemonteerd. Stap 1: Montage van de voorste en van de achterste voet Breng de achterste voet (8) gemonteerd met voetafdekkingen (9) en hoogtecompensatieschroeven (41) op het frame, en schroef hem vast...
  • Page 34 Stap 4: Montage van het stuur en van de computer Neemt u de computer (22) en steekt u de verbindingskabel(14) in de achterkant van de computer (22). U schroeft de computer (22) op de computerhouder aan het frame (13) middels de schroeven (23) vast, zonder de kabel daarbij de beschadi- gen.
  • Page 35: Opstappen, Gebruiken & Afstappen

    Opstappen, Gebruiken & Afstappen Transport van Apparaat: Aan de voorzijde bevinden zich twee rollers. Om het apparaat te verplaatsen kunt u de achterzijde van het apparaat optillen en sturen naar waar u wilt om het te plaatsen of te stallen. Aanpassen –...
  • Page 36: Handleiding Bij De Computer

    Computerhandleiding ET 6 VR WEERGAVE 1. TIME (Tijd): Voor de instelling / weergave van de tijd in minuten en secon- den tot maximum 99:59 minuten. Voorkeuze in stappen van minuten / telling „Omhoog“ en „Omlaag“ in stappen van seconden. 2. Distance (Afstand): Weergave en voorafgaande invoer voor de afstand. De voorafgaande invoer kan van 0 tot 99,9 km ingevoerd worden.
  • Page 37 Webracing standig uw maximale hartslagfrequentie en afhankelijk van het programma de corresponderende - op 55% / 75% of 90% - aangepaste beoogde frequentie De toetsen bediening bij het gebruik van het Nethatlon Software is als volgt; van de training. Deze gewenste waarde wordt weergegeven. +/- draaischijf regelt de verhoging of verlaging van de waarden.
  • Page 38: Trainingshandleiding

    Trainingshandleiding De onderstaande factoren moeten in acht worden genomen bij het bepalen van de benodigde training voor het bereiken van een merkbare verbetering van uw figuur en gezondheid: 1. Intensiteit: De mate van lichamelijke belasting bij de training moet de normale belasting overschrijden, zonder dat u daarbij buiten adem en/of uitgeput raakt.
  • Page 39: Обзор Содержания Ctp

    Обзор содержания Важные рекомендации и указания по безопасности ctp. 2. Обзор отдельных деталей стр. 3. Спецификация стр. 40 - 41 4. Руководство по сборке с отдельными иллюстрациями стр. 42 - 44 5. Руководство по использованию компьютера стр. 45 - 46 6.
  • Page 40 Спецификация - Список запасных частей • Компьютер с подсветкой LCD дисплея с одновременной индикацией ледующих параметров: время, дистанция, скорость, частота вращения ET 6 VR № заказа 91071(A) педалей, прибл. расход калорий, нагрузка в ваттах и пульс • Возможность задавать собственные параметры: Технические...
  • Page 41 № Наименование Размеры в мм Кол-во Монтируется на № ЕТ-№ картинки штук Круглый кожух 89,90 36-9107-11-BT Подшипник скольжения 36-9805-23-BT Винт 3/4“ x 10-32 36-9805-24-BT Винт для выравнивания высоты 36-9805-25-BT Прокладочная шайба 10//20 18,78 36-9718-40-BT Подшипник 6000ZZ 39-9998 Закрепление 16+18 33-9814-09-SI Четырехугольная...
  • Page 42: Руководство По Монтажу

    Руководство по монтажу При монтаже обязательно соблюдайте наши рекомендации и ука- зания по технике безопасности. Пожалуйста, выньте все отдель- ные части из коробки и проверьте на комплектность в соответ- ствии со спецификацией. Некоторые части уже предварительно смонтированы. Шаг 1: Монтаж передней и задней ножки 1.
  • Page 43 Шаг 4: Монтаж руля и компьютера 1. Соедините соединительный кабель (14) датчика с соответствую- щим гнездом на компьютере (22). 2. Прикрутите компьютер(22) к держателю компьютера на опорной трубе (13) при помощи винтов (23) избегая защемления кабеля. 3. Подведите руль (27) к открытому креплению руля на опорной трубе (13) и...
  • Page 44 Пользование тренажером Пользование тренажером На передней ножке находятся два транспортировочных ролика. Для того, чтобы передвинуть тренажер на другое место или поместить на место хранения, возьмитесь за руль и наклоните тренажер на переднюю ножку так, чтобы тренажер можно было легко передвинуть с помощью транспортировочных роликов на нужное место. Регулировка...
  • Page 45 Иструкция к компьютеру ET 6 VR 2. +/- (вращающаяся кнопка): Увеличивает или уменьшает установленные показатели. 3. START/STOP / СТАРТ/СТОП: Клавиша старта или остановки программ тренировки. 4. RECOVERY / ВОССТАНОВЛЕНИЕ : Фитнес-тест с определением фитнес-оценки (F1-F6). 5. QUICK START / БЫСТРЫЙ СТАРТ: Возможность начать тренировку в...
  • Page 46 2) PROGRAM (Встроенные тренировочные программы) рукоятках и кардиодатчиком (например, на Вас одет кардиодатчик 12 автоматических программ тренировки для целевой тренировки и руки лежат на датчиках), приемущество имеет измерение пульса (P1~P12). датчиками на рукоятках. Возможно увеличение или уменьшение регулировки сопротивления во время тренировки. УКАЗАНИЯ: Возможно...
  • Page 47 ИНСТРУКЦИЯ ПО ТРЕНИРОВКЕ Вы должны учитывать следующие факторы, чтобы определить верные параметры тренировок для достижения ощутимых физических результатов и пользы для здоровья. Интенсивность Уровень физических нагрузок при тренировках должен превышать уровень нормальных физических нагрузок, но вы не должны задыхаться и сильно переутомляться. Удобной мерой эффективности тренировки...
  • Page 48 Service / Hersteller Bei Reklamationen, notwendigen Ersatzteilbestellungen oder © by Top-Sports Gilles GmbH Reparaturen wenden Sie sich bitte an unsere Service Abteilung. D-42551 Velbert (Germany) Service: Top-Sports Gilles GmbH Tel.: +49 (0)2051/6067-0 Friedrichstrasse 55 info@christopeit-sport.com Fax: +49 (0)2051/6067-44 D - 42551 Velbert http://www.christopeit-sport.com...

Ce manuel est également adapté pour:

91071 aEt 6 vr

Table des Matières