Publicité

Les langues disponibles

Les langues disponibles

Liens rapides

HEDGE TRIMMER
TAILLE-HAIES
CORTASETOS
INSTRUCTION MANUAL
MANUEL D'INSTRUCTIONS
MANUAL DE INSTRUCCIONES
WARNING:
To reduce the RISK of injury, user must read and understand the instruction manual before using the Hedge Trimmer.
Manufacturer reserves the right to change specifications without notice.
Specifications may differ from country to country.
Do only hand over the Hedge Trimmer together with this manual.
AVERTISSEMENT:
Afin d'éviter les blessures, l'utilisateur doit lire et comprendre les instructions de ce manuel avec attention avant d'utiliser le taille-haies.
Le fabricant se séserve le droit de modifier les spécifications sans avertissement préalable.
Les spécifications peuvent varier d'un pays à l'autre.
Lorsque vous n'utiliser pas le toujours accompagner l'appareil du manuel contenant les instructions.
ADVERTENCIA:
Para reducir el riesgo de posibles lesiones, el usuario deberà leer y entender las instrucciones de este manual antes de utilizar el cortasetos.
El fabricante se reserva el derecho de cambiar las especificaciones sin previo aviso.
Las especifficaciones pueden variar de un país a otro.
Ceda únicamente el cortasetos junto con este manual.
HT-2249 D
English / French / Spanish
HT-2249 D
C

Publicité

Table des Matières
loading

Sommaire des Matières pour Dolmar HT-2249 D

  • Page 1 English / French / Spanish HEDGE TRIMMER TAILLE-HAIES CORTASETOS HT-2249 D INSTRUCTION MANUAL MANUEL D’INSTRUCTIONS MANUAL DE INSTRUCCIONES HT-2249 D WARNING: To reduce the RISK of injury, user must read and understand the instruction manual before using the Hedge Trimmer.
  • Page 2: Table Des Matières

    Thank you very much for selecting the DOLMAR Hedge Trimmer. We are Table of Contents Page pleased to be able to offer you the DOLMAR Hedge Trimmer which is the result Symbols............... 2 of a long development program and many ears of knowledge and experience.
  • Page 3: Safety Instructions

    SAFETY INSTRUCTIONS General Instructions THIS MACHINE CAN CAUSE SERIOUS INJURIES. Read the Instructions carefully for the correct handling, preparation, maintenance, starting and stopping of the machine. Be familiar with all controls and the proper use of the machine. (1) It is recommended only to loan the Hedge Trimmer to people who have proven to be experienced with Hedge Trimmers.
  • Page 4 Starting up the Hedge Trimmer Please make sure that there are children or other people within a working range of or 15 meters (5), also pay attention to any animals in the working vicinity. avoid operating while people, especially children are nearby. Before operating, always check that the Hedge Trimmer is safe for operation: Check the security of the throttle lever.
  • Page 5 Use only genuine spare parts and accessories supplied by DOLMAR authorized or factory service centers. Use of non-approved accessories and tools means increased risk of accidents and injuries. DOLMAR will not accept any liability for accidents or damage caused by the use of any non-approved accessories.
  • Page 6: Specification

    Clutch engagement speed WALBRO WYL Carburetor type type Solid state ignition Ignition system type NGK BPMR4A Spark plug type 0.6 - 0.7 Electrode gap 50 : 1 Mixture ratio (fuel : DOLMAR 2-stroke engine oil) 14 : 58 Gear ratio...
  • Page 7: Designation Of Parts

    DESIGNATION OF PARTS HT-2249 D DESIGNATION OF PARTS DESIGNATION OF PARTS DESIGNATION OF PARTS Blade Carburetor Blade cover Blunt extension I-O Switch (ON-OFF) Front handle Throttle lever Recoil starter Rear handle Fuel tank cap Muffler Choke lever Gearbox...
  • Page 8: Fuels/Refueling

    Observe the Safety Instructions on page 4. The engine has been designed for use with DOLMAR two-stroke engine oil and a mixture ratio of 50:1 only to protect the environment. In addition, a long service life and a reliable operation with a minumum emission of exhaust gases is guaranteed.
  • Page 9: Precautions Before Starting

    Refuelling The engine must be switched off. Stop the engine during refuelling, keep away from naked flames and do not smoke. Take care not to spill either fuel or oil in order to prevent soil contamination (enviromental protection). Clean the Hedge Trimmer immediately after fuel has been spilt. Do not spill any fuel onto the engine.
  • Page 10: Starting The Machine

    STARTING THE MACHINE Move at least 3 meters away from the place of refuelling. Place the Hedge Trimmer on a clean area of ground make sure that the cutting tool does not come into contact with the ground or any other objects. Cold starting (When the engine is cold or it has been stopped for more than 5 minutes or when fuel is added to the engine.) 1.
  • Page 11: Stopping The Machine

    STOPPING THE MACHINE 1. Release the throttle lever completely. 2. Push the I-O switch (1) to “O” position, the engine rotation will become low and the engine will stop. OPERATION OF THE MACHINE Never operate with a loose grip. Never touch the cutting device when starting the engine and during operation. Operate the Hedge Trimmer in such a manner as to avoid inhalation of the exhaust gases.
  • Page 12: Angle Change Of Rear Handle

    ANGLE CHANGE OF REAR HANDLE To permit vertical operation of the unit, the angle of the rear handle is designed to be changed. How to change the angle Return the throttle lever, and rotate the rear handle, pulling the rotation lock pin.
  • Page 13: Maintenance Instruction

    MAINTENANCE INSTRUCTIONS Turn off the engine and remove the spark plug connector when replacing or sharpening cutting tools, also when cleaning the cutter or cutting device or carrying out any maintenance. Never straighten or weld a damaged cutting blade. Inspect the cutting blades with the engine switched off at short, regular intervals for damage. (Detection of hairline cracks by means of tapping-noise test.) Beware the teeth are sharp.
  • Page 14 Checking the spark plug - Every 8 hours (Daily) Only use the supplied universal wrench to remove or to install the spark plug. The gap between the two electrodes of the spark plug should be 0.6 to 0.7mm. If the gap is too wide or too narrow, adjust it. If the spark plug is clogged with carbon or fouled, clean it thoroughly or replace it.
  • Page 15: Storage

    STORAGE When keeping the machine in storage for a long time, drain fuel from the fuel tank and carburetor, as follows: Drain all fuel from the fuel tank. Remove the spark plug and add a few drops of oil into the spark plug hole. Then, pull the starter gently to confirm that oil film covers the engine inside and tighten the spark plug.
  • Page 16 EPA regulations during its warranty period. For the components listed under PARTS COVERED, the dealer or service center authorized by Dolmar will, at no cost to you, make the necessary diagnosis, repair, or replacement necessary to ensure that the engine complies with applicable U.S.
  • Page 17: Obtaining Warranty Service

    As the engine owner, you should however be aware that the Dolmar may deny your warranty coverage if your engine or a part has failed due to abuse, neglect, improper maintenance or unapproved modifications.
  • Page 18: Maintenance And Repairs

    All repairs qualifying under this limited warranty must be performed by a service dealer authorized by Dolmar. In the event that any emission-related part is found to be defective during the warranty period, you shall notify Dolmar Warranty Service Department at 1-888-OPE-PART. Dolmar and you will be advised of the appropriate...
  • Page 19: Symboles

    Consignes de sécurité ..........20 Caractéristiques techniques........23 Les modéles HT-2249 D légers, prafiques et compacts, allient les avantages Liste des piéces............24 d’une technologic de pointe à une conception ergonomique, et sont des outils Carburants / Ravitaillement........25 de professionnels pour de norebreuses applications.
  • Page 20: Consignes De Sécurité

    CONSIGNES DE SECURITE Généralités CET APPAREIL PEUT PROVOQUER DES BLESSURES GRAVES. Veuillez lire attentivement le manuel d’instruction afin de manipuler, entretenir, mettre en route et arretêr correctement l’appareil. Chaque utilisateur est prié de se familiariser avec la totalite des commandes et des modes d’utilisation appropriés du taille-haies.
  • Page 21 Mise en marche du taille-haies – S’assurez qu’aucun enfant ou aucune autre personnene se trouve à moins de 15 mètres (5) de la zone d’utilisation du taille-haies’assurez également qu’il n’y a aucun animal dans les parages. S’assurez également qu’il n’y a aucun animal dans les parages.
  • Page 22: Premiers Secours

    être effectuées par des représentants antorisés. N’utilisezque des pièces et des accessoires d’origine, fournis par DOLMAR. L’utillsation d’outils et d’accessoires non agréés angrnente les risques d’accident. DOLMAR décline toute responsabilité en cas d’accident ou de dommage provoqué par l’utilisation d’accessoires ou d’outils non agréés.
  • Page 23: Caractéristiques Techniques

    Vitesse d’embrayage WALBRO WYL Carburateur type Type Allumage électronique Systéme d’allumage type NGK BPMR4A Bougie d’allumage type 0.6 - 0.7 Ecartement entre les électrodes 50 : 1 Rapport du mélange (carburant:huile pour moteur 2 temps DOLMAR) 14 : 58 Rapport d’engrenages...
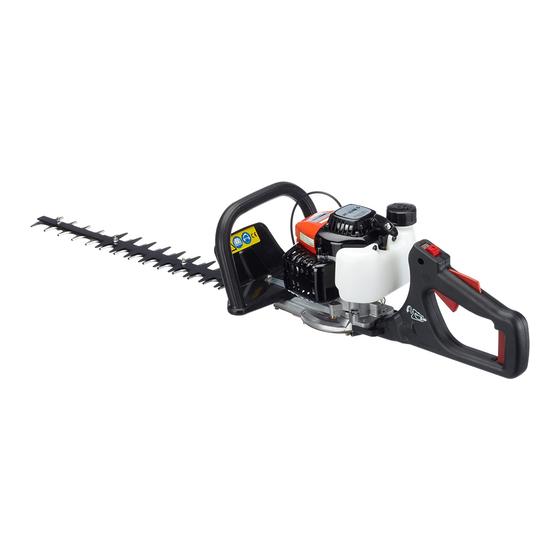
  • Page 24: Liste Des Piéces

    LISTE DES PIECES HT-2249 D LISTE DES PIECES LISTE DES PIECES LISTE DES PIECES Lame Carburateur Protection de lames Extension émoussée Bouton I-O (ON-OFF) Poignée avant Levier du papillon des gaz Démarreur à enroulement Poignée arrière Bouchon de réservoir de carburant Pot d’échappement...
  • Page 25: Carburants/Ravitaillement

    - haies. Rapport de mélange correct: Benzina : Huile d’origine DOLMAR pour moteur 2 temps = 50 : 1 ou Benzina : Huile d’autres fabricants pour moteur deux temps = 25 : 1 recommandé...
  • Page 26: Precautions A Observer Avant Le Demarrage

    Ravitaillement Le moteur doit être coupé Coupez le moteur lors du ravitaillement, tenez - vous à distance des flammes nues et ne fumez pas. Prenez garde à ne pas renverser du carburant ou de l’huile afin d’éviter de polluer le sol (protection de l’environnement). Nettoyez immédiatement le taille - haies après que du fuel a été...
  • Page 27: Demarrage De La Machine

    DEMARRAGE DE LA MACHINE Se placer à au moins 3 mètres de I’emplacement de ravitaillement en carburant. Poser le taille-haies dans un endroit dégagé pour s’assurer que l’outil de coupe n’est pas en contact avec le sol ou avec d’autres objets. Démarrage à...
  • Page 28: Arret De La Machine

    ARRET DE LA MACHINE 1. Relâcher complètement le levier de commande. 2. Poussez le bouton I-O (1) sur la position “O” lorsque la rotation du monteur ralentit. Le moteur s’arrête. FONCTIONNEMENT DE LA MACHINE N’utilisez jamais la machine en ne la tenant pas fermement. Ne touchez jamais l’appareil de coupe lors du démarrage du moteur et du fonctionnement.
  • Page 29: Changement De L'angle De La Poignee Arriere

    CHANGEMENT DE L’ANGLE DE LA POIGNEE ARRIERE Afin de faire le travail vertical, cette machine est conçu à permettre de changer l’angle de la poignée arrière. Méthode de changement de l’angle Remettre la manette des gaz en état et faire tourner la poignée arrière en tirant la goupille de blocage de rotation.
  • Page 30: Instructions De Maintenance

    INSTRUCTIONS DE MAINTENANCE Coupez le moteur et retirez le connecteur de la bougie d’allumage lors du remplacement ou de l’afftûage des outils de coupe et lors du nettoyage des lames ou de l’outil de coupe ou lors de tout travail de maintenance. Ne dressez ou soudez jamais une lame de coupe endommagée.
  • Page 31 Contrôle de la bougie d’allumage– Toutes les 8 heures (journalièrement) Utilisez uniquement la clé à molette fournie pour retirer ou monter la bougie d’allumage. L’écartement entre les deux électrodes de la bougie d’allumage devrait être de 0,6-0,7mm. Si l’écartement est trop large ou trop étroit, réglez-le. Si la bougie d’allumage est bouchée avec des résidus de carbone ou si elle set encrassée, nettoyez-la soigneusement ou remplacez-la.
  • Page 32: Remisage

    REMISAGE Lorsque la machine est remisée pendant une durée importante, évacuer le carburant du carburateur de la manière suivante : évacuer la totalité du carburant du réservoir et s’en défaire en respectant les réglementations locales. Retirer la bougie d’allumage et ajouter quelques gouttes d’huile dans le trou de la bougie d’allumage.
  • Page 33: Símbolos

    Lista de contenidos Página cortasetos de DOLMAR. Nos complace poder ofrecerle el cortasetos de Símbolos..............33 DOLMAR resultado de un largo programa de desarrollo y de muchos años de Instrucciones de seguridad ........34 conocimiento y experiencia. Datos Técnicos ............37 Designación de las piezas .........
  • Page 34: Instrucciones De Seguridad

    INSTRUCCIONES DE SEGURIDAD Instrucciones Generales ESTA MÁQUINA PUEDE CAUSAR DAÑOS GRAVES. Lea cuidadosamente las instrucciones para el correcto manejo, preparación, mantenimiento, arranque y parada de la máquina correctos. Familialícese con todos los controles y el correcto uso de la màquina. (1) Se recomienda prestar el cortasetos sólo a las personas que demuestren tener experiencia con el mismo.
  • Page 35: Arranque Del Cortasetos

    Arranque del cortasetos Asegúrese de que no haya niños u otras personas de un radio de 15 metros de lugar de trabajo (5), tenga cuidado también con cualquier animal que pueda haber en las cercanías de lugar de trabajo. Nunca haga funcionar la máquina mientras personas, especialmente niños estén cerca.
  • Page 36: Método De Funcionamiento

    Utilice solamente piezas de recambio y accesorios genuinos suministrados por DOLMAR. La utilización de accesorios no aprobados significará un aumento del riesgo de accidentes y heridas. DOLMAR no aceptará ninguna responsabilidad por los accidentes o los daños causados al utilizar cualquier accesorio no autorizado.
  • Page 37: Datos Técnicos

    DATOS TECNICOS HT-2249 D Modelo 1060 x 255 x 220 Dimensiones (largo X ancho X alto) Masa (con cubierta de cuchilla) Volumen (tanque de combustible) 21.0 Cilindrada del motor Longitud del cortador 0.60 Rendimiento máximo del motor Velocidad máxima de cuchilla 3000 Velocidad de ralentí...
  • Page 38: Designación De Las Piezas

    DESIGNACIÓN DE LAS PIEZAS HT-2249 D DESIGNACIÓN DE LAS PIEZAS DESIGNACIÓN DE LAS PIEZAS DESIGNACIÓN DE LAS PIEZAS Cuchilla Carburador Cubierta de cuchilla Extensión desafilada Interruptor I-O Asidero delantero Palanca de la mariposa de gases Arrancador de recular Asidero trasero Tapón del tanque de combustible...
  • Page 39: Combustibles/Repostaje

    DOLMAR). De o contrario, la función fiable del cortasetos no se podrá garantizar. Relación de mezcla correcta: Gasolina : Aceite de motor de dos carreras legitimo de DOLMAR = 50 : 1 o Gasolina : Aceite de motor de dos carreras de otros fabriantes = 25 : 1 recomendado...
  • Page 40: Precauciones Antes De Poner En Funcionamiento

    Repostaje El motor deberá estar apagado. Pare el motor durante el repostaje, aléjese de las llamas expuestas al aire y no fume. Tenga cuidado de no derramar combustible ni aceite para no contaminar el suelo (protección del medio ambiente). Limpie el cortasetos inmediatamente después de que se haya derramado combustible.
  • Page 41: Puesta En Funcionamiento De La Máquina

    PUESTA EN FUNCIONAMIENTO DE LA MÁQUINA Aléjese un mínimo de 3 metros del lugar de repostaje. Ponga el cortasetos sobre un lugar despejado del terreno asegurándose de que la herramienta de corte no esté en contacto con el suelo ni otros objetos. Arranque del motor en frío: (Cuando el motor esté...
  • Page 42: Parada De La Máquina

    PARADA DE LA MÁQUINA 1. Deje completamente libre la palanca de la mariposa de gases. 2. Empuje el Interruptor I-O (1) hasta la posición “O”, las revoluciones del motor estarán bajas y el motor se parará. OPERACIÓN DE LA MÁQUINA Nunca ponga en funcionamiento con un asidero flojo.
  • Page 43: Cambio De Anglo Del Mango Trasero

    CAMBIO DE ANGLO DEL MANGO TRASERO Para permitir la operación vertical del equipo, el ánglo del mango trasero está diseñado para ser cambiado. Cómo cambiar el ánglo Retorne la palanca del regulador y haga girar el mango trasero, tirando la aguja de retén de rotación.
  • Page 44: Instrucciones De Mantenimiento

    INSTRUCCIONES DE MANTENIMIENTO Pare el motor y desconecte los capuchones de las bujías al reemplazar o afilar las herramientas de corte, y también al limpiar el cortador o el dispositivo de corte, o al realizar cualquier mantenimiento. Nunca enderece o suelde una cuchilla de corte dañada. Inspeccione las cuchillas de corte con el motor puesto en marcha en intervalos cortos y regulares por daños.
  • Page 45 Comprobación de las bujías - 8 horas diarias Utilice solamente la llave universal suministrada para quitar o poner las bujías. La separación entre los dos electrodos de las bujías deberá ser de entre 0,6 y 0,7 mm. Si la separación es demasiado grande o pequeña, ajústela. Si las bujías están obstruidas con carbonilla o están sucias, límpielas minuciosamente o reemplácelas.
  • Page 46: Almacenaje

    ALMACENAJE Cuando guarde la máquina durante mucho tiempo, vacíe el combustible del tanque de combustible y del carburador de la forma siguiente: Vacíe todo el combustible del tanque de combustible. Quite las bujías y ponga unas pocas gotas de aceite en el orificio de cada Quita bujía.
  • Page 47 MEMO...
  • Page 48 DOLMAR POWER PRODUCTS PO Box 5007 Alpharetta GA 30005-5007 6019520601 10.08...

Table des Matières