Publicité

Les langues disponibles
  • FR

Les langues disponibles

Liens rapides

Novomatic 403

Publicité

Table des Matières
loading

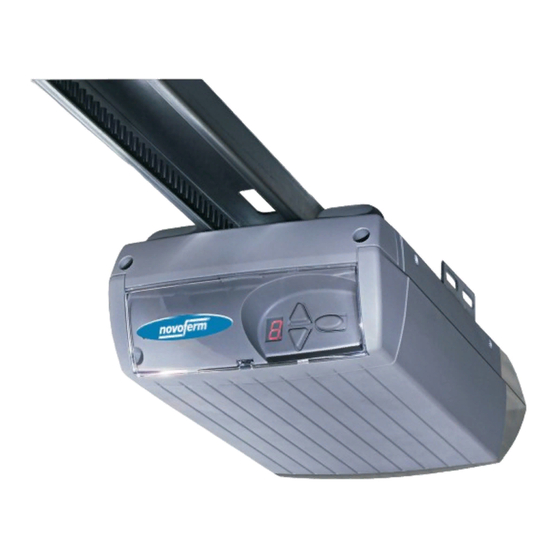
Sommaire des Matières pour Novoferm Novomatic 403

  • Page 1 Novomatic 403...
  • Page 3 max. 45°...
  • Page 4 Y-OB 2 x 1,0 AWG 22 AWG 22 AWG 22 AWG 22 24V- E43U WE GN BN 24V- 1 2 3 4 5 6 7 LS 2 LS 2 LS 2 LS 2 LS 2 230V~...
  • Page 5 A a C B D 3 sec. F< 400N...
  • Page 6: Allgemeine Informationen

    Ausführung des Produktes entspricht dem • Wartung/ Überprüfung heutigen Stand der Technik. • Technische Daten • Fehlersuchanleitung Das Produkt ist bei bestimmungsgemäßer Typ: Novomatic 403, 403 Verwendung betriebssicher. Dennoch bleibt ein Steuerung: FUTURE III • Diagnoseanzeige Restrisiko bestehen! Zugkraft Fn: 165N •...
  • Page 7: Impulsgeber Und Externe Sicherheitseinrichtungen

    • Montageanleitung Befestigung Laufschiene / Antriebskopf gezogenem Zugknopf in die Arretierposition (b) zu Laufschiene (wie im Bild dargestellt) mit Ketten- stecken. Bitte vor der Montage sorgfältig lesen! ritzel (2) auf die Antriebswelle (1a) stecken und mit Zum Wiederverriegeln Arretierstift in die linke Montage nur durch entsprechend qualifizierte den 4 Blechschrauben 8 x 16 verschrauben.
  • Page 8: Programmieren Des Antriebes

    • Programmieren des Achtung! Eine zu hoch eingestellte Kraft kann zu Menüschritt 3: Einstellung Tor- Auf- rletzungen von Personen führen.Verletzungen von Antriebes Position Personen führen. Halten Sie die Taste für 3 Sekunden gedrückt. Werkseitige Einstellung ist Wert 4! Bedienelemente Ziffer 3 erscheint auf der Anzeige 8a. Die Bedienelemente zum Programmieren des Kurz warten bis Ziffer 3 blinkt.
  • Page 9: Wartung/Überprüfung

    • Bedienungsanleitung Um den Zählerstand auszulesen, halten Sie die • Externe Sicherheitseinrichtungen Taste für 3 Sekunden gedrückt bis eine Ziffer er- Diese Betriebsanleitung beschreibt den sicheren Anschlussplan Bild 13 scheint. Die Ziffernanzeige gibt die Zahlenwerte und sachgerechten Umgang mit dem Produkt. Die beginnend von der höchsten Dezimalstelle bis zur angegebenen Sicherheitshinweise und Anwei- Schlupftürkontakt (STOP A)
  • Page 10 • Fehlersuchanleitung Wichtiger Hinweis: Bei Arbeiten am Antrieb ist unbedingt vorher der Netzstecker zu ziehen!!! Störung Mögliche Ursachen Abhilfe Tor schließt / öffnet nicht vollständig. Tormechanik hat sich verändert. Tor überprüfen lassen. Schließ- / Öffnungskraft zu schwach eingestellt. Krafteinstellung durchführen (Menüschritte 5 und 6). Endposition nicht richtig eingestellt.
  • Page 11: General Information

    - Spare parts Technical Data - Changes to the product Hazards that may emanate from the product Operator type: Novomatic 403 - Dismantling The product has been subjected to a risk assess- Control: FUTURE III - Disposal ment.
  • Page 12: Installation Instructions

    The enclosed door connector attachment is direction during the closing cycle. plugs prior to use to ensure that these are suitable for suitable for all Novoferm up-and-over doors and Connection for 2-wire photocell EXTRA 626 13d the strctural conditions on site.
  • Page 13: Special Settings

    Programming the operator end-of-travel position Checking the force limit facility Keep button pressed for 5 seconds. Number 3 - Place an obstruction (e. g. operator’s cardboard Control elements appears in the display 14 a.. box) underneath the doors’s closing edge. Wait a short while until the 3 starts flashing.
  • Page 14: Maintenance / Checks

    Operating Instructions An interruption of the light barrier causes a stopping and a reversal during the closing cycle. An These Operating Instructions describe how to use interruption of the light barrier during the opening the prodct properly and safely. The safety advice and cycle makes no difference.
  • Page 15: Diagnostic Display

    Trouble-shooting Important note: When working on the operator, always pull out the mains plug beforehand!!! Fault/Malfunction Possible cause Remedy Door does not fully close/open Door mechanics have changed Have door checked. Change force setting (menu stages 5 and 6) Set closing/opening force too weak. Reset end-of-travel positions (menu stages 3 End-of-travel positions incorrectly set and 4)
  • Page 16: Motorisation De Porte De Garage

    Entrée STOP B : cat. 2 / Plv = Cs d’origine du fabricant. Les contrefaçons ou les pièces de rechange défectueuses Fabricant: Novoferm tormatic GmbH peuvent entraîner des dommages, des Oberste-Wilms-Str. 15a dysfonctionnements ou une défaillance D-44309 Dortmund totale du produit.
  • Page 17 Noti e de ose ont g d a e e l c n o e e j a o s l d onct on d l p rte Veuillez lire attentivement cette notice a ant p si on de lo a e b) o ti b c g ( .
  • Page 18: Programmation De La Motorisation

    • Programmation de la Après le réglage, appuyer sur la touche . Le motorisation chiffre 0 apparaît sur l'afficheur. Contrôler ensuite les efforts programmés et le cas Éléments de commande échéant répéter les réglages. Les éléments de commande servant à L'effort au niveau du profilé...
  • Page 19: Entretien / Contrôle

    Si la porte rencontre un obstacle pendant • Compteur de cycles • Notice d’utilisation l'ouverture, la motorisation s'arrête et le sens de Le compteur de cycles enregistre le nombre Dla présente notice d’utilisation décrit le marche s'inverse pendant environ 1 seconde. d'ouvertures/fermetures effectuées par la maniement sûr et correct du produit.
  • Page 20: Affichage De Diagnostic

    Mode de reconnaissance des anomalies Remarque importante: débrancher impérativement le courant avant de procéder à toute operation sur la motorisation! Anomalie Causes possibles Remède La porte ne s’ouvre ou ne se ferme pas Le mécanisme de porte s’est modifié. Faire contrôler la porte. entièrement.
  • Page 21: Informaciones Generales

    - Lista de comprobación de la instalación defectuoso o fallo total del producto. de la puerta Fabricante: Novoferm tormatic GmbH - Comprobación de la instalación de la puerta Oberste-Wilms-Str. 15a - Explicación de los símbolos-Certificados • Modificaciones y reformas en el producto D-44309 Dortmund de comprobación y mantenimiento de...
  • Page 22 Instrucciones de montaje Fijación carril guía / cabezal del Desbloquear el patín de arrastre Leer atentamente antes del montaje! automatismo Para los trabajos adicionales, desbloquear en su El montaje debe ser ejecutado únicamente por Enchufar el carril guía (según la figura) con el caso la conexión entre la puerta y el automatismo instaladores cualificados.
  • Page 23: Ajustes Especiales

    Paso de menú 2: Programar la función de durante 3 segundos hasta que aparezca el número Transmisores de impulso y dispositivos de luz para el emisor manual 3. A continuación, accione 2 veces la tecla protección externos Accione la tecla hasta que aparezca el número 5.
  • Page 24 Paso 8 del menú: Adaptación de la puerta Pulse la tecla Aparece la cifra 8 en el indicador. de cierre, la puerta sólo se abre una rendija para Las pilas usadas son residuos especiales! Para lograr el óptimo desarrollo del movimiento y el liberar el obstáculo, pero impedir a pesar de ello la cumplimiento de las fuerzas, se debe seleccionar el •...
  • Page 25: Normas De Garantía

    Instrucciones para la localización de fallos Nota importante: Antes de realizar cualquier trabajo en el automatismo, se tiene que separar siempre el enchufe de la red !!! Fallo Posibles causas Correción La puerto no se cierra / abre por El mecanismo de la puerta se ha modificado. Hacer comprobar la puerta.
  • Page 26: Algemene Informatie

    • Gevaren die van het product kunnen uitgaan • Handleiding voor de bediening • Technische gegevens Voor het product wordt een analyse van de risico’s Type: Novomatic 403 uitgevoerd. De hierop gebaseerde constructie en • Onderhoud en controle Controle: FUTURE III uitvoering van het product komt overeen met de •...
  • Page 27 aandrijfas (1a) en schroef de looprail vast met de vergrendelen: plaats de arreteerstift weer in de Montagehandleiding plaatschroeven 8 x 16. linker parkeerpositie (a) en verbind deur en Voor de montage a.u.b. zorgvuldig lezen! aandrijving met elkaar. Loopwagen haakt bij de Met de montage mag uitsluitend gekwalificeerd Montage van de deurconsole volgende beweging automatisch weer in.
  • Page 28 Stekker van de aandrijving in het stopcontact eventueel opnieuw instellen. • Programmeren van de steken en toets ingedrukt houden.: De kracht aan de hoofdsluitkant mag de maximale aandrijving waarde van 150 N niet overschrijden! Menuoptie 3: Instellen van de positie Deur LET OP! Een te hoog ingestelde kracht betekent Bedieningselementen gevaar voor verwondingen.
  • Page 29 een obstakel stoot, zal de aandrijving stoppen en gecontroleerd. De installatie van de Belangrijke aanwijzing: de bewegingsrichting gedurende ca. één seconde krachtbegrenzing moet bij die gelegenheid worden In de fabriek is deze waarde ingesteld op 4. Deze worden omgekeerd. gecontroleerd (afbeelding 21)! waarde mag uitsluitend worden veranderd met LET OP! Een te hoog ingestelde uitdrukkelijke toestemming van de fabrikant van de...
  • Page 30: Opsporen Van Storingen

    Opsporen van storingen Belangrijke aanwijzing: bij werkzaamheden aan de aandrijving dient steeds eerst de stekker uit het stopcontact te worden getrokken! Storing Eventuele oorzaak Verhelpen Deur sluit / opent niet volledig. Het mechanisme van de deur is veranderd. Deur laten controleren. Sluit- / openingskracht te zwak ingesteld.

Table des Matières