Masquer les pouces Voir aussi pour Tectalk Float:

Publicité

Les langues disponibles
  • FR

Les langues disponibles

Liens rapides

Tectalk Float
Bedienungsanleitung
Deutsch / English / Français / Espanol / Italiano

Publicité

Table des Matières
loading

Sommaire des Matières pour Albrecht Tectalk Float

  • Page 1 Tectalk Float Bedienungsanleitung Deutsch / English / Français / Espanol / Italiano...
  • Page 2: Table Des Matières

    Inhalt Sicherheitshinweise ................3 Lieferumfang ..................4 Installation ................... 5 Bedienelemente und Anzeigen ............6 LC-Display ................... 7 Bedienung ................... 8 Zusätzliche Funktionen ................ 9 Fehlerbehebung ................13 Gewährleistungs- und Recyclinginformationen ........15 Technische Daten ................16 Deutsch...
  • Page 3: Sicherheitshinweise

    • Schalten Sie Ihr Funkgerät IMMER aus, wenn Hinweise die Verwendung von Sprechfunk oder Mobiltelefonen beschränken. • Benutzen Sie NUR von ALBRECHT zugelassene Akkus mit dem mitgelieferten Ladegerät. • VERMEIDEN Sie das Aufladen Ihres Funkgeräts oder Akkus, während es nass ist.
  • Page 4: Lieferumfang

    Lieferumfang • Tectalk Float Funkgerät mit Antenne • Li-Ionen-Akku • Tischladeschale • Netzteil • Gürtelclip • Adapter für ALBRECHT Headsets Deutsch...
  • Page 5: Installation

    Installation Gürtelclip abnehmen a. Ziehen Sie den Verschluss des Gürtelclips vom Gerät weg. b. Während des Ziehens des Verschlusses drücken Sie den Gürtelclip nach oben, wie in Abbildung 1 gezeigt. Abbildung 2 Abbildung 1 Montage des Gürtelclips a. Schieben Sie den Gürtelclip in den Schacht, wie in Abbildung 2 gezeigt.
  • Page 6: Bedienelemente Und Anzeigen

    Bedienelemente und Anzeigen 1. Hochleistungsantenne 2. Gürtelclip 3. Batteriefach 4. PTT (Sprechtaste) 5. Display-Beleuchtung/Monitor 6. Headset-Anschluss 7. Tastensperre 8. Kanal aufwärts 9. Kanal abwärts 10. Integriertes Mikrofon 11. Beleuchtetes LC-Display 12. Ein/Aus 13. Rufton 14. Lautstärke aufwärts 15. Lautstärke abwärts 16.
  • Page 7: Lc-Display

    LC-Display A. Schlüsselsymbol – leuchtet bei aktivierter Tastensperre. B. TX – leuchtet im Sendemodus. C. RX – leuchtet im Empfangsmodus. D. DW – Dual Watch-Funktion (Zweikanalüberwachung) E. Scan-Symbol – Kanal- oder CTCSS-Code-Suchlauf F. LO – niedrige Sendeleistung G. Tastenton-Symbol H. VOX-Symbol (Sprachsteuerung) CTCSS-Code (1-38) J.
  • Page 8: Bedienung

    Bedienung Ein- und Ausschalten 1. Zum Einschalten des Geräts halten Sie ON-OFF gedrückt, im LC-Display werden die Kanalnummer und der CTCSS-Code angezeigt. 2. Zum Ausschalten des Geräts halten Sie erneut ON-OFF gedrückt. Bedienungshinweise Funkgerät Das Gerät hat 8 Hauptkanäle und 38 CTCSS-Codes für jeden Kanal. Sie können mit anderen Funkgeräten kommunizieren, die den gleichen Hauptkanal und CTCSS-Code verwenden.
  • Page 9: Zusätzliche Funktionen

    Kanalwahl Drücken Sie CH UP oder CH DOWN zur Wahl des gewünschten Kanals (1-8). Standardmäßig ist Kanal 1 und der CTCSS-Code 00 (=aus) eingestellt. Vor der Wahl eines Kanals zur Kommunikation hören Sie stets hinein und vergewissern Sie sich, dass er nicht bereits belegt ist. Vermeiden Sie die Wahl eines belegten Kanals, wenn das Gerät Signale von unbekannten Dritten empfängt.
  • Page 10 Drücken Sie CH UP oder CH DOWN zur Auswahl der gewünschten Einstellung für den gewählten Menüpunkt. Halten Sie CH UP oder CH DOWN gedrückt, so wird die Auswahl schneller durchlaufen. Zur Bestätigung der Auswahl und zum Verlassen des Menümodus drücken Sie LOCK bzw. MENU, um zur nächsten Funktion zu navigieren.
  • Page 11 Kanal-Scan Die Richtung des Scans bestimmen Sie mit CH UP oder CH DOWN. Drücken Sie die PTT-Taste oder LOCK während des Scans, so wird der Scan automatisch unterbrochen und das Funkgerät stellt sich auf den zuletzt verwendeten Kanal ein. Bei aktivierter SCAN-Funktion blinken im LC-Display SC und die Kanalnummer.
  • Page 12 Roger Beep einstellen Der Roger Beep ist ein Signalton, der am Ende jeder Übertragung nach dem Loslassen der PTT-Taste gesendet wird. Dies zeigt jedem empfangenden Gerät an, dass Ihre Übertragung beendet ist. Bei Aktivierung des Roger Beeps wird das Tonsymbol im LC-Display angezeigt.
  • Page 13: Fehlerbehebung

    Monitor Halten Sie MONITOR für etwa 4 Sekunden gedrückt, um die Rauschsperre des Empfängers zu deaktivieren. Drücken Sie MONITOR erneut, um die Rauschsperre wieder einzuschalten. Möchten Sie nur vorübergehend nach schwachen Signalen suchen, so halten Sie MONITOR für 2 Sekunden gedrückt. Sie hören nun die Nebengeräusche und schwache Signale.
  • Page 14: Elektroschrottgesetz Und Recycling

    Gebäuden und Fahrzeugen die Reichweite erheblich einschränken können. Tragen Sie das Funkgerät dicht am Körper, beispielsweise in der Tasche oder am Gürtel, so beeinträchtigt dies ebenfalls die Reichweiche; tragen Sie das Funkgerät auf andere Weise. Verzerrter Ton. • Sprechen Sie während der Übertragung normal, 5 bis 8 cm vom Mikrofon entfernt.
  • Page 15: Gewährleistungs- Und Recyclinginformationen

    Gewährleistungs- und Recyclinginformationen Wir sind verpflichtet, jedem Gerät Informationen über die Entsorgung, über die gesetzlichen Gewährleistungsbestimmungen und die EG Konformitätserklärungen mit Hinweisen über das Benutzen der Geräte in den verschiedenen Ländern beizufügen. Sie finden daher diese Informationen im folgenden Text. Gesetzliche Gewährleistung von 2 Jahren nach Kaufdatum Der Verkäufer dieses Geräts gewährt Ihnen eine gesetzliche Gewährleistung von zwei Jahren nach Kaufdatum des Geräts.
  • Page 16: Technische Daten

    Technische Daten Allgemein Frequenzbereich 446,00625~446,09375 MHz Frequenztoleranz 2,5 PPM (bei 25 °C) Betriebstemperatur 0 °C to +55 °C Antenne Integralantenne Mikrofon Integriertes Elektretmikrofon Anzeige Lautsprecher 1 Watt, 8 Ω Spannungsversorgung Li-Ionen-Akku 3,7 V, 950 mAh Maße 135 mm x 62 mm x 37 mm (ohne Antenne u.
  • Page 17 Tectalk Float Manual English...
  • Page 18 Content Caution ....................19 Scope of Delivery ................20 Installation ..................21 Controls and Indicators ..............22 LC Display ..................23 Operation ..................24 Additional Functions ................25 Troubleshooting ................. 29 Warranty and Recycling Information ..........31 Technical Specifications ..............32 English...
  • Page 19: Caution

    ALWAYS switch off your radio where notices restrict the use of two- way radio or mobile telephones. ALWAYS replace the accessory jack cover when the jack is not in use. ONLY use ALBRECHT approved rechargeable batteries with the supplied charger. AVOID charging your radio or battery pack while is it wet.
  • Page 20: Scope Of Delivery

    Scope of Delivery • Tectalk Float Radio with Antenna • Li-Ion battery pack • Desktop charger • Power adaptor • Belt Clip • Adapter for ALBRECHT headsets English...
  • Page 21: Installation

    Installation Removing the belt clip a. Pull the belt clip latch away from the unit b. While pulling the belt clip latch, push up the belt clip as shown in Figure 1 Installing the belt clip Figure1 Figure2 a. Slide the belt clip into the slot as shown in Figure 2 b.
  • Page 22: Controls And Indicators

    Controls and Indicators 1. High efficiency antenna 2. Belt Clip 3. Battery door 4. PTT (Push-To-Talk) button 5. Lamp/Monitor button 6. External earset-microphone jack 7. Key Lock button 8. Channel UP button 9. Channel DOWN button 10. Built-in Microphone 11. Backlighted LC Display 12.
  • Page 23: Lc Display

    LC Display A. Keypad LOCK icon - is lighted when buttons are locked. B. TX icon - is lighted on when the radio is in transmit mode. C. RX icon - is lighted on when the radio is in receive mode. D.
  • Page 24: Operation

    Operation Power ON-OFF 1. To turn on the unit, press and hold the ON-OFF button, the LC Display will show the channel number and the CTCSS code number. 2. To turn off the unit, press and hold again the ON-OFF button. Using the radio The unit has 8 main channels and 38 CTCSS codes for each channel.
  • Page 25: Additional Functions

    Channel Selection Press the CH UP or CH DOWN to select the desired channel (1-8). The factory default start up channel is channel 1 and sub-channel 00. Before selecting a channel for communication, always listen on it to ensure it is not already being used. Always avoid selecting a busy channel when the unit keeps on receiving signal from unknown parties.
  • Page 26 To confirm the selection and exit the Menu mode, press the LOCK button or MENU button to move to the next function. CTCSS Code Selection The radio has 38 CTCSS private codes available. Different CTCSS tones may be associated to different channels. Selecting a CTCSS code of 00 will disable the CTCSS feature.
  • Page 27 set the last used channel. When SCAN feature is on, the SC icon will appear on the LC Display and the Channel number is flashing. CTCSS tone Scanning This function allows CTCSS tone scanning on the selected channel. Select the desired channel number and activate the CTCSS tone scanning.
  • Page 28 This will prompt any receiving unit that your transmission has ended. When the Roger Beep tone is enabled, the tone icon appears on the LC Display. Keypad Program Tone Setting When a key is pressed, a beep tone is heard to confirm your command.
  • Page 29: Troubleshooting

    background noise and possible weak signal from the unit. Release MONITOR button within 2 seconds to return. Automatic Power Save The radio has an Automatic Power Save circuit designed to extend battery life. If it senses no signal within 10 seconds, it automatically switches to the Power Save mode.
  • Page 30 Sound Distortion problems. • If you are transmitting, speak in a normal tone of voice, 2 to 3 inches away from the microphone. • If you are receiving, lower the volume to a comfortable level. • Radios must be at least 5 feet apart, otherwise you have to increase the distance between the radios •...
  • Page 31: Warranty And Recycling Information

    Warranty and Recycling Information We are legally obliged to include disposal and warranty information as well as EU declaration of conformity with the use instructions in different countries for every unit. Please find this information on the following pages. 2-Year warranty from date of purchase The manufacturer/retailer guarantees this product for two years from date of purchase.
  • Page 32: Technical Specifications

    Technical Specifications General Frequency Range 446,00625~446,09375 MHz Frequency Tolerance 2,5 PPM (bei 25 °C) Operation Temperature 0 °C to +55 °C Antenna Integral Antenna Microphone Integral Built-in Electret type Display Liquid Crystal Display Speaker 1 Watt, 8 Ω Power Source Rechargeable Li-ion Battery pack 3.7V 950mAh Dimensions...
  • Page 33 Tectalk Float Guide d'utilisateur Français...
  • Page 34 Sommaire Attention .................... 35 Contenu de la boîte ................36 Installation ..................37 Éléments de commande et indicateurs ..........38 Écran LCD ..................39 Instructions d'utilisation ..............40 Fonctions supplémentaires ..............41 Guide de dépannage ................. 45 Information importante ............... 47 Déchets d'Equipements Electriques et Electroniques (DEEE) et recyclage ...................
  • Page 35: Attention

    Attention IMPORTANT - LISEZ TOUTES LES INSTRUCTIONS attentivement et complètement avant d'utiliser votre émetteur / récepteur radio et conservez-les pour référence ultérieure. NE BRANCHEZ JAMAIS votre émetteur / récepteur radio à une source d'alimentation autre que la pile qui vous est fournie. Vous risquez sinon de l'endommager.
  • Page 36: Contenu De La Boîte

    à -20 °C ou supérieure à +60 °C. Consultez les informations par pays rapportées sur l'emballage et publiées sur notre serveur Internet service.alan-electronics.de. Contenu de la boîte • Émetteur / récepteur radio Tectalk Float avec antenne • Pile au lithium ionique • Chargeur de bureau •...
  • Page 37: Installation

    Installation Retrait de la pince pour ceinture a. Libérez la patte de fixation de la pince sur l'appareil. b. Maintenez la patte en position ouverte et dégagez la pince de son logement (voir la figure 1). Figure 2 Figure 1 Installation de la pince pour ceinture a.
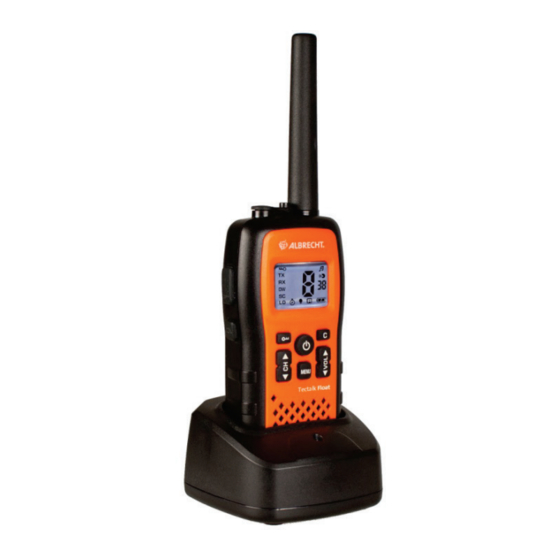
  • Page 38: Éléments De Commande Et Indicateurs

    Éléments de commande et indicateurs 1. Puissante antenne 2. Pince pour ceinture 3. Couvercle d'accès aux piles 4. Bouton PTT (Push-To-Talk, appuyez pour parler) 5. Touche Lampe/moniteur 6. Entrée pour un microphone-casque externe 7. Bouton de verrouillage 8. Touche canal + 9.
  • Page 39: Écran Lcd

    Écran LCD A. Icône de verrouillage des touches - cette icône s'allume lorsque vous verrouillez l'accès aux touches. B. Icône TX - cette icône s'allume lorsque l'émetteur / récepteur radio fonctionne en mode transmission. C. Icône RX - cette icône s'allume lorsque l'émetteur / récepteur radio fonctionne en mode réception.
  • Page 40: Instructions D'utilisation

    Instructions d'utilisation Mise en route - arrêt 1. Pour allumer votre appareil, appuyez sur la touche de ON-OFF et maintenez-la enfoncée. Le numéro du canal actuel et le code CTCSS apparaissent sur l'écran LCD. 2. Pour l'éteindre, réappuyez sur la touche de ON-OFF. Utilisation de l'émetteur/récepteur radio Votre émetteur / récepteur fonctionne sur 8 canaux principaux, avec 38 codes CTCSS par canal.
  • Page 41: Fonctions Supplémentaires

    Changement de canal Vous sélectionnez un canal (1-8) à l'aide des touches CH UP et CH DOWN. Par défaut, votre émetteur / récepteur radio utilise le canal 1 et le sous-canal 00. Avant de choisir un canal de communication, mettez-vous en écoute sur ce canal pour vérifier qu'il n'est pas déjà...
  • Page 42 Pour chaque fonction du menu, vous sélectionnez une autre valeur à l'aide des touches CH UP et CH DOWN. Pour accélérer le défilement des valeurs possibles, maintenez la touche CH UP ou CH DOWN enfoncée. Pour confirmer la nouvelle valeur et quitter le mode Menu, appuyez sur la touche LOCK.
  • Page 43 Réglage de la sensibilité de la commande vocale La sensibilité caractérise le seuil de puissance du signal détecté à partir duquel la transmission démarrera automatiquement. 5 seuils sont disponibles, avec le seuil 05 correspondant à la sensibilité la plus élevée. Balayage des canaux Appuyez sur la touche CH UP pour démarrer un balayage dans le sens croissant ou sur la toucheCH DOWN pour démarrer un balayage dans...
  • Page 44 Sélection de la sonnerie d'appel Vous pouvez choisir la sonnerie d'appel parmi les 5 qui sont fournies avec votre émetteur / récepteur radio. Appuyez sur la touche Call pour sélectionner la sonnerie d'appel. Bip de message bien reçu La fonction Bip de message bien reçu vous permet de conclure toutes vos émissions par un bip qui est envoyé...
  • Page 45: Guide De Dépannage

    Verrouillage des touches Pour verrouiller l'accès aux touches afin d'éviter de déclencher accidentellement l'une d'elles, appuyez sur la touche LOCK et maintenez-la enfoncée pendant environ 2 secondes. L'icône de cette fonction s'allume sur l'écran LCD. Vous n'avez alors plus accès qu'au bouton PTT et aux touches CALL et Monitor.
  • Page 46 Le signal est peut-être trop faible et / ou hors de portée. Si cela se produit, appuyez sur la touche MONITOR. Impossible de sélectionner un autre canal Pour sélectionner un autre canal, appuyez sur la touche MENU jusqu'à ce que le numéro de canal clignote sur l'écran LCD. Appuyez sur la touche CH UP ou DOWN pour choisir un autre canal.
  • Page 47: Information Importante

    Information importante Nous sommes légalement tenus d'inclure les dispositions et les informations de garantie et la déclaration de conformité de l'UE avec le mode d'emploi de chaque unité, et ce dans la langue de chaque pays. Veuillez trouvez ces informations dans les pages suivantes. Deux ans de garantie à...
  • Page 48: Spécifications Techniques

    Spécifications techniques Généralement Plage de fréquences 446,00625 à 446,09375 MHz Tolérance de fréquence 2,5 PPM (à 25°C) Températures de 0°C à +55°C fonctionnement Antenne Antenne intégrée Microphone Intégré, de type électret Affichage À crystaux liquides Haut-parleur 8 Ω, 1 watt Alimentation électrique Pile rechargeable au lithium ionique, 3,7 V 950 mAh...
  • Page 49 Tectalk Float Manual Español...
  • Page 50 Contenido Precaución ..................51 Pack de entrega ................52 Instalación ..................53 Controles e indicadores ..............54 Pantalla LC ..................55 Funcionamiento ................. 56 Funciones adicionales ............... 57 Problemas y soluciones ..............61 Información sobre la garantía y el reciclado ........63 WEEE y reciclaje ................
  • Page 51: Precaución

    Sustituya SIEMPRE la tapa de la cubierta la toma de accesorios cuando la toma no esté en uso. Utilice SÓLO baterías recargables aprobadas por ALBRECHT con el cargador incluido. EVITE cargar su radio o batería si están húmedas.
  • Page 52: Pack De Entrega

    Pack de entrega • Radio con antena Tectalk Float • Pack de batería de iones de litio • Cargador de escritorio • Adaptador de alimentación • Sujeción de cinturón • Adaptador para auriculares ALBRECHT Español...
  • Page 53: Instalación

    Instalación Retire el clip de sujeción a. Tire del cierre del clip de sujeción de la unidad. b. Mientras tira del cierre del clip de sujeción, empuje hacia arriba del clip de sujeción tal y como se muestra en la Figura 1. Figura 2 Figura 1 Instalación del clip de sujeción...
  • Page 54: Controles E Indicadores

    Controles e indicadores 1. Antena de alta eficiencia 2. Sujeción de cinturón 3. Tapa de la batería 4. Botón PTT (Pulsar para hablar) 5. Botón de Lámpara/Monitor 6. Toma de micrófono / auricular externo 7. Botón de bloqueo de teclas 8.
  • Page 55: Pantalla Lc

    Pantalla LC A. Icono de BLOQUEO de teclado – se ilumina cuando los botones están bloqueados. B. Icono TX - se ilumina cuando la radio está en modo transmisión. C. Icono RX - se ilumina cuando la radio está en modo recepción. D.
  • Page 56: Funcionamiento

    Funcionamiento ENCENDIDO - APAGADO 1. Para encender la unidad, pulse y mantenga pulsado el botón ON-OFF; la pantalla LCD mostrará el número de canal y el número de código CTCSS. 2. Para apagar la unidad, vuelva a pulsar y mantener pulsado el botón ON-OFF.
  • Page 57: Funciones Adicionales

    Selección de canales Pulse el botón CH UP o CH DOWN para seleccionar el canal que desee (1-8). El canal de inicio de fábrica por defecto es el canal 1 y el subcanal 00. Antes de seleccionar un canal para comunicarse, escuche siempre en él para asegurarse que no se está...
  • Page 58 Pulse los botones CH UP o CH DOWN para seleccionar la configuración que desee para el elemento de menú seleccionado. Si pulsa y mantiene pulsado los botones CH UP o CH DOWN, la selección se moverá más rápido. Para confirmar la selección y salir del modo menú, pulse el botón LOCK o el botón MENU para moverse a la siguiente función.
  • Page 59 Búsqueda de canales La dirección de la búsqueda puede determinarse pulsando los botones CH UP o CH DOWN. Si pulsa el botón PTT o LOCK durante la operación de BÚSQUEDA, la BÚSQUEDA se detendrá automáticamente y la radio se fijará en el último canal usado. Cuando la propiedad BÚSQUEDA está...
  • Page 60 Configuración de tono de llamada La radio está equipada con 5 melodías de tono de llamada seleccionables por el usuario. Pulse el botón Call para transmitir la melodía de tono de llamada. Configuración del tono de pitido Roger La radio está equipada con una propiedad de tono de pitido Roger seleccionable por el usuario, que le permite enviar un tono de pitido al final de cada transmisión cada vez que suelte el botón PTT.
  • Page 61: Problemas Y Soluciones

    Retroiluminación LCD Pulse brevemente el botón MONITOR para retroiluminar la pantalla LCD. Vuelva a pulsar este botón, para apagar la retroiluminación LCD. Función de monitor Pulse y mantenga pulsado el botón MONITOR durante aproximadamente 4 segundos para activar la función de monitor. Pulse el botón MONITOR una vez para volver.
  • Page 62 El alcance es limitado. La batería puede estar gastada. Cargue la batería si el indicador de nivel de batería está bajo. El alcance máximo variará dependiendo del terreno y el entorno. Los campos abiertos ofrecen un alcance máximo, mientras de que estructuras de acero / cemento, el follaje espeso y el uso en edificios y en vehículos puede limitar el alcance notablemente.
  • Page 63: Información Sobre La Garantía Y El Reciclado

    Información sobre la garantía y el reciclado Estamos obligados por la ley a incluir en cada unidad la información sobre la eliminación y la garantía del producto, así como la declaración de conformidad de la UE con las instrucciones de uso en los diferentes países.
  • Page 64: Especificaciones Técnicas

    Especificaciones Técnicas General Control de frecuencia Alcance de frecuencia 446.00625~446.09375 MHz Tolerancia de frecuencia 2.5PPM (a 25°C) Temperatura de 0°C a +55°C funcionamiento Antena Antena integral Micrófono Tipo Electret integrado Visualización Pantalla de cristal líquido Altavoz 1 Watt, 8Ω Alimentación Batería de iones de litio 3.7V 950mAh Dimensiones...
  • Page 65 Tectalk Float Manuale Italiano...
  • Page 66 Contenuto Cautela ....................67 Dotazione di consegna ..............68 Installazione ..................69 Comandi e indicatori ................70 Display LC ..................71 Funzionamento .................. 72 Funzioni supplementari..............73 Risoluzione dei problemi ..............77 Garanzia e informazioni sul riciclaggio ..........79 WEEE e riciclaggio ................79 Specifiche tecniche ................
  • Page 67: Cautela

    Inserire SEMPRE l'accessorio copripresa quando la presa non è in uso. Utilizzare SOLO batterie ricaricabili approvate da ALBRECHT con il caricabatterie in dotazione. EVITARE di caricare la vostra radio o la batteria mentre è bagnata. EVITARE di conservare o ricaricare la radio sotto luce diretta del sole.
  • Page 68: Dotazione Di Consegna

    Dotazione di consegna • Float Radio Tectalk con antenna • Batteria agli ioni di litio • Caricatore da tavolo • Alimentatore • Gancio per cintura • Adattatore per auricolari ALBRECHT Italiano...
  • Page 69: Installazione

    Installazione Rimozione del gancio per cintura a. Tirare la linguetta di blocco del gancio per cintura verso l'esterno. b. e contemporaneamente spingere il gancio verso l'alto, come mostrato nella figura 1. Figura 2 Figura 1 Installazione del gancio per cintura a.
  • Page 70: Comandi E Indicatori

    Comandi e indicatori 1. Antenna ad alta efficienza 2. Gancio per cintura 3. Coperchio del vano batterie 4. Tasto PTT (Push-To-Talk, Premi per parlare) 5. Tasto Luce/Monitor 6. Presa per microfono esterno 7. Tasto di blocco 8. Tasto Canale SU 9.
  • Page 71: Display Lc

    Display LC A. Icona lucchetto - è illuminata quando i tasti sono bloccati. B. Icona TX - è illuminata quando la radio è in modalità di trasmissione. C. Icona RX - è illuminata quando la radio è in modalità di ricezione.
  • Page 72: Funzionamento

    Funzionamento Accensione e spegnimento 1. Per accendere l'unità, premere e tenere premuto il tasto ON- OFF; il display LCD visualizzerà il numero del canale e il codice CTCSS. 2. Per spegnere l'unità, premere e tenere premuto di nuovo il tasto ON-OFF.
  • Page 73: Funzioni Supplementari

    Selezione del canale Premere i tasti CH UP o CH DOWN per selezionare il canale desiderato (1-8). Per impostazione predefinita da fabbrica, i valori iniziali sono canale 1 e sottocanale 00. Prima di selezionare un canale per la comunicazione, ascoltare sempre per accertarsi che non sia già...
  • Page 74 Premere il tasto CH UP o CH DOWN per scegliere l'impostazione desiderata per la voce di menu selezionata. Premendo e tenendo premuto il tasto CH UP o CH DOWN, la selezione scorrerà più rapidamente. Per confermare la selezione e uscire dalla modalità di menu, premere il tasto LOCK, oppure il tasto MENU per passare alla funzione successiva.
  • Page 75 Selezione del livello di sensibilità VOX La sensibilità, ovvero il livello della voce al quale il dispositivo comincerà a trasmettere, è regolabile in cinque passi. Il livello 05 VOX indica la sensibilità VOX massima. Scansione dei canali La direzione della scansione può essere determinata premendo uno dei tasti CH UP o CH DOWN.
  • Page 76 Impostazione del tono di chiamata La radio è dotata di 5 melodie selezionabili dall'utente per il tono di chiamata. Premere il tasto Call per trasmettere la melodia del tono di chiamata. Impostazione del tono Roger Beep La radio è dotata di una funzione di tono Roger Beep selezionabile dall'utente che consente di inviare un bip al termine di ogni trasmissione quando si rilascia il tasto PTT.
  • Page 77: Risoluzione Dei Problemi

    Retroilluminazione del display LCD Premere brevemente il tasto MONITOR per attivare la retroilluminazione del display LCD. Premerlo di nuovo per disattivare la retroilluminazione. Funzione di monitoraggio Premere e tenere premuto per circa 4 secondi il tasto MONITOR per attivare la funzione di monitoraggio. Premere il tasto MONITOR una volta per uscire.
  • Page 78 tasto DOWN per cambiare canale. La batteria potrebbe essere scarica. Il blocco del tastierino deve essere disattivato. La portata è limitata. La batteria potrebbe essere scarica. Caricare la batteria se l'indicatore del livello di carica è basso. La portata massima dipende dalle caratteristiche del terreno e dalle condizioni ambientali.
  • Page 79: Garanzia E Informazioni Sul Riciclaggio

    Garanzia e informazioni sul riciclaggio Siamo legalmente obbligati a includere le informazioni relative allo smaltimento e alla garanzia, nonché la dichiarazione di conformità UE con le istruzioni d'uso in paesi diversi per ogni unità. Queste informazioni sono riportate sulle pagine seguenti. 2 anni di garanzia dalla data di acquisto Il costruttore/rivenditore garantisce questo prodotto per due anni dalla data di acquisto.
  • Page 80: Specifiche Tecniche

    Specifiche tecniche Informazioni generali Controllo frequenza Tolleranza di frequenza 2,5 PPM (a 25°C) Gamma di frequenza 446,00625~446,09375 Temperatura operativa da 0°C a +55°C Antenna Antenna incorporata Microfono Microfono a elettrete integrato Visualizzazione Schermo a cristalli liquidi Altoparlante 1 Watt, 8 Ω Alimentazione Batteria ricaricabile agli ioni di litio da 3,7 V 950 mAh...
  • Page 81 Channel Frequencies Frequency Frequency Channel Channel (MHz) (MHz) 446.00625 446.05625 446.01875 446.06875 446.03125 446.08125 446.04375 446.09375 CTCSS Frequencies Frequency Frequency Frequency CTCS CTCS CTCS (Hz) (Hz) (Hz) -Code -Code -Code 67,0 107,2 167,9 71,9 110,9 173,8 74,4 114,8 179,9 77,0 118,8 186,2 79,7...
  • Page 82: Declaration Of Conformity

    Declaration of Conformity Herewith we declare that our product: PMR 446 Transceiver “Tectalk Float” corresponds to our Technical Construction Files and Test Reports and is conform to all relevant essential requirements of the R&TTE-Directive 1999/5/EC, issued March 9, 1999. According to Annex III of the R&TTE Directive the following harmonized standards and essential radio test suites, published in the "Official Journal"...
  • Page 83 Notizen/Notes:...

Table des Matières