Honeywell RTH9585 Serie Guide De L'utilisateur
Table des Matières
Les langues disponibles
Les langues disponibles
Liens rapides
Wi-Fi Color
Touchscreen
Programmable
Thermostat
User Guide
Read and save these
instructions.
For help please visit
yourhome.honeywell.com
In the box you will find
• Thermostat
• Wallplate
• Screws and anchors
• Quick Start Guide
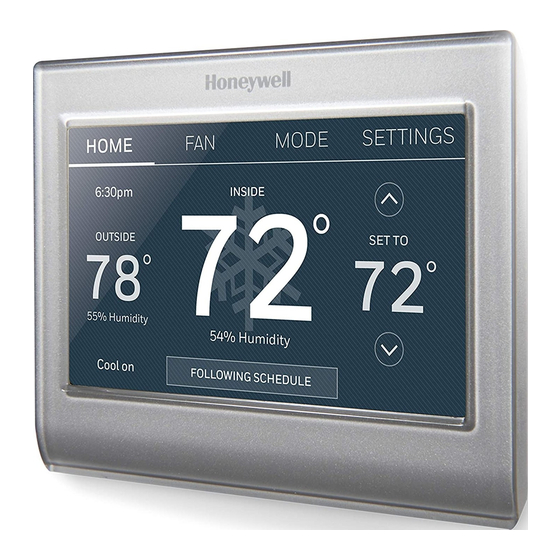
Features of your Wi-Fi thermostat
With your new thermostat, you can:
• Connect to the Internet to monitor and control your heating/cooling system.
• View and change your heating/cooling system settings.
• View and set temperature and schedules.
• Receive alerts via email and get automatic upgrades.
• View outdoor temperature and humidity (requires Wi-Fi set up and registration).
RTH9585
Wi-Fi Series
• Thermostat ID Card
• Wire labels
• User Guide
Chapitres
Table des Matières
Dépannage

Manuels Connexes pour Honeywell RTH9585 Serie


Sommaire des Matières pour Honeywell RTH9585 Serie
-
Page 39: Vous Trouverez Dans La Boîte
Guide de l’utilisateur Veuillez lire le mode d’emploi et le conserver en lieu sûr. Pour obtenir de l’aide veuillez visiter yourhome.honeywell.com Vous trouverez dans la boîte • Thermostat • Carte d’identification du thermostat • Plaque murale • Étiquettes de fils •... - Page 40 — vous pouvez rester connecté à votre service confort où que vous soyez. Le système Total Connect Comfort de Honeywell est la solution parfaite si vous voyagez fréquemment, possédez une maison de vacances ou une entreprise ou gérez un immeuble de placement, ou...
- Page 41 Table des matières À propos du nouveau thermostat Réglage des événements personnalisés : commerciale ......20 Référence rapide : utilisation résidentielle ..1 Réglage du programme des Référence rapide : utilisation commerciale ..2 jours fériés : commerciale ......21 Installation Lancement du mode Occupé...
-
Page 42: Référence Rapide : Utilisation Commerciale
Référence rapide : utilisation commerciale VENTILATEUR. MODE. Sélectionnez Sélectionnez le mode le mode du du ventilateur. système (chauffage, refroidissement, ACCUEIL. Touchez automatique,chauffage pour afficher l’écran d’urgence). Accueil. Heure actuelles. RÉGLAGES. Touchez pour afficher les Conditions options. Commencez extérieures. La ici pour configurer un température et programme. -
Page 43: Installation De Votre Thermostat
Installation de votre thermostat Vous aurez besoin des outils suivants pour l’installation de ce thermostat : • Un tournevis cruciforme n° 2 (3/16 po pour une cloison sèche, 7/32 po pour du plâtre) (optionnels) • Un stylo • Un marteau (optionnel) •... - Page 44 Installation de votre thermostat 3 Étiquetez les fils. Utilisez les étiquettes Étiquette autocollantes fournies pour autocollante étiqueter chaque fil lorsque vous le déconnectez. Étiquetez les fils conformément aux désignations de bornes de l’ancien thermostat Étiquettes et non pas en fonction des vierges couleurs des fils.
- Page 45 Installation de votre thermostat Important! Ce thermostat nécessite un câble C (neutre) pour l’alimentation. Le câble C, ou neutre, alimente le thermostat en 24 VCA. Si vous remplacez un thermostat existant, celui-ci pourrait ne pas être relié à un câble C. Plusieurs anciens thermostats mécaniques ou à...
- Page 46 Installation de votre thermostat Important! Câblage (système conventionnel - suite) Cochez la case pour chaque fil que vous connecter. c Dans l’image à droite, cochez la case Vous aurez besoin de cette à côté de chaque connexion. Vous information à l’étape 9. utiliserez cette liste de vérification à...
-
Page 47: Câblage Alternatif (Système Conventionnel)
Installation de votre thermostat Important! Câblage (système à thermopompe - suite) Cochez la case pour chaque fil que vous connecter. c Dans l’image à droite, cochez la case Vous aurez besoin de cette à côté de chaque connexion. Vous information à l’étape 9. utiliserez cette liste de vérification à... -
Page 48: Câblage Alternatif (Système À Thermopompe)
Si votre ancien thermostat a des câbles O et B séparés et qu’il contrôle un espace doté d’un système à pompe thermique, connectez le câble B au câble C. Si plus d’un thermostat régule le système, contactez le service de zonage d’Honeywell au 1 800 828-8367 pour obtenir de l’aide concernant le câblage. - Page 49 Installation de votre thermostat 8 Mettez le système de chauffage/ refroidissement en marche. Important! 8a Vérifiez que le fil C est branché sur le thermostat et sur le système de chauffage/ refroidissement. 8b Assurez-vous que la porte du système de chauffage/ Boîte des Interrupteur refroidissement est bien fermée.
-
Page 50: Connexion À Votre Réseau Wi-Fi
Installation de votre thermostat 9e Sélectionnez votre type de système et touchez Suivant. Le type de système détermine d’autres sélections pour terminer la configuration initiale. Utilisez la liste de vérification de l’étape 6A-d pour faire les sélections. Suivant 9f Touchez après avoir effectué... - Page 51 Connexion à votre réseau Wi-Fi 2b En utilisant le clavier, touchez les caractères pour saisir le mot de passe de votre réseau résidentiel. 2c Touchez Terminé. Le thermostat affiche “Connexion au réseau en cours. Veuillez patienter...” puis affiche l’écran “Connexion réussie”. Terminé...
-
Page 52: Déconnexion Du Réseau Wi-Fi
Déconnexion du réseau Wi-Fi 1 Touchez RÉGLAGES. RÉGLAGES Configuration Wi-Fi. 2 Sélectionnez Con guration Wi-Fi Déconnecter du réseau. Ce 3 Touchez thermostat affiche une question pour confirmer votre sélection. 4 Touchez pour confirmer que vous souhaitez vous déconnecter du réseau. Le thermostat affiche l’écran de configuration Wi-Fi. -
Page 53: Enregistrement De Votre Thermostat En Ligne
Enregistrement de votre thermostat en ligne Pour visualiser et régler votre thermostat Wi-Fi à distance, vous devez posséder un compte Total Connect Comfort. Voici comment procéder. 1 Ouvrez le site web Total Connect Comfort. Allez à mytotalconnectcomfort.com Visionnez la vidéo d’enregistrement du thermostat Wi-Fi à... - Page 54 Tarjeta de identificación del termostato l’écran. Après avoir ajouté inscribir este producto en mytotalconnectcomfort.com l’emplacement de votre ® U.S. Registered Trademark. © 2012 Honeywell International Inc. thermostat, vous devez entrer 69-2723EFS—01 M.S. 04-12 69-2723EFS-01 Printed in U.S.A. les identifiants uniques de votre...
-
Page 55: Réglage De L'heure/La Date
Réglage de l’heure/la date 1 Touchez l’heure courante. L’écran affiche Régler l’heure/Régler la date. 6:30 pm Régler l’heure Régler la 2 Touchez date. 3 Touchez jusqu’à ce que l’heure/la date adéquates s’affichent. Terminé 4 Touchez pour enregistrer ou Annuler pour ignorer les changements. Remarque : Ce thermostat se mettra à... -
Page 56: Réglage Du Mode Du Système
Réglage du mode du système MODE 1 Touchez pour afficher les réglages du MODE système. 2 Touchez l’option désirée : Terminé Chauffage : Le thermostat commande uniquement le système de chauffage. Refroidissement : Le thermostat commande uniquement le système de refroidissement. -
Page 57: Réglage Des Horaires De Programmation
Réglage des horaires de programmation 1 Touchez RÉGLAGES. RÉGLAGES Créer/Modifier l’horaire. 2 Sélectionnez Afficher/Modifier • Touchez pour voir le programme complet et faire un Créer / Modif ier I horaire réglage rapide. Aidez-moi • Touchez pour créer un programme en répondant à de simples questions. -
Page 58: Dérogation Aux Programmes : Résidentielle
Dérogation aux programmes : utilisation résidentielle 1 Touchez pour régler la température (côté droit de l’écran) et la durée Maintien jusqu’à. Le programme reprend lorsque la durée Maintien jusqu’à a expiré. PERMANENT Permanent 2 Sélectionnez pour maintenir la même température jusqu’à la prochaine modification ou jusqu’à... -
Page 59: Affichage Du Statut De L'équipement
Affichage du statut de l’équipement 1 Touchez RÉGLAGES. RÉGLAGES État du matriel. 2 Sélectionnez 3 Touchez pour afficher le statut de tout l’équipement contrôlé par le thermostat. En fonction de l’installation du thermostat, l’écran de statut de l’équipement peut indiquer les données relatives aux systèmes suivants : État du matériel •... -
Page 60: Réglage Des Programmes Vacances/Jours Fériés : Commerciale
Réglage des programmes vacances/jours fériés : utilisation commerciale Cette fonction permet de conserver de l’énergie RÉGLAGES lorsque personne ne se trouve sur le lieu de travail durant les jours fériés et les événements spéciaux. Ges onnaire des jours fériés / événements 1 Touchez RÉGLAGES. -
Page 61: Réglage Du Programme Des Jours Fériés : Commerciale
Réglage des événements personnalisés : utilisation commerciale Date spécifique Mois/ 6 Sélectionnez Jour de la semaine. Date spécifique, vous êtes • Pour invité à sélectionner la date de début, les réglages, la date de fin et la fréquence de l’événement. Suivant Mois/Jour de la semaine, vous... -
Page 62: Lancement Du Mode Occupé : Commerciale
Réglage du programme des jours fériés : utilisation commerciale Cette fonction vous permet de personnaliser RÉGLAGES les réglages de température à maintenir à partir de maintenant jusqu’à une date spécifiée. Le Mode Jours fériés thermostat reprend le programme normal à la date sélectionnée. -
Page 63: Personnalisation De La Couleur De L'écran
Personnalisation de la couleur de l’écran Vous pouvez personnaliser l’affichage de votre RÉGLAGES thermostat pour l’assortir à votre décor. 1 Touchez RÉGLAGES. Thémes de couleurs Thèmes de couleurs. 2 Touchez 3 Sélectionnez le nom d’une couleur à utiliser comme arrière-plan prédéfini, ou sélectionnez Personnaliser pour définir votre propre couleur d’arrière-plan et de police. -
Page 64: Nettoyage De L'écran Du Thermostat
Nettoyage de l’écran du thermostat Lorsque vous sélectionnez l’option de RÉGLAGES nettoyage de l’écran, l’écran se verrouille pour que les réglages ne soient pas Ne oyer I écran modifiés accidentellement durant le nettoyage. 1 Touchez RÉGLAGES. Nettoyer l’écran. Une 2 Sélectionnez invite vous demande si vous souhaitez nettoyer l’écran pendant 30 secondes. -
Page 65: Mises À Jour Logicielles
Les mises à jour ont lieu tôt le matin. Une fois votre thermostat mis à jour, il est relancé et affiche brièvement le logo Honeywell. L’écran affiche “Mise à jour logicielle...” avec une barre de progression verte. Une fois la mise à jour terminée, votre écran d’accueil s’affiche comme d’habitude... -
Page 66: Balayage Avant Occupation
Balayage avant occupation Cette fonction pour utilisation commerciale active le ventilateur de 1 heure à 3 heures avant chaque période occupée pour fournir un environnement de travail confortable à l’arrivée. Protection du compresseur Le thermostat maintient le compresseur arrêté pendant quelques minutes avant un redémarrage, pour éviter d’endommager l’équipement. -
Page 67: Réglage Des Préférences Avancées
Réglage des préférences avancées Vous pouvez modifier des options pour plusieurs RÉGLAGES fonctions du système. Bien que de nombreuses options, telles que la langue et les réglages Préférences d’indication de température, soient les mêmes pour toutes les configurations, d’autres dépendent du type de système utilisé. -
Page 68: Modification De La Configuration Du Système
Réglage des préférences avancées Options de préférences avancées (fin) Titre de l’écran Réglages et options (Les options varient en fonction de la configuration.) Sélectionnez la durée de maintien de la température durant une Durée de la dérogation dérogation : 1-10 heures ou pas de limite. Sélectionnez Non pour lancer la récupération à... - Page 69 Modification de la configuration du système Remarque : Touchez le bouton Aide orange sur n’importe quel écran pour obtenir plus d’informations. Options de configuration du système (RÉGLAGES > Configuration du système) Titre de l’écran Réglages et options (Les options varient en fonction de la configuration.) Langue English/Français/Español.
-
Page 70: Foire Aux Questions
Foire aux questions Q Mon thermostat fonctionnera-t-il toujours si je perds ma connexion Wi-Fi? : R Oui, le thermostat actionnera votre système de chauffage et/ou de refroidissement avec ou sans Wi-Fi. Q Comment puis-je trouver le mot de passe de mon routeur? : R Contactez le fabriquant du routeur ou vérifiez la documentation du routeur. -
Page 71: Obtenir De L'aide Et Répondre Aux Alertes
Obtenir de l’aide et répondre aux alertes Votre thermostat offre deux types d’assistance. Si ces options d’assistance ne répondent pas à vos questions, consultez la foire aux questions (page Aide 30) et les conseils de dépannage (page 32). Aide sur écran La plupart des écrans comprennent un bouton Aide orange. -
Page 72: Dépannage
Dépannage En cas de difficultés avec le thermostat, essayez les suggestions suivantes. La plupart des problèmes peuvent être réglés rapidement et facilement. Rien n’apparaît • Vérifiez le disjoncteur et réinitialisez-le si nécessaire. à l’écran • Assurez-vous que l’interrupteur de marche-arrêt du système de chauffage et de refroidissement est sur marche. -
Page 73: Glossaire
Glossaire Fil C Le fil “C”, ou neutre, amène l’alimentation 24 V c.a. au thermostat à partir du système de chauffage/refroidissement. Certains thermostats mécaniques ou à pile peuvent ne pas être dotés de ce fil. Il est nécessaire à l’établissement d’une connexion Wi-Fi à votre réseau domestique. Système de chauffage/refroidissement à... -
Page 74: Garantie Limitée
(i) renvoyez-le avec la facture ou une autre preuve d’achat date au lieu d’achat; ou (ii) appelez le service à la clientèle de Honeywell en composant le 1-855-733-5465. Le service à la clientèle déterminera si le produit doit être retourné à l’adresse suivante : Honeywell Return Goods, Dock 4MN10-3860, 1885 Douglas Dr. N., Golden Valley, MN 55422, ou si un produit de remplacement peut vous être expédié. - Page 75 69-2715EF—07...
- Page 76 ® Marque de commerce déposée américaine. Apple, iPhone, iPad, iPod touch et iTunes sont des marques de commerce de Apple Inc. Toutes les autres marques de commerce sont propriété de leurs propriétaires respectifs. © 2017 Honeywell International Inc. 33-00269EF—01 M.S. 03-17 Imprimé aux États-Unis...