ITATOOLS ITA22 Notice D'instructions
MANUALE D'USO – DISTINTA RICAMBI
OPERATION MANUAL – SPARE PARTS LIST
NOTICE D'INSTRUCTIONS – PIECES DE RECHANGE
BETRIEBSANLEITUNG – ERSATZTEILLISTE
MANUAL DE USO – LISTA DE RECAMBIOS
ITA22
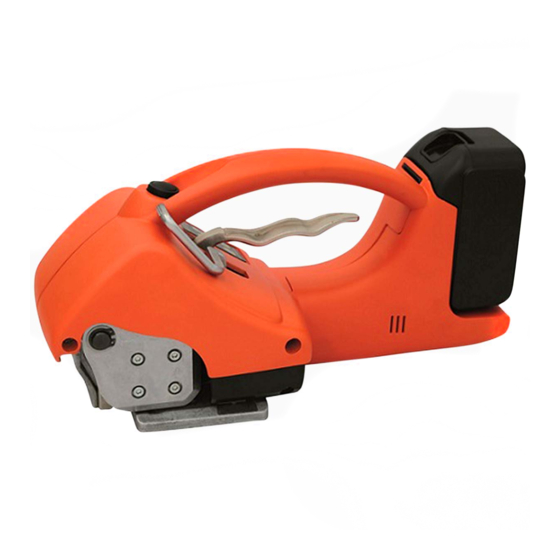
REGGIATRICE A BATTERIA PER REGGIA IN PLASTICA
BATTERY POWERED PLASTIC STRAPPING TOOL
APPAREIL DE CERCLAGE À BATTERIE POUR FEUILLARD EN PLASTIQUE
AKKU KUNSTSTOFFBAND UMREIFUNGSGERÄT
FLEJADORA CON BATERÍA PARA FLEJE DE PLÁSTICO
ITATOOLS s.r.l.
Via per Caronno 23 - 21040 Origgio (VA) - ITALY
Tel. +39.02.96450619 Fax +39.02.9659747
info@itatools.it
-
www.itatools.com
LEGGERE LE ISTRUZIONI PRIMA DI UTILIZZARE L'APPARECCHIO
READ ALL INSTRUCTIONS BEFORE OPERATING THE TOOL
AVANT D'UTILISER L'APPAREIL LIRE LA NOTICE D'INSTRUCTIONS
VOR DER INBETRIEBNAHME DES GERÄTES DIE BEDIENUNGSANLEITUNG LESEN
LEA LAS INSTRUCCIONES ANTES DE UTILIZAR EL APARATO
Ed. 06-17

Manuels Connexes pour ITATOOLS ITA22


Sommaire des Matières pour ITATOOLS ITA22
- Page 1 OPERATION MANUAL – SPARE PARTS LIST NOTICE D’INSTRUCTIONS – PIECES DE RECHANGE BETRIEBSANLEITUNG – ERSATZTEILLISTE MANUAL DE USO – LISTA DE RECAMBIOS ITA22 REGGIATRICE A BATTERIA PER REGGIA IN PLASTICA BATTERY POWERED PLASTIC STRAPPING TOOL APPAREIL DE CERCLAGE À BATTERIE POUR FEUILLARD EN PLASTIQUE AKKU KUNSTSTOFFBAND UMREIFUNGSGERÄT...
- Page 3 INDICE TABLE OF CONTENTS TABLE DES MATIERES 1) Istruzioni di sicurezza 1) Safety instructions 1) Normes de sécurité 2) Dati tecnici 2) Technical data 2) Données techniques 3) Garanzia e responsabilità 3) Warranty and liability 3) Garantie et responsab. 4) Installazione-accessori 4) Installation-accessories 4) Installation-accessories 5) Descrizione e regolazioni...
- Page 4 tension and/or strap breakage that could lead to package fall and to violent movement of the strap against the operator. It is recommended to use edge protectors if package has sharp corners, to place the strap correctly around a properly positioned package, to remain in safety position (on one side of strap) during strapping cycle, to use the correct strap quality, width, thickness, and strength as recommended in this manual.
- Page 5 1.1 INFORMAZIONI RELATIVE ALLO SMALTIMENTO / DISPOSAL INFORMATION / INFORMATION SUR L'ÉLIMINATION / ENTSORGUNG / INDICACIONES ECOLOGICAS : Per lo smaltimento dell’apparecchio rispettare le normative locali vigenti, separare le parti elettriche dalle parti meccaniche in modo che possano essere smaltite separatamente. Per lo smaltimento delle batterie e del caricabatteria rispettare le normative vigenti di riciclaggio ecologico.
- Page 6 Verwendung ungeeignet machen El período de la garantía de cada aparato y cargador de batteria Itatools es de 12 meses a partir de la fecha de envío indicada en el documento de acompañamiento. La empresa Itatools srl se compromete, durante el período de garantía, a sustituir sin costo alguno todas las partes que a su entero juicio presenten defectos que afecten su correcto funcionamiento.
- Page 7 Itatools SRL todos los órdenes de su batería durante un período de 60 días a partir de la fecha de envío el documento. Itatools se compromete a sustituir a su discreción la batería de forma gratuita sólo en el caso en el que hay por defecto de fabricación que lo hacen inadecuado para su uso...
- Page 8 Do not transport or store the battery with metal objects, also to avoid short circuits. Do not try to charge with different chargers than Itatools original, the battery could be seriously damaged. Check the contacts before use.
-
Page 9: I - Istruzioni Di Sicurezza
Die Batterie muss gesammelt, verwertet oder entsorgt werden, eine umweltfreundliche Art und Weise. Detektiv oder toten Batterien müssen recycelt werden accordino zu den nationalen / lokalen Richtlinien. TECHNISCHE DATEN : Li-Ion (Lithium-Ionen) 14.4V – 3.0 Ah Gewicht: 450 gr. Cod. : B800509 Time tarifering 30 min. -
Page 10: Charging Process
CHARGING PROCESS: The fast charging operation is indicated by the continuous charge indicator of battery green. The battery can be taken out and used at any time. Note: The charging operation is possible only when the temperature of the rechargeable battery is located within the range of allowable charging temperature. -
Page 11: Segnalazioni Luminose
podría ocasionar daños irreparables en el circuito electrónico. No invierta la polaridad cuando se utiliza o recarga. Antes de usar, compruebe que los contactos están limpios, intactos y no hay batería en los objetos de metal. NO DEJE EN CARGA DE LA BATERÍA SIN SUPERVISIÓN. - Page 12 GANCIO SOSPENSIONE / SUSPENSION HOOK / CROCHET DE LEVAGE/ AUFZUGHAKEN / GANCHO PARA ESLINGA : La macchina può essere equipaggiata con un gancio di sospensione a due posizioni (verticale op. orizzontale). Il gancio deve essere fissato al tendireggia tramite due viti (comprese nella fornitura) come illustrato in figura sotto. Il codice di ordinazione è...
- Page 13 ELEMENTI PRINCIPALI E REGOLAZIONI / OPERATING ELEMENTS AND ADJUSTMENTS / MODULES PRINCIPAUX ET RÉGLAGES / WICHTIGE HINWEISE UND EINSTELLUNGEN / ELEMENTOS PRINCIPALES Y AJUSTES NON AZIONARE MAI L’APPARECCHIO SENZA REGGIA, SI PUO’ DANNEGGIARE IL RULLO ED IL DISPOSITIVO DI SALDATURA / TAGLIO GB - DO NOT OPERATE THE TOOL WITHOUT STRAP, YOU COULD DAMAGE THE FEEDWHEEL AND THE WELDING / CUTTING GROUP...
- Page 14 Programmazione (fig.A) / Programming (pic.A) / Programmation (image A) / Programmieren (bild A) / Programación (fig.A) : Per poter effettuare ogni tipo di regolazione (saldatura/taglio e tensionamento) occore innanzitutto che la macchina sia accesa, dopodichè premere contemporaneamente i tasti S+ (Saldatura) e T+ (Tensionamento) per circa 10 sec. come illustrato in figura A,all’attivazione della procedura di programmazione il led illuminato indica il valore della saldatura,per passare al tensionamento basterà...
- Page 15 ( A ) ( B ) TASTI REGOLAZIONE SALDATURA WELDING ADJUSTMENT BUTTONS TOUCHES DE RÉGLAGE SOUDURE TASTE ZUM EINSTELLEN DER SCHWEIßZEIT TECLAS DE AJUSTE DE LA SOLDADURA ( C ) TASTI REGOLAZIONE TENSIONAMENTO TENSIONING ADJUSTMENT BUTTONS TOUCHES DE RÉGLAGE TENSION TASTE ZUM EINSTELLEN DER BANDSPANNKRAFT TECLAS DE AJUSTE DEL TENSADO Regolazione grani area saldatura / Adjusting welding area / Ajustement du secteur de soudure / Einstellen der...
- Page 16 (fig.F8) GB - The tool model ITA22 is designed to strap packages with plastic strap. The strap is fed around the package manually and inserted in the tool, as shown in the instructions, tensioned, cutted and friction-welded by the tool.
- Page 17 Sicherheitsknopfes.Den Akku dann nach oben herausziehen. (Bild F8). El aparato modelo ITA22 ha sido concebido para envolver embalajes con flejes de plástico. El fleje debe enrollarse en el embalaje manualmente y a continuación, introducirse, conforme a las instrucciones, en el aparato que lo tensa, lo corta y lo suelda por vibración.
- Page 18 ( F5 ) ( F6 ) ( F7 ) ( F8 ) Controllo della saldatura (fig.G) / Seal check (pic.G) / Contrôle de la soudure (fig.G) / Schweißkontrolle (bild G) / Control de la soldadura (Fig.G) Un controllo regolare della qualità della saldatura è fondamentale e può essere eseguito visivamente: GB - A regular control of the seal quality is very important and can be easily made as follows: Un contrôle régulier de la qualité...
- Page 19 ( G3 ) NO – resistenza sigillatura dubbia NO – seal strength affected NON – soudure douteuse NEIN- Schweißzeit zu lang NO – resistencia de sellado dudosa MANUTENZIONE E PULIZIA / SERVICING - CLEANING / ENTRETIEN ET NETTOYAGE / WARTUNG UND REINIGEN / MANTENIMIENTO Y LIMPIEZA PRIMA DI QUALUNQUE INTERVENTO SULL’APPARECCHIO TOGLIERE LA BATTERIA DALLA MACCHINA Pulire periodicamente l’apparecchio dai residui di reggia, in particolare il rullo di tensionamento, le piastrine dentate del gruppo saldatura e trazione e la cesoia, utilizzando esclusivamente aria compressa...
- Page 20 ( H1 ) ( H2 ) ( H3 ) Sostituzione piedino saldante oscillante / Welding foot replacement / Remplacement de pied de soudure / Austausch des Schwinger-Schweißplätchen / Sustitución de la plaquita de soldadura oscilante Per la sostituzione del piedino saldante oscillante proseguire come segue: Togliere il carter di copertura svitando la vite di fissaggio (fig.L1),rimuovere il perno piede oscillante (fig.L2), togliere il piede con l’aiuto di una pinza e sostituirlo (fig.L3).
- Page 21 Remplacer ou nettoyer le rouleau de tension seulement après avoir enlevée la batterie, retirer le circlip B600159 et l’èpaisseur B600112 (Fig.M1). Devisser les 4 vis à tete cilindrique B500035 (Fig.M2), retirer le couvercle avec un tournevis à tête plate entre celui-ci et le châssis (Fig.M3) et en suite faire sortir le rouleaulogé...
- Page 22 RISOLUZIONE PROBLEMI / TROUBLESHOOTING / SOLUTION DES PROBLEMS / PROBLEMLÖSUNGEN / LOCALIZACIÓN DE AVERÍAS PROBLEMA / TROUBLE / PROBLEMES / PROBLEM / PROBLEMA SOLUZIONE / REMEDY / SOLUTION / LÖSUNG / SOLUCIÓN Inserendo la batteria e premendo il pulsante di tensionamento l’apparecchio non si attiva / After fitting the battery and pushing the tension button the tool doesn’t work / Après avoir inséré...
- Page 23 l’appareil et à l’application de cerclage.Faire attention que l’emballage n’aille pas de bords tranchants. D Eigestellter Spannwertr zu groß. Überprüfen ob das zu benutzende Kunststoffband den eigenschaften des einzusetzenden Gerätes oder Anwendung passt. E Ajuste el valor de tensión; puede resultar excesivo. Revise que las características del fleje se correspondan con las del aparato y la aplicación.
- Page 24 des Kunststoffbandes nicht ausreichend; Obere Kunststoffband wird nicht richtig abgeschnitten oder ist unregelmäßig auch wenn man die Zeit einstellt / Sellado del fleje insuficiente; corte del fleje superior incompleto; corte del fleje superior inconstante incluso tras el ajuste del tiempo I Verificare e regolare il tempo di sigillatura in base al tipo di reggia utilizzato - aumentare il tempo Verificare se sono usurate o danneggiate la cesoia e/o il piedino di saldatura —...
- Page 25 D Prüfen ob micro-switch für Schweißvorgang nicht beschädigt oder nicht angeschlossen ist oder wird nicht vom Nocken aktiviert. E Controle que el microinterruptor de arranque de la soldadura no esté dañado o desconectado, o si no es activado por la leva. Dopo la sigillatura non è...
- Page 26 battery / Impossible de recharger la batterie avec le chargeur de batterie / Akku läßt sich nicht mit dem Ladegerät laden / No es posible recargar la batería en el cargador I La batteria è danneggiata: non riutilizzare ---- La batteria è andata sotto il limite di scarica (10.8V) controllare con tester;Verificare il funzionamento del caricabatteria GB The battery is damaged- do not use.
- Page 27 ESPLOSI-RICAMBI / LAYOUT-SPARE PARTS LIST / LISTE DES PIECES /ZEICHNUNGEN - RSATZTEILE DIAGRAMAS - RECAMBIOS Ed. 06-17 Q.TA' DESCRIZIONE CODICE ITEM DESCRIPTION Q.TY GR.MOTORE TRAZIONE TIPO LT A000007 LT TENSION MOTOR GROUP ASS.MOTORE SALDATURA CONCEPT A000238 WELDING MOTOR ASSEMBLED ASSIEME TELAIO A002000 MAIN FRAME ASSEMBLED ASSIEME BIELLA...
- Page 28 Q.TA' DESCRIZIONE CODICE ITEM DESCRIPTION Q.TY TASTO AZIONAMENTO ITA 22 B800537 ITA 22TENSION BUTTON KIT CAVI POTENZA B800538 POWER CABLES KIT SCHEDA POTENZA ITA 22 B800539 ITA 22 POWER CARD SCHEDA TASTIERA ITA 22 B800540 ELECTRONIC SIGNAL CARD PERNO PIEDINO SALDATURA D000010 PERNO INGRANAGGIO D000170...
- Page 30 NOTE...
- Page 32 EN60745-1, EN60745-2-18, EN55014-1, EN55014-2, EN61000-3-2, EN61000-3-3 Batteries certificate to UN38.3 standard - Air Transportation Safety F - ITATOOLS Srl déclare sous sa propre responsabilité que l'appareil ITA 22 est conforme à la Directive 2006/42/CE, ainsi qu’aux Normes EN12100-2010, EN60745-1, EN60745-2-18, EN55014- 1, EN55014-2, EN61000-3-2, EN61000-3-3 Batteries certificate to UN38.3 standard - Air Transportation Safety...