Publicité
Liens rapides
Installation and Setup Guide / Guide d'installation et de configuration
GENERAL INFORMATION
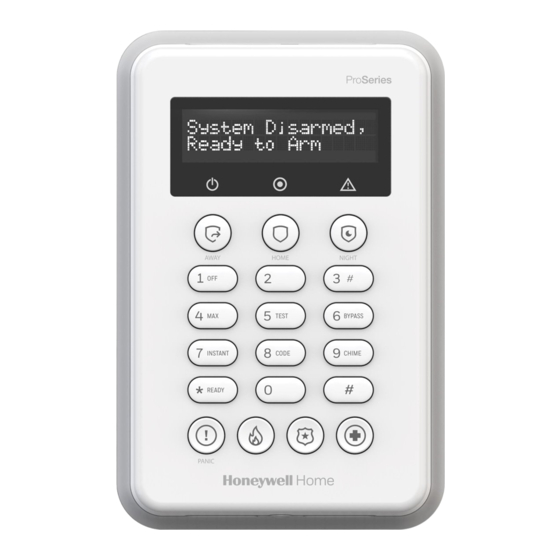
The PROSIXLCDKP is a wireless alpha keypad that is used in conjunction with the
PROA7PLUS, and PROH8PLUS Control Panels. Up to eight (8) Keypads can be used
on the system.
KEY FUNCTIONS
DISARM KEY
ARMING KEY
(NO DELAY)
ADDING SECURITY
CODES
CHECKING ZONES
PANIC
FIRE
DISPLAY WINDOW
System Disarmed:
Ready to Arm
OPERATING THE KEYPAD
For operating instructions, refer the Control Panel User Guide.
LEDs / DEL
Off / Arrêt
POWER /
ALIMENTATION
Not Ready to Arm / Pas
STATUS / ÉTAT
prêt à armer
TROUBLE /
Programming mode /
ANOMALIE
Mode de programmation
REMOVE CASE BACK AND INSTALL THE BATTERY
1.
Remove the cover securing screw at the bottom of the keypad and pull up to remove
case back.
2.
Plug battery connector into the receptacle as shown, and snap the battery pack in place.
Remove Case Back /Retirez l'arrière du boîtier
SET
SCREW
WALL
1
PWR. ADAPTER /
WALL
DEPUIS ALIM.
PLATE
ADAPTATEUR
MOUNTING
SCREWS
(3-TYP)
9V
GND/TERRE
TAMPER
SCREW
KEYPAD MOUNTING
The keypads can be surface mounted directly to a wall or desk mounted.
Wall Mounting
1.
With the case back removed, and battery pack installed, route the 2 wires from the
external power supply plug through the opening in the wall mount.
2.
Mount the wall mount, using the screws provided. Insert the tamper screw as shown.
3.
Connect the 2 wires to the touchpad terminal block. Observe polarity. See Wiring Table.
4.
Align the case with the cleats and snap into place and secure with bottom screw.
Desk Mounting with Optional Desk Stand
1.
After installing battery pack, plug in the barrel connector from the power supply.
Snap case back onto desk mount and secure with bottom screw.
2.
NOTES:
• Wiring to the DC power supply must not exceed 75 feet using 16-gauge wire. If the DC voltage
drops below 8.38Vdc an "AC LOSS" "Keypad # x 80x" message will be displayed and reported,
(if enabled).
• Do not connect the transformer to a receptacle that is controlled by a switch.
The Green AC LED on the keypad will stay lit solid if primary power is present. If primary power
•
is lost, the Green AC LED will blink and the Amber Trouble LED will blink.
DISPLAY WINDOW
ARMING KEYS
AWAY
HOME
NIGHT
1
2
3
#
OFF
TESTING THE SYSTEM
4
5
6
MAX
TEST
BYPASS
BYPASSING ZONES
7
8
9
CODE
CHIME
CHIME MODE
#
READY
0
QUICK ARMING
MEDICAL/PERSONAL
POLICE
QS-005-V0
QS-007-V0
Red / Rouge
Low Battery (no AC) /
Batterie faible (pas
CA)
Armed / Armé
System Trouble /
Anomalie de système
Install Battery / Installez la batterie
QS-030-V0
Wall Mount / Montage mural
FROM
2
ENGAGE
TOP
CLEATS
Wiring Table
Distance from Power Supply
Up to 19 ft (5.8m) / Jusqu'à 19 pieds (5.8m)
Up to 30 ft (9m) / Jusqu'à 30 pieds (9m)
Up to 51 ft (15.5m) / Jusqu'à 51 pieds (15.5m)
Up to 75 ft (23m) / Jusqu'à 75 pieds (23m)
PROSIXLCDKP Series / Série PROSIXLCDKP
RENSEIGNEMENTS GÉNÉRAUX
Le PROSIXLCDKP est un clavier alpha sans fil utilisé conjointement avec les
panneaux de contrôle PROA7PLUS et PROH8PLUS.
charge jusqu'à huit (8) keypads.
TOUCHE DÉSARMEMENT
TOUCHES ARMEMENT
AJOUT DE CODES
UTILISATION DU KEYPAD
Pour les directives d'utilisation, consultez le guide de l'utilisateur du panneau.
Amber / Ambre
Green / Vert
AC / CA
Ready to Arm /
Prêt à armer
RETIREZ L'ARRIÈRE DU BOÎTIER ET INSTALLEZ LA BATTERIE
1. Retirez la vis de fixation du couvercle au bas du clavier et tirez vers le haut pour retirer le
boîtier.
2.
Branchez le connecteur de la batterie dans le réceptacle, comme illustré, puis encliquetez
le bloc-batterie.
Attach Desk Stand (Optional) / Installation du support de table (facult)
BATTERY
PACK/
BATTERIE
QS-029-V0
3
A f t e r
1 M in
2 = L C D
B a c k
li g h t
1
OF F
2
SE LE CT
3
4
SC RO
MA X
LL
5
TE ST
6
7
BY PA
INS TA
SS
NT
8
CO DE
9
CH IM
RE AD
E
Y
0
SNAP INTO PLACE
QS-027-V0
MONTAGE DU KEYPAD
Les claviers peuvent être montés en surface directement sur un mur ou sur un bureau.
Support mural
1.
Alors que l'arrière du boîtier est retiré et le bloc-batterie installé, faites passer les 2 fils depuis la
prise du bloc d'alimentation externe par l'ouverture au dos du boîtier.
2.
À l'aide des vis fournies, montez l'arrière du boîtier à un mur. Insérez la vis antisabotage,
comme illustré.
3.
Raccordez les 2 fils au bornier du touchpad. Respectez la polarité. Voir Tableau de câblage..
4.
Alignez le boîtier sur les cales supérieures et enclenchez-le.
Installation sur table avec support facultatif
1. Après avoir installé les piles, attachez le clavier à son dos et fixez-le avec la vis inférieure.
2. Remettez le boîtier en place sur le support de bureau.
Tableau de câblage
/
Wire size @ 1.0A /
Taille de câble @ 1.0A
#22 wire / cable
#20 wire / cable
#18 wire /cable
#16 wire / cable
NOTES:
Le câblage du source de courant CC ne doit pas dépasser 75 pieds avec un fil de calibre 16. Si
•
la tension CC chute en dessous de 8,38 Vcc, un message «PERTE AC», «Clavier n ° x 80x»,
s'affiche, s'il est activé.
Ne connectez pas le transformateur à une prise contrôlée par un interrupteur
•
Le voyant vert AC du clavier reste allumé en permanence si l'alimentation principale est
•
présente. En cas de perte d'alimentation primaire, le voyant vert AC clignote et le voyant de
problème Ambre clignote..
Wireless Keypad/ Clavier sans fil
Le système peut prendre en
FONCTIONS PRINCIPALES
AWAY
HOME
NIGHT
1
2
3
#
OFF
(SANS DELAI)
4
5
6
MAX
TEST
BYPASS
7
8
9
CODE
CHIME
DE SÉCURITÉ
0
#
READY
VÉRIFICATION
DE ZONES
PANIC
INCENDIE
FENÊTRE D'AFFICHAGE
Système désarmé:
Prêt à armer
QS-007-FC-V0
Flashing Green /
Flashing Amber /
Vert lignotant
Ambre clignotant
On Battery – Normal (no
AC) / Sur batterie –
normal (pas CA)
Device Trouble /
Appareil de
périphérique
Attach Desk Stand (Optional) / Installation du
support de table (facult)
ENGAGE TOP CLEATS
SECURE
WITH
SET
SCREW
FENÊTRE
D'AFFICHAGE
TOUCHES ARMEMENT
TEST DU SYSTÈME
ZONES DE
CONTOURNEMENT
MODE CARILLON
ARMEMENT RAPIDE
MEDICAL/PERSONAL
POLICE
QS-005-FC-V0
Flashing Red /
Rouge clignotant
Low Battery (no AC) /
Batterie faible
(pas CA)
Alarm/Alarm Memory /
Alarme/mémoire
d'alarme
SNAP
INTO
PLACE
Publicité

Manuels Connexes pour Honeywell Home PROSIXLCDKP Serie


Sommaire des Matières pour Honeywell Home PROSIXLCDKP Serie
- Page 1 PROSIXLCDKP Series / Série PROSIXLCDKP Wireless Keypad/ Clavier sans fil Installation and Setup Guide / Guide d’installation et de configuration GENERAL INFORMATION RENSEIGNEMENTS GÉNÉRAUX The PROSIXLCDKP is a wireless alpha keypad that is used in conjunction with the Le PROSIXLCDKP est un clavier alpha sans fil utilisé conjointement avec les panneaux de contrôle PROA7PLUS et PROH8PLUS.
- Page 2 Responsible Party / Issuer of Supplier’s Declaration of Conformity: Honeywell International, 2 Corporate Center Dr., Melville, NY 11747, Ph: 516-577-2000 Partie responsable / Émetteur de la déclaration de conformité du fournisseur : Honeywell International, 2 Corporate Center Drive., Melville, NY 11747, Tél. 516 577-2000.