Table des Matières
Publicité
Les langues disponibles
Les langues disponibles
Liens rapides
Publicité
Table des Matières

Manuels Connexes pour Chopin SDmatic

Sommaire des Matières pour Chopin SDmatic
- Page 1 SDmatic Mode d’emploi • User’s manual Modo de empleo 12/2016 20, avenue Marcellin Berthelot - Z.I. du Val de Seine 92396 Villeneuve La Garenne cedex - France Tél. : 33 (0)1 41 47 50 88 - Fax. : 33 (0)1 47 92 28 27...
-
Page 3: Table Des Matières
Pantalla táctil ........96 Description des menus du SDmatic ....17 Descripción de los menús del SDmatic . - Page 4 SDmatic 12/2016...
-
Page 5: Mode D'emploi
étant d’apporter une assistance pour l’utilisation du SDmatic. La copie de tout ou partie de ce manuel, pour une utilisation n’ayant pas de rapport direct avec l’exploitation de cet appareil, est rigoureusement interdite sans l’autorisation expresse de Tripette & Renaud Chopin. Mode d’emploi 12/2016... - Page 6 SDmatic Mode d’emploi 12/2016...
-
Page 7: Declaration De Conformite
CHOPIN TECHNOLOGIES – KPM Analytics Group - 20 avenue Marcellin Berthelot - 92396 Villeneuve-la-Garenne Cedex, France SAS au capital de 6 478 694 € - RCS Nanterre - Siret 403 156 441 00020 - APE 2651B - TVA FR 03 403 156 441 Mode d’emploi ... - Page 8 SDmatic Mode d’emploi 12/2016...
-
Page 9: Introduction
à mesurer la quantité d’iode absorbée par les granules d’amidon d’une solution régulée à 35°C. ■ Pour cela, le SDmatic va générer en fonction de la masse de la farine, une quantité proportionnelle d’iode, et ensuite mesurer son absorption par la farine afin d’en déterminer le taux... - Page 10 SDmatic ■ Déroulement d’un cycle de mesure A - Phase 0 : initialisation du cycle de mesure ; B - Dès que la résistance chauffante a amené la solution à bonne température (35°C) (phase 1), la sonde produit électrochimiquement de l’iode en fonction de la masse de farine introduite (Phase 2 et 3) ;...
-
Page 11: Caractéristiques Générales
SDmatic ■ Caractéristiques générales ❏ Alimentation : 110/230 Vca - 50 /60 Hz - 70 W ❏ Niveau de bruit : < 70 dB ❏ Dimensions : Largeur x Profondeur x Hauteur : 370 x 390 x 250 mm ❏ Poids net : 6 kg ■... -
Page 12: Installation Et Mise En Route
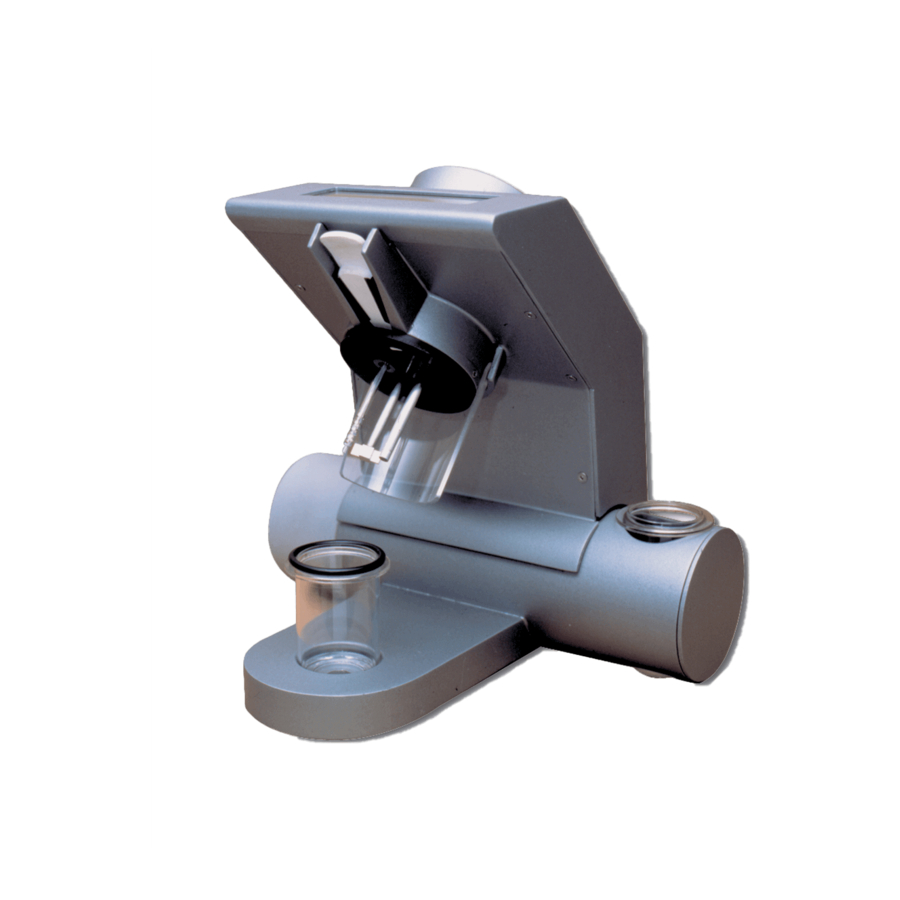
- un crayon pour écran tactile (3) avec un support-crayon ; - deux cuillères (4) ; - un récipient de nettoyage (5) situé sur le côté gauche du SDmatic ; - un cordon d’alimentation (6), - un flacon plastique (shaker) (7). - Page 13 SDmatic ■ Installation ❏ Poser le SDmatic sur une surface horizontale et stable. ❏ Eviter de placer le SDmatic derrière une vitre, surtout si celle-ci est exposée au soleil pendant plusieurs heures. ❏ Protecteur de la sonde A la livraison, la sonde de mesure est protégée par une protection plastique.
-
Page 14: Raccordement
SDmatic 2.2 Raccordement ■ Raccordement électrique ❏ Le SDmatic est un appareil électrique qui doit être relié à un réseau équipé d'une prise de Terre. Vérifier avant toute chose l'état de cette prise. ❏ De plus, le réseau électrique doit comporter en amont un disjoncteur DDR (Dispositif Différentiel Résiduel) de sensibilité... -
Page 15: Raccordement D'autres Appareils
SDmatic ■ Raccordement d’autres appareils Port RS232 Port parallèle Le SDmatic possède deux prises de connection à l’arrière. ■ Port parallèle Permet de raccorder une imprimante à tickets (24 colonnes). ■ Port RS232 Permet de modifier les calibrations utilisateurs via le programme SDMlink fourni avec l’appareil (voir... -
Page 16: Ecran Tactile
SDmatic 2.3 Ecran tactile L’écran tactile s’utilise à l’aide d’un crayon spécialement étudié pour ne pas altérer la surface. La navigation dans les menus de l’appareil se fait à l’aide d’icônes adaptées et suffisamment explicatives de la fonction qu’elles représentent. -
Page 17: Description Des Menus Du Sdmatic
SDmatic 2.4 Description des menus du SDmatic ■ Description du menu principal Le menu principal permet de choisir entre trois autres menus : ❏ le menu Test ; ❏ le menu Contrôle ; ❏ le menu Calibration. Menu Test Menu Contrôle... -
Page 18: Menu Calibration
SDmatic ■ Description du menu Contrôle Le menu contrôle permet de tester les fonctionnalités du SDmatic. ■ Menu Calibration Le menu calibration permet de régler différentes fonctionnalités du SDmatic. Mode d’emploi 12/2016... -
Page 19: Utilisation
- Test du SDmatic. 3.1 Préparation d’un essai ■ Préparation de la solution ❏ Préparer dans un flacon plastique (fourni avec le SDmatic) : - 120 ml d’eau distillée dosée précisément (± 0,1 ml) ; - 1,5 grammes d’acide citrique (C ) (±... - Page 20 SDmatic ❏ Mettre en place le bol de réaction dans le SDmatic et rabattre le bras. ❏ Afin d’accélérer le cycle de test, il est possible de préparer une solution de test dans le deuxième bol de réaction et de la mettre à...
- Page 21 ❏ Déposer l’échantillon sur la cuillère puis mettre la cuillère en place dans le SDmatic. Cette opération ne doit être effectuée que si le bol de réaction et la solution sont positionnés sur le SDmatic. Pesée de la farine Mise en place de la farine Note : Répartir la farine entre les marques de la cuillère (voir figure ci-...
-
Page 22: Réalisation D'un Essai
SDmatic 3.2 Réalisation d’un essai ■ Test du SDmatic ❏ Pour lancer un cycle de test, à partir du menu principal, appuyer sur l’icône de test (voir page 17). ❏ Ensuite appuyer sur "Farine". appuyer sur "Farine" ❏ Un écran numérique apparaît. Entrer la masse relevée lors de la pesée de la farine, à... - Page 23 SDmatic ❏ Appuyer sur l’icône de test pour lancer le cycle. appuyer sur Test Quitter Le test ne commence que si le bras du SDmatic est en position basse. Vérifier également la présence d’eau dans le bol. Note : Dans certains cas, l’écran suivant apparaît. Si l’eau est présente, appuyer sur "...
- Page 24 SDmatic ❏ Un nouvel écran apparaît. Sur cet écran est indiqué en temps réel : - un numéro de phase de l’essai, - un chronomètre, - l’intensité mesurée dans la solution par la sonde, - la température de la solution, - un indicateur de chauffe.
- Page 25 SDmatic ❏ Une fois le cycle de test terminé, le SDmatic émet trois "bips". L’écran des résultats apparaît. Le taux d’amidon endommagé est indiqué, ainsi que deux autres unités de calibration. Résultat en Résultat A UCDc (corrigé) Résultat en UCD % : 95.59%...
- Page 26 Il est possible d’imprimer les résultats en appuyant sur l’icône "Impression". Pour sortir de cet écran de résultat, appuyer sur l’icône "Quitter". ❏ Ecran de validation de sortie. En appuyant sur "OUI", le SDmatic revient au menu principal. Mode d’emploi 12/2016...
-
Page 27: Nettoyage Après Chaque Test
SDmatic 3.3 Nettoyage après chaque test ❏ Après chaque test, la sonde de mesure, l’agitateur et la résistance du SDmatic doivent être nettoyés afin que le test suivant ne soit pas affecté/pollué par des résidus de solution du test précédent. -
Page 28: Réglages De L'appareil
■ A partir du menu principal, il est possible de régler la date et L’APPAREIL l’heure du SDmatic ■ Choix formats et réglage date et heure ❏ Pour régler la date et l’heure du SDmatic, appuyer sur la date ou l’heure du menu principal. Date Heure ❏... - Page 29 - réglage de l’intensité du vibreur; - étalonnage utilisateur. ■ Choix de la langue ❏ Le SDmatic offre la possibilité de choisir entre 8 langues. ❏ Pour cela appuyer sur l’icône (mappemonde) de choix des langues. ❏ Appuyer sur la langue souhaitée.
- Page 30 SDmatic ■ Personnalisation de l’impression des résultats ❏ Pour personnaliser l’impression des résultats, appuyer sur l’icône imprimante. Imprimante ❏ Entrer le texte souhaité à l’aide du clavier alpha-numérique et du stylo en sélectionnant la ligne souhaitée. L’écran présente 4 lignes (de 24 caractères). Lorsqu’on clique sur une ligne, un clavier alpha-numérique (qwerty) apparaît....
-
Page 31: Sélection Des Unités De Mesure
SDmatic ------------------------------------------ Exemple d’impression SDmatic CHOPIN - - - - - - - - -1.50 - - - - - - - - - - - CHOPIN ZI Val de Seine 92390 VLG France - - - - - - - - - - - - - - - - - - - - - - -... - Page 32 SDmatic ■ Réglage de l’intensité du vibreur ❏ Pour régler l’intensité du vibreur, appuyer sur l’icône vibreur. Vibreur ❏ Deux valeurs sont indiquées. La valeur " 1 " représente la vibration la moins forte qui permet de faire tomber la farine dans le bol.
-
Page 33: Calibration De Lappareil
SDmatic CALIBRATION DE ■ Il est possible de calibrer le SDmatic afin d’obtenir les résultats L’APPAREIL dans des unités autre que AACC et Farrand. La modification des calibrations utilisateurs du SDmatic et la création de nouvelles calibrations nécessitent l’utilisation du programme SDmlink. -
Page 34: Changement De La Langue Du Programme
SDmatic ❏ Cliquer sur "Suivant" pour achever l’installation du programme. ■ Changement de la langue du programme Le programme est installé par défaut en anglais. Pour modifier la langue du programme, ouvrir le programme Sdmlink en double-cliquant sur l’icône puis sélectionner "File", "Language". - Page 35 Pour créer une calibration, utiliser au moins 3 farines différentes et déterminer pour chaque farine : - le taux d’absorption d’iode (A %) mesuré avec le SDmatic, - la valeur de référence R de la farine. La calibration utilisateur est de la forme :...
- Page 36 SDmatic - Saisir le nom de la calibration (sur 9 caractères maximum). - Pour sauvegarder la calibration, cliquer sur "Enregistrer" puis nommer le fichier et enregistrer. Note : - La calibration doit être utilisée dans la plage de mesure calculée [A...
- Page 37 SDmatic ■ Transfert d’une calibration ❏ Connecter le SDmatic à l’ordinateur avec le câble RS 232 fourni avec l’appareil. ❏ Mettre sous tension le SDmatic. Appuyer sur puis sur l’icône pour accéder au menu calibration utilisateur. Menu calibration utilisateur ❏...
- Page 38 SDmatic ❏ Cliquer sur l’icône "envoi" puis sur CAL 1 (ou CAL 2) pour transférer la calibration et remplacer la calibration n° 1 (ou n° 2) en cours dans l’appareil. Envoi Cal 1 Cal 2 Note : Il est possible de restaurer les calibrations AACC 76-31 et Farrand.
-
Page 39: Maintenance Du Sdmatic
(suivi type carte de contrôle). En cas d’écarts de résultats supérieurs à 3%, vérifier la chaîne de mesure (page 42) et contacter votre agent CHOPIN si nécessaire. 6.2 Dépannage ■ Changement du fusible Si l’appareil ne s’allume pas et après avoir contrôlé l’alimentation en courant, changer le fusible du SDmatic. - Page 40 Si l’écran tactile fonctionne mal ou pas du tout, il est conseillé de le réétalonner. A la mise sous tension du SDmatic, appuyer au centre de l’écran à l’aide du stylo. Une croix apparaît en haut à droite. Appuyer sur la croix.
- Page 41 ■ Messages d’erreur Erreur Signification Causes possibles et remèdes ERR 0a Checksum programme Erreur logiciel. ❏ Contacter votre agent agréé CHOPIN. ERR 0b Checksum EE PROM Erreur mémoire. ❏ Contacter votre agent agréé CHOPIN. ERR 0c Erreur date Régler la date du SDmatic.
-
Page 42: Menu Contrôle
❏ Pour faire fonctionner l’agitateur, appuyer sur l’icône correspondant. Pour l’arrêter, appuyer à nouveau dessus. Faire attention au rotor de l’agitateur. ❏ Pour vérifier l’état du contact de fermeture du SDmatic, fermer et ouvrir le SDmatic en vérifiant l’icône correspondant. Agitateur Vibreur Position de la tête de... - Page 43 (valeur haute). La valeur de cette résistance correspond à une valeur étalon. La valeur de courant mesurée doit être comprise entre 159 et 161 A. Si cette valeur est hors limite, contacter votre agent CHOPIN. 159 Mesure 161 Petite flèche ❏...
- Page 44 SDmatic Mode d’emploi 12/2016...
-
Page 45: User's Manual
The technical elements that constitute this manual (text and illustrations) are not contractual, their only target being to bring assistance for using the SDmatic. Use, duplication or disclosure of subject data, for any purpose other than relating to the use or servicing of the equipment, is strictly prohibited without the written authorisation of Tripette &... - Page 46 SDmatic User’s manual 12/2016...
-
Page 47: Declaration Of Conformity
CHOPIN TECHNOLOGIES – KPM Analytics Group - 20 avenue Marcellin Berthelot - 92396 Villeneuve-la-Garenne Cedex, France SAS au capital de 6 478 694 € - RCS Nanterre - Siret 403 156 441 00020 - APE 2651B - TVA FR 03 403 156 441 User’s manual ... - Page 48 SDmatic User’s manual 12/2016...
-
Page 49: Introduction
This allows to offset problems that may arise during the process. ■ The SDmatic from Chopin is designed to measure the following in less than 10 minutes and with a single test: - the starch damage rate of the flour in A... - Page 50 SDmatic ■ Measuring cycle: A - Time 0: start of measuring cycle. B - From the moment the heating resistor brings the solution to the proper temperature (35°C, stage 1), the probe electrochemically produces iodine according to the mass of flour to be tested (stages 2 and 3).
-
Page 51: General Characteristics
SDmatic ■ General characteristics: ❏ Power supply: 110 / 230 VAC single phase 50 / 60 Hz - 70 W ❏ Noise: < 70 dB ❏ Dimensions (mm): L = 370, W = 390, H = 250 ❏ Net weight: 6 kg ■... -
Page 52: Installation And Start-Up
- 1 power supply cable (6), - 1 plastic bottle (shaker) (7). - 1 dropper (8) (for thiosulfate) - 1 RS232 cable (9) to connect the SDmatic to a computer. - 1 USB memory stick (10) with user's manual and software. SDmatic User’s manual... - Page 53 SDmatic ■ Installation ❏ Place the SDmatic on a stable and horizontal surface. ❏ Avoid installing the SDmatic next to a window, especially if it is exposed to sunshine for hours. ❏ Probe protector For the delivery, the measuring probe is protected with a plastic protector.
-
Page 54: Connection
Device) of sensitivity 30 mA of AC class upstream the appa- ratus. ❏ The plug for power supply is located at the back of the SDmatic. ■ Switch on / switch off ❏ The apparatus must be switched on or off using the switch at the back of the SDmatic. - Page 55 SDmatic ■ Connection of other units RS232 Port Parallel port The SDmatic is equipped with two ports located at the back of the apparatus. ■ Parallel port The parallel port allows the connection of a ticket printer (24 columns). ■ RS232 port...
-
Page 56: Touch-Sensitive Screen
SDmatic 2.3 Touch-sensitive screen The control of the touch-sensitive screen requires a special pen designed to avoid damaging its surface. The movements in the menus is performed by means of suitable and self-explanatory icons. User’s manual 12/2016... -
Page 57: Description Of The Menus
SDmatic 2.4 Description of the menus ■ Main menu The main menu allows to select one of the three following menus: ❏ the Test menu, ❏ the Control menu, ❏ the Calibration menu. Test menu Control menu Calibration menu ■ Test menu... -
Page 58: Control Menu
SDmatic ■ Control menu The control menu allows to test the functionality of the SDmatic. ■ Calibration menu The calibration menu allows to set some functionality of the SDmatic. User’s manual 12/2016... -
Page 59: Normal Use
- test with SDmatic. 3.1 Test preparation ■ Preparation of the solution ❏ Prepare in a plastic bottle (supplied with the SDmatic): - 120 ml of distilled water precisely measured (± 0.1 ml), - 1.5 grams of citric acid (C ) (±... - Page 60 SDmatic ❏ Place the reaction bowl in the SDmatic and fold down the arm. ❏ In order to speed up the test cycle, a testing solution could be prepared in the second reaction bowl and could be preheated in the SDmatic (this would reduce the heating time in the SDmatic during the test).
- Page 61 ❏ Place the flour sample in the spoon and the spoon in the SDmatic. This operation should be performed only if the reaction bowl and the solution are placed on the SDmatic. Weighing of the flour Installation of the flour...
-
Page 62: Test Cycle
Validate by pressing on the validation key. Validation key Numerical keypad ❏ Two additional values can be entered into the SDmatic: the water content and the protein content. The default values are the following: - water content: 14.00%, - protein content: 12.00%. - Page 63 ❏ Press on the Test icon to start the cycle. Press on Test icon Exit The test starts only if the arm of the SDmatic is folded down. Also check that the reaction bowl contains water. Note: In some cases, the screen hereunder is displayed. Press on YES if there is water, otherwise press on NO.
- Page 64 SDmatic ❏ A new screen is displayed, which shows in real time: - the stage number of the test, - a timer, - the current inside the solution measured by the probe, - the temperature of the solution, - a heating indicator.
- Page 65 SDmatic ❏ When the test cycle is completed, the SDmatic makes three "beeps". The result screen is displayed. The starch damage rate and two other calibration units are shown. Result in UCDc Result A (adjusted) Result in UCD A % : 95.59% UCD : 25.1...
- Page 66 The results can be printed by pressing on the icon "Print". To leave this result screen, press on the icon "Exit". ❏ Exit validation screen: If you press on "YES", the SDmatic goes back to the main menu. User’s manual 12/2016...
-
Page 67: Cleaning After Each Test
(risk of detachment of the rings). ❏ To clean these parts, use the container located on the left side of the SDmatic. ❏ Place the container under the probe, the stirrer and the resistor. ❏ Rinse them carefully with distilled water. -
Page 68: Setting The Apparatus
■ The date and time of the SDmatic can be set in the main menu. APPARATUS ■ Choosing the formats and setting date and time ❏ To set the date and time of the SDmatic, press on the date or time in the main menu. Time Date ❏... -
Page 69: Language Selection
SDmatic ■ SDmatic parameters and calibration units can be set in the calibration menu. ■ Some functions are protected by a code: they can only be used by Chopin entitled agents. ■ Parameters that can be set by the user are the following:... - Page 70 SDmatic ■ Results printing modification ❏ To modify the result printing, press on the icon "printer". Printer. ❏ Choose a text line and then key in the desired text using the alphanumeric keyboard and the pen. The screen displays 4 lines of 24 characters. If you click on a line, an alphanumeric keyboard (qwerty) is displayed.
- Page 71 SDmatic ------------------------------------------ Printout example SDmatic CHOPIN - - - - - - - - -1.50 - - - - - - - - - - - CHOPIN ZI Val de Seine 92390 VLG France - - - - - - - - - - - - - - - - - - - - - - -...
- Page 72 SDmatic ■ Adjusting the vibrator’s intensity ❏ In order to adjust the intensity of the vibrator, press on the icon "Vibrator". Vibrator ❏ Two values are then displayed. Value "1" represents the weakest vibration, which makes the flour fall into the bowl. Value "2"...
-
Page 73: Apparatus Calibration
SDmatic APPARATUS ■ It is possible to calibrate the SDmatic in order to obtain results CALIBRATION with other units than AACC and Farrand. The change of the SDmatic user calibrations and the creation of new calibrations need the use of the SDMlink program. - Page 74 SDmatic ❏ Click on "Next" to complete the installation. ■ Change of the program language The program is installed by default in english. To modify the program language, open the Sdmlink program by double clicking on the icon then select "File", "Language".
- Page 75 The user calibration follows: R= a A %² + b A % + c with R: reference value ( 0 < R < 100) % : measure of the Sdmatic ❏ Creation of a calibration: - Open the program Sdmlink. ...
- Page 76 SDmatic - Enter the name of the calibration (9 characters maximum). - To save the calibration, click on "Save" then give a name to the file and save. Note: - The calibration must be used in the calculated measu- ring range [A %min ;...
- Page 77 SDmatic ■ Transfer of one calibration ❏ Connect the SDmatic to the computer with the RS232 cable provided with the apparatus. ❏ Switch on the SDmatic. Press on the on the icon enter in the user calibration menu. Menu calibration utilisateur ❏...
- Page 78 SDmatic ❏ Click on the icon "sending" then on "CAL 1" (or "CAL 2") to transfer the calibration and replace the actual calibration nb 1 (or nb 2) in the apparatus. Sending Cal 1 Cal 2 Note: It is possible to restore the calibrations AACC 76-31 an Farrand.
-
Page 79: Maintenance Of The Sdmatic
SDmatic MAINTENANCE OF If the SDmatic is not used for a long time, keep the THE SDMATIC measurement devices in distilled water. 6.1 Periodic maintenance The SDmatic does not require particular preventive maintenance. ■ Cleaning ❏ Once a week, proceed to a cleaning of the apparatus using a damp cloth. - Page 80 ■ Initialisation of the screen If the touch screen does not work properly, it must be re-calibrated. Switch the SDmatic on while keeping the pen slightly pressed on the screen centre: a cross is displayed on the top right-hand corner.
-
Page 81: Error Messages
❏ Contact your Chopin agent. ERR 0b Checksum EEPROM Memory error. ❏ Contact your Chopin agent. ERR 0c Date error Set the date of the SDmatic. ERR 0d Communication Inter Micro-controller Hardware error. ❏ Contact your Chopin agent. ERR 1 Heating problem Water missing / measurement probe out of order / resistor out of order. -
Page 82: Control Menu
❏ To run the stirrer, press on the corresponding icon. Press it again to stop the stirrer. Take care of the rotor of the stirrer. ❏ To verify the status of the SDmatic closing contact, close and open the SDmatic and check the corresponding icon. Stirrer... - Page 83 Pressing the big arrow switches the 40 mA, which is the strength needed by the probe to electrochemically produce iodine. To verify this strength, remove the covers of the apparatus. To be performed only by a CHOPIN representative. User’s manual 12/2016...
- Page 84 SDmatic User’s manual 12/2016...
-
Page 85: Sdmatic
SDmatic SDmatic Modo de empleo ESPAÑOL AVVERTENZE Los elementos técnicos reunidos en este manual (tanto el texto como las ilustraciones) no tienen índole contractual, ya que su propósito es servir de ayuda para la utilización del ® SDmatic Queda terminantemente prohibido copiar todo o parte de este manual, salvo para servir a la explotación directa de dichos aparatos, sin la previa autorización expresa de Tripette &... - Page 86 SDmatic Modo de empleo 12/2016...
-
Page 87: Declaración De Conformidad
CHOPIN TECHNOLOGIES – KPM Analytics Group - 20 avenue Marcellin Berthelot - 92396 Villeneuve-la-Garenne Cedex, France SAS au capital de 6 478 694 € - RCS Nanterre - Siret 403 156 441 00020 - APE 2651B - TVA FR 03 403 156 441 Modo de empleo ... - Page 88 SDmatic Modo de empleo 12/2016...
-
Page 89: Introducción
35°C. ■ Para ello, el SDmatic va a generar, en función del peso de la harina, una cantidad proporcional de iodo, midiendo luego su absorción por la harina con objeto de determinar el porcentaje del... - Page 90 SDmatic ■ Desarrollo de un ciclo de medida A — Fase 0: inicialización del ciclo de medida; B — En cuanto la resistencia de calentamiento ponga la solución en la buena temperatura (35°C) (fase 1), la sonda produce electroquímicamente iodo en función del peso de harina introducido (fase 2 y 3);...
-
Page 91: Características Generales
SDmatic ■ Características generales ❏ Alimentación: 110/230 Vca - 50 /60 Hz - 70 W ❏ Nivel de ruido: < 70 dB ❏ Dimensiones: Ancho x Profundidad x Altura: 370 x 390 x 250 mm ❏ Peso neto: 6 kg ■... -
Page 92: Instalación Yarranque
- un lápiz para pantalla táctil (3) con su soporte; - dos cucharas (4); - un vaso de limpieza (5) situado por el lado izquierdo del SDmatic; - un cordón de alimentación (6); - un frasco de plástico (shaker) (7);... - Page 93 SDmatic ■ Instalación ❏ Poner el SDmatic en una superficie horizontal y estable. ❏ Evitar colocar el SDmatic detrás de un cristal, sobretodo si éste está expuesto al sol durante varias horas. ❏ Protector de la sonda En el momento de su entrega, la sonda de medida está protegida por un plástico.
-
Page 94: Conexión
SDmatic 2.2 Conexión ■ Conexión eléctrica ❏ El SDmatic es un aparato eléctrico que debe conectarse a una red equipada con un enchufe de tierra. Comprobar antes de nada el buen estado de este enchufe. ❏ q Además, la red eléctrica debe disponer de un disyuntor DDR (Dispositivo Diferencial Residual) de sensibilidad ... - Page 95 SDmatic ■ Conexión de otros aparatos Puerto RS232 Puerto paralelo El SDmatic posee dos enchufes de conexión en su parte trasera. ■ Puerto paralelo Permite conectar una impresora de tickets (24 columnas). ■ Puerto RS232 Permite modificar las calibraciones de usuarios por medio del pro- grama SDMlink proporcionado con el aparato (ver página...
-
Page 96: Pantalla Táctil
SDmatic 2.3 Pantalla táctil La pantalla táctil se utiliza por medio de un lápiz especialmente estudiado para no alterar la superficie. La navegación en los menús del aparato se efectúa por medio de iconos adaptados y suficientemente explicativos de la función que representan. -
Page 97: Descripción De Los Menús Del Sdmatic
SDmatic 2.4 Descripción de los menús del SDmatic ■ Descripción del menú principal El menú principal permite elegir entre tres otros menús: ❏ el menú Test; ❏ el menú Control; ❏ el menú Calibración. Menú Test Menú Control Menú Calibración ■... - Page 98 SDmatic ■ Descripción del menú Control El menú control permite comprobar las funcionalidades del SDmatic. ■ Menú Calibración El menú control permite ajustar las funcionalidades del SDmatic. Modo de empleo 12/2016...
-
Page 99: Utilización
3.1 Preparación de una prueba ■ Preparación de una solución ❏ Preparar en un frasco de plástico (suministrado por el SDmatic): - 120 ml de agua destilada medida con precisión (± 0,1 ml); - 1.5 gramos de ácido cítrico (C ) (±... - Page 100 SDmatic ❏ Poner en su sitio el vaso de reacción en el SDmatic y bajar el brazo. ❏ Con objeto de acelerar el ciclo de prueba, es posible preparar una solución de prueba en un segundo vaso de reacción, poniéndolo a calentarse en el SDmatic (el tiempo de calentamiento por el SDmatic durante la prueba se reduce de este modo).
- Page 101 ❏ Poner la muestra en la cuchara y luego poner la cuchara en su sitio en el SDmatic. Esta operación no debe efectuarse más que si el vaso de reacción y la solución están colocados en el SDmatic. Pesada de la harina Introducción de la harina...
-
Page 102: Realización De Una Prueba
SDmatic 3.2 Realización de una prueba ■ Test del SDmatic ❏ Para lanzar un ciclo de test, a partir del menú principal, pulsar en el icono de test (ver página 97). ❏ Pulsar luego en “Harina”. pulsar en “Harina” ❏ Aparece una pantalla numérica. Teclear el peso observado al pesar la harina, por medio del lápiz y del teclado. - Page 103 ❏ Pulsar en el icono de prueba para lanzar el ciclo. presionar Test Salir El test no empieza mas que si el brazo del SDmatic está en posición inferior. Comprobar también la presencia de agua en el vaso. Nota : En ciertos casos, la pantalla siguiente aparece.
- Page 104 SDmatic ❏ Aparece una nueva pantalla En esta pantalla se indica en tiempo real: - un número de fase de prueba, - un cronómetro, - la intensidad medida en la solución por la sonda, - la temperatura de la solución, - un indicador de calentamiento.
- Page 105 SDmatic ❏ En cuanto se haya terminado el ciclo de test, el SDmatic emite tres “señales”. La pantalla de los resultados aparece. El porcentaje de almidón dañado aparece indicado, así como dos otras unidades de calibración. Resultado en Resultado A...
- Page 106 80% del iodo generado. Es posible imprimir los resultados presionando el icono “Impresión”. Para salir de esta pantalla de resultados, presionar el icono “Salir”. ❏ Pantalla de validación de salida. Presionando en “SÍ”, el SDmatic vuelve al menú principal. Modo de empleo 12/2016...
-
Page 107: Limpieza Después De Cada Prueba
3.3 Limpieza después de cada prueba ❏ Tras cada prueba, la sonda de medida, el agitador y la resistencia del SDmatic deben limpiarse con objeto de que la prueba siguiente no sea afectada/contaminada por residuos de la solución test anterior. -
Page 108: Ajustes Del Aparato
■ A partir del menú principal, es posible ajustar la fecha y la hora APARATO del SDmatic. ■ Opción formatos y ajuste fecha y hora ❏ Para ajustar la fecha y la hora del SDmatic, pulsar en la fecha o la hora del menú principal. Fecha Hora ❏... -
Page 109: Selección Del Idioma
- el ajuste de la intensidad del vibrador, - el calibrado del usuario. ■ Selección del idioma ❏ El SDmatic propone la posibilidad de elegir 8 idiomas. ❏ Para ello pulsar en el icono (mapamundi) de selección de los idiomas. - Page 110 SDmatic ■ Personalización de la impresión de los resultados ❏ Para personalizar la impresión de los resultados, pulsar en el icono impresora. Impresora ❏ Poner el texto deseado por medio del teclado alfanumérico y del lápiz, seleccionando la línea deseada.
- Page 111 SDmatic ------------------------------------------ Ejemplo de impresión SDmatic CHOPIN - - - - - - - - -1.50 - - - - - - - - - - - CHOPIN ZI Val de Seine 92390 VLG France - - - - - - - - - - - - - - - - - - - - - - -...
- Page 112 SDmatic ■ Ajuste de la intensidad del vibrador ❏ Para ajustar la intensidad del vibrador, pulsar en el icono vibrador. Vibrador ❏ Se indican dos valores. El valor “1” representa la vibración menos fuerte, que permite hacer caer la harina en el vaso. El valor “2”...
-
Page 113: Calibración Del Aparato
■ Es posible calibrar el SDmatic para obtener resultados en APARATO unidades diferentes de AACC y Farrand. La modificación de las calibraciones de usuarios del SDmatic y la creación de nuevas calibraciones necesitan la utilización del programa SDmlink. ■ Instalación del programa Sdmlink CONFIGURACIÓN MÍNIMA:... - Page 114 SDmatic ❏ Hacer clic en "Siguiente" para terminar la instalación del programa. ■ Modificación del idioma del programa El programa se instala en inglés por defecto. Para modificar el idioma del programa, abrir el programa Sdmlink con doble clic en el icon y seleccionar "Archivo", "Idiomas".
- Page 115 Para crear una calibración, utilizar al menos 3 harinas diferentes y determinar para cada una: - la tasa de absorción de yodo (A %) medida con el SDmatic, - la valeur de référence R de la farine. La calibración de usuario toma la forma:...
- Page 116 SDmatic - Indicar el nombre de la calibración (9 letras al máximo). - Para guardar la calibración, hacer clic en "Guardar", dar nombre al archivo y guardar. Nota : La calibración se debe utilizar en un intervalo de medida calculado [AI %mín.; AI %máx.] para evitar resultados aberrantes.
- Page 117 SDmatic ■ Transferencia de una calibración ❏ Conectar el SDmatic a la computadora con el cordón RS 232 proporcionado con el aparato. ❏ Poner en tensión el SDmatic. Pulsar en y luego en el icono para acceder al menú "Calibración de usuario"...
- Page 118 SDmatic ❏ Hacer clic en el icono "Envío" y luego en CAL 1 (o CAL 2) para transferir la calibración y sustituir la calibración n° 1 (o n° 2) pendiente en el aparato. Envío Cal 1 Cal 2 Nota : Es posible restablecer las calibraciones AACC 76-31 y Farrand.
-
Page 119: Mantenimiento Del Sdmatic
6.2 Reparación ■ Cambio de fusible Si el aparato no se enciende, y tras control de la alimentación de corriente, cambiar el fusible del SDmatic. ❏ Desconectar el aparato y con un pequeño destornillador abrir el portafusibles, cambiar el fusible. - Page 120 ■ Inicialización de la pantalla Si la pantalla táctil funcional mal o no funciona, se aconseja recalibrarla. Al encender el SDmatic, presionar en el centro de la pantalla con el lápiz. Aparece una cruz arriba a la derecha. Pulsar en esta cruz....
- Page 121 ■ Messages d’erreur Error Significado Causas posibles y remedios ERR 0a Checksum programa Error del programa. ❏ Contactar con el agente de CHOPIN correspondiente. ERR 0b Checksum EE PROM Error de memoria. ❏ Contactar con el agente de CHOPIN correspondiente.
-
Page 122: Menú Control
❏ Para hacer funcionar el agitador, pulsar en el icono correspondiente. Para detenerlo, pulsarlo de nuevo. Poner atención al rotor del agitador.. ❏ Para comprobar el estado del contacto de cierre del SDmatic, cerrar y abrir el SDmatic comprobando el icono correspondiente. Agitador Vibrador Posición de la cabeza de... - Page 123 El valor de esta resistencia corresponde a un valor patrón. El valor de la corriente medida debe estar comprendido entre 159 y 161 μA. Si este valor está fuera de los límites, contactar con el agente CHOPIN correspondiente. 159 Medida 161 Pequeña flecha ❏...
- Page 124 SDmatic Modo de empleo 12/2016...