Geemarc CL100 Mode D'emploi
Masquer les pouces Voir aussi pour CL100:

Publicité

Les langues disponibles

Les langues disponibles

Liens rapides

Multifunction telephone
Téléphone multifonctions
Multifunktionstelefon
English P2
Français P14
Deutsch P26

Publicité

Table des Matières
loading

Sommaire des Matières pour Geemarc CL100

  • Page 1 Multifunction telephone Téléphone multifonctions Multifunktionstelefon English P2 Français P14 Deutsch P26...
  • Page 2 !!! User manual to read carefully before start to use !!! !!! Manuel d’utilisation à lire impérativement avant la mise en service !!! !!! Bevor Ihr neues Telefongerät zu benutzen, bitte lesen Sie dies Benutzerhandbuch sehr sorgfältig !!! CAUTION: this telephone is specifically designed for the people with hearing difficulties and is provided with a handset earpiece volume control for individual requirements.
  • Page 3: Table Des Matières

    Index !!!Please refer to our website: www.geemarc.com for an up to date user guide, as there may be important updates and changes you need to be aware of !!! Description ..............3 Setting up ..............5 1- Connecting the telephone ........5 2- Ringer volume setting ..........
  • Page 4: Description

    Description 1. Line socket. 2. Volume and tone adjustment ON/OFF switch. 3. 3 emergency numbers. 4. Reception tone adjustment. 5. Clip for wall mounting. 6. Reception volumen adjustment. 7. Handset cord socket.
  • Page 5 Description 8. Last number redial. 9. Time break recall. 10. Memory storing. 11. Flashing incoming ring indicator. 12. Mute. 13. Direct memories. 14. Ring volume setting. 15. Sending volume setting. 16. Extra volume and tone adjustment. 17. Red light of tone/volume activation. 18.
  • Page 6: Setting Up

    Setting up 1 – Connecting the telephone - Connect the handset cord (1). - Open the battery compartment (2). - Insert 4 alkaline batteries (type AAA 1.5V, not supplied) in the comartment (*). Batteries are required if you wish to increase the ringer level up to 10 dB (2).
  • Page 7: 4- Time Break Recall Setting

    Setting up 3 – Dialling mode (Tone/Pulse) settings The Tone/Pulse switch is factory pre-set to Tone position. In the UK, all telephone exchanges now use Tone (T) dialing. If your phone does not dial out, it is probably being used from an older private switch board (PBX).
  • Page 8 Setting up - Drill 2 holes in the wall (80mm apart). - Insert the wall plugs and the screws leaving about 6 mm of the screws projecting from the wall. - Slide the telephone downwards to secure. Screw...
  • Page 9: Volume And Tone Adjustment

    Volume and tone adjustment 1 – Receiving volume and tone adjustment You can increase the volume and adjust the receiving tone according to your own hearing requirements. The button allows extra receiving and tone functions to be activated or not during the conversation. When the function is activated, the red light of extra receiving and tone function located near the button is lit.
  • Page 10: 2- Sending Volume Adjustment

    Volume and tone adjustment When the switch located behind the phone is ON, the extra-receiving and tone functions are automatically activated each time you use the phone. When this switch is OFF, you will need to activate the function by pressing the button Tone and volume (15dB to 30dB) adjustment is only activated when the button is set to ON.
  • Page 11: Using The Phone

    Using the phone Using the phone Using the phone Using the phone If you are using this telephone with a hearing aid, set your hearing aid to the “T” setting. 1 – Answer a call - When an incoming call is received the phone will ring and flash, to answer the call lift the handset and speak.
  • Page 12: 6- Storing Telephone Numbers

    Using the phone 6 – Storing telephone numbers Your telephone can store12 direct memories including 3 priority numbers (24 digits maximum for priority memory and 32 digits for M1, M2...M9). For example, the 3 priority P1, P2, P3 memories allow you to store the 3 numbers below: = Fire = Police = Doctor...
  • Page 13: General Informations

    Thus if you respect these instructions you ensure human health and environmental protection. Guarantee: From the moment your Geemarc CL100 is purchased, Geemarc guarantee it for the period of two years. During this time, all repairs or replacements (at our option) are free of charge. Should you experience a problem then contact our helpline or visit our website at www.geemarc.com.
  • Page 14 For product support and help visit our website at www.geemarc.com E-mail : help@geemarc.com Telephone : 01707 387602 lines are open 09h00 to 16h00 Mon to Fri 2 rue Galilée, Parc de l’Etoile, 59791 Grande-Synthe Cedex, France This product is made in China To Geemarc Telecom...
  • Page 15 Index !!! Vérifiez si une version plus récente de ce guide d'utilisation est disponible sur notre site Internet www.geemarc.com !!! Description ..............15 Installation ..............17 1- Raccordements ............17 2- Réglage de la sonnerie ..........17 3- Numérotation multifréquences ou décimale ..... 18 4- Interrupteur 300/100ms ..........
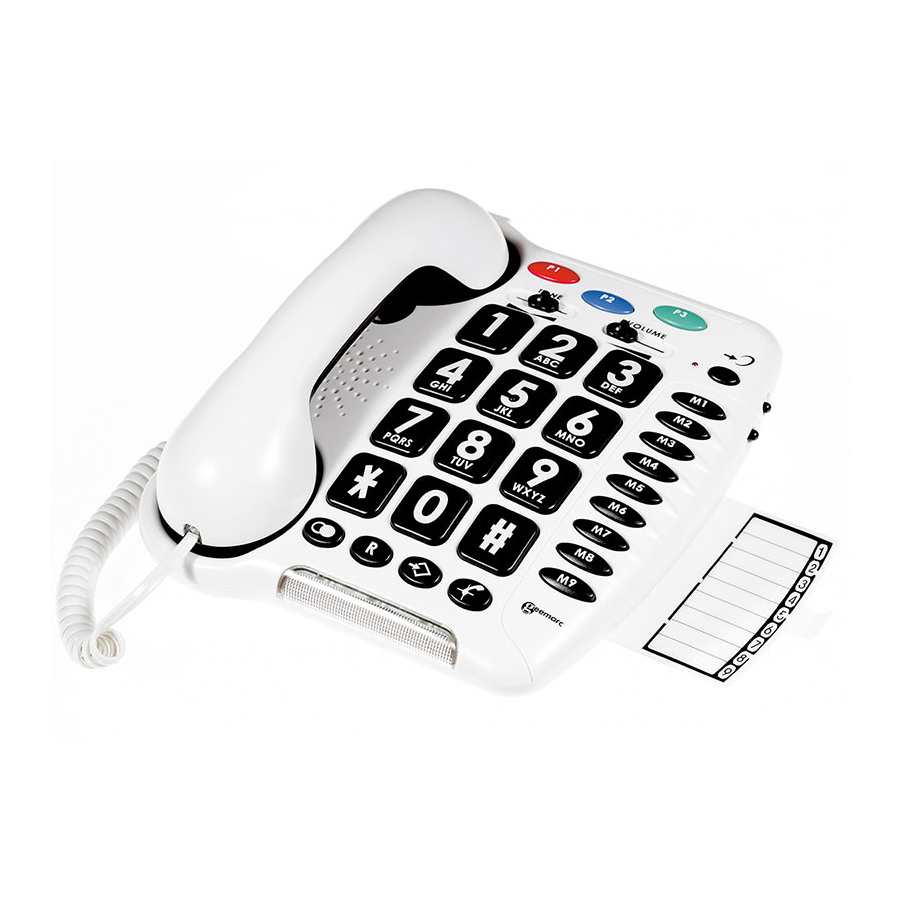
  • Page 16: Description

    Description 1. Prise cordon de ligne. 2. Activation automatique de la correction d’écoute au décroché. 3. 3 mémoires d’urgence. 4. Réglage de la tonalité de réception. 5. Ergot de position murale. 6. Réglage du volume de réception. 7. Prise de cordon combiné.
  • Page 17 Description 8. Rappel du dernier numéro composé. 9. Touche R. 10. Mise en mémoire. 11. Flash lumineux de sonnerie. 12. Secret. 13. Mémoires directes. 14. Réglage du volume de sonnerie. 15. Réglage du volume d’émission. 16. Activation de la correction de tonalité et volume de réception.
  • Page 18: Installation

    Installation 1 – Raccordements - Branchez le cordon du combiné (1). - Ouvrez le compartiment à piles (2). - Insérez 4 piles (type AAA 1.5V alkalines), non fournies dans le compartiment (*). Les piles sont necessaires si vous désirez augmenter le niveau de sonnerie de 10 dB (2). - Refermez le compartiment à...
  • Page 19: 3- Numérotation Multifréquences Ou Décimale

    Installation 3 – Numérotation multifréquences (T) ou décimale (P) Au moment de sa livraison, votre téléphone est en mode multifréquences (T). Si le central téléphonique dont vous dépendez fonctionne en mode décimale (P), vos appels n’aboutiront pas. Il vous suffira alors de commuter l’interrupteur T/P situé en dessous du téléphone sur la position P pour remédier à...
  • Page 20 Installation - Percez 2 trous verticaux distant de 80 mm dans votre mur. - Insérez 2 chevilles avec leurs vis. - Laissez dépasser les vis de 6mm. - Faites glisser votre téléphone dans les têtes de vis. La vis...
  • Page 21: Réglage Du Volume Et De La Tonalité

    Réglage du volume et de la tonalité 1 – Réglage du volume et de la tonalité de réception Vous pouvez amplifier le volume et régler la tonalité de réception de votre combiné. La touche permet d’activer ou de désactiver le correcteur de réception durant la conversation.
  • Page 22: 2- Réglage Du Volume D'émission

    Réglage du volume et de la tonalité L’interrupteur sur ON situé à l’arrière de l’appareil active automatiquement la correction à chaque décroché du combiné. Sur OFF, il faudra activer la fonction en appuyant sur la touche Le réglage de la tonalité et du volume (de 15dB à 30 dB) n’est activé...
  • Page 23: Utilisation

    Using the phone Using the phone Using the phone Utilisation Si vous êtes porteur d’une aide auditive, commutez cette dernière en position «T». 1 – Recevoir un appel - Lorsque le téléphone sonne (flash lumineux de sonnerie de votre téléphone activé), décrochez le combiné pour parler à votre correspondant.
  • Page 24: 6- Mémoriser Un Numéro De Téléphone

    Utilisation Utilisation 6 – Mémoriser un numéro de téléphone Votre téléphone possède 12 mémoires directes dont 3 d’urgences, (24 chiffres maximum par mémoire prioritaires et 32 pour les mémoires M1, M2...M9). Les mémoires d’urgence permettent de mémoriser par exemple les 3 numéros suivants: =Pompier =Police =Docteur...
  • Page 25: Informations Générales

    à la protection de la santé humaine. Garantie: Cet CL100 est garanti 2 ans pièces et main-d'oeuvre. La date d'achat figurant sur le ticket de caisse fera foi. Cette garantie s'exerce sous réserve d'une utilisation normale de l'appareil. Les dommages occasionnés par les surtensions électriques, la foudre ou par un...
  • Page 26 - La basse pression peut entraîner une explosion ou une fuite de liquide ou de gaz inflammable. Consulter notre site Internet pour obtenir la notice détaillée ou des informations et de l'aide sur nos produits : www.geemarc.com 2 rue Galilée, Parc de l’Etoile, 59791 Grande-Synthe Cedex, France Email: sav@geemarc.fr Téléphone: 03 28 58 75 99...
  • Page 27 Index !!! Sehen Sie auf unserer Webseite www.geemarc.com nach, ob eine aktualisierte Fassung dieser Bedienungsanleitung erhältlich ist !!! Beschreibung ............. 27 Aufbau ................. 29 1- Anschließen des Telefons ........29 2- Rufton einstellung ............ 29 3- Einstellen von Ton- / Pulswahl ......... 30 4- Einstellen der Flashzeit ..........
  • Page 28: Beschreibung

    Beschreibung 1. Buchse für das Telefonkabel. 2. Schalter zur automatischen Aktivierung der Hörerverstärkung beim Abnehmen des Hörers. 3. 3 Notfalltasten. 4. Hoch-/Tieftonregelung. 5. Clip für die Wandmontage. 6. Lautstärkeregelung.
  • Page 29 Beschreibung 7. Hörerkabel. 8. Wahlwiederholung. 9. R-Taste. 10. Speichertaste. 11. Blitzlicht für Anrufsignal. 12. Stummschalttaste. 13. Direktwahltasten. 14. Einstellung Klingellautstärke. 15. Einstellung Sprachverstärkung. 16. Taste zum Anund Ausschalten der Hörerverstärkung. 17. Rotes Licht bei eingeschalteter Hörerverstärkung. 18. Hörerkabel. 19. Batteriefach. 20.
  • Page 30: Aufbau

    Aufbau 1 – Anschließen des Telefons - Schließen Sie das Telefonhörerkabel an (1). - Öffnen Sie das Batteriefach (2). - Legen Sie 4 Micro(AAA) Alkalibatterien (nicht im Lieferumfang) richtig herum in das Batteriefach ein. Batterien werden benötigt wenn Sie die Klingellautstärke um 10dB verstärken wollen (2).
  • Page 31: 3- Einstellen Von Ton- / Pulswahl

    Aufbau 3 – Einstellen von Ton- / Pulswahl (T/P) Das Telefon ist ab Werk auf Tonwahl eingestellt. Alle Anschlüsse in Deutschland funktionieren heutzutage mit Tonwahl (T). Sollten Sie dennoch Probleme haben einen Anruf zu tätigen, betreiben Sie das Telefon eventuell an einer älteren Telefonanlage.
  • Page 32 Aufbau - Bohren Sie zwei Löcher mit einem abstand von 80MM in die Wand (nutzen Sie dazu die Wandinstallations-Schablone). - Führen 2 Dübel und die Befestigungsschrauben ein. - Die Schrauben sollten dabei 6MM von der Wand abstehen. - Hängen Sie das Telefon über die Schraubenköpfe und ziehen Sie es nach unten um es zu sichern.
  • Page 33: Ton- U. Lautstärke Regelung

    Ton- u. Lautstärke Regelung 1 – Einstellen der Hörerlautstärke sowie der Höhen und Tiefen Sie können die Lautstärke sowie die Höhen und Tiefen des Hörers entsprechend Ihrer Erfordernisse anpassen. Mit der Taste können Sie die Hörerverstärkung, sowie die veränderten Höhen und Tiefen während des Gesprächs aktivieren und deaktivieren.
  • Page 34: 2- Einstellen Der Sprachverstärkung

    Ton- u. Lautstärke Regelung Achtung : Wenn die Hoch-/Tieftonregelung, die Hörerlautstärke und die Sprachverstärkung auf Maximum eingestellt sind, kann ein Pfeifen auftreten. Wenn dies der Fall ist, sollte die Sprachverstärkung mit dem Schalter reduziert werden. Wenn der Schalter an der Rückseite des Telefons auf ON eingestellt ist, ist die zusätzliche Verstärkung der Lautstärke sowie der Höhen und Tiefen bei jedem Gebrauch automatisch eingeschaltet.
  • Page 35: Benutzung Des Telefons

    Benutzung des telefons Using the phone Using the phone Using the phone Wenn Sie dieses Telefon mit einem Hörgerät benutzen stellen Sie ihr Hörgerät auf die „T“- Position. 1 – Annahme eingehender Telefonanrufe - Einen eingehenden Telefonanruf signalisiert das Telefon durch einen Klingelton und Lichtblitze.
  • Page 36: 6- Einspeichern Von Telefonnummern

    Benutzung des telefons 6 – Einspeichern von Telefonnummern Ihr Telefon kann 12 Direktwahl- und 3 Notfallrufnummern speichern (Höchstens 24 Ziffern per vorrangige gespeicherte Nummer und höchstens 32 Ziffern für M1, M2…M9). Auf den Notfalltasten können Sie z. B. Feuerwehr, Polizei, den Notruf oder die Nummer Ihres Arztes speichern.
  • Page 37: 7- Eine Gespeicherte Nummer Anwahlen

    Benutzung des telefons 7 – Eine gespeicherte nummer anwahlen - Heben Sie den Telefonhörer ab und warten Sie auf das Freizeichen. - Drücken Sie M1 bis M9 oder eine der Notfalltasten; die gespeicherte Nummer wird automatisch angewählt. Um die gespeicherten Telefonnummern registrieren, verwenden Sie den Index unter der Basis entfernt.
  • Page 38: Generelle Informationen

    Generelle Informationen GARANTIE : Auf Ihr Geemarc CL100 wird von Geemarc Telecom SA zwei Jahre Garantie ab Kaufdatum gemäß diesen Garantiebestimmungen gewährt. Während dieser Zeit werden im Garantie- fall nach Wahl der Geemarc Telecom SA Material- und Fabrikationsfehler unentgeltlich beseitigt oder Ihr Geemarc Produkt ausgetauscht. Bei Störungen oder Fragen wenden Sie sich an unsere Hotline oder besuchen Sie unsere Homepage www.geemarc.com.
  • Page 39 - Extrem niedriger Luftdruck, der zu einer Explosion oder zum Verlust von entflammbarer Flüssigkeit oder Gas führen kann. Produktsupport und Hilfe erhalten Sie auf unserer Webseite unter www.geemarc.com/de E-mail:kundendienst@geemarc.com Telefon:+49(0)30 209 95 789 2 rue Galilée, Parc de l’Etoile, 59791 Grande-Synthe Cedex, France Von Geemarc Telecom im China hergestellt...
  • Page 40 UGCL100v2_EnFrGe_v2.4...

Table des Matières