Publicité

Les langues disponibles
  • FR

Les langues disponibles

Liens rapides

HOT SPOT
SLIMCURVE
Infrarotheizung
Infrared Heater
Calefactor infrarrojo
Chauffage infrarouge
Stufa a infrarossi
10035059 10035060 10035061 10035062
www.klarstein.com
Hinweis: Dieses Produkt ist nur für gut isolierte Räume
oder für den gelegentlichen Gebrauch geeignet.
Note: This product is only suitable for well insulated
spaces or occasional use.
Advertencia: Este producto está indicado únicamente en
lugares abrigados o para una utilización punctual.
Remarque : Ce produit ne peut être utilisé que dans
des locaux bien isolés ou de manière occasionnelle.
Nota: Questo prodotto è adatto solo per spazi
ben isolati o uso occasionale.

Publicité

Table des Matières
loading

Sommaire des Matières pour Klarstein 10035059

  • Page 1 Infrarotheizung Infrared Heater Calefactor infrarrojo Chauffage infrarouge Stufa a infrarossi 10035059 10035060 10035061 10035062 www.klarstein.com Hinweis: Dieses Produkt ist nur für gut isolierte Räume oder für den gelegentlichen Gebrauch geeignet. Note: This product is only suitable for well insulated spaces or occasional use.
  • Page 3: Table Des Matières

    Italiano 59 Geräteübersicht 9 Inbetriebnahme und Bedienung 1 1 Reinigung und Pflege 15 Hinweise zur Entsorgung 16 Hersteller 16 TECHNISCHE DATEN Artikelnummer 10035059, 10035060 10035061, 10035062 Nennleistung 500 W/ 1000 W 1000 W/ 2000 W Nennspannung 220 – 240 V ~ 50 Hz Abmessungen (mm)
  • Page 4: Sicherheitshinweise

    SICHERHEITSHINWEISE • Prüfen Sie vor der Benutzung die Spannung auf der Geräteplakette und schließen Sie das Gerät nur an Steckdosen an, die der Spannung des Geräts entsprechen. • Falls das Netzkabel beschädigt ist, lassen Sie es von einer ausgebildeten Fachkraft ersetzen. •...
  • Page 5: Produktdatenblatt

    PRODUKTDATENBLATT Modellkennung(en) 10035059, 10035060 Angabe Symbol Wert Einheit Angabe Einheit Wärmeleistung Nur bei elektrischen Speicher-Einzelraumheizgeräten: Art der Regelung der Wärmezufuhr Nennwärmeleistung Manuelle Regelung der Wärmezufuhr mit k.A. integriertem Thermostat Mindestwärmeleistung Manuelle Regelung der Wärmezufuhr k.A. (Richtwert) mit Rückmeldung der Raum- und/oder Außentemperatur...
  • Page 6 Modellkennung(en) 10035061, 10035062 Angabe Symbol Wert Einheit Angabe Einheit Wärmeleistung Nur bei elektrischen Speicher-Einzelraumheizgeräten: Art der Regelung der Wärmezufuhr Nennwärmeleistung Manuelle Regelung der Wärmezufuhr mit k.A. integriertem Thermostat Mindestwärmeleistung Manuelle Regelung der Wärmezufuhr k.A. (Richtwert) mit Rückmeldung der Raum- und/oder Außentemperatur Maximale kontinuierliche Elektronische Regelung der Wärmezufuhr...
  • Page 7: Installation

    INSTALLATION Abmessungen Artikel Leistung (W) L (mm) H (mm) L1 (mm) H1 (mm) 10035059 1000/500 10035060 10035061 2000/1000 10035062...
  • Page 8 Mindestabstände Luftauslass Hinweis: Die Mindestabstände zu den vier Seiten des Heizgeräts müssen unbedingt eingehalten werden. Wandaufhängung...
  • Page 9: Geräteübersicht

    Rolleninstallation und Entfernung Drücken Wenn die Installation abgeschlossen ist, Drücken Sie auf den Druckknopf, um die ist ein klickendes Geräusch zu hören. Rollen wieder vom Gerät zu trennen. GERÄTEÜBERSICHT Gerät Luftauslass Bedienfeld Schalter Rollen...
  • Page 10 Bedienfeld 1 Leistungsanzeige 12 Bestätigen (OK) 2 Heizleistung 13 Programmeinstellung (Set) 3 Heizanzeige 14 Grad Celsius (°C) 4 Niedrige Heizanzeige (LO) 15 Temperaturanzeige 5 Hohe Heizanzeige (HI) 16 Minutenanzeige 6 Offene Fensteranzeige (WO) 17 Stundenanzeige 7 Manuelle Modusanzeige (M) 18 Tagesanzeige 8 Automatische Modusanzeige (A) 19 Wechseltaste automatischer und manueller Modus...
  • Page 11: Inbetriebnahme Und Bedienung

    INBETRIEBNAHME UND BEDIENUNG Erste Verwendung • Entnehmen Sie das Gerät vorsichtig aus der Verpackung. Bewahren Sie den Termin zur späteren Lagerung des Geräts auf. • Stellen Sie sicher, dass der Netzschalter (21) sich vor dem Einstecken des Geräts in der Position „0“ befindet. •...
  • Page 12 Temperatureinstellung • Die Temperatureinstellung ist im automatischen und im manuellen Modus identisch. Die voreingestellte Temperatureinheit ist °C. • Sobald das Gerät eingeschaltet ist, können Sie mit den Tasten Erhöhen (10) und Senken (1 1) die Temperatur einstellen, sobald die Temperaturanzeige (15) auf dem Bildschirm blinkt.
  • Page 13 Ein/Aus • Drücken Sie die Ein/Aus-Taste (20), um das Gerät ein- oder auszuschalten. Wenn Sie das Gerät ausschalten, während dieses sich im Automatikmodus befindet, läuft das Gerät entsprechend der Voreinstellungen. • Wenn Sie möchten, dass das Gerät für einen längeren Zeitraum ausgeschaltet bleibt, müssen Sie dieses zunächst in den manuellen Modus versetzen und dieses dann ausschalten.
  • Page 14 Offene Fernster Anzeige • Sobald das Gerät ein offenes Fenster erkennt, hört es auf zu heizen. Deaktivieren der Offenen Fernster Anzeige • Drücken Sie zum aus-/einschalten zwei Mal die Ein/Aus-Taste (20). Die Leuchtanzeige „WO“ wird in der offenen Fensteranzeige (6) deaktiviert. Das Gerät befindet sich im normalen Betriebszustand.
  • Page 15: Reinigung Und Pflege

    REINIGUNG UND PFLEGE • Schalten Sie das Gerät aus und ziehen Sie vor der Reinigung des Geräts den Netzstecker aus der Steckdose. • Stellen Sie sicher, dass das Gerät vor der Einstellung vollständig abgekühlt ist. • Reiben Sie die Geräteoberfläche mit einem feuchten (nicht nassen) Tuch ab, um Staub und Schmutz zu entfernen.
  • Page 16: Hinweise Zur Entsorgung

    HINWEISE ZUR ENTSORGUNG Wenn es in Ihrem Land eine gesetzliche Regelung zur Entsorgung von elektrischen und elektronischen Geräten gibt, weist dieses Symbol auf dem Produkt oder auf der Verpackung darauf hin, dass dieses Produkt nicht im Hausmüll entsorgt werden darf. Stattdessen muss es zu einer Sammelstelle für das Recycling von elektrischen und elektronischen Geräten gebracht werden.
  • Page 17: Technical Data

    Device Overview 23 Commissioning and Operation 25 Cleaning and Care 29 Hints on Disposal 30 Producer 30 TECHNICAL DATA Item number 10035059, 10035060 10035061, 10035062 Nominal power 500 W/ 1000 W 1000 W/ 2000 W Nominal voltage 220 – 240 V ~ 50 Hz Dimensions (mm)
  • Page 18: Safety Instructions

    SAFETY INSTRUCTIONS • Do not use the appliance until it is securely fi xed as described in this manual. • Check that the voltage indicates on the data plate corresponds with that of the local network before connecting the appliance to the mains power supply. •...
  • Page 19: Product Data Sheet

    PRODUCT DATA SHEET Model identifier(s): 10035059, 10035060 Item Symbol Value Unit Item Unit Heat output Type of heat input, for electric storage local space heaters only Nominal heat output manual heat charge control, with integrated thermostat Minimum heat output manual heat charge control with room and/or...
  • Page 20 Model identifier(s): 10035061, 10035062 Item Symbol Value Unit Item Unit Heat output Type of heat input, for electric storage local space heaters only Nominal heat output manual heat charge control, with integrated thermostat Minimum heat output manual heat charge control with room and/or (indicative) outdoor temperature feedback Maximum continuous heat...
  • Page 21: Installation

    INSTALLATION Dimensions Item Power (W) L (mm) H (mm) L1 (mm) H1 (mm) 10035059 1000/500 10035060 10035061 2000/1000 10035062...
  • Page 22 Minimum distances Air outlet Note: The minimum distances to the four sides of the heater must be observed. Wall mounting...
  • Page 23: Device Overview

    Wheel installation and removal Push When the installation is complete, a Press the push button to disconnect the clicking sound can be heard. wheels from the unit. DEVICE OVERVIEW Device Ait outlet Control panel Switches Wheels...
  • Page 24 Control panel 1 power display 12 Confirm (OK) 2 Heat output 13 Program setting (Set) 3 Heating indicator 14 Degrees Celsius (°C) 4 Low heat indicator (LO) 15 Temperature display 5 High heat indicator (HI) 16 Minute display 6 Open window display (WO) 17 Hour display 7 Manual mode indicator (M) 18 Day display...
  • Page 25: Commissioning And Operation

    COMMISSIONING AND OPERATION First use • Carefully remove the device from the packaging. Keep the date for later storage of the device. • Make sure that the power switch (21) is in the „0“ position before plugging in the device. •...
  • Page 26 Temperature adjustment • The temperature setting is identical in automatic and manual mode. The default temperature unit is °C. • Once the unit is switched on, you can use the Increase (10) and Decrease (1 1) buttons to set the temperature as soon as the temperature display (15) flashes on the screen.
  • Page 27 On/Off • Press the on/off button (20) to switch the unit on or off. If you turn the unit off while it is in automatic mode, the unit will run according to the default settings. • If you want the unit to remain off for a long period of time, you must first set the unit to manual mode and then turn it off.
  • Page 28 Open remote display • As soon as the device detects an open window, it stops heating. Deactivating the Open Window Display • Press the on/off button (20) twice to switch the unit off/on. The „WO“ indicator light is deactivated in the open window display (6). The unit is in normal operating mode.
  • Page 29: Cleaning And Care

    CLEANING AND CARE • Turn off the appliance and unplug the power cord from the wall outlet before cleaning the appliance. • Make sure that the product has cooled down completely before adjustment. • Wipe the surface of the unit with a damp (not wet) cloth to remove dust and dirt. •...
  • Page 30: Disposal Considerations

    DISPOSAL CONSIDERATIONS If there is a legal regulation for the disposal of electrical and electronic devices in your country, this symbol on the product or on the packaging indicates that this product must not be disposed of with household waste. Instead, it must be taken to a collection point for the recycling of electrical and electronic equipment.
  • Page 31: Fiche Technique

    Mise en marche et utilisation 39 Nettoyage et entretien 43 Informations sur le recyclage 44 Fabricant 44 FICHE TECHNIQUE Numéro d'article 10035059, 10035060 10035061, 10035062 Puissance nominale 500 W/ 1000 W 1000 W/ 2000 W Tension nominale 220 – 240 V ~ 50 Hz...
  • Page 32: Consignes De Sécurité

    CONSIGNES DE SÉCURITÉ • Avant utilisation, vérifi ez la tension sur l‘étiquette de l‘appareil et connectez uniquement l‘appareil à des prises correspondant à sa tension. • Si le cordon d‘alimentation est endommagé, faites-le remplacer par un spécialiste qualifi é. • Ne placez pas la cheminée directement sous la prise. •...
  • Page 33: Fiche De Données Produit

    FICHE DE DONNÉES PRODUIT Référence (s) du produit 10035059, 10035060 Donnée Symbole Valeur Unité Donnée Unité Puissance calorifique Uniquement pour les radiateurs électriques à accumulation : Type de régulation de l'apport de chaleur Puissance calorifique Pnom Régulation manuelle de l'apport de chaleur...
  • Page 34 Référence (s) du produit 10035061, 10035062 Donnée Symbole Valeur Unité Donnée Unité Puissance calorifique Uniquement pour les radiateurs électriques à accumulation : Type de régulation de l'apport de chaleur Puissance calorifique Pnom Régulation manuelle de l'apport de chaleur Sans nominale avec thermostat intégré...
  • Page 35: Installation

    INSTALLATION Mesures Article Puissance L (mm) H (mm) L1 (mm) H1 (mm) 10035059 1000/500 10035060 10035061 2000/1000 10035062...
  • Page 36 Distances minimales Sortie d‘air Remarque : les distances minimales doivent être strictement respectées des quatre côtés de l‘appareil. Suspension murale...
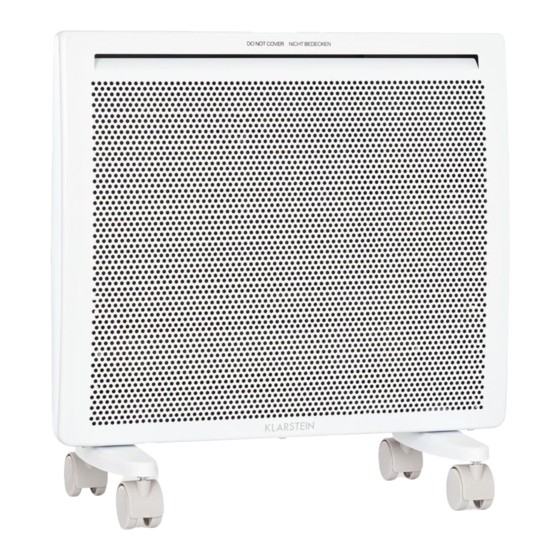
  • Page 37: Aperçu De L'appareil

    Installation et démontage des roulettes Appuyez Vous entendrez un clic lorsque Appuyez sur le bouton pour séparer les l'installation sera terminée. roulettes de l'appareil. APERÇU DE L‘APPAREIL Appareil Panneau de Sortie d‘air commande Interrupteur Roulettes...
  • Page 38 Panneau de commande 1 Affichage de la puissance 12 Confirmer (OK) 2 Puissance de chauffage 13 Paramètres du programme (Set) 3 Témoin de chauffage 14 Degrés Celsius (°C) 4 Témoin de chauffage bas (LO) 15 Affichage de la température 5 Témoin de chauffage élevé (HI) 16 Affichage des minutes 6 Témoin de fenêtre ouverte (WO) 17 Affichage des heures...
  • Page 39: Mise En Marche Et Utilisation

    MISE EN MARCHE ET UTILISATION Première utilisation • Retirez soigneusement l‘appareil de son emballage. Conservez la date pour le stockage ultérieur de l‘appareil. • Assurez-vous que l‘interrupteur d‘alimentation (21) est en position „0“ avant de brancher l‘appareil. • Assurez-vous que l‘appareil est installé conformément au mode d‘emploi. •...
  • Page 40 Réglage de la température • Le réglage de la température est identique en mode automatique et manuel. L‘unité de température par défaut est °C. • Dès que l‘appareil est allumé, vous pouvez utiliser les touches Augmenter (10) et Réduire (1 1) pour régler la température quand l‘affichage de température (15) clignote à...
  • Page 41 Marche / Arrêt • Appuyez sur la touche marche / arrêt (20) pour allumer ou éteindre l‘appareil. Si vous éteignez l‘appareil alors qu‘il est en mode automatique, l‘appareil fonctionne selon les paramètres par défaut. • Si vous souhaitez que l‘appareil reste éteint pendant une période plus longue, mettez-le d‘abord en mode manuel, puis éteignez-le.
  • Page 42: Verrouillage Parental

    Témoin de fenêtre ouverte • Dès que l‘appareil détecte une fenêtre ouverte, il cesse de chauffer. Désactivation du témoin de fenêtre ouverte • Pour allumer / éteindre, appuyez deux fois sur la touche marche / arrêt (20). Le voyant „WO“ du témoin de fenêtre ouverte (6) est désactivé. L‘appareil passe en mode de fonctionnement normal.
  • Page 43: Nettoyage Et Entretien

    NETTOYAGE ET ENTRETIEN • Éteignez l‘appareil et débranchez la fiche de la prise avant de nettoyer l‘appareil. • Assurez-vous que l‘appareil a complètement refroidi. • Essuyez la surface de l‘appareil avec un chiffon humide (non mouillé) pour éliminer la poussière et la saleté. •...
  • Page 44: Informations Sur Le Recyclage

    INFORMATIONS SUR LE RECYCLAGE S‘il existe une réglementation pour l‘élimination ou le recyclage des appareils électriques et électroniques dans votre pays, ce symbole sur le produit ou sur l‘emballage indique que cet appareil ne doit pas être jeté avec les ordures ménagères.
  • Page 45: Datos Técnicos

    Vista general del aparato 51 Puesta en funcionamiento 53 Limpieza y cuidado 57 Retirada del aparato 58 Fabricante 58 DATOS TÉCNICOS Número de artículo 10035059, 10035060 10035061, 10035062 Potencia nominal 500 W/ 1000 W 1000 W/ 2000 W Tensión nominal 220 – 240 V ~ 50 Hz...
  • Page 46: Indicaciones De Seguridad

    INDICACIONES DE SEGURIDAD • Antes de utilizar el aparato, compruebe la tensión en la placa técnica del mismo y conecte el aparato solamente a tomas de corriente que se adecuen a dicha tensión. • Si el cable de alimentación está dañado, deberá ser sustituido por un servicio técnico.
  • Page 47: Hoja De Datos Del Producto

    HOJA DE DATOS DEL PRODUCTO Denominación del modelo 10035059, 10035060 Dato Símbolo Valor Unidad Dato Unidad Potencia térmica Solo con disposítivos de acumulación de calor eléctricos para abastecimiento local: Tipo de regulación del abastecimiento de calor Potencia térmica nominal Pnom Regulación manual del abastecimiento de calor...
  • Page 48 Denominación del modelo 10035061, 10035062 Dato Símbolo Valor Unidad Dato Unidad Potencia térmica Solo con disposítivos de acumulación de calor eléctricos para abastecimiento local: Tipo de regulación del abastecimiento de calor Potencia térmica nominal Pnom Regulación manual del abastecimiento de calor con termostato integrado: Potencia térmica mínima Pmin...
  • Page 49: Instalación

    INSTALACIÓN Dimensiones Artículo Potencia (W) L (mm) H (mm) L1 (mm) H1 (mm) 10035059 1000/500 10035060 10035061 2000/1000 10035062...
  • Page 50 Distancia mínima Salida de aire Nota: Las distancias mínimas a los cuatro lados del aparato deben cumplirse obligatoriamente. Soporte para pared...
  • Page 51: Vista General Del Aparato

    Instalación de las ruedas y distancia Presionar Cuando se haya completado la Presione el botón para separar las instalación, escuchará un sonido de clic. ruedas del aparato. VISTA GENERAL DEL APARATO Aparato Panel de control Salida de aire Interruptor Ruedas...
  • Page 52 Panel de control 1 Indicador de potencia 12 Confirmar (OK) 2 Potencia de calefacción 13 Ajustes del programa (set) 3 Indicador de calefacción 14 Grados Celsius (°C) 4 Indicador de nivel de calefacción bajo 15 Indicador de temperatura (LO) 5 Indicador de nivel de calefacción alto 16 Indicador de minutos (HI) 6 Indicador de ventana abierta (WO)
  • Page 53: Puesta En Funcionamiento

    PUESTA EN FUNCIONAMIENTO Primer uso • Retire el aparato del embalaje con cuidado. Conserve el embalaje para almacenar posteriormente el aparato. • Asegúrese de que el interruptor de alimentación (21) se sitúe en la posición „0“ antes de enchufar el aparato. •...
  • Page 54 Configuración de temperatura • La configuración de temperatura es idéntica en los modos manual y automático. La unidad de temperatura predeterminada es °C. • Cuando el aparato esté encendido, pulse los botones Aumentar (10) y Reducir (1 1) para ajustar la temperatura en cuanto el indicador de temperatura (15) parpadee en la pantalla.
  • Page 55 On/Off • Pulse el botón on/off (20) para encender o apagar el aparato. Si apaga el aparato mientras se encuentra en modo automático, este continuará funcionando según la programación predeterminada. • Si desea que el aparato se mantenga apagado durante más tiempo, primero debe cambiarlo al modo manual y luego apagarlo.
  • Page 56 Indicador de ventana abierta • Si el aparato detecta una ventana abierta, dejará de calentar. Desactivar el indicador de ventana abierta • Pulse dos veces el botón on/off (20) para desactivarlo/activarlo. El indicador luminoso „WO“ desaparece del indicador de ventana abierta (6). El aparato se encuentra en modo normal de funcionamiento.
  • Page 57: Limpieza Y Cuidado

    LIMPIEZA Y CUIDADO • Apague el aparato y desconecte el enchufe de la toma de corriente antes de limpiarlo. • Asegúrese de que el aparato se haya enfriado completamente antes de realizar cualquier ajuste. • Limpie la parte exterior con un paño húmedo (no mojado) para eliminar los sedimentos de polvo y la suciedad.
  • Page 58: Retirada Del Aparato

    INDICACIONES SOBRE LA RETIRADA DEL APARATO Si en su país existe una disposición legal relativa a la eliminación de aparatos eléctricos y electrónicos, este símbolo estampado en el producto o en el embalaje advierte que no debe eliminarse como residuo doméstico. En lugar de ello, debe depositarse en un punto de recogida de reciclaje de aparatos eléctricos y electrónicos.
  • Page 59 Descrizione del dispositivo 65 Messa in funzione e utilizzo 67 Pulizia e manutenzione 71 Smaltimento 72 Produttore 72 DATI TECNICI Numero articolo 10035059, 10035060 10035061, 10035062 Potenza nominale 500 W/ 1000 W 1000 W/ 2000 W Tensione nominale 220 – 240 V ~ 50 Hz...
  • Page 60: Avvertenze Di Sicurezza

    AVVERTENZE DI SICUREZZA • Controllare la tensione sulla targhetta del dispositivo e collegarlo solo a prese di corrente con tensione corrispondente. • Se il cavo di alimentazione è danneggiato, farlo sostituire da un tecnico specializzato. • Non posizionare la stufa direttamente sotto a una presa elettrica. •...
  • Page 61: Scheda Informativa Del Prodotto

    SCHEDA INFORMATIVA DEL PRODOTTO Identificazione del modello (i) 10035059, 10035060 Indicazione Simbolo Valore Unità Indicazione Unità Potenza termica Solo per gli apparecchi per il riscaldamento d'ambiente locale elettrici ad accumulo: Tipo di controllo dell´apporto termico Potenza termica nominale Pnom Controllo manuale del carico termico con N.D.
  • Page 62 Identificazione del modello (i) 10035061, 10035062 Indicazione Simbolo Valore Unità Indicazione Unità Potenza termica Solo per gli apparecchi per il riscaldamento d'ambiente locale elettrici ad accumulo: Tipo di controllo dell´apporto termico Potenza termica nominale Pnom Controllo manuale del carico termico con N.D.
  • Page 63: Installazione

    INSTALLAZIONE Dimensioni Articolo Potenza (W) L (mm) H (mm) L1 (mm) H1 (mm) 10035059 1000/500 10035060 10035061 2000/1000 10035062...
  • Page 64 Distanza minima Uscita aria Nota: le distanze minime sui quattro lati della stufa devono essere assolutamente rispettate. Fissaggio alla parete...
  • Page 65: Descrizione Del Dispositivo

    Installazione e rimozione delle rotelle Presionar Quando l’installazione è conclusa, si Premere il tasto per staccare le rotelle dal sente un clic. dispositivo. DESCRIZIONE DEL DISPOSITIVO Dispositivo Uscita Panello di controllo dell’aria Interruttore Rotelle...
  • Page 66 Panello di controllo 1 Indicazione potenza 12 Confermare (OK) 2 Potenza riscaldante 13 Impostazione programma (Set) 3 Indicazione riscaldamento 14 Gradi Celsius (°C) 4 Indicazione riscaldamento a bassa 15 Indicazione temperatura intensità (LO) 5 Indicazione riscaldamento ad alta 16 Indicazione minuti intensità...
  • Page 67: Messa In Funzione E Utilizzo

    MESSA IN FUNZIONE E UTILIZZO Primo utilizzo • Togliere il dispositivo dall’imballaggio facendo attenzione. Conservare la scatola per riporvi il dispositivo in futuro. • Assicurarsi che l’interruttore di rete (21) sia in posizione “0” prima di collegare la spina del dispositivo. •...
  • Page 68 Impostare la temperatura • L’impostazione della temperatura è identica in modalità automatica e manuale. L’unità di temperatura predefinita è °C. • Non appena il dispositivo è acceso e l’indicazione della temperatura (15) lampeggia, è possibile impostare la temperatura con Aumentare (10) e Diminuire (1 1).
  • Page 69 On/Off • Premere On/Off (20) per accendere e spegnere il dispositivo. Se si spegne il dispositivo mentre si trova in modalità automatica, il dispositivo opera in base alle impostazioni predefinite. • Se si desidera che il dispositivo rimanga spento più a lungo, è necessario metterlo in modalità...
  • Page 70 Indicazione finestra aperta • Non appena il dispositivo rileva una finestra aperta, smette di riscaldare. Disattivare l’indicazione finestra aperta • Premere due volte On/Off (20) per spegnere/accendere. L’indicazione luminosa “WO” viene disattivata nell’indicazione finestra aperta (6). Il dispositivo si trova in normale stato di funzionamento.
  • Page 71: Pulizia E Manutenzione

    PULIZIA E MANUTENZIONE • Spegnere il dispositivo e staccare la spina dalla presa elettrica prima della pulizia. • Assicurarsi che il dispositivo si sia completamente raffreddato prima della pulizia. • Strofinare le superfici con un panno umido (non bagnato), in modo da rimuovere la polvere.
  • Page 72: Smaltimento

    AVVISO DI SMALTIMENTO Se nel proprio paese si applicano le regolamentazioni inerenti lo smaltimento di dispositivi elettrici ed elettronici, questo simbolo sul prodotto o sulla confezione segnala che questi prodotti non possono essere smaltiti con i rifiuti normali e devono essere portati a un punto di raccolta di dispositivi elettrici ed elettronici.

Ce manuel est également adapté pour:

100350601003506110035062

Table des Matières