Table des Matières
Publicité
Les langues disponibles
Les langues disponibles
Liens rapides
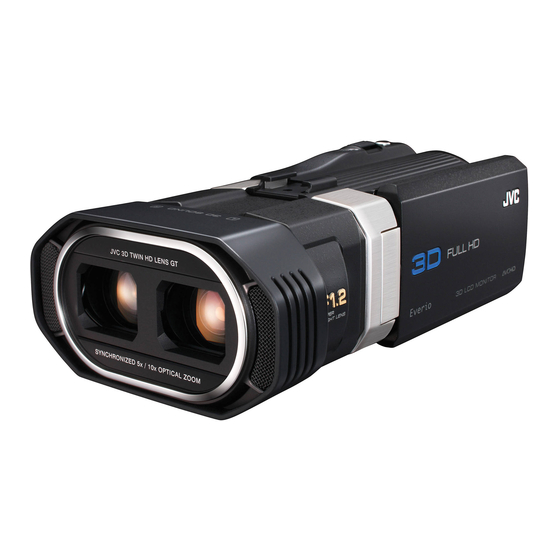
HD MEMORY CAMERA
GS-TD1 A
Basic User Guide
Thank you for purchasing this JVC product.
Before use, please read the Safety Precautions and Cautions on p. 2 and p. 34 to ensure safe
use of this product.
Detailed User Guide
.
A "Basic User Guide" (this manual) and a "Detailed User Guide" are available for this
product.
For more details on operating this product, please refer to the "Detailed User Guide"
at the following website.
http://manual.jvc.co.jp/index.html/
o
You can also access the website from the supplied CD-ROM. (p. 27)
o
For Future Reference:
Enter the Model No. (located on the bottom of the camera) and Serial No.
(located on the battery pack mount of the camera) below.
Model No.
Serial No.
© 2011 Victor Company of Japan, Limited
*LYT2308-001B-M*
LYT2308-001B-M
EN SP FR
US
0111TKH-SW-VM
Publicité
Chapitres
Table des Matières
Dépannage

Manuels Connexes pour JVC Everio GS-TD1


Sommaire des Matières pour JVC Everio GS-TD1
- Page 1 HD MEMORY CAMERA GS-TD1 A Basic User Guide Thank you for purchasing this JVC product. Before use, please read the Safety Precautions and Cautions on p. 2 and p. 34 to ensure safe use of this product. Detailed User Guide A “Basic User Guide”...
-
Page 2: Safety Precautions
The battery pack, the camcorder with battery installed, and the remote control with battery installed should not be exposed to excessive heat such as direct sunlight, fire or the like. For more information, refer to the Detailed User Guide http://manual.jvc.co.jp/index.html/... - Page 3 Make a backup of important recorded data when unused for long periods of time. JVC will not be responsible for any lost data. It is 13. Refer all servicing to qualifi ed service personnel. recommended to copy your important recorded Servicing is required when the apparatus has data to a disc or other recording media for storage.
-
Page 4: Precautions On Recording And Playing
3D effect may be weak if viewed from an angle other than the front. The LCD monitor appears darker when 3D images are displayed. Change the display to 2D when it is difficult to see, such as when using this unit outdoors. For more information, refer to the Detailed User Guide http://manual.jvc.co.jp/index.html/... - Page 5 Recording and viewing of 3D images is only recommended for ages 5 to 6 and above. Guardians should pay close attention to children as health problems may result if fatigue and discomfort are not noticed immediately. For more information, refer to the Detailed User Guide http://manual.jvc.co.jp/index.html/...
-
Page 6: Table Des Matières
A “Basic User Guide” (this manual) and a “Detailed User Guide” are available for this product. For more details on operating this product, please refer to the “Detailed User Guide” at the following website. http://manual.jvc.co.jp/index.html/ You can also access the website from the supplied CD-ROM. (p. 27) Verifying the Accessories... -
Page 7: Names Of Parts And Functions
3D Button (p. 14, p. 15, p. 17) A/B (Video/Still Image) Button Switches between video and still image modes. i.AUTO (Intelligent Auto) Button Switches between Intelligent Auto and Manual modes. Remote Sensor For more information, refer to the Detailed User Guide http://manual.jvc.co.jp/index.html/... -
Page 8: Names Of Buttons And Functions On The Lcd Monitor
Press this Switches between recording and playback modes. button again to release the displays. Index Screen Button LCD Monitor 3D/2D Display Switching Button Operation Buttons (p. 18) For more information, refer to the Detailed User Guide http://manual.jvc.co.jp/index.html/... -
Page 9: Menu Screen
(For details, refer to the Detailed User Guide.) (Adjust by lightly tapping with a corner of an SD card, etc. Do not press with an object with a sharp tip or do not press hard.) For more information, refer to the Detailed User Guide http://manual.jvc.co.jp/index.html/... -
Page 10: Igetting Started
Cover CAUTION Be sure to use JVC battery packs. If you use any other battery packs besides JVC battery packs, safety and performance cannot be guaranteed. Charging time: Approx. 2 h 40 m (using supplied battery pack) * The charging time is when the unit is used at 25°C (77°F). If the battery pack is charged outside the room temperature range of 10°C to 35°C (50°F to 95°F), charging may... -
Page 11: Grip Adjustment
SD card. Turn off the camcorder by pressing the M button for about 2 seconds. Label To remove the card Push the card inward once, then pull it out straight. For more information, refer to the Detailed User Guide http://manual.jvc.co.jp/index.html/... - Page 12 REC MEDIA FOR VIDEO REC MEDIA FOR IMAGE C Tap “FILE”. E Tap “SD CARD”. FORMAT SD CARD FILE REC MEDIA FOR VIDEO SD CARD D Tap “YES”. E After formatting, tap “OK”. For more information, refer to the Detailed User Guide http://manual.jvc.co.jp/index.html/...
-
Page 13: Clock Setting
“SAVE”. hours before setting the clock. (p. 10) The city name and time difference are displayed. Tap “<” or “>” to select the city name. CLOCK/AREA SETTING SAVE For more information, refer to the Detailed User Guide http://manual.jvc.co.jp/index.html/... -
Page 14: Irecording
(MP4(MVC)) and 1 hour 20 minutes during 2D recording.(p. 31) Do not remove the battery pack, AC adapter, or SD card when the access lamp is lighted. The recorded data may become unreadable. For more information, refer to the Detailed User Guide http://manual.jvc.co.jp/index.html/... -
Page 15: Still Image Recording
You can also tap Q on the touch screen to record. However, focus cannot be set by pressing halfway. Indications during still image recording Recording Media 3D/2D Mode 10:10AM Battery Indicator Shutter Speed Image Size Intelligent Auto Mode Focus Remaining Number of Shots Recording in Progress For more information, refer to the Detailed User Guide http://manual.jvc.co.jp/index.html/... - Page 16 NOTE When “PARALLAX ADJUSTMENT” is assigned to the ADJ button, parallax can be adjusted manually using the ADJ button and control dial. For details, refer to the “Detailed User Guide”. For more information, refer to the Detailed User Guide http://manual.jvc.co.jp/index.html/...
-
Page 17: Iplayback
Tap W to show all the thumbnails that are displayed in a group. Tap again to restore the group. (Still image only) To capture a still image during playback Pause the playback and press the SNAPSHOT button. For more information, refer to the Detailed User Guide http://manual.jvc.co.jp/index.html/... -
Page 18: Playing Back On Tv
If you are using an HDTV, you can play back in HD quality by connecting to the HDMI mini connector. Connecting to the HDMI connector HDMI Mini Cable (Provided) To HDMI Mini HDMI Connector Input Connector For more information, refer to the Detailed User Guide http://manual.jvc.co.jp/index.html/... - Page 19 You can enjoy realistic audio sounds by recording with 3D sound turned on and viewing the video from the center of the TV or center of the right and left speakers. For more information, refer to the Detailed User Guide http://manual.jvc.co.jp/index.html/...
- Page 20 When viewing 3D images on this unit, a message will be displayed every 30 minutes. To turn off the message display, set “3D DISPLAY WARNING” to “OFF”. To change the setting, refer to the Detailed User Guide (Menu Settings/“COMMON” Menu). For more information, refer to the Detailed User Guide http://manual.jvc.co.jp/index.html/...
-
Page 21: Icopying
“AVCHD DVD” enables you to copy (record) videos to a DVD in the high definition quality. Note that they cannot be played back on devices that do not support AVCHD. For more information, refer to the Detailed User Guide http://manual.jvc.co.jp/index.html/... -
Page 22: Creating Discs With A Dvd Writer Or External Blu-Ray Drive
To use the USB cable provided with the external Blu-ray drive, purchase the USB extension cable. Mini-A (Male) – A (Female) (Part number: QAM0852-001) * Consult your nearest JVC service center. To USB Connector NOTE AC Adapter To AC The recordable time on the disc... - Page 23 To add more files to the DVD later, tap copied. “NO”. “UNSAVED SCENES” (video)/ “UNSAVED IMAGES” (still image): Videos or still images that have never been copied are automatically selected and copied. For more information, refer to the Detailed User Guide http://manual.jvc.co.jp/index.html/...
- Page 24 Æ To A “SELECT FROM IMAGES”: Select and copy the desired still images individually. Æ To B For more information, refer to the Detailed User Guide http://manual.jvc.co.jp/index.html/...
-
Page 25: Using A Usb External Hard Disk Drive
To USB Connector To play back the files copied Select “PLAYBACK” in step 1. Videos or still images saved in an external * Consult your nearest JVC service hard disk drive can be played back on this center. unit. For more information, refer to the Detailed User Guide... -
Page 26: Copying To Computer
It is recommended to use a BD/DVD writer (optional). Still images cannot be recorded to discs using the provided software. For more information, contact your PC’s manufacturer. For more information, refer to the Detailed User Guide http://manual.jvc.co.jp/index.html/... - Page 27 To view the Detailed User Guide, connect to the internet and click “Detailed User Guide” in step 2. For the operating details of Everio MediaBrowser 3D, refer to “Help” - “MediaBrowser Help” on the Everio MediaBrowser 3D toolbar. The instruction manual will appear. For more information, refer to the Detailed User Guide http://manual.jvc.co.jp/index.html/...
- Page 28 Tap “BACK UP”. CONNECT TO PC B Click “Safely Remove USB Mass Storage Device”. C (For Windows Vista) Click “OK”. BACK UP D Disconnect the USB cable and close the LCD monitor. For more information, refer to the Detailed User Guide http://manual.jvc.co.jp/index.html/...
-
Page 29: Ifurther Information
Use of this software is authorized according to the terms of the software license. (for inquires regarding this unit) When contacting the nearest JVC office or agency in your country (refer to the JVC Worldwide Service Network at http://www.jvc-victor.co.jp/english/worldmap/index-e.html) about this software, please have the following information ready. -
Page 30: Recordable Time/Number Of Images
Up to 9,999 still images may be recorded on the built-in memory (during 2D mode) and SD cards with at least 16 GB capacity (regardless of image size and quality). For more information, refer to the Detailed User Guide http://manual.jvc.co.jp/index.html/... -
Page 31: Troubleshooting
B Remove the AC adapter and battery pack from this unit, reattach them, open the LCD monitor and this unit powers on automatically. 5 If the above do not solve the problem, consult your nearest JVC dealer or JVC service center. - Page 32 (Otherwise, charging may stop to protect the battery pack.) This is not a malfunction. (This unit may This unit heats up. become warm when used for a long time.) For more information, refer to the Detailed User Guide http://manual.jvc.co.jp/index.html/...
-
Page 33: Warning Indications
Appears for 5 seconds after power is CHECK LENS COVER turned on if the lens cover is closed or when it is dark. Consult your JVC dealer or the JVC UNABLE TO RECORD service center. PROPERLY IN 3D PLEASE SWITCH TO 2D FOR... -
Page 34: Cautions
“Siemens Plug”, as shown. battery. For this AC plug adapter, consult your nearest (USA and Canada only) JVC dealer. Plug Adapter Recording Medium • Be sure to follow the guidelines below to prevent corruption or damage to your recorded data. - Page 35 ... near appliances generating strong magnetic Changes or modifications not approved by or electric fields (speakers, broadcasting JVC could void the user’s authority to operate antennas, etc.). the equipment. This equipment has been ... in places subject to extremely high (over 40°C tested and found to comply with the limits for or 104°F) or extremely low (under 0°C or 32°F)
-
Page 36: Specifications
* When using the AC adapter overseas, please prepare a commercially available converter plug for the country or region of visit. The specifications and appearance of this product are subject to changes for further improvement without prior notice. For more information, refer to the Detailed User Guide http://manual.jvc.co.jp/index.html/... - Page 37 VIDEOCÁMARA GS-TD1 A Guía básica del usuario Gracias por haber adquirido este producto JVC. Antes de su uso, lea las precauciones de seguridad y advertencias en p. 2 y p. 34 para garantizar un uso seguro de este producto. Guía detallada del usuario Un “Guía básica del usuario”...
-
Page 38: Precauciones De Seguridad
Para obtener más información, consulte la Guía detallada del usuario http://manual.jvc.co.jp/index.html/... - Page 39 JVC no se responsabilizará de cualquier está dañado, si ocurrió derrame de líquidos pérdida de datos. Le sugerimos que guarde los o caída de objetos dentro del aparato, si el...
- Page 40 El monitor LCD se ve más oscuro cuando aparecen las imágenes en 3D. Cambie la visualización a 2D cuando la misma resulte difícil, como por ejemplo cuando se utiliza esta unidad en exteriores. Para obtener más información, consulte la Guía detallada del usuario http://manual.jvc.co.jp/index.html/...
- Page 41 Los tutores deben prestar mucha atención a los niños ya que pueden surgir problemas de salud si no se nota la fatiga y la molestia en forma inmediata. Para obtener más información, consulte la Guía detallada del usuario http://manual.jvc.co.jp/index.html/...
-
Page 42: Comprobación De Los Accesorios
Para más detalles sobre el funcionamiento de este producto, consulte el “Guía detallada del usuario” en el siguiente sitio web. http://manual.jvc.co.jp/index.html/ También puede acceder al sitio web desde el CD-ROM provisto. (p. 27) Comprobación de los accesorios Adaptador de CA Batería... -
Page 43: Nombres De Piezas Y Funciones
Botón de 3D (p. 14, p. 15, p. 17) Para grabación en 2D, sólo se utilizan las lentes del lateral Botón A/B (vídeo/imagen fija) izquierdo. Alterna entre los modos de vídeo e imagen fija. Para obtener más información, consulte la Guía detallada del usuario http://manual.jvc.co.jp/index.html/... -
Page 44: Nombres De Los Botones Y Funciones En El Monitor Lcd
Presione este botón nuevamente para que aparezcan las visualizaciones. Botón de pantalla de índice Botón del Monitor LCD para alternar entre visualizaciones 3D/2D Botones de funcionamiento (p. 18) Para obtener más información, consulte la Guía detallada del usuario http://manual.jvc.co.jp/index.html/... -
Page 45: Utilizar La Pantalla Táctil
área de pulsación. (para más información, consulte la Guía detallada del usuario). (Realice el ajuste pulsando ligeramente con el margen de una tarjeta SD, etc. No presione con un objeto de punta filosa ni presione con fuerza.) Para obtener más información, consulte la Guía detallada del usuario http://manual.jvc.co.jp/index.html/... -
Page 46: Iintroducción
Cubierta PRECAUCIÓN Asegúrese de utilizar baterías JVC. Si utiliza alguna otra batería que no sea JVC, no se pueden garantizar la seguridad ni el rendimiento del producto. Tiempo de carga: Aprox. 2 h 40 m (utilizando la batería suministrada) * El tiempo de carga aplica cuando la unidad se utiliza a 25 °C (77 °F). Si se carga la batería en un rango de temperatura ambiente que no se encuentre entre 10 °C... -
Page 47: Ajuste De La Correa De Mano
SD. Apague la videocámara presionando el botón M durante unos 2 segundos. Etiqueta Para extraer la tarjeta Presione la tarjeta hacia dentro y luego retírela hacia arriba. Para obtener más información, consulte la Guía detallada del usuario http://manual.jvc.co.jp/index.html/... - Page 48 SOPORTE GRAB. VÍDEO SOPORTE GRAB. FOTO C Pulsar “ARCHIVO”. E Pulsar “TARJETA SD”. FORMATEAR TARJETA SD SOPORTE GRAB. VÍDEO ARCHIVO TARJETA SD D Pulsar “SÍ”. E Después del formateado, pulse “ACEPTAR”. Para obtener más información, consulte la Guía detallada del usuario http://manual.jvc.co.jp/index.html/...
-
Page 49: Ajuste Del Reloj
Cargue esta unidad durante más de 24 horas antes de ajustar el reloj. (p. 10) Para obtener más información, consulte la Guía detallada del usuario http://manual.jvc.co.jp/index.html/... -
Page 50: Igrabación
(p. 31) Cuando la luz de acceso se ilumina, no extraiga la batería, el adaptador de CA ni la tarjeta SD. Es posible que los datos grabados no puedan leerse. Para obtener más información, consulte la Guía detallada del usuario http://manual.jvc.co.jp/index.html/... -
Page 51: Grabación De Imágenes Fijas
Indicaciones durante la grabación de imágenes fijas Modo 3D/2D Grabación de soportes 10:10AM Indicador de batería Velocidad del obturador Tamaño de imagen Modo Auto Inteligente Enfoque Número restante de tomas Grabación en curso Para obtener más información, consulte la Guía detallada del usuario http://manual.jvc.co.jp/index.html/... - Page 52 Cuando “AJUSTE DE PARALAJE” se designa al botón ADJ, el paralaje se puede ajustar en forma manual utilizando el botón y dial de control ADJ. Para más información, consulte la “Guía detallada del usuario”. Para obtener más información, consulte la Guía detallada del usuario http://manual.jvc.co.jp/index.html/...
-
Page 53: Ireproducción
Pulse nuevamente para restaurar el grupo. (Sólo imagen fija) Para capturar una imagen fija durante una reproducción Ponga la reproducción en pausa y presione el botón SNAPSHOT. Para obtener más información, consulte la Guía detallada del usuario http://manual.jvc.co.jp/index.html/... -
Page 54: Reproducción En Un Televisor
Si está utilizando un HDTV, puede reproducir en calidad HD conectándose a un mini conector HDMI. Conexión al conector HDMI Mini cable HDMI (Proporcionado) A mini Entrada del conector HDMI conector HDMI Para obtener más información, consulte la Guía detallada del usuario http://manual.jvc.co.jp/index.html/... - Page 55 Puede disfrutar sonidos de audio realistas grabando con el sonido en 3D encendido y visualizando el vídeo desde el centro del TV o desde el centro de los altavoces izquierdo y derecho. Para obtener más información, consulte la Guía detallada del usuario http://manual.jvc.co.jp/index.html/...
- Page 56 Cuando visualice imágenes en 3D en esta unidad, aparecerá una mensaje cada 30 minutos. Para detener la aparición de este mensaje, ajuste “ALERTA VISIÓN 3D” en “OFF”. Para cambiar la configuración, consulte la Guía detallada del usuario (Configuraciones de menú/Menú “GENERAL”) Para obtener más información, consulte la Guía detallada del usuario http://manual.jvc.co.jp/index.html/...
-
Page 57: Icopia
NOTA “AVCHD DVD” le permite copiar (grabar) vídeos en un DVD en calidad de alta definición. Tenga en cuenta que no pueden reproducirse en dispositivos que no soportan AVCHD. Para obtener más información, consulte la Guía detallada del usuario http://manual.jvc.co.jp/index.html/... -
Page 58: Crear Discos Con Una Grabadora De Dvd O Una Unidad Externa De Blu-Ray
Blu-ray externa, compre el cable A conector de extensión USB. Mini A (macho) A (hembra) (número de pieza: QAM0852-001) Adaptador de CA * Consulte con su centro de servicio de JVC a la Salida de más cercano. CA(110 V a 240 V) NOTA Escritor DVD(CU-VD3U) El tiempo de grabación de los discos... - Page 59 Para reproducir en otros dispositivos, pulse “ESCENAS SIN GUARDAR” (vídeo)/ “IMÁG. NO GUARDADAS” (imagen fija): “SÍ”. Para agregar más archivos al DVD más tarde, pulse “NO”. Para obtener más información, consulte la Guía detallada del usuario http://manual.jvc.co.jp/index.html/...
- Page 60 “SELECC. DE IMÁGENES”: Selecciona y índice durante la reproducción. Los copia las imágenes fijas deseadas en forma archivos especiales tampoco pueden individual. Æ A B copiarse. Para obtener más información, consulte la Guía detallada del usuario http://manual.jvc.co.jp/index.html/...
-
Page 61: Utilizar Una Unidad Usb De Disco Duro Externo
“SÍ”. Para reproducir los archivos copiados Seleccione “REPRODUCCIÓN” en el paso 1. * Consulte con su centro de servicio de JVC más Los vídeos o imágenes fijas guardados en un cercano. disco duro externo pueden reproducirse en esta unidad. -
Page 62: Copia Al Pc
Se recomienda el uso de un escritor BD/DVD (opcional). No se pueden grabar imágenes fijas a discos utilizando el software proporcionado. Para obtener más información, póngase en contacto con el fabricante de su PC. Para obtener más información, consulte la Guía detallada del usuario http://manual.jvc.co.jp/index.html/... - Page 63 Para obtener los detalles operativos de Everio MediaBrowser 3D, consulte “Ayuda” - “Ayuda de MediaBrowser” en la barra de herramientas de Everio MediaBrowser 3D. Aparecerá el manual de instrucciones. Para obtener más información, consulte la Guía detallada del usuario http://manual.jvc.co.jp/index.html/...
- Page 64 D Desconecte el cable USB y cierre el HACER COPIA DE SEGURIDAD monitor LCD. El software proporcionado Everio MediaBrowser se inicia en el PC. Las demás operaciones se deben realizar en el PC. Para obtener más información, consulte la Guía detallada del usuario http://manual.jvc.co.jp/index.html/...
-
Page 65: Imás Información
El uso de este software está autorizado de acuerdo con las condiciones de la licencia de software. JVC (para información sobre esta unidad) Cuando se ponga en contacto con la oficina o agencia JVC más cercana de su país (consulte la Red de servicios internacionales JVC en http://www.jvc-victor.co.jp/english/worldmap/index-e.html) para hacer consultas sobre este software, tenga a mano la siguiente información. -
Page 66: Tiempo De Grabación/Número De Imágenes
Hasta 9.999 imágenes fijas pueden grabarse en la memoria integrada (durante modo 2D) y en las tarjetas SD con capacidad mínima de 16 GB (sin importar el tamaño ni la calidad de la imagen). Para obtener más información, consulte la Guía detallada del usuario http://manual.jvc.co.jp/index.html/... -
Page 67: Resolución De Problemas
Si tiene dificultades para operar la unidad, consulte las descripciones detalladas del “Guía detallada del usuario”. http://manual.jvc.co.jp/index.html/ 3 Consulte las preguntas frecuentes de los nuevos productos en la página web de JVC. http://www.jvc.com/ 4 Esta unidad es un dispositivo controlado por microordenador. La descarga electrostática, el ruido exterior y la interferencia (de un televisor, radio, etc.) pueden provocar que la... - Page 68 Esto no debe considerarse un mal La temperatura de esta funcionamiento. (la temperatura de esta unidad aumenta. unidad puede subir si se utiliza durante un largo tiempo). Para obtener más información, consulte la Guía detallada del usuario http://manual.jvc.co.jp/index.html/...
-
Page 69: Indicaciones De Advertencia
DEL OBJETIVO la lente está colocada o cuando está oscuro. IMPOSIBLE GRABAR Póngase en contacto con su distribuidor JVC ADECUADAMENTE EN 3D o centro de servicios JVC. CAMBIE A 2D PARA GRABAR Para obtener más información, consulte la Guía detallada del usuario... -
Page 70: Advertencias
American National Standard dicha batería. C73, emplee un enchufe adaptador de CA, (Sólo para EE.UU. y Canadá) denominado “Siemens Plug”, como el mostrado. Consulte con su distribuidor JVC más cercano para obtener este enchufe adaptador. Soporte de grabación Enchufe adaptador •... - Page 71 Los cambios o modificaciones no aprobados por en lugares sometidos a sacudidas o JVC podrian anular la autoridad del usuario para vibraciones excesivas. utilizar el equipo. Este equipo ha sido examinado cerca de un televisor.
-
Page 72: Especificaciones
* Si utiliza un adaptador de CA en el extranjero, utilice un enchufe adaptador comercialmente disponible para el país o región en la que se encuentre. Las especificaciones y el aspecto de este producto están sujetos a cambios sin previo aviso. Para obtener más información, consulte la Guía detallada del usuario http://manual.jvc.co.jp/index.html/... - Page 73 CAMÉSCOPE GS-TD1 A Guide de l’utilisateur Merci d’avoir acheté ce produit JVC. Avant toute utilisation, veuillez lire les précautions de sécurité et les mises en garde sur p. 2 et p. 34 pour pouvoir utiliser le produit en toute sécurité.
-
Page 74: Précautions De Sécurité
Éviter d’exposer la batterie, le caméscope avec la batterie insérée ou la télécommande avec la batterie insérée à une chaleur excessive, telle que celle des rayons directs du soleil, d’un feu ou autre source de chaleur. Pour plus d'informations, veuillez vous rapporter au Manuel d'utilisation http://manual.jvc.co.jp/index.html/... - Page 75 13. Confier toutes les réparations à du personnel un autre support d’enregistrement pour stockage. de service qualifié. Un dépannage est JVC décline toute responsabilité pour toute perte nécessaire lorsque l’appareil a été endommagé de données. d’une façon ou d’une autre, telle que lorsque le cordon d’alimentation ou la fiche est...
-
Page 76: Précautions Pour L'enregistrement Et La Lecture D'images 3D
L’effet 3D peut être faible si on est placé dans un angle différent que directement en face. Le moniteur LCD apparaît plus sombre quand les images 3D sont affichées. Passez l’affichage en 2D lorsqu’il est difficile de voir, comme lorsque vous utilisez cet appareil à l’extérieur. Pour plus d'informations, veuillez vous rapporter au Manuel d'utilisation http://manual.jvc.co.jp/index.html/... - Page 77 5 à 6 ans et plus. Les tuteurs doivent prêter une attention particulière aux enfants, vu que des problèmes de santé peuvent survenir si la fatigue et l’inconfort ne sont pas remarqués immédiatement. Pour plus d'informations, veuillez vous rapporter au Manuel d'utilisation http://manual.jvc.co.jp/index.html/...
-
Page 78: Vérifier Les Accessoires
Pour de plus amples détails sur le fonctionnement de ce produit, veuillez consulter le “Manuel d’utilisation” sur le site Web à l’adresse suivante. http://manual.jvc.co.jp/index.html/ Vous pouvez également accéder au site web à partir du CD-ROM fourni. (p. 27) Vérifier les accessoires... -
Page 79: Noms Des Pièces Et Des Fonctions
Active les fonctions préréglées. Pour l’enregistrement 2D, seul l’objectif du côté gauche est Touche 3D (p. 14, p. 15, p. 17) utilisé. Touche A/B (Vidéo/Photo) Bascule entre les modes vidéo et photo. Pour plus d'informations, veuillez vous rapporter au Manuel d'utilisation http://manual.jvc.co.jp/index.html/... -
Page 80: Noms Des Touches Et Fonctions Sur L'écran Lcd
Appuyez sur cette touche en la Touche de commutation d’affichage maintenant enfoncée pour fixer les moniteur LCD 3D/2D écrans. Appuyez à nouveau sur cette Touches de fonctionnement (p. 18) touche pour faire disparaître les écrans. Pour plus d'informations, veuillez vous rapporter au Manuel d'utilisation http://manual.jvc.co.jp/index.html/... -
Page 81: Écran D'index
(Pour plus d’informations, veuillez vous rapporter au Manuel d’utilisation.) (Ajustez en tapant légèrement avec le coin d’une carte SD, etc. N’appuyez pas avec un objet dont la pointe est aiguisée et n’appuyez pas en exerçant une forte pression.) Pour plus d'informations, veuillez vous rapporter au Manuel d'utilisation http://manual.jvc.co.jp/index.html/... -
Page 82: Idémarrer
ATTENTION Assurez-vous d’utiliser des batteries de JVC. Si vous utilisez des batteries d’autres fabricants JVC, les performances et la sécurité ne seront pas garanties. Durée de chargement : Environ 2 h 40 m (avec la batterie fournie) * Le temps de chargement est lorsque l’appareil est utilisé à 25 °C (77 °F). Si la batterie n’est pas chargée à... -
Page 83: Ajustement De La Dragonne
SD. Éteignez le caméscope en appuyant sur la touche M pendant environ 2 secondes. Étiquette Pour retirer la carte Poussez la carte vers l’intérieur puis tirez-la vers vous. Pour plus d'informations, veuillez vous rapporter au Manuel d'utilisation http://manual.jvc.co.jp/index.html/... -
Page 84: Pour Utiliser Une Carte Sd
C Appuyez sur “FICHIER”. E Appuyez sur “CARTE SD”. FORMATER LA CARTE SD SUPPORT ENREG. VIDEO FICHIER CARTE SD D Appuyez sur “OUI”. E Une fois le formatage terminé, appuyez sur “OK”. Pour plus d'informations, veuillez vous rapporter au Manuel d'utilisation http://manual.jvc.co.jp/index.html/... -
Page 85: Régler L'horloge
Appuyez sur “<” ou “>” pour régler le Chargez cet appareil pendant plus nom de la ville. de 24 heures avant de régler l’horloge. (p. 10) REGLAGE HORLOGE/ZONE ENREG. Pour plus d'informations, veuillez vous rapporter au Manuel d'utilisation http://manual.jvc.co.jp/index.html/... -
Page 86: Ienregistrement
3D (MP4 (MVC)) et 1 heure 20 minutes lors de l’enregistrement 2D. (p. 31) Ne retirez pas la batterie, l’adaptateur secteur ou la carte SD lorsque le voyant d’accès est allumé. Les données enregistrées peuvent devenir illisibles. Pour plus d'informations, veuillez vous rapporter au Manuel d'utilisation http://manual.jvc.co.jp/index.html/... -
Page 87: Formats D'enregistrement 3D
Indications apparaissant à l’écran lors de l’enregistrement d’une photo Supports d’enregistrement Mode 3D/2D 10:10AM Indicateur de batterie Vitesse d’obturation Taille d’image Mode Auto Intelligent Mise au point Nombre de prises de vue restantes Enregistrement en cours Pour plus d'informations, veuillez vous rapporter au Manuel d'utilisation http://manual.jvc.co.jp/index.html/... -
Page 88: Enregistrer Des Images 3D (Vidéo/Photo)
Lorsque “AJUSTEMENT PARALLAX” est assigné à la touche ADJ, la parallaxe peut être ajustée manuellement à l’aide de la touche ADJ et de la molette de contrôle. Pour plus d’informations, veuillez vous rapporter au “Manuel d’utilisation”. Pour plus d'informations, veuillez vous rapporter au Manuel d'utilisation http://manual.jvc.co.jp/index.html/... -
Page 89: Ilecture
Appuyez à nouveau pour restaurer le groupe. (Photo seulement) Pour capturer une photo durant la lecture Arrêtez la lecture et appuyez sur la touche SNAPSHOT. Pour plus d'informations, veuillez vous rapporter au Manuel d'utilisation http://manual.jvc.co.jp/index.html/... -
Page 90: Touches De Fonctionnement Utilisables Lors De La Lecture
Si vous utilisez un HDTV, vous pouvez lire en qualité HD, en le connectant à un mini connecteur HDMI. Connecter au connecteur HDMI Téléviseur Mini câble HDMI (fourni) Vers mini Entrée connecteur HDMI connecteur HDMI Pour plus d'informations, veuillez vous rapporter au Manuel d'utilisation http://manual.jvc.co.jp/index.html/... -
Page 91: Lecture En Qualité Standard
Vous pouvez profiter de sons audio réalistes en enregistrant avec la fonction son 3D activée et en regardant la vidéo à partir du centre du téléviseur ou au centre des haut- parleurs droit et gauche. Pour plus d'informations, veuillez vous rapporter au Manuel d'utilisation http://manual.jvc.co.jp/index.html/... -
Page 92: Lire Des Images 3D
Lors de la visualisation d’images 3D sur cet appareil, un message sera affiché toutes les 30 minutes. Pour arrêter l’affichage de ce message, réglez “AVERT. AFFICHAGE 3D” sur “ARRET”. Pour modifier le réglage, consultez le Manuel d’utilisation (Menu de configuration/Menu “COMMUN”). Pour plus d'informations, veuillez vous rapporter au Manuel d'utilisation http://manual.jvc.co.jp/index.html/... -
Page 93: Icopier
En sélectionnant “AVCHD DVD”, vous pouvez copier (enregistrer) des vidéos sur un DVD en qualité haute définition. Notez qu’ils ne peuvent pas être lus sur des appareils qui ne supportent pas AVCHD. Pour plus d'informations, veuillez vous rapporter au Manuel d'utilisation http://manual.jvc.co.jp/index.html/... -
Page 94: Création De Disques Avec Un Graveur Dvd Ou Un Lecteur Blu-Ray Externe
Blu-ray externe, achetez le câble USB de rallonge. Vers connecteur Mini-A (Mâle) – A (Femelle) (Numéro de pièce : QAM0852-001) * Consultez votre centre de services JVC Adaptateur secteur le plus proche. vers prise secteur (110 V à 240 V) -
Page 95: Copier Tous Les Fichiers
Pour lire sur d’autres périphériques, appareil sont copiées. appuyez sur “OUI”. “SCENES NON ENREG.” (vidéo)/ Por ajouter d’autres fichiers au DVD par “IMAGES NON ENREG.” (photo) : la suite, appuyez sur “NON”. Pour plus d'informations, veuillez vous rapporter au Manuel d'utilisation http://manual.jvc.co.jp/index.html/... -
Page 96: Sélectionner Les Fichiers À Copier
“CHOISIR DES IMAGES” : Sélectionne être copiés. Les fichiers spéciaux ne et copie les photos désirées peuvent pas être copiés non plus. individuellement. Æ Vers B Pour plus d'informations, veuillez vous rapporter au Manuel d'utilisation http://manual.jvc.co.jp/index.html/... -
Page 97: Utilisation D'un Lecteur Usb De Disque Dur Externe
Vers connecteur USB Pour lire les fichiers copiés Sélectionnez “LECTURE” à l’étape 1. Des vidéos ou des photos enregistrées * Consultez votre centre de services JVC dans un disque dur externe peuvent le plus proche. être lues sur cet appareil. -
Page 98: Copie Vers L'ordinateur
être utilisé. L’utilisation d’un graveur BD/DVD est recommandée (optionnel). Vous ne pourrez pas enregistrer de photos sur disque à partir du logiciel fourni. Pour plus d’informations, veuillez contacter le fabricant de votre ordinateur. Pour plus d'informations, veuillez vous rapporter au Manuel d'utilisation http://manual.jvc.co.jp/index.html/... -
Page 99: Installer Le Logiciel Fourni
“Notice d'utilisation détaillée” à l’étape 2. Pour des détails sur le fonctionnement de Everio MediaBrowser 3D, reportez- vous à “Aide” - “Aide MediaBrowser” sur la barre d’outils Everio MediaBrowser 3D. Le manuel d’instruction apparaît. Pour plus d'informations, veuillez vous rapporter au Manuel d'utilisation http://manual.jvc.co.jp/index.html/... -
Page 100: Sauvegarder Tous Les Fichiers
CONNECTER AU PC sécurité”. C (Pour Windows Vista) Cliquez sur “OK”. D Débranchez le câble USB et fermez l’écran LCD. SAUVEGARDER Le logiciel fourni Everio MediaBrowser se lance sur votre ordinateur. Pour plus d'informations, veuillez vous rapporter au Manuel d'utilisation http://manual.jvc.co.jp/index.html/... -
Page 101: Iinformations Supplémentaires
L’utilisation de ce logiciel est autorisée selon les termes de sa licence. (pour toutes questions concernant cette unité) Préparez les informations suivantes avant de contacter l’agence ou le bureau JVC local le plus proche à propos de ce logiciel (réseau de service après-vente mondial JVC : http://www.jvc-victor.co.jp/english/ worldmap/index-e.html). -
Page 102: Durée D'enregistrement/Nombre De Photos
9 999 9 999 1 728×1 296 (4:3) 9 999 3 000 6 200 9 999 9 999 640×480 (4:3) 9 999 9 999 9 999 9 999 9 999 Pour plus d'informations, veuillez vous rapporter au Manuel d'utilisation http://manual.jvc.co.jp/index.html/... -
Page 103: Dépannage
Si vous éprouvez des difficultés à utiliser cet appareil, veuillez consulter les descriptions détaillées dans le “Manuel d’utilisation”. http://manual.jvc.co.jp/index.html/ 3 Consultez les FAQ sur les nouveaux produits, sur le site Internet de JVC. http://www.jvc.com/ 4 Cette unité est un périphérique contrôlé par micro-ordinateur. Les décharges électrostatiques, les bruits externes et les interférences (provenant d’une TV ou d’une... - Page 104 (Sans quoi, la batterie risque de ne plus être protégée pendant la charge.) Ce n’est pas un dysfonctionnement. (Cet L’unité surchauffe. appareil peut chauffer lorsqu’il a été utilisé pendant un long moment.) Pour plus d'informations, veuillez vous rapporter au Manuel d'utilisation http://manual.jvc.co.jp/index.html/...
-
Page 105: Messages D'avertissement
Il apparaît pendant 5 secondes après VERIFIER CACHE- avoir allumé l’appareil, si le protège- OBJECTIF objectif est fermé ou s’il fait noir. Consultez votre concessionnaire JVC ou IMPOSSIBLE le centre de service JVC. D'ENREGISTRER CORRECTEMENT EN 3D VEUILLEZ BASCULER... -
Page 106: Mises En Garde
C73, utiliser un adaptateur de prise recyclage de cette batterie, veuillez nommé “Siemens Plug”, comme indiqué ci-dessous. Pour cet adaptateur de prise secteur, consulter composer le 1-800-8-BATTERY. votre revendeur JVC le plus proche. (États-Unis et Canada seulement) Adaptateur de prise Support d’enregistrement •... - Page 107 (par exemple, près d’une cuisinière). Des changements ou modi cations non ... dans des endroits trop exposés aux chocs ou vibrations. approuvés par JVC peuvent annuler le droit de ... près d’un téléviseur. l’utilisateur de faire fonctionner l’appareil. Cet ...
-
Page 108: Spécifications
* Pour utiliser un adaptateur secteur à l’étranger, pensez à préparer une prise convertisseur disponible dans le commerce pour le pays ou la région visité(e). Les caractéristiques et l’apparence de ce produit sont susceptibles d’être modifiées sans préavis pour d’éventuelles améliorations. Pour plus d'informations, veuillez vous rapporter au Manuel d'utilisation http://manual.jvc.co.jp/index.html/...